3 Using the Connector
This chapter is divided into the following sections:
3.1 Performing First-Time Reconciliation
After deploying the connector, you must then reconcile all existing target system user records into Oracle Identity Manager.
If you are using the target system as a trusted source, then you must configure and run the Domino Connector Trusted User Reconciliation scheduled job to reconcile user records from the target system.
Note:
-
See Scheduled Jobs for Reconciliation of User Records for information about the attributes for this scheduled job.
-
See Configuring Scheduled Jobs for information about configuring scheduled jobs.
Reconciled user records are converted into OIM Users.
3.2 Scheduled Job for Lookup Field Synchronization
The Domino Connector Lookup Reconciliation scheduled job is used for lookup field synchronization.
Table 3-1 describes the attributes of this scheduled job. The procedure to configure scheduled jobs is described later in the guide.
Note:
Attribute values are predefined in the connector XML file that you import. Specify values only for those attributes that you want to change.
Table 3-1 Attributes of the Domino Connector Lookup Reconciliation Scheduled Job
| Attribute | Description |
|---|---|
|
|
Enter the name of the IT resource instance that the connector must use to reconcile data. Default value: None |
|
|
Enter the Object Type you want to reconcile. Default value: |
|
|
Enter the name of the lookup definition in Oracle Identity Manager that must be populated with values fetched from the target system. Default value: |
|
|
Enter the name of the attribute to be saved into the Code Key lookup value. Default value: |
|
|
Enter the name of the attribute to be saved into the Decode lookup value. Default value: |
|
|
Enter a filter to filter out the records to be stored in the lookup. For more information and proper syntax, see "Performing Limited Reconciliation". |
3.3 Configuring Reconciliation
As mentioned earlier in this guide, reconciliation involves duplicating in Oracle Identity Manager the creation of and modifications to user accounts on the target system. This section discusses the following topics related to configuring reconciliation:
3.3.1 Performing Full Reconciliation and Incremental Reconciliation
When you run the Domino Connector User Reconciliation scheduled job, only target system records that are added or modified after the last time the scheduled job was run are fetched into Oracle Identity Manager. This is incremental reconciliation.
You can perform a full reconciliation run to fetch all existing target system records into Oracle Identity Manager. To perform a full reconciliation run:
- Ensure the
Latest Tokenparameter is not set. You must leave this parameter empty. - Run the Domino Connector User Reconciliation job.
After a full reconciliation run, the time stamp at which the reconciliation run ends is stored in the time stamp parameter of the IT resource. From the next reconciliation run onward, only target system records added or modified after the last reconciliation run are fetched to Oracle Identity Manager. In other words, incremental reconciliation is automatically activated from the next run onward.
3.3.2 Performing Limited Reconciliation
By default, all target system records that are added or modified after the last reconciliation run are reconciled during the current reconciliation run. You can customize this process by specifying the subset of added or modified target system records that must be reconciled.
The connector provides a Filter parameter that allows you to use any of the Domino resource attributes to filter the target system records. (The filter is no longer restricted to four attributes, as it was in earlier releases).
You can perform limited reconciliation by creating filters for the reconciliation module. This connector provides a Filter attribute (a scheduled task attribute) that allows you to use any of the Lotus Notes resource attributes to filter the target system records.
For detailed information about ICF Filters, see ICF Filter Syntax of Oracle Fusion Middleware Developing and Customizing Applications for Oracle Identity Manager.
While deploying the connector, follow the instructions in Configuring Scheduled Jobs to specify attribute values.
3.3.3 Reconciliation Scheduled Jobs
When you run the Connector Installer, reconciliation scheduled tasks are automatically created in Oracle Identity Manager.
You must specify values for the attributes of the following scheduled jobs:
Note:
See Configuring Scheduled Jobs for the procedure.
3.3.3.1 Scheduled Jobs for Reconciliation of User Records
Depending on whether you want to implement trusted source or target resource reconciliation, you must specify values for the attributes of one of the following user reconciliation scheduled jobs:
-
Domino Connector User Reconciliation (scheduled job for target resource reconciliation)
-
Domino Connector Trusted User Reconciliation (scheduled job for trusted source reconciliation)
Table 3-2 describes the attributes of both scheduled jobs.
Table 3-2 Attributes of the Scheduled Jobs for Reconciliation of User Records
| Attribute | Description |
|---|---|
|
|
Name of the IT resource instance that the connector must use to reconcile data. Default is: |
|
|
Name of the resource object. Default is: |
|
|
Object Type to be reconciled. Default is: |
|
|
Expression for filtering records. Use the following syntax: syntax = expression ( operator expression )*
operator = 'and' | 'or'
expression = ( 'not' )? filter
filter = ('equalTo' | 'contains' | 'containsAllValues'
| 'startsWith' | 'endsWith' | 'greaterThan' | 'greaterThanOrEqualTo'
| 'lessThan' | 'lessThanOrEqualTo' ) '(' 'attributeName' ',' attributeValue ')'
attributeValue = singleValue | multipleValues
singleValue = 'value'
multipleValues = '[' 'value_1' (',' 'value_n')* ']'
Default is: |
|
|
Latest Date the reconciliation was run. Default is: |
|
|
Domino Attribute used to get the object's modification date. Default is: |
3.3.3.2 Scheduled Jobs for Reconciliation of Deleted Users
Table 3-3 describes the attributes of the Domino Connector Delete Reconciliation scheduled job for reconciliation of deleted users.
Table 3-3 Attributes of the Domino Connector Delete Reconciliation Scheduled Job
| Attribute | Description |
|---|---|
|
|
Name of the IT resource instance that the connector must use to reconcile data. Default is: |
|
|
Name of the resource object. Default is: |
|
|
Object Type to be reconciled. Default is: |
|
|
Expression for filtering records. Use the following syntax: syntax = expression ( operator expression )*
operator = 'and' | 'or'
expression = ( 'not' )? filter
filter = ('equalTo' | 'contains' | 'containsAllValues'
| 'startsWith' | 'endsWith' | 'greaterThan' | 'greaterThanOrEqualTo'
| 'lessThan' | 'lessThanOrEqualTo' ) '(' 'attributeName' ',' attributeValue ')'
attributeValue = singleValue | multipleValues
singleValue = 'value'
multipleValues = '[' 'value_1' (',' 'value_n')* ']'
Default is: |
Table 3-4 describes the attributes of the Domino Connector Trusted Delete Reconciliation scheduled job for the trusted reconciliation of deleted users.
Table 3-4 Attributes of the Domino Connector Trusted Delete Reconciliation Scheduled Job Attribute
| Attribute | Description |
|---|---|
|
|
Name of the trusted IT resource instance that the connector must use to reconcile data. Default is: |
|
|
Name of the resource object. Default is: |
|
|
Object Type to be reconciled. Default is: |
|
|
Expression for filtering records. Use the following syntax: syntax = expression ( operator expression )*
operator = 'and' | 'or'
expression = ( 'not' )? filter
filter = ('equalTo' | 'contains' | 'containsAllValues'
| 'startsWith' | 'endsWith' | 'greaterThan'
| 'greaterThanOrEqualTo' | 'lessThan' | 'lessThanOrEqualTo' )
'(' 'attributeName' ',' attributeValue ')'
attributeValue = singleValue | multipleValues
singleValue = 'value'
multipleValues = '[' 'value_1' (',' 'value_n')* ']'
Default is: |
3.4 Scheduled Jobs for Lookup Field Synchronization and Reconciliation
Table 3-5 lists the scheduled jobs shipped as part of the connector.
Table 3-5 Scheduled Jobs for Lookup Field Synchronization and Reconciliation
| Scheduled Job | Description |
|---|---|
|
|
This scheduled job is used for lookup field synchronization. |
|
|
This scheduled job is used for user reconciliation in target resource mode. |
|
|
This scheduled job is used for user reconciliation in trusted source mode. |
|
|
This scheduled job is used for reconciliation of deleted user records. |
|
|
This scheduled job is used for reconciliation of deleted user records in trusted source mode. |
3.5 Configuring Scheduled Jobs
This section describes the procedure to configure scheduled jobs. You can apply this procedure to configure the scheduled jobs for lookup field synchronization and reconciliation.
To configure a scheduled job:
-
If you are using Oracle Identity Manager release 11.1.1:
-
Log in to the Administrative and User Console.
-
On the Welcome to Oracle Identity Manager Self Service page, click Advanced in the upper-right corner of the page.
-
On the Welcome to Oracle Identity Manager Advanced Administration page, in the System Management region, click Search Scheduled Jobs.
-
-
If you are using Oracle Identity Manager release 11.1.2.x:
-
Log in to Oracle Identity System Administration.
-
In the left pane, under System Management, click Scheduler.
-
-
Search for and open the scheduled job as follows:
-
On the Welcome to Oracle Identity Manager Advanced Administration page, in the System Management region, click Search Scheduled Jobs.
-
On the left pane, in the Search field, enter the name of the scheduled job as the search criterion. Alternatively, you can click Advanced Search and specify the search criterion.
-
In the search results table on the left pane, click the scheduled job in the Job Name column.
-
-
On the Job Details tab, you can modify the following parameters:
-
Retries: Enter an integer value in this field. This number represents the number of times the scheduler tries to start the job before assigning the Stopped status to the job.
-
Schedule Type: Depending on the frequency at which you want the job to run, select the appropriate schedule type.
Note:
See Creating Jobs in Oracle Fusion Middleware Administering Oracle Identity Manager for detailed information about schedule types.
In addition to modifying the job details, you can enable or disable a job.
-
-
Specify values for the attributes of the scheduled job. To do so:
Note:
-
Attribute values are predefined in the connector XML file that you import. Specify values only for those attributes that you want to change.
-
Values (either default or user-defined) can be left empty.
-
Attributes of the scheduled job are discussed in Reconciliation Scheduled Jobs.
On the Job Details tab, in the Parameters region, specify values for the attributes of the scheduled job.
-
-
After specifying the attributes, click Apply to save the changes.
Note:
The Stop Execution option is available in the Administrative and User Console. You can use the Scheduler Status page to either start, stop, or reinitialize the scheduler.
3.6 Action Scripts
Note:
Action Scripts on 11gR2 works only on OIM version 11.1.1.5.8 or later.
Actions are scripts that you can configure to run before or after create, update, and delete provisioning operations. For example, you could configure a script to run before every user creation.
The following sections provide information related to actio scripts:
Note:
-
Script on connector is supported on windows machines only.
-
To configure a before or after action, your connector must support running scripts. An exception is Groovy (with target set to Connector), which the Identity Connector Framework (ICF) supports by default for all converged connectors.
3.6.1 Understanding Action Scripts
The IBM Lotus Notes and Domino connector supports
-
CMD: windows batch script and target: Connector
-
lotusscript: Lotus Script and target: Resource
The target means where the script is executed.
-
If the target is Connector, then the script is executed on the same computer where the connector is deployed. For example, if you deploy the connector on the connector server, the script will be executed on that computer.
-
If the target is Resource, then the script is executed on the computer where the target resource is running (on Lotus Domino Server in this case).
Both the scripts when executed have access to form fields via variables, CMD can use environment variables and LOTUSSCRIPT can use DocumentContext to get the variable value. The variables have WSUSER_ prefix for every variable which was provided as part of the script execution.
In addition, Oracle Identity Manager can be configured to provide script options. Script options can be configured in two way: Operation Options Mapping, which is form field mapping common for all scripts per object type and Action Options which is static string settings per action. These script options are available to scripts, the same as the form fields (via variables).
Note:
To execute lotusscript with Domino Connector, the following two options need to be provided either as part of Operation Options Mapping or Action Mappings (recommended way):
-
agentName – with value specifies the name of the agent created on Domino Server, for example, oim-script.
-
agentCreate – this value specifies if an agent should be created (if doesn't exist) on Domino Server, the recommended value is "true"
The actions (script execution) can be configured in Oracle Identity Manager before or after the following provisioning events:
-
create
-
update
-
delete
Table 3-6 shows here what is provided by ICF-INTG to the connector when executing an action:
Table 3-6 Output by ICF-INTG
| Operation | Form fields | Operation Options Mapping | Action Options |
|---|---|---|---|
|
Create |
All form fields provided to create operation |
All mapped fields configured |
All action options configured |
|
Update |
Form fields which were updated Note: no uid |
All mapped fields configured |
All action options configured |
|
Delete |
Uid only |
All mapped fields configured |
All action options configured |
3.6.2 Configuration Examples
This section provides example configurations for configuring action scripts.
Example 1 of Configuration
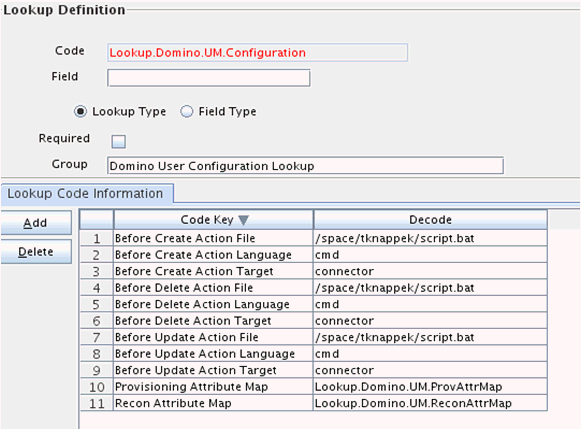
In this example, Oracle Identity Manager is configured to run script.bat for every (create/update/delete) domino provisioning operation as shown in Figure 3-1:
Script.bat file:
set >c:\script.out
When a provisioning operation is performed then the action is executed and script.out will have the following content:
Create Operation:
WSUSER_accountId=test  otest03191
WSUSER_Comment="some comment"
WSUSER_EndDate=0
WSUSER_FirstName=test
WSUSER_idFile=f:\otest03191.id
WSUSER_LastName=otest03191
WSUSER_MailFile=mail/otest03191.nsf
WSUSER_MoveCertifier=false
WSUSER_NorthAmerican=false
WSUSER_Recertify=false
WSUSER_ShortName=otest03191
WSUSER___PASSWORD__=org.identityconnectors.common.security.GuardedString@e3259c99
Update Operation (update of one field):
WSUSER_Comment="some comment updated"
Update Operation (update of multiple fields):
WSUSER_Comment="comment updated"
WSUSER_Location="location updated"
WSUSER___CURRENT_ATTRIBUTES__="{Attributes=[Attribute: {Name=Recertify, Value=[false]}, Attribute: {Name=idFile, Value=[f:\otest03191.id]}, Attribute: {Name=NorthAmerican, Value=[false]}, Attribute: {Name=MailFile, Value=[mail/otest03191.nsf]}, Attribute: {Name=FirstName, Value=[test]}, Attribute: {Name=MoveCertifier, Value=[false]}, Attribute: {Name=Comment, Value=[some comment updated]}, Attribute: {Name=__NAME__, Value=[test  otest03191]}, Attribute: {Name=ShortName, Value=[otest03191]}, Attribute: {Name=__PASSWORD__, Value=[org.identityconnectors.common.security.GuardedString@e3259c99]}, Attribute: {Name=LastName, Value=[otest03191]}, Attribute: {Name=EndDate, Value=[0]}], ObjectClass=ObjectClass: __ACCOUNT__}"
Delete Operation:
WSUSER_UNID=A3F0AE57AD341B0D80257B3300766FCF
Example 2 of Configuration:
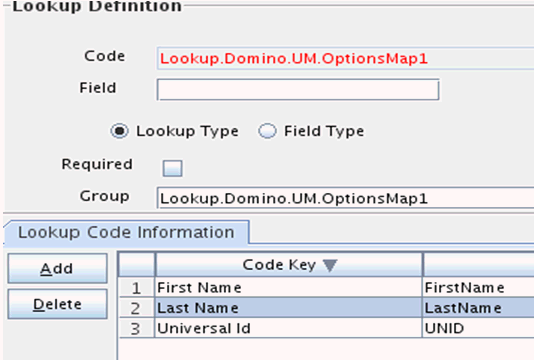
You can configure the operations options mapping to provide, for example, First Name, Last Name, and Universal Id by the following steps:
-
Create a lookup with value as shown in Figure 3-2:
-
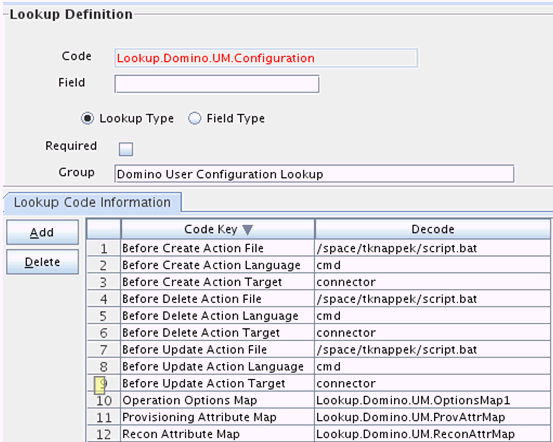
Link this lookup to the original object type configuration as shown in Figure 3-3:
-
Leave script.bat unchanged.
-
When a provisioning operation is performed then the action is executed and script.out will have the following content:
Create Operation:
SUSER_accountId=test  otest03192
WSUSER_Comment="some comment"
WSUSER_EndDate=0
WSUSER_FirstName=test
WSUSER_idFile=f:/otest03192.id
WSUSER_LastName=otest03192
WSUSER_MailFile=mail/otest03192.nsf
WSUSER_MoveCertifier=false
WSUSER_NorthAmerican=false
WSUSER_Recertify=false
WSUSER_ShortName=otest03192
WSUSER___PASSWORD__=org.identityconnectors.common.security.GuardedString@e3259c99
Update Operation (update of one field):
WSUSER_Comment="some comment updated"
WSUSER_FirstName=test
WSUSER_LastName=otest03192
WSUSER_UNID=3B97A9C002AF3B2580257B330079E757
Update Operation (update of multiple field):
WSUSER_Comment="comment updated"
WSUSER_FirstName=test
WSUSER_LastName=otest03192
WSUSER_Location="location updated"
WSUSER_UNID=3B97A9C002AF3B2580257B330079E757
WSUSER___CURRENT_ATTRIBUTES__="{Attributes=[Attribute: {Name=Recertify, Value=[false]}, Attribute: {Name=idFile, Value=[f:/otest03192.id]}, Attribute: {Name=NorthAmerican, Value=[false]}, Attribute: {Name=MailFile, Value=[mail/otest03192.nsf]}, Attribute: {Name=FirstName, Value=[test]}, Attribute: {Name=MoveCertifier, Value=[false]}, Attribute: {Name=Comment, Value=[some comment updated]}, Attribute: {Name=__NAME__, Value=[test  otest03192]}, Attribute: {Name=ShortName, Value=[otest03192]}, Attribute: {Name=__PASSWORD__, Value=[org.identityconnectors.common.security.GuardedString@e3259c99]}, Attribute: {Name=LastName, Value=[otest03192]}, Attribute: {Name=EndDate, Value=[0]}], ObjectClass=ObjectClass: __ACCOUNT__}"
Delete Operation:
SUSER_FirstName=test
WSUSER_LastName=otest03192
WSUSER_UNID=3B97A9C002AF3B2580257B330079E757
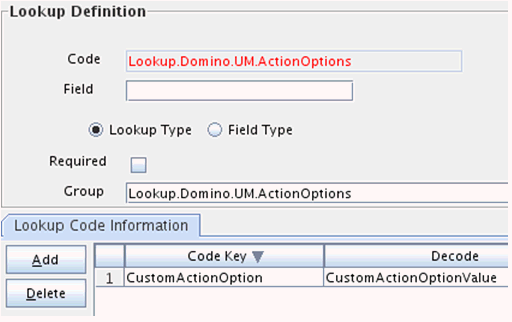
Example 3 of Configuration:
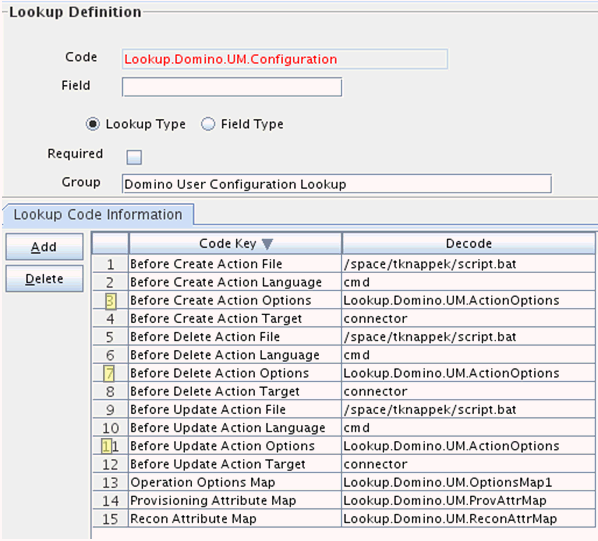
Keep the existing configuration from Example 2 and add Action Options for each action (create/update/delete). You can configure the same Action options for all of them, but each action can have different options.
Figure 3-4 and Figure 3-5 shows one action option configured:
When a provisioning operation is performed then the action is executed and script.out will have the following content:
Create Operation:
WSUSER_accountId=test  otest03193
WSUSER_Comment="some comment"
WSUSER_CustomActionOption=CustomActionOptionValue
WSUSER_EndDate=0
WSUSER_FirstName=test
WSUSER_idFile=f:\otest03193.id
WSUSER_LastName=otest03193
WSUSER_MailFile=mail/otest03193.nsf
WSUSER_MoveCertifier=false
WSUSER_NorthAmerican=false
WSUSER_Recertify=false
WSUSER_ShortName=otest03193
WSUSER___PASSWORD__=org.identityconnectors.common.security.GuardedString@e3259c99
Update Operation (update of one field):
WSUSER_Comment="some comment updated"
WSUSER_CustomActionOption=CustomActionOptionValue
WSUSER_FirstName=test
WSUSER_LastName=otest03193
WSUSER_UNID=885A2EBA9F6C4F9680257B33007BF3A6
Update Operation (update of multiple fields):
WSUSER_Comment="comment updated"
WSUSER_CustomActionOption=CustomActionOptionValue
WSUSER_FirstName=test
WSUSER_LastName=otest03193
WSUSER_Location="location updated"
WSUSER_UNID=885A2EBA9F6C4F9680257B33007BF3A6
WSUSER___CURRENT_ATTRIBUTES__="{Attributes=[Attribute: {Name=Recertify, Value=[false]}, Attribute: {Name=idFile, Value=[f:\otest03193.id]}, Attribute: {Name=NorthAmerican, Value=[false]}, Attribute: {Name=MailFile, Value=[mail/otest03193.nsf]}, Attribute: {Name=FirstName, Value=[test]}, Attribute: {Name=MoveCertifier, Value=[false]}, Attribute: {Name=Comment, Value=[some comment updated]}, Attribute: {Name=__NAME__, Value=[test  otest03193]}, Attribute: {Name=ShortName, Value=[otest03193]}, Attribute: {Name=__PASSWORD__, Value=[org.identityconnectors.common.security.GuardedString@e3259c99]}, Attribute: {Name=LastName, Value=[otest03193]}, Attribute: {Name=EndDate, Value=[0]}], ObjectClass=ObjectClass: __ACCOUNT__}"
Delete Operation:
WSUSER_CustomActionOption=CustomActionOptionValue
SUSER_FirstName=test
WSUSER_LastName=otest03192
WSUSER_UNID=3B97A9C002AF3B2580257B330079E757
3.6.3 Accessing Variables from Script
CMD:
Environment variables are used, it can be accessed with %VARIABLE%.
Example:
echo "%WSUSER_UNID%"
LOTUSSCRIPT:
Domino for example:
Sub Initialize
 Main
End Sub
Sub Main
      Dim session As New NotesSession
      Dim doc As NotesDocument
      Set doc = session.DocumentContext
      Dim unid As Variant
      unid = doc.GetItemValue("WSUSER_UNID")
End Sub
3.7 Configuring Provisioning in Oracle Identity Manager Release 11.1.2.x
To configure provisioning operations in Oracle Identity Manager release 11.1.2.x:
Note:
The time required to complete a provisioning operation that you perform the first time by using this connector takes longer than usual.
-
Log in to Oracle Identity System Administration.
-
Create a user. See Managing Users in Oracle Fusion Middleware Performing Self Service Tasks with Oracle Identity Manager for more information about creating a user.
-
On the Account tab, click Request Accounts.
-
In the Catalog page, search for and add to cart the application instance, and then click Checkout.
-
Specify value for fields in the application form and then click Ready to Submit.
-
Click Submit.
-
If you want to provision entitlements, then perform these steps:
-
On the Entitlements tab, click Request Entitlements.
-
In the Catalog page, search for and add to cart the entitlement, and then click Checkout.
-
Click Submit.
-
3.8 Guidelines for Performing Provisioning
Apply the following guidelines while performing provisioning.
-
You must enter values for the following mandatory attributes during provisioning operations:
Last NameServer NamePassword -
The
IDFile NameandMail File Nameattributes are unique for each user. The Mail File Already Exists error message is displayed if you enter a file name that already exists on the target system. -
If you specify
Trueas the value of thecreateMailDBInBackgroundattribute, then the connector does not check whether mail files are successfully created during Create User provisioning operations. -
Password update will not work if ID File Name is not provided for that user while provisioning.
3.9 Performing Provisioning Operations on Oracle Identity Manager Release 11.1.1.x
Provisioning a resource for an OIM User involves using Oracle Identity Manager to create a target system account for the user.
When you install the connector on Oracle Identity Manager release 11.1.1, the direct provisioning feature, including the process form, is automatically enabled.
If you configured the connector for request-based provisioning, then the process form is suppressed and the object form is displayed. In other words, direct provisioning is disabled when you configure the connector for request-based provisioning. If you want to revert to direct provisioning, then perform the steps described in Switching Between Request-Based Provisioning and Direct Provisioning.
This following are types of provisioning operations:
-
Direct provisioning
-
Request-based provisioning
Note:
This does not apply if you are using OIM 11.1.2.x or later.
Note:
Oracle Identity Manager does not indicate the status of provisioning operations. After a provisioning operation, if the connector status is
-
Provisioned, the operation was successful.
-
Provisioning, the operation failed.
To determine whether the problem occurred during an update or create operation, click Resource History for details.
See Also:
Managing Provisioning Tasks in Oracle Fusion Middleware Performing Self Service Tasks with Oracle Identity Manager for more information about the types of provisioning
This section discusses the following topics:
3.9.1 Direct Provisioning
To provision a resource by using the direct provisioning approach:
-
Log in to the Administrative and User Console.
-
If you want to first create an OIM User and then provision a target system account, then:
-
On the Welcome to Identity Administration page, in the Users region, click Create User.
-
On the Create User page, enter values for the OIM User fields, and then click Save.
-
-
If you want to provision a target system account to an existing OIM User, then:
-
On the Welcome to Identity Administration page, search for the OIM User by selecting Users from the list on the left pane.
-
From the list of users displayed in the search results, select the OIM User. The user details page is displayed on the right pane.
-
-
On the user details page, click the Resources tab.
-
From the Action menu, select Add Resource. Alternatively, you can click the add resource icon with the plus (+) sign. The Provision Resource to User page is displayed in a new window.
-
On the Step 1: Select a Resource page, select Lotus Notes from the list and then click Continue.
-
On the Step 2: Verify Resource Selection page, click Continue.
-
On the Step 5: Provide Process Data for Lotus User page, enter the details of the account that you want to create on the target system and then click Continue.
-
On the Step 5: Provide Process Data for Lotus User page, search for and select a group for the user on the target system and then click Continue.
-
On the Step 6: Verify Process Data page, verify the data that you have provided and then click Continue.
The "Provisioning has been initiated" message is displayed.
-
Close the window displaying the "Provisioning has been initiated" message.
-
On the Resources tab, click Refresh to view the newly provisioned resource.
3.9.2 Request-Based Provisioning
A request-based provisioning operation involves both end users and approvers. Typically, these approvers are in the management chain of the requesters. The following sections discuss the steps to be performed by end users and approvers during a request-based provisioning operation:
Note:
The procedures described in these sections are built on an example in which the end user raises or creates a request for provisioning a target system account. This request is then approved by the approver.
3.9.2.1 End User's Role in Request-Based Provisioning
The following steps are performed by the end user in a request-based provisioning operation:
3.10 Switching Between Request-Based Provisioning and Direct Provisioning
If you have configured the connector for request-based provisioning, you can always switch to direct provisioning. Similarly, you can always switch back to request-based provisioning any time. This section discusses the following topics:
3.10.1 Switching From Request-Based Provisioning to Direct Provisioning
If you want to switch from request-based provisioning to direct provisioning, then:
-
Log in to the Design Console.
-
Disable the Auto Save Form feature as follows:
-
Expand Process Management, and then double-click Process Definition.
-
Search for and open the Lotus User process definition.
-
Deselect the Auto Save Form check box.
-
Click the Save icon.
-
-
If the Self Request Allowed feature is enabled, then:
-
Expand Resource Management, and then double-click Resource Objects.
-
Search for and open the Lotus User resource object.
-
Deselect the Self Request Allowed check box.
-
Click the Save icon.
-
3.10.2 Switching From Direct Provisioning to Request-Based Provisioning
If you want to switch from direct provisioning back to request-based provisioning, then:
-
Log in to the Design Console.
-
Enable the Auto Save Form feature as follows:
-
Expand Process Management, and then double-click Process Definition.
-
Search for and open the Lotus User process definition.
-
Select the Auto Save Form check box.
-
Click the Save icon.
-
-
If you want to enable end users to raise requests for themselves, then:
-
Expand Resource Management, and then double-click Resource Objects.
-
Search for and open the Lotus User resource object.
-
Select the Self Request Allowed check box.
-
Click the Save icon.
-
3.11 Guidelines for Performing Reconciliation
Apply the following guidelines while performing reconciliation.
Oracle Identity Manager does not fetch values for the following fields from the target system during reconciliation:
-
Certifier ID File Path
-
Certifier Password
-
IDFile Name
-
Mail Replica Servers
-
Organization Unit
-
Recertify
-
MoveCertifier
When an account is created in Oracle Identity Manager through reconciliation of a new record from the target system, you must manually set values for these fields.
3.12 Uninstalling the Connector
If you want to uninstall the connector for any reason, see Uninstalling Connectors in Oracle Fusion Middleware Administering Oracle Identity Manager.
