About Binding and Control Flow
Oracle JET includes components and expressions to easily bind dynamic elements to a page in your application using Knockout.
Using oj-bind-text to Bind Text Nodes
Oracle JET supports binding text nodes to variables using the oj-bind-text element and by importing the ojknockout module.
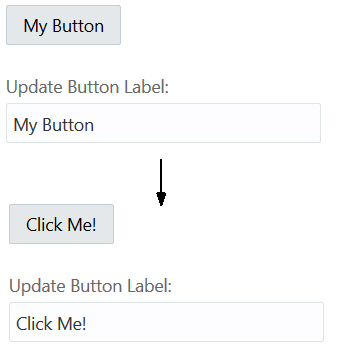
The oj-bind-text element is removed from the DOM after binding is applied. For example, the following code sample shows an oj-input-text and an oj-button with a text node that are both bound to the buttonLabel variable. When the input text is updated, the button text is automatically updated as well.
<div id='button-container'>
   <oj-button id='button1'>
      <span><oj-bind-text value="[[buttonLabel]]"></oj-bind-text></span>
   </oj-button>
   <br><br>
   <oj-label for="text-input">Update Button Label:</oj-label>
   <oj-input-text id="text-input" value="{{buttonLabel}}"></oj-input-text>
</div>
The script to create the view model for this example is shown below.
require(['ojs/ojcore', 'knockout', 'jquery', 'ojs/ojknockout', 'ojs/ojbutton', 'ojs/ojinputtext', 'ojs/ojlabel'],
function(oj, ko, $)
{
  function ButtonModel() {
    this.buttonLabel = ko.observable("My Button");
  }

  $(function(){
    ko.applyBindings(new ButtonModel(), document.getElementById('button-container'));
  });
});
The figure below shows the output for the code sample.
The Oracle JET Cookbook contains the complete example used in this section. See Text Binding.
Binding HTML attributes
Oracle JET supports one-way attribute data binding for attributes on any HTML element by prefixing ':' to the attribute name and by importing the ojknockout module.
To use an HTML attribute in an HTML or JET element, prefix a colon to it. JET component-specific attributes do not need the prefix.
The following code sample shows two JET elements and two HTML elements that use both the prefixed and non-prefixed syntax. Since the label and input elements are native HTML elements, all of their data bound attributes should use the colon prefixing. The oj-label and oj-input-text use the prefix only for native HTML element attributes and the non-prefixed syntax for component-specific attributes.
<div id="demo-container">
  <oj-label for="[[inputId1]]">oj-input-text element</oj-label>
  <oj-input-text :id="[[inputId1]]" value="{{value}}"></oj-input-text>
  <br><br>
  <label :for="[[inputId2]]">HTML input element</label>
  <br>
  <input :id="[[inputId2]]" :value="[[value]]" style="width:100%;max-width:18em"/>
</div>
The script to create the view model for this example is shown below.
require(['jquery', 'knockout', 'ojs/ojinputtext', 'ojs/ojlabel', 'ojs/ojknockout'],
  function($, ko)
  {
    function ViewModel()
    {
      this.inputId1 = 'text-input1';
      this.inputId2 = 'text-input2';
      this.value = "This text value is bound.";
    }

    $(function()
    {
      ko.applyBindings(new ViewModel(), document.getElementById('demo-container'));
    });
  });
The figure below shows the output for the code sample.

The Oracle JET Cookbook contains the complete example used in this section. See Attribute Binding.
Using oj-bind-if to Process Conditionals
Oracle JET supports conditional rendering of elements by using the oj-bind-if element and importing the ojknockout module.
The oj-bind-if element is removed from the DOM after binding is applied, and must be wrapped in another element such as a div if it is used for slotting. The slot attribute has to be applied to the wrapper since oj-bind-if does not support it. For example, the following code sample shows an image that is conditionally rendered based on the option chosen in an oj-buttonset.
<div id="demo-container">
  <oj-buttonset-one class="oj-buttonset-width-auto" value="{{buttonValue}}">
    <oj-option id="onOption" value="on">On</oj-option>
    <oj-option id="offOption" value="off">Off</oj-option>
  </oj-buttonset-one>
  <br><br>
  <div>Image will be rendered if the button is on:</div>
  <oj-bind-if test="[[buttonValue() === 'on']]">
    <oj-avatar role="img" aria-label="Avatar of Amy Bartlet" size="md" initials="AB"
               src="images/composites/avatar-image.jpg" class="oj-avatar-image">
    </oj-avatar>
  </oj-bind-if>
</div>
In the above example, the oj-avatar element is an icon which can display a custom or placeholder image. See oj-avatar.
The script to create the view model for this example is shown below.
require(['jquery', 'knockout', 'ojs/ojknockout', 'ojs/ojbutton', 'ojs/ojavatar'],
  function($, ko)
  {
    function ViewModel()
    {
      this.buttonValue = ko.observable("off");
    }

    $(function()
    {
      ko.applyBindings(new ViewModel(), document.getElementById('demo-container'));
    });
  });
The figure below shows the output for the code sample. When the oj-buttonset is set to 'on', the oj-avatar element is rendered and displayed.

The Oracle JET Cookbook contains the complete example used in this section. See If Binding.
Using oj-bind-for-each to Process Loop Instructions
Oracle JET supports processing loop instructions, such as binding items from an array by using the oj-bind-for-each element and by importing the ojknockout module.
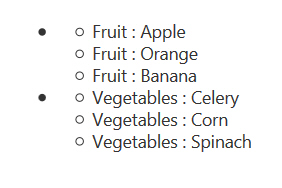
The oj-bind-for-each element only accepts a single template element as its direct child. Any markup to be duplicated, such as li tags, must be placed inside the template tag. For example, the following code sample shows an unordered list nested inside another unordered list. The list items are created using an oj-bind-text tag inside nested oj-bind-for-each elements.
<div id="form-container">
  <ul>
    <oj-bind-for-each data="[[categories]]" as="category">
      <template><li>
          <ul>
            <oj-bind-for-each data="[[category.data.items]]" as="item">
              <template><li>
                <oj-bind-text value="[[category.data.name + ' : ' + item.data]]"></oj-bind-text>
              </li></template>
            </oj-bind-for-each>
          </ul>
      </li></template>
    </oj-bind-for-each>
  </ul>
</div>
In the above example, the as attribute provides an alias for the bound data. This alias is referenced in the nested oj-bind-for-each and oj-bind-text elements.
The script to create the view model for this example is shown below.
require(['ojs/ojcore', 'knockout', 'jquery', 'ojs/ojknockout'],
    function (oj, ko, $)
    {
      function SimpleModel()
      {
        this.categories =
        [ { name:"Fruit",items:["Apple","Orange","Banana"] },
          {name:"Vegetables",items:["Celery","Corn","Spinach"] }
        ];
      };
      $(
        function ()
        {
          ko.applyBindings(new SimpleModel(),
            document.getElementById('form-container'));
        }
      );
    });
The figure below shows the output for the code sample.
The Oracle JET Cookbook contains the complete example used in this section. See Foreach Binding.
Binding Style Properties
The Oracle JET attribute binding syntax also supports Style attributes, which can be passed as an object or set using dot notation. The ojknockout module must be imported.
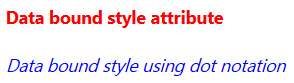
The style attribute binding syntax accepts an Object in which style properties should be referenced by their JavaScript names. Applications can also set style sub-properties using dot notation, which uses the CSS names for the properties. The code sample below shows two block elements with style attributes. The first element binds a style Object, while the second binds properties directly to the defined style attributes.
<div id="demo-container">
  <div :style="[[style]]">Data bound style attribute</div>
  <br>
  <div :style.color="[[fontColor]]" :style.font-style="[[fontStyle]]">Data bound style using dot notation</div>
</div>
The script to create the view model for this example is shown below. The style object referenced above is highlighted below.
require(['jquery', 'knockout', 'ojs/ojinputtext', 'ojs/ojlabel', 'ojs/ojknockout'],
  function($, ko)
  {
    function ViewModel()
    {
      this.fontColor = "blue";
      this.fontStyle = "italic";
      this.style = {"fontWeight": "bold", "color": "red"};
    }

    $(function()
    {
      ko.applyBindings(new ViewModel(), document.getElementById('demo-container'));
    });
  });
The figure below shows the output for the code sample.
The Oracle JET Cookbook contains the complete example used in this section. See Style Binding.
Binding Event Listeners to JET and HTML Elements
Oracle JET provides one-way attribute data binding for event listeners on JET and HTML elements using the on-[eventname] syntax and by importing the ojknockout module.
Oracle JET event attributes provide two key advantages over native HTML event listeners. First, they provide three parameters to the listener:
-
event: The DOM event, such as click or mouse over. -
data: equal tobindingContext['$data']. When used in iterations, such as in anoj-bind-for-each, this parameter is the same asbindingContext['$current']. -
bindingContext: The entire data binding context (or scope) that is applied to the element.
Second, they have access to the model state and can access functions defined in the ViewModel using the data and bindingContext parameters.
Note:
Thethis context is not directly available in the event listeners. This is the same behavior as native HTML event listeners.
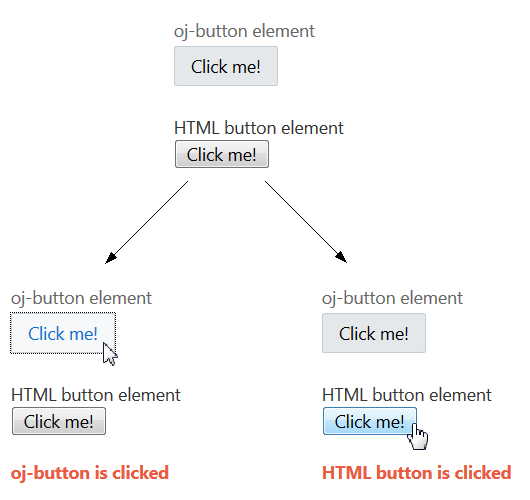
For example, the following code sample shows an oj-button that uses the on-oj-action event attribute and an HTML button that uses the on-click event attribute to access custom functions defined in the ViewModel shown below.
<div id="demo-container">
  <oj-label for="button1">oj-button element</oj-label>
  <oj-button id="button1" on-oj-action="[[clickListener1]]">Click me!</oj-button>
  <br><br>
  <label for="button2">HTML button element</label>
  <br>
  <button id="button2" on-click="[[clickListener2]]">Click me!</button>
  <br><br>
  <div style="font-weight:bold;color:#ea5b3f;">
    <oj-bind-text value="[[message]]"></oj-bind-text>
  </div>
</div>
Note:
HTML events use the prefix “on”, such asonclick and onload. JET events use the prefix “on-”, such as on-click and on-load.
The script to create the view model for this example is shown below. Note the usage of the data attribute to access the message parameter.
require(['jquery', 'knockout', 'ojs/ojbutton', 'ojs/ojlabel', 'ojs/ojknockout'],
  function($, ko)
  {
    function ViewModel()
    {
      this.message = ko.observable();

      this.clickListener1 = function(event, data, bindingContext)
      {
        data.message('oj-button is clicked');
      };

      this.clickListener2 = function(event, data, bindingContext)
      {
        data.message('HTML button is clicked');
      };
    }

    $(function()
    {
      ko.applyBindings(new ViewModel(), document.getElementById('demo-container'));
    });
  });
The figure below shows the output for the code sample.
The Oracle JET Cookbook contains the complete example used in this section. See Event Binding.
Binding Classes
The Oracle JET attribute binding syntax has enhanced support for the class attribute, and can accept in addition to a string, an object or an array. This can be used to set classes on components. The ojknockout module must be imported.
The :class attribute binding can support expressions that resolve to a space delimited string, an Array of class names, or an Object of class to a boolean value or expression for toggling the class in the DOM. Object values can be used to toggle classes on and off. Array and string values can be used only to set classes.
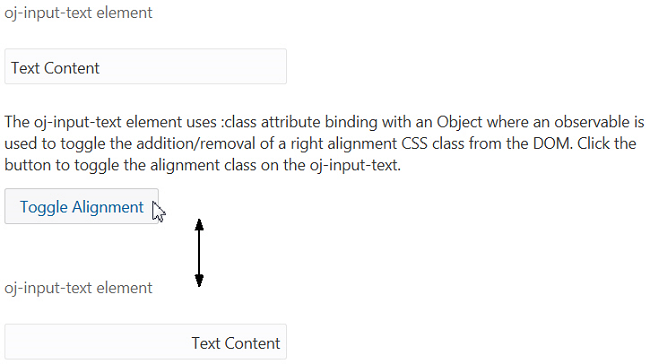
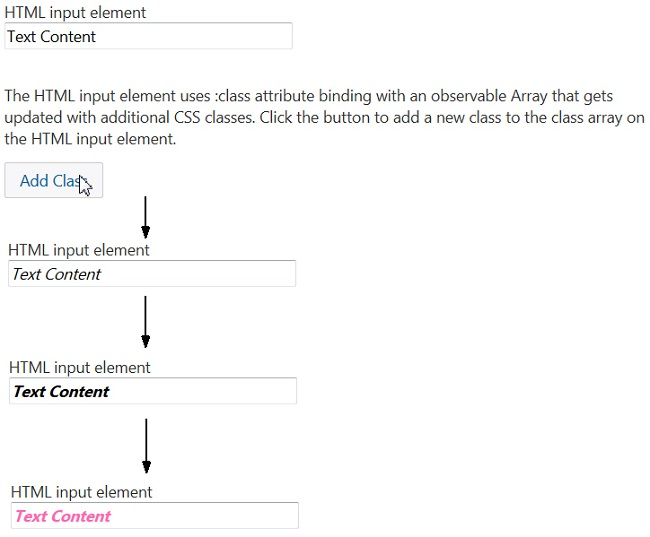
For example, the following code sample shows an oj-input-text and an HTML input that both use :class.
<oj-input-text id="input1"
               :class="[[{'oj-form-control-text-align-right': alignRight}]]"
               value="Text Content"></oj-input-text>
<oj-button id="button2" on-oj-action="[[clickListener2]]">Toggle Alignment</oj-button>

<input id="input2" :class="[[classArrayObs]]"
       value="Text Content" style="width:100%;max-width:18em"/>
<oj-button id="button1" on-oj-action="[[clickListener1]]">Add Class</oj-button>
The script to create the view model for this example is shown below.
require(['jquery', 'knockout', 'ojs/ojlabel', 'ojs/ojinputtext', 'ojs/ojbutton', 'ojs/ojknockout'],
  function($, ko)
  {
    function ViewModel()
    {
      this.alignRight = ko.observable(false);
      this.classArrayObs = ko.observableArray();
      var classList = ['pink', 'bold', 'italic'];
      var self = this;

      this.clickListener1 = function(event) {
        var newClass = classList.pop();
        self.classArrayObs.push(newClass);

        // Disable the add button once we're out of classes
        if (classList.length === 0)
          document.getElementById('button1').disabled = true;
      };

      this.clickListener2 = function(event) {
        self.alignRight(!self.alignRight());
      };
    }

    $(function()
    {
      ko.applyBindings(new ViewModel(), document.getElementById('demo-container'));
    });
  });
The CSS class styles used by the classList variable above are shown below.
.bold {
  font-weight: bold;
}
.italic {
  font-style: italic;
}
.pink {
  color: #ff69b4;
}
The figure below shows the first of the two outputs for the code sample. The button acts as a toggle to switch on and off the oj-form-control-text-align-right class property and hence change the alignment of the text.
The figure below shows the second of the two outputs for the code sample. The button calls a function to take a pre-defined array of classes and add them to the input element. Each class has CSS modifications that come into effect when the class is added.
The Oracle JET Cookbook contains the complete example used in this section. See Class Binding.