16 Using the Oracle Enterprise Scheduler Web Service
This chapter describes how you can use the Oracle Enterprise Scheduler web service for accessing a subset of the Oracle Enterprise Scheduler runtime functionality.
This chapter includes the following sections:
16.1 Introduction to the Oracle Enterprise Scheduler Web Service
Oracle Enterprise Scheduler provides a rich set of functionality for enterprise level scheduling.
This functionality includes support for the following operations:
-
Creating and managing Oracle Enterprise Scheduler metadata
-
Submitting and managing Oracle Enterprise Scheduler job requests
-
Configuring and managing Oracle Enterprise Scheduler
Client applications can use the Oracle Enterprise Scheduler web service (ESSWebservice) to access a subset of the Oracle Enterprise Scheduler runtime functionality. The ESSWebservice is provided primarily to support SOA integration, for example invoking Oracle Enterprise Scheduler from a BPEL process. However, any client that requires a web service to interact with Oracle Enterprise Scheduler can use ESSWebservice. ESSWebservice exposes job scheduling and management functionality for request submission and request management.
ESSWebservice is deployed within the Oracle Enterprise Scheduler application, where the application is a Java EE application within the Oracle Enterprise Scheduler runtime framework. Thus, the ESSWebservice is available on every node where Oracle Enterprise Scheduler is installed and deployed.
The ESSWebservice is a synchronous web service, such that all the operations invoked are synchronous operations. Although the Oracle Enterprise Scheduler internal job execution model is asynchronous, the ESSWebservice APIs need not be asynchronous. However, Oracle Enterprise Scheduler web service also provides the capability to retrieve the job completion events asynchronously (in a manner similar to implementing the Oracle Enterprise Scheduler EventListener contract in the core API layer).
The ESSWebservice WSDL describes the complete functionality for the ESSWebservice. Table 16-1 summarizes the operations available with ESSWebservice.
Table 16-1 Summary of Operations Available with ESSWebservice
| Operation | Communication Type | Description |
|---|---|---|
|
|
Synchronous |
Adds a post-processing action to a step in a job set request. This method is called prior to submitting the request. The method provides support for action previously supported by add_printer, add_notification, add_layout in concurrent processing. The parameters to these legacy routines are passed as arguments to addPPAction in the order in which they were declared in the original routine. |
|
|
Synchronous |
Similar to |
|
|
Synchronous |
Cancels the processing of a request that is not in a terminal state. |
|
Oracle Enterprise SchedulerOracle Enterprise SchedulerOracle Enterprise Scheduler Oracle Enterprise SchedulerOracle Enterprise Scheduler |
Synchronous |
Marks a request in a terminal state for deletion. This does not physically remove any data, although the request is no longer be accessible by most methods. For parent requests, this operation cascades to all children. |
|
|
Asynchronous |
Registers for an asynchronous status update when the request completes. A one-way operation with a separate asynchronous response. |
|
|
Synchronous |
Gets an |
|
|
Synchronous |
Gets the runtime details of the specified request. |
|
|
Synchronous |
Retrieves the current state of the specified request. |
|
|
Synchronous |
Withholds further processing of a request that is in |
|
|
Synchronous |
Releases a request from the |
|
|
Synchronous |
Sets the status of an asynchronous java job. |
|
|
Synchronous |
Sets NLS environment options for a request. |
|
|
Synchronous |
Marshals arguments in the previous concurrent processing style into a Oracle Enterprise Scheduler properties for a step in a job set request. This operation is invoked prior to submitting a request. |
|
|
Synchronous |
Marshals arguments in the previous concurrent processing style into Oracle Enterprise Scheduler properties.This operation is invoked prior to submitting the request. The key of each argument is ARGUMENT_PREFIX#, where # is the ordinal value of the argument. For example ARGUMENT_PREFIX1="firstArg" and ARGUMENT_PREFIX2="secondArg". |
|
|
Synchronous |
Submits a new recurring job request (a request with a schedule). |
|
|
Synchronous |
Submits a new job request. For more information, see Use Case: Using Oracle Enterprise Scheduler ESSWebservice from a BPEL Process |
16.2 Developing and Using ESSWebservice Applications
Oracle Enterprise Scheduler executes a job request, for example a Java type job request, in the context of the application that submitted the job.
Typically, for development purposes, Oracle Enterprise Scheduler and client applications co-exist locally on any given node which allows Oracle Enterprise Scheduler to execute the job in the context of the target application. For the purposes of production, the client application and Oracle Enterprise Scheduler often reside on different servers.
A Java EE application that uses Oracle Enterprise Scheduler contains all the Oracle Enterprise Scheduler artifacts including the following:
-
Metadata, including a job type, a job definition, a schedule, and any other required metadata such as a job set.
-
Job implementation classes (for Java jobs).
-
A Required Oracle Enterprise Scheduler endpoint description (an MDB description in
ejb-jar.xml).
Any clients interacting with Oracle Enterprise Scheduler using ESSWebservice need to provide this type of Java EE application, so that Oracle Enterprise Scheduler can run jobs in the context of the correct target application. All such web service clients must know the name of the corresponding Java EE hosting application and should pass it to Oracle Enterprise Scheduler and should pass it to the Oracle Enterprise Scheduler web service call wherever required (as defined in the WSDL).
Such an application is a regular Oracle Enterprise Scheduler client application, where the job request submission and management are done using ESSWebservice operations.
16.2.1 How to Develop and Use an ESSWebservice Java EE Application
When the Oracle Enterprise Scheduler functionality is accessed using the ESSWebservice web service, a corresponding hosting Java EE application must be available to Oracle Enterprise Scheduler. Even though clients can interact with Oracle Enterprise Scheduler remotely using the Oracle Enterprise Scheduler web service, the associated Java EE hosting application must still be co-located with Oracle Enterprise Scheduler. This allows Oracle Enterprise Scheduler to execute job requests in the correct application context. Therefore, ESSWebservice clients must still develop, package and deploy a corresponding Java EE hosting application that contains all the required Oracle Enterprise Scheduler artifacts.
16.2.2 How to Develop and Use an ESSWebservice SOA Application with BPEL
For SOA clients all the SOA components such as a BPEL process are deployed as a SOA composite. A SOA composite is not a Java EE application. The composite is executed using the SOA fabric runtime framework (within soa-infra).
For SOA components, create a separate Java EE hosting application that acts as the proxy between the composite and Oracle Enterprise Scheduler. This hosting application can either be created in a one-to-one association with one Oracle Enterprise Scheduler application for each composite deployed, or multiple composites can share a single Java EE hosting application. The Java EE hosting application contains all the desired Oracle Enterprise Scheduler artifacts.
16.2.3 Setting Web Service Addressing Headers for getCompletionStatus() Operation
As shown in the ESSWebservice WSDL, if clients want to be notified asynchronously on job completion they can invoke the getCompletionStatus() operation. Upon job completion, Oracle Enterprise Scheduler invokes the callback operation onJobCompletion() following ws-addressing where ESSWebservice captures the caller's address in the incoming call. Clients should be capable of receiving the callback at any arbitrary time in the future. Such a callback depends entirely upon the time required to complete the job. This is similar to the Oracle Enterprise Scheduler functionality for invoking a client's listener (that implements the Oracle Enterprise Scheduler EventListener contract) upon job completion.
When you use getCompletionStatus() clients must include certain required web service addressing headers (in particular the wsa:MessageID and wsa:ReplyTo headers). This allows the Oracle Enterprise Scheduler runtime to asynchronously notify the job completion status be sent to the correct ReplyTo address. When you use getCompletionStatus() from a BPEL process the SOA runtime automatically adds the required headers. When using getCompletionStatus() programmatically on the client side, using the web service proxies, the web service client must set these addressing headers.
16.2.4 Restrictions When Using ESSWebservice
ESSWebservice does not support the following Oracle Enterprise Scheduler features:
-
Ad hoc Request Submission: ESSWebservice does not support ad hoc job request submission (ad hoc request submission is available using the EJB APIs). Therefore any job that is submitted using the ESSWebservice must have its corresponding definition, including a job type and job definition along with the schedule definitions created as metadata objects in the associated proxy application. The web service operation can then refer to such metadata objects using their identifier arguments as specified in the WSDL.
-
Query API: ESSWebservice does not expose the query APIs. Web service clients do not need to obtain the query information for Oracle Enterprise Scheduler requests. ESSWebservice web service clients do not provide generic monitoring and managing functionality that would require the use of query APIs.
16.2.5 ESSWebservice Implementation
The Oracle Enterprise Scheduler functionality is exposed as web a service using a Service Endpoint Interface (SEI) annotated with the JAX-WS annotations. The web service implementation of this SEI web service invokes the common Oracle Enterprise Scheduler implementation layer. The ESSWebservice is exposed in Document/literal wrapped mode for maximum interoperability.
Some of the data types used in ESSWebservice are not suitable to be used in a web service directly. Such data types cannot be readily converted into corresponding XML representation. Therefore, the Oracle Enterprise Scheduler web service layer defines wrapper classes around these data types that are exposed in the ESSWebservice, and visible in the WSDL. In general, the web service layer reuses the existing data types where possible.
16.3 ESSWebservice WSDL File
When Oracle Enterprise Scheduler is installed and running, you can obtain the WSDL definition file from the web services page.
When Oracle Enterprise Scheduler is installed and running, you can obtain the WSDL definition file from the web services page at the following type of URL:
http://host:port/ess/esswebservice?WSDL
For example,
http://system1:7001/ess/esswebservice?WSDL
Note that you cannot invoke web service operations by directly accessing the ESSWebservice URL from a browser.
16.4 Use Case: Using Oracle Enterprise Scheduler ESSWebservice from a BPEL Process
This example demonstrates how to use the ESSWebService from a BPEL process; in the BPEL process you use ESSWebService to submit a job request.
The use case demonstrates one way of using Oracle Enterprise Scheduler for BPEL and SOA users. Experienced SOA users and designers may have other ideas for how to work with Oracle Enterprise Scheduler using the web service.
Oracle JDeveloper is used to create an application and the projects within the application that contain the code and support files for the application.
JDeveloper provides accessibility options, such as support for screen readers, screen magnifiers, and standard shortcut keys for keyboard navigation. You can also customize JDeveloper for better readability, including the size and color of fonts and the color and shape of objects. For information and instructions on configuring accessibility in JDeveloper, see "Oracle JDeveloper Accessibility Information" in Developing Applications with Oracle JDeveloper.
To create the ESSWebService sample application, follow these steps:
-
Start Oracle JDeveloper.
-
Click the New Application button.
-
In the New Gallery - Items area select SOA Application.
-
Click OK.
-
Use the Name your application window to enter the name and location for the new application and to specify the application template.
-
In the Application Name field, enter an application name. For this example, enter
EssWebApplication. -
In the Directory field, accept the default or specify a location for the application to be created.
-
Enter an application package prefix or accept the default, no prefix.
The prefix, followed by a period, applies to objects created in the initial project of an application.
-
Click Next.
-
-
In the Name Your Project dialog, select SOA project options.
-
In the Project Name field, enter a project name or accept the default,
Project1. -
On the Project Features tab, select SOA Suite.
-
Click Next.
-
-
In the Configure SOA Settings dialog, select Composite with BPEL Process and click Finish.
-
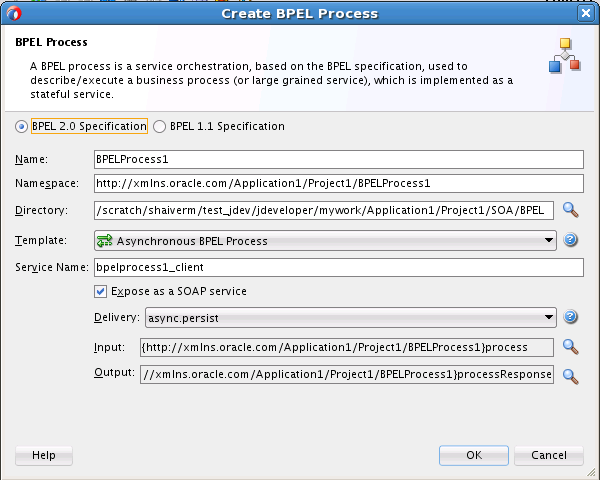
Choose one of the two BPEL specifications as shown in Figure 16-1.
-
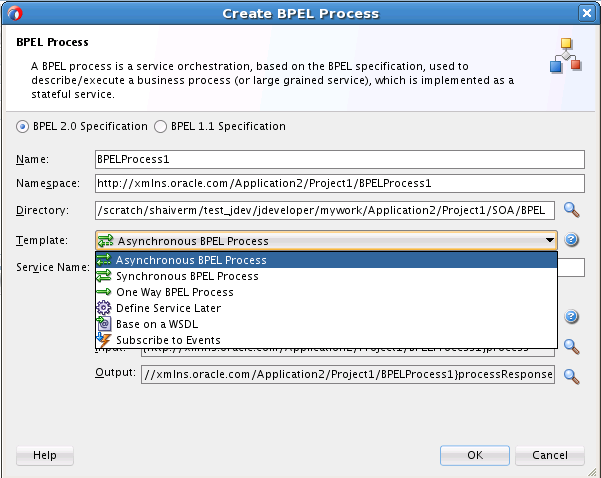
Select the service type from the Template dropdown menu as shown in Figure 16-2 and click OK.
-
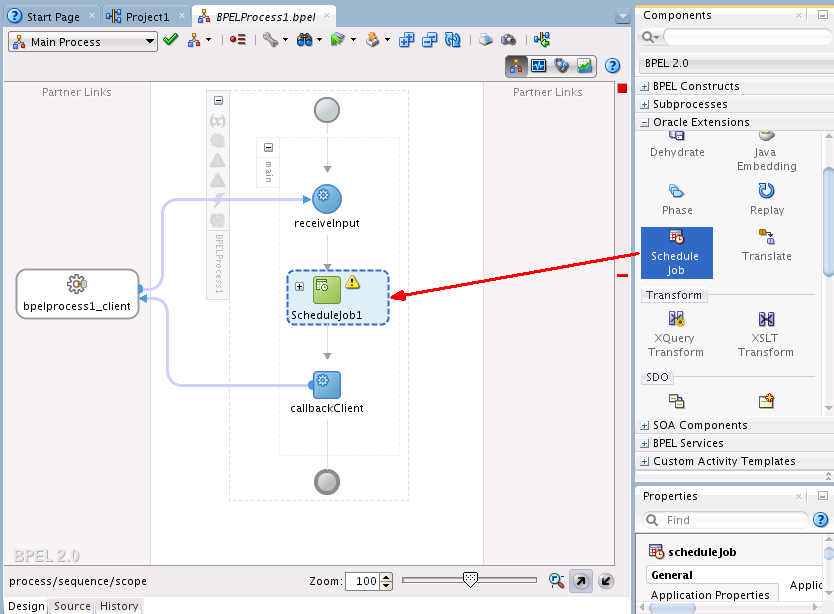
In the Editor pane (
BPELProcess1.bpel), drag the Schedule Job component from the Oracle Extensions section of the Components palette to the position between the receiveInput and callBackClient components as shown in Figure 16-3.Figure 16-3 Adding the Schedule Job Component
Description of "Figure 16-3 Adding the Schedule Job Component" -
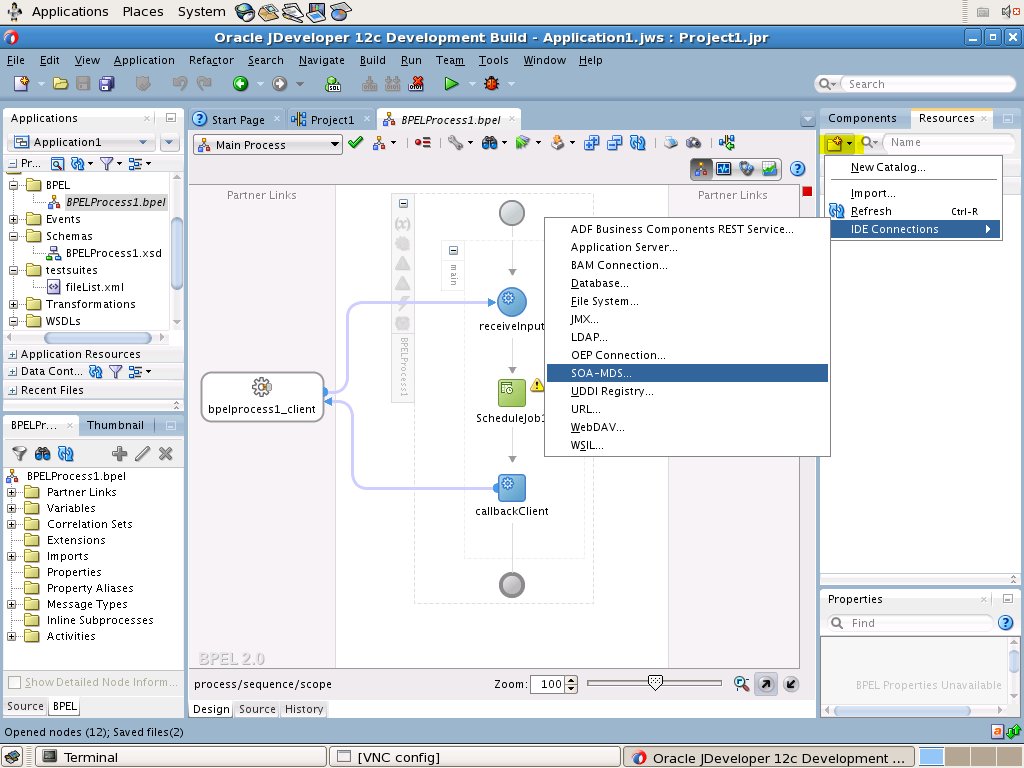
Create a connection to the metadata server as shown in Figure 16-4.
-
Click the New button in the resource window.
-
In the dropdown menu, select IDE Connecitons > SOA-MDS. In the Create SOA-MDS Connection dialog, fill in the appropriate information about your MDS server.
Note:
You can also create the connection by choosing File > New Gallery > General > Connections > SOA-MDS Connections.
Figure 16-4 Creating a Connection to the Metadata Server
Description of "Figure 16-4 Creating a Connection to the Metadata Server" -
-
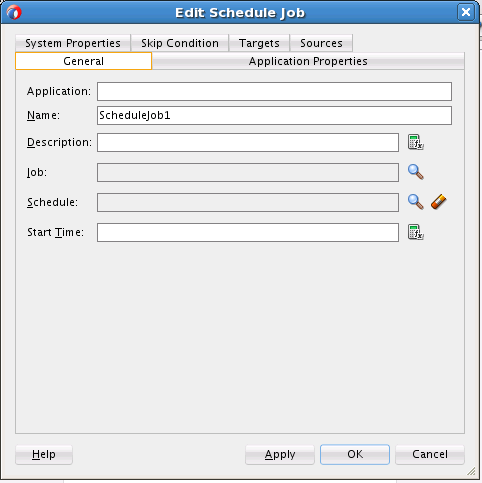
Right-click the Schedulejob1 component and select the Edit item. This invokes the Edit Schedule Job dialog shown in Figure 16-5.
-
Click the Job browse button to select the job definition through the MDS connection. Figure 16-6 shows an example.
Figure 16-6 Selecting the Job Definition Through the MDS Connection
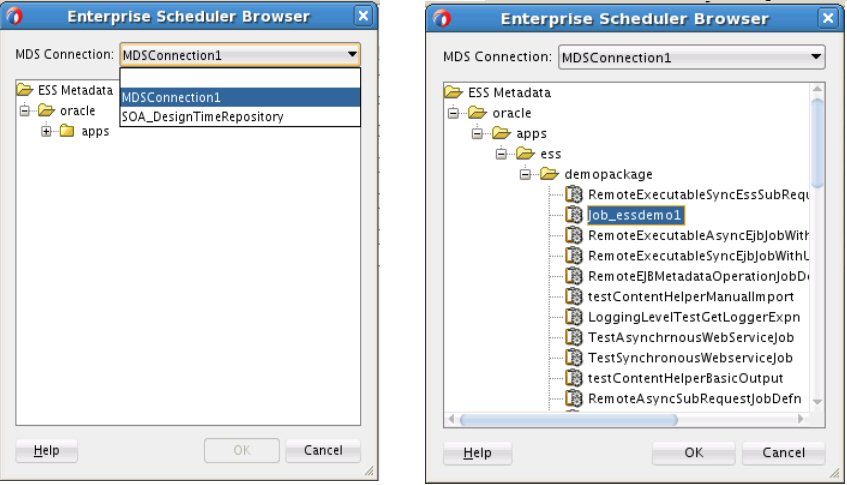
Description of "Figure 16-6 Selecting the Job Definition Through the MDS Connection" -
If the Sys_effectiveApplication property is not defined in the job definition you selected, you are prompted to provide it in Application field on the general tab. If Sys_effectiveApplication property is defined in the selected job definition, it appears in the Application field and cannot be edited. See Figure 16-7.
Figure 16-7 Defining the Sys_effectiveApplication Property (if not Already Defined)
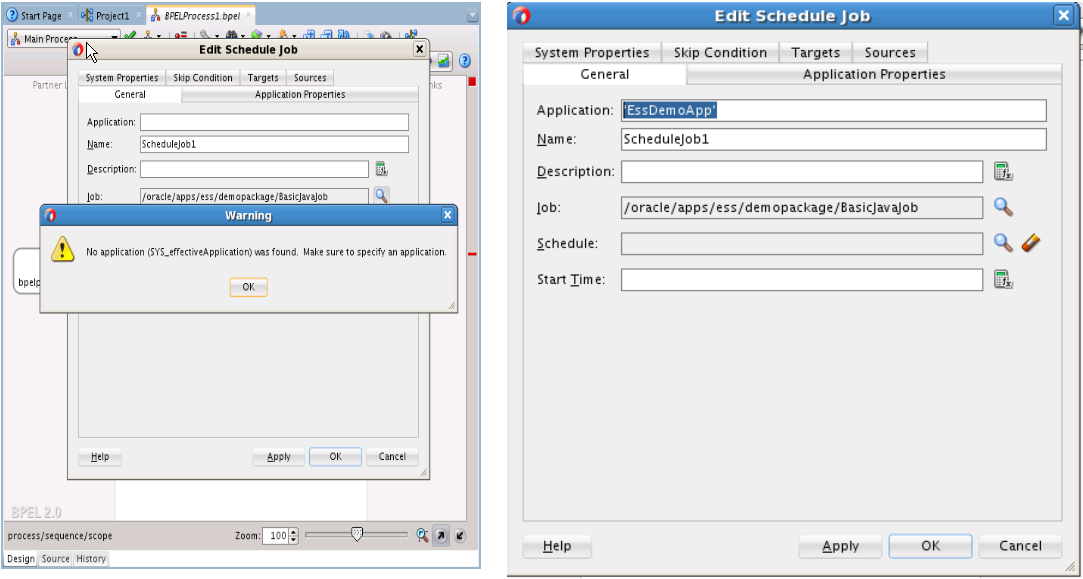
Description of "Figure 16-7 Defining the Sys_effectiveApplication Property (if not Already Defined)" -
Add system properties:
-
Select the System Properties tab.
-
The Job Properties pane should be populated with system properties obtained through the MDS connection from the job definition.
-
Use the Add button to add additional system properties in the User Defined Properties pane.
Figure 16-8 Adding User Defined Properties
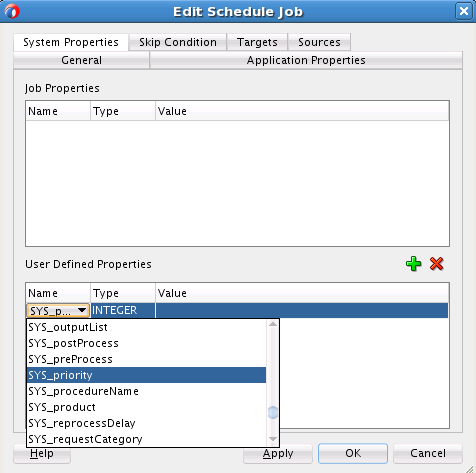
Description of "Figure 16-8 Adding User Defined Properties" -
-
Add application properties:
-
Select the Application Properties tab.
-
The Job Properties pane should be populated with properties obtained through the MDS connection from the job definition.
-
Use the Add button to add additional properties in the User Defined Properties pane.
Figure 16-9 Adding Additional User Defined Properties
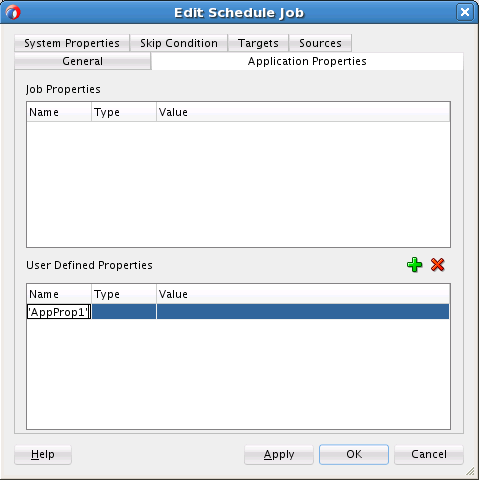
Description of "Figure 16-9 Adding Additional User Defined Properties" -
-
Attach the WSDL URL.
-
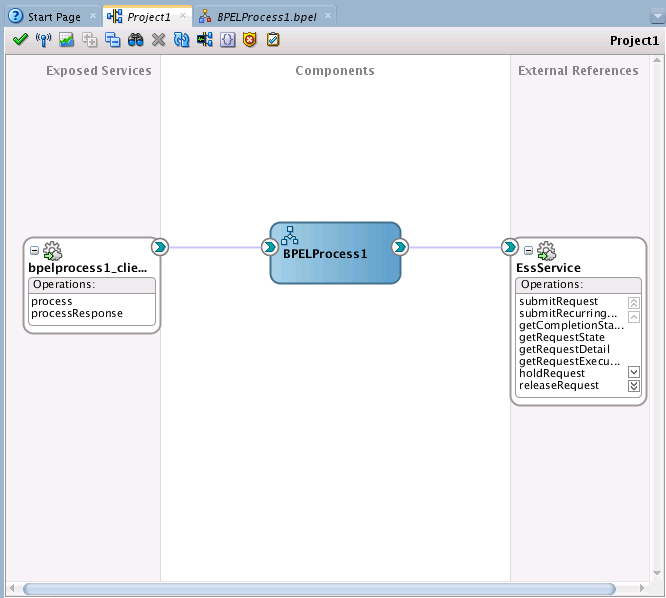
Click the Project Editor tab (Figure 16-10).
-
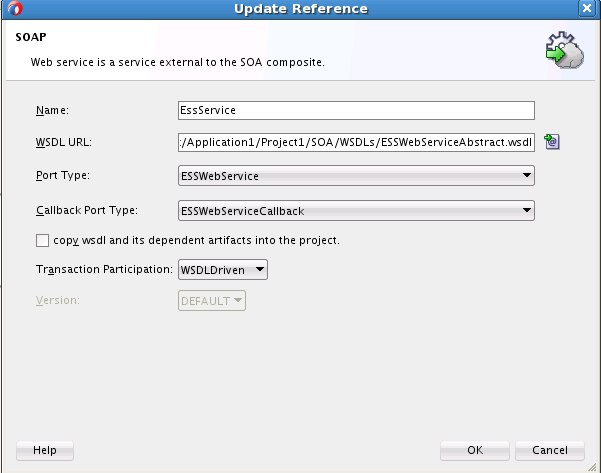
Edit the ESSService component. Provide the Name, WSDL URL, Port Type and other information (Figure 16-11).
-
-
Add a security policy to the service.
-
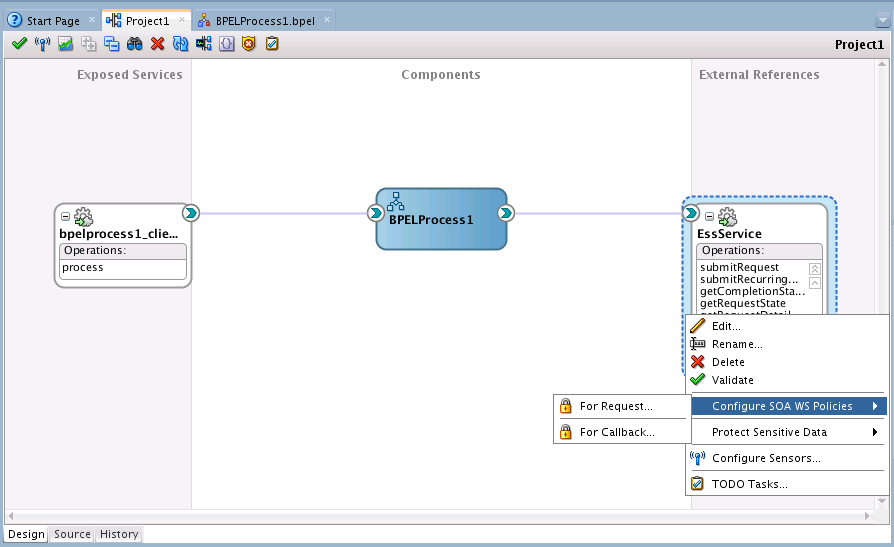
In the Project Editor tab, right-click the Oracle Enterprise Scheduler web service and select Configure SOA WS Policies > For Request to open the Configure SOA WS Policies dialog as shown in Figure 16-12.
Figure 16-12 Opening the Configure SOA WS Policies
Description of "Figure 16-12 Opening the Configure SOA WS Policies" -
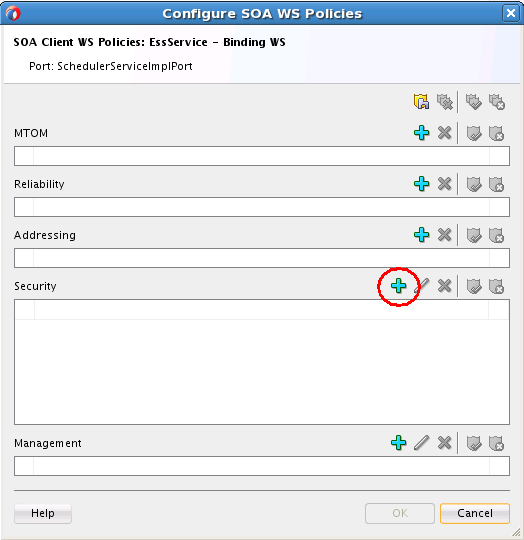
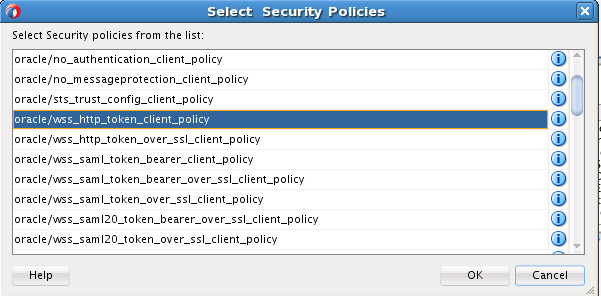
In the Security area of the Configure SOA WS Policies, click the Add button to attach the desired security policies. For example, oracle
/wss_http_token_client_policyas shown in Figure 16-13 and Figure 16-14. If you are creating an asynchronous BPEL process you must also use this process to attach a service policy to the callback.Figure 16-13 The Configure SOA WS Policies Dialog
Description of "Figure 16-13 The Configure SOA WS Policies Dialog"Figure 16-14 The Select Security Policies Dialog
Description of "Figure 16-14 The Select Security Policies Dialog"
-
-
Add the Invoke activity for the
getCompletionStatusoperation.-
Click the Design tab to switch the display from the source view back to the design view.
-
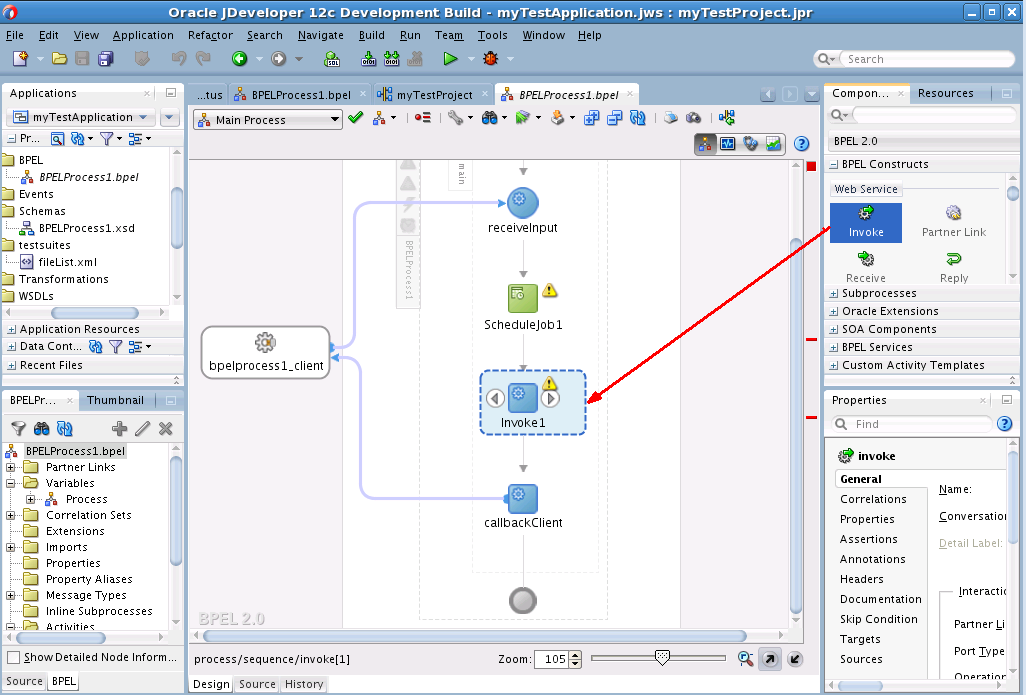
From the BPEL Constructs section of the Component Palette, drag and drop an Invoke component between Schedulejob1 and callbackClient as shown in Figure 16-15.
Figure 16-15 Drag and Drop an Invoke Component Between Schedulejob1 and callbackClient
Description of "Figure 16-15 Drag and Drop an Invoke Component Between Schedulejob1 and callbackClient" -
Right-click the Invoke1 button to open the Edit Invoke dialog. Rename the component getStatusAsync.
-
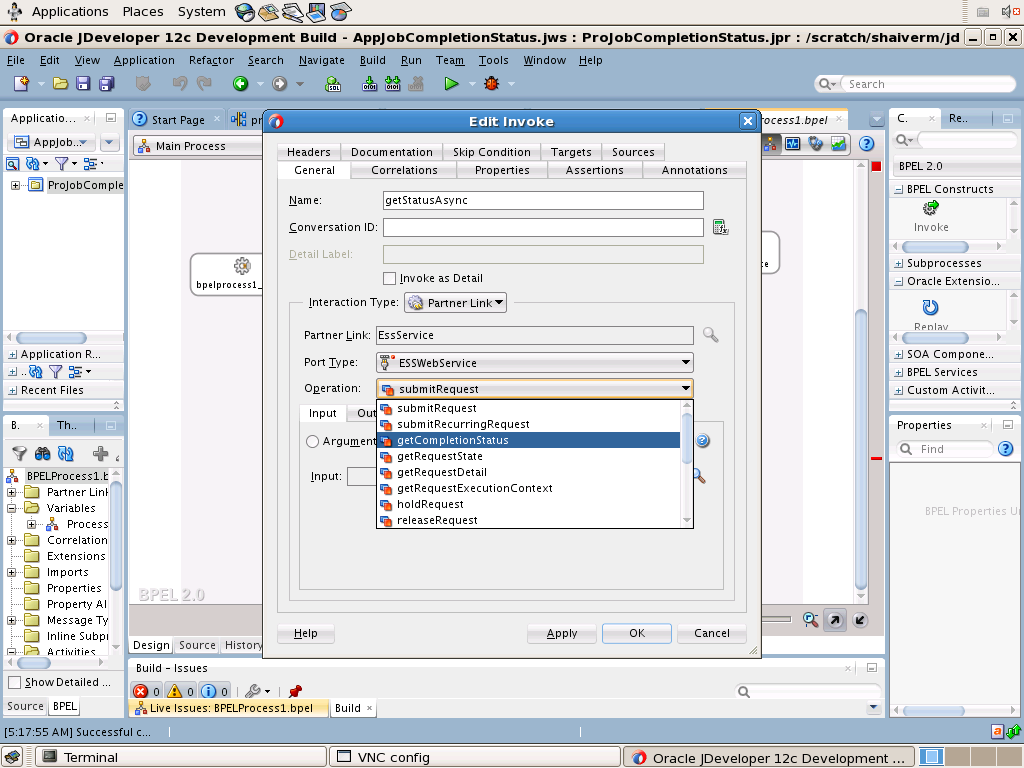
Drag the arrow from the getStatusAsync component to the EssService component in the Partner Links area. The Edit Invoke dialog opens as shown in Figure 16-16.
-
From the Edit Invoke dialog Operation dropdown, select getCompletionStatus as shown in Figure 16-16.
-
Create an input variable named
xand click OK to close the Edit Invoke dialog. -
Drag and drop an Assign component from the BPEL Construct area in the Component Palette to between the ScheduleJob1 and the getStatusAsync component.
-
Double-click the Assign component to open the Edit Assign dialog and map the ScheduleJob1 output parameter
requestIDto the getStatusAsync input parameterrequestIDas shown in Figure 16-17. Click OK.Figure 16-17 Use the Edit Assign Dialog to Map the ScheduleJob1 Output parameter requestID to the getStatusAsync Input Parameter requestID
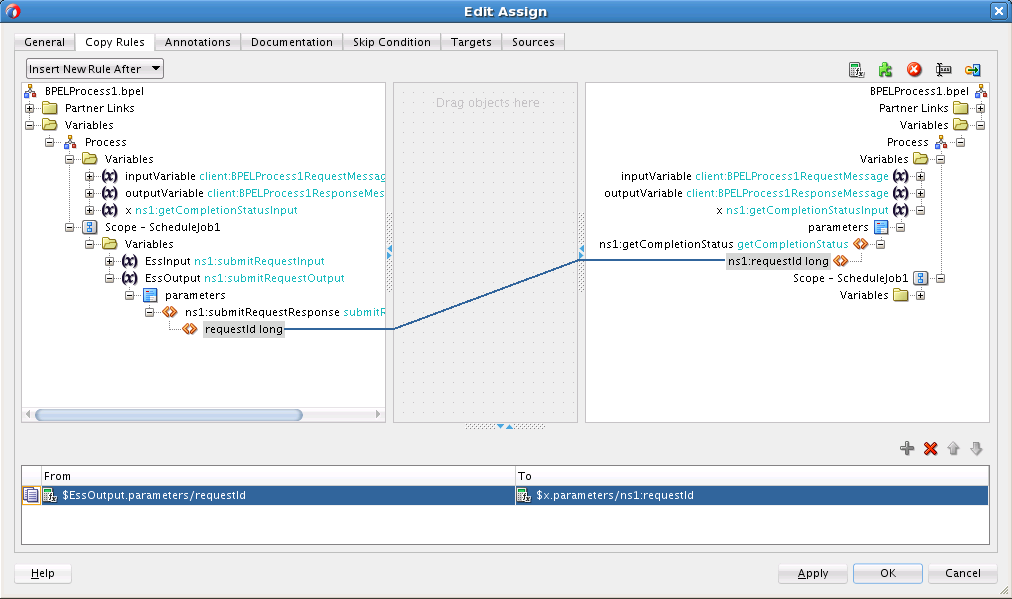
Description of "Figure 16-17 Use the Edit Assign Dialog to Map the ScheduleJob1 Output parameter requestID to the getStatusAsync Input Parameter requestID"
-
-
Receive job completion status.
-
From the BPEL Constructs section of the Component Palette, drag and drop a Receive component between the getStatusAsync and the callbackClient components as shown in Figure 16-18.
Figure 16-18 Drag and Drop a Receive Component Between the getStatusAsync and the callbackClient Components
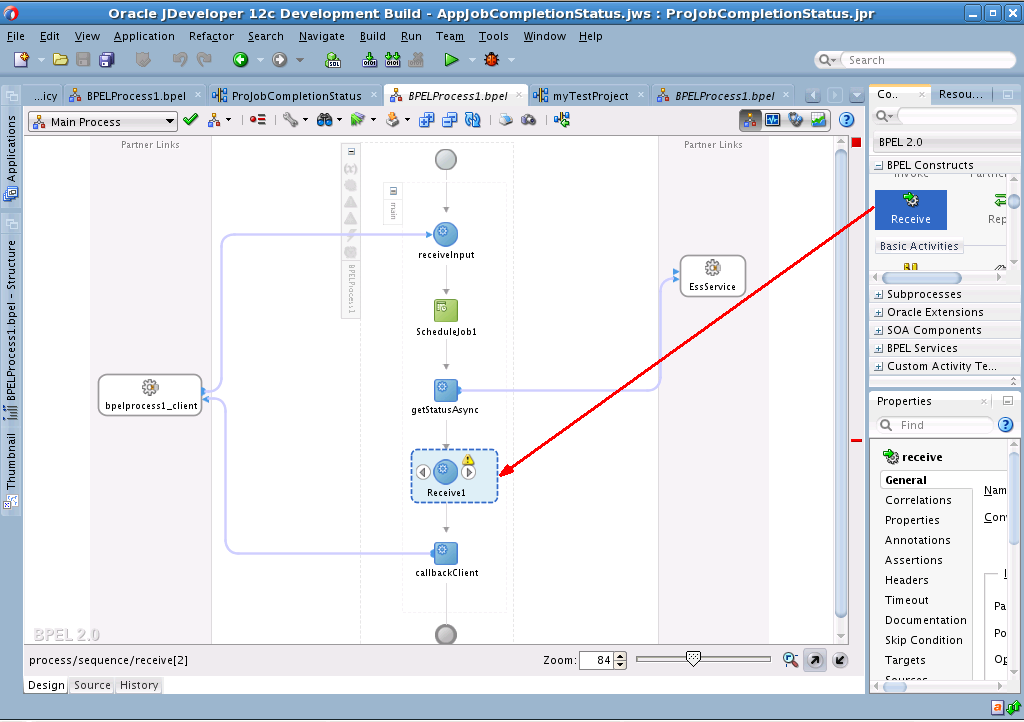
Description of "Figure 16-18 Drag and Drop a Receive Component Between the getStatusAsync and the callbackClient Components" -
Attach the Receive1 component to ESSService in Partner Links area by dragging the arrow from the Receive1 component to the ESSService component. This action also opens the Edit Receive dialog. Rename the Receive1 component to OnJobCompletion as shown in Figure 16-19.
Figure 16-19 Rename the Receive1 component to OnJobCompletion
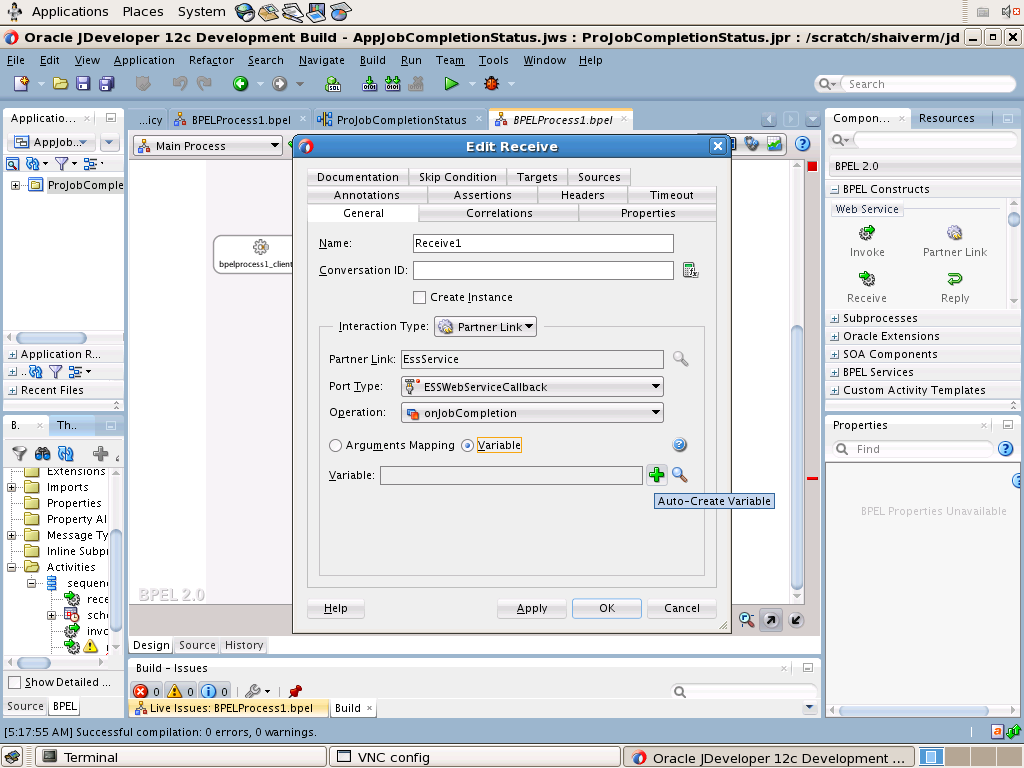
Description of "Figure 16-19 Rename the Receive1 component to OnJobCompletion" -
Select the OnJobCompletion operation and add a variable named
yas shown in Figure 16-19. Click OK to close the Edit Receive dialog. -
Drag and drop an Assign component from the BPEL Construct area in the Component Palette to between the onJobCompletion component and the callbackClient component.
-
Double-click the Assign component to open the Edit Assign dialog and map the onJobCompletion component's output parameter
resultMessageto the callbackClient component's input parameterresultvariable as shown in Figure 16-20. Click OK.Figure 16-20 Map the onJobCompletion Component's Output Parameter resultMessage to the callbackClient Component's input Parameter result Variable
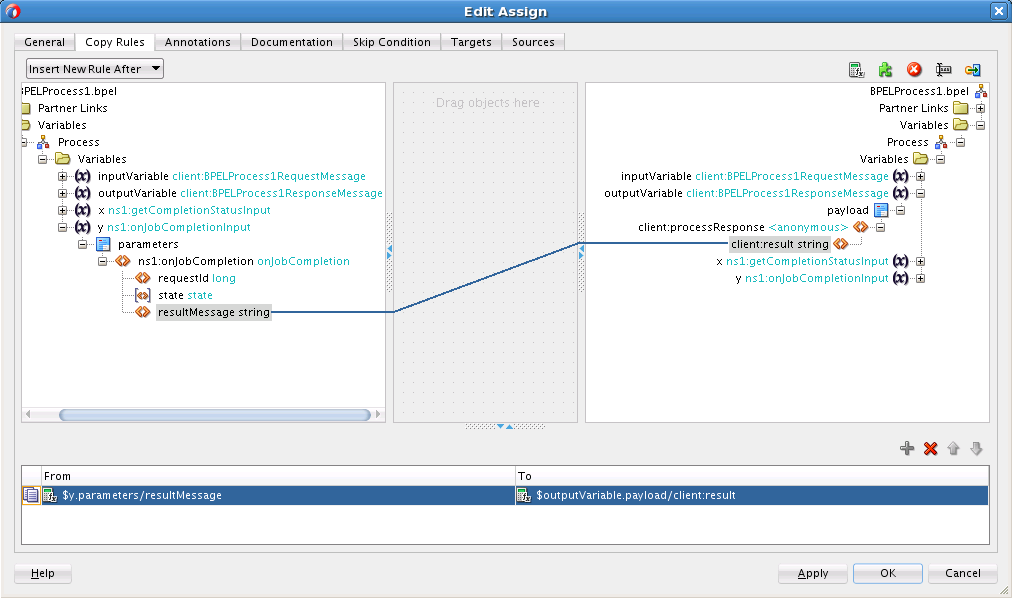
Description of "Figure 16-20 Map the onJobCompletion Component's Output Parameter resultMessage to the callbackClient Component's input Parameter result Variable"
-
