20 Creating Oracle Mediator Routing Rules
This chapter includes the following sections:
For additional information about defining routing rules for specific scenarios, see:
20.1 Introduction to Routing Rules
Routing rules are mediation logic or execution logic that you define to achieve the requisite mediation. Mediator lets you route data between service consumers and service providers. As the data flows from service to service, it must be transformed. These two tasks, routing and transformation, are the core responsibilities of Mediator. You can use routing rules to specify how a message processed by a Mediator reaches its next destination. Routing rules specify where a Mediator sends the message, how it sends the message, and what changes should be made to the message structure before sending it to the target service.
A routing rule can be triggered either by a service operation or an event subscription. The service operation can be synchronous, asynchronous, or one-way. Routing rules can be of the following two types:
-
Static Routing Rules
Static rules do not change depending on the invocation context and are applied consistently.
-
Dynamic Routing Rules
Dynamic rules let you externalize the routing logic to an Oracle Rules Dictionary, which in turn enables dynamic modification of the routing logic.
For more information about creating routing rules, see How to Create Static Routing Rules and How to Create Dynamic Routing Rules. For information about standard message exchange patterns and how they are handled by Mediator, see Understanding Message Exchange Patterns of an Oracle Mediator.
20.1.1 Static Routing Rules
A static routing rule is not expected to change depending on the invocation context. In this case, the routing can be an echo, a routing to another service, or a publishing of an event.
When you define static rules, you can specify the following types of information:
-
Target Service
Mediator sends messages to the target service you specify. This service can either be defined as a WSDL interface or a Java interface. For information about invoking a target service, see How to Specify Mediator Services or Events.
-
Execution Type
Mediator executes routing rules either sequentially (that is, running in the same thread) or in parallel (running on different threads). For information about specifying an execution type, see How to Specify Sequential or Parallel Execution.
Note:
For synchronous service invocations, the routing rule should always be sequential.
-
Reply, Callback, and Fault Handlers
You can define how Mediator handles synchronous reply, callback, and fault messages. For information about handlers, see How to Configure Response Messages, How to Handle Faults, and Static Routing Rule Components.
20.1.1.1 Types of Static Rules
You can define the following types of static rules for a Mediator:
-
Filter Expression
You can define a filter expression that is applied to the message content (payload or headers). When you define a filter, the contents are analyzed before any service is invoked. For example, you might apply a filter expression that specifies that a service be invoked only if the message includes a customer ID, or if the value for that customer ID matches a certain pattern. For information about specifying filter expressions, see How to Specify an Expression for Filtering Messages.
-
Transformations
Mediator can transform message data before forwarding the message to a service. You can define transformations to set a value on the target payload by mapping data or by assigning values.
The XSLT Mapper lets you define transformations that apply to the whole message body to convert messages from one XML schema to another. The Assign Values function works on individual fields. Using this dialog, you can assign values from the message (for example, payload and headers), from a constant, or from various system properties, such as the properties of an adapter present in the data path. For information about defining transformations, see How to Create XSLT Transformations and How to Assign Values.
-
Accessing Header Variables from Expressions
Mediator can detect any SOAP headers that are used in building the expression for the current routing rule operation. For information about accessing headers, see How to Access Headers for Filters and Assignments and Manual Expression Building for Accessing Properties for Filters and Assignments.
-
Schematron-Based Validations
You can specify the Schematron files that Mediator should use to validate different parts of an inbound message. For information about performing Schematron-based validations, see How to Use Semantic Validation.
-
Java Callouts
Mediator lets you add Java callouts to the routing rules. Java callouts enable you to use external Java classes to manipulate messages flowing through the Mediator. For information about using Java callouts, see How to Use Java Callouts.
-
User-defined Extension Functions
These are your own set of functions that can be used by the XSLT Mapper. For information about using user-defined extension functions, see "To add user-defined extension functions:".
20.1.1.2 Static Routing Rule Components
Static routing rules define the following components:
-
Request Handler: Defines how Mediator handles incoming requests.
-
Reply Handler: Defines how the synchronous response from the called service is handled by Mediator.
-
Fault Handler: Defines how the named or declared faults from the called service are handled by Mediator.
-
Callback Handler: Defines how the asynchronous response and callback from the called service are handled by Mediator.
-
Timeout Handler in Callback: Defines how long Mediator waits for the asynchronous response and callback before performing timeout handling for the particular asynchronous request.
-
Event Publishing and Service Invocation: Calls other services or publishes an event depending on the configuration of the handlers.
20.1.2 Dynamic Routing Rules
A dynamic routing rule lets you externalize the routing logic to an Oracle Rules Dictionary or Domain Value Map (DVM), which in turn enables dynamic modification of the routing logic in a routing rule. Dynamic routing enables you to dynamically route messages at runtime from a mediator to multiple target services, based on the message content.
Dynamic routing rules are described in more detail in How to Create Dynamic Routing Rules.
20.1.3 Sequential and Parallel Execution
Routing rules can be executed sequentially or in parallel. This section describes the basic principles of both types of execution. If an operation or event has both sequential and parallel routing rules, first sequential routing rules are evaluated and actions are performed, and then parallel routings are queued for parallel execution.
Note:
If a Mediator service component with a request-response interface has only parallel routing rules, the Mediator service component does not send a response back to the caller. Though you can create this type of Mediator service component, the caller of the Mediator service component does not receive a response at runtime.
20.1.3.1 Basic Principles of Sequential Routing Rules
Mediator processes sequential routing rules based on the following principles:
-
Mediator evaluates routings and performs the resulting actions sequentially. Sequential routings are evaluated in the same thread and transaction as the caller.
-
Mediator always enlists itself into the global transaction propagated through the thread that is processing the incoming message. For example, if an inbound JCA adapter invokes a Mediator, the Mediator enlists itself with the transaction that the JCA adapter has initiated.
-
Mediator propagates the transaction through the same thread as the target components while executing the sequential routing rules.
-
Mediator never commits or rolls back transactions propagated by external entities.
-
Mediator manages the transaction only if the thread-invoking Mediator does not already have an active transaction. For example, if Mediator is invoked from inbound SOAP services, Mediator starts a transaction and commits or rolls back the transaction depending on success and failure.
20.1.3.2 Basic Principles of Parallel Routing Rules
Mediator processes routing rules in parallel based on the following principles:
-
Mediator queues and evaluates routings in parallel in different threads.
The messages of each Mediator service component are retrieved in a weighted, round-robin fashion to ensure that all Mediator service components receive parallel processing cycles. This is true even if one or more Mediator service components produce a higher number of messages compared to other components. The weight used is the message priority set when designing a Mediator service component. Higher numbers of parallel processing cycles are allocated to the components that have higher message priority.
You can set the Priority field in the Mediator Editor to indicate the priority of a Mediator service component. Priorities can range from zero to nine, with nine being the highest priority. The default priority is four.
Note:
The Priority property is applicable only to parallel routing rules.
-
Mediator initiates a new transaction for processing each parallel rule. The initiated transaction ends with an enqueue to the Mediator parallel message dehydration store.
For example, if a Mediator service component has one parallel routing rule, one message is enqueued on the Mediator parallel message dehydration store. The parallel message dispatcher to the store then initiates a transaction, reads the message from the database store, and invokes the target component or service of this routing rule. The transaction initiated by the listener thread is a completely new transaction and is propagated to the target components.
Note:
Dehydrating of messages means storing the incoming messages in a database for parallel routing rules so they can be processed later by worker threads.
-
Mediator commits or rolls back transactions because it is the initiator of these transactions.
20.1.3.3 Finer Control Over Thread Allocation in Parallel Routing
You can specify dedicated work managers to handle parallel routing and error handling messages for a mediator component. You can use the Oracle WebLogic Server Administration Console to configure work managers. See Viewing and Configuring Work Manager Properties in Administering Oracle SOA Suite and Oracle Business Process Management Suite for more details on configuring work managers.
Use the NameWorkManagerMappings Mediator service engine property to specify the mediator component and its associated work managers in Oracle Enterprise Manager Fusion Middleware Control. See Configuring Oracle Mediator Service Engine Propertiesin Administering Oracle SOA Suite and Oracle Business Process Management Suite for more details on configuring Mediator runtime properties.
The NameWorkManagerMappings property has the following keys:
-
parallelRoutingWorkManagerName:The name of the work manager configured for parallel routing. If this is not specified, the default SOA work manager is used. -
fullyQualifiedComponentDistinguishedName:The fully qualified distinguished name of the mediator component. The format to be used isPartitionName/CompositeName!Revision/ComponentName.For example,soaInfra/MyProject!1.0/Mediator1.
20.2 Resequencing Rules
Mediator includes a resequencer, which rearranges streams of related but out-of-sequence messages into their sequential order based on the type of resequencer used and the rules you define. When incoming messages arrive in a random order, the resequencer orders the messages based on sequential or chronological information, and then sends the messages to the target services in the correct order based on the resequencing configuration.
For more information about resequencing messages, see Resequencing in Oracle Mediator.
20.3 Defining Routing Rules
Routing rules can only be defined for a Mediator with a defined interface. For more information on how to define an interface, see How to Define an Interface for a Mediator.
20.3.1 How To Access the Routing Rules Section
You define the routing rules in the Routing Rules section of the Mediator Editor.
Figure 20-1 shows the Routing Rules section of the Mediator Editor.
Figure 20-1 Mediator Editor- Routing Rules Section
Description of "Figure 20-1 Mediator Editor- Routing Rules Section"
Figure 20-2 lists and describes the icons in the Routing Rules section.
You can access the Routing Rules section of the Mediator Editor using one of the following methods:
20.3.1.1 From the SOA Composite Editor:
-
Double-click the icon that represents the Mediator for which you want to specify the routing rules.
-
If the Routing Rules section is not visible, click the Plus (+) icon next to Routing Rules.
20.3.1.2 From the Applications window:
-
In the Applications window, expand the SOA project and then expand the SOA Content folder.
-
In the SOA Content folder, double-click the name of the Mediator file in which you want to specify the routing rules.
The Mediator file has an
MPLANextension. -
If the Routing Rules section is not visible, click the Plus (+) icon next to Routing Rules.
20.3.2 How to Create Static Routing Rules
The following topics provide information and instructions for defining static routing rules for Mediator, including specifying the services and events, defining handlers, transformations, expressions, filters, and so on.
20.3.2.1 How to Specify Mediator Services or Events
After creating a Mediator component, you associate it with inbound service operations or event subscriptions and with outbound targets. Targets are outbound service operations or event publishing. A target specifies the next service or event to which a Mediator sends messages and also specifies which service operation to invoke. You can specify a service or an event as a target type.
You can also echo source messages back to the initial caller after any transformation, validations, assignments, or sequencing operations are performed. An echo can only be specified if the Mediator component has a synchronous or asynchronous interface. Whether the echo is synchronous or asynchronous depends on the WSDL file of the caller. The echo option is only available for inbound service operations and is not available for event subscriptions.
The purpose of the echo option is to expose all the Mediator functionality as a callable service without having to route it to any other service. For example, you can call a Mediator to perform a transformation, a validation, or an assignment, and then echo the Mediator back to your application without routing it anywhere else.
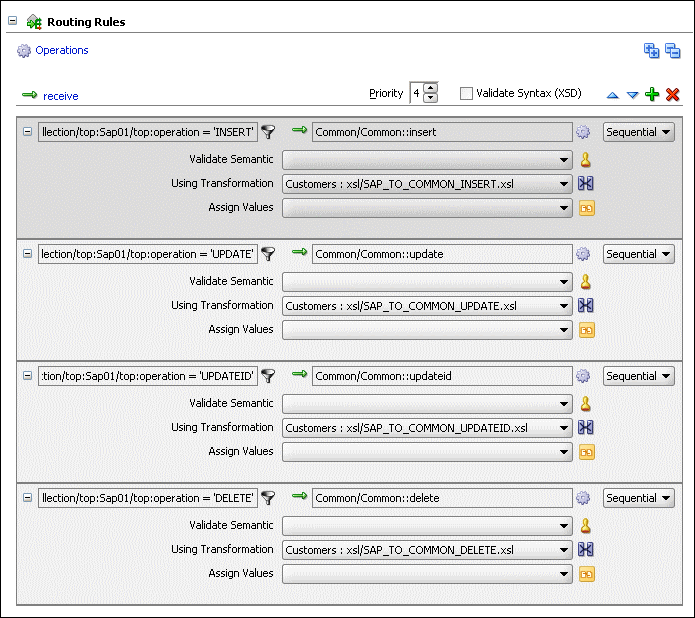
You can specify multiple routings for an inbound operation or event. Each routing is mapped to one target service invocation or event. Therefore, to specify multiple service invocations or raise multiple events, you must specify one routing rule for each target. For example, you can invoke an operation based on a message payload from the following operations defined in a service:
-
insert
-
update
-
updateid
-
delete
To do this action, you must create four routing rules, one for each operation. Later, when you specify a filter expression for each rule, you can specify which target and operation is applied to each message instance based on the message payload, as shown in Figure 20-3.
Figure 20-3 Multiple Routings for an Inbound Operation
Description of "Figure 20-3 Multiple Routings for an Inbound Operation"
20.3.2.1.1 To invoke a service:
To perform this step, the target service must be defined in a WSDL document or a Java interface.
-
In the Routing Rules section, click Add next to the operation for which you are defining routing rules, and then select static routing rule.
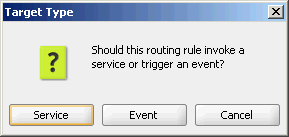
The Target Type dialog appears, as shown in Figure 20-4.
-
Click Service.
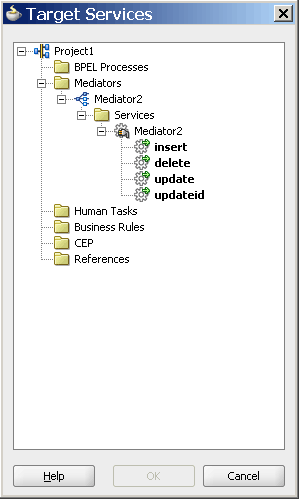
The Target Services dialog appears, as shown in Figure 20-5.
-
In the Target Services dialog, navigate to and then select an operation provided by a service.
Note:
You can select a service defined by a WSDL file or a Java interface. A service can consist of multiple operations, as shown in Figure 20-5.
-
Click OK.
-
If you selected a target service defined by a Java interface, the Interface Required dialog appears. Click Yes to create the required WSDL file, and then click OK on the confirmation dialog.
A new Static Routing section appears where you can define the routing rule.
-
Configure the routing rule as described the remaining sections of this chapter.
20.3.2.1.2 To trigger an event:
-
In the Routing Rules section, click Add next to the operation for which you are defining routing rules, and then select static routing rule.
The Target Type dialog appears, as shown in Figure 20-4.
-
Click Event.
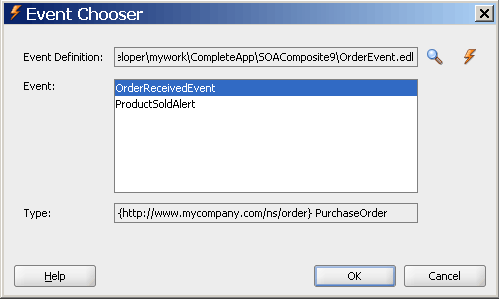
The Event Chooser dialog appears.
-
To the right of the Event Definition field, click Search.
The SOA Resource Browser dialog appears.
-
Select an event (
.edl) file and click OK.The Event field is populated with the events defined in the selected file, as shown in Figure 20-6.
Note:
Instead of browsing for an existing event definition file, you can create a new file by clicking Create new event definition (edl) file and completing the fields in the Create Event Definition File dialog.
-
Select an event.
-
Click OK.
A new Static Routing section appears where you can define the routing rule.
-
Configure the routing rule as described the remaining sections of this chapter.
20.3.2.2 What You May Need to Know About Echoing a Service
The echo option has the following limitations:
-
Echoing a service is supported only with Mediator interfaces having the following types of WSDL files:
-
Request/reply
-
Request/reply/fault
-
Request/callback
Note:
The echo option is not available for Mediator interfaces having request/reply/fault/callback WSDL files or for one-way WSDL files.
-
-
The echo option is available for synchronous operations such as request/reply and request/reply/fault.
Note:
The echo option is only available for synchronous operations when the routing rule is sequential because parallel routing rules are not supported for Mediators with synchronous operations.
-
For synchronous operations with a conditional filter, the echo option does not return a response to the caller when the filter condition is set to
false. Instead, it returns anullresponse. -
The echo option is available for asynchronous operations only if the Mediator interface has a callback operation. In this case, the echo is run on a separate thread.
Note:
The asynchronous echo option is available only when the routing rule is parallel. If you use the echo option, then sequential routing rules are not supported for Mediators with asynchronous operations.
20.3.2.3 How to Specify Sequential or Parallel Execution
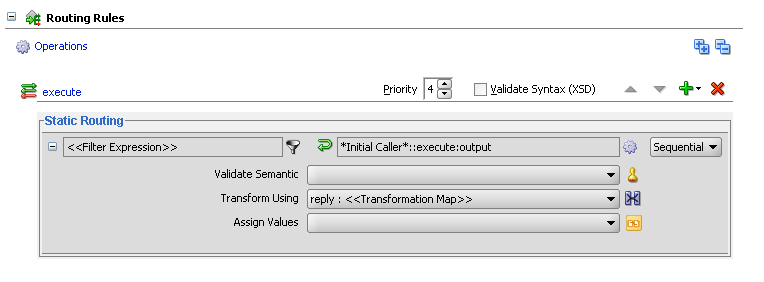
A routing rule can be executed either in parallel or sequentially. To specify an execution type for a routing rule, select the Sequential or Parallel execution type in the Routing Rules section.
20.3.2.4 How to Configure Response Messages
In the Mediator routing rules, you can specify how to handle the response messages in synchronous and asynchronous interactions. For synchronous interactions, you can specify the transformations and assignments for the response and the fault message. You can forward the response and the fault message to another service or event, or you can send them back to the initial caller, if the initial caller is expecting responses and faults.
For asynchronous interactions, you can specify transformations and assignments, and a timeout period for receiving the response. The timeout period can be specified in seconds, hours, days, months, or years. By default, the timeout period is infinite. If a callback response does not come within the specified timeout period, a timeout response can be forwarded to another service, to another event, or back to the initial caller.
You cannot route a Mediator response to a two-way service. If you want to route a response to a two-way service, you should use a one-way Mediator between the first Mediator and the two-way service. The response should first be forwarded to the one-way Mediator, which in turn should call the two-way service.
Note:
-
Zero is an unsupported value to be specified as a timeout period.
-
If the callback is received and processing of the callback fails, by default the timeout handler is invoked for processing the action specified in the timeout handler.
-
Typically, the caller receives the callback after waiting for 100 milliseconds. However, if you have a bridge Mediator with a sequential routing rule and a connection to a synchronous interface service, then due to the complex flow of the program with all sequential routing rules, the caller may take longer to get ready to receive the callback. You can work around this issue by changing the routing rule of the bridge Mediator to parallel.
To specify a timeout period for asynchronous processing:
The following steps are performed in the Routing Rules section of the Mediator Editor.
Note:
If the number of routing rules is larger and the time taken to execute the routing rules exceeds the transaction timeout, you must set the transaction timeout to a value that is greater than the time taken to execute all the routing rules.
20.3.2.5 How to Handle Premature Callbacks
Callback messages might arrive before the initiating transaction is completed. In this case, correlation in Mediator fails. If you have an issue with premature callbacks, you can use the oracle.tip.mediator.callback.correlationWaitDuratino_in_seconds property to set a time period in seconds for which the callback thread waits before retrying the callback.
You define the property in the composite.xml file in the component element that defines the Mediator component. In the example shown below, the wait time before retrying is 15 seconds.
<component name="Mediator1">
    <implementation.mediator src="Mediator1.mplan"/>
    <property name="oracle.tip.mediator.callback.correlationWaitDuration_in_
    seconds">15</property>
</component>
20.3.2.6 How to Handle Multiple Callbacks
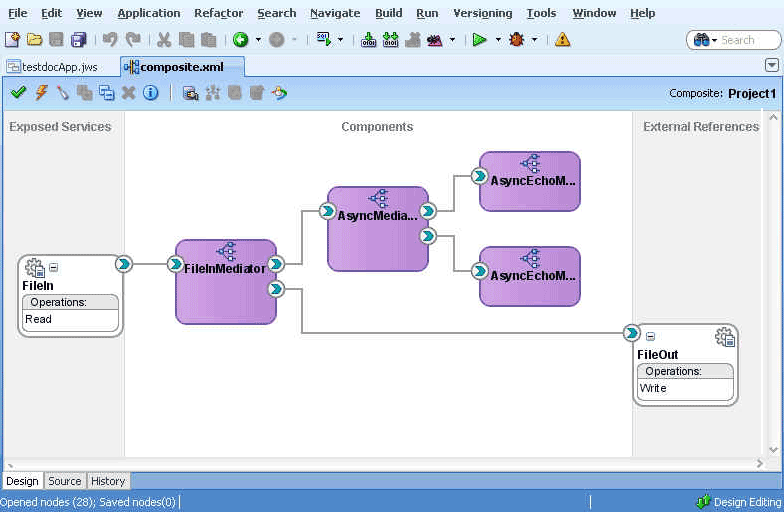
A single Mediator cannot handle multiple callbacks. If you have a composite application with a Mediator that receives multiple callbacks, the behavior of the composite application is undetermined. For example, in the scenario shown in Figure 20-9, AsyncMediator forwards the callback response from AsyncEchoMediator1 and AsyncEchoMediator2 to FileInMediator. In such a flow, the AsyncMediator might return the callback from both AsyncEchoMediator1 and AsyncEchoMediator2, or from either one of them. The exact behavior is random and unpredictable.
Figure 20-9 Sample Mediator Handling Multiple Callback
Description of "Figure 20-9 Sample Mediator Handling Multiple Callback"
20.3.2.7 How to Handle Faults
If you create a new routing rule in which the target service operation has one or more faults, you still see a single fault routing section in the Mediator Editor. If the source Mediator service component supports one or more faults, then the fault is routed back to the caller by default. You can choose the source and target fault names to be routed. You can also use the service browser to route the fault to another target.
20.3.2.7.1 To define an additional fault routing:
The following steps are performed in the Routing Rules section of the Mediator Editor.
-
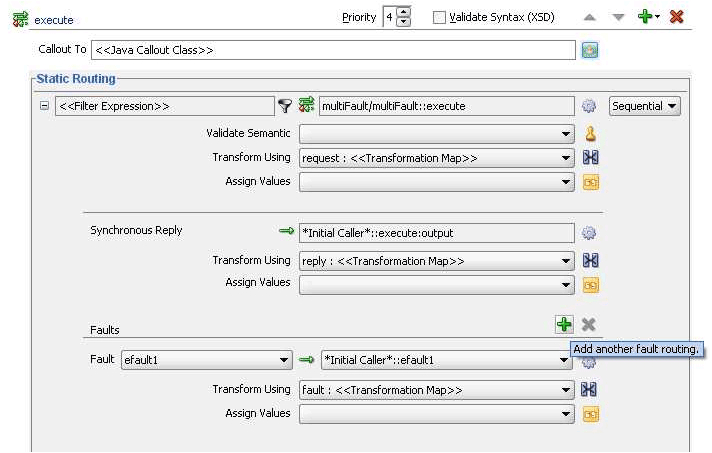
In the Faults section, click the Add another fault routing button shown in Figure 20-10.
Another fault section appears in the routing rule box.
-
Configure the target service, transformations, and assign values for the new fault.
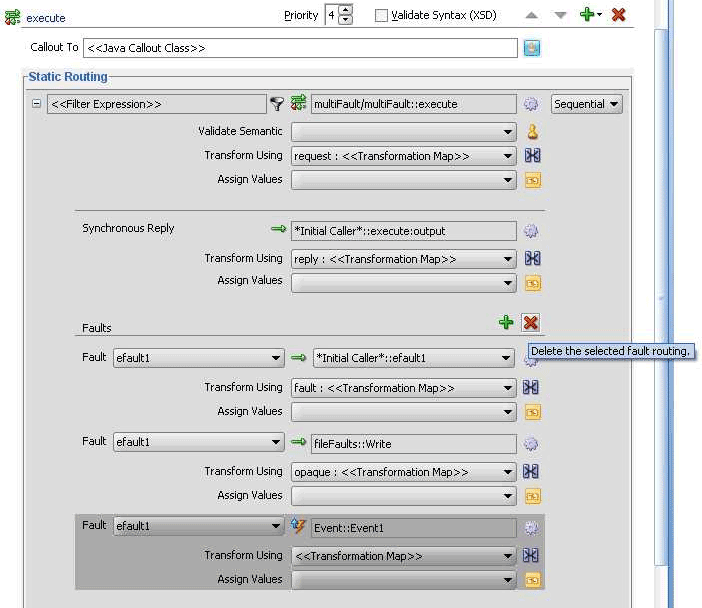
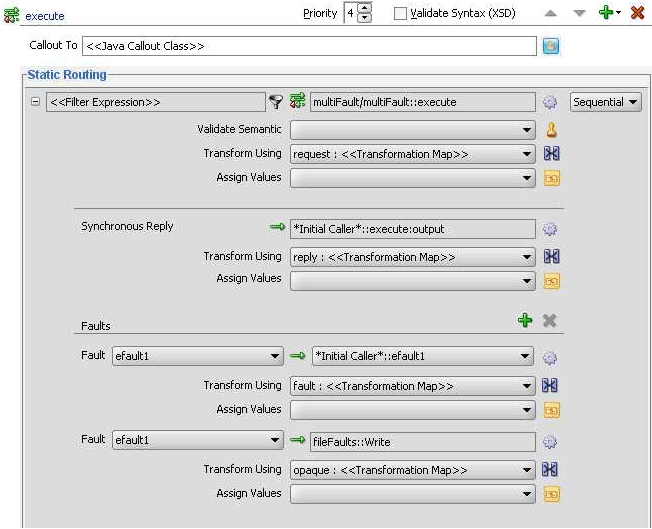
Figure 20-11 shows a second fault being routed to a file adapter service.
Figure 20-11 Second Fault Added to Routing Rules
Description of "Figure 20-11 Second Fault Added to Routing Rules"Note:
You can route the same fault to multiple targets using different transformations.
20.3.2.7.2 To remove a fault routing section:
The following steps are performed in the Routing Rules section of the Mediator Editor.
-
Highlight the fault routing you want to remove by clicking in the target service field, and then click Delete the selected fault routing, as shown in Figure 20-12.
20.3.2.8 How to Specify an Expression for Filtering Messages
The filter expression routing rule lets you filter messages based on their payload. If the filter expression for a given message instance evaluates to true, the message is delivered to the target service or event specified within the routing rule.
For example, you route your data to customers in two different countries, such as US and Canada, but you only want notices regarding the MOBILE product line to be sent to US customers and the LANDLINE product line to customers in Canada. To implement this routing, you must define a routing rule for each component and operation pair that sends messages to the target customers. In addition, you specify filter expressions for the routing rules that send messages to the customers in the US or Canada.
You can also define filter expression message properties or message headers.
Filter Expression Message Properties
Two examples of filter expression message properties are shown below:
$in.property.custom.Priority = '1'

$in.property.tracking.ecid = '2'
Filter Expression Message Headers
Two examples of filter expression message headers are shown below:
$in.header.wsse_Security/wsse:Security/Priority = '234'

$in.header.wsse_Security/wsse:Security/Priority = '234'
For the preceding filter expression message headers to work, you must add the attribute shown in the following example to the root element of the .mplan file.
wsse = "http://docs.oasis-open.org/wss/2004/01/oasis-200401-wss-wssecurity-
 secext-1.0.xsd"
20.3.2.8.1 To specify an expression for filtering messages:
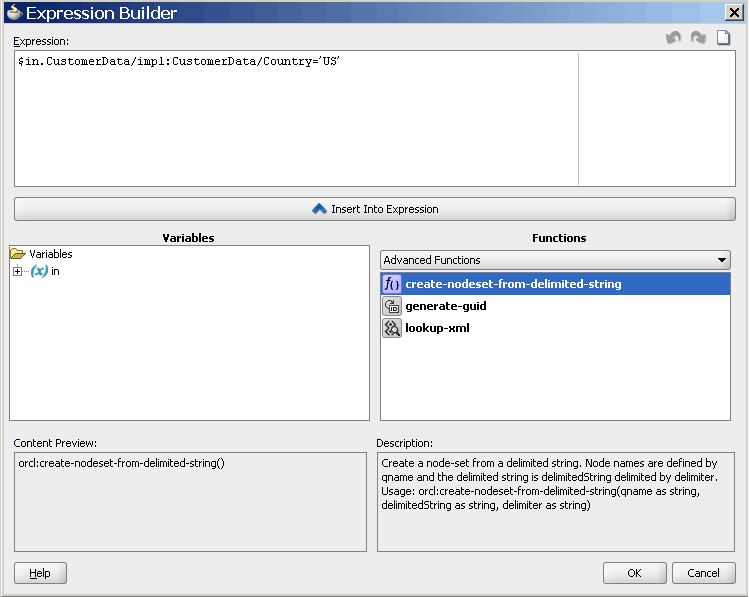
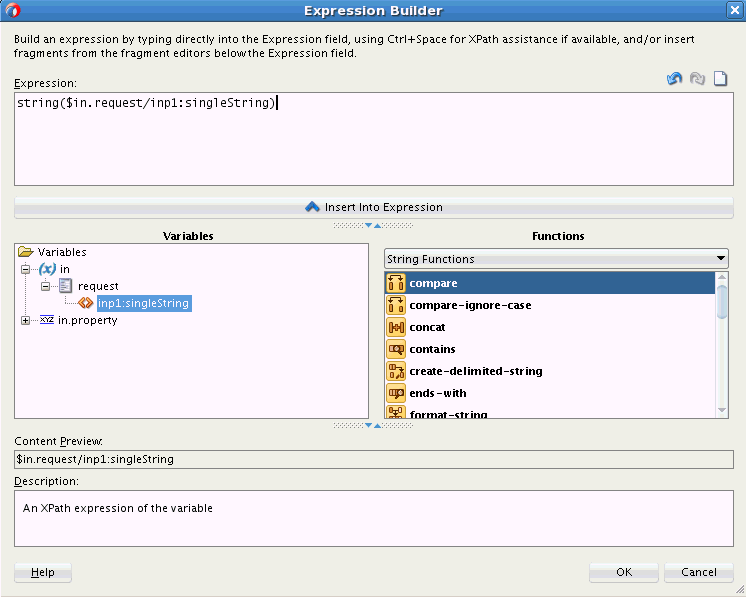
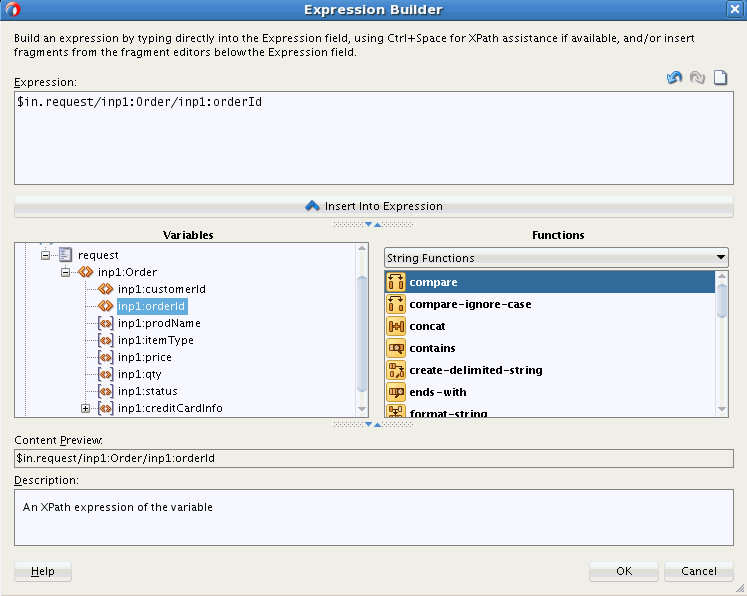
You can use the Expression Builder to graphically create a filter expression. The Expression Builder dialog contains the components and controls that assist you in designing a filter expression.
-
To the right of the Filter Expression field in the Routing Rules section, click the Invoke Expression Builder icon.
The Expression Builder dialog appears, as shown in Figure 20-13.
-
Double-click a value in the Variables field or the Functions palette to add the value to the Expression field. Using a combination of variable elements, functions, and manually entered text, you can build an expression by which you want message payloads to be filtered for a given routing rule.
The following table describes each of the fields in the Expression Builder dialog:
Table 20-1 Expression Builder Fields
Field Description Expression
This field contains the actual expression used to filter messages. You can enter the filter expression either manually or by using the Variable field and the Functions palette.
Using the icons on the upper right side of this field, you can undo the last edit made, redo the last edit made, or clear the entire Expression field.
Variables
This field contains the message defined for a Mediator component. Oracle JDeveloper parses the Mediator WSDL file and presents the message definition in the Variables field. The input message is stored in the
$invariable, and you can use the$in.propertiesto access the properties of an input message.If the input message consists of multiple parts, use
$in.partnameto access a part of an input message.Functions Palette
This list provides a list of functions that you can include in an expression. When you select a function, a preview of how that function appears when added to the Expression field appears in the Content Preview field, and a description of the function appears in the Description field.
Content Preview
This field indicates how a value selected from the Variables field or Functions palette appears when it is inserted into the Expression field.
Description
This field describes the value selected from the Variables field or Functions Palette.
20.3.2.8.2 To specify a filter expression on a message payload:
-
To the right of the Filter Expression field in the Routing Rules section, click the Invoke Expression Builder icon.
The Expression Builder dialog is displayed.
-
In the Variables field, expand the message definition and select the message element on which you want to base the expression.
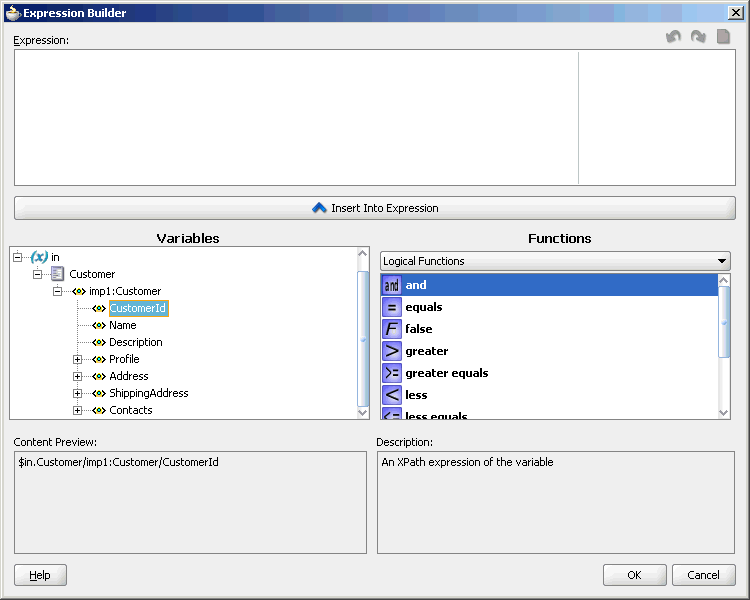
For example, the CustomerId element is shown selected in Figure 20-14.
Figure 20-14 Expression Builder Dialog – Variables Element Selected
Description of "Figure 20-14 Expression Builder Dialog – Variables Element Selected" -
Click Insert Into Expression.
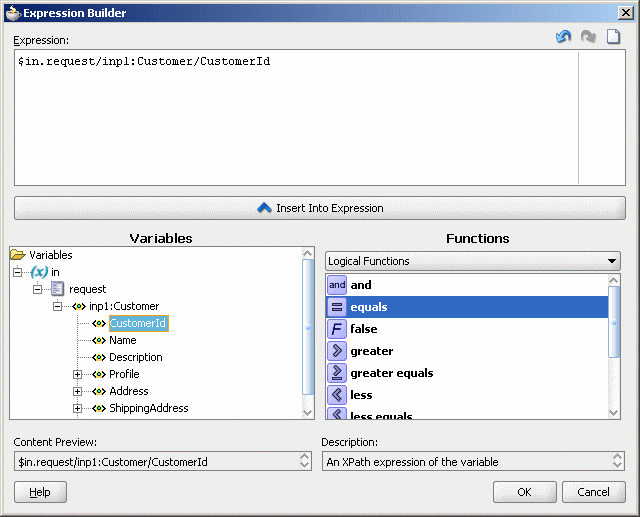
The expression is added in the Expression field, as shown in Figure 20-15.
Figure 20-15 Expression Builder Dialog – Variables Element Inserted
Description of "Figure 20-15 Expression Builder Dialog – Variables Element Inserted" -
From the Functions list, select the function to apply to the message payload. For example, equals.
Functions are grouped in categories that are listed when you click the down arrow in the Functions list. For example, if you click the down arrow and select Logical Functions, the list appears as shown in Figure 20-15.
-
Click Insert Into Expression.
The XPath expression for the selected function is inserted into the Expression field.
-
Complete the expression.
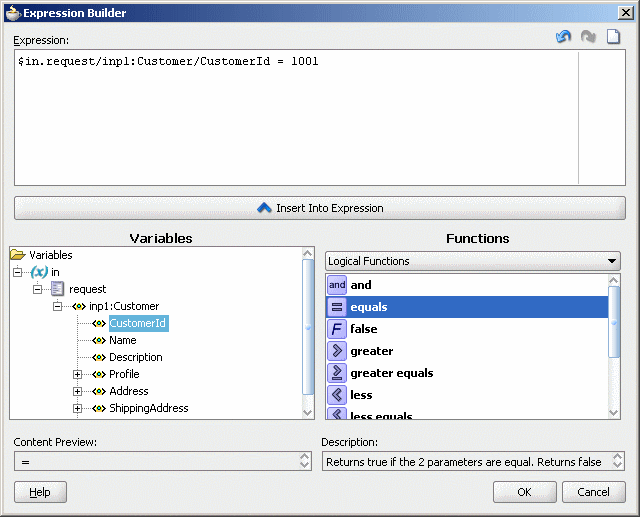
In this example, the Customer ID must equal
1001to evaluate to true, as shown in Figure 20-16.Figure 20-16 Sample Expression Builder Dialog – Value Entered
Description of "Figure 20-16 Sample Expression Builder Dialog – Value Entered" -
If there are any errors, you can edit the expression manually, or use the expression editing icons, which are summarized in Figure 20-17.
-
Click OK.
The expression is added to the Routing Rules section.
To modify or delete a filter expression, double-click the Add Filter Expression icon, and then modify or delete the expression in the Expression field of the Expression Builder.
20.3.2.9 How to Translate Between Native XSD Formats and XML Formats
Mediator enables you to translate native format data into XML data, for inbound data, and XML data into native format data for outbound translations. So, for example, you can use inbound translation to convert an incoming comma-delimited native data file into an XML data file. You can use outbound translation to convert XML data into native data format for a target service.
Mediator provides the following translation features:
-
Inbound Translation: Converts inbound data from native data format to XML. Inbound translation is configured at the operation level. The translated data is available for transform and assign operations.
-
Outbound Translation: Converts outbound data from XML to native data format. Outbound translation can be configured for each routing rule. The native data is then routed to the target service.
-
Translate and Route Only: Translates inbound data from native data format to XML, and routes it to the target service. An outbound WSDL file is created for the target service. This feature is only supported for mediators that have a one-way (no response) operation.
20.3.2.10 How to Use Inbound Translation
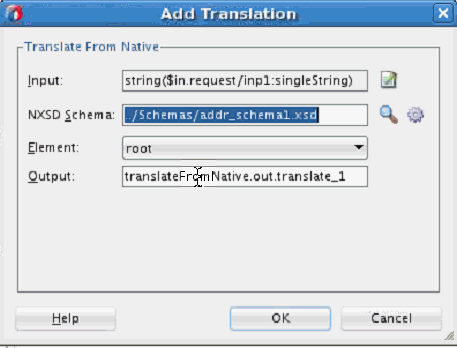
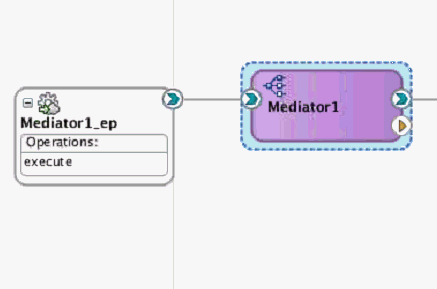
This section demonstrates using inbound translation. Figure 20-18 shows a mediator (Mediator1) connected to an inbound web service. The mediator receives a native string from the inbound web service, and uses inbound translation to convert the native string into XML.
Figure 20-18 Mediator Receiving Inbound Data
Description of "Figure 20-18 Mediator Receiving Inbound Data"
To translate inbound data from native XSD to XML format:
20.3.2.11 How to Use Outbound Translation
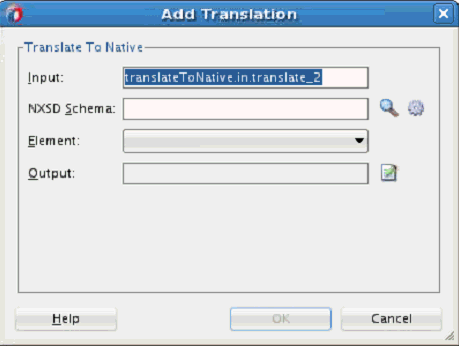
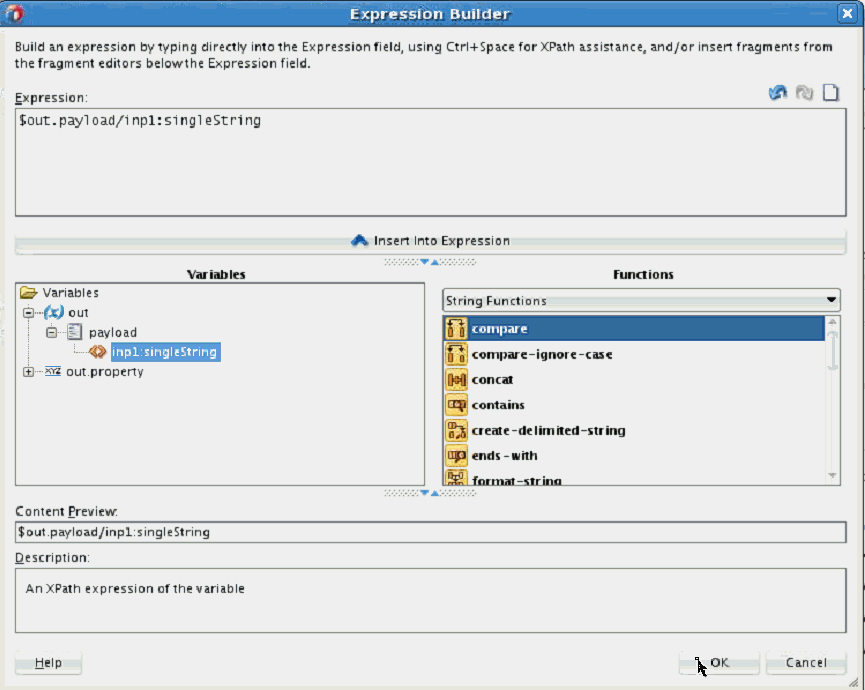
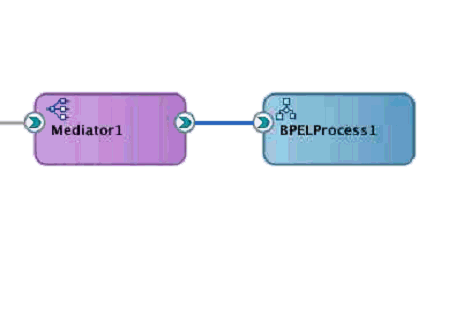
This section demonstrates using outbound translation. Figure 20-22 shows a mediator (Mediator1) connected to a BPEL process. The mediator uses outbound translation to convert XML data into native string, and routes this string to the BPEL process.
Figure 20-22 Mediator Sending Outbound Data
Description of "Figure 20-22 Mediator Sending Outbound Data"
To translate outbound data from XML to native XSD format:
20.3.2.12 How to Create XSLT Transformations
Oracle JDeveloper provides an XSLT Mapper that lets you specify a mapper file (XSL file) to transform data from one XML schema (expressed as an XSD file) to another. The XSLT Mapper enables data interchange among applications using different schemas. For example, you can map an incoming purchase order schema to an outgoing invoice schema. After you define an XSL file, you can reuse it in multiple routing rule specifications.
20.3.2.12.1 To create a transformation:
-
In the Routing Rules section, click the Select an existing mapper file or create a new one icon to the right of the Transform Using field. The Request Transformation Map dialog appears.
-
Do one of the following:
-
If the XSLT map file (.xsl) exists, click Browse to find and select the XSLT file to use. Click OK.
-
If you are creating a new XSLT map file, click the Create Mapping icon. The Create Transformation Map dialog appears.
-
-
In the Create Transformation Map dialog, select XSLT under Type.
-
Edit the XSLT File Name, as appropriate.
-
Edit the XSLT Directory, as appropriate. The default directory is the
SOA_Project/SOA/Transformationsdirectory. Click Browse to browse and select the directory. -
Repeat the above steps for any synchronous reply, callback, response, or fault messages.
In case of synchronous reply or fault message, the Reply Transformation Map dialog or the Fault Transformation Map dialog contains an Include Request in the Reply Payload option, as shown in Figure 20-26.
Figure 20-26 Reply Transformation Map Dialog

Description of "Figure 20-26 Reply Transformation Map Dialog" -
To create an
$initialvariable that contains the original message of a synchronous interaction, select the Include Request in the Reply Payload option.The variable is created, as shown in Figure 20-27.
Note:
An initial message can also consist of multiple parts. Use $initial.partname to access a part of the initial message. If the parts of the inbound and outbound messages are identical, then no transformation is required for data interchange.
For information about the XSLT Mapper, see Creating Transformations with the XSLT Map Editor .
20.3.2.13 How to Create XQuery Transformations
Oracle Mediator supports XQuery transformations from one XML schema to another. The XQuery 1.0 specification is supported.
20.3.2.13.1 To create an XQuery transformation:
-
In the Routing Rules section, click the Select an existing mapper file or create a new one icon to the right of the Transform Using field. The Request Transformation Map dialog appears.
-
Do one of the following:
-
If the XQuery map file (.xqy) exists, click Browse to find and select the XQuery file to use. Click OK.
-
If you are creating a new XQuery map file, click the Create Mapping icon. The Create Transformation Map dialog appears.
-
-
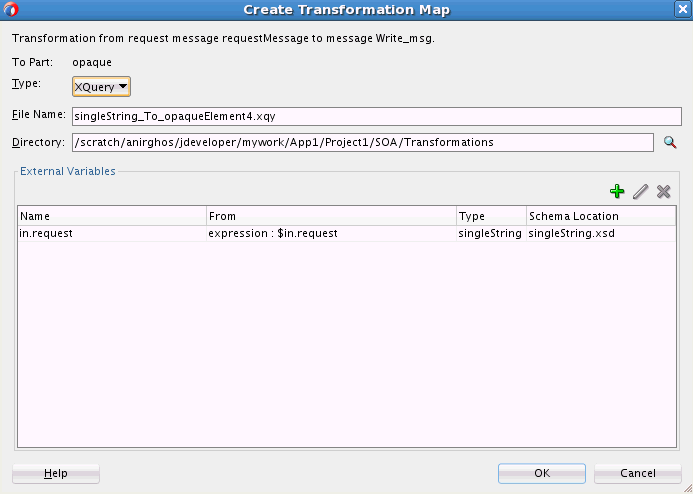
In the Create Transformation Map dialog, select XQuery under Type.
Figure 20-29 shows the Create Transformation Map dialog.
Figure 20-29 Create Transformation Map Dialog
Description of "Figure 20-29 Create Transformation Map Dialog" -
Edit the XQuery File Name, as appropriate.
-
Edit the XQuery Directory, as appropriate. The default directory is the
SOA_Project/SOA/Transformationsdirectory. Click Browse to browse and select the directory. -
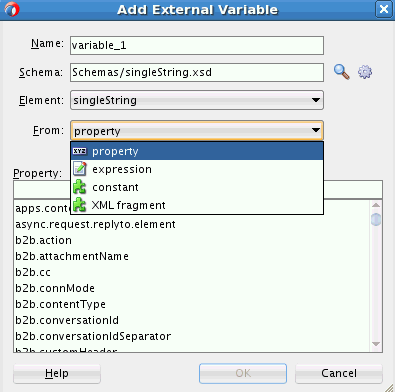
Under the External Variables section, you can define the external variables for the XQuery. Click Add Variable to add a new external variable. The Add External Variable dialog appears.
Note:
External variables are automatically created for implicit mediator variables that are available as transformation input. For example, the mediator input request
in.requestautomatically has an external variable for it.Figure 20-30 shows the Add External Variable dialog.
-
Specify a Name, Schema, and schema Element for the external variable.
-
Under From, choose how to map the value for the external variable. Select from one of the following:
-
Property: Lists the properties that you can select from.
-
Expression: Enables you to build an expression using mediator implicit variables, properties, and a list of functions that you can use in the expression. You can click the Invoke Expression Builder icon to launch the expression builder.
See How to Specify an Expression for Filtering Messages and Building XPath Expressions in the Expression Builder in for more information about working with the expression builder.
-
Constant: Enables you to specify a literal value for the external variable.
-
XML Fragment: Enables you to specify XML data for the external variable.
-
-
Click OK in the Add External Variable dialog to add the external variable. The Create Transformation Map dialog is populated with the external variable.
Note:
To edit an external variable, select it from the list and click Update Variable.
To delete an external variable, select it from the list and click Delete Variable.
-
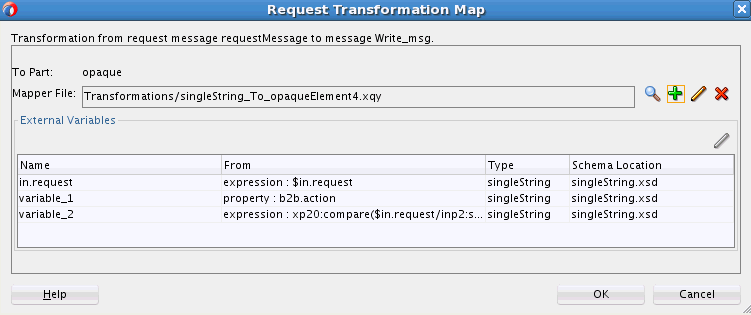
Click OK in the Create Transformation Map dialog. The Request Transformation Map dialog appears, and it is populated with the Mapper File name and the external variables defined.
Figure 20-31 shows the Request Transformation Map dialog.
Figure 20-31 Request Transformation Map Dialog
Description of "Figure 20-31 Request Transformation Map Dialog" -
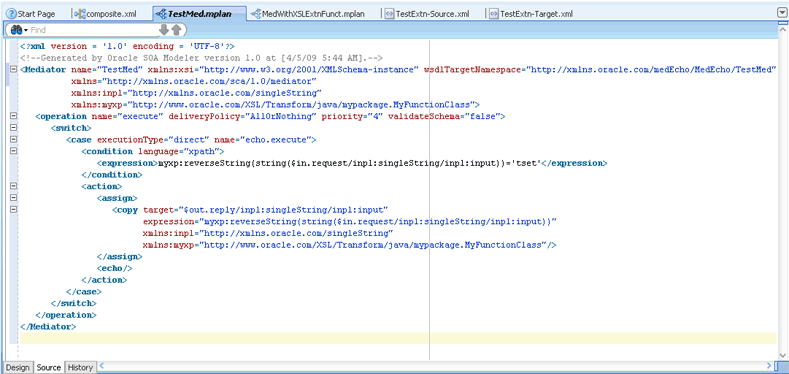
Click OK in the Request Transformation Map dialog. The transformation action details are added to the mediator mplan file.
20.3.2.13.2 To edit an XQuery transformation:
-
In the Routing Rules section, click the Select an existing mapper file or create a new one icon to the right of the Transform Using field. The Request Transformation Map dialog appears.
Note:
You cannot add or delete external variables from an existing XQuery (.xqy) map. However, you can select a variable and click Update Variable to modify the expression or value associated with the external variable.
-
Click the Edit Mapping icon to the right of the Mapper File field. The XQuery map opens in the XQuery Mapper.
-
See Creating Transformations with the XQuery Mapper for more information on using the XQuery Mapper.
20.3.2.14 How to Assign Values
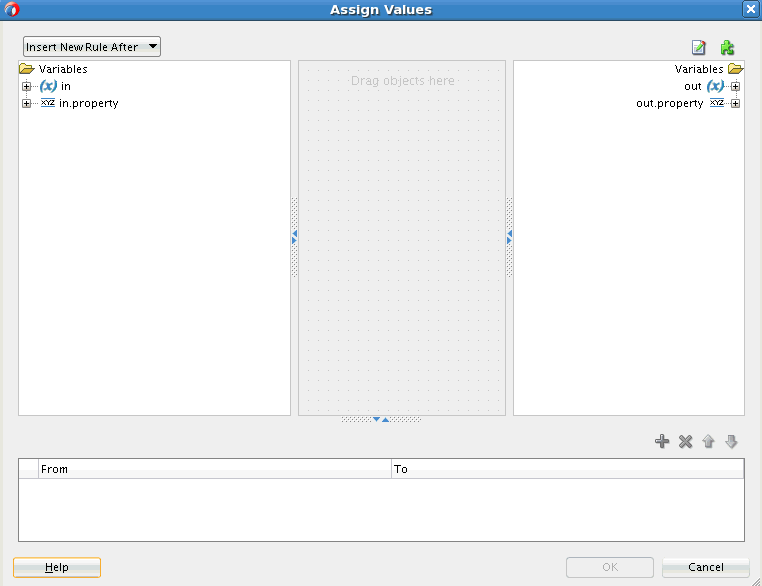
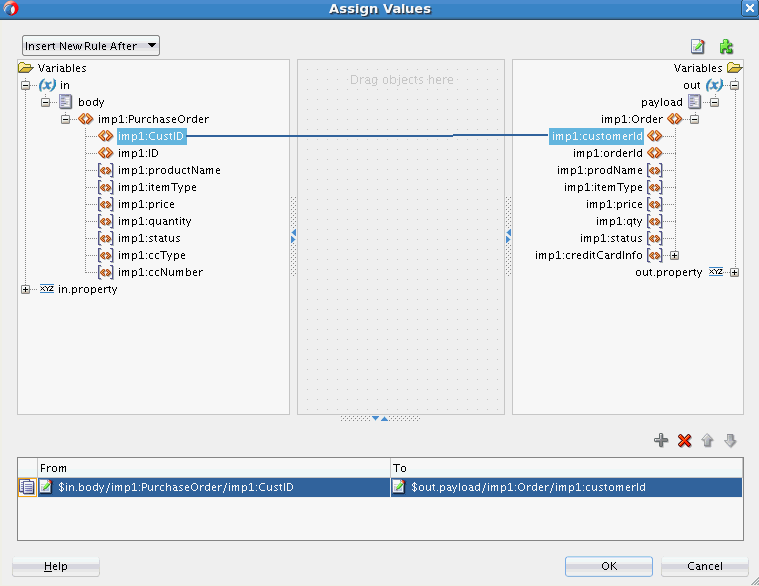
You can use the Assign Values field to propagate the headers, payload, and properties of a message from source to target. Figure 20-32 shows the Assign Values dialog that is displayed when you click the Assign Values icon in the Routing Rules section.
The left hand pane of the Assign Values dialog contains the source variables and the right hand pane shows the target variables. You can copy values from source variables to target variables. You can also create complex expressions and assign them to target variables. You can also assign literals (constants or XML fragments) to target variables.
The bottom pane of the Assign Values dialog shows the assignments you have created. You can select and edit any assignment.
20.3.2.14.1 To copy a source node to a target node:
-
Expand the source tree in the left pane by clicking the plus sign (+) next to a source node. Similarly expand the target tree in the right pane.
-
Use one of the following methods to copy a source variable to a target variable:
-
Drag the desired source node to the target node. A line appears connecting the source and target nodes. The assignment also appears in the bottom pane. Figure 20-33 shows the Assign Values dialog after copying a source node to a target node.
-
Select the source node in the left pane and the target node in the right pane. Click the Create rule from selected nodes icon (green plus icon) above the bottom pane to create an assignment.
Figure 20-33 Copying Source Variables to Target Variables
Description of "Figure 20-33 Copying Source Variables to Target Variables" -
-
Click OK to create the assignment.
20.3.2.14.2 To assign complex expressions:
-
Drag the Assign Source Expression icon from the top right hand corner to the target node or the canvas (center pane). The Expression Builder appears.
-
Create an expression using the available source variables and functions.
Optionally click Help for more information about the Expression Builder dialog.
-
Click OK to close the Expression Builder.
-
If you had dragged the expression to the canvas or center pane in Step 1, drag the expression icon in the canvas to the desired target node. This maps the expression to the target variable.
Note:
To edit the assignment, right-click the assignment in the bottom pane. Select Edit Source Expression or Edit Target Expression to edit the source and target respectively.
-
Click OK to create the assignment.
20.3.2.14.3 To assign constant values and XML fragments:
-
Drag the Assign Source Literal icon from the top right hand corner to the target node or the canvas (center pane). The Assign Source Literal dialog appears.
-
Enter the constant value or XML Fragment to be assigned.
-
Select Literal is XML Fragment if your constant value is valid XML.
-
Click OK.
-
If you had dragged the source literal to the canvas or center pane in Step 1, drag the source literal icon in the canvas to the desired target node. This maps the source literal to the target variable.
Note:
-
When you assign values to a particular Mediator property during event publishing, the assigned value does not get propagated to the subscribing event.
You can work around this issue by using transformations to include the property as part of the event body.
-
You cannot assign values to the
jca.db.userNameandjca.db.passwordproperties on Oracle WebLogic Server because their data sources do not support setting the user name or password dynamically to thegetConnectionmethod.
Table 20-2 through Table 20-4 list the various possibilities of assignment on constants and properties, payloads, and headers of a message from source to target.
Table 20-2 Possibilities on Constants and Properties
| Source | Target | Example |
|---|---|---|
|
Property |
Property |
|
|
Constant |
Property |
|
Table 20-3 Possibilities on Payload
| Source | Target | Example |
|---|---|---|
|
XPath Expression |
Property |
|
|
XPath Expression (below part level) |
Property |
|
|
Property |
XPath Expression (below part level) |
|
|
Constant |
XPath Expression (below part level) |
|
|
XPath Expression |
XPath Expression |
|
|
XPath Expression (below part level) |
XPath Expression (below part level) |
|
Table 20-4 Possibilities on Header
| Source | Target | Example |
|---|---|---|
|
XPath Expression (below part level) |
Property |
|
|
Property |
XPath Expression (below part level) |
|
|
Constant |
XPath Expression (below part level) |
|
|
Constant |
XPath Expression (below part level) |
|
|
XPath Expression |
XPath Expression |
|
|
XPath Expression (below part level) |
XPath Expression (below part level) |
|
20.3.2.15 What You May Need to Know About the Assign Activity
Note the following issues about the assign activity.
-
The assign activity is executed in the order of the
<copy>elements that appear in the Mediator mplan. -
You can reorder the assignments by selecting an assignment in the bottom pane of the Assign Values dialog and clicking the Up or Down arrow to move the assignment in the assignments list.
-
When creating a new assignment, you can choose to insert it at the desired place in the list of assignments. Select an existing assignment in the bottom pane of the Assign Values dialog and select Insert New Rule After or Insert New Rule Before from the list at the top left of the dialog.
-
The output variable from the Translate From Native activity and the input variable to a Translate To Native activity are also available for assignments in the Assign Values dialog.
-
All assignments that appear in the bottom pane of the Assign Values dialog are applied to the Mediator mplan only after you click OK.
-
A source XPath expression should always refer to a leaf node while the source is assigned to a target property. Otherwise, all the values of the child nodes in the source get concatenated and are assigned to the target property. The following example provides details:
<copy target="$out.property.jca.file.FileName"
 expression="$in.body/imp1:request/ProductReq/Make"
 xmlns:imp1="http://xmlns.oracle.com/psft"/>
Note:
A leaf node is a node with no child nodes.
-
While assigning a constant or a property to a target XPath expression, the target XPath expression should always point to a leaf node. Otherwise, nonleaf nodes contain only a string value that may generate nonvalid XML according to the
.xsdfile. The following example provides details.<copy target="$out.request/inp1:request/ProductReq/Make" value="NewMakeValue" xmlns:inp1="http://xmlns.oracle.com/psft"/>
In this example,
$out.request/inp1:request/ProductReq/Makerefers to the leaf node. -
If a transformation is available, then while assigning a source part to a target part, the target is overwritten because the assign activity occurs on top of the transformation. If the transformation is not available, then the assign activity creates the target. The following example provides details.
<copy target="$out.request" expression="$in.body"/>

<copy target="$out.header.inp1_header" expression="$in.header.inp1_header"
  xmlns:inp1="http://xmlns.oracle.com/psft"/>
-
If one of the child nodes in the target payload has to be modified, then there are the following two use cases:
-
If a transformation is available, then directly assign a source expression to a target XPath expression that is pointing to that child node in the target. The following example provides details:
<copy value="ConstantModel"
target="$out.request/inp1:request/ProductReq/Model"
 xmlns:inp1="http://xmlns.oracle.com/psft"/>
-
If a transformation is not available, then there are two steps involved. First, assign the source part to the target part, and then assign the source expression to a target XPath expression that is pointing to the child node in the target. The following example provides details:
<copy target="$out.request" expression="$in.body"/> and <copy
 value="ConstantModel" target="$out.request/inp1:request/ProductReq/Model"
 xmlns:inp1="http://xmlns.oracle.com/psft"/>
-
-
When only one of the child nodes of the source has to be propagated into a target, then first ensure that there is no transformation invoked. Then, assign the source XPath expression to point to the required child node. The following example provides details:
<copy target="$out.request/imp1:ProductReq"
 expression="$in.body/imp1:request/ProductReq"
 xmlns:imp1="http://xmlns.oracle.com/psft"/>
In this case, the source element evaluated from
$in.body/imp1:request/ProductReqdoes not contain a complete tree structure that starts from the root element, but contains only a child node. The following example provides details:<ProductReq> <Make>MAKE</Make> <Model>MODEL</Model> </ProductReq> -
If there are multiple assign activities in a Mediator and each source XPath expression points to a different child node, then there are the following two use cases:
-
If a transformation is available, then the corresponding child node in the target is updated.
-
If a transformation is not available, then the target should be a multiple part target with each part referring to the source child node.
-
-
With headers, if the
passThroughHeaderproperty is set, then-
Any header manipulation in a transformation is updated in the target headers.
-
The part level assign activity overwrites the target header part.
-
The below part level node assign activity updates the corresponding node in the target.
-
-
If multiple source nodes (below part level) are assigned to the same target node (below part level), then the target node contains the value of the last
copyelement in the assign activity. The following example provides details.<copy target="$out.request/imp1:request/ProductReq/Make" expression="$in.body/imp1:request/ProductReq/Model" xmlns:imp1="http://xmlns.oracle.com/psft"/> <copy target="$out.request/imp1:request/ProductReq/Make" expression="$in.body/imp1:request/Description" xmlns:imp1="http://xmlns.oracle.com/psft"/>
In the preceding example, the first
copyelement does not have any effect because the secondcopyelement overwrites it. -
If the XPath expression results in a list (multiple occurrences), then there are the following two use cases:
-
If the list contains a single element, then the XPath expression is propagated.
-
If the list contains multiple elements, then the XPath expression is not supported.
-
-
The following activities happen while assigning a source child node to a target child node:
-
The source child node name and namespace are overwritten by the target node name and namespace, respectively.
-
The target child node is replaced by the source child node in the parent node of the target node.
-
20.3.2.16 How to Access Headers for Filters and Assignments
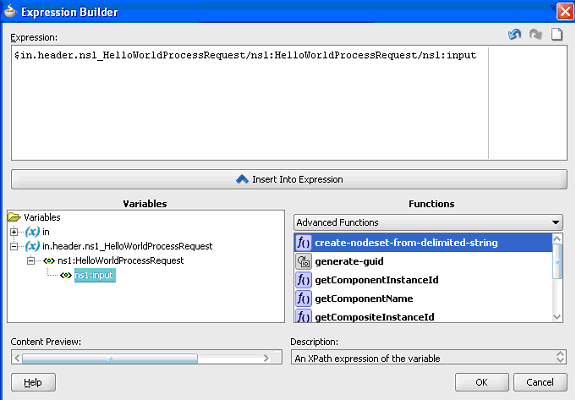
When the Expression Builder is invoked from a Mediator, either for defining a filter or for defining an assignment source or target, the WSDL file is parsed. This automatically detects any SOAP headers for the current routing rule operation and makes them visible as variables under the in or out folder as header./ns_elementName/, as shown in Figure 20-34. Here, ns is the namespace prefix and elementName is the root element name for the header schema.
The following scenarios provide details.
Scenario 1: Namespace Prefixes wsse and ns1 Are Already Defined
Assume the namespace prefixes wsse and ns1 are already defined in the WSDL file or the .mplan file. You can then write an XPath expression as follows:
$in.header.wsse_Security/wsse:Security/ns1:Foo/Priority
Scenario 2: Schema Without a Namespace Predefined in the WSDL File
Assume you want to use a schema that does not have a namespace predefined in the WSDL file. The Expression Builder is then enhanced to allow you to enter {full_namespace} instead of a prefix. The Expression Builder then generates a unique prefix and the prefix definition is added to the .mplan file.
For example, enter the expression in the Expression Builder shown in the following example:
$in.header.{http://docs.oasis-open.org/wss/2004/01/oasis-200401-wss-wssecurity-sec
ext-1.0.xsd}_Security/
{"http://docs.oasis-open.org/wss/2004/01/oasis-200401-wss-wssecurity-secext-1.0.xs
d"}:
Security/{"http://www.globalcompany.com/ns/OrderBooking"}:Foo/Priority
The .mplan file contains the content shown in the following example:
xmlns:ns1="http://docs.oasis-open.org/wss/2004/01/oasis-200401-wss-wssecurity-
secext-1.0.xsd"
xmlns:ns2="http://www.globalcompany.com/ns/OrderBooking"
...
expression="$in.header.ns1_Security/ns1:Security/ns2:Foo/Priority"
Figure 20-34 Expression Builder Dialog - Automatic Header Detection
Description of "Figure 20-34 Expression Builder Dialog - Automatic Header Detection"
By default, SOAP headers are not passed through by Mediator. You must add the passThroughHeader endpoint property to the corresponding Mediator routing service:
<property name="passThroughHeader">true</property>
For example, to add this property, you can modify the composite.xml file, as shown in the following example:
<component name="Mediator1">
     <implementation.mediator src="Mediator1.mplan"/>
     <property name="passThroughHeader">true</property>
</component>
For the headers to pass through, the source and the target must have the same QName (name and namespace). If the source and the target have different QNames, then either a transformation or part-level assignment must be performed.
It is important to note that, with a passthrough Mediator (without a transformation or assign), if the source and target part QNames are not identical, then Mediator passes through the message payloads to the target service without any error. However, this can result in an error in the target service because the message payloads are not reconstructed according to the message structure of the target service.
Note:
-
The user interface supports both SOAP 1.1 and SOAP 1.2.
-
For automatic header detection, a concrete WSDL file must be used when creating the Mediator service component.
-
Assignments execute after filters. Therefore, if you are assigning a value in a custom header, then the particular assignment is not visible to the filter.
20.3.2.16.1 Manual Expression Building for Accessing Headers for Filters and Assignments
There are use cases in which the header schemas cannot be determined from the WSDL files. For example, security headers that are appended to a message, or the headers for a Mediator that are created using an abstract WSDL file. To access these headers, you must manually enter the XPath expression into the Expression Builder.
The syntax for header expressions is shown in the following example:
$in.header.<header root element namespace prefix>_<header root element name>/<xpath>
Therefore, for the header shown in the following example:
<wsse:Security xmlns:wsse="http://docs.oasis-open.org/wss/2004/01/oasis-200401-wss-wssecurity-sec
ext-1.0.xsd">
<Priority>234</Priority>
</wsse:Security>
The filter expression is as follows:
$in.header.wsse_Security/wsse:Security/Priority = '234'
The assignment expression is as shown in the following example:
<copy target="$out.property.jca.jms.priority"
 expression="$in.header.wsse_Security/wsse:Security/Priority"/>
For the preceding expressions to work, you must add the attribute shown in the following example to the root element of the .mplan file.
wsse = "http://docs.oasis-open.org/wss/2004/01/oasis-200401-wss-wssecurity-
secext-1.0.xsd"
20.3.2.16.2 Manual Expression Building for Accessing Properties for Filters and Assignments
An example of a filter expression is as follows.
$in.property.tracking.ecid = '2'
An example of an assignment expression is as follows.
<copy target="$out.property.tracking.ecid" value="$in.property.tracking.ecid"/>
20.3.2.17 How to Use Semantic Validation
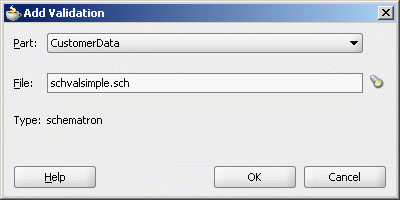
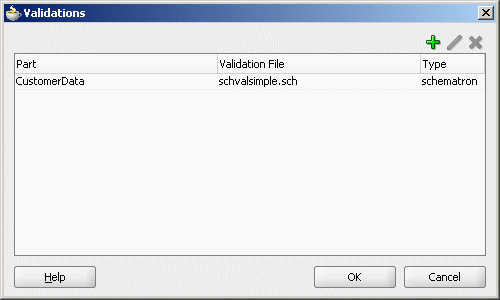
You can specify Schematron files for validating an inbound message and its various parts. Schematron version 1.5 is the supported version.
Perform the following steps for specifying a Schematron schema to validate an inbound message and its various parts.
To use semantic validation:
20.3.2.18 How to Work with Attachments
You can configure how Mediator handles attachments by adding properties to the project's composite.xml file. For information on working with attachments, see "Sending Attachment Streams" and "Overriding Pass Through Settings for Attachments in ".
20.3.2.19 How to Use Java Callouts
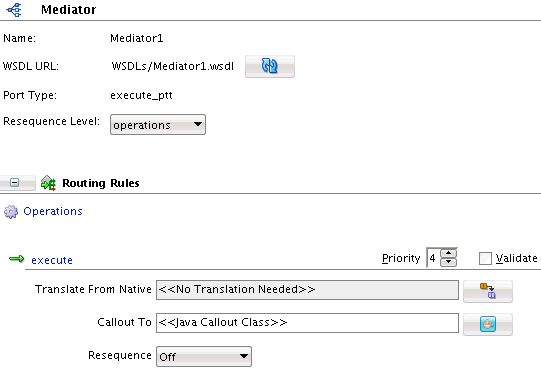
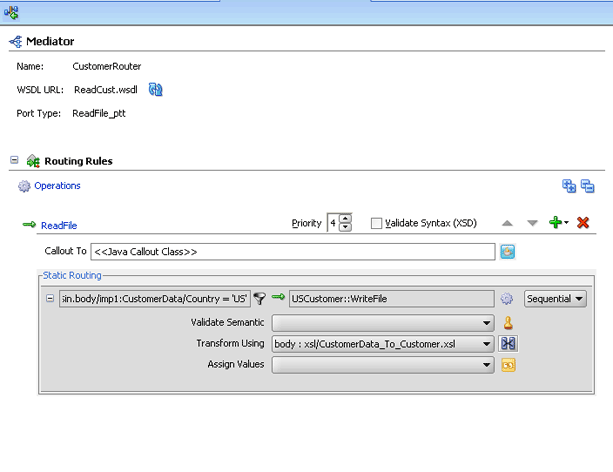
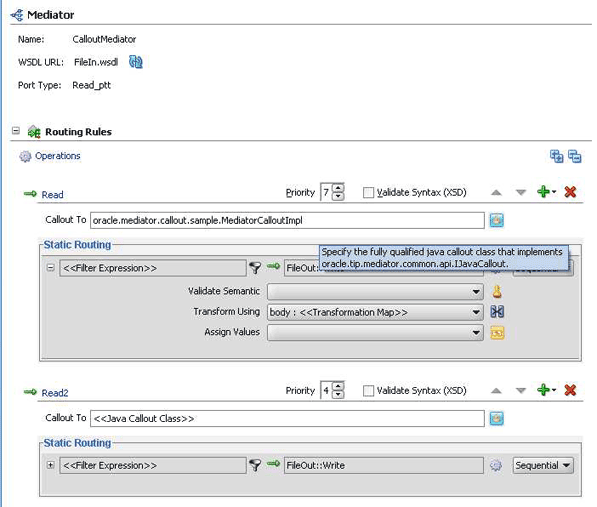
Java callouts enable you to use external Java classes to manipulate messages flowing through the Mediator. Only one Java callout is supported per operation or event subscription. The callout class must implement the oracle.tip.mediator.common.api.IjavaCallout interface. Callouts are available for both static and dynamic routings. Figure 20-37 shows a sample Mediator with two operations, in which both the operations have one routing rule each and the first operation has a callout class.
Figure 20-37 Sample Mediator Supporting Java Callout
Description of "Figure 20-37 Sample Mediator Supporting Java Callout"
20.3.2.19.1 To make Java callout classes available:
You must ensure that the Java callout class is available on the server. You can use any of the following methods for this:
-
Copy the Java class to the
SCA-INF/classesfolder. -
Copy the JAR file containing the Java class to the
SCA-INF/libfolder. -
If you want to share custom classes across multiple mediator projects:
-
Copy the custom JARs to
<SOA_HOME>/soa/modules/oracle.soa.ext_11.1.1directory. -
Run ANT.
-
Restart SOA Server.
Alternatively, you can also do the following:
-
Add the path of the JAR to manifest of
<SOA_HOME>/soa/modules/oracle.soa.ext_11.1.1/oracle.soa.ext.jar. -
Restart SOA Server.
-
For steps you need to update oracle.soa.ext.jar, see the soa/modules/oracle.soa.ext_11.1.1/readme.txt file.
For instructions about adding custom classes and JAR files, see Adding Custom Classes and JAR Files.
20.3.2.19.2 To enter the Java class for the callout:
You can either manually enter the Java class or select a class from the Class Browser.
-
To manually enter the name of the Java callout class, start typing the class name in the Callout To field, as shown in Figure 20-38. The auto-completion feature of Oracle JDeveloper completes the address and the classes in the current project.
-
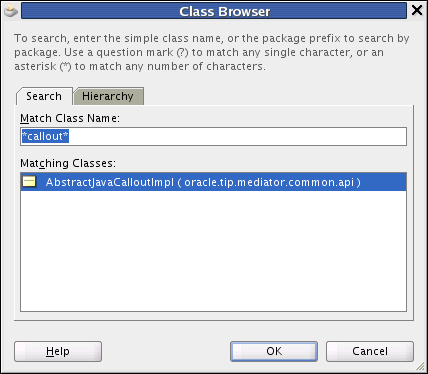
To select from a list of available classes, click the Select Java Callout Class icon.
The standard Oracle JDeveloper class browser appears, as shown in Figure 20-39.
The class browser is filtered so it only displays classes that implement the
oracle.tip.mediator.common.api.IjavaCalloutinterface.
20.3.2.19.3 To set the payload root element (when using a filter expression):
If you have a Java callout in Mediator and use a filter expression in the same Mediator, you must set the root element for the payload, as shown in the following example:
changexmldoc = XmlUtils.getXmlDocument(ChangedDoc);
String mykey = "request";
message.addPayload(mykey,changexmldoc.getDocumentElement());
20.3.2.19.4 To enable domain value map and cross reference functions:
To use domain value map functions or cross reference functions in a Java callout, you must add the soa-xpath-exts.jar file to the project and import the necessary Java classes into your code.
-
In the Oracle JDeveloper Projects Explorer, right-click the name of the project containing the Java callout.
-
Select Project Properties.
The Project Properties dialog appears.
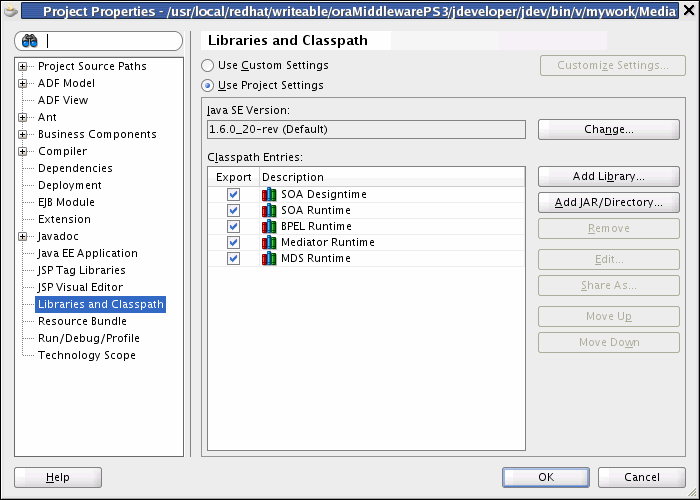
-
In the left panel, select Libraries and Classpath, as shown in Figure 20-40.
Figure 20-40 Libraries and Classes on the Project Properties Dialog
Description of "Figure 20-40 Libraries and Classes on the Project Properties Dialog" -
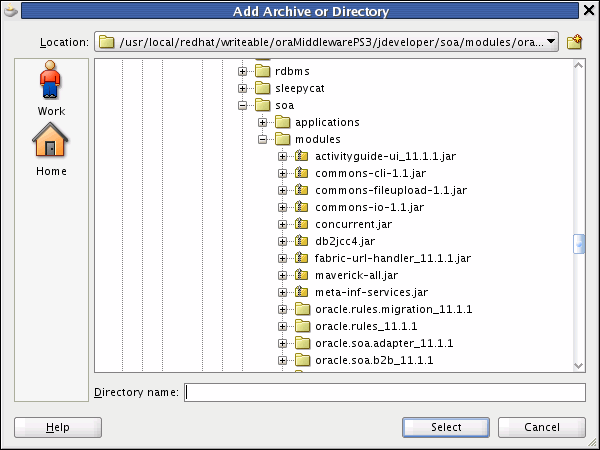
Click Add JAR/Directory.
The Add Archive or Directory dialog appears, as shown in Figure 20-41.
Figure 20-41 Add Archive or Directory Dialog
Description of "Figure 20-41 Add Archive or Directory Dialog" -
In the explorer tree, expand the directories to select
<JDEV_HOME>/jdeveloper/soa/modules/oracle.soa.fabric_11.1.1/soa-xpath-exts.jar, and then click Select.The JAR file appears in the Classpath Entries list.
-
Click OK.
Note:
When using domain value map functions, import the following into your Java class:
-
oracle.tip.dvm.LookupValue -
oracle.tip.dvm.exception.DVMException
When using cross reference (xref) functions, import the following into your Java class:
-
oracle.tip.xref.xpath.XRefXPathFunctions -
oracle.tip.xref.exception.XRefException
20.3.2.19.5 Mediator Java Callout API
The Java callout API defines two interfaces: oracle.tip.mediator.common.api.IjavaCallout and oracle.tip.mediator.common.api.CalloutMediatorMessage.
Table 20-5 lists and describes the methods in the oracle.tip.mediator.common.api.IjavaCallout interface.
Table 20-5 Description of Methods in the IjavaCallout Interface
| Method | Description |
|---|---|
|
|
This method is invoked when the callout implementation class is instantiated for the first time. |
|
|
This method is called before Mediator starts executing the cases. You can customize this method to include validations and enhancements. |
|
|
This method is called before Mediator starts executing any particular case. You can customize this method to include case-specific validations and enhancements. |
|
|
This method is called before Mediator finishes executing callback handling. You can customize this method to perform callback auditing and custom fault tracking. |
|
|
This method is called after Mediator finishes executing the cases. You can customize this method to perform response auditing and custom fault tracking. Post-processing methods are called after all sequential routing rules are executed and do not wait for parallel routing rules to complete. |
|
|
This method is called after Mediator starts executing the cases. You can customize this method to perform response auditing and custom fault tracking. |
|
|
This method is called after Mediator finishes executing callback handling. You can customize this method to perform callback auditing and custom fault tracking. |
Note:
If you change the message properties of a Mediator by using a Java callout in the preRoutingRule method or the preRouting method, then you must explicitly copy the changed property to the outbound message by using Mediator assignment functionality. For example, if you are changing the jca.file.FileName property in a Java callout, then you must update the Mediator assignment statement as follows:
<assign>
<copy target="$out.property.jca.file.FileName"
expression="$in.property.jca.file.FileName"/>
</assign>
Table 20-6 discusses the methods in the CalloutMediatorMessage interface.
Table 20-6 Description of Methods in the CalloutMediatorMessage Interface
| Method | Description |
|---|---|
|
|
This method sets a payload of the Mediator messages. |
|
|
This method adds a property to the Mediator messages. |
|
|
This method adds a header to the Mediator messages. |
|
|
This method retrieves Mediator message properties by providing the property name. |
|
|
This method retrieves Mediator message properties. |
|
|
This method retrieves the instance ID of the Mediator messages. This instance ID is the Mediator instance ID created for that particular message. |
|
|
This method retrieves a payload of the Mediator messages. |
|
|
This method retrieves a header of the Mediator messages. |
|
|
This method retrieves a componentDN for the Mediator service component. |
Note:
-
The
oracle.tip.mediator.common.api.AbstractJavaCalloutImplclass is a dummy implementation of theIJavaCalloutinterface. This class defines all the methods present in theIJavaCalloutinterface. Therefore, you can extend this class to override only a few specific methods of theIJavaCalloutinterface.Dummy implementation of an interface means that the implementation class provides definitions for all the methods declared in the particular interface, but one or more defined methods may have an empty method body. Extending a dummy implementation class is much easier because you can choose to override only a subset of the methods, unlike implementing an interface and defining all the methods.
-
Details of the processing occurring within the Java callout are not displayed in the Mediator audit trail screen.
20.3.2.19.6 Sample Java Callout Class
The following example shows a sample Java callout class:
package qa.as11tests.javacallout;

import com.collaxa.cube.persistence.dto.XmlDocument;

import com.oracle.bpel.client.NormalizedMessage;

import java.util.logging.Logger;
import java.util.Map;
import java.util.Iterator;

import oracle.tip.mediator.common.api.CalloutMediatorMessage;
import oracle.tip.mediator.common.api.ExternalMediatorMessage;
import oracle.tip.mediator.common.api.IJavaCallout;
import oracle.tip.mediator.common.api.MediatorCalloutException;
import oracle.tip.mediator.metadata.CaseType;
import oracle.tip.mediator.utils.XmlUtils;

import oracle.tip.pc.services.functions.ExtFunc;

import oracle.xml.parser.v2.XMLDocument;

import org.w3c.dom.Document;
import org.w3c.dom.Element;
import org.w3c.dom.Node;

public class JavaCalloutSanity implements IJavaCallout {
    Logger logger = Logger.getLogger("Callout");
    public JavaCalloutSanity() {    }

    public void initialize(Logger logger) throws MediatorCalloutException {
        this.logger = logger;
        this.logger.info("Initializing...");
    }
    public boolean preRouting(CalloutMediatorMessage calloutMediatorMessage) {
        System.out.println("Pre routing...");
        String sPayload = "null";
        String sPayload_org = "null";
        for (Iterator msgIt = calloutMediatorMessage.getPayload().entrySet().iterator();
             msgIt.hasNext(); ) {
            Map.Entry msgEntry = (Map.Entry)msgIt.next();
            Object msgKey = msgEntry.getKey();
            Object msgValue = msgEntry.getValue();
            if (msgKey.equals("request"))
                sPayload = XmlUtils.convertDomNodeToString((Node)msgValue);
       }
        sPayload_org = sPayload;
        String tobeReplaced = "CHANGE_THIS";
        String replaceWith = "JAVA_CALLOUT_||_PRE_ROUTING";
        int start = sPayload.indexOf(tobeReplaced);
        StringBuffer sb = new StringBuffer();
        sb.append(sPayload.substring(0, start));
        sb.append(replaceWith);
        sb.append(sPayload.substring(start + tobeReplaced.length()));
        String changedPayload = sb.toString();
        String uid;
        try {
            uid = ExtFunc.generateGuid();
        } catch (Exception e) {
        }
              XMLDocument changedoc;
        try {
            changedoc = XmlUtils.getXmlDocument(changedPayload);
            String mykey = "request";
            calloutMediatorMessage.addPayload(mykey,
                                              changedoc.getDocumentElement());
            //calloutMediatorMessage.getPayload().put(mykey, changedoc);
        } catch (Exception e) {
        }
        System.out.println("Changed from : \n"+sPayload_org+"\nTo\n"+changedPayload);
        System.out.println("End Pre routing...\n\n");
        return false;
    }
    public boolean postRouting(CalloutMediatorMessage calloutMediatorMessage,
                               CalloutMediatorMessage calloutMediatorMessage1,
                               Throwable throwable) throws MediatorCalloutException {
        System.out.println("Start Post routing...");
        String sPayload = "null";
        String sPayload_org = "null";
        for (Iterator msgIt = calloutMediatorMessage1.getPayload().entrySet().iterator();
             msgIt.hasNext(); ) {
            Map.Entry msgEntry = (Map.Entry)msgIt.next();
            Object msgKey = msgEntry.getKey();
            Object msgValue = msgEntry.getValue();
            if(msgKey.equals("reply"))
                sPayload = XmlUtils.convertDomNodeToString((Node)msgValue);
        }

        sPayload_org = sPayload;
        String tobeReplaced = "POST_ROUTING_RULE_REQUEST_REPLY";
        String replaceWith = "POST_ROUTING_RULE_REQUEST_REPLY_||_POSTROUTING_||_JAVA_CALLOUT_WORKING";
        int start = sPayload.indexOf(tobeReplaced);
        StringBuffer sb = new StringBuffer();
        sb.append(sPayload.substring(0, start));
        sb.append(replaceWith);
        sb.append(sPayload.substring(start + tobeReplaced.length()));
        String changedPayload = sb.toString();
        XMLDocument changedoc;
        try {
            changedoc = XmlUtils.getXmlDocument(changedPayload);
            String mykey = "reply";
            calloutMediatorMessage1.addPayload(mykey,changedoc.getDocumentElement());
            // calloutMediatorMessage1.getPayload().put(mykey, changedoc.getDocumentElement());
        } catch (Exception f) {
        }
        System.out.println("Changed from : \n"+sPayload_org+"\nTo\n"+
                changedPayload);
        System.out.println("End Post routing...\n\n");
        return false;
    }
    public boolean preRoutingRule(CaseType caseType,
                                  CalloutMediatorMessage calloutMediatorMessage) {
        System.out.println("\nStart PreRoutingRule.\n");
        String sPayload = "null";
        String sPayload_org = "null";
        for (Iterator msgIt =
             calloutMediatorMessage.getPayload().entrySet().iterator();
             msgIt.hasNext(); ) {

            Map.Entry msgEntry = (Map.Entry)msgIt.next();
            Object msgKey = msgEntry.getKey();
            Object msgValue = msgEntry.getValue();
            if(msgKey.equals("request"))
                sPayload = XmlUtils.convertDomNodeToString((Node)msgValue);
        }
        sPayload_org = sPayload;
        String tobeReplaced = "PRE_ROUTING";
        String replaceWith = "PRE_ROUTING_||_PRE_ROUTING_RULE";
        int start = sPayload.indexOf(tobeReplaced);
        StringBuffer sb = new StringBuffer();
        sb.append(sPayload.substring(0, start));
        sb.append(replaceWith);
        sb.append(sPayload.substring(start + tobeReplaced.length()));
        String changedPayload = sb.toString();
        XMLDocument changedoc;
        try {
            changedoc = XmlUtils.getXmlDocument(changedPayload);
            String mykey = "request";
            calloutMediatorMessage.addPayload(mykey,
                                              changedoc.getDocumentElement());
            // calloutMediatorMessage.getPayload().put(mykey, changedoc);
        } catch (Exception e) {
        }
        System.out.println("Changed from : \n"+sPayload_org+"\nTo\n"+changedPayload);
        System.out.println("End PreRoutingRule.\n\n");
        return true;
    }
    public boolean postRoutingRule(CaseType caseType,
                                   CalloutMediatorMessage calloutMediatorMessage,
                                   CalloutMediatorMessage calloutMediatorMessage1,
                                   Throwable throwable) {
        System.out.println("Start PostRoutingRule.");
        String req_sPayload = "null";
        String req_sPayload_org = "null";
        String rep_sPayload = "null";
        String rep_sPayload_org = "null";
        for (Iterator msgIt =
             calloutMediatorMessage.getPayload().entrySet().iterator();
             msgIt.hasNext(); ) {
            Map.Entry msgEntry = (Map.Entry)msgIt.next();
            Object msgKey = msgEntry.getKey();
            Object msgValue = msgEntry.getValue();
            if(msgKey.equals("request"))
                req_sPayload = XmlUtils.convertDomNodeToString((Node)msgValue);
        }
        req_sPayload_org = req_sPayload;
        String tobeReplaced = "PRE_ROUTING_RULE";
        String replaceWith = "PRE_ROUTING_RULE_||_POST_ROUTING_RULE_REQUEST";
        int start = req_sPayload.indexOf(tobeReplaced);
        StringBuffer sb = new StringBuffer();
        sb.append(req_sPayload.substring(0, start));
        sb.append(replaceWith);
        sb.append(req_sPayload.substring(start + tobeReplaced.length()));
        String changedPayload = sb.toString();
        XMLDocument changedoc;
        try {
            changedoc = XmlUtils.getXmlDocument(changedPayload);
            String mykey = "request";
            calloutMediatorMessage.addPayload(mykey,
                                              changedoc.getDocumentElement());
            // calloutMediatorMessage.getPayload().put(mykey, changedoc);
        } catch (Exception e) {
        }
        for (Iterator msgIt =
             calloutMediatorMessage1.getPayload().entrySet().iterator();
             msgIt.hasNext(); ) {
            Map.Entry msgEntry = (Map.Entry)msgIt.next();
            Object msgKey = msgEntry.getKey();
            Object msgValue = msgEntry.getValue();
            if(msgKey.equals("reply"))
                rep_sPayload = XmlUtils.convertDomNodeToString((Node)msgValue);
        }
        rep_sPayload_org = rep_sPayload;
        tobeReplaced = "PRE_ROUTING_RULE";
        replaceWith = "PRE_ROUTING_RULE_||_POST_ROUTING_RULE_REQUEST_REPLY";
        start = rep_sPayload.indexOf(tobeReplaced);
        sb = new StringBuffer();
        sb.append(rep_sPayload.substring(0, start));
        sb.append(replaceWith);
        sb.append(rep_sPayload.substring(start + tobeReplaced.length()));
        changedPayload = sb.toString();
        try {
            changedoc = XmlUtils.getXmlDocument(changedPayload);
            String mykey = "reply";
            calloutMediatorMessage1.addPayload(mykey,changedoc.getDocumentElement());
            // calloutMediatorMessage1.getPayload().put(mykey, changedoc.getDocumentElement());
        } catch (Exception e) {
        }
        System.out.println("Changed from : \n"+req_sPayload_org+"\nTo\n"+changedPayload);
        System.out.println("End postRoutingRule\n\n");
        return true;
    }
}
20.3.3 How to Create Dynamic Routing Rules
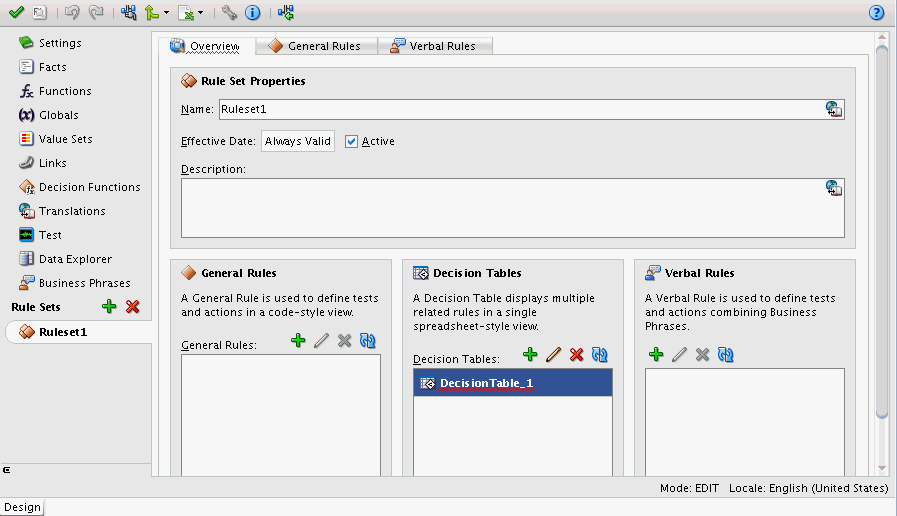
The basic idea behind dynamic routing is to separate the control logic, which determines the path taken by the process, from the execution of the process. Dynamic routing enables you to dynamically route messages at runtime from a mediator to multiple target services, based on the message content. You can use Domain Value Maps (DVMs) or Decision Components (Business Rules) to override static routes at runtime.
20.3.3.1 How to Dynamically Override a Static Routing Rule Using a DVM
You can use a Domain Value Map (DVM) to dynamically override an existing static routing rule. You can create a new DVM, or use an existing DVM to override mediator routing options.
20.3.3.1.1 To override a static route using DVM:
-
Double-click the mediator component to open the Mediator Editor.
-
Under the Routing Rules section, scroll down to the routing rule that you want to modify.
-
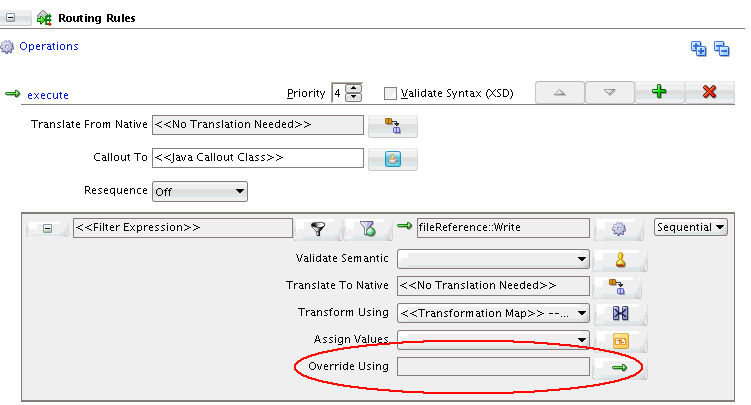
To the right of the Override Using field, click the button, identified by the green arrow. Figure 20-42 shows the Override Using field.
Figure 20-42 Override Using Field Under Routing Rules
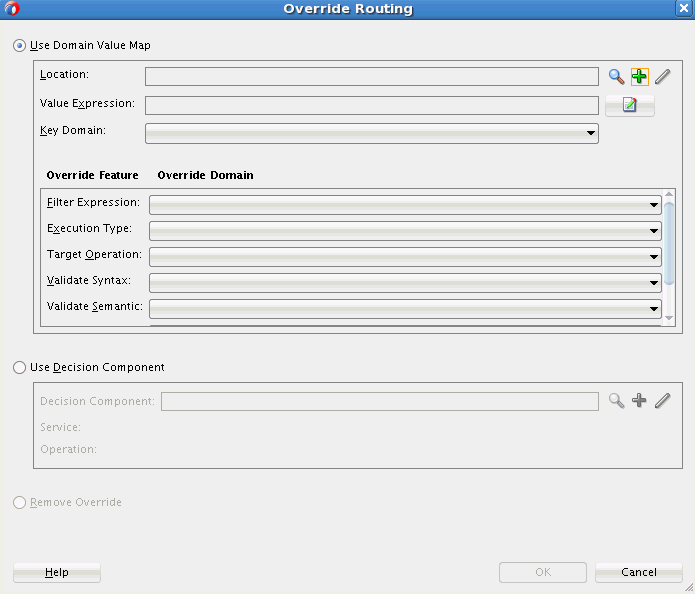
Description of "Figure 20-42 Override Using Field Under Routing Rules"The Override Routing dialog appears.
-
Select Use Domain Value Map to create or use a domain value map. Figure 20-43 shows the Override Routing dialog.
-
To the right of the Location field, click Create new DVM file, identified by the green plus (+) icon, to create a new DVM file. The Create Domain Map Value dialog appears.
Note:
You can also choose an existing DVM file by clicking Find existing DVM file, identified by the Search icon.
-
In the Create Domain Map Value dialog, specify a DVM Name and select a Directory to store the DVM file. Click OK. The DVM File Created dialog appears.
-
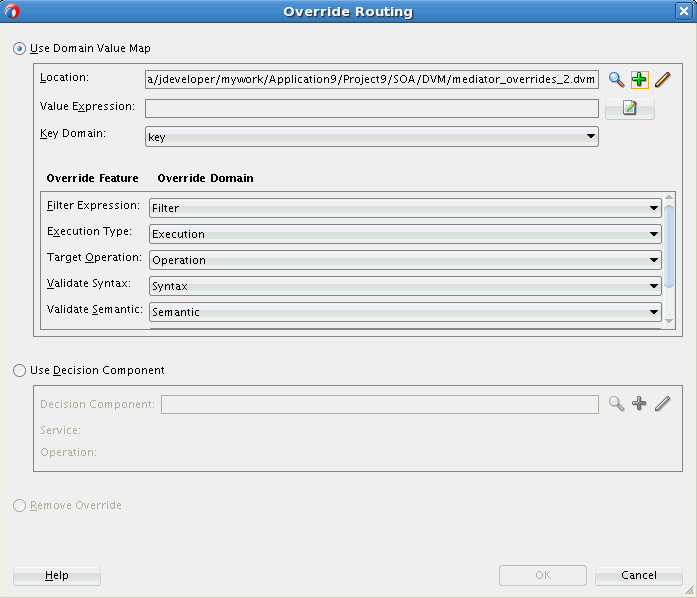
Click OK to confirm. The Override Routing dialog is now populated with the details of the new DVM. shows the Override Routing dialog after creating a new DVM.
A new domain is created for each feature of the mediator that can be overridden. For example, as shown in Figure 20-44, the Filter domain is created for the mediator Filter Expression.
-
Select a Key Domain corresponding to the lookup column for the DVM.
-
To the right of the Value Expression field, click the Invoke Expression Builder icon to specify a value expression corresponding to the key domain. The Expression Builder dialog appears.
-
Build the expression corresponding to the value expression for the domain key, and click OK. You can use the Help button for more information on the Expression Builder.
-
Click OK in the Override Routing dialog.
20.3.3.1.2 To add a new domain to the DVM:
-
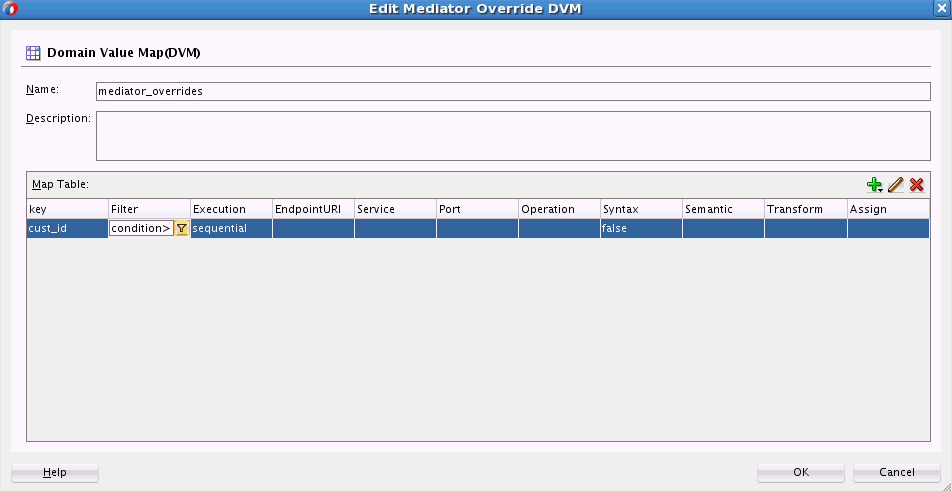
In the Override Routing dialog (Figure 20-44), click the Open DVM file editor icon to the right of the Location field. The Edit Mediator Override DVM dialog appears. Figure 20-46 shows the Edit Mediator Override DVM dialog.
Figure 20-46 Edit Mediator Override DVM Dialog
Description of "Figure 20-46 Edit Mediator Override DVM Dialog" -
If required, edit the Name and Description of the DVM.
-
Under Map Table, click the Add Domain/Values icon identified by the green plus (+) icon. A pop-up menu appears.
-
To add a new domain or column, select Add Domain. The Create Domain dialog appears.
-
Specify a Name for the new domain. Use the Help button for more details on the Create Domain process.
Click OK
20.3.3.1.3 To add a new row to the DVM:
-
In the Override Routing dialog (Figure 20-44), click the Open DVM file editor icon to the right of the Location field. The Edit Mediator Override DVM dialog appears (Figure 20-46).
-
Under Map Table, click the Add Domain/Values icon identified by the green plus (+) icon. Select Add Domain Values from the pop-up menu that appears.
-
You can click each row item to edit it. Alternatively select the row and click the Edit Domain/Values icon to edit the row. The Edit Mediator Override Row dialog appears. Figure 20-47 shows the Edit Mediator Override Row dialog.
Figure 20-47 Edit Mediator Override Row Dialog
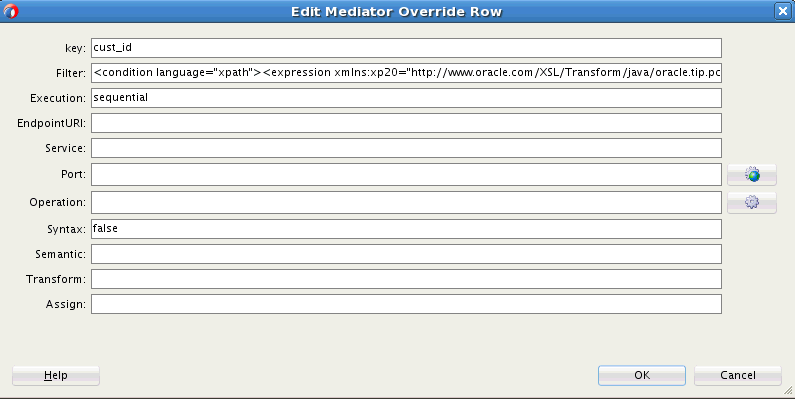
Description of "Figure 20-47 Edit Mediator Override Row Dialog" -
Edit the fields, as desired. The usual mediator tools are available to assist you with the editing. For example, clicking the Transform button next to the Transform domain enables you to create a transformation map. After the edits are complete, click OK.
20.3.3.1.4 To delete a domain from the DVM:
-
In the Override Routing dialog (Figure 20-44), click the Open DVM file editor icon to the right of the Location field. The Edit Mediator Override DVM dialog appears (Figure 20-46).
-
To delete a DVM row, select the row and click the Remove Domain/Values icon.
20.3.3.1.5 To delete a row from the DVM:
-
In the Override Routing dialog (Figure 20-44), click the Open DVM file editor icon to the right of the Location field. The Edit Mediator Override DVM dialog appears (Figure 20-46).
-
To delete a DVM column, select the column and click the Remove Domain/Values icon.
20.3.3.2 How to Dynamically Override a Static Routing Rule Using a Decision Component
You can use a decision component, or business rule, to dynamically override an existing static routing rule. You can create a new decision component, or use an existing decision component to override mediator routing options.
20.3.3.2.1 To override a static route using a Decision Component:
-
Double-click the mediator component to open the Mediator Editor.
-
Under the Routing Rules section, scroll down to the routing rule that you want to modify.
-
To the right of the Override Using field, click the button, identified by the green arrow. Figure 20-48 shows the Override Using field.
Figure 20-48 Override Using Field Under Routing Rules

Description of "Figure 20-48 Override Using Field Under Routing Rules"The Override Routing dialog appears.
-
Select Use Decision Component to create or use a decision component.
-
To the right of the Decision Component field, click Create Decision Service, identified by the green plus (+) icon, to create a new decision service component. The Create Decision Service dialog appears.
Note:
You can also choose an existing decision service component file by clicking Find existing decision service component, identified by the Search icon.
-
Specify a Component Name for the decision component and a Service Name for the service. Click OK. The new decision service component is created, and you are returned to the Override Routing dialog. The dialog now contains the details for the decision service component.
This creates a new business rule service component that is wired to the Mediator service component within the SOA composite of the Mediator service component.
If you look at the design view of the composite, you can see a business rule component wired to the mediator in addition to the static reference wiring. Figure 20-49 shows the design view for a sample composite.
Figure 20-49 Mediator Connected to a Business Rule Component

Description of "Figure 20-49 Mediator Connected to a Business Rule Component"The business rule service component includes a rule dictionary. The rule dictionary is a metadata container for the rule engine artifacts, such as fact types, rulesets, rules, decision tables and so on. As part of creating the business rule service component, the rule dictionary is preinitialized with the following data.
-
Fact Type Model
The fact type model is the data model that can be used for modeling rules. The rule dictionary is populated with a fact type model that corresponds to the input of a phase activity in a BPEL process, and some fixed data model that is required as part of the contract between the Mediator service component and the business rule service component.
-
Ruleset
A ruleset is a container of rules used as a kind of grouping mechanism for rules. A ruleset can be exposed as a service. As part of creating the business rule service component, one ruleset is created within the rule dictionary.
-
Decision Table (or matrix)
From a rule engine perspective, a decision table is a collection of rules with the same fact type model elements in the condition and action part of the rules. The decision table enables you to visualize rules in a tabular format. As part of creating the business rule service component, a new decision table is created within the ruleset.
-
Decision Service
As part of creating the business rule service component, a decision service is created to expose the ruleset as a service of the business rule service component. The service interface is used by the Mediator service component to evaluate the decision table.
-
20.3.3.2.2 To edit a decision component:
-
In the Override Routing dialog (Figure 20-44), click the Open Decision Component Editor icon to the right of the Decision Component field. The Decision Component Editor appears, as shown in Figure 20-50.
-
Under Decision Tables, select the decision table and click Edit to edit the decision table.
See Getting Started with Oracle Business Rules for more information on working with decision tables and business rules.
20.3.4 What You May Need to Know About Using Dynamic Routing Rules
Note the following limitations on using dynamic routing rules with Mediator:
-
All possible message patterns are supported (Synchronous, Asynchronous, Synchronous-Asynchronous, and One-Way).
-
Event publishers and echo cannot have dynamic routing rules associated with them.
-
Static rule overrides are applicable only for requests, and not for responses. If you must override a response, you must route it to another mediator and override it as a request.
-
When overriding a target port, the overriding port must be of the same port type.
20.3.5 How to Define Default Routing Rules
Mediator processes messages depending on the conditions specified in the routing rules. In some cases, a Mediator may not process an incoming message because the message does not satisfy any of the conditions specified in the routing rules. You can define a default routing rule for such messages. The default routing rule is executed when none of the conditions of other routing rules are satisfied.
A default routing rule is the same as the routing rules discussed in How to Create Static Routing Rules. The only difference between a default routing rule and other routing rules is that a default routing rule does not have any condition associated with it. Otherwise, a default routing rule is the same as other routing rules in every other aspect, such as target service, response handling, fault handling, and so on.
Note:
-
Default rules are available only for static routing rules.
-
You cannot specify a default routing rule for a Mediator service component with dynamic routing rules because you cannot define both static and dynamic routing rules in the same Mediator service component.
20.3.5.1 Default Rule Scenarios
A default routing rule can be either a sequential rule or a parallel rule. A default routing rule, whether sequential or parallel, is guaranteed to be executed when no other routing rule condition is satisfied. When the default rule is executed, the Mediator audit trail shows that the filter conditions of all the routing rules failed, and the filter condition of the default routing rule passed and was executed. The following example provides details:
ActivityJan 7, 2010 4:35:15 PM
Message onCase "fileout2.Write"
Jan 7, 2010 4:35:15 PM
Message Evaluation of xpath condition " No Filter (DEFAULT CASE) " resulted
true
You can define all routing rules, including default routing rules, as either sequential or parallel routing rules, so the expected behavior of routing rules varies. The following sections discuss each combination and the expected behavior:
Sequential Default Routing Rule
You can have the following possible scenarios with a sequential default routing rule:
-
All the other routing rules of the Mediator are sequential: This is the simplest case in which all the routing rules, including the default routing rule, are of a sequential type. Runtime evaluates the filter conditions of all routing rules and, if none of the filter conditions are matched, then the default sequential routing rule is executed. Default sequential routing rule execution happens in the same transaction as the incoming message. After the default rule is executed, a post Java callout occurs.
-
At Least One of the Routing Rules of the Mediator are parallel: This is a complex case in which the default routing rule is sequential and at least one of the other routing rules is parallel. The default behavior at runtime is to execute all sequential routing rules first and then execute parallel routing rules. Therefore, this is a tricky situation because a default rule should be executed only after all other routing rules are evaluated to be false.
In this case, the server first evaluates the filter condition of parallel rules before evaluating the default routing rule filter condition. If none of the other filter conditions are matched, then the default sequential routing rule is executed.
Parallel Default Routing Rule
You can have the following possible scenarios with a parallel default routing rule:
-
All the other routing rules of the Mediator are parallel: This is a straightforward case. The default routing rule is not executed if any of the filter conditions specified in the other routing rules are matched. If none of the filter conditions are matched, then the default routing rule is executed asynchronously.
-
Other Routing Rules of the Mediator are sequential or parallel: This is a complex but common use case in which there are other sequential or parallel routing rules available, and the default routing rule is parallel. The default routing rule is not executed if any of the other sequential or parallel routing rule criteria is matched. If none of the conditions are matched, then the default routing rule is executed asynchronously.
Note:
The fact that the default routing rule is executed automatically implies that the default routing rule is the only case that was executed for the given Mediator service component. Similarly, if a Mediator service component has one routing rule without any filter condition and also has a default routing rule, then the default routing rule is never executed.
20.3.5.2 Default Rule Target
The target of the default routing rule is the same as the supported targets of any other existing routing rule. This indicates that the target can be a service, an event, or an echo. Similarly, the response from the default routing rule target service can be forwarded or returned to the original caller. If the target service returns a fault, then the fault is handled in the same way as it is handled in any other routing rule.
Note:
If exceptions occur while evaluating or executing other routing rules, then the default routing rule is not executed.
20.3.5.3 Default Rule: Validation, Transformation, and Assign Functionality
Schematron validation, transformation, and assign functionality for the default routing rule works in the same way as other routing rules.
20.3.5.4 Default Rule: Java Callouts
The current behavior of a pre-Java callout or post-Java callout works in the same way as for other routing rules. For Java callouts, the default routing rule is considered another routing rule. Therefore, for the scenarios in which the default routing rule is executed, the postRouting() callback method occurs only after the default routing rule is executed.
Note:
The post-Java callouts occur after the execution of sequential rules and do not wait for the parallel rules to complete execution. Therefore, if the default routing rule is sequential, then the postRouting() callback method occurs after executing the default routing rule. If the default routing rule is parallel, then the postRouting() callback occurs after all sequential rules are executed and does not wait for the execution of the parallel default routing rule.
20.3.5.5 Default Rule: Mediator .mplan File
To set a routing rule as the default one, click the Set as Default Routing Rule icon shown on Figure 20-2. The .mplan file changes, as shown in Figure 20-51.
Figure 20-51 .mplan File of a Mediator with a Default Routing Rule
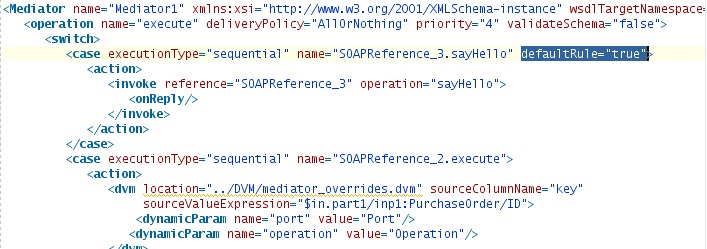
Description of "Figure 20-51 .mplan File of a Mediator with a Default Routing Rule"
