28 Configuring Dynamic Converter

This chapter describes how to set the Dynamic Converter default template, conversion formats, slideshow template files, and how to remove wireless templates.

This chapter covers the following topics:

28.1 Before Using Dynamic Converter

Before you begin using Dynamic Converter to design templates for your content items, the following must be in place:

  • Content items checked into Oracle WebCenter Content Server. For information on how to check in content, see Using Oracle WebCenter Content.

  • Dynamic Converter templates checked into Content Server with the correct template type. For more information, see Managing Conversion Templates.

  • Template selection rules added, with associated metadata and templates. For more information, see Managing Template Rules.

  • Conversion formats and other pertinent information specified on the Dynamic Converter Configuration page.

28.2 Setting the Default Template

A default template is applied to content items that do not match your defined template criteria. To change the default template associated with your content items:

  1. Open the Dynamic Converter Admin page.
  2. Click Configuration Settings.
  3. On the Dynamic Converter Configuration page, in the Template text box under the Default Template heading, enter the content ID for a template. You can select the type of template from the Template Types menu and then choose your template from the Available Templates menu.
  4. In the Layout text box, under the Default Layout heading, enter the content ID for a layout template. You can also choose your layout template from the Available Layouts menu. (Layouts only apply for the Classic HTML Conversion templates.)
  5. Click Update at the bottom of the Dynamic Converter Configuration page to enable your default templates.

28.3 Setting Up Conversion Formats

The file format (MS Word, RTF, plain text, etc.) of your content items must be included in the conversion formats list in order for Dynamic Converter to recognize and convert the content item. Only file formats included in this list will have an (HTML) link beside them on the search results page, content information page, and so on.

This section covers the following topics:

28.3.1 Adding File Formats For Dynamic Conversion

You can add one or more file formats on the Dynamic Converter Configuration page at any time. To add a new file format:

  1. Open the Dynamic Converter Admin page.
  2. Click Configuration Settings.
  3. On the Dynamic Converter Configuration page, under the Conversion Formats heading, in the formats text box, type the file format that you would like converted into a web page (or select it from the menu to the right). Formats in the text box must be separated by a comma and a space, for example:
    application/msword, application/vnd.ms-excel
    

    File formats must follow the naming convention in Content Server's Configuration Manager. For example, Microsoft Word documents are entered as application/doc or application/msword.

    Note that with Office 2007 files (for example, docx, xlsx, and pptx), you must enable the following formats on the DC Configuration page to see the (HTML) link:

    application/vnd.openxmlformats-officedocument.presentationml.presentation
    application/vnd.openxmlformats-officedocument.presentationml.slide
    application/vnd.openxmlformats-officedocument.presentationml.slideshow
    application/vnd.openxmlformats-officedocument.presentationml.template
    application/vnd.openxmlformats-officedocument.spreadsheetml.sheet
    application/vnd.openxmlformats-officedocument.spreadsheetml.template
    application/vnd.openxmlformats-officedocument.wordprocessingml.document
    application/vnd.openxmlformats-officedocument.wordprocessingml.template
    

    For more information on file format naming conventions, see the Content Server administration documentation.

  4. Click Update to add your file formats to Dynamic Converter.

28.3.2 Removing File Formats From Dynamic Conversion

You can remove file formats on the Dynamic Converter Configuration page at any time. To remove a file format (you cannot undo this operation):

  1. Open the Dynamic Converter Admin page.
  2. Click Configuration Settings.
  3. On the Dynamic Converter Configuration page, under the Conversion Formats heading, in the formats text box, select the file format that you would like to remove.
  4. Press the Delete key on your keyboard to remove the file format from the text box. Be sure that you only remove the format that you wish to eliminate, and not all the formats listed in the box.
  5. Click Update to remove the file format from Dynamic Converter.

    Note:

    If you accidentally delete the wrong file format, add it again, and then click Update.

28.4 Configuring Slideshow Template Files for PowerPoint Presentations

If you intend to use Dynamic Converter templates to convert PowerPoint presentations, it is recommended that you use an HTML Conversion template. You will be able to customize your template by navigating to Document Formatting then the Presentations tab in the template editor.

If you use a Classic HTML Conversion template, you should use the "slideshow" hcst files available for download from Oracle Technology Network at http://www.oracle.com/technetwork/indexes/samplecode/. After downloading, check the samples into Content Server. You need to check in all three of the slideshow files (slideshow.hcst, slideshowb.hcst, and slideshowc.hcst). A sample PowerPoint file (dc_powerpoint.ppt) is also available for download.

If you have Dynamic Converter configured in such a way that it automatically assigns content IDs upon file check-in, you need to edit each slideshow template file to reflect this. Each file must then be checked in again before you can begin using the templates.

To configure the slideshow template files for conversion of PowerPoint presentations:

  1. Check all three slideshow files (slideshow.hcst, slideshowb.hcst, and slideshowc.hcst) into the Content Server. Make sure that you check them in as script templates. For more information, see Checking In a Template.

    To ensure the files are checked into the correct Web Layout directory, make sure that you use the same content type, security group, and account (if applicable) for all three files.

    If the content IDs are generated automatically, locate and note the automatically generated content ID of each slideshow file.

    If the content IDs are not generated automatically, it is recommended that you use something like "DC-Slideshow," "DC-SlideshowB," and "DC‐SlideshowC."

  2. Access the downloaded slideshow sample files.
  3. Open each of the slideshow hcst files in a text editor, such as WordPad or vi, and then search for and replace the following slideshow references with the appropriate content IDs:

    Note:

    Be sure to save your changes before closing each file.

    • slideshow.hcst:

      Search for: slideshowbtemplate

      Replace with: the content ID of the checked-in slideshowb.hcst template. For example, 1002 or DC‐SlideshowB.

    • slideshowb.hcst:

      Search for: slideshowctemplate

      Replace with: the content ID of the checked-in slideshowc.hcst template. For example, 1003 or DC‐SlideshowC.

    • slideshowc.hcst:

      Search for: slideshowbtemplate

      Replace with: the content ID of the checked-in slideshowb.hcst template. For example, 1002 or DC‐SlideshowB.

      Make absolutely sure that you retain the file extension, so something like:

      {## link element=sections.current.bodyorimage template=slideshowbtemplate.hcst}.
      

      If you do not, the application may throw an exception during the HTML conversion.

      On UNIX systems, the content ID is case-sensitive, so dc-slideshow is not the same as DC-Slideshow or DC-SLIDESHOW.

  4. Search for the slideshow files in the Content Server and click the Info link on the search results page.

    The content information page is displayed.

  5. Click Check out.
  6. Click Check In on the check-out confirmation page.
  7. Browse to the modified slideshow files and click Check In on the content check-in form.
  8. Repeat steps 4 to 7 for the each of the slideshow files.

You can now set up the conversion format for PowerPoint presentations (see Setting Up Conversion Formats) and assign the checked-in templates to a template rule (see Managing Template Rules).

28.5 Removing Wireless Templates

Dynamic Converter 12.2.1 does not support the wireless template type, but still provides wireless support based on the Classic HTML Conversion templates. An existing Content Server with an earlier version of Dynamic Converter may still have the wireless template type, but attempting to use it will cause failure.

To remove the wireless template from the list of available templates:
  1. Open a new browser window and log into WebCenter Content as a system administrator.
  2. Open the Admin Applets page.
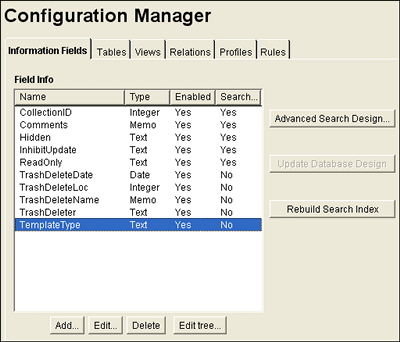
  3. Under the Administration Applets section, click Configuration Manager.

    Figure 28-1 Configuration Manager Window

    The configuration manager Information Fields tab
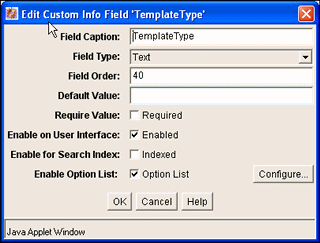
  4. On the Configuration Manager window, on the Information Fields tab, choose the TemplateType row and click Edit.

    Figure 28-2 Edit TemplateType Dialog

    The Edit Template Type dialog
  5. In the editing dialog for the TemplateType field, click Configure.
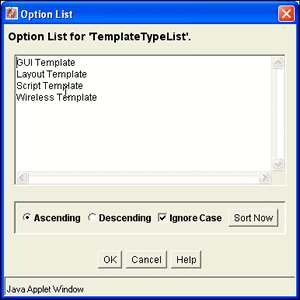
  6. In the Configure Option List window, click Edit.

    Figure 28-3 Option List for TemplateType

    The Option List dialog
  7. In the Option List window, highlight Wireless Template and press the Delete key to remove the Wireless Template as an option.
  8. Click OK three times to return to the Configuration Manager window.
  9. From the menu bar, choose Options.
  10. Choose Publish Schema.

    Your changes are propagated to the Content Server.

  11. Exit the Configuration Manager application and wait a few minutes. Then revisit the template check-in form.