10 Viewing and Annotating Documents
This chapter has the following sections:
10.1 About Viewing and Annotating Documents
Oracle WebCenter Content converts many document formats to versions that are displayed on the Document page within a standard web browser. This means that even if someone does not have the native software that created a document, they can still view and share the document.
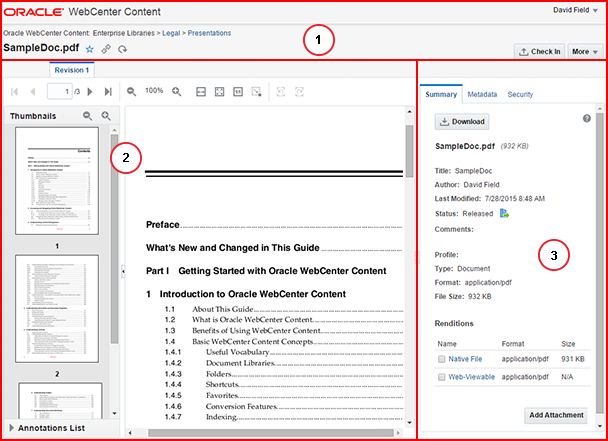
In addition to viewing documents, you can annotate documents and perform a variety of tasks from the Document page, which has the following main sections:
Figure 10-1 Oracle WebCenter Content Document Page

10.1.1 Banner section
In the banner section, you can perform the following tasks:
-
File an unfiled document or view the path to a filed document's location in the context of Oracle WebCenter Content
-
Mark a document as a favorite
-
View links to the document
-
Check in new revisions of documents
-
Access more tasks from the More menu
-
Log out of Oracle WebCenter Content
10.1.2 Preview area
Depending on the document format and how your system is configured, Oracle WebCenter Content converts uploaded documents into formats that are viewable using a standard web browser or document viewer. If your system can display a viewable rendition of the document, it is displayed in the preview area. You can perform the following tasks using the toolbar in the preview area:
-
Going to specific pages
-
Zooming the page view
-
Adjusting the document width
-
Rotating the document
-
Viewing/hiding, filtering, and adding annotations.
Note:
If a particular document format (for example, .indd or .indt) cannot be converted to a web-viewable version, a blank page is displayed in the preview area.10.1.3 Properties section
The properties section displays a summary of document properties with the option to display all properties, including security metadata. From the document properties area you can do these tasks:
-
Download a copy of the native file
-
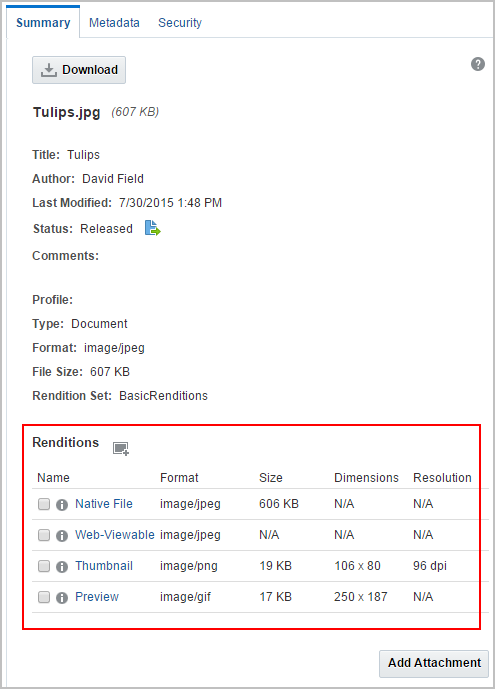
View or download any generated rendition
-
Download annotated versions of the document if the document has annotations.
-
Add attachments to the document
-
View and edit metadata and security properties
-
View workflow details of documents in a workflow and check in, approve, or reject items assigned to you.
10.2 Viewing Documents on the Document Page
Documents can be accessed from the Find Documents page and viewed on the View Documents page. How to access the documents depends on if the results list is set to display as List, Thumbnail, or Tabular:
-
If set to List or thumbnail, click either the thumbnail or document name to view the document
-
If set to Tabular, click the View icon or document name to view the document
10.3 Changing the Document View
The View Documents page toolbar allows you to change how a document is displayed in the preview area. Using the toolbar, you can:
- Navigate multipage documents
- Increase or decrease the display size of the document
- Rotate the document page displayed in the viewer
- View/hide, filter, and add annotations (If you do not have annotation privileges, the annotation related options do not appear in the toolbar.)
Additionally, the side pane of the preview area can expand to display thumbnail images of each page of the document and the annotations list. Click a page in the thumbnail pane to go to that page.
Figure 10-2 Oracle WebCenter Content Document Page Toolbar

10.4 Viewing Alternate Renditions
Alternate renditions are available for most documents when converted to HTML dynamically or when converted to some other web-viewable format at the time a document is uploaded. Dynamic conversions are not available for some native document formats, and also must be converted each time you select it. Web-viewable renditions are typically available for a wide range of native document formats and are converted once when a document is uploaded.
Dynamic conversions of documents can be viewed in a standard web browser outside of the View Documents page by:
-
Selecting Launch Dynamic Conversion from a contextual menu. To access the contextual menu, right-click a document in a results list.
-
Clicking Dynamic Conversion under the Renditions area in the Properties section of a View Documents page.
Web-viewable renditions of documents can be viewed in a standard web browser outside of the Document page by:
-
Selecting Launch Web Rendition from the list toolbar menu. To access the list toolbar menu, select a document in a results list.
-
Clicking Web-Viewable under the Renditions area in the Properties section of a View Documents page.

10.4.1 How do I view and work with digital asset renditions?
Some digital assets such as images and videos may be set to have additional renditions created automatically. Select a digital asset rendition to display a tool bar next to the rendition title that allows you to download a rendition, copy a rendition to the rendition clipboard, get links to a rendition, or delete the rendition if you have rights to do so.
10.4.2 How do I use the renditions clipboard?
What is on the renditions clipboard?
Renditions of files that you put here. These are one or more of the following:
-
The native file. This is the one that you or someone else first uploaded to the server.
-
The web-viewable rendition. This is nearly always created when you first upload the native file to the server.
-
Other renditions of this file that may have been created, usually by a process set up by the system administrator.
How did these renditions get onto this clipboard?
You added a rendition to the clipboard by selecting an item in a search result list and choosing the Add to Rendition Clipboard option. Or you did so using the rendition tool bar on the View Documents Summary tab.
What can I do with the renditions on the clipboard?
-
View a native file on a page within WebCenter Content: Click the item's thumbnail image, or select Open in New Tab from the context menu of the Native File link.
-
View the web-viewable file in a web browser: Click the Web-Viewable link or select Open in New Tab from its context menu.
-
View other renditions in their associated application: Click the rendition's link [or select Open from its context menu].
-
Download the renditions: Check the boxes for the renditions you want to download, then click the Download Renditions icon. Files are downloaded as a zip file through the Save As dialog.
-
Get links to renditions: Check the boxes for the renditions you want to get links to, then select the Get Link to Renditions icon. The links are listed in a pop-up box. You can copy and paste the links from here yourself, or you can use the special feature to send them in an email.
You can also remove a rendition from the clipboard by checking its box and selecting the Remove Renditions from Clipboard icon, or you can empty the clipboard of all renditions by clicking Empty.
10.5 Viewing the Native File
If you have the software to open a native version of a document, you can download a copy and view it using the native software by clicking Native File in the Renditions area on the Summary tab of a View Documents page. See Checking Out and Downloading Documents for information on downloading a document.
10.6 Viewing Previous Document Revisions
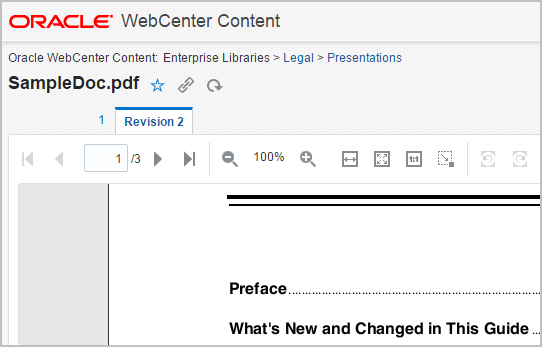
The preview area of the View Documents page provides access to all previous revisions of a document. Revision numbers are listed above the View Documents page toolbar. Clicking a revision number displays that revision of the document in the preview area and the metadata of that revision in the document properties section.
Figure 10-3 Revision Tabs in Document View

10.7 Annotating Documents
Provided you have the permissions to do so, you can add or modify annotations to documents. Among other things, documents can be stamped Approved, have a particular text highlighted, or have a note addressing a specific issue added.
10.7.1 About annotation security
In some cases, not all annotations should be seen or allowed to be modified by all people. For example, upper management may annotate a request for proposal with pertinent information regarding an upcoming merger. Legally they may not be able to share that information with others in an organization who need access to that proposal, so the annotation permission is set to hide the annotation from those without proper permissions. Or perhaps a manager annotates a raise request denying the raise. The annotation can be restricted so the person who made the request can not approve it by modifying the annotation. Or a document may contain personal information such as Social Security numbers or health issues that need to be redacted and protected. Redaction annotation can be set to restricted to prevent others from hiding or modifying them to see the information.
-
Standard (S): Annotations appear on the document page for all users. They may be applied and changed only by users granted Standard annotation security permissions.
-
Restricted (T): Annotations are visible to all users but can be modified only by a user granted the restricted permission. If you do not have the restricted permission (permission to change restricted documents), you can view the annotation but cannot alter it or change the permissions.
-
Hidden (H): Annotations are visible only to users that have been granted the hidden permission. Only users having the hidden permission can mark an annotation as hidden or modify existing hidden annotations.
Note:
If no annotation security is assigned to a person, they cannot create new or modify existing annotations. However, they still can view all Standard and Restricted annotations. This ensures that redaction annotations are applied for all people with rights to view a document.Users must be granted the security level they assign to an annotation. For example, users assigned only the restricted security level can grant only the restricted security level to any annotation they create. Users that have been assigned the standard and restricted security levels by an administrator can specify a security level of standard or restricted, but not hidden.
Note:
Redaction annotations cannot be marked hidden.10.7.2 How do I view and hide annotations?
Note:
A change in viewer technology starting with Imaging version 11.1.1.6.0 may cause stamp, sticky note, or text annotations created in earlier Imaging versions to be resized when first opened in the 11.1.1.6.0 version of the viewer. Redactions, line, and highlight annotations should not be affected. The change in size is caused by the ability of the new viewer to size annotations based on the resolution (in dots per inch) of the document image.
In some cases when viewing a document, annotations may get in the way of seeing information on the document you need to see. Click the Hide Annotations icon in the Document Page toolbar to hide annotations on a document. Alternatively, click the Show Annotations icon to view all annotations on a document.
10.7.3 How do I create annotations?
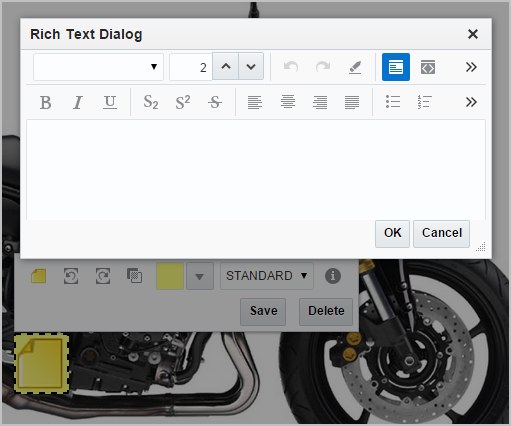
Select the type of annotation you want to create from the annotation toolbar. After you select, click on the document to create annotations such as Text, Sticky Note or Stamp, or drag the mouse cursor over the document to create other annotation types. An editing toolbar appears as soon as you create an annotation. Typical options on the editing toolbar include rotating the annotation, changing annotation color, and setting annotation permissions. Additional options are determined by the type of annotation. For example, the stamp annotation tool lets you choose from several stamps, and the note annotation toolbar lets you open a rich text editor.
Figure 10-4 Note Annotation with Annotation Toolbar and Rich Text Editor Displayed

After you have finished creating an annotation, save it using the Save button on the editing toolbar. Navigating away from a viewed document without saving changes may cause changes to be lost.
The following table lists and describes the types of annotations available.
Table 10-1
| Annotation Style | Icon | Description |
|---|---|---|
|
Text |
|
Select then click on document to display the editing toolbar. Enter the content in the description field of the toolbar. |
|
Highlight |
|
Select then drag on the current page to highlight a portion of the current page. Opacity and color are controlled by the accompanying toolbar. |
|
Sticky Note |
|
Select then click on the current page to display the editing toolbar. Click the Edit Note icon in the accompanying toolbar to open the rich text dialog. |
|
Redaction |
|
Select then drag on the current page to cover a portion of the current page. Redaction annotations are placed based on coordinates and may shift with inconsistent use of fonts. If your redaction annotation has shifted, talk to your system administrator about ensuring that a consistent set of fonts is used across the server and clients. |
|
Box |
|
Select then drag on the current page to enclose a portion of the page in a box. The box color and border are controlled by the accompanying toolbar. |
|
Stamp |
|
Select then click the current page to add a predefined watermark annotation to the page. There are four default stamp options:
The stamp message, size, orientation, and opacity is controlled by the accompanying toolbar. |
|
Line |
|
Select then drag on the current page to add a line notation for underlining or striking through a word or image on the current page. Color, line width, and inclusion of arrowheads are controlled by the accompanying toolbar. |
How do I create annotations using the keyboard?
To create an annotation using the keyboard:
-
Use the Tab key to navigate through screen controls and focus on the Annotation Edit Mode menu button (
 ) in the Document Page toolbar.
-
Press the Down key to view the annotations menu.
-
Use the Up and Down keys to focus on an annotation type in the menu.
-
Press Shift+Enter to create the annotation at the default location on the document.
Along with the annotation, the annotation toolbar (in the keyboard mode) appears.Tip:
You can Tab through to Edit Mode Selector button ( ) in the Document Page toolbar and press Shift+Enter to create a text annotation without using the annotations menu.
-
Use the controls in the toolbar to edit the annotation. Use the Tab key to navigate through and focus on controls in the toolbar. Use the Up and Down keys to alter values. Use the Enter key to make a selection.
Note:
The size and position controls (Left, Top, Width, and Height) are available in the annotation toolbar only when you use the keyboard to create or modify an annotation.
10.7.4 How do I modify annotations?
After you create an annotation, you can modify aspects of the annotation using the same toolbar that you used to create the annotation. To display the toolbar, click the annotation and select the Edit (![]() ) button that appears on the annotation. Use the toolbar to modify the annotation in variety of ways, including:
) button that appears on the annotation. Use the toolbar to modify the annotation in variety of ways, including:
-
Change the text in a text annotation by editing the description field in the annotation toolbar.
-
Change the text in a note annotation by clicking the Edit Note icon in the annotation toolbar to display the rich text editor.
-
Cut, copy, paste, reorganize and undo changes to content within a note annotation using the rich text editor.
-
Change an annotation background and border color using the background fill color and border color tools.
-
Change the opacity of a highlight or stamp annotation using the Annotation Opacity Level icon and the slider to fade or darken the annotation.
-
Rotate a stamp annotation.
-
Change permissions to an annotation using the permissions drop-down menu in the annotation toolbar.
-
Move it to a different location on the page by dragging it.
-
Resize it by dragging the edges.
Note:
To modify an annotation, you must have appropriate permissions. See, About annotation security for details.How do I modify annotations using the keyboard?
-
Open the Annotations List in the side pane of the preview area.
-
Use the Tab key to navigate through screen controls and focus on one of the cells of the Annotations List table.
-
Press F2 to get the Annotations List table into actionable mode.
-
Tab through the table listing to focus on a particular annotation and press Shift+Enter.
The associated annotation is made active in the viewer, and the annotation toolbar (in the keyboard mode) appears.
-
Use the controls in the toolbar to modify the annotation. Use the Tab key to navigate through and focus on controls in the toolbar. Use the Up and Down keys to alter values. Use the Enter key to make a selection.
10.7.5 How do I delete annotations?
Select the annotation and click the Edit (![]() ) button that appears on it to open the editing toolbar. Select Delete in the toolbar to delete the annotation.
) button that appears on it to open the editing toolbar. Select Delete in the toolbar to delete the annotation.
10.7.6 How do I download annotated documents?
If the document has annotations, an Annotations section is included in the Summary Properties page. This section lists downloadable versions of the document that have the annotations applied. Click on a particular version to download it.
The annotations you see on the downloaded document will depend on the permissions you have been given by the system administrator.
Note:
If a document has redactions and if you do not have the permission to see the content under redactions, you can download only the annotated version of the document. The options to download the native file and other rendition types are disabled.10.8 Using Links
Links to view a document can be easily shared with others. If a person does not have rights to view a document, it remains secure and is not displayed. Document links can be displayed in these ways:
-
Clicking the Link icon in the View Documents page banner section
-
Selecting Get Links from the More menu in the View Documents page banner area
-
Clicking the Get Links icon in the results list toolbar on the Find Documents page
-
Right-clicking a document in a results list and select Get Link from the contextual menu
Links can also be displayed for folders and libraries.