20 Creating Pagelets: Examples and Advanced Topics
Topics:
Creating a Simple Pagelet (an Example)
This section will give you a basic feel of how you can use Pagelet Producer to proxy a web page. We will proxy a simple static "Hello World" web page, cut one section out of that page, and present it as a pagelet that you can later insert in WebCenter Portal, WebCenter Interaction, on your own application page.
This section includes the following topics:
Configuring the Initial Pagelet Producer Setup
For this example, let's assume that the Pagelet Producer server is running on http://pageletserver.company.com:8889/pagelets/.
-
First, let's check that Pagelet Producer is up and running.
To do that we just need to access its URL (for example,
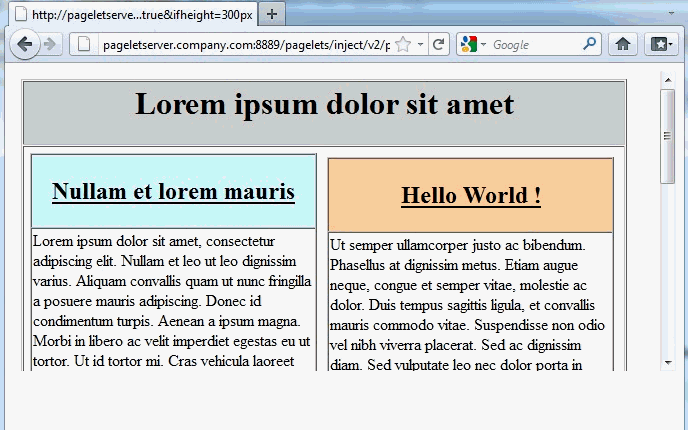
http://pageletserver.company.com:8889/pagelets/). Figure 20-1shows what should be returned: -
Log into the Pagelet Producer administration screens with your administrator credentials:
For example,
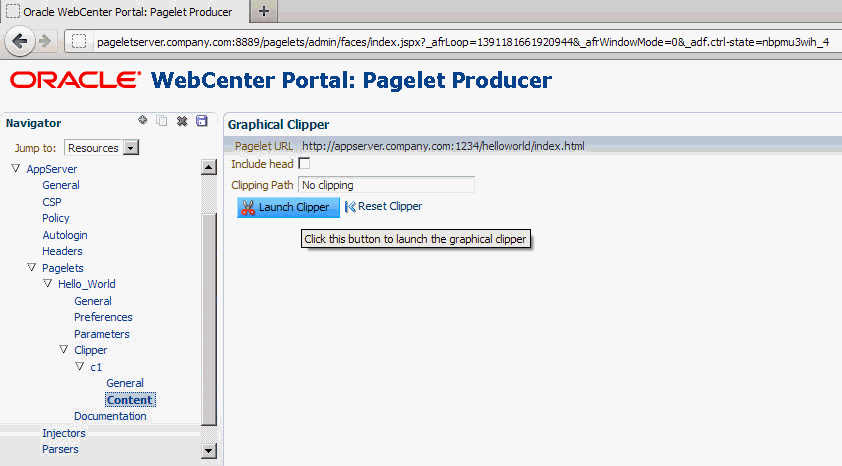
http://pageletserver.company.com:8889/pagelets/adminFigure 20-2 Pagelet Producer Administration Screen
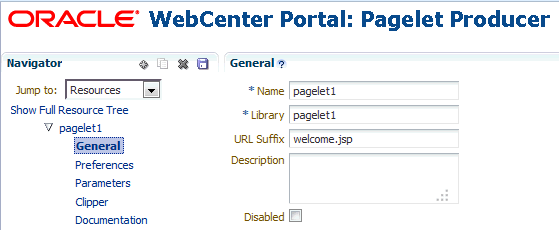
Description of "Figure 20-2 Pagelet Producer Administration Screen" -
If you connect to the internet via a proxy server, you need to configure proxy in the Pagelet Producer settings:
-
In the Navigator pane's Jump To drop down list, select Settings.
-
Click Proxy.
-
Enter your proxy server configuration as shown in Figure 20-3.
Figure 20-3 Pagelet Producer Proxy Settings
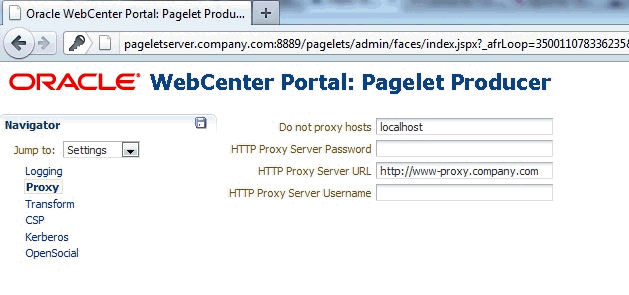
Description of "Figure 20-3 Pagelet Producer Proxy Settings"
-
Creating a Resource
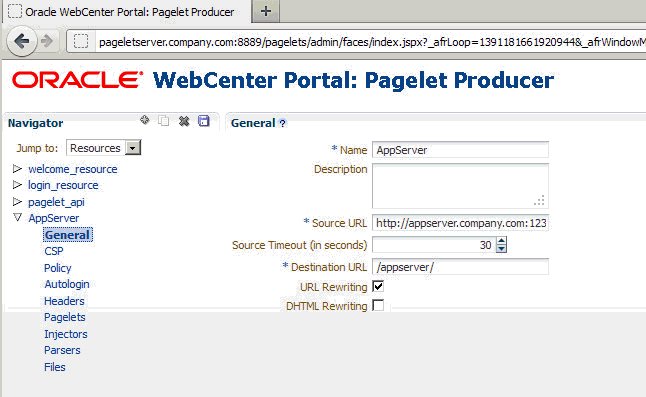
The first thing that you need to do is to create a resource for your web page. This will tell Pagelet Producer that all sub-paths of the web page should be proxied. It also will allow you to set up common rules for how your web page should be proxied and will serve as a container for your pagelets.
Creating a Pagelet
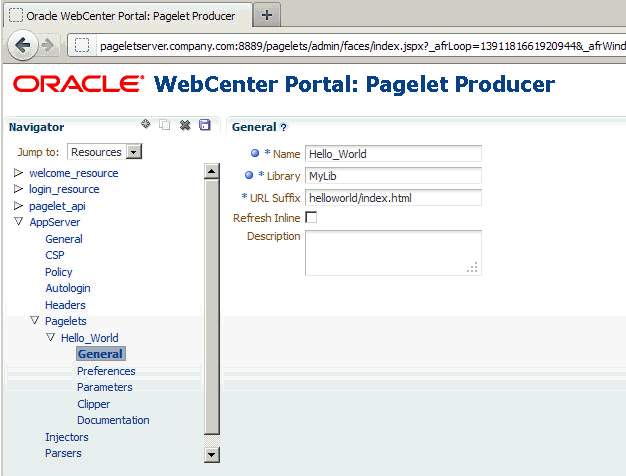
Let's continue by creating our "Hello World" pagelet.
The Library name can be anything you want, it doesn't have to match the resource name at all. It is used as a logical grouping of pagelets, and you can include pagelets from multiple resources into the same library or create a new library for each pagelet.
After you save the pagelet you can access it here:
http://pageletserver.company.com:8889/pagelets/inject/v2/pagelet/MyLib/Hello_World
which is:
http://pageletserver.company.com:8889/pagelets/inject/v2/pagelet/ +[Library] +[Name]
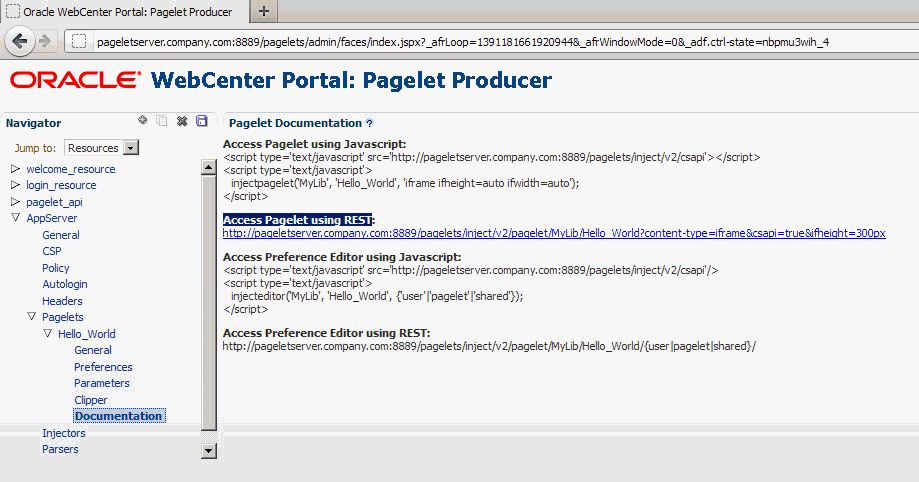
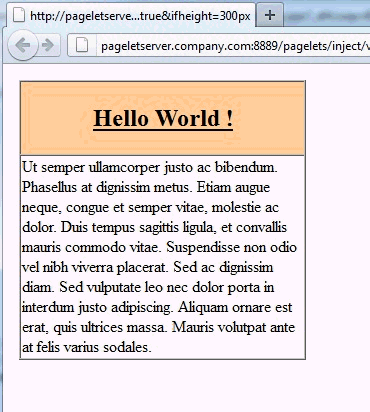
Or to test the injection of a pagelet into iFrame you can click on the pagelet's Documentation node and use the Access Pagelet using REST URL.
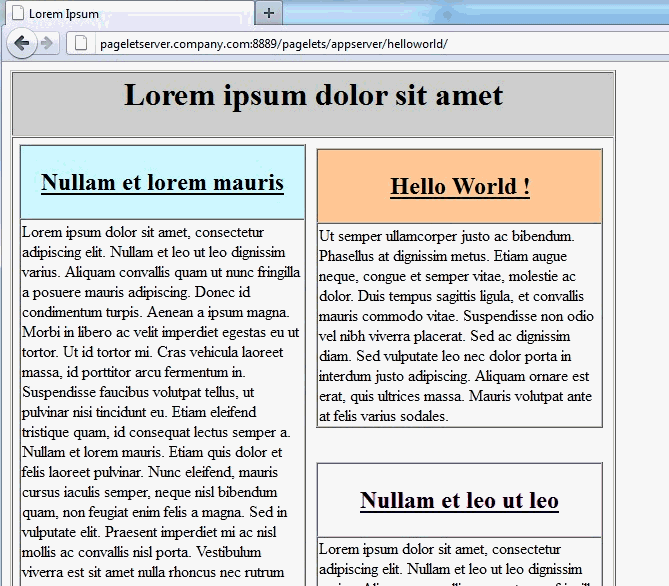
If you click the URL on the Documentation page you should see the following:
Consuming a Pagelet in WebCenter Portal (an Example)
This section provides an example of how you can consume a simple "Hello World" pagelet in WebCenter Portal. Before continuing, first follow the instructions in Creating a Simple Pagelet (an Example) to create the "Hello World" pagelet that will be used in this example.
This section includes the following subsections:
Registering the Pagelet Producer with WebCenter Portal
In order to use our newly created pagelet from WebCenter Portal, we first need to register Pagelet Producer:
Consuming a Pagelet in WebCenter Interaction (an Example)
This section provides an example of how you can consume a simple "Hello World" pagelet in WebCenter Interaction (WCI) 10.3.0 or later. Before continuing, first follow the instructions in Creating a Simple Pagelet (an Example) to create the "Hello World" pagelet that will be used in this example.
This section includes the following subsections:
Registering the Pagelet Producer Remote Server
In order to use our newly created pagelet from WCI, we first need to register Pagelet Producer:
-
Log into WCI as an administrator.
-
Click Administration.
-
Create the folder where we are going to keep all Pagelet Producer related objects by following the steps below:
-
Open the Create Object... dropdown and select Administrative Folder.
-
Enter
PageletProduceras the Name and click OK.Figure 20-11 WCI - Create Administration Folder
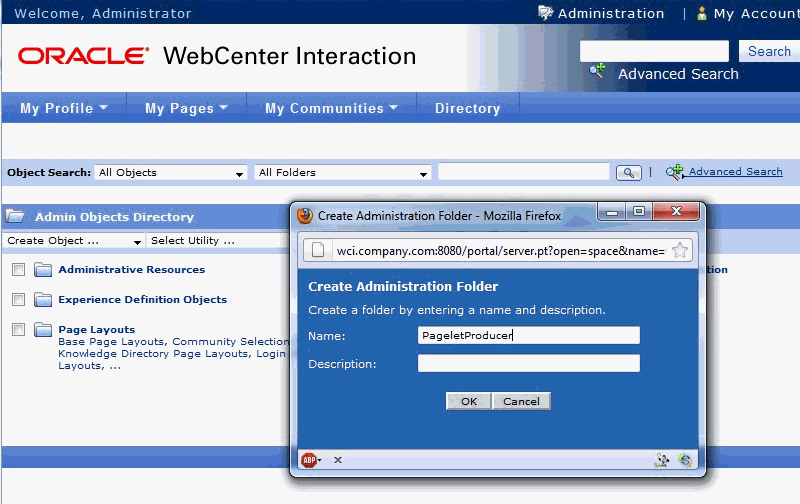
Description of "Figure 20-11 WCI - Create Administration Folder"
-
-
Click the newly created
PageletProducerfolder. -
Open the Create Object... dropdown and select Remote Server.
-
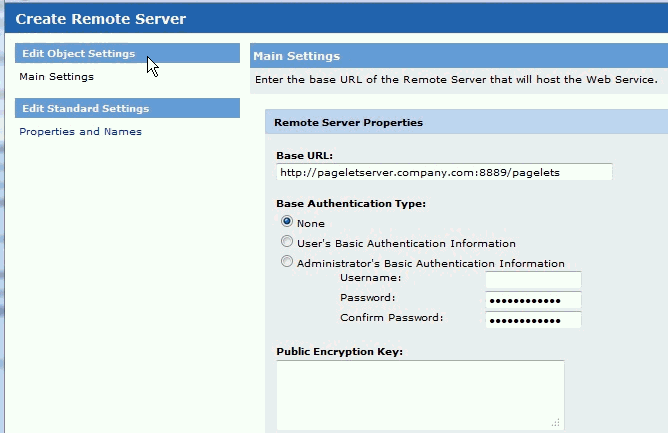
In the Base URL field, enter
http://pageletserver.company.com:8889/pagelets(this is the address of our Pagelet Producer server in this example). -
Click Finish.
-
Select the
PageletProducerfolder and in the Save As field enterPagelet Producer Remote Server.Figure 20-14 WCI - Saving the Pagelet Producer Remote Server Object
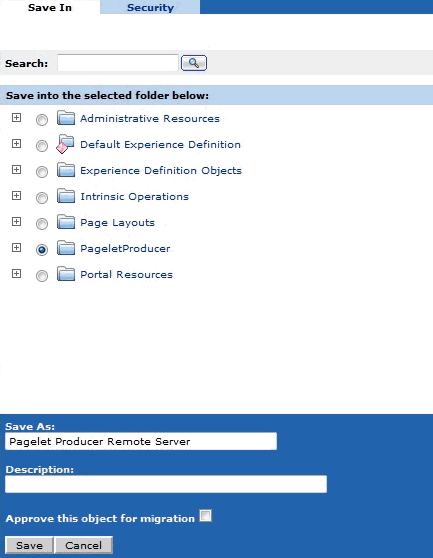
Description of "Figure 20-14 WCI - Saving the Pagelet Producer Remote Server Object" -
Click Save.
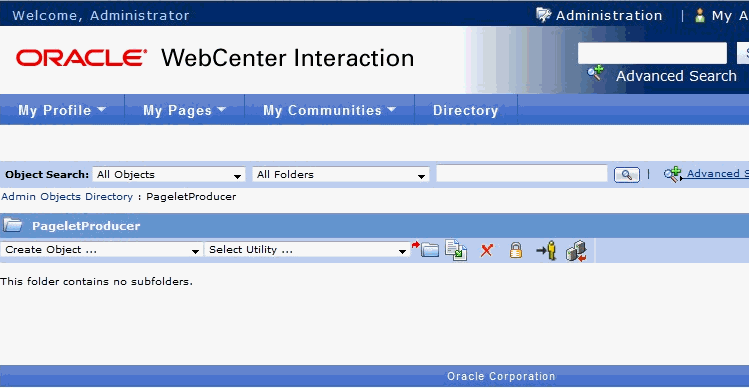
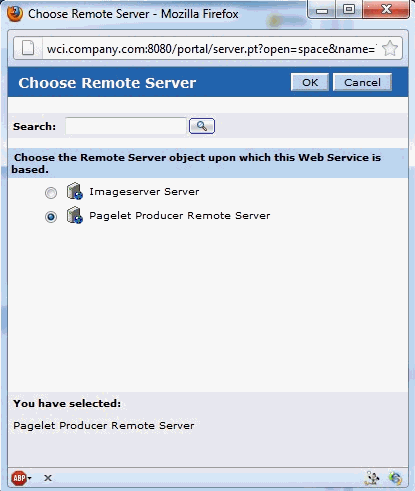
You've now created a Pagelet Producer Remote Server connection in the PageletProducer folder.
Figure 20-15 WCI - Pagelet Producer Remote Server Object
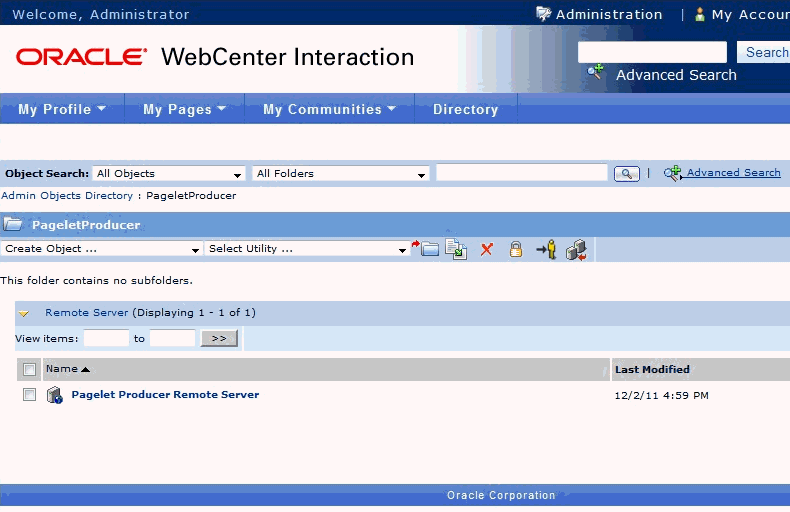
Description of "Figure 20-15 WCI - Pagelet Producer Remote Server Object"
Creating the "Hello World" Web Service
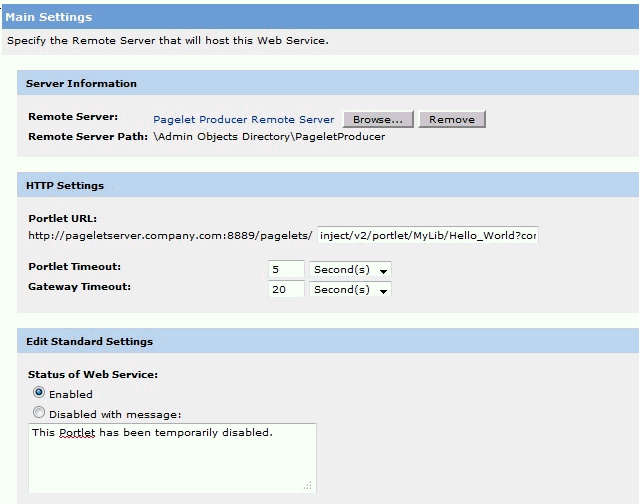
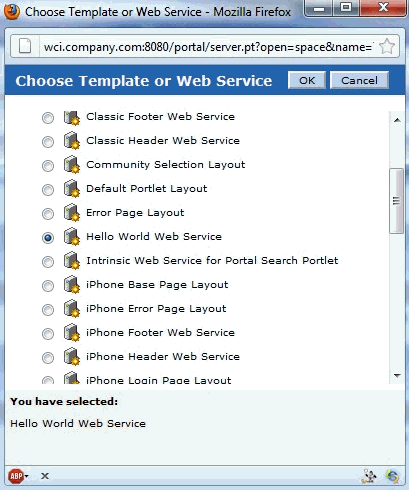
In this section we'll continue by creating the "Hello World" web service.
Creating the "Hello World" Portlet
In this section we'll continue by creating a Hello World portlet.
Using the Hello World Portlet on the WCI Home Page
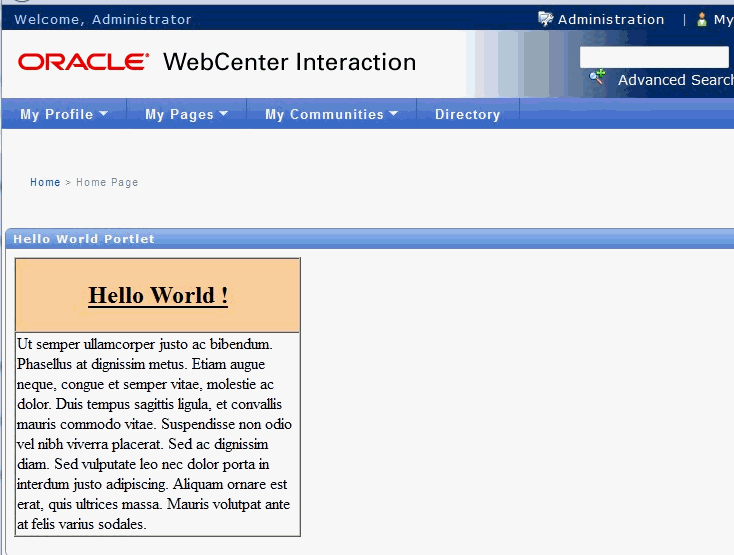
Now that we've registered the Pagelet Producer, set up the Pagelet Producer web service, and created the Hello World portlet, let's continue by using the portlet on a page in WCI. For the sake of simplicity, we'll use the WCI Home Page, but you could use any other WCI page.
Consuming a Pagelet in Oracle WebCenter Sites (an Example)
This section is aimed at developers who need to integrate content into Oracle WebCenter Sites 11g pages, including existing WSRP portlets or elements of web UI exposed by backend applications such as Oracle EBS. Developers should be familiar with Oracle WebCenter Sites and Oracle WebCenter Pagelet Producer and have a solid understanding of web technologies.
This section includes the following subsections:
Adding Pagelets to Oracle WebCenter Sites
Once a pagelet and its related resources are configured, you can insert it into a web page using JavaScript or REST. For more information, see Adding a Pagelet to a Web Page.
Here, we'll use an approach in which pagelets are added directly to a page template in Oracle WebCenter Sites using an iFrame with a REST URL for accessing pagelets as a content source. This requires an addition to the page template script tag to load the CSAPI JavaScript library (which adds necessary functions into the parent page), as well as the actual iFrame that loads pagelet content:
<script type="text/javascript" src="http://%PAGELET_PRD_HOST%/pagelets/inject/v2/csapi"/>
<iframe id="pt-pagelet-iframe-1" width="100%" frameborder="0" src="http://%PAGELET_PRD_HOST%/pagelets/inject/v2/pagelet/lib_name/pagelet_name?content-type=html&consumepage=true&ifheight=auto"></iframe>
Where lib_name and pagelet_name refer to the library and pagelet configured in Pagelet Producer. For more information about parameters, see How to Access Pagelets Using REST.
Enabling IFrame Auto-Resizing
To provide a more seamless integration of the pagelet into the consuming page, you can make the pagelet iFrame behave more like inline markup by dynamically resizing to accommodate its content. To enable this feature, some extra configuration is required in both Sites and Pagelet Producer.
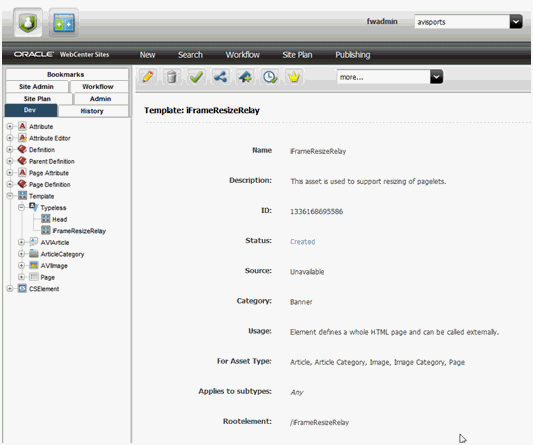
This section uses the AviSports sample site shipped with WebCenter Sites. To add any new asset to this site, you must log in to the Sites Administration page and open the Dev section in the left hand navigation as shown in Figure 20-20:
First, create a new template with the following settings:
-
Name
-
Name: iFrameResizeRelay (or name of your choice)
-
For Asset Type: Applicable to various asset types (typeless)
-
-
Element
-
Usage: Element defines a whole HTML page and can be called externally
-
Element Storage Path/Filename: iframe-resize.html (or name of your choice)
-
Element Logic:
<html>
 <head>
 <title>Resizing Page</title>
 <script type="text/javascript">
function onLoad() {
var params =window.location.search.substring( 1 ).split( '&' );
var height;
var width;
var iframe;
for( var i =0, l =params.length; i < l; ++i ) {
var parts =params[i].split( '=' );
switch( parts[0] ) {
case 'height':
height =parseInt( parts[1] );
break;
case 'width':
width =parseInt( parts[1] );
break;
case 'iframe':
iframe =parts[1];
break;
}
}
window.top.updateIFrame( iframe, height, width );
}
if (window.addEventListener) {
window.addEventListener("load", onLoad, false);
} else if (window.attachEvent) {
window.detachEvent("onload", onLoad);
window.attachEvent("onload", onLoad);
} else {
window.onload=onLoad;
}
 </script>
 </head>
 <body>
 </body>
</html>
-
-
Site Entry
-
Cache Rules: Cached (default)
-
-
Save
-
Record SiteCatalog Pagename as
%PAGENAME%(if you used the default name, this would be<site_name>/iFrameResizeRelay)
The new template is addressable as follows:
http://%SITES_HOST%/cs/Satellite?pagename=%PAGENAME%
Make a note of this URL; it will be used to configure the Injector for the pagelet.
Next, apply the iFrame resizing feature by adding a new Injector to the pagelet using the Pagelet Producer Administration Console. Open the pagelet, select Injectors and create a new Injector with the following settings:
-
General
-
Name: auto_resizer (or name of your choice)
-
URL Filter: <none>
-
MIME Filter: text/html
-
Inject Location: Before </head>
-
-
Content: Select Text (default) and copy the JavaScript below into the text area
Replace SITES_RESIZE_RELAY_PAGE in the JavaScript below with the URL to the template you created in the previous step.
<script type="text/javascript">
var SITES_RESIZE_RELAY_PAGE ="http://%SITES_HOST%/cs/Satellite?pagename=%PAGENAME%"; //CHANGE ME!

if (window.addEventListener) {
window.addEventListener("load", calculateSizeFixed, false);
} else if (window.attachEvent) {
window.attachEvent("onload", calculateSizeFixed);
} else {
window.onload=calculateSizeFixed;
}
function calculateSizeFixed() {
var PTResizeIFrame =PTResizeIFrame ││{};
 if (PTPortalPage && PTPortalPage.portlets) {
for (var i in PTPortalPage.portlets) {
if ( PTPortalPage.portlets[i].id != "page") {
PTResizeIFrame.pageletInstanceID =PTPortalPage.portlets[i].id;
 break;
 }
}
}
else if (!PTResizeIFrame.pageletInstanceID) {
PTResizeIFrame.pageletInstanceID =1;
 }

if (!PTResizeIFrame.pageletResizePage) {
var match =window.location.search.match(/resizepage=[^&]*/);
 if (match != null && match.length > 0) PTResizeIFrame.pageletResizePage =unescape(match[0].substr("resizepage=".length));
 else PTResizeIFrame.pageletResizePage =SITES_RESIZE_RELAY_PAGE;
 }
var agent =navigator.userAgent;
 var ffversion =agent.indexOf("Firefox") >= 0 ? agent.substring(agent.indexOf("Firefox")).split("/")[1] : -1;
 var FFextraHeight =parseFloat(ffversion)>=0.1? 25 : 0;
 var scrollHeightExtra =15;
 if (agent.indexOf('MSIE') > 0) {
scrollHeightExtra =35;
 }
if (FFextraHeight > 0) scrollHeightExtra =FFextraHeight;
 var wrapper =document.getElementById( 'pt-inner-iframe-wrapper-' +PTResizeIFrame.pageletInstanceID);
 if (wrapper ==null) wrapper =createRelayIFrame(PTResizeIFrame.pageletInstanceID);
 var iframe =document.getElementById( 'pt-inner-iframe-' +PTResizeIFrame.pageletInstanceID);
 var height =0;
 var width =0;
 var iframename ='';

if( (document.contentDocument) && (document.contentDocument.documentElement.offsetHeight) ) {
height =document.contentDocument.documentElement.offsetHeight +FFextraHeight;
}else if( (document.contentDocument) && (document.contentDocument.body.offsetHeight) ) {
height =document.contentDocument.body.offsetHeight+FFextraHeight;
}else if (document && document.documentElement.scrollHeight ) {
height =document.documentElement.scrollHeight +scrollHeightExtra;
 }else if( document && document.body.scrollHeight ) {
height =document.body.scrollHeight +scrollHeightExtra;
 }else {
height =wrapper.offsetHeight;
 }
width =wrapper.offsetWidth;
 iframename ='pt-pagelet-iframe-' +PTResizeIFrame.pageletInstanceID;
 var qsSeparator =PTResizeIFrame.pageletResizePage.indexOf("?") >= 0 ? "&" : "?";

iframe.setAttribute("src", PTResizeIFrame.pageletResizePage +qsSeparator +'height=' +height +'&' +'width=' +width +'&' +'iframe=' +iframename);
}

function createRelayIFrame(pageletInstanceId) {
var wrapper =document.createElement("div");
 wrapper.id ="pt-inner-iframe-wrapper-" +pageletInstanceId;
 var iframe =document.createElement("iframe");
 iframe.id ="pt-inner-iframe-" +pageletInstanceId;
 iframe.setAttribute("height", 0);
 iframe.setAttribute("frameborder", 0);
 iframe.setAttribute("width", 0);
 wrapper.appendChild(iframe);
 document.body.appendChild(wrapper);
 return wrapper;
}
</script>
Add the pagelet to the page template in Sites using a REST URL within an IFrame. In the IFrame, the id parameter should use the unique number identifying the pagelet IFrame (for example, "pt-pagelet-iframe-1"). You must add the following query string parameters to the pagelet URL to support IFrame auto-resizing:
-
resizepage=http://%SITES_HOST%/cs/Satellite?pagename=%PAGENAME% -
ifheight=auto
For example:
<script type="text/javascript" src="http://%PAGELET_PRD_HOST%/pagelets/inject/v2/csapi"/>
<iframe id="pt-pagelet-iframe-1" width="100%" frameborder="0" src="http://%PAGELET_PRD_HOST%/pagelets/inject/v2/pagelet/lib_name/pagelet_name?content-type=html& consumepage=true&resizepage=http://%SITES_HOST%/cs/Satellite?pagename=%PAGENAME%&ifheight=auto">
</iframe>
Note:
In certain situations automatic resizing may not work properly when multiple pagelets are present on a page. This is known to occur with pagelets that require form auto-login to external authentication servers. In this case, only one pagelet can be configured for auto-resizing, while the others should use static IFrame sizing.
Changing Pagelet Styling
To make a pagelet fit better visually in a consuming WebCenter Sites page, an Injector may be used to add styles that override the original CSS. In order for the override to work correctly, it is important that the style definitions supplied by the Injector come after the styles defined by the backend application. The following example does this by injecting replacement CSS into the end of the <HEAD> section.
To restyle a pagelet, add a new Injector to the pagelet using the Pagelet Producer Administration Console. Open the pagelet, select Injectors and create a new Injector with the following settings:
-
General:
-
Name: new_styles (or name of your choice)
-
URL Filter: <none>
-
MIME Filter: text/html
-
Injector Location: Before </head>
-
-
Content
Injector Location: Before </head>
Consuming Applications as Pagelets Using EBS11i includes a working example of an Injector used to re-style the EBS UI to match the sample AviSports site in WebCenter Sites.
Using Identity Propagation
The core purpose of Pagelet Producer is to proxy backend applications. Since Pagelet Producer acts as a "middle-man" between the browser and the backend application, identity propagation must be broken into two parts:
Establishing Identity in Pagelet Producer
Pagelet Producer typically injects web content into WebCenter Sites using an IFrame as shown in Figure 20-21.
Figure 20-21 Pagelet Producer Content as IFrame in Sites

Description of "Figure 20-21 Pagelet Producer Content as IFrame in Sites"
Since the content is injected as an IFrame, user identity must be established in both the Sites container and the Pagelet Producer container as shown in Figure 20-22. Note that Figure 20-22leaves out the user directory that is assumed to be shared between the two authentication schemes.
Figure 20-22 Different authentication schemes for Sites and Pagelet Producer
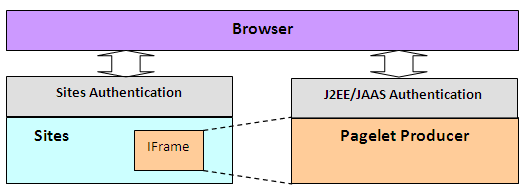
Description of "Figure 20-22 Different authentication schemes for Sites and Pagelet Producer"
The ideal way to manage identity between the browser and the two containers would be to use Oracle Access Manager (OAM) as shown in Figure 20-23. Note that Figure 20-23leaves out the user directory that is assumed to be shared between the two authentication schemes, and excludes the OAM access server. Note also that this configuration is not supported for pre-11g versions.
Figure 20-23 Ideal Frontend Authentication Configuration Using OAM
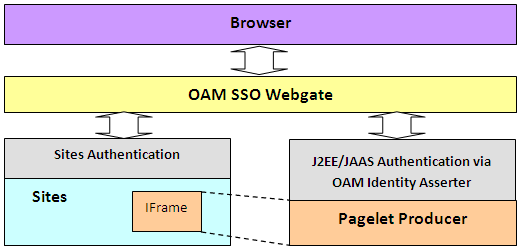
Description of "Figure 20-23 Ideal Frontend Authentication Configuration Using OAM"
To set up OAM for WebCenter Sites 11g, refer to the chapter on "Oracle Access Manager Integration Setup" in Oracle WebCenter Sites Configuring Supporting Software.
Using a Login Page Supplied by Pagelet Producer
Before setting up OAM, it is sometimes useful to test the integration of Pagelet Producer in Sites. Without OAM, users must authenticate separately with Pagelet Producer and with Sites (see Figure 20-22). This section describes how to configure separate authentication with Pagelet Producer.
If OAM SSO is not present on either Pagelet Producer or Sites, the authentication scheme shown in Figure 20-24must be supported by ensuring that Pagelet Producer provides a login form.
To force Pagelet Producer to display a login form:
Propagating Identity from Pagelet Producer to the Backend Application
The way in which identity is established depends on the type of application, as described in the following topics:
WSRP/JPDK Portlets
WSRP portlets must use WSS tokens for identity propagation. For details on configuring security tokens, see Registering WSRP Portlet Producers in Pagelet Producer in Administering Oracle WebCenter Portal, and Consuming WSRP Portlets as Pagelets.
Each Oracle PDK-Java portlet that requires an identity will be passed credentials based upon information supplied by the external application's login form. For details, see Managing External Applications and Registering an Oracle PDK-Java Portlet Producer in Administering Oracle WebCenter Portal.
Stand-alone Backend Application Protected with Native Authentication (Non-SSO)
Pagelet Producer has a feature called Autologin that allows Pagelet Producer to interact with the "native" authentication mechanism established by a backend application.
Identity Propagation with Autologin
Since each backend application has its own means of authentication, a separate login prompt must be initiated by Pagelet Producer to collect any required credentials. Pagelet Producer resources can be configured to send credentials to backend applications as basic authentication headers, NTLM tokens, or Kerberos tokens, as well as manage forms-based authentication (typically via a session cookie). For information about configuring Autologin, see How to Configure Autologin.
Note:
Set the Username and Password fields to use the User Vault so that each user will be prompted for his or her own unique credentials to access the backend application.
Stand-alone Backend Application Protected with SSO
Determining the proper Autologin settings for a backend application can be very challenging. Doing so requires looking at request headers, identifying redirects, and examining markup (sometimes dynamically generated). This inspection and configuration process can be daunting if there are multiple applications for which Autologin is required. Therefore, if Oracle Access Manager (OAM) or Oracle SSO (OSSO) is available, it is highly recommended that one of these single sign-on solutions be used to protect backend applications.
Once the backend application is protected with OAM, there are two ways that Pagelet Producer can supply credentials as described in the following subsections:
Using Direct Identity Propagation to OAM Protected Backend Application
An OAM 11g WebGate is an Apache module running on Oracle HTTP Server (OHS) that manages all validation of user credentials with the OAM server. Once it has established the validity of a user it sends the OAM_REMOTE_USER header to the web application on the application server that OHS is proxying. The application server will have an OAM identity asserter running on it that will set the JAAS user principal name to the OAM_REMOTE_USER header value.
If Pagelet Producer is protected with an OAM 11g WebGate it will receive an OAM_REMOTE_USER header. All web applications that it proxies will also receive this header. If the web application it proxies is on an application server with the OAM Identity Asserter, then the OAM Identity Asserter will use the OAM_REMOTE_USER header value passed from Pagelet Producer to set the user principal. This will all work as long as Pagelet Producer is not trying to proxy the URL to the WebGate for the protected web application. The rest of this section describes in details how this can be achieved in the context of Sites integration.
Example Setup
This example assumes that both WebCenter Sites and Pagelet Producer are protected by OAM WebGate as illustrated in Figure 20-23, and the following hosts and ports are used by the applications:
-
OAM SSO WebGate:
www.example.com:80 -
WebCenter Sites:
sites_host:8080 -
WebCenter Pagelet Producer:
pp_host:8889 -
Backend application:
backendhost:8001 -
Full URL to backend application as viewed from browser (via WebGate)
http://www.example.com/backend/console -
Full URL to backend application if accessed directly through application server (available only in internal network)
http://backendhost:8001/console
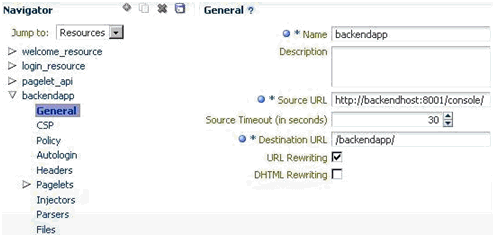
Set up the Pagelet Producer resource to use the direct URL to the backend application, thus bypassing the WebGate (i.e., http://backendhost:8001/console).
Figure 20-25 Pagelet Producer Administration Console - General Properties Page
Description of "Figure 20-25 Pagelet Producer Administration Console - General Properties Page"
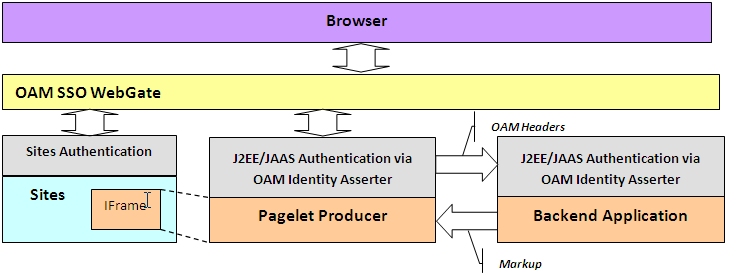
By setting up Pagelet Producer to call directly into the backend application (bypassing the WebGate) all the OAM secure headers that Pagelet Producer receives are passed to the OAM Identity Asserter on the application server hosting the backend application. Once the OAM Identity Asserter on the application server hosting the backend application receives the OAM headers it will set the proper user principal (see Figure 20-26). Note that Figure 20-26leaves out the user directory that is assumed to be shared between the two authentication schemes. It also excludes the OAM access server.
Figure 20-26 Pagelet Producer Calling the Backend Application Directly
Description of "Figure 20-26 Pagelet Producer Calling the Backend Application Directly"
Note:
Although setting up Pagelet Producer to bypass the WebGate will achieve single sign-on, this solution should not always be applied. In cases where the OHS server hosting the WebGate is also managing load balancing for the backend application, bypassing the WebGate will also bypass load-balancing. All traffic to the application will be routed to one server. In this case we recommend configuring Pagelet Producer for Autologin as described in Using Identity Propagation with Autologin and SSO.
Using Identity Propagation with Autologin and SSO
If bypassing the OAM WebGate (as described in Using Direct Identity Propagation to OAM Protected Backend Application) is not a feasible option then credentials can still be supplied using Pagelet Producer's Autologin feature. The advantage of using Autologin with an Oracle SSO solution (OAM or OSSO) login page as opposed to individual login forms for each backend application (see Identity Propagation with Autologin) is that Autologin only has to be set up once and the configuration steps are the same for every implementation.
The steps for setting up Autologin with OSSO are described in Configuring Autologin.In a production environment, these steps can be followed as is with one exception: the ssousername and password form fields should be linked to the "User Vault".
Backend applications protected with OAM can also be set up following the steps described for OSSO in the Configure Autologin section in this document with the following exceptions:
-
The login form URL will be a set location (e.g.,
http://oam11g.mycompany.com:14100/oam/server/obrareq.cgi).Be sure to remove the query string after the fixed location argument when setting the Autologin form identification URL.
-
The form action URL will be a different value, but it should be a static value. Inspect the OAM form to determine the form action URL.
-
The username and password fields may be different values. Inspect the OAM form fields to determine these values.
-
Include the following two generated values: "request_id" and "OAM_REQ".
Reference: Common Autologin Configurations
This section provides a quick reference of Autologin settings in Pagelet Producer for common backend SSO scenarios.
This section contains the following topics:
Autologin Settings for Oracle Access Manager (OAM)
Login Form Identification:
-
URL:
http://%OAM_ROOT%/server/obrareq.cgi
Form Submit Location:
-
URL:
/oam/server/auth_cred_submit
Form Fields:
-
actionURL: static:
/oam/server/auth_cred_submit -
request_id: Generated
-
username: Unsecured or Credential Vault
-
OAM_REQ: Generated
-
password: Unsecured or Credential Vault
Autologin Settings for Oracle SSO (OSSO)
Login Form Identification:
-
URL:
%OSSO_HOST%/sso/jsp/login.jsp
Form Submit Location:
-
URL:
%OSSO_HOST/sso/auth - POST
Form Fields:
-
appctx: Generated
-
locale: Generated
-
password: Unsecured or Credential Vault
-
site2pstoretoken: Generated
-
ssousername: Unsecured or Credential Vault
-
v: Generated
Consuming WSRP Portlets as Pagelets
Pagelet Producer incorporates the WebCenter Common Consumer and therefore can expose WSRP portlets as pagelets for use in WebCenter Sites or any other web container that does not include a WSRP consumer.
The WSRP Portlet Producer can be registered with Pagelet Producer using Fusion Middleware Control, WLST, or the Pagelet Producer Administrative Console. For more information, see Registering WSRP Portlet Producers In Pagelet Producer in Administering Oracle WebCenter Portal. Once registration is complete, the WSRP producer appears as a resource in the Pagelet Producer Administrative Console, and the portlets associated with the WSRP endpoint will be listed in the pagelets collection for the resource.
Note:
Auto-generated WSRP resources and pagelets cannot be modified. To create a version that can be modified, choose the resource in the Pagelet Producer Administrative Console and click Copy. The cloned version of the resource can be edited and various elements such as Injectors can be added to customize pagelet functionality. For example, a custom Injector could be used to inject CSS classes to modify portlet markup to make it look and feel like the Sites that will host the pagelet.
If the WSRP Producer that you are with Pagelet Producer requires authentication, the following steps are required:
-
Configure WS-Security between Pagelet Producer and the WSRP Producer as described in Configuring Web Services Security in Administering Oracle WebCenter Portal. You must ensure that the Java Key Store (JKS) is properly configured between the WSRP producer and Pagelet Producer; for details, see Setting Up the WebCenter Portal Domain Keystore in Administering Oracle WebCenter Portal.
-
During the WSRP Producer registration, select the appropriate Token Profile in the Security section and enter the necessary configuration information. The path to the keystore must be absolute.
Exposing Custom ADF Task Flows as WSRP Portlets
Although it is possible to consume an ADF task flow in Pagelet Producer by 'clipping' it out of the page on which it is hosted, this is not the recommended approach. Considering the complexity of the markup generated by an ADF page and potential dependencies on other task flows or ADF page parameters, the recommended approach is to create a WSRP portlet based on the task flow and then consume the portlet in Pagelet Producer. One advantage of this approach is that ADF task flow parameters become portlet parameters that can be mapped to pagelet parameters, allowing information to be passed from the Sites page to the task flow. For step-by-step instructions on how to make a portlet from an ADF task flow, see How to Create a JSF Portlet Based on a Task Flow.
After the ADF task flow is exposed as a portlet, deploy a new WSRP Producer to a managed server in your WLS domain (for example, the WC_Portlet server on your WebCenter domain). Obtain the WSDL URL from the info page (http://%PRODUCER_HOST%/%APP_CONTEXT%/info) and make note of it. To register the new WSRP Producer with Pagelet Producer, see WSRP Portlet Producers in Pagelet Producer in Administering Oracle WebCenter Portal.
Exposing WSRP Portlets Developed for Oracle WebLogic Portal
Oracle WebLogic Portal (WLP) supports a variety of portlet types, including Java Portlets, Java Server Faces Portlets, Java Server Page and HTML Portlets (for a complete list, see Portlet Types in Portlet Development Guide for Oracle WebLogic Portal). Remote (Proxy) Portlets are WSRP portlets and can be directly exposed as pagelets by the WSRP Producer with Pagelet Producer.
Exposing WLP Portlets Using WLP as WSRP Producer
WLP can expose Java, Page Flow, JSP, JSF, and Struts Portlets as a "complex producer" that includes the required WSRP interfaces, optional interfaces and some extended interfaces (for details see "WebLogic Portal Producers" in Oracle Fusion Middleware Federated Portals Guide for Oracle WebLogic Portal). Consequently, native WLP portlets can be consumed by Pagelet Producer as any other WSRP portlets. Configuration and best practices for WSRP interoperability between WLP and the WebCenter Common Consumer are described in WSRP Interoperability with Oracle WebCenter Portal and Oracle Portal in Federated Portals Guide for Oracle WebLogic Portal.
Note:
WLP portlets are WSRP-enabled by default since version 9.2. In earlier versions, you must edit the portlet properties and set the "Offer as Remote" property to true.
Configuring WS-Security between a WLP WSRP Producer and WebCenter Consumer
To consume WSRP portlets exposed by WLP in the WebCenter Common Consumer (Pagelet Producer), configuration is required on both the producer and consumer sides.
Typically it is impossible to consume WSRP portlets exposed by WebLogic Portal as an anonymous user, so it is necessary to configure SAML security on WLP for the producer and the WebCenter Common Consumer. Step-by-step instructions can be found in SAML Security Between a WebCenter Portal: Framework Application Consumer and a WebLogic Portal Producer in Federated Portals Guide for Oracle WebLogic Portal. These instructions are comprehensive, with the following adjustments:
-
In section 5 of "Configuring the Producer," the steps for configuring keystore information on the WSRP consumer are executed in JDeveloper. You must complete this step in the WebCenter Common Consumer (Pagelet Producer). You can specify the signing alias and keystore password using WLST or Fusion Middleware Control. For details, see Setting Up the WebCenter Portal Domain Keystore in Administering Oracle WebCenter Portal.
Note:
Once you have configured the keystore values you must restart both the managed server hosting Pagelet Producer (by default
WC_Portlet) and the WLS Admin Server for the JPS configuration changes to be picked up. -
In section 4 of "Configuring the Producer", the instructions do not emphasize the importance of the issuer name. The name placed here must match that sent by the consumer. For Oracle JPS, the default issuer ID sent is
www.oracle.com.
Registering the WLP WSRP Producer in Pagelet Producer
To register the WLP WSRP Producer in Pagelet Producer, follow the standard steps for creating and configuring a new WSRP Producer described in WSRP Portlet Producers in Pagelet Producer in Administering Oracle WebCenter Portal. Make sure to include the following settings:
-
WSDL URL:
http://%WLP_HOST%/%PORTAL_APP_NAME%/producer/wsrp-1.0/markup?WSDL -
Security:
Token Profile: Select "WSS 1.0 Token with Message Integrity"
After registration, a new Pagelet Producer resource is automatically created and populated with pagelets to represent the WLP portlets associated with this WSRP endpoint.
Note:
To allow user identity propagation to the portlets, both WLP and Pagelet Producer should be configured as described in Propagating Identity from Pagelet Producer to the Backend Application. (For testing purposes or for portlet content that can be accessed without authentication, you can specify a valid username in the Default User field under Security.)
Adding WLP WSRP Portlets to Sites
To add WLP WSRP portlets to a page in Sites, follow the steps in Adding Pagelets to Oracle WebCenter Sites. The URL to use for the src attribute in the IFrame tag that loads pagelet content can be found under "Documentation" in How to Access Pagelets Using REST.
Auto-generated WSRP resources and pagelets cannot be modified. To use Pagelet Producer features to alter the markup of the WLP portlet such as modify look and feel of the portlet UI by injecting custom CSS styles, you must create a new version of the resource. Choose the resource that was created for your WLP WSRP Producer in the Pagelet Producer Administrative Console and click Copy. The cloned version can be modified, including adding elements such as Injectors to customize pagelet functionality.
Consuming WebCenter Portal Services as Pagelets in Sites
WebCenter Portal includes services and tools, such as documents, that can be used to facilitate user collaboration in WebCenter Sites. For an overview of these tools, see Staying Informed and Staying Organized in Using Portals in Oracle WebCenter Portal.
The recommended approach for exposing these services and tools in Sites is to consume the associated WSRP portlets in Pagelet Producer by leveraging the Services Producer component included with Oracle WebCenter Portal (11.1.1.6 and later).
The following portal tools are exposed as WSRP portlets by default:
-
Activity Stream
-
Mail
-
Document Manager
-
Lists
-
Tag Cloud
-
Blogs
Note:
Additional tools can be exposed by extending the Services Producer to a new JSF page and then adding the task flow to the page.
Requirements
Install WebCenter Portal following the instructions in Oracle Fusion Middleware Installation Guide for Oracle WebCenter. Make sure that all dependent components are also installed and configured, including WebCenter Content Server, and Pagelet Producer. For more information, see Requirements.
Configuring Security and Single Sign-On
There are two prerequisites to allow access to WebCenter Portal services from a Sites-driven web site:
-
Create a common user base between the web site and WebCenter Portal
-
Establish user identity propagation from the web site to WebCenter Portal
These are described in the following topics:
Creating a Common User Base: LDAP Integration
Creating a common user base requires configuring a common LDAP repository to be used by WebCenter Sites and all WebCenter Portal components. When selecting an LDAP server, make sure it is compliant with the WebLogic Server that runs WebCenter Portal components.
Things to remember when configuring security on WLS:
-
Set the priority of the Authenticators to SUFFICIENT
-
Set the Control Flag (in parenthesis) and order of authentication providers as follows:
-
OAM Identity Asserter (REQUIRED)
-
LDAP Authenticator (SUFFICIENT)
-
Default Authenticator (SUFFICIENT)
-
Default Identity Asserter (SUFFICIENT)
-
Establishing User Identity Propagation: OAM Configuration
To establish user identity propagation, we recommend configuring the SSO solution for WebCenter Sites and WebCenter Portal using Oracle Access Manager (OAM).
If you are using OAM, make sure it is configured to pass the user principal name in the ORACLE_REMOTE_USER header. Both ObSSOCookie and OAM_REMOTE_USER must be set to active on the OAM Identity Asserter on the WebLogic Server.
Configuring the GUID Attribute in the Identity Store
Specify the GUID attribute value to ensure that the value that is used in the identity store matches the value configured in the LDAP authentication provider. This value is configured in the jps-config.xml file.
Set the GUID for your LDAP authenticator in the jps-config.xml file.
<serviceInstance provider="idstore.ldap.provider" name="idstore.ldap">
<property value="oracle.security.jps.wls.internal.idstore.WlsLdapIdStoreConfigProvider" name="idstore.config.provider"/>
<property value="oracle.security.idm.providers.stdldap.JNDIPool" name="CONNECTION_POOL_CLASS"/>
<property value="GUID=uuid" name="PROPERTY_ATTRIBUTE_MAPPING"/>
</serviceInstance>
Configuring SSO for Discussions Server
To use discussions, configure the discussions server for SSO before ordering the Authenticators in WebLogic Server (using the Default Authenticator and Default Identity Asserter). It is also possible to use WLST to configure SSO for the discussions server. For details, see Configuring the Discussions Server for SSO in Administering Oracle WebCenter Portal.
Importing WebCenter Services Exposed as WSRP Portlets
To import the WSRP portlets that expose WebCenter Services into Pagelet Producer, simply register the Services Producer as a WSRP Producer in Pagelet Producer using Enterprise Manager, WLST or the Pagelet Producer Administrative Console.
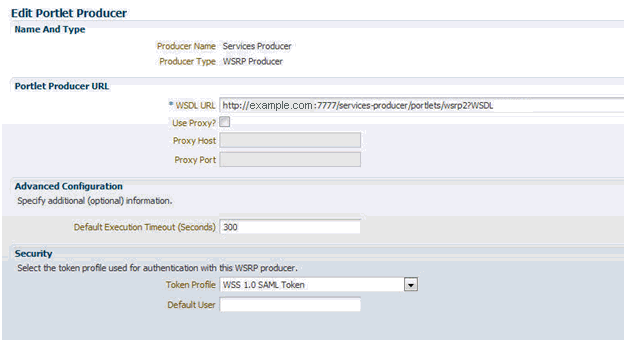
Figure 20-27 shows an example of WSRP endpoint registration in the Pagelet Producer Administrative Console. For details, see WSRP Portlet Producers in Pagelet Producer in Administering Oracle WebCenter Portal.
Figure 20-27 Pagelet Producer Administrative Console - WSRP Endpoint
Description of "Figure 20-27 Pagelet Producer Administrative Console - WSRP Endpoint"
The Token Profile in the Security section of this page must be set to WSS 1.0 SAML Token to support the Services Producer. You should also enter a suitable execution timeout for requests made by Pagelet Producer to the Services Producer (the default is 30 seconds).
Once registration is complete, the Services Producer will appear as a resource in the Pagelet Producer Administrative Console and all WSRP portlets exposed by the Producer will be listed in the pagelets collection for the resource:
Adding Pagelets to Sites Pages
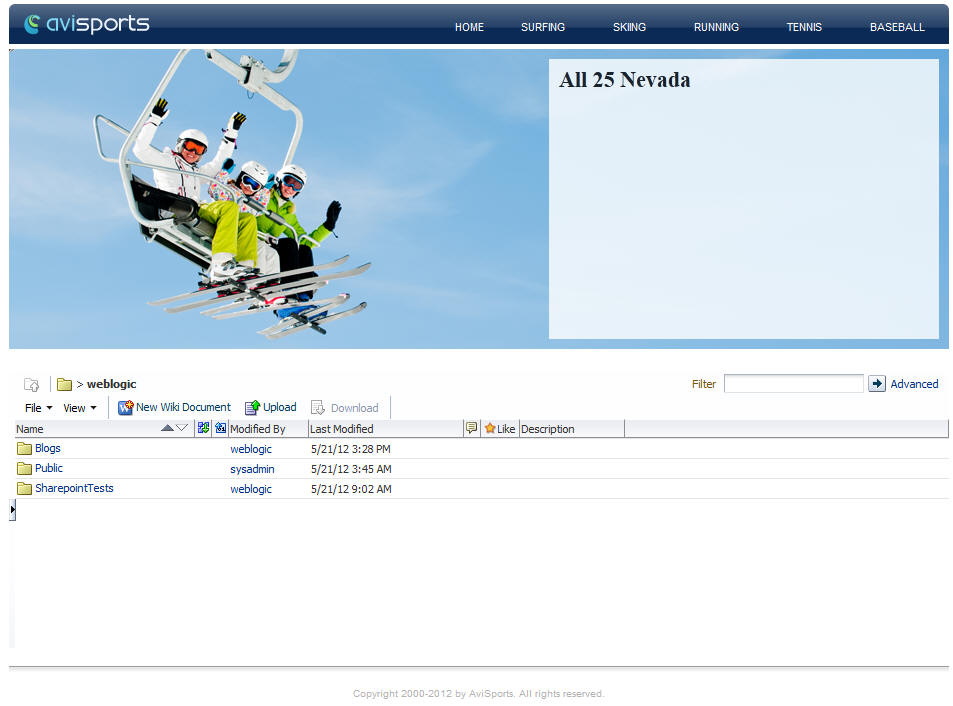
Any pagelet exposing WebCenter Services can be added to a WebCenter Sites page following the steps described in Adding Pagelets to Oracle WebCenter Sites. Figure 20-28 shows the Document Manager Service embedded into a page of the AviSports sample site in WebCenter Sites.
Note:
Auto-generated WSRP resources and pagelets such as the ones associated with the Services Producer cannot be modified. To add an Injector or make other modifications, you must create a version that can be edited. Choose the resource in the Pagelet Producer Administrative Console and click Copy. The cloned version of the resource can be edited and various elements such as Injectors can be added to customize pagelet functionality.
Figure 20-28 AviSports Sample Site with Document Embedded
Description of "Figure 20-28 AviSports Sample Site with Document Embedded"
Consuming Applications as Pagelets Using EBS11i
This section provides detailed instructions for consuming the Oracle E-Business Suite 11i Order Information module UI as a pagelet. It covers autologin, navigation suppression, restyling, and URL rewriting.
This example was created using an EBS 11i instance that is protected with Oracle SSO. The following common terms and variables are used in the example:
-
%EBS_HOST%: root URL of the EBS host (for example,http://my-ebs.company.com:port/) -
%OSSO_HOST%: root URL of the OSSO host (for example,http://sso.company.com:port/)
This section contains the following topics:
Creating a Resource for Basic URL Mapping (Proxy)
The following steps set up the basic URL mapping for a new EBS resource in Pagelet Producer:
Configuring Autologin
This step assumes that the EBS System is protected by OSSO and that Pagelet Producer will be configured to provide form Autologin rather than participate in SSO (a common scenario if the web site is not protected by SSO). EBS credentials may be shared for all users (useful for testing) or stored in the Pagelet Producer credential vault for each user.
Note:
The names of login form fields are usually obtained by investigating the HTML source for the login page that protects the backend resource.
Creating a Pagelet
This step associates a pagelet with the Order Status page in the EBS Order Information module. To create a new pagelet, select the Pagelets section under the EBS resource you created and click the Create icon. Create the new pagelet with the following settings:
-
Name: order_status (or your choice)
-
Library: ebs11 (or your choice)
-
URL Suffix: OA_HTML/RF.jsp?function_id=1005664&resp_id=22480&resp_appl_id=660&security_group_id=0&lang_code=US
-
Refresh Inline: off
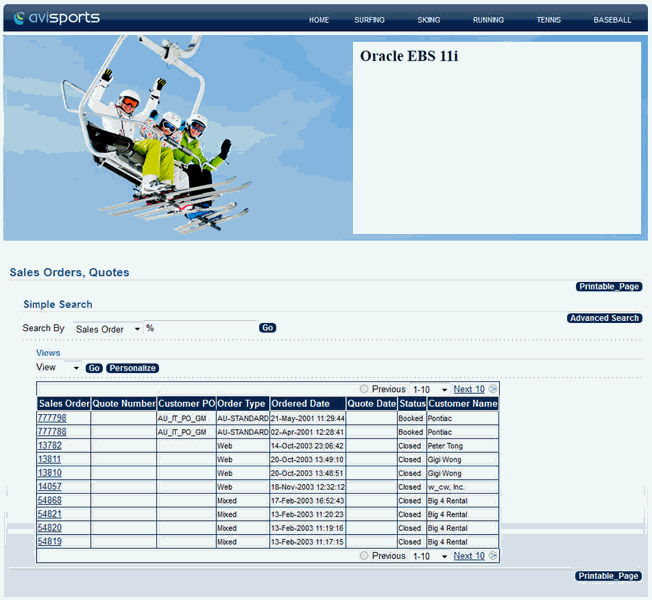
You can test the configured pagelet by accessing it via the REST link on the Documentation page. You should be taken to the Sales Order page without logging in (unless the pagelet uses the User Vault to store credentials and you are accessing it for the first time). From this page, you can use Simple Search to locate orders, using '%' as a wildcard character.
Making Corrective Configurations
After a pagelet has been created, it often requires additional features (Parser, Injector and/or Clipper) to either address issues with URL re-writing in the proxied markup, or simply to modify the markup for style or to hide unnecessary elements. This section describes corrective configurations that were applied to the sample pagelet that exposes the Order Information UI in EBS.
This section includes the following subsections:
Creating a Pluggable Parser for Popup URL Rewriting
Parsers allow you to supplement or change the built-in logic for parsing content and finding URLs that need to be rewritten. When built-in parsers fail to identify URLs, custom parsers can be used to correct this failure. In the case of the EBS 11i UI, this step is required to fix popup handling in Advanced Search.
Under the EBS Resource, create a new Parser with the following settings:
-
Name: popupRewriter (or your choice)
-
URL Filter: *.jsp*
-
Use Base Parser: on
-
Fragment Locations
-
var _jspDir='(.*?)';(type Static URL) -
<frame .? src="(.?)(type Static URL)
-
Figure 20-29 shows the settings for the popupRewriter.
Creating an Injector to Disable Frame-busting
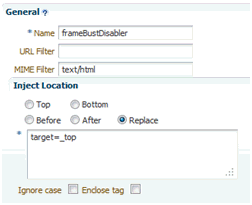
Injectors insert content into a specified location in the proxied resource page. The content can be any text, including HTML, CSS, JavaScript, and pagelet declarations. An empty injector may also be used to remove unwanted content from the page. The following injector was created for the EBS pagelet to prevent it from taking over the page, which was happening on the first displayed page where the user is asked to choose responsibility.
Under the EBS resource create a new Injector with the following settings:
-
General
-
Name: frameBustDisabler
-
URL Filter: <none>
-
MIME Filter: text/html
-
Inject Location: Replace
target=_top
-
-
Content: (Text)
alt=''
Figure 20-30 shows the parameter settings for the new Injector.
Creating an Injector to Auto-Resize the iFrame
In order to provide a more seamless integration into the consuming page, the pagelet iFrame can be configured to behave more like inline content by dynamically resizing to accommodate its contents. For details, see Enabling IFrame Auto-Resizing in this document.
Setting Up Clipping by JavaScript Injection
One option for suppressing page elements exposed as a pagelet is to create a clipper using graphical or Regular Expression-based clipping, available in Pagelet Producer. However, the recommended approach is to use custom JavaScript that is injected into the proxied page. This approach is often more flexible as it can easily accommodate the need to dynamically adjust rules that identify the element(s) to suppress or accommodate rules for suppressing multiple elements on the page.
Custom JavaScript can be added to the proxied resource page using an injector. To suppress EBS 11i standard header and navigation elements, use the following injector definition to insert a snippet of JavaScript that hides the unnecessary elements at page load time. (The standard Clipper feature in Pagelet Producer is not used due to the complexity of the EBS web UI.)
Under the EBS Resource, create a new Injector with the following settings:
-
General:
-
Name: nav_suppressor (or your choice)
-
URL Filter: <none>
-
MIME Filter: text/html
-
Inject Location: Before
</body>
-
-
Content: (Text - copy and paste the content below)
<script type="text/javascript">
// this script is injected into the page by ensemble
// it hides header and footer tables at page load

//register handler function to the page load event
if (window.addEventListener) {
window.addEventListener('load', hideHeaderFooter, false);
} else if (document.attachEvent) {
window.attachEvent('onload', hideHeaderFooter);
}

//this function does the actual hiding
function hideHeaderFooter() {
var form =document.forms[0];
 if (typeof(form) =='undefined') return;
 //main span is form's second child span
 var spansFound =0;
 var mainSpan =null;
 for (var i =0; i < form.childNodes.length; i++) {
var child =form.childNodes[i];
 if (child.tagName && child.tagName.toLowerCase() =='span') {
if (++spansFound ==2) {
mainSpan =child;
 break;
 }
}
}
if (typeof(mainSpan) != "undefined" && mainSpan != null) {
for (var i =0; i < mainSpan.childNodes.length; i++) {
var child =mainSpan.childNodes[i];
 if (child.tagName && child.tagName.toLowerCase() =='table') {
child.style.display ='none';
 }
}
}
}
//call this function directly
hideHeaderFooter();
</script>
Creating an Injector for Pagelet Restyling
To make the EBS pagelet fit better visually in the consuming page, an injector can be used to add styles to override the original CSS.
The example injector definition below shows how to implement restyling for the AviSports sample web site in WebCenter Sites.
Note:
In order for the override to work correctly, it is important that the style definitions supplied by the injector come after the styles defined by the backend application. In the example below, the content is injected into the end of the <HEAD> section on the page.
Under the EBS Resource, create a new Injector with the following settings:
-
General:
-
Name: avisports_styles
-
URL Filter: <none>
-
MIME Filter: text/html
-
Inject Location: Before
</head>
-
-
Content: (Text - copy and paste the content below)
<style>
* {
font: 11px Arial,Helvetica,sans-serif;
}
body {
background: url("http://sites-host:port/cs/avisports/images/BlueSliver.png") repeat-x scroll center bottom transparent;
}
.OraTableCellText, .x1l, .OraTableCellNumber, .x1n, .OraTableCellIconButton, .x1p, .OraTableCellSelect, .x55,
.OraTableControlBarTop, .x1i, .OraTableControlBarBottom, .x1j {
background-color: #eceef1;
 border-color: #0b2a55;
}
.OraTableColumnHeader, .x1r, .OraTableSortableColumnHeader, .x20, .OraTableSortableHeaderLink, .x23 {
background-color: #0b2a55;
 border-color: #F7F7E7;
 color: #336699;
}
.OraTableHeaderLink, .x24, .OraTableColumnHeaderNumber, .x1s, .OraTableColumnHeaderIconButton, .x1t {
background-color: #0b2a55;
 color: #ffffff;
}
.p_InContextBrandingText, .x2l, .OraHGridNavRowInactiveLink, .x3v, .OraNavBarInactiveLink, .x42,
.OraBINavBarInactiveLink, .x7n, .OraBINavBarInactiveLink_small, .x7o {
color: #000000;
}
.OraLink:link, .xd:link, .OraBreadCrumbs, .xh, .OraBulletedList a, .xj a, .OraLinkText, .x2v,
.OraHGridNavRowActiveLink, .x3u, .OraNavBarActiveLink, .x41, .OraBINavBarActiveLink, .x7l, .OraBINavBarActiveLink_small, .x7m {
color: #0b2a55;
}
.OraBreadCrumbs a, .xh a {
color: #0b2a55;
}
</style>
Testing the Pagelets
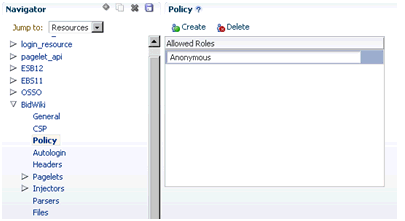
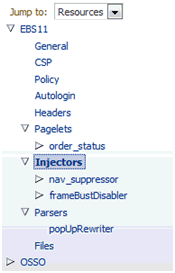
The EBS11 resource now includes the pagelet, the custom injectors, and the custom parser as shown in Figure 20-31.
Test the pagelet by browsing to the Documentation page and using the URL shown below, substituting the local host ID for "example.com."
http://example.com:8889/pagelets/inject/v2/pagelet/ebs11/order_status?content-type=iframe&csapi=true&ifheight=300px
Final Result
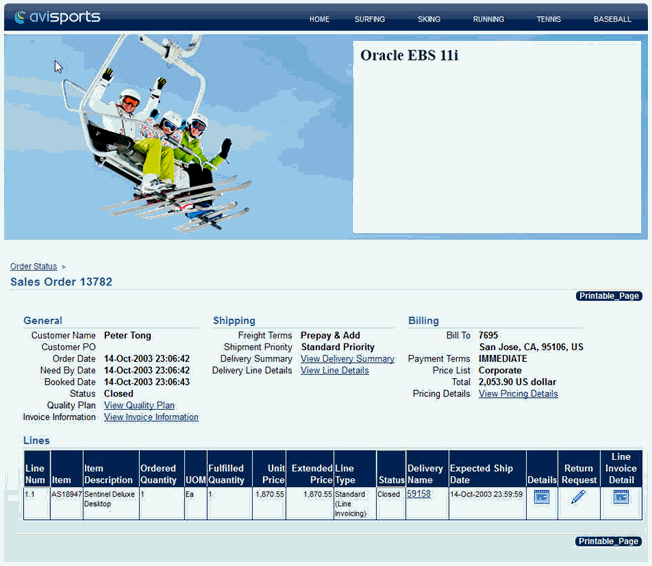
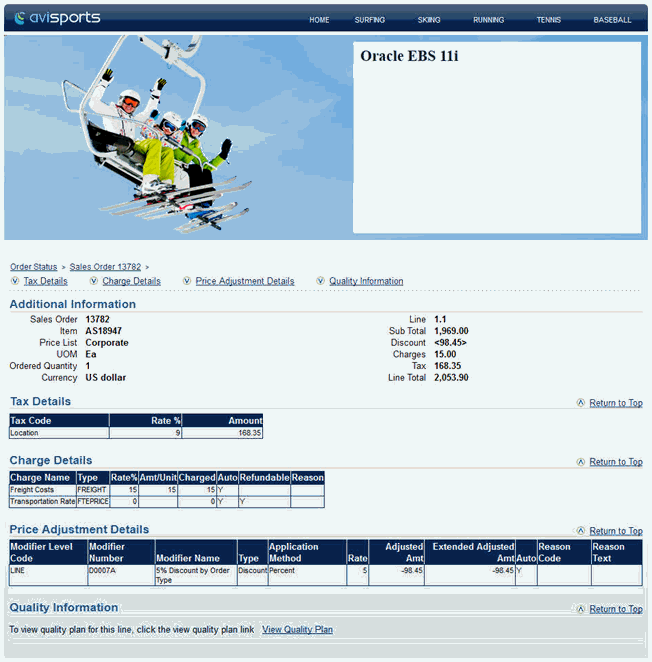
The following screenshots show the EBS 11i Order Information screens embedded into a page of the AviSports sample site in WebCenter Sites using a REST URL for pagelet access in an iFrame:
Consuming OpenSocial Gadgets Using Pagelet Producer
Pagelet Producer is an OpenSocial container that exposes the following features:
-
People (exposes People Connections)
-
Activities (exposes Activity Stream)
-
Appdata (supports gadget personalization)
-
Pub-Sub mechanism
Note that the People and Activities features require WebCenter Portal. To use the People or Activities features, target the WebCenterDS at the WC_Portlet managed server (i.e., at Pagelet Producer). For Appdata, Pagelet Producer supports user, instance and pagelet -scoped preferences.
To follow the example:
-
Open Pagelet Producer and create a new OpenSocial resource.
-
Define the URLs and policies as required.
-
Create a new pagelet specifying the URL for an external gadget.
For example:
http://bayareacoder.com/gogo/localweather/localweather.xml -
If the gadget supports Preferences, configure the required parameters (see Figure 20-32and Figure 20-33).
-
Create or upload the gadget XML file (see Figure 20-34).
Figure 20-34 Pagelet Producer with Activities JavaScript and XML Options
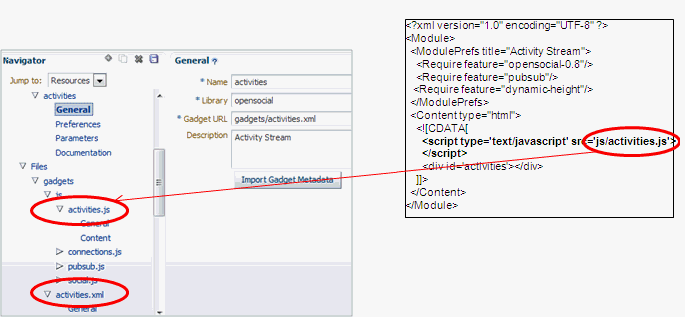
Description of "Figure 20-34 Pagelet Producer with Activities JavaScript and XML Options"Note that the path supplied in the Name field is a ‘virtual' URL that Pagelet Producer will use to serve the file and any path or name can be used.
-
Create or upload any other files that the new gadget requires (for example, any JavaScript files, images, and so forth), and you're done.
Guidelines for Effective Geometry Management and Pagination
Effective geometry management results in efficient sizing and placement of task flows on the page. If the task flows are not designed properly, you end up with pages that have a slow response time or lots of unnecessary scroll bars or white spaces between components. For example, if you include a task flow containing very little data inside a container that stretches it (for example, a Show Detail Frame component), there is a lot of white space below the data in the task flow. Poor design can also cause scrolling to be slow and unpredictable in a task flow with a table displaying a large amount of data. To avoid such issues, be sure to design your task flows so that they flow and use a conventional pagination model when displaying large data sets.
Follow the guidelines in this section when designing new task flows for WebCenter Portal. Also, be sure to adhere to these guidelines when you edit existing WebCenter Portal task flows.
This section includes the following topics:
Using an Injector with JavaScript
To avoid unnecessary white spaces in your task flows, you must ensure that the task flow content flows and is not stretched by the task flow container. A stretching task flow is one that is stretched to the height of the container, whereas a flowing task flow is one whose height is determined by its content, rather than by a stretching container or by itself having a fixed height. A flowing task flow with a small amount of data is shorter than one with large amounts of data
To design a flowing task flow, you must ensure that:
-
The child component of the task flow does not have a fixed height.
-
The Show Detail Frame component surrounding the task flow region does not have a fixed height (specified using its contentStyle attribute).
Using an Injector with SSL
Consuming an SSL resource requires a Pagelet Producer connection over HTTPS, including:
-
Secure port mapping between WLS and Pagelet Producer
-
Container should also be accessed via HTTPS
The injector can modify HTML markup that Pagelet Producer proxies:
-
Based on URL pattern (resource scope)
-
Based on MIME type
-
Based on location (top or bottom) or exact text match (before, after, replace)
-
Content page defines what gets injected
Advanced URL Rewriting
This section describes how to use Pagelet Producer's auto-login feature, and how to design a custom parser.
This section contains the following topics:
Using Auto-Login
Auto-login lets you pass username/password credentials to a back-end resource. These can be passed as either:
-
Static credentials – one set for all users
-
Dynamically acquired from user at first resource access and then stored in secure Credential Vault
-
User Profile (capture and pass username)
The supported authentication mechanisms for auto-login are:
-
Basic login
-
Form login (used in the following example)
-
NTLM login
-
Kerberos login
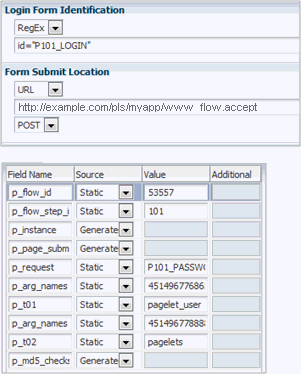
The example in Figure 20-35and the code snippet below shows how you can use auto-login to redirect to a login page:
Figure 20-35 Pagelet Producer - Auto-Login Example
Description of "Figure 20-35 Pagelet Producer - Auto-Login Example"
The following code reflects the settings in Figure 20-35:
<form action="wwv_flow.accept" method="post" name="wwv_flow" id="wwvFlowForm" autocomplete="off">
 <input type="hidden" name="p_flow_id" value="53557" id="pFlowId" />
<input type="hidden" name="p_flow_step_id" value="101" id="pFlowStepId" />
<input type="hidden" name="p_instance" value="724836084846701" id="pInstance" />
<input type="hidden" name="p_page_submission_id" value="1431956852758801" id="pPageSubmissionId" />
<input type="hidden" name="p_request" value="" id="pRequest" />
<div id="login"> <div id="messages"></div> <div id="login-main">
<table id="myapp_layout_45149677586857064102" border="0" class="formlayout" summary="" role="presentation" datatable=0 >
<tr><td align="right"><label for="P101_USERNAME" tabindex="999“><a class="optional-w-help"
 href="javascript:popupFieldHelp('45149677686365064111','724836084846701')" tabindex="999">
User Name</a></label></td> <td colspan="1" rowspan="1" align="left"><input
type="hidden" name="p_arg_names" value="45149677686365064111" /><input type="text"
id="P101_USERNAME" name="p_t01" value="" size="20" maxlength="100" class="text_
field" /></td></tr><tr><td align="right"><label for="P101_PASSWORD" tabindex="999"><a class="optional-w-help"
href="javascript:popupFieldHelp('45149677888869064121','724836084846701')" tabindex="999">Password</a></label></td> <td colspan="1" rowspan="1"
align="left"><input type="hidden" name="p_arg_names" value="45149677888869064121"/> <input type="password" name="p_t02" size="20"
maxlength="100" value="" id="P101_PASSWORD" class="password" onkeypress="return
submitEnter(this,event)" /> <input type="button" value="Login"onclick="myapp.submit('LOGIN');" id="P101_LOGIN" /> </td></tr>
</table> Please refer to "Using Myapp" in the Myapp User's Guide for more
information.</div> </div> <input type="hidden" name="p_md5_checksum" value="" />
<input type="hidden" name="p_page_checksum" value="D95DBE8607E971820E98E93FC0EC064E" /></form>
Using a Custom Parser
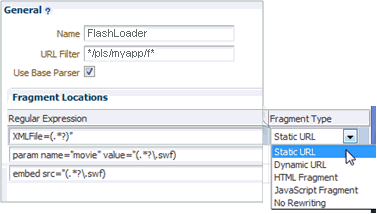
Parsers let you extend or change built-in logic for URL parsing. Using a URL Filter and regular expressions, you can narrow down the part of the page that the parser should modify (Figure 20-36).
Figure 20-36 Pagelet Producer - Custom Parser Example
Description of "Figure 20-36 Pagelet Producer - Custom Parser Example"
Using regular expressions lets you specify the HTML fragment to parse. The first grouping expression, denoted by parentheses, identifies the fragment itself, while the rest of the expression provides the context for finding it. A pluggable parser framework lets you fine-tune how the proxy recognizes different types of content based on MIME type, HTTP headers or URL.
In this example, there are three URLs in two places within the page markup that need to be modified to make Flash work:
<embed src=“ /i/flashchart/anychart_5/swf/OracleAnyChart.swf?
XMLFile=http://example.com/pls/myapp/myapp_ util.flash?p=53557:1:74175370346201:FLOW_FLASH_CHART5_R45192463162785599619_en"
 <param name="movie" value=“/i/flashchart/anychart_5/swf/AnyChart.swf?
XMLFile=http://example.com/pls/myapp/myapp_ util.flash?p=53557:1:74175370346201:FLOW_FLASH_CHART5_R45192463162785599619_en"
The following three regular expressions (shown under Regular Expressions in Figure 20-36) are used to achieve this:
-
XMLFile=(.*?)“ -
param name="movie" value="(.*?\.swf) -
embed src="(.*?\.swf)

