13 Managing People Connections
Configure People Connections in WebCenter Portal to create social networking tools and track portal user activities.
Permissions: To perform the tasks in this chapter, you must be granted the WebLogic Server
Adminrole through the Oracle WebLogic Server Administration Console and theAdministratorrole granted through WebCenter Portal Administration.
For more information about roles and permissions, see Understanding Administrative Operations, Roles, and Tools.
Topics:
Parent topic:Administering Tools and Services
About the People Connections Service
The People Connections service provides social networking tools for creating, interacting with, and tracking the activities of one’s connections. Its features enable users to manage their personal profiles, access the profiles of other users, provide ad hoc feedback, post messages, track activities, and connect with others.
People Connections features include:
-
Activity Stream for viewing user activities generated through application or social networking actions.
-
Connections for connecting to other application users to share information, comment on performance, exchange messages, and track activity
-
Feedback for giving ad hoc performance feedback to other users
-
Message Board for posting messages to other users
-
Profile for entering information about yourself and viewing the information of other users
-
Publisher for publishing status messages and posting files and links
The People Connections service provides task flows for using it features. For information on adding People Connections functionality to a portal, see Adding Connections to a Portal in Building Portals with Oracle WebCenter Portal.
Always use the Fusion Middleware Control or WLST command-line tool to review and configure back-end services for WebCenter Portal. Any changes you make to WebCenter Portal post-deployment are stored in MDS metadata store as customizations. Most changes you make to WebCenter Portal tools and services configuration through Fusion Middleware Control or using WLST are not dynamic. For your changes to take effect, you must restart the managed server where the application is deployed.
People Connections Prerequisites
To use the People Connections service, you must have the WEBCENTER schema installed in your database.
In a production environment, an enterprise can leverage its back-end identity store as a means of providing People Connections with a population of potential connections. In a development environment, developers can add test-users to the jazn-data.xml file.
For example, Profile takes the bulk of its information from the back-end identity store that provides WebCenter Portal with its users. Additionally, Profile may offer opportunities for altering some of this information and for providing additional data not included in the identity store.
For information about connecting to a back-end (LDAP) identity store for the production version of your application, see Configuring the Identity Store.
Configuring People Connections for WebCenter Portal
This section steps you through the process of setting application-wide values for People Connections features. It includes the following subsections:
Accessing People Connections Administrative Settings
To access People Connections administrative settings:
-
In the portal browser, click the Administration tile, then click Settings.
-
On the Settings page, click Tools and Services.
You can also enter the following URL in your browser to navigate directly to the Tools and Services pages:
http://host:port/webcenter/portal/admin/settings/tools -
Click People Connections.
Configuring Activity Stream
Activity Stream is for publishing and tracking users’ application activity. Activity Stream configuration settings specify the users and activities that are streamed, who can see a user’s streamed activities, and whether liking and commenting is available on each streamed activity.
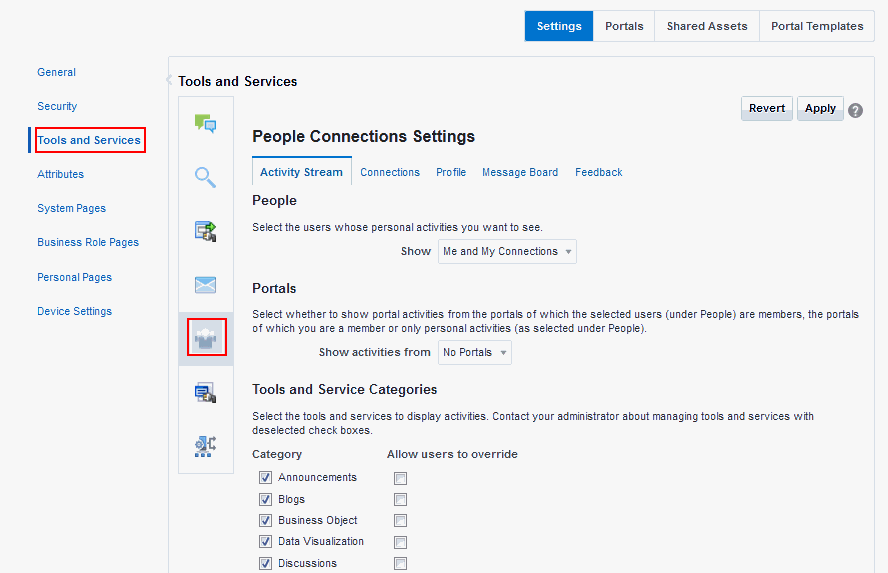
Who can view a user’s activities and the types of activities tracked depend on Activity Stream configuration.
Table 13-1 Activities Tracked by Activity Stream
| Feature Area | Tracked Activities | Scope | Activities Shared or Private |
|---|---|---|---|
|
Connections |
|
Home portal |
Shared with inviter and invitee's connections |
|
Documents |
|
|
|
|
Events |
|
Portal |
Shared with other portal members |
|
Feedback |
|
Home portal |
Shared with whomever is permitted to view such activities (see Setting Feedback Preferences in Using Portals in Oracle WebCenter Portal). |
|
Lists |
|
Portal |
Shared with other portal members |
|
Message Board |
|
Home portal |
Shared with whomever is permitted to view such activities (see Setting Message Preferences in Using Portals in Oracle WebCenter Portal). |
|
Pages |
|
|
|
|
Profiles |
|
Home portal |
Shared with whomever is permitted to view such activities (see Setting Profile Preferences in Using Portals in Oracle WebCenter Portal). |
|
WebCenter Portal Management |
|
Portal |
Shared with other portal members |
|
Tagging |
|
|
|
Configure Activity Stream to show or hide actions from these categories:
-
People—For determining whose activities to show, either the current user’s or both the current user and the user’s connections.
-
WebCenter Portal—For determining whether to show activities from all available portals or just the Home portal.
-
Service Categories—For selecting the services from which to report activities and enabling users to override these default selections in their personal preferences or preventing users from overriding.
-
Privacy—For selecting who may see the current user’s activities.
-
Comments and Likes—For enabling users to comment on a posted activity and like a posted activity
To configure Activity Stream for all users:
-
On the Settings page, click Tools and Services.
You can also enter the following URL in your browser to navigate directly to the Tools and Services pages:
http://host:port/webcenter/portal/admin/settings/tools -
Click the icon for People Connections Settings.
-
Click the Activity Stream tab.
-
Under People, select whose activities to show:
-
Only Me—Show only the current user’s activities in his or her view of the Activity Stream.
-
Me and My Connections—Show the current user’s activities and the activities of that user’s connections in his or her view of the Activity Stream.
-
No Personal—Omit all activities streamed from the Home portal in the current user’s view of his or her Activity Stream.
-
-
Under Portals, select to show activities from:
-
All Portals—All portals the user has access to
-
My Portals—All portals the user manages
-
No Portals—Only the Home portal
-
-
Under Service Categories, select the services from which to publish activity.
Note: The activities of services that are not selected are still tracked, but they do not appear in the Activity Stream. If you select to show the activities at some later point, then all of the activities that occurred when it was not selected will appear in the Activity Stream.
Table 1 lists the activities tracked by the Activity Stream.
-
Optionally, select Allow Owner Override to enable users to override a setting for a given service through their personal preferences.
Deselect this check box to prevent users from overriding the application defaults you set here.
-
Under Privacy, specify who can view the current user’s activities and whether users can override this setting in their personal preferences.
Table 13-2 Activity Stream Privacy Options
| Option | Description |
|---|---|
|
Allow all of my activities to be viewed by |
Specify who can view another user's activities. Choose from:
|
|
Allow Owner Override |
Enable users to override the application default settings using their own People Connections Preferences. |
-
Expand the Likes and Comments node, and specify whether liking and commenting are allowed:
-
Select Enable comments on objects in the Activity Stream to enable users to comment on a given Activity Stream item. Deselect the check box to prevent users from commenting.
-
Select Enable others to like objects in the Activity Stream to enable users to like an Activity Stream item. Deselect the check box to prevent users from liking.
Tip: Users can like and comment on streamed items that include objects. For example, users can like or comment on “Jack posted a message.” Users cannot like or comment on system messages, such as “Jack and Jill are now connected.”
-
-
Click Apply.
Configuring Connections
Connections configuration involves selecting who can view another user’s connections and whether users accept invitations to connect automatically.
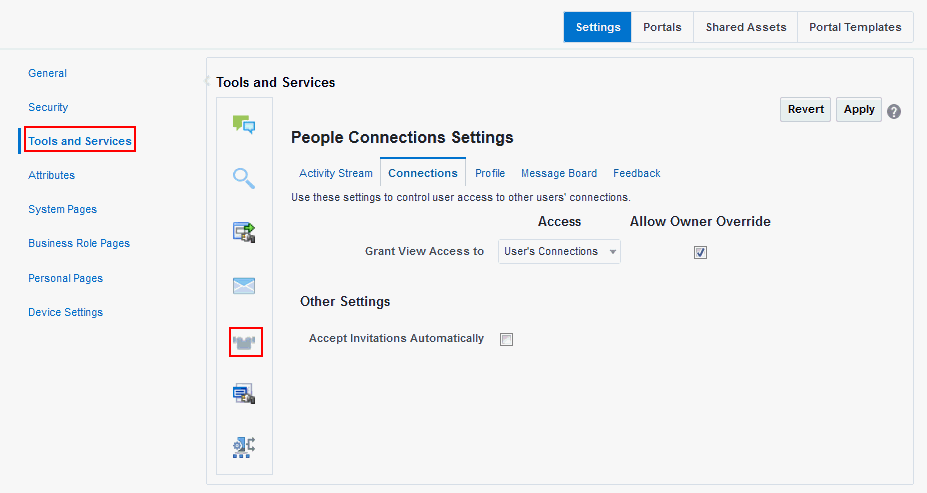
To configure Connections:
-
On the Settings page (see Accessing the Settings Pages in WebCenter Portal Administration), click Tools and Services.
You can also enter the following URL in your browser to navigate directly to the Tools and Services pages:
http://host:port/webcenter/portal/admin/settings/toolsSee Also: WebCenter Portal Pretty URLs in Building Portals with Oracle WebCenter Portal.
-
Click the icon for People Connections Settings.
-
Click the Connections tab.
-
Select the required connection options:
Table 13-3 Connections Configuration Options
| Option | Description |
|---|---|
|
Grant View Access to |
Classes of users to whom to grant automatic view access to a user's connections. The users you select can view and interact with another user's connections. Choose from:
|
|
Allow Owner Override |
Allow or prohibit users from overriding the administrator View access setting:
|
|
Accept Invitations Automatically |
|
- Click Apply.
Configuring Profile
Every authenticated user has a profile that displays personal information, such as email address, phone number, office location, department, manager, direct reports, and so on. All but three attributes are stored and read from the LDAP identity store that is configured for WebCenter Portal. The three exceptions are: profile photo, expertise, and Publisher status messages.
Use People Connections Settings for Profile to specify whether users are allowed to change their sign in password, which profile sections display for different types of users, whether users are allowed to update their profile details, and the profile settings that users may edit.
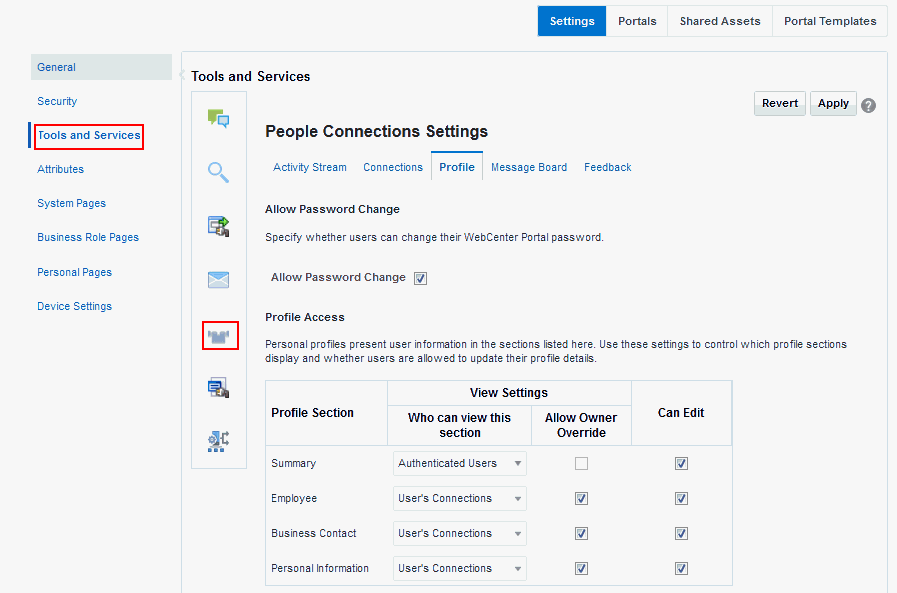
Personal profiles are presented in four profile sections: Summary, Employee, Business Contact, Personal Information. Each section provides information related to the section name. For example, Summary includes a collection of basic details, such as the user’s name, email address, and office location.
To configure Profile:
-
On the Settings page (see Accessing the Settings Pages in WebCenter Portal Administration), click Tools and Services.
You can also enter the following URL in your browser to navigate directly to the Tools and Services pages:
http://host:port/webcenter/portal/admin/settings/toolsSee Also: WebCenter Portal Pretty URLs in Building Portals with Oracle WebCenter Portal.
-
Click the icon for People Connections Settings.
-
Click the Profile tab.
-
Select the required options:
Table 13-4 Profile Configuration Options
| Option | Description |
|---|---|
|
Allow Password Change |
Specify whether users are allowed to change their sign in password.
|
|
Profile Access |
Specify which profile sections to show and whether users are allowed to update their profile details. View Settings—Specify which users can view the associated profile section, and whether users can change these defaults in their personal Preferences. Note: View Settings for the Summary section control not only who can view summary details but also who can search for the user (for example, through global search, people pickers, and the searches one uses to find and invite other users to connect). For example, if Everyone is selected; if None is selected, then the user will not appear in search results.
Set values for:
Can Edit—Select to enable users to edit the associated profile section of their own personal profiles; deselect to prohibit editing. This setting also controls whether an Edit link appears in the Profile task flow, but it does not affect the appearance of the Edit button or links on the default version of the Profile page. You can use the other Profile administrative settings to prohibit users from actually changing any Profile details. |
|
Profile Attributes - Edit Settings |
Specify the profile section attributes that users are allowed to edit by default. Under Allow Update:
|
| Profile Synchronization settings |
Specify profile synchronization settings:
|
- Click Apply.
Configuring Message Board
Message Boards provide a way for users to view and post messages to their connections. Configuration settings for Message Board provide controls for who can view and post messages, who can edit and delete the messages they leave, who can delete and change the visibility of messages they receive, and whether commenting and liking are available on each message.
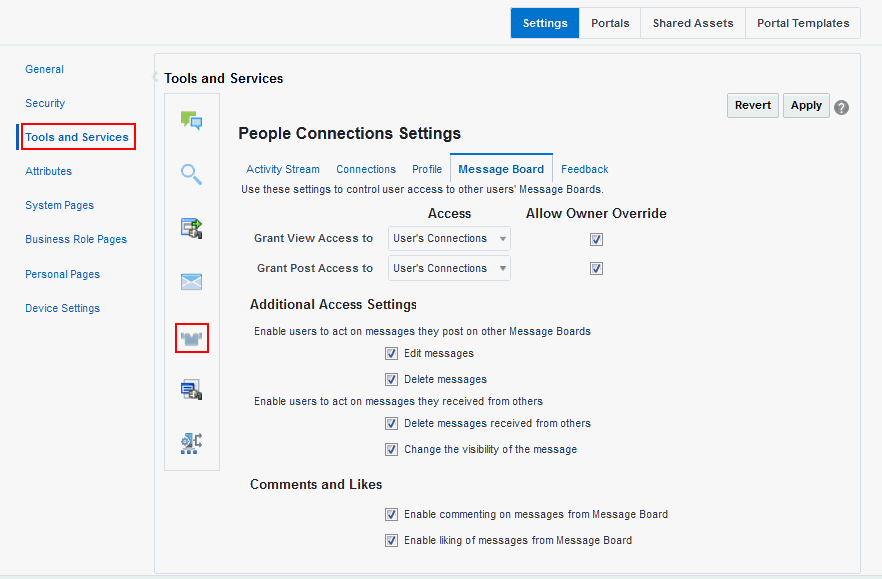
To configure Message Board:
-
On the Settings page (see Accessing the Settings Pages in WebCenter Portal Administration), click Tools and Services.
You can also enter the following URL in your browser to navigate directly to the Tools and Services pages:
http://host:port/webcenter/portal/admin/settings/toolsSee Also: WebCenter Portal Pretty URLs in Building Portals with Oracle WebCenter Portal.
-
Click the icon for People Connections Settings.
-
Click the Message Board tab.
-
Specify the required options:
Table 13-5 Message Board Configuration Options
| Option | Description |
|---|---|
|
Grant View Access to |
Specify who can view Message Board messages.
|
|
Grant Post Access to |
Specify who can post Message Board messages.
|
|
Allow Owner Override |
Specify whether users can override these administrative defaults.
|
|
Enable users to act on messages they post on other Message Boards |
Specify whether users are allowed to act on the messages they post.
|
|
Enable users to act on messages they received from others |
Specify whether users can act on messages they receive from others.
|
|
Enable commenting on messages from Message Board |
Specify whether users can comment on messages that are posted on a Message Board.
|
|
Enable liking of messages from Message Board |
Specify whether to enable users to like a message.
|
- Click Apply.
Configuring Feedback
Feedback provides a way for users to view and post feedback for other application users. Configuration settings for Feedback provide controls for granting view and post access for feedback a user receives, granting view access for feedback a user gives, allowing users to override administrative default settings, enabling users to delete the feedback they post, and enabling a user to show or hide feedback left by others.
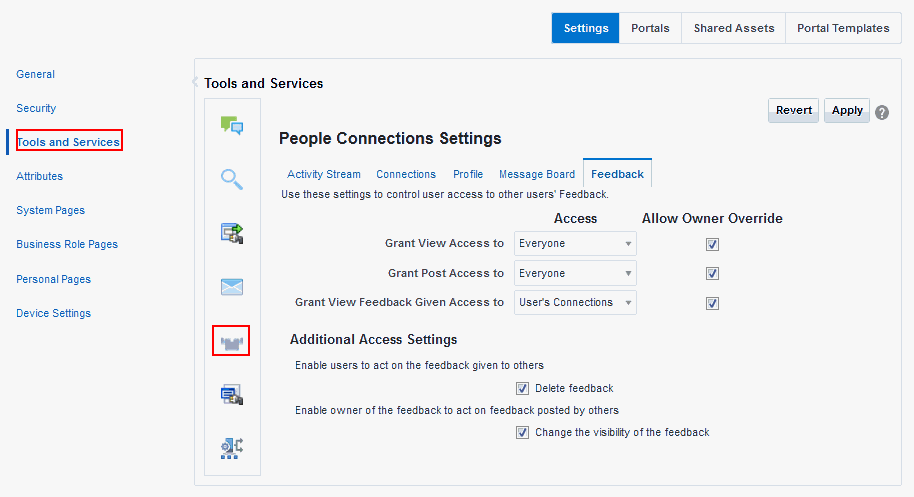
To configure Feedback:
-
On the Settings page (see Accessing the Settings Pages in WebCenter Portal Administration), click Tools and Services.
You can also enter the following URL in your browser to navigate directly to the Tools and Services pages:
http://host:port/webcenter/portal/admin/settings/toolsSee Also: WebCenter Portal Pretty URLs in Building Portals with Oracle WebCenter Portal.
-
Click the icon for People Connections Settings.
-
Click the Feedback tab.
-
Select the required options:
Table 13-6 Feedback Configuration Options
| Option | Description |
|---|---|
|
Grant View Access to |
Specifies who can view the current user's Feedback
|
|
Grant Post Access to |
Specifies who can post user Feedback
|
|
Grant View Feedback Given Access to |
Specifies who can see the View menu to switch between Feedback Given and Feedback Received in a Feedback task flow
|
|
Allow Owner Override |
Specifies whether users can override these administrative defaults
|
|
Enable users to act on the feedback given to others |
Indicates whether users can delete the Feedback they post
|
|
Enable owner of the feedback to act on feedback posted by others |
Indicate whether to enable users to hide or show Feedback from another user.
|
- Click Apply.
Archiving the Activity Stream Schema
Administrators can use these WLST commands to archive and restore data in the Activity Stream schema:
-
archiveASByDate—Archive activity stream data that is older than a specified date. -
archiveASByDeletedObjects—Archive activity stream data associated with deleted objects. -
archiveASByClosedSpaces—Archive activity stream data associated with portals that are currently closed. -
archiveASByInactiveSpaces—Archive activity stream data associated with portals that have been inactive since a specified date. -
restoreASByDate—Restore archived activity stream data from a specified date into production tables. -
truncateASArchive—Truncate activity stream archive data. -
archiveASBySpace—Archive activity stream data associated with a portal. -
archiveASAllSpaces—Archive activity stream data associated with all portals. -
archiveASByUser—Archive activity stream data associated with a user. -
archiveASAllUsers—Archive activity stream data associated with all users. -
archiveASByDeletedActors—Archive activity stream data associated with deleted actors. -
showASStatistics—Report activity stream statistics.
For more information, see Activity Stream in WebCenter WLST Command Reference Reference.
Specifying a Management Chain for Organization View
The Organization View task flow and the Organization tab on a Profile page can provide a visualization of your management chain, for example, they can render a view of a manager and the manager’s direct reports.
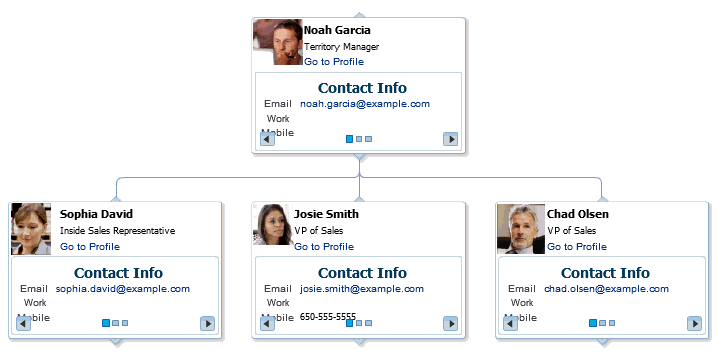
By default, the values that define the management chain for these organization views are blank. This means that managers are not automatically specified for users in the back-end identity store that provides user details.
Tip: The value for Manager on the Profile page’s About tab is also defined by the methods suggested in this section.
For the management chain to be rendered in organization views, the back-end identity store that is used for WebCenter Portal authentication must be set up in such a way that direct report users have a manager attribute. And the manager attribute must be defined as the Distinguished Name (DN) of their manager user.
Tip: In an LDAP environment, a user can be managed by only one person; in the same environment, a user can manage many people.
Example Embedded LDAP Configuration
You can specify a management chain within the Oracle WebLogic Server (WLS) embedded LDAP or within an external LDAP, such as Oracle Internet Directory (OID). However, the management chain you define through the embedded LDAP is for testing or proof of concept and not for production. For production, you must use an external LDAP, such as OID, for the identity store for WebCenter Portal authentication.
See Also: For more information, see Configuring the Identity Store, or refer to the documentation provided with your LDAP implementation.
This example describes how to define a management chain within the embedded LDAP in WebLogic Server for testing or proof of concept.
Note: The steps provided in this example are similar to those you take for an external LDAP. That is, you create an attribute (
manager) and set a value on the attribute for each user. For this value, enter the DN of the selected user’s manager.
In this example, there are three users:
-
user1 -
user2 -
manager_user
To define a management chain with these users:
-
Enable browsing of the embedded LDAP using an external viewer, such as Apache Directory Studio:
-
Go to the WLS Administration Console, and log in as the administrator user.
-
Click your domain (for example,
wc_domain), then open the Security tab and then the Embedded LDAP subtab (Figure 7).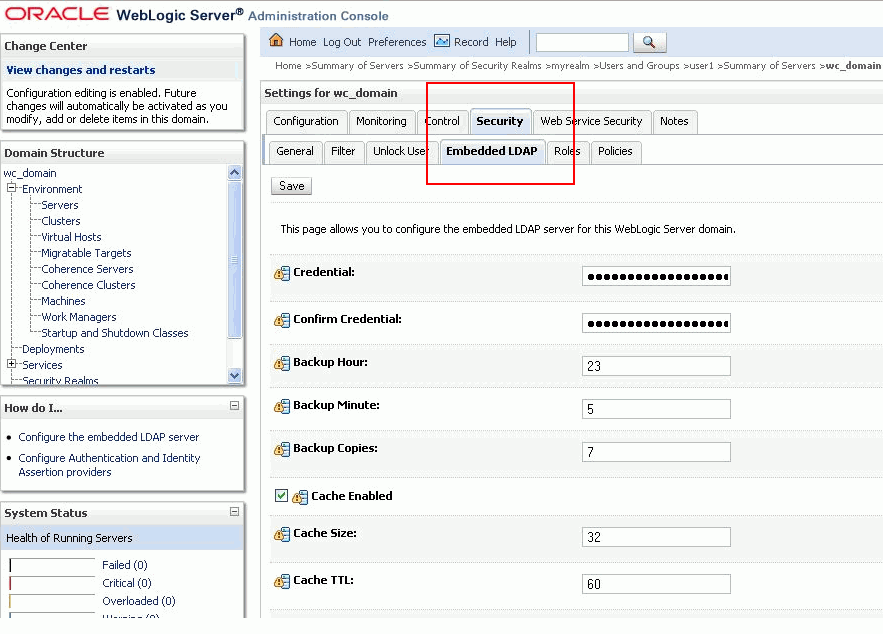
-
Enter a value in the Credential field, and then reenter that value in the Confirm Credential field.
Tip: The default credential is a randomly generated password. Set it to something memorable.
-
Restart your administration and managed servers.
-
-
Start up the LDAP viewer you selected in Step 1, and create a connection using the following details:
-
hostname(for example,example.com) -
port(the WLS administration port, for example7001) -
Bind DN(cn=Admin) -
Password(that is, the credential you set in Step 1c)
-
-
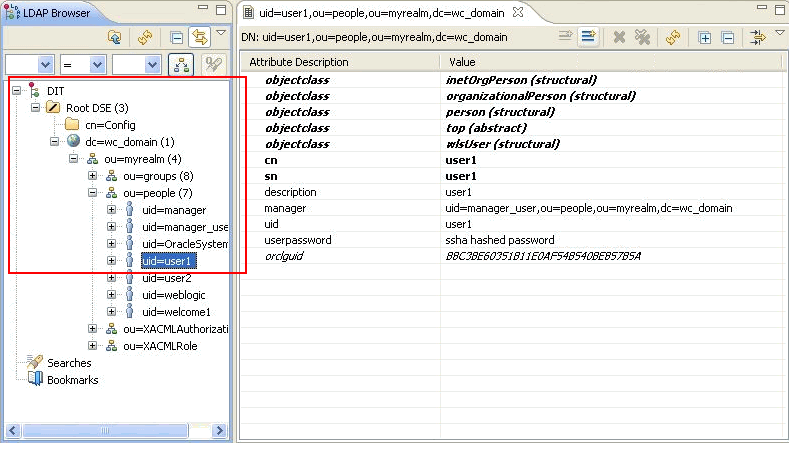
Navigate to
user1by finding the users within the DIT tree (Figure 8).For example, click in succession:
-
dc=wc_domain -
ou=myrealm -
ou=people -
uid=user1
-
-
In the Attribute Description column, add a new attribute of type
manager.Tip: Press Ctrl-Shift-+ to open the New Attribute dialog.
-
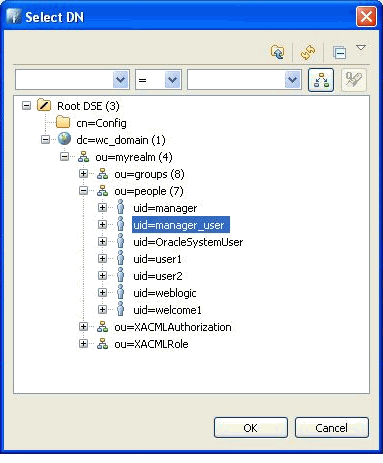
For the attribute value, select the DN for
manager_user(Figure 9).For example, under the root, select in succession:
-
dc=wc_domain -
ou=myrealm -
ou=people -
uid=manager_user
-
-
Repeat Steps 3 through 5 for
user2.
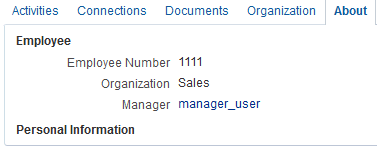
Now user1 and user2 are managed by manager_user. You can check this by logging in to WebCenter Portal as user1 and navigating to the About tab of the Profile page. The user manager_user is shown as the manager (Figure 10).
Tip: Click the value for Manager (in this example,
manager_user) to view the manager’s profile. Access the Organization tab to see the organization view associated with the currently viewed profile.
Setting Profile Configuration Properties
Administrators can use WLST commands to set profile configuration properties, such as setting the profile version that appears in the user interface. Administrators can perform the following actions:
-
Set the profile configuration properties by running
setProfileConfig.Syntax:
setProfileConfig(appName, [ProfilePageVersion], [ProfileSyncHourOfDay], [ProfileSyncFrequencyInDays], [server], [applicationVersion])This command takes the following parameters:
-
appName- The name of the WebCenter Portal application in which to perform this operation. For example,webcenter. -
ProfilePageVersion- (Optional) The profile page version to use. Valid values for ProfilePageVersion are:-
v1- Use old-style Profile pages (11.1.1.7.0 and earlier) -
v2- (default) Use the new Profile page format (introduced in 11.1.1.8.0)
**Note:** Profile page version changes will not take effect until you restart the server where the WebCenter Portal application is deployed. -
-
ProfileSyncHourOfDay- (Optional) The hour to start profile synchronization. Any value between 0 and 23. The default value is 23, equivalent to 11pm. -
ProfileSyncFrequencyInDays- (Optional) How often profile synchronization takes place (in days). Any value greater than 0. The default value is 7.
Note: If you omit a parameter, the corresponding configuration remains unchanged.
-
-
List the current profile configuration settings by running
listProfileConfig.Syntax:
listProfileConfig(appName)This command takes the following parameter:
appName- The name of the WebCenter Portal application to perform this operation on. For example,webcenter.
-
Get the current value of a profile property by running
getProfileConfig.Syntax:
getProfileConfig(appName, key, [server], [applicationVersion])This command takes the following parameters:
-
appName- The name of the WebCenter Portal application to perform this operation on. For example,webcenter. -
key- Name of a the Profile Config property to get. Valid values include:-
ProfilePageVersion -
ProfileSyncHourOfDay -
ProfileSyncFrequencyInDays
-
-
server- (Optional) The name of the target server where the application is deployed. -
applicationVersion- (Optional) The version number of the application.
-
Synchronizing Profiles with the Identity Store
Administrators can use WLST commands to synchronize profile information in the LDAP identity store with WebCenter Portal. Administrators can perform the following actions:
-
Start or stop profile synchronization for all users or a single user by running
startSyncProfilesorstopSyncProfiles. -
Check whether profile synchronization is currently in progress by running
isSyncProfilesRunning. -
Set various profile synchronization options:
-
Specify whether to synchronize user profile photos in LDAP by running
setProfilePhotoSync. -
Synchronize profile information for a specific user by running
syncProfile.
-
For more information, see the following command references in WebCenter WLST Command Reference Reference: