17 Working with Skins
Permissions:
To perform the tasks in this chapter on shared skins, you must have the application-level Create, Edit, and Delete Skins permission. Users with the Application Specialist role have this permission by default. For more information about application-level permissions, see About Application Roles and Permissions in Administering Oracle WebCenter Portal.
To perform the tasks in this chapter, you need one of the following portal-level permissions:
-
Assets: Create, Edit, and Delete AssetsorCreate AssetsandEdit Assets(standard permissions) -
Skins: Create, Edit, and Delete SkinsorCreate SkinsandEdit Skins(advanced permissions)
See Also:
For information about defining a portal's look and feel how using skins in conjunction with other assets, see Creating a Look and Feel for Portals.
About Skins
A skin is a resource that defines colors, fonts, and other aspects of various components used on the pages of a portal. A skin changes the way the user interface appears, and not how the application functions. You can use skins to give individual portals a distinct personality or to apply specific branding, achieving the appearance that suits your organization.
On the Assets and Shared Assets pages, WebCenter Portal provides several built-in skins, and you can create new custom skins. Alternatively, portal designers can develop custom skins to reflect a personality, or to incorporate specific branding. If a skin is a shared asset (available to all portals), it is shown on the Assets page of all portals along with portal-specific skins. Within a portal, you can copy an existing skin.
Note:
Creating and editing a skin is a complex task, requiring knowledge of CSS and how the skin is used in page templates. As such, skins should be developed by an experienced Web Developer. Oracle recommends that developers use JDeveloper to develop skins for portals. When fully developed, the developer can publish skins directly to WebCenter Portal (the portal server) or to a specific portal for immediate use or for testing. Alternatively, the developer can export the skin to a file and upload the skin to WebCenter Portal later.
For more information, see Developing Skins in Developing for Oracle WebCenter Portal.
Skins are based on the Cascading Style Sheet (CSS) specification. A skin is made up of various selectors that define the CSS styles or properties of different parts of a component. You can adjust the look and feel of any component by changing its style-related properties. Some selectors, like a background or foreground color or a font style, may be global and affect all components.
Each skin works together with a page template to determine the overall look and feel of the pages in your portal. While the page template controls the location and behavior of components on the page, the skin controls the visual appearance of those components. The skin selectors in the skin correspond to the style classes in the page template, so when designing a skin, you must ensure that it is usable with the intended page template.
See Also:
By default, a portal inherits its skin from the default specified for all portals by the system administrator.
Each page template can define a preferred skin to identify the skin that works best with that page template. When a page template is selected as the new default page template for a portal or as the system default, the default skin automatically updates to the page template's preferred skin.
You can optionally select a different skin for an individual portal, overriding the default skin setting. When you change the skin for a portal, the skin is applied to all the pages of the portal. However, the portal administration pages are not affected. They always appear with the default skin, Alta.
WARNING:
Changing the default skin to something other than the preferred skin for the selected default page template may produce unexpected results.
About the Built-In Skins
WebCenter Portal provides the following built-in skins to get you started.
-
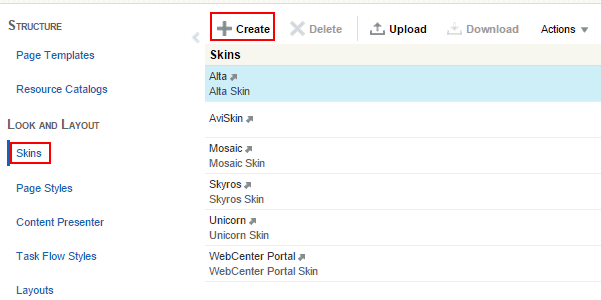
Alta
-
Skyros
-
WebCenter Portal
Note:
Beginning with Release 12c (12.2.1.4.0), Oracle WebCenter Portal has deprecated the support for the built-in skins Mosaic and Unicorn. However, if you have upgraded from a prior release, these skins remain available in your upgraded instance.
You can change the appearance of a specific portal or the entire application by using one of these built-in skins. These built-in skins are designed to work with specific built-in page templates. For more information, see About the Built-In Page Templates.
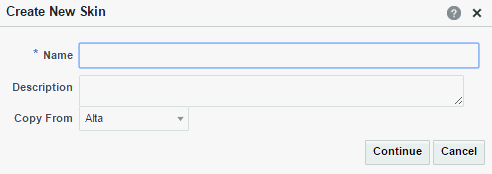
You cannot directly edit any of the built-in skins. If you want to alter one of these skins to make it match your requirements, you must create a new skin, selecting the built-in skin from the Copy From list, and then make the required adjustments in the new skin.
See Also:
Setting the Default Skin
When a user creates a page, the default skin is used to determine the appearance of the page and its components. This helps to ensure that all pages in a portal have a consistent appearance.
Skins work in combination with page templates to determine the look and feel of the pages in a portal. When you set the default page template, the default skin is automatically set to the preferred skin for that page template, if it has one.
Note:
If you change the default skin to something other than the page template's preferred skin, the pages in your portal may not look as expected. For more information, see Setting the Preferred Skin for a Page Template.
This section includes the following subsections:
Setting the Default Skin for a Portal
Note:
To perform this task, you must be a portal manager or member with Administration: Manage Security and Configuration or Administration: Manage Configuration permission in the portal.
For more information about permissions, see About Roles and Permissions for a Portal.
Every portal has a set of default assets, including a default skin. A portal's default skin is applied to all the pages of the portal except the administration pages. Administration pages always use the Alta skin. When you create a portal, by default, the portal inherits the preferred skin of the page template defined for the portal template used when the portal was created. If the portal template does not define a default page template, the preferred skin of the system default page template is used instead.
To set a different default skin for the pages in your portal, see Changing the Skin for a Portal.
Setting the Default Skin for All Portals
Note:
To perform this task, you must be a system administrator (have the Administrator role, or the Portal Server: Manage All or Portal Server: Manage Configuration permission).
System administrators can select a skin to use as the system, or application-level, default skin. The system default skin is applied to pages in the Home portal and to pages in portals where the portal template used to create the portal did not define a default skin.
The system default skin is not applied to existing portals for which a specific skin has already been set. Also, the system default skin is not applied to the administration pages. Administration pages always use the Alta skin.
For information about how to set the system default skin, see Choosing a Default Skin in Administering Oracle WebCenter Portal.
Setting the Default Skin for the Home Portal
By default, the appearance of the Home portal is determined by the system default skin. However, users can change the skin applied to their view of the Home portal through user preference settings. For more information, see Changing the Look and Feel of Your View in Using Portals in Oracle WebCenter Portal.
Creating a Skin
If none of the available skins meet your requirements, you can create your own. When you create a skin, you use an existing skin as the starting point for the new skin.
Note:
Creating and editing a skin is a complex task, requiring knowledge of CSS and how the skin is used in page templates. While you can develop skins in WebCenter Portal as described here, the editing capabilities are limited. Oracle recommends that developers use JDeveloper to develop skins for portals. New skins can also be developed from scratch using JDeveloper. When fully developed, the developer can upload skins directly to WebCenter Portal (the portal server) for immediate use or for testing. Alternatively, the developer can export the skin to a file and upload the skin to WebCenter Portal later.
For more information, see Developing Skins in Developing for Oracle WebCenter Portal.
If you choose to create a skin in WebCenter Portal, giving you the option to later refine it in JDeveloper, you can do so at the application level or at the portal level. Application-level skins are available for use in all portals, unless the portal has been specifically excluded. Portal-level skins are available to use only in the portal in which they are created.
To create a skin:
Editing a Skin
In a portal, you can edit a skin to meet your requirements. Note that you can not edit built-in skins; you can copy a built-in skin to create a new custom skin for a portal, then edit that copy.
Note:
Creating and editing a skin is a complex task, requiring knowledge of CSS and how the skin is used in page templates. Therefore, skins should be developed by an experienced Web Developer. Oracle recommends that developers use JDeveloper to modify skins for portals. New skins can also be developed from scratch using JDeveloper. When fully developed, the developer can upload skins directly to WebCenter Portal (the portal server) for immediate use or for testing. Alternatively, the developer can export the skin to a file and upload the skin to WebCenter Portal later.
For more information, see Developing Skins in Developing for Oracle WebCenter Portal.
A skin must define the required ADF Faces skin selectors for the components in your portal. For example, you can use the .ADFDefaultFontFamily:alias selector to specify the font family for your portal as follows:
.AFDefaultFontFamily:alias {
font-family: Tahoma, Verdana, Helvetica, sans-serif;
}
For information about:
-
ADF Faces skin selectors in general, see Working with ADF Skin Selectors in Developing ADF Skins. Also refer to JDeveloper's online help for information about the selectors that you can use in a skin. These are documented in the "Skin Selectors for Fusion's ADF Faces Components" and "Skin Selectors for Fusion's Data Visualization Tools Components" topics in JDeveloper's online help.
-
Defining ADF Faces component style selectors, see Properties in the ADF Skinning Framework in Developing ADF Skins and Changing the Style Properties of a Component in Developing Web User Interfaces with Oracle ADF Faces.
In addition to ADF skin selectors, a skin's CSS file contains three WebCenter Portal-specific selectors. These are:
-
.WCPageTemplate:alias- Defines the background color and the image and its position for the main area of the page template below the top banner, as shown in the example below:.WCPageTemplate:alias { background-image:url(/afr/fusion/dbd_centerGradient.png); background-repeat:repeat-y; background-position:top center; background-color: #024296; color: white; } -
.WCContent- Defines the background color of the area of the page template containing the actual page content..WCContent { background-color:#EEF3F8; border-top:1px solid #BECFE2; } -
.WCPortletContentMedium:alias- Defines the background color and image of task flows and portlets inshowDetailFramecomponents..WCPortletContentMedium:alias { background-image:url(/adf/images/gradient-275x275-fcfcfc.png); background-repeat:no-repeat; }
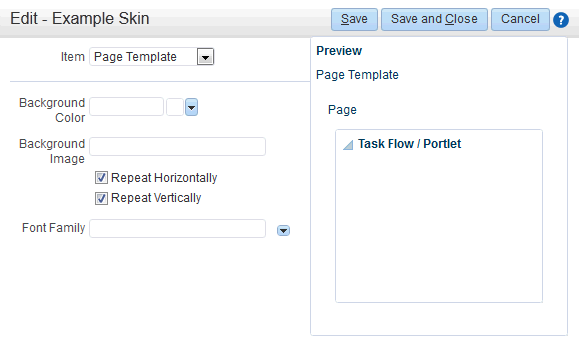
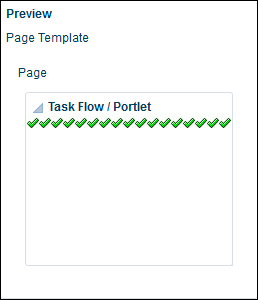
WebCenter Portal provides an Edit dialog to edit a skin's basic appearance settings by mapping target areas to the WebCenter Portal-specific skin selectors available in the CSS file.
To edit other skin selectors in the CSS file, you must edit the source code of the skin. While editing the source code of a skin, you can add, edit, or delete any skin selector to suit your requirements. For example, if you want to override the default font size, then in your skin's CSS file you can specify the required size in the skin selector, as follows:
.AFDefaultFont:alias
{
font-size:12px;
}
When you edit the source code of a skin using the Edit Source dialog, the format of the code is validated and an error message is displayed if you miss any tags or add them incorrectly.
See Also:
Note:
You must have a thorough understanding of CSS specification about selectors if you plan to edit skin selectors in the source code of your skin. You might get into a situation where your style is not getting picked up because the skin you are extending has a selector that is more specific than your selector.
To edit the basic appearance settings of a skin:
Managing a Skin
The following options are available on the Assets or Shared Assets page to enable you to manage skins:
See Also:
-
Create—For more information, see Creating a Skin.
-
Delete—You can delete a skin when it is no longer required.
For more information, see Deleting an Asset.
-
Upload—You can upload an archive file that contains a skin that has been developed using JDeveloper.
For more information, see Uploading an Asset.
-
Download—You can download a skin into an archive file for further development in JDeveloper.
For more information, see Downloading an Asset.
-
Actions
-
Copy—You can create a copy of a skin.
For more information, see Copying an Asset.
-
Security Settings—You can control whether all users or only specific users or groups can access a skin.
For more information, see Setting Security for an Asset.
-
Show Properties—Each skin has an associated Show Properties dialog that summarizes useful information about it.
For more information, see Viewing Information About an Asset.
-
Edit Source—You can directly edit the source code of a skin.
For more information, see Editing the Source Code of an Asset.
-
Edit Properties—Each skin has certain properties associated with it that control how it is displayed in the portal. You can edit these properties through the Edit Properties dialog.
For more information, see Setting Properties on an Asset.
Skins also define three default attributes:
-
skinIdspecifies the unique identifier of a skin. Typically, it is a combination of the skin family and the render kit, for example,BrightBlue.desktop. -
skinFamilyspecifies the family to which a skin belongs. It is an identifier that can be used by a number of skins with different render kits. For example, you could have a family namedBrightBlue. It can be used with renderkitdesktopormobile. -
skinExtendsspecifies the ID of the skin being extended. For example, suppose you like themidnightskin, but want a different font size in that skin. You can configure your skin to extend themidnight.desktopskin and then you can edit the source code of your skin to override the font size.
You can add, edit, or delete these attributes. For more information, see Setting Asset Attributes.
-
-
-
Available—You can control whether or not a skin is available for use in a portal by selecting or deselecting this check box.
For more information, see Showing and Hiding Assets.
Tip:
In addition to showing or hiding a skin, you can also control whether a shared skin is available to any, all, or selected portals in WebCenter Portal. For more information, see Setting Properties on an Asset.
-
Edit—For more information, see Editing a Skin.
