Managing AllPortalTemplates
With permission to manage all portal templates, you can modify and publish the templates created by others, and import or export templates.
Permissions: To perform the tasks in this chapter, you must have the default permissions of the
Application Specialistrole, or thePortal Templates: Manage Allpermission. Note that thePortal Creatorrole does not have this permission by default. Users with this permission can manage all portal templates in WebCenter Portal on the Portal Templates page in WebCenter Portal administration. Create, rename, set access to, delete, publish, hide, and import or export portal templates.
With the default permissions of the Authenticated-User role, or the application-level Portal Templates: Create Portal Templates permission, users can create, rename, set access to, and delete their own portal templates on the Portal Templates page in either the Home portal or WebCenter Portal administration. This permission does not allow users to import, export, or publish portal templates. See Working with Portal Templates.
Topics
About Managing Portal Templates
When creating a portal, users can base it on the built-in portal template, their own custom portal template, or a published portal template created by others. Portal templates provide a consistent look and feel and an efficient way to get started creating a portal that is configured as required by an organization. For more information, see About Portal Templates.
Use the Portal Templates page in WebCenter Portal administration to manage every portal template in WebCenter Portal. With the default permissions of the Application Specialist role, or the Portal Templates: Manage All permission, you can create, rename, set access to, delete, publish, hide, and import or export portal templates.
Users with the Portal Templates: Create Portal Templates permission can create, rename, set access to, and delete their own portal templates on the Portal Templates page in either the Home portal or WebCenter Portal administration. This permission does not allow users to import, export, or publish portal templates.
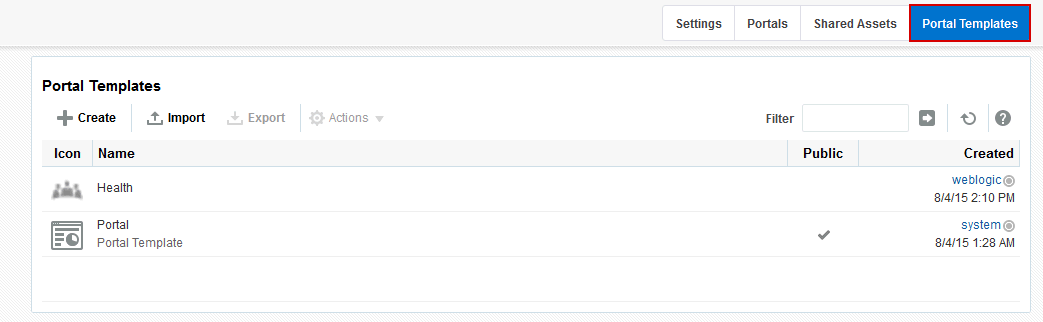
Viewing All Portal Templates
On the Portal Templates page in WebCenter Portal administration, you can quickly see who created each portal template, and the date on which it was created.
To see a list of every portal template in WebCenter Portal, together with their description, creator, and other useful information:
- From the Portals menu, select Administration.
-
Click the Portal Templates tab. Figure: PortalTemplates Page inWebCenter PortalAdministration
Description of the illustration wcsug_admin_template_tab.gif
Creating a New Portal Template
You cannot modify the built-in portal template, but any user with Portal Templates: Create Portal Templates permission can create new portal templates for use by all users to create portals. This permission is granted to the Authenticated User role by default.
To create a new portal template, you start by creating a portal based on an existing template, and customize it according to your requirements. Then, you can create a new portal template based on the customized portal that you have developed. During the creation of a portal template, you can select to inherit the documents, lists, member information, roles, or pages from the source portal. The security settings, including Advanced Permissions (if applicable), for the source portal are also copied by the template.
Users with the default permissions of the Application Specialist role (or any user with Portal Templates: Manage All permission) can publish any portal template for others to use; otherwise, it remains private and hidden from others.
Note:
The
Portal Creatorrole does not have default permissions to create or manage portal templates.
To create a portal template:
- Go to the Portal Templates page in either the Home portal or WebCenter Portal administration:
-
In the Home portal, click the Portal Templates tab. If this tab is not showing, click the Actions icon and select Personalize Pages, where you can select Show Page.
-
From the Portals menu, select Administration, then click the Portal Templates tab.
-
-
Click Create to open the Create dialog.
Note:
There must be at least one portal available to use as the basis for the new portal template. Otherwise, Create is not active.
Figure: Create aPortalTemplate Dialog: Setup Step
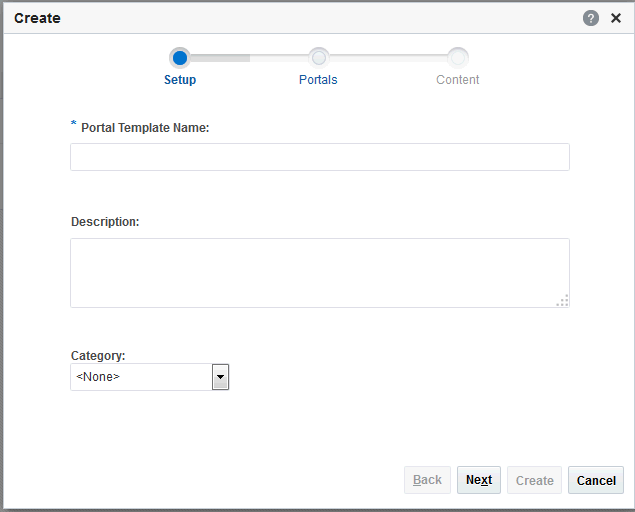
Description of the illustration wcsug_gs_savetmplt.gif
-
In the Setup step, enter a suitable Portal Template Name and (optionally) Description. Enter a name that describes the portal template and other WebCenter Portal users will recognize. You can later rename the template as desired.
Portal template names can contain only alphanumeric characters and underscores (spaces and special characters, such as
&and#, are not allowed). The maximum allowable length is 200 characters. The following reserved keywords are not allowed as the full portal template name in either upper or lower case, or a combination of both—admin,builder,group,groups,home,last,page,pages,my portals,my spaces,portal,portals,space,spaces,system,webcenter,webcenter administration,WebCenter Portal,webcenter portals,webcenter space,webcenter spaces. These reserved words are allowable as part of a longer name (for example,Sales Group).Note:
WebCenter Portal removes any unsupported special characters (such as
-) and character spaces in the display name specified here to derive the initial internal name for the portal template. For example, a display nameMy Mega-Templategenerates the internal nameMyMegaTemplate. -
From the Category list, select a category under which to list the portal template when creating a portal, or leave as <None> if no category is suitable, then click Next.
In the portal creation wizard, the portal template will be listed under the selected category heading, or under More... if you do not select a category.
-
In the Portals step, select a portal from the list (which displays portals that you created or have permissions to manage) to use as the basis for your new portal template, then click Next. Figure: Create aPortalTemplate Dialog: Portals Step
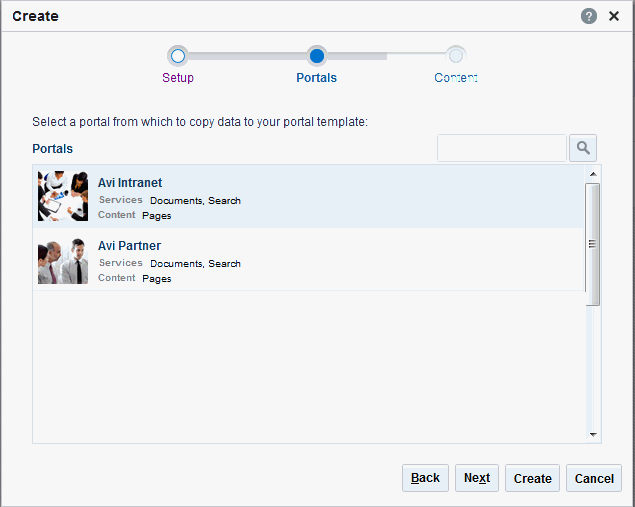
Description of the illustration wcsug_gs_savetmplt3.gif
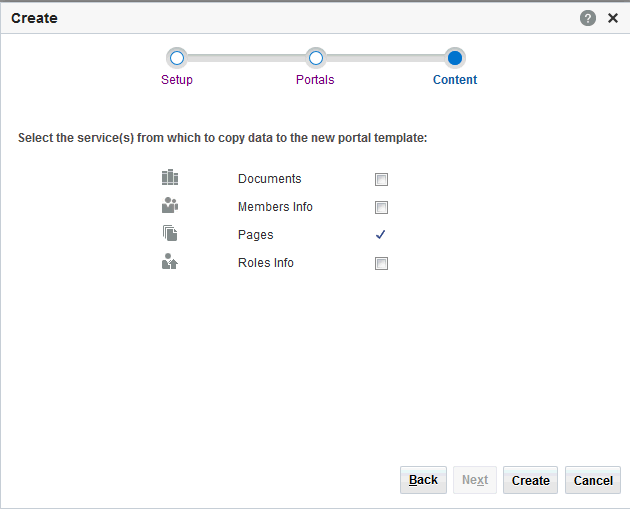
- In the Content step, select the services that contain data that you want the portal template to inherit from the parent portal.
Note:
-
The security settings of all pages in the new portal template default to Inherit Parent Security so that the pages in all portals created from the portal template initially inherit access settings from the permissions established for the portal.
-
List definitions are always copied; checking Lists in this step specifies that you want to copy the list data, too.
-
By default, all portal assets are copied. If you do not want your template to inherit all portal assets, you can later edit the portal template to remove individual assets (such as task flows or data controls) that you do not want to include.
-
If you select Members Info, the Roles Info **option is also selected. By selecting **Members Info, you are copying the portal members and custom roles from the portal you selected as the basis for the new template into the new template that you are creating.
-
If you select Roles Info and do not select Members Info, you are copying only the roles into your new template. Only the custom roles that are included in the portal you selected as the basis for the new template are copied into the new template.
-
If Advanced Permissions has been specified in the portal that is used to create a new portal template and you select both Members Info (and by default Roles Info) or only Roles Info when creating the portal template, then the specified advanced permissions are included in the portal template (and subsequently in a portal that is created using the template).
-
If custom page permissions are specified for roles or individual users in a portal that is later used to create a new portal template, then only the custom page permissions specified for the roles (not individual users) are included in the portal template (and subsequently in a portal that is created using the portal template).
Figure: Create aPortalTemplate Dialog: Content Step
-
Description of the illustration wcsug_gs_savetmplt2.gif
- Click Create.
-
The new portal template displays on your Portal Templates page in the Home portal and on the Portal Templates page in WebCenter Portal administration.
-
By default, the template is private, which means that other users will not see it on their Portal Templates page in the Home portal, and it is not available for selection when they create a new portal.
-
Users granted the
Portal Templates: Manage Allpermission can manage all portal templates and make them public.
-
Importing and ExportingPortalTemplates
This section describes how to import and export portal templates:
System administrators can also import and export portals and portal templates using WLST commands. To find out more about these WLST commands and how to migrate the back-end data associated with portals, see Deploying Portals, Templates, Assets, and Extensions in Administering Oracle WebCenter Portal.
Importing Portal Templates
With the default permissions of the Application Specialist role, or the Portal Templates: Manage All permission, you can import portal templates from a portal archive (.par file) into WebCenter Portal.
On import, all portal templates included in the archive are re-created. If a portal template exists, then it is deleted and replaced. If a portal template does not exist, then it is created.
Newly imported portal templates are not immediately available for general use. You must publish the imported templates to make them available to everyone.
See Publishing or Hiding a Portal Template.
Portal templates that use document services (files, folders, wikis, blogs) automatically own a content folder on WebCenter Portal’s back-end content repository. The content folder is included in the portal template archive in a .zip file located at: transport.mar\oracle\webcenter\lifecycle\importexport\data\oracle-webcenter-doclib\docsexport.zip
Note:
Portal template archives do not include web content/pages referenced by the portal template that is stored outside the template’s content folder, for example, information displayed through Content Presenter that is not stored in the template’s content folder. Similarly, template archives do not include shared assets. You must migrate all dependent content to the target so it is accessible to the imported template. If you do not move all dependent content to the target server it will be missing when you import the portal template.
An option to exclude the content folder is available using the importWebCenterPortals WLST command, described in Importing Portal Templates from an Archive Using WLST in Administering Oracle WebCenter Portal.
To import one or more portal templates from a .par file:
-
On the application-level Portal Templates page, click Import in the toolbar.
The Import Portal Templates pane opens.
Figure: Importing Portal Templates
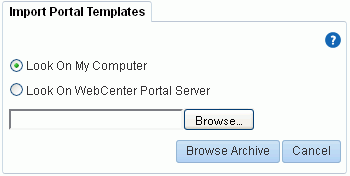
Description of the illustration wcadm_wpa_import_template.gif
- Specify the location of your portal template archive (
.parfile):-
Look On My Computer. Click in the input field or click Browse to open the File Upload dialog and navigate to the
.parfile on your local file system. -
Look On WebCenter Portal Server. Enter the path on the server where WebCenter Portal is deployed, including the archive file name. For example,
/tmp/MyPortalTemplateExport.par. You can specify any shared location that is accessible from WebCenter Portal.
-
-
Click Browse Archive to review the content available for import.
Figure: Importing Portal Templates
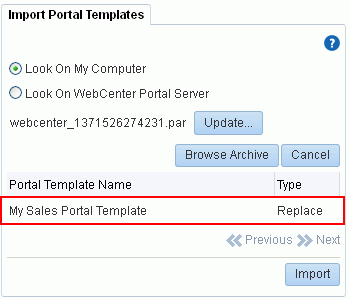
Description of the illustration wcadm_wpa_import_template2.gif
The names of all the WebCenter Portal templates in the specified archive display in the table. The **Type** column indicates when there is a conflict between the portal templates in the archive and those which exist on the target:

- **New** - A portal template with this name does not exist on the target. On import a new template is created.

- **Replace** - A portal template with this name and the same GUID exists on the target. The existing template is deleted on import and replaced with the version in the archive.

- **Conflict** - A portal template with this name exists on the target but the template on the target has a different GUID to the template you are trying to import. Or similarly, this template has the same GUID as one of the templates in the target but the template names do not match.

  If the import process detects a conflict between the portal templates you are trying to import and those which exist on the target, you must resolve the issue. For example, if the conflict is due to matching names but different GUIDs you could either change the name of the source portal template and create a new export archive, or rename the conflicting portal template in the target application and import the same archive.
-
Click Import.
-
If you are replacing an existing portal template, click Yes to confirm the overwrite.
Any content in the portal template archive will be included in the import. An information message displays when all templates import successfully.
-
Monitor progress in the Import Portal Templates dialog. When the import is complete, click Close. Figure: Import Portal Templates Progress
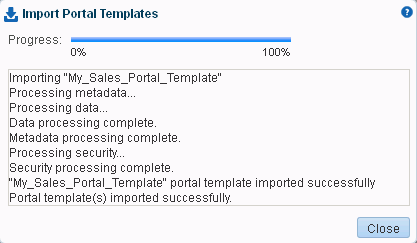
Description of the illustration wcpaa_imp_ptmp_prog.gif
-
To publish the portal template to make it available to all WebCenter Portal users, select the template name, click the Actions menu, and select Make Public.
The template is published and displays on the Portal Templates page in the Home portal for all users.
Exporting Portal Templates
With the default permissions of the Application Specialist role, or the Portal Templates: Manage All permission, you can export portal templates from WebCenter Portal to a portal archive (.par file) and deploy them on another portal server. Built-in templates cannot be exported.
While export and import utilities are primarily used to move information between WebCenter Portal instances, the portal template export feature is also useful as a backup service, and for sharing and exchanging templates with others.
Portal templates can contain pages, documents, lists, and security information such as custom roles and member details.
When you export a portal template, all this information is packaged in a portal data file (.pdr). The PDR file contains a metadata archive (.mar file) and a single XML file containing security policy information for the template. The export process packages up one or more template .pdr files to an archive that you can save to your local file system or to a remote server file system.
As template data is included in the portal template archive, you do not need to manually migrate any template data to the target server.
Templates that use document tools (files, folders, wikis, blogs) automatically own a content folder on WebCenter Portal’s back-end content repository. When you use WebCenter Portal to export portal templates, the content stored in this folder is automatically included in the portal template archive (.pdr) for easy deployment to another target server. The folder is added to a .zip file located at: transport.mar\oracle\webcenter\lifecycle\importexport\data\oracle-webcenter-doclib\docsexport.zip
Note:
Portal template archives do not include web content or pages referenced by the portal template that is stored at any other location, for example, information displayed through Content Presenter that is not stored in the portal template’s content folder. Only the folder assigned to the portal template on WebCenter Portal’s back-end content repository is included with the portal template archive.
You can save export archives to your local file system or to a remote server file system.
To export one or more portals templates from WebCenter Portal:
- From the Portals menu, select Administration.
-
Click the Portal Templates tab. Figure: PortalTemplates Page inWebCenter PortalAdministration
0
Description of the illustration wcsug_admin_template_tab.gif
The export archive (.par) is saved to the specified location.
Viewing Information About a Portal Template
Note:
The
Portal Creatorrole does not have default permissions to view or manage portal templates.
To view information about a portal template:
- From the Portals menu, select Administration.
-
Click the Portal Templates tab. Figure: PortalTemplates Page inWebCenter PortalAdministration
3
Description of the illustration wcsug_admin_template_tab.gif
Searching for a Portal Template
Global search does not search portal assets, such as portal templates, page templates, resource catalogs, and so on. The Filter field on the Portal Templates page is useful for searching for portal template names or descriptions when your application includes a large number of portal templates.
Note:
The
Portal Creatorrole does not have default permissions to view or search for portal templates.
To search for a portal template by a string in the Name or Description:
- From the Portals menu, select Administration.
-
Click the Portal Templates tab. Figure: PortalTemplates Page inWebCenter PortalAdministration
6
Description of the illustration wcsug_admin_template_tab.gif
Renaming a Portal Template
To rename a portal template:
- From the Portals menu, select Administration.
-
Click the Portal Templates tab. Figure: PortalTemplates Page inWebCenter PortalAdministration
8
Description of the illustration wcsug_admin_template_tab.gif
Setting Up Access to a Portal Template
You can grant specific users and groups read-only or manage access to a portal template that you have permissions to manage.
To set up access to a portal template:
- Go to the Portal Templates page in either the Home portal or WebCenter Portal administration:
-
In the Home portal, click the Portal Templates tab. If this tab is not showing, click the Actions icon and select Personalize Pages, where you can select Show Page.
-
From the Portals menu, select Administration, then click the Portal Templates tab.
-
-
Click Create to open the Create dialog.
Note:
There must be at least one portal available to use as the basis for the new portal template. Otherwise, Create is not active.
Figure: Create aPortalTemplate Dialog: Setup Step
Description of the illustration wcsug_gs_savetmplt.gif
-
In the Setup step, enter a suitable Portal Template Name and (optionally) Description. Enter a name that describes the portal template and other WebCenter Portal users will recognize. You can later rename the template as desired.
Portal template names can contain only alphanumeric characters and underscores (spaces and special characters, such as
&and#, are not allowed). The maximum allowable length is 200 characters. The following reserved keywords are not allowed as the full portal template name in either upper or lower case, or a combination of both—admin,builder,group,groups,home,last,page,pages,my portals,my spaces,portal,portals,space,spaces,system,webcenter,webcenter administration,WebCenter Portal,webcenter portals,webcenter space,webcenter spaces. These reserved words are allowable as part of a longer name (for example,Sales Group).Note: WebCenter Portal removes any unsupported special characters (such as
-) and character spaces in the display name specified here to derive the initial internal name for the portal template. For example, a display nameMy Mega-Templategenerates the internal nameMyMegaTemplate. -
From the Category list, select a category under which to list the portal template when creating a portal, or leave as <None> if no category is suitable, then click Next.
In the portal creation wizard, the portal template will be listed under the selected category heading, or under More... if you do not select a category.
-
In the Portals step, select a portal from the list (which displays portals that you created or have permissions to manage) to use as the basis for your new portal template, then click Next. Figure: Create aPortalTemplate Dialog: Portals Step
Description of the illustration wcsug_gs_savetmplt3.gif
- In the Content step, select the services that contain data that you want the portal template to inherit from the parent portal.
Note:
-
The security settings of all pages in the new portal template default to Inherit Parent Security so that the pages in all portals created from the portal template initially inherit access settings from the permissions established for the portal.
-
List definitions are always copied; checking Lists in this step specifies that you want to copy the list data, too.
-
By default, all portal assets are copied. If you do not want your template to inherit all portal assets, you can later edit the portal template to remove individual assets (such as task flows or data controls) that you do not want to include.
-
If you select Members Info, the Roles Info **option is also selected. By selecting **Members Info, you are copying the portal members and custom roles from the portal you selected as the basis for the new template into the new template that you are creating.
-
If you select Roles Info and do not select Members Info, you are copying only the roles into your new template. Only the custom roles that are included in the portal you selected as the basis for the new template are copied into the new template.
-
If Advanced Permissions has been specified in the portal that is used to create a new portal template and you select both Members Info (and by default Roles Info) or only Roles Info when creating the portal template, then the specified advanced permissions are included in the portal template (and subsequently in a portal that is created using the template).
-
If custom page permissions are specified for roles or individual users in a portal that is later used to create a new portal template, then only the custom page permissions specified for the roles (not individual users) are included in the portal template (and subsequently in a portal that is created using the portal template).
Figure: Create aPortalTemplate Dialog: Content Step
-
Description of the illustration wcsug_gs_savetmplt2.gif
- Click Create.
-
The new portal template displays on your Portal Templates page in the Home portal and on the Portal Templates page in WebCenter Portal administration.
-
By default, the template is private, which means that other users will not see it on their Portal Templates page in the Home portal, and it is not available for selection when they create a new portal.
-
Users granted the
Portal Templates: Manage Allpermission can manage all portal templates and make them public.0
-
Publishing or Hiding a Portal Template
When you create a portal template, it is private by default. This means that only you as the template creator can see the template on your personal Portal Templates page in the Home portal. To make the template available to users, you must publish it.
Note:
To publish or hide a portal template, you need the default permissions of the
Application Specialistrole, or thePortal Templates: Manage Allpermission. Note that thePortal Creatorrole does not have this permission by default. Users with thePortal Templates: Create Portal Templatespermission can create, rename, set access to, and delete their own portal templates, but cannot publish a template.
To publish or hide portal templates:
- Go to the Portal Templates page in either the Home portal or WebCenter Portal administration:
-
In the Home portal, click the Portal Templates tab. If this tab is not showing, click the Actions icon and select Personalize Pages, where you can select Show Page.
-
From the Portals menu, select Administration, then click the Portal Templates tab.
-
-
Click Create to open the Create dialog.
Note:
There must be at least one portal available to use as the basis for the new portal template. Otherwise, Create is not active.
Figure: Create aPortalTemplate Dialog: Setup Step
Description of the illustration wcsug_gs_savetmplt.gif
-
In the Setup step, enter a suitable Portal Template Name and (optionally) Description. Enter a name that describes the portal template and other WebCenter Portal users will recognize. You can later rename the template as desired.
Portal template names can contain only alphanumeric characters and underscores (spaces and special characters, such as
&and#, are not allowed). The maximum allowable length is 200 characters. The following reserved keywords are not allowed as the full portal template name in either upper or lower case, or a combination of both—admin,builder,group,groups,home,last,page,pages,my portals,my spaces,portal,portals,space,spaces,system,webcenter,webcenter administration,WebCenter Portal,webcenter portals,webcenter space,webcenter spaces. These reserved words are allowable as part of a longer name (for example,Sales Group).Note:
WebCenter Portal removes any unsupported special characters (such as
-) and character spaces in the display name specified here to derive the initial internal name for the portal template. For example, a display nameMy Mega-Templategenerates the internal nameMyMegaTemplate. -
From the Category list, select a category under which to list the portal template when creating a portal, or leave as <None> if no category is suitable, then click Next.
In the portal creation wizard, the portal template will be listed under the selected category heading, or under More... if you do not select a category.
-
In the Portals step, select a portal from the list (which displays portals that you created or have permissions to manage) to use as the basis for your new portal template, then click Next. Figure: Create aPortalTemplate Dialog: Portals Step
Description of the illustration wcsug_gs_savetmplt3.gif
- In the Content step, select the services that contain data that you want the portal template to inherit from the parent portal.
Note:
-
The security settings of all pages in the new portal template default to Inherit Parent Security so that the pages in all portals created from the portal template initially inherit access settings from the permissions established for the portal.
-
List definitions are always copied; checking Lists in this step specifies that you want to copy the list data, too.
-
By default, all portal assets are copied. If you do not want your template to inherit all portal assets, you can later edit the portal template to remove individual assets (such as task flows or data controls) that you do not want to include.
-
If you select Members Info, the Roles Info **option is also selected. By selecting **Members Info, you are copying the portal members and custom roles from the portal you selected as the basis for the new template into the new template that you are creating.
-
If you select Roles Info and do not select Members Info, you are copying only the roles into your new template. Only the custom roles that are included in the portal you selected as the basis for the new template are copied into the new template.
-
If Advanced Permissions has been specified in the portal that is used to create a new portal template and you select both Members Info (and by default Roles Info) or only Roles Info when creating the portal template, then the specified advanced permissions are included in the portal template (and subsequently in a portal that is created using the template).
-
If custom page permissions are specified for roles or individual users in a portal that is later used to create a new portal template, then only the custom page permissions specified for the roles (not individual users) are included in the portal template (and subsequently in a portal that is created using the portal template).
Figure: Create aPortalTemplate Dialog: Content Step
-
Description of the illustration wcsug_gs_savetmplt2.gif
- Click Create.
-
The new portal template displays on your Portal Templates page in the Home portal and on the Portal Templates page in WebCenter Portal administration.
-
By default, the template is private, which means that other users will not see it on their Portal Templates page in the Home portal, and it is not available for selection when they create a new portal.
-
Users granted the
Portal Templates: Manage Allpermission can manage all portal templates and make them public.4
-
Deleting a Portal Template
Deleting a portal template does not affect the portals that were created using the portal template.
Note:
The built-in portal template cannot be deleted. However, users with the default permissions of the
Application Specialistrole, or thePortal Templates: Manage Allpermission, can hide the built-in portal template from everyone’s view .
Deleting a portal template does not affect the portals that were created using the portal template.
To delete a portal template when it is no longer required:
- Go to the Portal Templates page in either the Home portal or WebCenter Portal administration:
-
In the Home portal, click the Portal Templates tab. If this tab is not showing, click the Actions icon and select Personalize Pages, where you can select Show Page.
-
From the Portals menu, select Administration, then click the Portal Templates tab.
-
-
Click Create to open the Create dialog.
Note:
There must be at least one portal available to use as the basis for the new portal template. Otherwise, Create is not active.
Figure: Create aPortalTemplate Dialog: Setup Step
Description of the illustration wcsug_gs_savetmplt.gif
-
In the Setup step, enter a suitable Portal Template Name and (optionally) Description. Enter a name that describes the portal template and other WebCenter Portal users will recognize. You can later rename the template as desired.
Portal template names can contain only alphanumeric characters and underscores (spaces and special characters, such as
&and#, are not allowed). The maximum allowable length is 200 characters. The following reserved keywords are not allowed as the full portal template name in either upper or lower case, or a combination of both—admin,builder,group,groups,home,last,page,pages,my portals,my spaces,portal,portals,space,spaces,system,webcenter,webcenter administration,WebCenter Portal,webcenter portals,webcenter space,webcenter spaces. These reserved words are allowable as part of a longer name (for example,Sales Group).Note:
WebCenter Portal removes any unsupported special characters (such as
-) and character spaces in the display name specified here to derive the initial internal name for the portal template. For example, a display nameMy Mega-Templategenerates the internal nameMyMegaTemplate. -
From the Category list, select a category under which to list the portal template when creating a portal, or leave as <None> if no category is suitable, then click Next.
In the portal creation wizard, the portal template will be listed under the selected category heading, or under More... if you do not select a category.
-
In the Portals step, select a portal from the list (which displays portals that you created or have permissions to manage) to use as the basis for your new portal template, then click Next. Figure: Create aPortalTemplate Dialog: Portals Step
Description of the illustration wcsug_gs_savetmplt3.gif
- In the Content step, select the services that contain data that you want the portal template to inherit from the parent portal.
Note:
-
The security settings of all pages in the new portal template default to Inherit Parent Security so that the pages in all portals created from the portal template initially inherit access settings from the permissions established for the portal.
-
List definitions are always copied; checking Lists in this step specifies that you want to copy the list data, too.
-
By default, all portal assets are copied. If you do not want your template to inherit all portal assets, you can later edit the portal template to remove individual assets (such as task flows or data controls) that you do not want to include.
-
If you select Members Info, the Roles Info **option is also selected. By selecting **Members Info, you are copying the portal members and custom roles from the portal you selected as the basis for the new template into the new template that you are creating.
-
If you select Roles Info and do not select Members Info, you are copying only the roles into your new template. Only the custom roles that are included in the portal you selected as the basis for the new template are copied into the new template.
-
If Advanced Permissions has been specified in the portal that is used to create a new portal template and you select both Members Info (and by default Roles Info) or only Roles Info when creating the portal template, then the specified advanced permissions are included in the portal template (and subsequently in a portal that is created using the template).
-
If custom page permissions are specified for roles or individual users in a portal that is later used to create a new portal template, then only the custom page permissions specified for the roles (not individual users) are included in the portal template (and subsequently in a portal that is created using the portal template).
Figure: Create aPortalTemplate Dialog: Content Step
-
Description of the illustration wcsug_gs_savetmplt2.gif
- Click Create.
-
The new portal template displays on your Portal Templates page in the Home portal and on the Portal Templates page in WebCenter Portal administration.
-
By default, the template is private, which means that other users will not see it on their Portal Templates page in the Home portal, and it is not available for selection when they create a new portal.
-
Users granted the
Portal Templates: Manage Allpermission can manage all portal templates and make them public.7
-