Managing a Portal Page
Manage a portal page and its settings, including page security and how a page is exposed in the portal navigation.
Permissions: To perform the tasks in this chapter, you must be a portal manager or a portal member with the permission
Basic Services: Edit Page Access, Structure, and Content(standard permissions) orPages: Create, Edit, and Delete Pages(advanced permissions).
Note that a user with a role that grants them permissions to create, edit, or publish a portal page, or even manage a portal, is not automatically allowed to view the portal. To view a portal, a user must be explicitly granted the portal-level permission Basic Services: View Pages and Content (standard permissions) or Pages: View Pages (advanced permissions).
See About Roles and Permissions for a Portal.
Topics
-
Setting Page Behavior for a Specific Page When No Page Variant Exists
-
Setting Navigation Properties and Display Options for a Page
Accessing Portal Page Management
As a portal member, you will have access to pages in the portal. The portal manager can grant you permissions to view, create, edit, and manage pages in the portal. Other portal members can grant you permissions to access the pages that they own. Pages that you create are for your own use only, unless you specifically share them with other users.
To manage a page that you created or have permissions to manage:
-
Open the page in the page editor.
-
Click the page's Actions icon (page menu icon) and select actions to adjust the position of the page in the navigation hierarchy, copy the page, or delete the page.
-
Click the page's Actions icon (page menu icon) and select Page Information to display the page management tabs.
Note:
Alternatively, locate the portal you want to edit, then click Flip icon to display the portal actions menu and select Administer, then select Page Information. Page Information for the first visible page opens.
The screen shot shows the portal actions after you flip the portal. The Administer and Page Information options are highlighted.
Figure: Page Information Tabs
Description of the illustration wcpaa_pginfo2.gif
- Modify page settings and properties as described in the following sections:
-
Summary tab:
-
Parameters tab: Adding or Modifying Page Parameters
-
Source tab: Viewing and Modifying Page Source Code
-
Security tab: Setting Page Security
-
Advanced tab: Setting Navigation Properties and Display Options for a Page
-
Adjusting Page Order and Hierarchy in thePortalNavigation
To adjust the order and hierarchy of a page, open the page in the page editor, then::
-
To change the page order, either drag the page to a new position in the page hierarchy, or click its Actions icon (page menu icon) and select Move Up or Move Down.
-
To change the page hierarchy, click its Actions icon (page menu icon) and select Indent to make the page a subpage of the page above it, or select Outdent to move the page to a higher level in the page hierarchy.
Note:
As you organize your page hierarchy, take into account the size of the browser window and the screen resolution. While you can create a page hierarchy with many pages at the same level, the browser display may not have enough room to expose pages past a certain point in the hierarchy (for example, if they are listed in a drop down that extends to the bottom of the browser window). Try to limit and arrange your portal navigation for optimal display without overflow.
Figure: Moving a Page in thePortalNavigation (inPortalEditor)
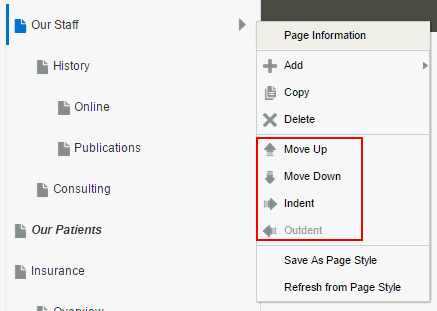
Description of the illustration wcpaa_page_move.gif
Copying a Page
You can copy any page to create a new page, whether or not you have permissions on the original page.
Notes: - Copying a page also copies its subpages and page variants.
-
If the page you are copying includes portlets or task flows, then the customizations of those portlets or task flows are also copied.
To copy a page, Open the page in the page editor, then click its Actions icon (
 ) and select Copy.
Figure: Copying a Page (inPortalAdministration)
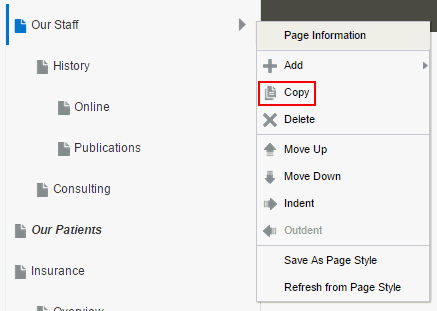
Description of the illustration wcpaa_pg_cpy.gif
The copied page (and its subpages and page variants) are not immediately available when viewing the portal. You can modify the page and/or its subpages and page variants in draft mode, then when you are satisfied with your changes, and are ready to make a page available to others who view the portal, you can publish the page.
Figure: Page Copy Added to Navigation
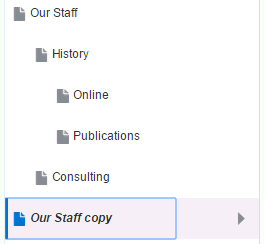
Description of the illustration wcpaa_pg_cpy2.gif
Deleting a Page
If you created or have permissions to manage a page, you can delete the page. However, you should be aware that deleting a page affects all members of the portal.
Notes: - Deleting a page also deletes its subpages.
- You cannot delete a page if it is the only page or the only visible top level page in the portal.
To delete a page that you created or have permissions to manage:
- Open the page in the page editor, then delete it in either of the following ways:
-
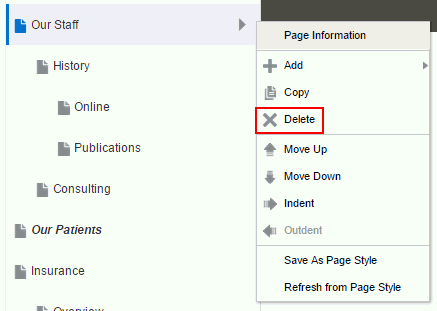
Click its Actions icon (page menu icon) and select Delete.
Figure: Deleting a Page
-
Description of the illustration wcpaa_pg_del.gif
- Select the page, then click the **Delete** link in the right pane.
**Figure: Deleting a Page**
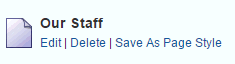
Description of the illustration wcpaa_pg_del2.gif
- In the Delete dialog, click Delete to confirm the request to delete the selected page.
Viewing and Modifying Page Settings
To view and modify page settings (such as title, description, visibility, parameters, source code, security, properties, and display options):
- Open the page in the page editor.
-
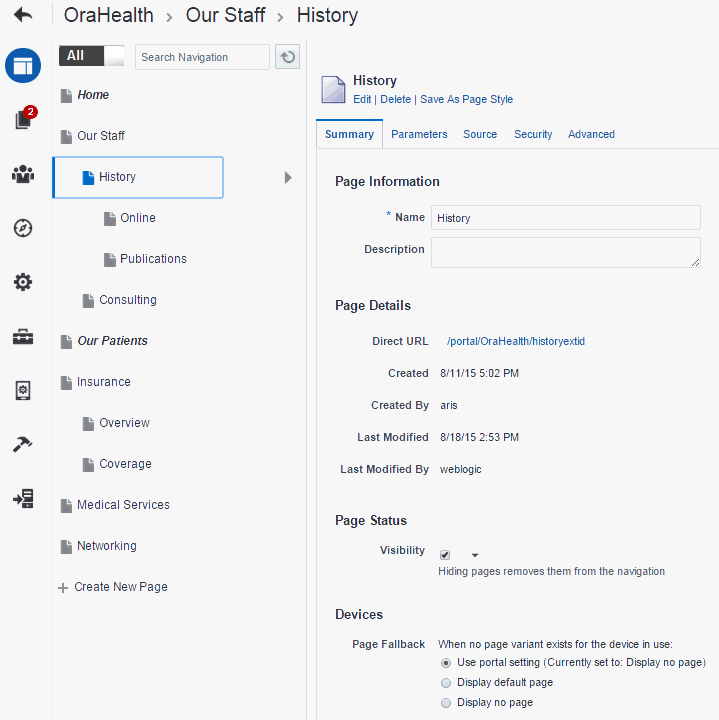
Click the page's Actions icon (page menu icon) and select Page Information. Figure: Accessing Page Management Settings

Description of the illustration wcpaa_pginfo.gif
- Modify page settings and properties as described in the following sections:
-
Summary tab (Figure 9-8):
-
Parameters tab: Adding or Modifying Page Parameters
-
Source tab: Viewing and Modifying Page Source Code
-
Security tab: Setting Page Security
-
Advanced tab: Setting Navigation Properties and Display Options for a Page
Figure: Page Summary Tab
-
Description of the illustration wcpaa_pginfo2.gif
Renaming a Page
If you created or have permissions to manage a portal page, you can rename the page.
Be aware that renaming a page affects all members in the portal as this action alters the page itself, not only your view. Renaming a page changes the display name for the page and the page navigation item. It does not change the page URL; any pretty URLs using the old name remain valid.
Even when page drafts are enabled, renaming a page takes effect immediately on the published page, regardless of whether or not the page has a pending draft. In other words, you do not need to publish the page draft before the new page name can be seen by page viewers.
To rename a page that you created or have permissions to manage:
-
Open the page in the page editor.
-
Click the page's Actions icon (page menu icon) and select actions to adjust the position of the page in the navigation hierarchy, copy the page, or delete the page.
-
Click the page's Actions icon (page menu icon) and select Page Information to display the page management tabs.
Note:
Alternatively, locate the portal you want to edit, then click Flip icon to display the portal actions menu and select Administer, then select Page Information. Page Information for the first visible page opens.
The screen shot shows the portal actions after you flip the portal. The Administer and Page Information options are highlighted.
Figure: Page Information Tabs
Description of the illustration wcpaa_pginfo2.gif
- Modify page settings and properties as described in the following sections:
-
Summary tab:
-
Parameters tab: Adding or Modifying Page Parameters
-
Source tab: Viewing and Modifying Page Source Code
-
Security tab: Setting Page Security
-
Advanced tab: Setting Navigation Properties and Display Options for a Page2
-
Entering or Changing a Page Description
If you created or have permissions to manage a page, you can change the description of the page. The new description is shown at the top of the page information settings.
Even when page drafts are enabled, changing a page description takes effect immediately on the published page, regardless of whether or not the page has a pending draft. In other words, you do not need to publish the page draft before the new page description can be seen by page viewers.
To enter or change the description for a page that you created or have permissions to manage:
-
Open the page in the page editor.
-
Click the page's Actions icon (page menu icon) and select actions to adjust the position of the page in the navigation hierarchy, copy the page, or delete the page.
-
Click the page's Actions icon (page menu icon) and select Page Information to display the page management tabs.
Note:
Alternatively, locate the portal you want to edit, then click Flip icon to display the portal actions menu and select Administer, then select Page Information. Page Information for the first visible page opens.
The screen shot shows the portal actions after you flip the portal. The Administer and Page Information options are highlighted.
Figure: Page Information Tabs
Description of the illustration wcpaa_pginfo2.gif
- Modify page settings and properties as described in the following sections:
-
Summary tab:
-
Parameters tab: Adding or Modifying Page Parameters
-
Source tab: Viewing and Modifying Page Source Code
-
Security tab: Setting Page Security
-
Advanced tab: Setting Navigation Properties and Display Options for a Page3
-
Showing or Hiding a Page in the Portal Navigation
If you created or have permissions to manage a portal page, you can control whether or not that page is shown in the portal navigation. A page is added to the portal navigation when it is first published. If you hide a page, it is removed from the portal navigation for all portal viewers, but is still available in the portal editor to edit and manage.
To show or hide a page in the portal navigation for all viewers:
-
Open the page in the page editor.
-
Click the page's Actions icon (page menu icon) and select actions to adjust the position of the page in the navigation hierarchy, copy the page, or delete the page.
-
Click the page's Actions icon (page menu icon) and select Page Information to display the page management tabs.
Note:
Alternatively, locate the portal you want to edit, then click Flip icon to display the portal actions menu and select Administer, then select Page Information. Page Information for the first visible page opens.
The screen shot shows the portal actions after you flip the portal. The Administer and Page Information options are highlighted.
Figure: Page Information Tabs
Description of the illustration wcpaa_pginfo2.gif
- Modify page settings and properties as described in the following sections:
-
Summary tab:
-
Parameters tab: Adding or Modifying Page Parameters
-
Source tab: Viewing and Modifying Page Source Code
-
Security tab: Setting Page Security
-
Advanced tab: Setting Navigation Properties and Display Options for a Page4
-
Setting Page Behavior for a Specific Page When No Page Variant Exists
Page variants are alternative views of an existing page for specific device groups to target specific device size and characteristics. The base page and the page variant have the same URL, security, parameters, and so on.
When using a device (such as smart phones, tablets, and desktop browsers) in a device group that does not have a page variant defined, and the device group is not the default device group for the portal, the page fallback setting determines how to render the page when it is viewed on that device. This behavior is set for all pages in a portal in the portal administration, but you can override the portal-level setting for an individual page, as described here.
This setting is honored based on the following rules:
-
Open the page in the page editor.
-
Click the page's Actions icon (page menu icon) and select actions to adjust the position of the page in the navigation hierarchy, copy the page, or delete the page.
-
Click the page's Actions icon (page menu icon) and select Page Information to display the page management tabs.
Note:
Alternatively, locate the portal you want to edit, then click Flip icon to display the portal actions menu and select Administer, then select Page Information. Page Information for the first visible page opens.
The screen shot shows the portal actions after you flip the portal. The Administer and Page Information options are highlighted.
Figure: Page Information Tabs
Description of the illustration wcpaa_pginfo2.gif
- Modify page settings and properties as described in the following sections:
-
Summary tab:
-
Parameters tab: Adding or Modifying Page Parameters
-
Source tab: Viewing and Modifying Page Source Code
-
Security tab: Setting Page Security
-
Advanced tab: Setting Navigation Properties and Display Options for a Page5
-
See Also: 1. Open the page in the page editor.
-
Click the page's Actions icon (page menu icon) and select actions to adjust the position of the page in the navigation hierarchy, copy the page, or delete the page.
-
Click the page's Actions icon (page menu icon) and select Page Information to display the page management tabs.
Note:
Alternatively, locate the portal you want to edit, then click Flip icon to display the portal actions menu and select Administer, then select Page Information. Page Information for the first visible page opens.
The screen shot shows the portal actions after you flip the portal. The Administer and Page Information options are highlighted.
Figure: Page Information Tabs
Description of the illustration wcpaa_pginfo2.gif
- Modify page settings and properties as described in the following sections:
-
Summary tab:
-
Parameters tab: Adding or Modifying Page Parameters
-
Source tab: Viewing and Modifying Page Source Code
-
Security tab: Setting Page Security
-
Advanced tab: Setting Navigation Properties and Display Options for a Page7
-
At the application-level, your system administrator configures device group settings and creates page variants for system pages.
To set the fallback behavior for a page when displayed on a device in a device group that does not have a page variant defined, and the device group is not the default device group for the portal:
-
Open the page in the page editor.
-
Click the page's Actions icon (page menu icon) and select actions to adjust the position of the page in the navigation hierarchy, copy the page, or delete the page.
-
Click the page's Actions icon (page menu icon) and select Page Information to display the page management tabs.
Note:
Alternatively, locate the portal you want to edit, then click Flip icon to display the portal actions menu and select Administer, then select Page Information. Page Information for the first visible page opens.
The screen shot shows the portal actions after you flip the portal. The Administer and Page Information options are highlighted.
Figure: Page Information Tabs
Description of the illustration wcpaa_pginfo2.gif
- Modify page settings and properties as described in the following sections:
-
Summary tab:
-
Parameters tab: Adding or Modifying Page Parameters
-
Source tab: Viewing and Modifying Page Source Code
-
Security tab: Setting Page Security
-
Advanced tab: Setting Navigation Properties and Display Options for a Page8
-
Adding or Modifying Page Parameters
Page parameters allow communication between components and the pages that contain them by providing a means of storing values for passing to page components that have been configured to consume them.
For example, imagine a page that contains stock ticker and stock news components. You want the ticker and the news components to both consume the same parameter value so that they both show information for the same company.
Even when page drafts are enabled, changing page parameters takes effect immediately on the published page, regardless of whether or not the page has a pending draft. In other words, you do not need to publish the page draft before the effect of new page parameters can be seen by page viewers.
Note:
If you change a page parameter value, the new value is immediately saved. You cannot revert back to the prior value. Therefore, take note of parameter values before you change them in case you want to set them back to their original values.
To add or modify page parameters:
-
Summary tab:
-
Parameters tab: Adding or Modifying Page Parameters
-
Source tab: Viewing and Modifying Page Source Code
-
Security tab: Setting Page Security
-
Advanced tab: Setting Navigation Properties and Display Options for a Page0
Viewing and Modifying Page Source Code
The Source tab for a selected page enables you to view, search, and edit the source code for the page. If there is draft for the current page, the source is for the draft. If there is no page draft, then the source is for the published page.
Even when page drafts are enabled, changing page source code takes effect immediately on the published page, regardless of whether or not the page has a pending draft. In other words, you do not need to publish the page draft before the effect of page source code changes can be seen by page viewers.
You can view and modify the source code for a page on two tabs:
-
Summary tab:
-
Parameters tab: Adding or Modifying Page Parameters
-
Source tab: Viewing and Modifying Page Source Code
-
Security tab: Setting Page Security
-
Advanced tab: Setting Navigation Properties and Display Options for a Page1
Figure: Viewing Page Source Code (inPortalEditor)
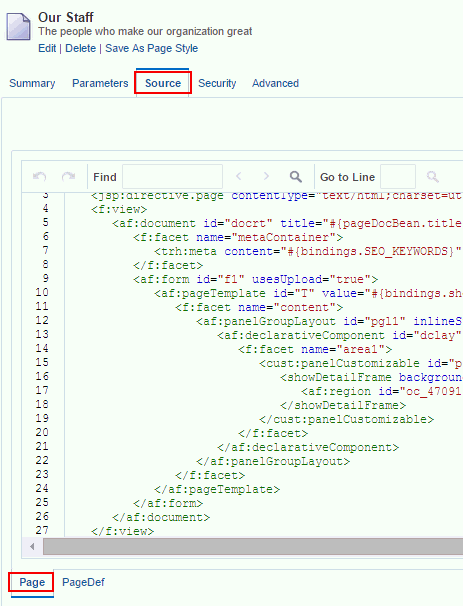
Description of the illustration wcpaa_pg_srcpg.gif
To view the source code for a page:
-
Summary tab:
-
Parameters tab: Adding or Modifying Page Parameters
-
Source tab: Viewing and Modifying Page Source Code
-
Security tab: Setting Page Security
-
Advanced tab: Setting Navigation Properties and Display Options for a Page2
Setting Page Security
By default, the pages you create in a portal are viewable by all portal members. In the Home portal, the personal pages you create are accessible only to you and the system administrator.
You can use page access settings to enable others to work with your portal pages and personal pages, and to remove that access. When you grant Create permission on a page, those granted this permission can create subpages.
When you grant access to one of your personal pages in the Home portal to another user, they must deliberately show the page in their view. The user must take this step for each session because shared pages are not automatically shown on login.
Even when page drafts are enabled, changing page security takes effect immediately on the published page, regardless of whether or not the page has a pending draft. In other words, you do not need to publish the page draft before the effect of new page security is implemented.
You may want to open a page to many users, but limit the exposure of a particular page component. To accomplish this, you can set the component’s Access properties to hide the component, or specify more granular visibility by role or user, or by using an EL expression.
To specify security settings for a page:
-
Summary tab:
-
Parameters tab: Adding or Modifying Page Parameters
-
Source tab: Viewing and Modifying Page Source Code
-
Security tab: Setting Page Security
-
Advanced tab: Setting Navigation Properties and Display Options for a Page3
Setting Navigation Properties and Display Options for a Page
You can specify various properties and display options for page navigation items to determine their appearance and behavior when the portal navigation is rendered.
Even when page drafts are enabled, changing page properties takes effect immediately on the published page, regardless of whether or not the page has a pending draft. In other words, you do not need to publish the page draft before the effect of new properties are implemented.
To set navigation properties or display options for a page navigation item:
-
Summary tab:
-
Parameters tab: Adding or Modifying Page Parameters
-
Source tab: Viewing and Modifying Page Source Code
-
Security tab: Setting Page Security
-
Advanced tab: Setting Navigation Properties and Display Options for a Page6