16 Working with Wikis
Create, edit, and manage wikis, which multiple users can use to share content that is relevant, useful, and up-to-date.
See Also: For an overview of the different options available in WebCenter Portal for working with portal content and adding content to a portal, see Introduction to Adding Content to a Portal.
Note: To perform the tasks in this chapter, you need the following permissions:
- To view or post comments on wiki documents, you need only the
View Documentspermission.- To view a wiki page, you need the
View Pagepermission. This permission is granted to all authenticated users by default. To edit a wiki page, you need to be grantedEditpermissions on the page.- To create a personal page using the Wiki page style, you need the application-level permission
Pages: Create. This permission is granted to all authenticated users by default, allowing them to create and manage their personal pages in the Home portal.- To use the New Wiki Document action and work with wiki documents, you need the portal-level permission
Create Documents(which includes delete permissions on wiki documents that you create). To delete wiki documents that are not your own, you must haveDelete Documentspermission.
Permissions: The tasks described in this chapter are available only if the system administrator and portal manager have made wiki functionality available in WebCenter Portal and the current portal, as described in Prerequisites for Enabling Wiki Functionality in Building Portals with Oracle WebCenter Portal.
Topics:
Parent topic: Adding Content to a Portal
About Wikis
Wikis are web pages that offer in-place editing using HTML.
Wikis epitomize the concepts of community and collaboration by allowing all authorized community members to contribute their information to a body of knowledge. Users with sufficient permissions on a wiki can add, revise, or delete content. Wikipedia (http://www.wikipedia.com) is a widely-known example of the use of wikis. Users from all over the world collaborate to create and edit Wikipedia pages, resulting in a rich, dynamic knowledge base for everyone’s benefit.
In WebCenter Portal, you create a wiki page using Wiki page style, which supports a dedicated wiki page with a default wiki document that offers in-place editing features through the Rich Text Editor (RTE).
A wiki page is exposed in the Content Manager task flow as a folder, just like any other page. The folder contains a default wiki document, with the same name as the page name. The wiki page is automatically added to the portal’s navigation.
To create a new wiki page, you must have the following permissions:
-
Create PagesorCreate, Edit, Delete Pages -
Create Documents
In a portal, the newly created wiki page inherits portal permissions (where the Portal Manager role and users with Customize Pages permissions have Create, Edit, and Delete permissions, and users with View Pages and Content permissions have only View permission).
In the Home portal, a newly created wiki page inherits the same permissions as a public folder; the owner is granted the Administer, Read, Write, and Delete permissions, and public users are granted only the Read access.
Creating a Wiki
This section describes the ways to create a wiki.
This section includes the following topics:
Creating a Wiki Page
You can create a dedicated wiki page using the Wiki page style. The wiki page will appear in the portal navigation. When you click the wiki page’s name in the navigation, the content of the wiki page gets displayed.
You can create a dedicated wiki page using the Wiki page style as either:
-
A personal page in the Home portal, selecting Wiki as the page style. See Creating a Personal Page.
-
A page in a portal, selecting Wiki as the page style. This is an advanced task, described in Creating a Page or Subpage in an Existing Portal in Building Portals with Oracle WebCenter Portal.
Tip: The Wiki page style is available only if the Documents tool is enabled for the portal. Wikis offer in-place editing features through the Rich Text Editor (RTE), described in Using the Rich Text Editor (RTE).
The initial wiki page, containing a default wiki document with default text, looks similar to Figure 16-1.
Figure 16-1 Default Wiki Document Created Using the Wiki Page Style
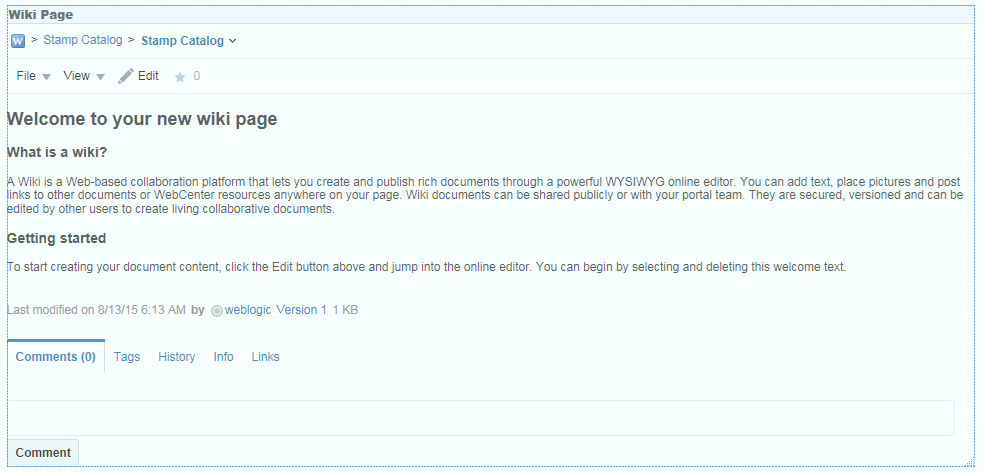
In the wiki document, you can replace the default text with the desired content. For information, see Editing a Wiki.
The breadcrumbs at the top display the path where the wiki document is created in the document hierarchy.
In the Content Manager task flow, you can find the newly created wiki document stored in a separate folder for the wiki page under the root folder, as shown in Figure 16-2. Both the folder and the default wiki document share the same name.
Figure 16-2 Default Wiki Document for a Wiki Page in the Document Hierarchy

Creating a Wiki Document Within a Wiki Page
A page based on the Wiki page style contains a default wiki document. Anyone with appropriate permissions on the wiki page can create additional wiki documents. Additional wiki documents are siblings of the default wiki document, and are all stored in the dedicated folder that is automatically created for the wiki page. A wiki document is not displayed in portal navigation, but is listed only in the document hierarchy.
To create a wiki document within a wiki page:
-
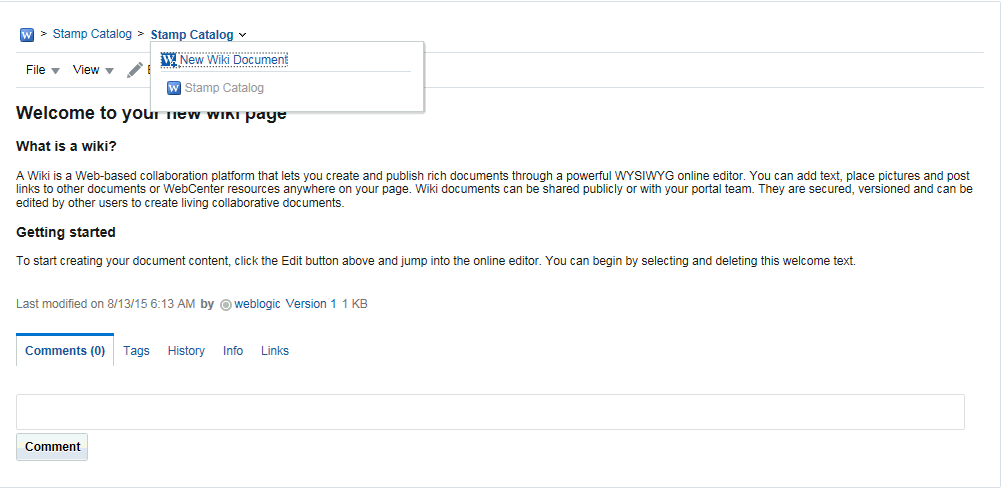
Navigate to the wiki page and select the New Wiki Document action (Figure 16-3).
Figure 16-3 The New Wiki Document Option Available for a Wiki Page
-
In the Rich Text Editor (RTE), in the Title field, enter a name for the new wiki document (for example,
Just Lincoln). -
Add, revise, and preview text, formatting, styling, and links in the Rich Text, HTML, and Preview tabbed panes.
Note:
- For information about using the toolbar and features in the Rich Text pane, see Using the Rich Text Editor (RTE).
- Apple iPad users cannot make selections from drop-down lists in the RTE. This is a known limitation.
-
Click Create to save your changes and exit the editor.
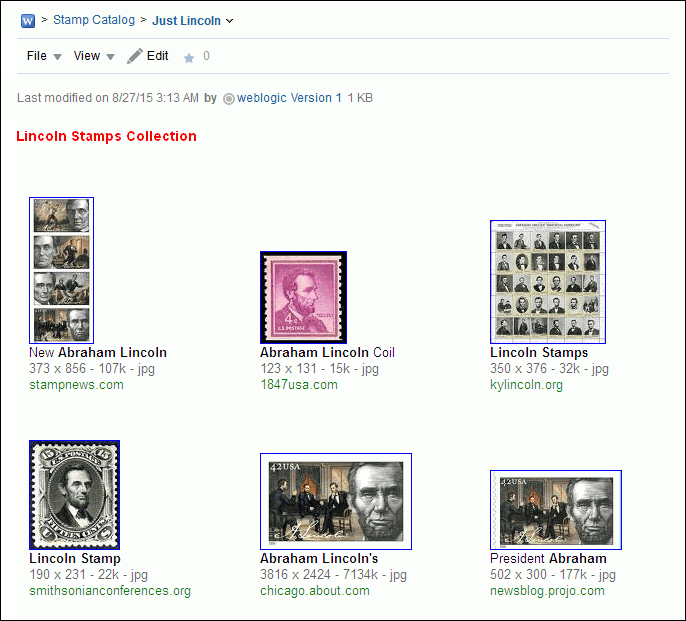
The new wiki document displays, ready to be edited by other portal members (Figure 16-4).
Figure 16-4 New Wiki Document Associated with a Wiki Page
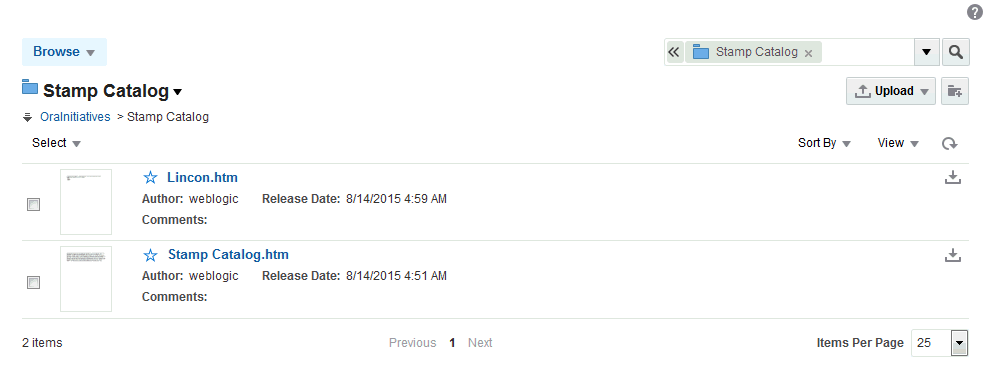
In the Content Manager task flow, the new wiki document (
Lincoln) is saved as a document under its parent wiki folder (Stamp Catalog), along with the wiki document created as the default wiki page document (Stamp Catalog), as shown in Figure 16-5.Figure 16-5 Wiki Document Created Within a Wiki Page
In the wiki page, the drop-down arrow next to the page name in the breadcrumbs displays a menu that includes the wiki documents created within the page (in this example,
Lincoln) (Figure 16-6).Figure 16-6 List of Wiki Documents Associated with Wiki Page

Creating a Wiki Document Using the Wikis System Page
When you create wiki documents within a wiki page, they are listed under the wiki page’s folder in the document hierarchy. You can choose to create wiki documents using the Wikis system page so that they are listed directly as a top-level folder in the document hierarchy.
To create a wiki document using the Wikis system page:
-
Ensure the Wikis system page is exposed in your portal navigation. For information, see Adding an Existing Page to the Portal Navigation in Building Portals with Oracle WebCenter Portal.
-
On the Wikis system page of your portal, select the New Wiki Document action Figure 16-795B3-CED5-4867-8301-0B60D1F2F851).
Figure 16-7 The New Wiki Document Option Available on the Wikis System Page

-
Add, revise, and preview text, formatting, styling, and links in the Rich Text, HTML, and Preview tabbed panes.
Note:
- For information about using the toolbar and features in the Rich Text pane, see Using the Rich Text Editor (RTE).
- Apple iPad users cannot make selections from drop-down lists in the RTE. This is a known limitation.
-
Click Create to save your changes and exit the editor.
The new wiki document displays, ready to be edited by other portal members.
On the Wikis system page, the new wiki document (
MyStamps) is shown as a top-level folder in the document hierarchy, as shown in .Figure 16-8 A Wiki Document Listed in the Document Hierarchy on the Wikis System Page

Editing a Wiki
You use the Rich Text Editor (RTE) to add or revise the content of your wiki documents.
Note: The Rich Text Editor (RTE) can edit wiki documents up to 1MB in size. For wiki documents larger than 1MB, the Edit action is not active.
When you open a wiki document for editing, WebCenter Portal automatically checks the file out. If another user is already editing a wiki document when you try to open it, you will see a message that the wiki document has already been checked out.
Whenever you save changes to a wiki document, WebCenter Portal automatically checks the file in and creates a new version of the wiki document. This means that the last saved version of a wiki document appears as the current version.
To edit a wiki:
-
Open the wiki document.
Tip: To open the default wiki document, navigate to the wiki page.
To open another wiki document created within the wiki page, first click the dropdown arrow next to the page name in the breadcrumbs and select the appropriate document.
-
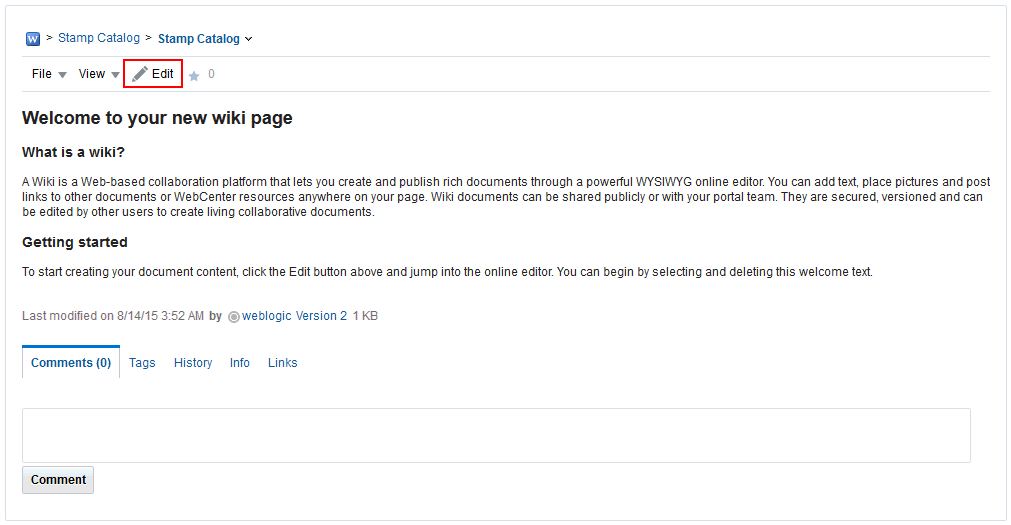
Click the Edit action.
Figure 16-9 Editing a Wiki Page
-
In the RTE, add, revise, and preview text, formatting, styling, and links in the Rich Text, HTML, and Preview tabbed panes.
Note:
- For information about using the toolbar and features in the Rich Text pane, see Using the Rich Text Editor (RTE).
- Apple iPad users cannot make selections from drop-down lists in the RTE. This is a known limitation.
-
Select the Minor Edit? check box if you do not want to notify portal members about your changes.
Leaving this check box deselected updates the Activity Stream and sends notifications after you save your changes.
-
Click Save to save your changes and continue editing, or click Save and Close to save your changes and exit the editor.
Using the Rich Text Editor (RTE)
The Rich Text Editor (RTE) is a fully-integrated HTML text editor, which you can use to create and edit wiki documents and blog posts.
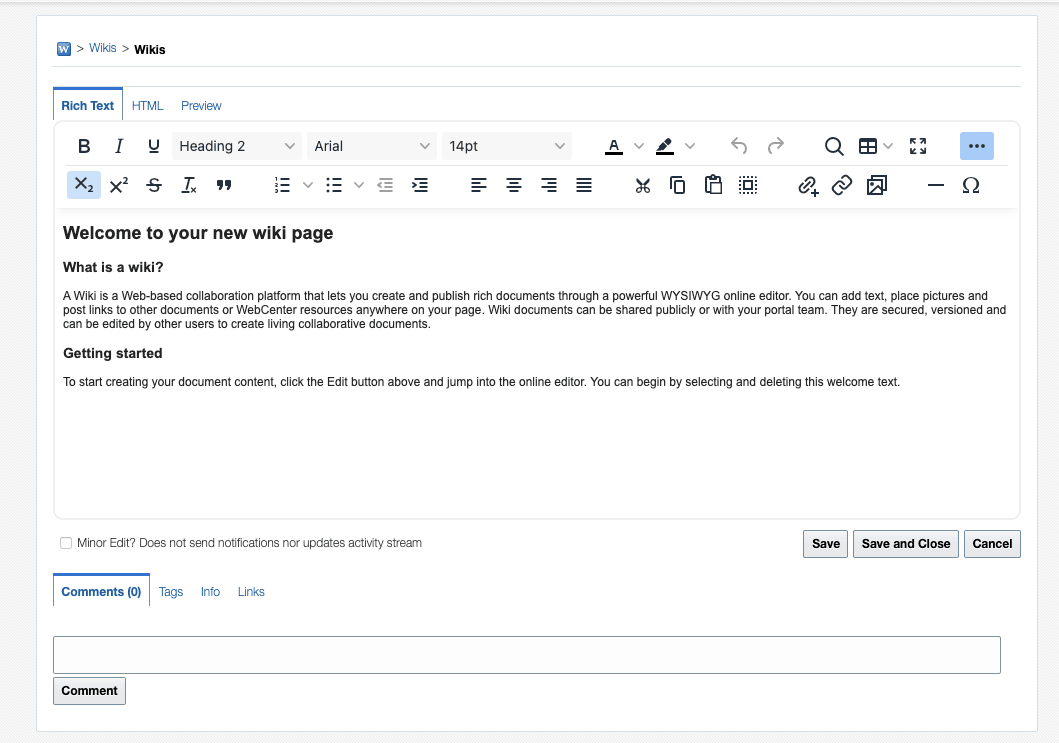
Figure 16-10 shows create mode, and Figure 16-11 shows edit mode.
Figure 16-10 New Wiki Document in Rich Text Editor
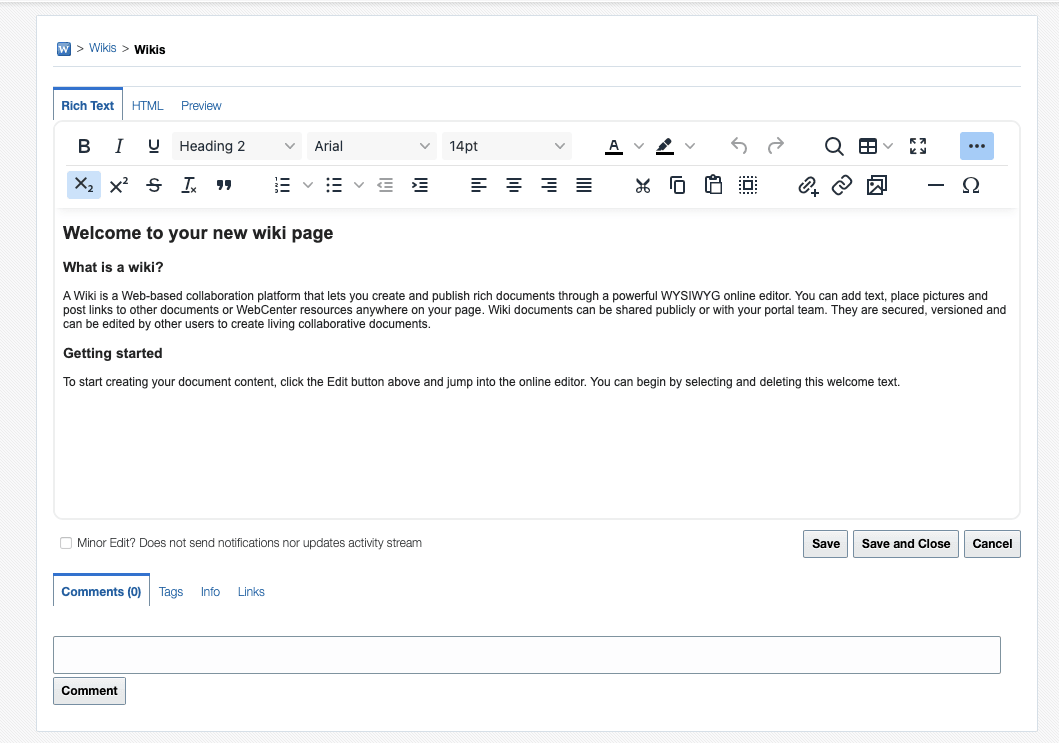
Figure 16-11 Editing Wiki Document in Rich Text Editor
To use the RTE:
-
Open the RTE either by creating a new wiki document (see Creating a Wiki Page) or blog post (see Creating a Blog Post), or editing a wiki (see Editing a Wiki) or blog post.
-
Enter a display name in the Title field.
-
Add, revise, and preview text, formatting, styling, and links in the Rich Text, HTML, and Preview tabbed panes.
Note:
- For information about using the toolbar and features in the Rich Text pane, see About the Rich Text Editor Toolbar, Working with Tables in the Rich Text Editor, and Using the Keyboard in the Rich Text Editor.
- Apple iPad users cannot make selections from drop-down lists in the RTE. This is a known limitation.
-
(For wiki documents only) Select the Minor Edit? check box if you do not want to notify portal members about your changes.
Leaving this check box deselected updates the Activity Stream and sends notifications after you save your changes.
-
In the tabbed panes along the bottom of the RTE, you can add comments, tags, or links pertinent to the document or post.
-
Save your changes:
-
To create and save a new wiki document or blog post, click Create.
-
To save updates to an existing wiki document or blog post, click Save. To save updates and exit the RTE, click Save and Close.
-
About the Rich Text Editor Tabbed Panes
The RTE provides four tabbed panes where you can create and edit your wiki and blog posts.
-
Rich Text. Create and revise content in a WYSIWYG environment using the icons and controls in the RTE toolbar (see About the Rich Text Editor Toolbar).
Note: Apple iPad users cannot make selections from drop-down lists in the RTE. This is a known limitation.
-
HTML. Enter HTML manually. This includes entering source code for HTML not handled by the WYSIWYG icons and controls on the Rich Text tab.
If you exit the HTML pane, then come back to it again, any HTML that may have been entered on separate lines will reformat to display on a single line, as is customary for most HTML editors.
Note:
- The RTE ignores the following types of tags when entered in HTML because they are irrelevant or redundant within the RTE context:
- script tags
- form elements, such as
input,select,textarea, andform frame/frameset- document tags, such as
html,head,body,meta, andtitle - unknown tags; for example:
<foo></foo>
- Changes to the behavior of the default CSS selectors in a wiki or blog is not supported.
- The RTE ignores the following types of tags when entered in HTML because they are irrelevant or redundant within the RTE context:
-
Preview. Shows a preview of your wiki document or blog post as it will appear when published.
About the Rich Text Editor Toolbar
The Rich Text tab of the Rich Text Editor includes various icons and controls to create and revise content in a WYSIWYG environment.
Table 16-1 describes the RTE toolbar icons and controls.
To perform an operation assigned to an icon, click the icon once to either immediately perform the action or open a dialog with further configuration options.
Table 16-1 Rich Text Editor Toolbar Icons and Controls on Rich Text Tab
| Control | Description |
|---|---|
 |
Bold, Italic, and Underline. Select text, and click the desired font style icon; or click an icon, and enter text. Click the icon again to exit the font style. |
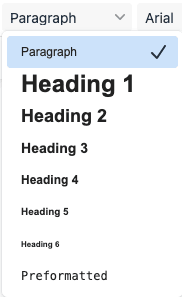 |
Paragraph Format. Select a format, then enter text; or highlight text, then select a format. |
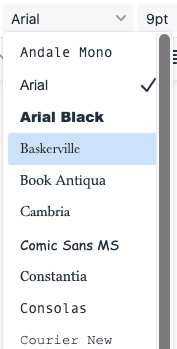 |
Font Name. Select a font, then enter text; or highlight text, then select a font. |
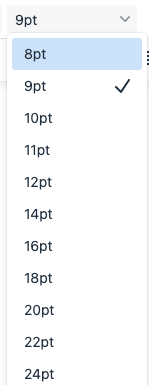 |
Font Size. Select a size, then enter text; or highlight text, then select a size. |
 |
Text Color or Background Color. Select text, and click the desired text or background color icon, then select a color. Or, click an icon and select a color, then enter text. |
 |
Left Justify, Center Justify, and Right Justify. Select text, and click to apply the desired text alignment; or click an icon, and enter text. |
 |
Decrease Indent and Increase Indent. Select text, and click the desired indent icon to move text left or right. |
 |
Numbered List and Bulleted List. Start a new line, click the desired list type icon, and enter text. Or, select lines of text and click an icon. Click the icon again to remove the list formatting. Alternately, end list mode by pressing Enter twice after the last item. |
 |
Remove Format. Select text, and click this icon to remove all font styling, such as font types, sizes, weights, and colors. Lists and indents are not affected. |
 |
Select Resource. Select text to link to an existing portal resource, then click this icon to open the Select Resource dialog. Select a resource (for example, a document or an announcement in the current portal, or a URL) to be linked from the selected text. Clicking the linked text in the document opens the selected resource in the Document Viewer preview pane. New Resource. Select text to link to a new portal resource, then click this icon to open the New Resource dialog. Select a resource to be linked from the selected text, then create the resource (for example, a discussion forum topic or note), specify the external location of the resource (for example, a URL), specify a name for the new resource (for example, a wiki document), or upload the resource from your local file system or a connected network drive (for example, a document). Note: If you create a new wiki document in this manner, Oracle WebCenter Portal creates a placeholder for the new wiki document in the current folder. To add content to the new wiki document, you must navigate to it and open it in the RTE. Note: For an external URL to be found valid by WebCenter Portal, the system administrator must add it to the list of valid URLs in the The URL entered is not available in the list of valid URLs. Contact your system administrator for the list of valid URLs. The links created using Select Resource and New Resource are created as inline links, and are not added to the Links tab associated with the details of the linking resource. For information about links to resources in WebCenter Portal, see Linking Information. Embed Image. Click to open the Embed Image dialog:
|
 |
Table. |
 |
Insert Horizontal Line. Click to insert a horizontal line at the current cursor location. |
 |
Maximize/Minimize. Click to expand the RTE to fill the entire screen, or reduce the RTE to display inside the portal. |
 |
Snippet. In a blog post, select a portion of text, then click this icon to display that portion as a summary of the blog post on the blog summary page (or digest page), with a Read More link to allow users to view the full blog. In a wiki document, this functionality is not available. |
 |
Find or Replace. Click to open the Find and Replace dialog, where you can search for a string, or replace a given string with specified text. |
 |
Cut, Copy, or Paste or Select All. Select all content in the body in the text input area or Select text, then cut or copy selected text, or paste text in the buffer at the current cursor location. Note: If a browser security warning displays, you can either use keyboard commands (see Using the Keyboard in the Rich Text Editor) or configure your browser to grant access to the clipboard. For example, for the FireFox browser, see |
Working with Tables in the Rich Text Editor
You can use the Rich Text Editor to create tables in your wiki documents and blog posts.
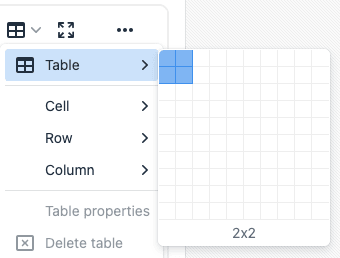
To create a table in the RTE, click the Table icon in the toolbar and select the required rows and columns (Figure 16-12).
Figure 16-12 Rich Text Editor: Table Icon
To access the Table Properties, you can select the table (Figure 16-13), where you can set basic properties for the table, as described in Table 16-2.
Figure 16-13 Rich Text Editor: Table Properties Dialog (Basic Properties)
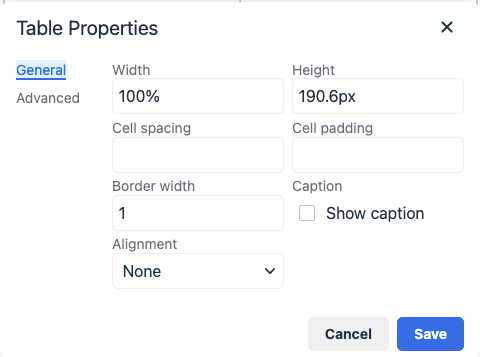
Table 16-2 Rich Text Editor: Basic Table Properties
| Property | Description |
|---|---|
|
Width |
Enter the width of the table, selecting either pixels or a percent value. Giving the width as a percent value lets you set the proportion of the editing area that the table will occupy. |
|
Height |
Enter the height of the table in pixels. |
|
Cell spacing |
Enter the space between each cell, in pixels. |
|
Cell padding |
Enter the space between the cell border and its contents, in pixels. |
|
Border width |
Enter the width of the table borders. |
|
Caption |
Check the box to show the caption to be displayed above the table and edit the text. |
|
Alignment |
Select the alignment of the table on the page Left, Center, or Right. |
Click the Advanced tab to expose the advanced table properties (Figure 16-14), which you can set as described in Table 16-3.
Figure 16-14 Rich Text Editor: Table Properties Dialog (Advanced Properties)
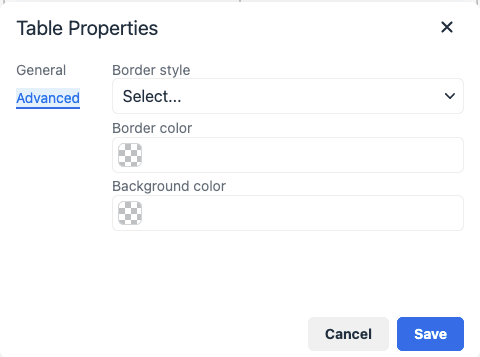
Table 16-3 Rich Text Editor: Advanced Table Properties
| Property | Description |
|---|---|
|
Border style |
Select the border style for the table. |
|
Border color |
Click to open the dialog where you can select the color of the table border from the color palette. |
|
Background color |
Click to open the dialog where you can select the color of the table background from the color palette. |
With a table inserted into your document, you can enter values directly in the cells. Additional options is available by clicking the table (Figure 16-15)
Figure 16-15 Rich Text Editor: Table Options

«««< HEAD Also you can select the table and click the table menu as described in Table 16-4. ======= Also you can select the table and click the table menu as described in Table 16-4.
origin/1412onprem
Table 16-4 Rich Text Editor: Table Menu Selections
| Action | Description |
|---|---|
|
Cell |
|
|
Row |
|
|
Column |
|
|
Delete Table |
Deletes the entire table and its contents. |
|
Table Properties |
Opens the Table Properties dialog, where you can modify properties as described in Table 16-2 and Table 16-3, with the exception of the number of rows and columns. |
Editing Table Cells in the Rich Text Editor
You can insert, delete, merge cells, or modify cell properties in the Rich Text Editor.
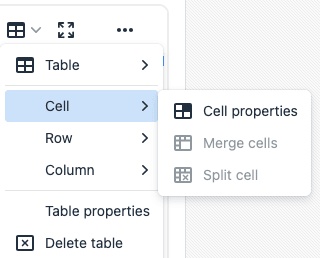
To insert, delete, merge cells, or modify cell properties, select the cell (the current cell), then choose Cell from Table Menu to expand the submenu of cell actions (Figure 16-16).
Figure 16-16 Rich Text Editor: Table Cell Actions
Editing Table Rows in the Rich Text Editor
In the Rich Text Editor, you can insert or delete table rows.
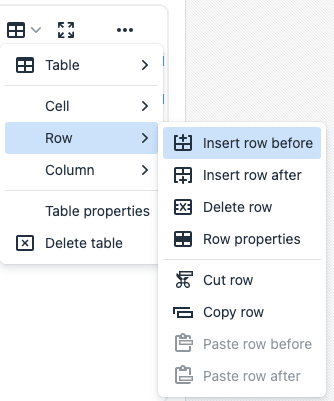
To insert or delete rows in a table, select a row (the current row), then choose Row from Table Menu to expand the submenu of row actions (Figure 16-17).
Figure 16-17 Rich Text Editor: Table Row Actions
Editing Table Columns in the Rich Text Editor
In the Rich Text Editor, you can insert or delete table columns.
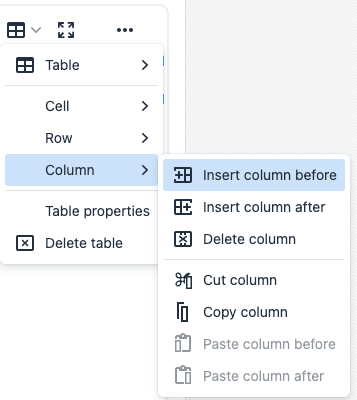
To insert or delete columns in a table, select a column (the current column), then choose Column from Table Menu to expand the submenu of column actions (Figure 16-18).
Figure 16-18 Rich Text Editor: Table Column Actions
Using the Keyboard in the Rich Text Editor
The Rich Text Editor is compliant with several accessibility standards, including the Web Content Accessibility Guidelines (WCAG), the US Section 508 Amendment to the Rehabilitation Act of 1973 and the IBM Web Accessibility Checklist. To this end, you can use the RTE with the keyboard as well as a screen reader. The currently supported screen reader solution is JAWS.
For more information about accessibility in Oracle WebCenter Portal, see Setting Your Accessibility Options for WebCenter Portal.
Table 16-9 summarizes the keyboard keys and combinations available to you to navigate and edit text in the RTE.
Table 16-9 Rich Text Editor: Keyboard
| Keyboard Keys | Description |
|---|---|
|
Alt+F10 |
Moves to the toolbar. |
|
Tab |
In the toolbar, moves to the next button group. In a dialog, moves to the next element. |
|
Shift+Tab |
In the toolbar, moves to the previous button group. In a dialog, moves to the previous element. |
|
Left Arrow/Right Arrow |
In the toolbar, moves between buttons within a button group. In a dialog, moves within a field. |
|
Enter |
In the toolbar, selects the current button or menu item, or expands a drop-down list or menu. In a dialog, confirms entry at current cursor location. |
|
Down Arrow/ Up Arrow |
Moves between selections in a drop-down list. |
|
Esc |
Closes a menu without executing any command. When inside a submenu, closes the submenu and returns focus to the parent context menu. Press Esc again to close it. In a dialog, cancels entries and closes dialog (equivalent to clicking Cancel or Close). |
|
In the editing area: |
|
|
Shift+F10 |
Opens the context menu of the current element (use down arrow and up arrow to move between selections in the menu, and Enter to select an action). |
|
Alt+F10 |
Moves to the tab selection in a dialog (use left and right arrow keys to move between tabs, and Enter to move to the fields on a tab). |
|
Ctrl+A |
Selects the entire content in the editing area. |
|
Ctrl+B |
Changes the formatting of the selected text to bold or remove the bold formatting of the selected text. |
|
Ctrl+C |
Copies highlighted selections to the clipboard. |
|
Ctrl+I |
Changes the formatting of the selected text to italics or remove the italics from the selected text. |
|
Ctrl+U |
Underlines the selected text or remove the underline formatting of the selected text. |
|
Ctrl+V or Shift+Insert |
Pastes the content on the clipboard at the current cursor location. |
|
Ctrl+X or Shift+Delete |
Cuts highlighted selections to the clipboard. |
|
Ctrl+Y |
Performs the redo operation. |
|
Ctrl+Z |
Performs the undo operation. |
Exposing an Existing Wiki Document in the Portal Navigation
If you have created a wiki document within a wiki page, it is not automatically added to the portal navigation.
This section includes the following topics:
Exposing an Existing Wiki Document as a Wiki Page
When you create a wiki page using the Wiki page style, it is listed in the document hierarchy, and is exposed as a separate page in the portal navigation. However, when you create a wiki document using the New Wiki Document action, the wiki document is listed only in the document hierarchy. For easy access to such a wiki document, you can publish it to appear as a page in the portal navigation.
To publish an existing wiki document as a page in the portal navigation:
-
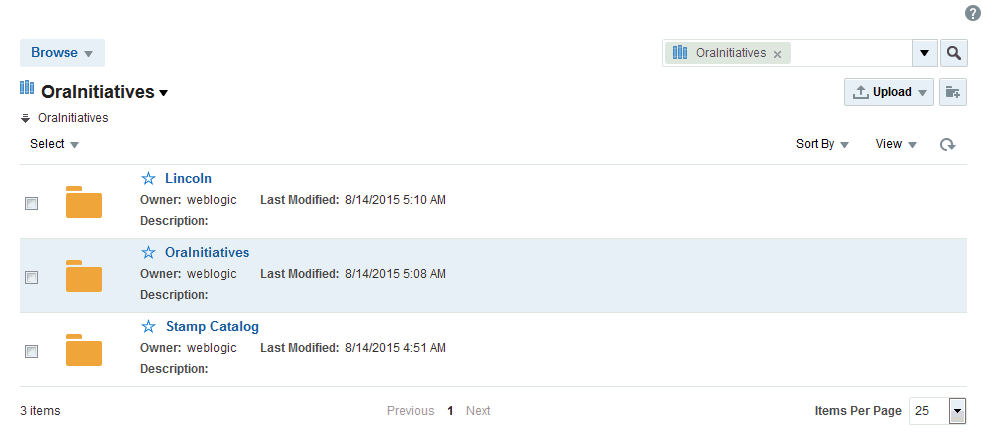
In the Content Manager task flow, create a folder with the same name as the existing wiki document at the root level of the portal (see Working with Folders and Files). For example, if the existing wiki document is named
Member Meeting Schedule, create a folder namedMember Meeting Schedule(Figure 16-19).Figure 16-19 Folder Created at the Portal Root Level
-
Move the existing wiki document into the newly created folder.
Note: The wiki document must have been originally created using the New Wiki Document action, as described in Creating a Wiki Document Within a Wiki Page.
-
Create a new page in the portal, selecting the Wiki page style.
-
In the Title field, enter the display name of the existing wiki document that you want to expose; for example,
Member Meeting Schedule.Note: While there are restrictions on naming files (including wiki documents), there are no naming restrictions for page names. Thus, while any of the following characters can be used to name a wiki page, the page title will include the character(s) but the associated wiki document will replace the illegal character with
_.? # & \ / * " | < > : ^For example, if you create a wiki page named
What's In a Name?, the page will have this title, but the associated wiki document will be namedWhat's In a Name_. -
Click Create.
The wiki document is now exposed as a separate page in the navigation area. The location depends on the page template used by your portal. Figure 16-20 shows the
Member Meeting Schedulewiki document exposed as a page in the navigation area in a portal.Figure 16-20 A Wiki Document Exposed as a Page

Exposing an Existing Wiki Document Using Content Presenter
Content Presenter enables you to select a wiki document, and render its content in a specific template on a page.
This is an advanced task, covered in Publishing Content Using Content Presenter in Building Portals with Oracle WebCenter Portal.
Managing Wiki Documents
Managing a wiki document is like managing any file, as described in Working with Folders and Files.