33 Configuring the Lucene Search Engine
Topics:
Overview of WebCenter Sites Search Functions
When you install WebCenter Sites, the search feature in the WebCenter Sites database and Lucene are available. The Lucene engine is set up as WebCenter Sites is installed, allowing content contributors, website visitors, and third party applications to search for assets.
This chapter includes information detailing how to use the Lucene search engine, how to make additional assets searchable and how to pause or disable the search engine.
Topics:
Indexing for Search Functions
searches are run against a Lucene search index, not database. A search index is built by an automated process called indexing, which collects, and stores asset data in a format that can be quickly retrieved during a search.
Search results are returned based solely on the data that is available in the index at the time the search is performed. The more assets you include in the index, the longer it takes to build and to search.
You select the types of assets to index on the search configuration forms. Selected assets are indexed and therefore, searchable. Asset types you omitted from indexing are not indexed and are not searchable.
When the index is built, the Lucene search engine checks every thirty seconds for changes made to assets of the types selected for indexing. If changes were made (such as creating a new index item, editing an existing entry, or deleting an entry), Lucene updates the index. By default, index data is stored in the <cs_shared_dir>/lucene directory (where <cs_shared_dir> is the shared file system directory).
Using WebCenter Sites Search Functions
WebCenter Sites includes the following search functions: Global search, Asset Type search, and the most specific of the searches, Configure Attributes for Asset Type Index. This search option is a subset of the Asset Type Index option, as it allows you to specify attributes that are searchable for the indexing-enabled asset types.
You can enable all of the searches on your system. The searches differ in how they store the indexed user-defined attributes.
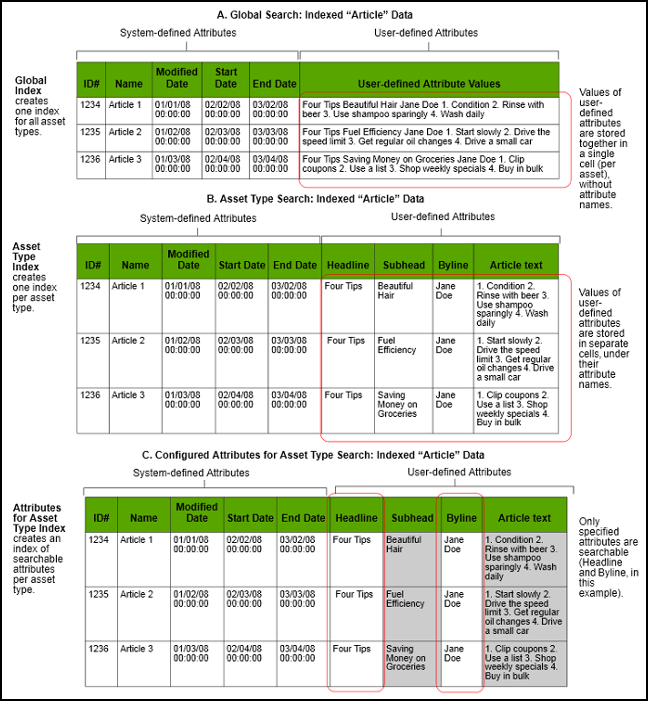
Global Search indexes system-defined attributes individually, allowing users to search by specific attributes. An asset's user-defined attribute values are stored together in one table cell. Attribute names are omitted. When Global search is configured, users are restricted to searching across all user-defined attributes per asset type.
For example, suppose you have an article asset. You could search for the string "Jane Doe." However, you could not limit your search to just one specific user-defined attribute, because all of the user-defined attribute data are stored together in a single cell that does not differentiate one attribute from another.
Asset Type Search indexes each attribute value in its own individual cell by attribute name. Asset type searches are used for the Public Site Search API, which enables search capabilities on the website. See Using Public Site Search in Developing with Oracle WebCenter Sites.
Asset type search has a level of specificity to its search results that Global search does not. An asset type search can return search results more quickly than a Global search. By limiting searches to only the relevant attributes, Asset Type search can eliminate the necessity for a search to run across unnecessary index data.
Configure Attributes for Asset Type Search enables you to limit a search to only the attributes that you specify for the asset types that are enabled by Asset Type Search.
The following figure and table illustrate the differences in Lucene-based searches and their levels of granularity. Each table represents an index for the same article type asset, but for a different type of search function. Across the tables, only the system-defined attribute data is stored in the same way.
Note:
The following tables illustrate the granularity of global searches, asset type searches, and attribute-specific searches. They are not meant to indicate how the search engine stores indexed data.
Figure 33-1 Search Function Tables and Differences

Description of "Figure 33-1 Search Function Tables and Differences"
Besides the way they index data, the searches enable different functions, as summarized in the following table.
Table 33-1 Search Functions
| Global Index | Asset Type Index |
|---|---|
|
Enables searches across all selected asset types. |
Enables searches per asset type (multiple asset types can be enabled). |
|
Creates one index for all selected asset types. |
Creates one index per asset type. |
|
Supports searching by system-defined attributes. |
Supports searching by system-defined and custom attributes. |
|
System-defined attributes can be filtered (by using Configuring Attributes for Asset Type Index). |
System-defined and custom defined attributes can be filtered (by using Configuring Attributes for Asset Type Index). |
|
Supports public searches on live site. |
Supports public searches on live site. |
See About Search API in Went through the requirements, scope and sprint plan for Sites CECS integration..
Setting Up Search Indices
The major steps to set up Lucene are:
Use the information from the following topics to set up the Lucene engine:
Enabling the Lucene Search Engine
This section explains how to enable the Lucene engine.
To start the Lucene Engine:
- In the General Admin tree, expand the Admin node, expand Search, and then double-click Start/Stop Search Engine Indices.
- Click Start Search Engine.
Lucene is now enabled to start indexing selected data. The time it takes to index data varies with the number of assets being indexed and the speed of your system.
After the Lucene Search Engine is started, it will continue to run until it is disabled. While indexing is running, changes to selected asset types are detected and the index is updated. The status of the asset type is listed as Enabled while the index is running. If you wish to remove search capability, in addition to stopping indexing, you also have to delete index data. See Deleting Index Data.
Adding Asset Types to the Search Index
This section explains how to add asset types to the Global Search Index and the Asset Type index. After each initial index has been created, Lucene checks for changes every five seconds. By default, index data is stored in the <cs_shared_dir>/lucene directory (where <cs_shared_dir> is the WebCenter Sites shared file system directory). After the data is added, it is maintained until indexing is stopped entirely or paused for a selected asset type. Assets of the selected types are not returned by the search feature until Lucene has indexed them.
To add new asset types to the search index:
-
Enable the Lucene engine:
-
In the General Admin tree, expand the Admin node, expand the Search node, and then double-click Start/Stop Search Engine Indices.
-
Click Start Search Engine.
-
-
Add asset types to the global search index:
-
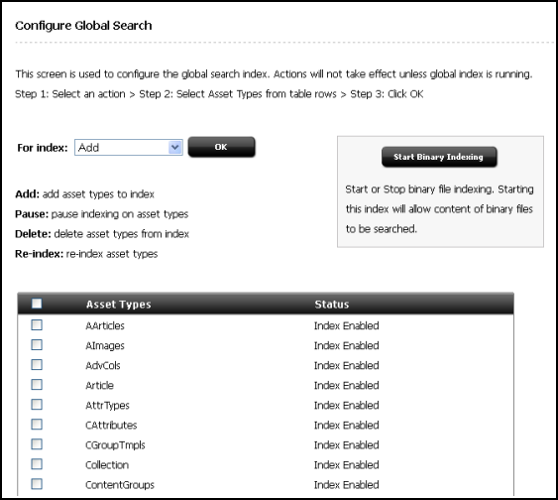
Double-click Configure Global Search.
-
In the For index: list, select Add. WebCenter Sites displays a list of asset types that are not currently being indexed.
-
In the Asset Types list, select the asset types you want to index.
-
Click OK.
-
In the confirmation pop-up dialog, click OK. The asset type status changes to Enabled, and indexing is enabled for the selected asset type. The index is created for that asset type as soon as the first asset of that type is created.
-
-
Add asset types to the asset type search index.
-
Double-click Configure Asset Type Search.
-
In the For index: list, select Add.
WebCenter Sites displays a list of asset types that are not currently being indexed.
-
In the list, select the asset types you want to index.
-
Click OK.
In the confirmation pop-up dialog that opens, click OK.
The asset type status changes to Enabled, and indexing is enabled for the selected asset type. The index is created for that asset type as soon as the first asset of that type is created.
-
-
Enable binary file indexing, if wanted (click Start Binary Indexing). For more information about binary file indexing, see Indexing Binary Files.
Configuring Attributes for Asset Type Index
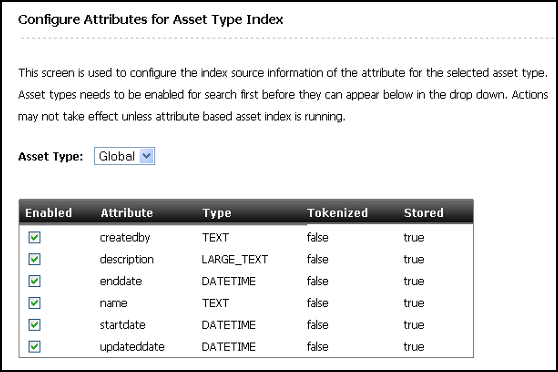
You can configure indexing on specific attributes for specific asset types. The selected asset type must be enabled for indexing first before you can select any specific attributes for the asset type. After you have enabled Lucene and conducted a search on the live site, assets with indexed attribute data matching the search terms are returned.
To configure attributes for a selected asset type:
Indexing Binary Files
Binary files are files of type other than text, such as Word and PDF documents. You can choose to not enable this option if your assets do not reference binary files, or if the files they reference contain content that is not indexable, such as images and videos.
This section covers the following topics:
Enabling Indexing of Binary Files
If one or more asset types which you added to the indexing queue are set up to reference binary files stored in the file system, you can configure Lucene to convert the contents of those files to text when indexing the assets that reference them. By default, Lucene is set up to ignore all binary files referenced by assets being indexed.
To enable binary file indexing:
-
If you have not done so, enable the Lucene engine:
-
In the General Admin tree, expand the Admin node, expand Search, and then double-click Start/Stop Search Engine Indices.
-
Click Start Search Engine.
The button name changes to Stop Search Engine.
-
-
In the General Admin tree, expand the Admin node, and then expand Search.
-
Complete either:
-
To enable binary file indexing for Global search, double-click Configure Global Search.
-
To enable binary file indexing for Asset Type search, double-click Configure Asset Type Search.
-
-
Click Start Binary Indexing.
Lucene will now convert to text all binary files that are referenced by the assets it indexes.
Disabling Indexing of Binary Files
If you decide that you no longer want Lucene to convert the contents of binary files referenced by assets it indexes, you can disable this feature to improve performance.
To disable binary file indexing:
-
If you have not done so, enable the Lucene engine:
-
In the General Admin tree, expand the Admin node, expand Search, and then double-click Start/Stop Search Engine Indices.
-
Click Start Search Engine.
The button name changes to Stop Search Engine.
-
-
In the General Admin tree, expand the Admin node, and then expand Search.
-
Complete either:
-
To disable binary file indexing for Global search, double-click Configure Global Search.
-
To disable binary file indexing for Asset Type search, double-click Configure Asset Type Search.
-
-
Click End Binary Indexing.
Lucene will now ignore all binary files referenced by the assets it indexes.
Disabling the Lucene Search Engine
You can stop the Lucene engine to improve performance. After the engine is stopped, you are no longer able to add or delete assets, or pause indexing. You are also no longer able to re-index assets.
To stop indexing:
Maintaining Search Indexes
After you have set up Lucene, you may have to perform tasks such as temporarily suspending indexing to perform bulk operations on assets, re-indexing, deleting index data, or writing code to specifically query the search engine.
This section covers the following topics:
Pausing and Resuming Indexing
Pausing and stopping indexing are similar functions. When you pause indexing, you have the ability to pause indexing for selected asset types. When you stop the search index you stop indexing on all assets.
When you add and delete large numbers of assets, you can speed up the process by temporarily pausing indexing on the assets of the type you are adding or deleting. To reflect these changes in your search index, you then have to index all assets of the type that you added or deleted, using the re-indexing function.
Pausing Global and Asset Type Indexing
When indexing is enabled, every asset that is added or updated to the WebCenter Sites database is indexed after it is saved. Saving a large number of assets will proceed faster if you pause the indexing of assets of that type. You can then resume indexing and re-index all assets of that type after the assets are added to the database, indexing all the new (and existing) assets at one time.
When paused, searches continue to return results against the existing index. However, changes to the database made after indexing is paused are not indexed. Therefore, search results do not reflect changes made to the database after indexing was paused.
To pause indexing:
-
If you have not done so, enable the Lucene engine:
-
In the General Admin tree, expand the Admin node, expand Search, and then double-click Start/Stop Search Engine Indices.
-
Click Start Search Engine.
The button name changes to Stop Search Engine.
-
-
In the General Admin tree, expand the Admin node, and then expand Search.
-
Complete either:
-
To pause indexing for Global search, double-click Configure Global Search.
-
To pause indexing for Asset Type search, double-click Configure Asset Type Search.
-
-
In the For index: list, select Pause.
WebCenter Sites displays the list of asset types for which you can pause indexing.
-
In the Asset Types list, select the asset types for which you want to pause indexing.
Note:
If no asset types are displayed when you select Pause from the list, stop here. Either indexing is paused for all asset types, or no asset types have yet been selected for indexing.
-
Click the OK button next to the list of operation selections.
-
In the confirmation pop-up dialog that opens, click OK.
The Lucene Search Engine pauses indexing on assets of the selected types and preserves their index data. The status of the asset type changes to Paused.
Re-indexing
The time it takes to re-index assets varies with the number of assets being indexed and your system configuration. Updated search results for assets of the selected types are returned only after the Lucene search engine has indexed them.
To re-index assets:
-
If you have not done so, enable the Lucene engine:
-
In the General Admin tree, expand the Admin node, expand the Search node, and then double-click Start/Stop Search Engine Indices.
-
Click Start Search Engine.
-
-
In the General Admin tree, expand the Admin node, and then expand the Search node.
-
Complete either:
-
To re-index assets for Global search, double-click Configure Global Search.
-
To re-index assets for Asset Type search, double-click Configure Asset Type Search.
-
-
In the For index: list, select Re-index.
displays the asset types currently selected for indexing.
Note:
If no asset types are displayed when you select Re-index from the list, stop here. No asset types are in the indexing queue or indexing has been paused for all asset types in the queue.
-
In the list, select the asset types whose index data you want to build (or rebuild).
-
Click OK.
-
In the confirmation pop-up dialog that opens, click OK.
Indexing begins.
The status of the selected asset types changes to Enabled.
Updated search results for assets of the selected types are returned only after the Lucene search engine has indexed them.
Deleting Index Data
If you no longer have to perform searches on assets of a particular type, search results can be returned more quickly if the unnecessary data is removed from the index.
You may also wish to delete indexes if you stopped indexing and then deleted a large number of assets. In this case, it could be faster to delete the relevant index data and then re-index the remaining assets than to allow the regular indexing process to run through its normal process.
When you delete index data, WebCenter Sites first pauses indexing of the assets of the selected asset types, then deletes the index data of those assets. After you delete data from the index, index data is no longer available for assets of the selected types. Search results no longer return data from assets of the selected types.
To delete data from the index:
Writing Code that Queries the Search Index
The following sample code illustrates how to query the Lucene search engine index. This code is based on the assumption that the user wants to search against a particular site and a particular asset type, where the site is passed in as variable currentSite and type is passed in as assetType. The code is used to write a query against the Global index. The Lucene search engine would return all the assets or the maxResults (if total is greater than maxResults) specified of the type that belongs to the specified site.
import COM.FutureTense.CS.Factory;
import COM.FutureTense.Interfaces.ICS;
import com.fatwire.cs.core.search.data.ResultRow;
import com.fatwire.cs.core.search.engine.*;
import com.fatwire.cs.core.search.query.Operation;
import com.fatwire.cs.core.search.query.QueryExpression;
import com.fatwire.cs.core.search.source.IndexSourceConfig;
import com.fatwire.cs.core.search.source.IndexSourceMetadata;
import com.fatwire.search.engine.SearchEngineConfigImpl;
import com.fatwire.search.query.QueryExpressionImpl;
import com.fatwire.search.source.IndexSourceConfigImpl;
import com.fatwire.search.source.SearchIndexFields;

import java.util.Collections;

public class SearchTest {
    public static void main(String[] args) {
        SearchTest searchTest = new SearchTest();
        String assetType = "Content_C";
        int maxResults = 100;
        try {
            searchTest.testSelect(assetType, maxResults);
        } catch (Exception e) {
            //
        }
    }

    public void testSelect(String assetType, int maxResults) throws Exception {
        ICS ics = Factory.newCS();
        IndexSourceConfig srcConfig = new IndexSourceConfigImpl(ics);
        SearchEngineConfig engConfig = new SearchEngineConfigImpl(ics);
        IndexSourceMetadata sourceMd =
                srcConfig.getConfiguration("Global");
        String engineName = sourceMd.getSearchEngineName();
        SearchEngine eng = engConfig.getEngine(engineName);
        String currentSite = (String)
                sourceMd.getProperty(SearchIndexFields.Global.SITEID);
        QueryExpression siteExpr = new
                QueryExpressionImpl(SearchIndexFields.Global.SITEID,
                Operation.CONTAINS, currentSite);
        siteExpr =
                siteExpr.or(SearchIndexFields.Global.SITEID, Operation.EQUALS, "0");
        QueryExpression typeQ = new QueryExpressionImpl(SearchIndexFields.Global.ASSET_TYPE,
                Operation.EQUALS, assetType);
        QueryExpression qe = typeQ.and(siteExpr);
        qe.setMaxResults(maxResults);
        SearchResult<ResultRow> res =
                eng.search(Collections.singletonList("Global"), qe);
    }
} 
