71 Installing and Configuring Developer Tools

Would you like to start managing WebCenter Sites resources in Eclipse? Set up Developer Tools on your machine and integrate your instance of WebCenter Sites with Eclipse.

For information about installing, configuring, and updating Developer Tools, as well as managing WebCenter Sites resources in Eclipse, see these topics:

Prerequisites

Are you planning to set up Developer Tools on your system? Here are some important points that you should keep in mind before you set up Developer Tools.

  • The Developer Tools plug-in you need to integrate with the Eclipse IDE and the executable JAR file for the command line interface are both located in the ${Oracle Home}/wcsites/clients directory of your WebCenter Sites installation.

  • The Developer Tools and Eclipse IDE work with JDK 1.8 and higher versions only. If you use JDK versions lower than 1.8, then the Eclipse IDE plugin reports that it is running on a lower platform than specified, and this might cause code runtime errors due to an unmatched platform.

  • Determine whether you will be connecting to a local or remote WebCenter Sites instance.

  • After you have integrated Eclipse with WebCenter Sites, you must log in to WebCenter Sites with general administrator credentials (for example, fwadmin/xceladmin). This user must be a part of the RestAdmin group.

  • To use the command line interface feature:

    • Developer Tools requires access to the CAS internal URL for the WebCenter Sites instance to which you are connecting. The CAS internal URL is specified during the Oracle WebCenter Sites installation. The internal URL must be publicly accessible for Developer Tools to access it.

      See Configuring the CAS Primary Cluster Node in Installing and Configuring Oracle WebCenter Sites.

    • You must have an advanced knowledge of Developer Tools. See Using Developer Tools Command Line Interface (CLI).

Setting Up Developer Tools

To set up Developer Tools, you install the Developer Tools Plug-in, integrate WebCenter Sites with it, and enable code completion on remote hosts. You also need to know how to work with existing resources using Developer Tools and how to manage resources.

How to Install the Developer Tools Plug-in

  1. Download the Eclipse package that suits your development needs. The Eclipse IDE for Java EE Developers is recommended for development on WebCenter Sites. You can download Eclipse from the following URL:
  2. Locate the clients/eclipse-plugin folder in your WebCenter Sites installation directory (${Oracle Home}/wcsites/clients/eclipse-plugin). This folder contains the the developer Tools plug-in com.oracle.sites.developer-tools.zip files.
  3. Start Eclipse (run eclipse.exe).

    Note:

    Eclipse installs plug-ins from local file system (or archive) locations and remote locations. The location of a plug-in is referred to as a software site. For the Developer Tools plug-in, the software site is the path to the Developer Tools plug-in on the file system.

  4. From the Eclipse menu, choose Help, then choose Install New Software.

    The installation wizard opens showing Available Software ).

  5. On the Available Software page, click Add (located to the right of the Work with field).
  6. In the Add Repository dialog, fill in the following fields, and then click OK.
    • In the Name field, enter a unique name for the Developer Tools plug-in.

    • In the Location field, click Archive to specify the location (software site) of the Developer Tools plug-in located in the clients/eclipse-plugin folder.

    The installation wizard picks up the Developer Tools plug-in from the specified location (software site), and lists the name of the plug-in on the Available Software page.

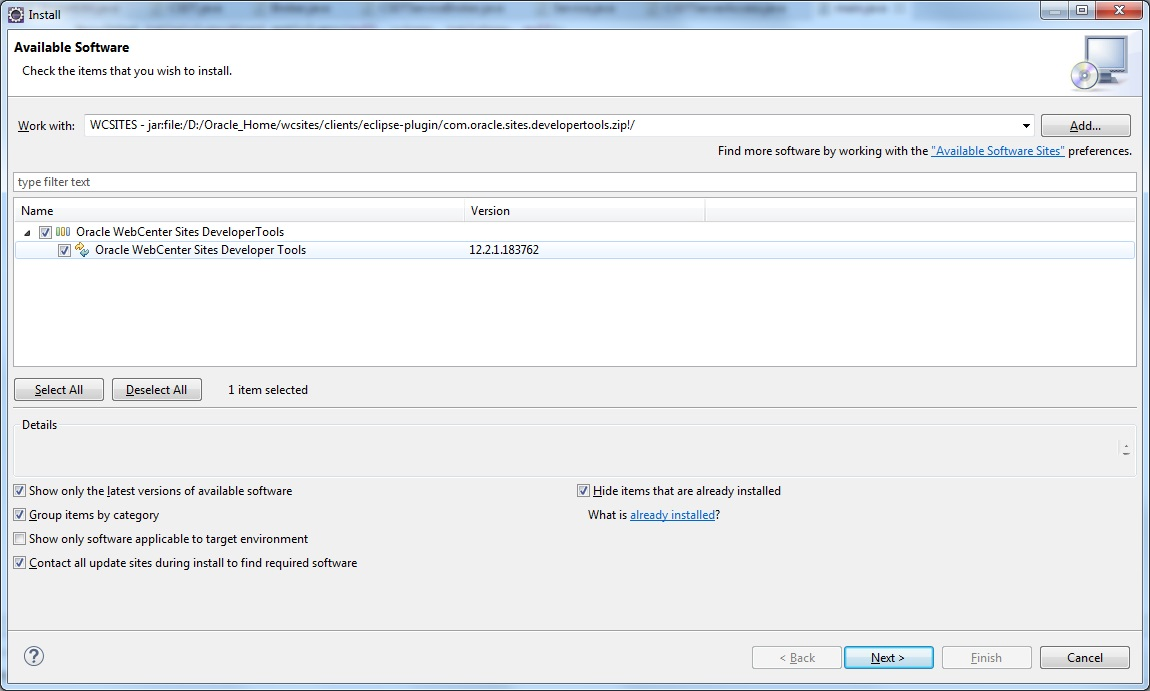
  7. On the Available Software page, select Oracle WebCenter Sites Developer Tools, then click Next .

    Figure 71-1 Installation Wizard: Available Software Listing the Developer Tools Plug-In

    Description of Figure 71-1 follows
    Description of "Figure 71-1 Installation Wizard: Available Software Listing the Developer Tools Plug-In"

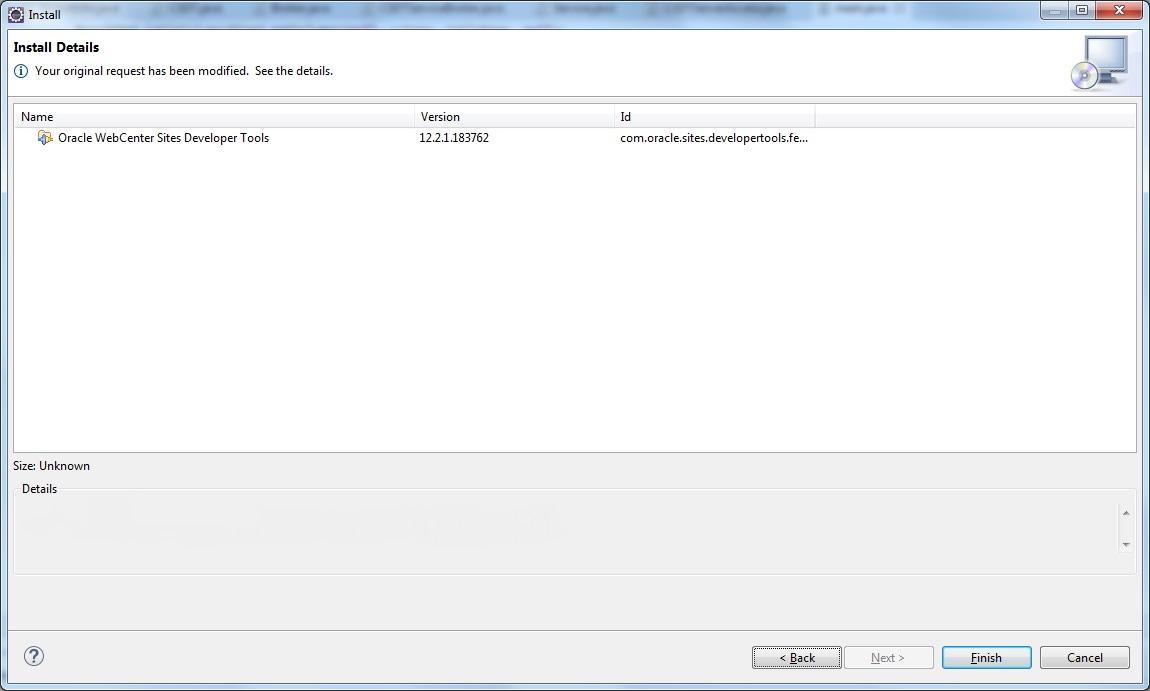
    The Install Details page opens.

  8. On the Install Details page, click Finish .

    Figure 71-2 Installation Wizard: Install Details Window

    Description of Figure 71-2 follows
    Description of "Figure 71-2 Installation Wizard: Install Details Window"

    Note:

    The version numbers in all figures are for representation purpose only. These numbers may differ depending upon which WebCenter Sites version you use. 
  9. During the installation process, a Security Warning dialog opens. Click OK to continue with the installation.
  10. After the installation completes successfully, the Software Updates dialog open.

    To ensure WebCenter Sites is running, access ${base_url}/HelloCS, where ${base_url} is the base URL for your WebCenter Sites instance. For example, if your base URL is http://example:8080/cs, then http://example:8080/cs/HelloCS is the verification URL for your WebCenter Sites instance.

  11. Restart Eclipse by clicking Yes in the Software Updates dialog.

    Restarting Eclipse refreshes the plug-in cache and makes the Developer Tools plug-in available in Eclipse.

How to Verify the Developer Tools Plug-In Installation

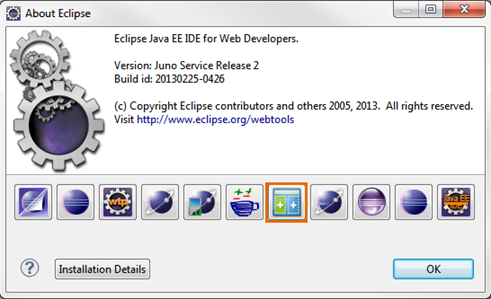
  1. After Eclipse restarts, verify that the Developer Tools plug-in is installed successfully. From the Eclipse menu, choose Help, then choose About Eclipse.

    The About Eclipse dialog opens showing the Developer Tools icon in the list of installed plug-ins.

    Figure 71-3 About Eclipse Dialog

    Description of Figure 71-3 follows
    Description of "Figure 71-3 About Eclipse Dialog"
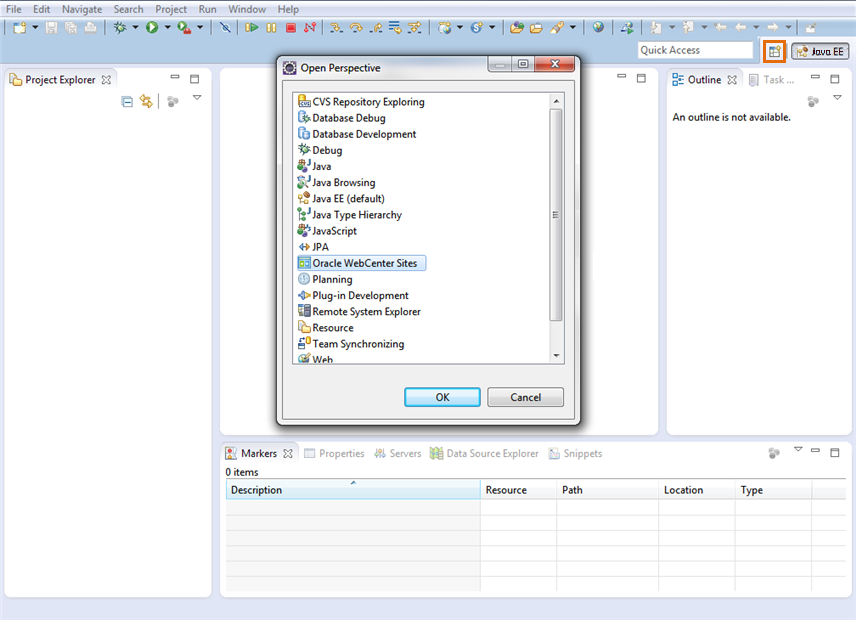
  2. Open the Oracle WebCenter Sites perspective by clicking the Open Perspective icon, located on the top right of the Eclipse IDE. In the Open Perspective dialog, select Oracle WebCenter Sites, then click OK.

    Figure 71-4 Open Perspective: Oracle WebCenter Sites

    Description of Figure 71-4 follows
    Description of "Figure 71-4 Open Perspective: Oracle WebCenter Sites"

How to Integrate WebCenter Sites with the Eclipse IDE

If you are setting up Developer Tools for the first time, the configuration form is automatically displayed.

If you have connected to a WebCenter Sites instance and want to connect to a different instance, navigate to the WebCenter Sites toolbar and click the ConfigurePreference wizard to open the configuration form.

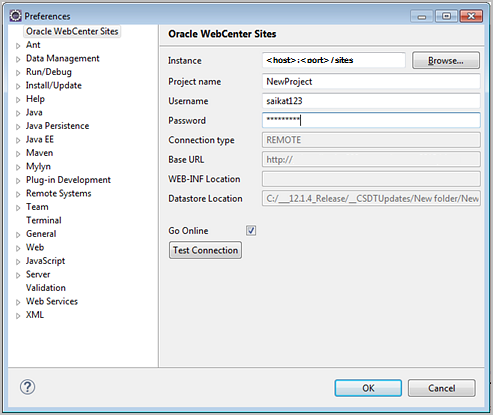
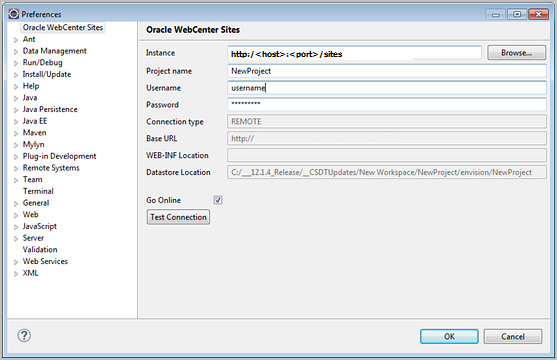
To integrate WebCenter Sites with the Eclipse IDE, enter information for the WebCenter Sites instance to which you want to connect into the configuration form, as follows:

  1. In the Instance field, do one of the following, depending on whether you are connecting to a local or remote host:

    Note:

    A remote connection supports the creation of multiple projects on the same remote host. Local connections support only one project at a time.

    • If you are connecting to a local host, click Browse to select the locations of the config folder (which contains the wcs_properties.json file for the WebCenter Sites instance).

    • If you are connecting to a remote host (for example, http://example:8080/cs), enter the path to the host in the format [host]:[port]/[path]. (You must prefix either http:// or https:// .)

    After you enter a value in the Instance field, the following fields are automatically populated. The values of these fields are based on whether you specified a local or remote host in the Instance field:

    • Remote Connection: If you are connecting to a remote host, the value is set to true. If you are connecting to a local host, the value is set to false.

    • Host IP Address: Specifies the IP address of the host to which you are connecting.

    • Port: Specifies the port number of the host to which you are connecting.

    • Web Context Path: Specifies the context path to the host.

    • Workspace: Specifies the location of the Developer Tools workspace (Eclipse project).

    • Sites Context Root: If you are connecting to a local host, this field contains the path of the WebCenter Sites web application. If you are connecting to a remote host, this field is blank.

  2. In the Project name field, enter a name for the project on which you will be working.
  3. In the Username field, enter the user name of a general administrator. This user must be a member of the RestAdmin group.
  4. In the Password field, enter the password for the user name.
  5. Select the Go Online checkbox to access the server and work with the WebCenter Sites resources in Eclipse.
  6. Click Test Connection.
    A dialog opens stating that the connection was successful.
  7. In the dialog box, click OK.
  8. In the configuration form, click OK.

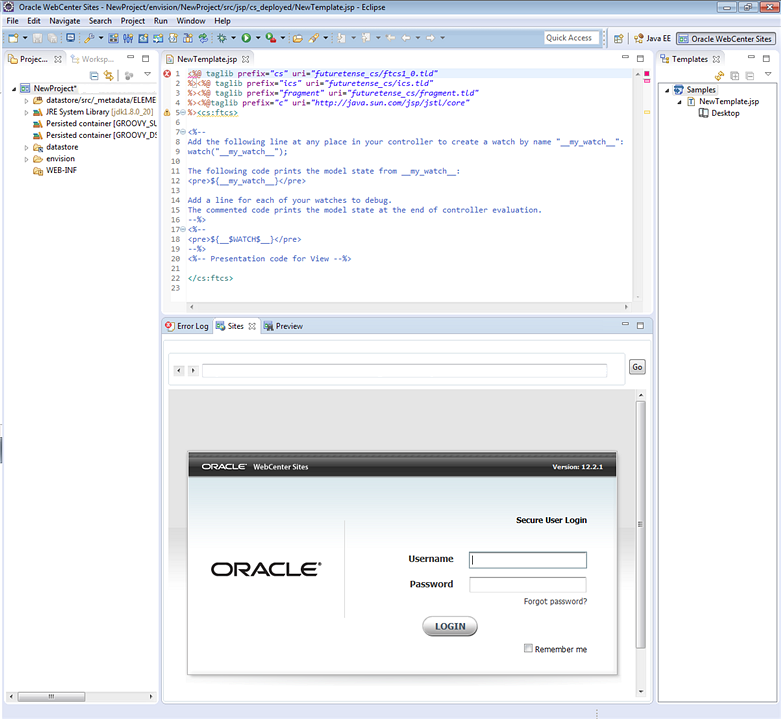
    The Oracle WebCenter Sites perspective opens. The following figure shows how the Oracle WebCenter Sites perspective look if you are accessing WebCenter Sites-integrated Eclipse for the first time.

    Note:

    You are not required to open the Oracle WebCenter Sites perspective to work with WebCenter Sites resources.

    Figure 71-6 Oracle WebCenter Sites Perspective

    Description of Figure 71-6 follows
    Description of "Figure 71-6 Oracle WebCenter Sites Perspective"

If the Oracle perspective renders as shown in the figure above, then you have successfully set up Developer Tools. When WebCenter Sites is integrated with Eclipse, you are not required to open the Oracle WebCenter Sites perspective to work with WebCenter Sites resources.

Note:

The panels containing the Eclipse and Developer Tools views are interchangeable. To move a view to a different panel, click the view's tab and drag it to the panel.

How to Enable Code Completion for Remote Hosts

  1. Copy the WEB-INF directory from the remote computer to your local file system. It is recommended that you copy it into your Eclipse project folder, located under the workspace folder you created when you initially integrated Eclipse with WebCenter Sites.

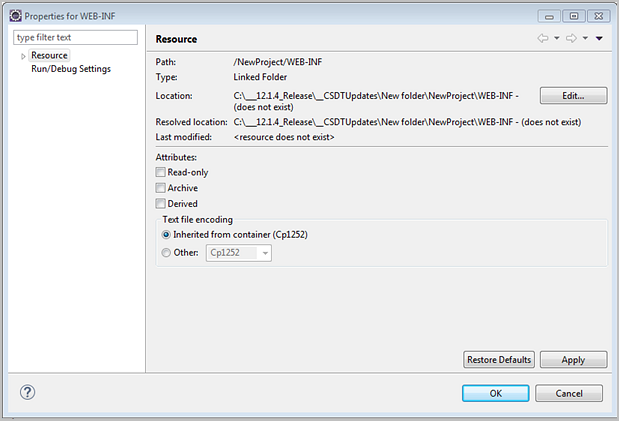
  2. In the Project view in Eclipse, right-click the WEB-INF folder and select Properties.

    The Properties for WEB-INF window opens.

    Figure 71-7 Properties for WEB-INF Window

    Description of Figure 71-7 follows
    Description of "Figure 71-7 Properties for WEB-INF Window"
  3. In the Location field, click Edit.

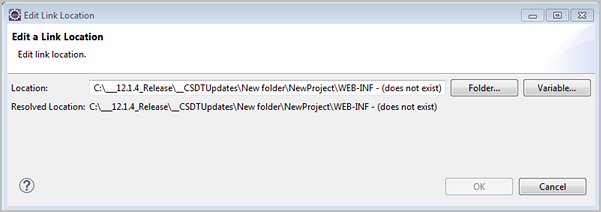
    The Edit a Link Location window opens.

    Figure 71-8 Edit a Link Location Window

    Description of Figure 71-8 follows
    Description of "Figure 71-8 Edit a Link Location Window"
  4. In the Location field, click Folder... and then navigate to the location of the WEB-INF folder you copied from step 1. Then, click OK.

  5. In the Properties for WEB-INF window, click OK.

    This enables Eclipse to perform tag completion and proper syntax highlighting.

    Note:

    Code completion is enabled automatically for local instances.

How to Use Developer Tools to Work with Existing Resources

If you upgraded your WebCenter Sites system and want to use Developer Tools to work with resources created before this release (existing resources), see What You Should Know About Using Developer Tools with Pre-Existing Resources.

How to Manage WebCenter Sites Resources

To quickly get started with managing WebCenter Sites resources in the Oracle WebCenter Sites perspective, continue to Managing WebCenter Sites Resources in Eclipse.

How to Work with a Pre-Existing Project in Eclipse

When you integrate Eclipse with a WebCenter Sites instance, you specify the name and location of your workspace. Upon subsequent access of this workspace, you must log in with the credentials you specified in the Configuration form when you initially integrated WebCenter Sites with the Eclipse IDE. Otherwise, you will be working offline and have no access to WebCenter Sites resources in Eclipse.

To work with a pre-existing project in the Eclipse IDE:
  1. Open the Eclipse IDE and select the workspace associated with the WebCenter Sites instance you want to work with.
    Eclipse opens, however, you are working in offline mode.
  2. To go online and gain server access to the WebCenter Sites instance, do one of the following:
    • Select any WebCenter Sites component in Eclipse.

      For example:

      1. Click the Create New Template icon.

        An Error dialog opens with a message stating that your current project is currently offline.

      2. Click Yes.

        The Credentials dialog opens.

      3. In the Credentials dialog, enter the username and password for the WebCenter Sites instance to which you want to connect, and then click Go Online.

    • Open the Configuration form and enter your credentials for the WebCenter Sites instance to which you want to connect, as follows:

      1. In the WebCenter Sites toolbal, click the ConfigurePreferences icon.

        The Configuration form opens.

      2. In the Configuration form, enter your credentials into the Username and Password fields.

      3. Select the Go Online checkbox.

        Figure 71-9 Configuration Form

        This image shows the Preferences dialog.
      4. Click OK.

    You are now working online and can create and manage WebCenter Sites resources in Eclipse.

Updating Developer Tools

Here are the steps you need to perform after you’ve upgraded your WebCenter Sites installation.

How to Update the Location of the Developer Tools Plug-In

  1. Ensure that the updated Developer Tools plug-in (com.oracle.sites.developer-tools.zip) is available in the {$Oracle Home}/wcsites/clients/eclipse-plugin directory.
  2. Start Eclipse (execute eclipse.exe).
  3. From the Eclipse menu, choose Help, then choose Install New Software.

    The Available Software dialog opens.

  4. In the Available Software dialog box, click Add.
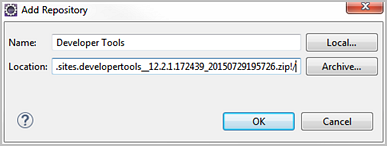
  5. In the Add Repository dialog, fill in the following fields, and then click OK.
    • In the Name field, enter a name for the Developer Tools plug-in

    • In the Location field, click Archive to specify the location of the updated plug-in, then click OK.

    Figure 71-10 Add Repository Dialog

    Description of Figure 71-10 follows
    Description of "Figure 71-10 Add Repository Dialog"
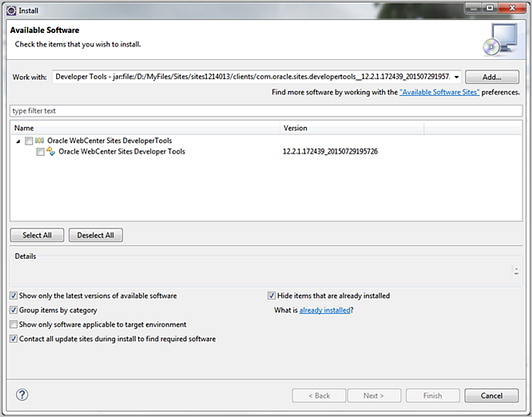
  6. In the Available Software dialog box, select the update for the Developer Tools plug-in and then click Next.

    Figure 71-11 Available Software: Select Updated Plug-in

    Description of Figure 71-11 follows
    Description of "Figure 71-11 Available Software: Select Updated Plug-in"

    The Install Details dialog opens showing updated plug-in was installed successfully.

  7. In the Install Details dialog, click Finish.
  8. Restart Eclipse for the changes to take effect.

How to Check for Updates to Existing Plug-Ins

  1. From the Eclipse menu, choose Help, then choose Check for Updates.

    The Available Updates dialog opens.

  2. Select Oracle WebCenter Sites Developer Tools, then click Next.

    The Update Details dialog opens.

  3. Click Finish.
  4. During the update process, a Security Warning dialog opens. Click OK to continue the update.
  5. After the update completes successfully, the Software Updates dialog opens. Before proceeding to the next step, start your local WebCenter Sites instance and restart Eclipse by clicking Yes in the Software Updates dialog.

How To Verify That the Developer Tools Plug-In Has Been Updated

After Eclipse restarts, verify that the Developer Tools plug-in has been successfully updated to the latest version.

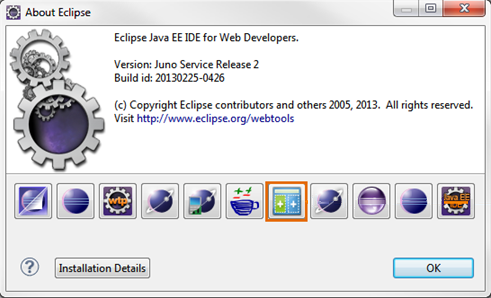
  1. From the Eclipse menu, choose Help, then choose About Eclipse.

    The About Eclipse dialog opens showing the Developer Tools icon in the list of installed plug-ins.

    Figure 71-12 About Eclipse Dialog

    Description of Figure 71-12 follows
    Description of "Figure 71-12 About Eclipse Dialog"
  2. In the About Eclipse dialog, click the Developer Tools icon.

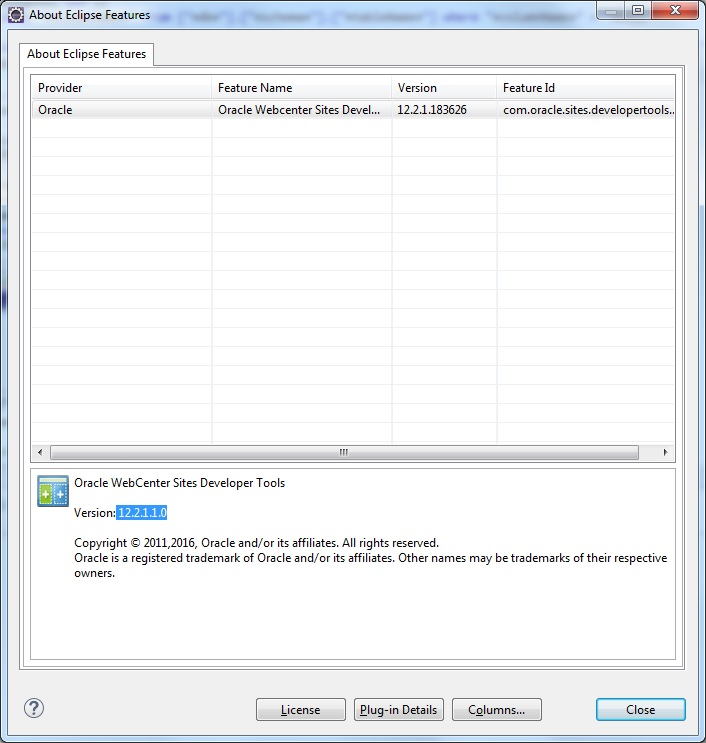
    The About Eclipse Features window opens, showing the version details of the Developer Tools plug-in.

    Figure 71-13 About Eclipse Features Window

    Description of Figure 71-13 follows
    Description of "Figure 71-13 About Eclipse Features Window"

Managing WebCenter Sites Resources in Eclipse

In Eclipse, you can create, edit, and otherwise manage code-based WebCenter Sites resources.

  • Template assets

  • Controller assets

  • SiteEntry assets

  • CSElement assets

  • ElementCatalog Entries

  • SiteCatalog Entries

See these topics that summarize the steps for managing resources in Eclipse:
How to Create Resources

  1. Start your local WebCenter Sites.
  2. Start Eclipse.
  3. Open the Oracle WebCenter Sites perspective:

    From the Eclipse menu, choose Window, then choose Perspective, then Open Perspective, then Other, and then select Oracle WebCenter Sites.

  4. Create any or all of the following resources:
    • To create a Template asset, click the Create New Template icon and fill in the forms.

    • To create a new Controller asset, click the Create New Controller icon and fill in the form.

    • To create a CSElement asset, click the Create New Element icon and fill in the forms.

    • To create a SiteEntry asset, click the Create New Site Entry icon and fill in the forms.

    • To create an ElementCatalog entry, click the Create New Element Catalog Entry icon and fill in the forms.

    • To create a SiteCatalog entry, click the Create New SiteCatalog Entry icon and fill in the forms.

    For field definitions and information about Template, CSElement, SiteEntry assets and SiteCatalog and ElementCatalog entries, see Creating Template, CSElement, and SiteEntry Assets. For field definitions and information about Controller assets, see Creating a Controller.

  5. When you click Save, the resource you created is automatically imported into WebCenter Sites.
  6. To manage the resources you create, edit, delete, or share with other sites use the Sites Workshops Elements view. Right-click the resource and select an option. For information about the available options, see Workspace.

How to Display Developer Tools Views in Panels

  1. Start your local WebCenter Sites.
  2. Start Eclipse.
  3. Open the Oracle WebCenter Sites perspective:

    From the Eclipse menu, choose Window, then choose Open Perspective, then Other, and then Oracle WebCenter Sites.

  4. Select Window, then Show View, and then Other.
  5. In the Show View dialog, select a view (located under the Oracle WebCenter Sites folder):
    • Sites UI shows the embedded Admin and Oracle WebCenter Sites: Contributor interfaces.

    • Sites Log View shows the log file for WebCenter Sites.

    • Developer Reference shows the Tag Reference for Oracle WebCenter Sites Reference and Java API Reference for Oracle WebCenter Sites only if you have associated the Tag Reference and Javadoc with your current WebCenter Sites instance.

    • Sites Workspace Elements provides access to code-related resources. This view shows the resources in a tree and groups each resource according to its site affiliation.

    • Logging Configuration shows a dynamically updating view of the Log ODL configuration. In this view you can set the log levels of each WebCenter Sites logger.

    • Preview Browser shows an embedded preview browser.

    • Template View, shows all the Template assets created in Eclipse and any Template assets exported from WebCenter Sites to Eclipse.

How to Export and Import Data Between WebCenter Sites and Developer Tools

  1. Start your local WebCenter Sites.
  2. Start Eclipse.
  3. Open the Oracle WebCenter Sites perspective:

    From the Eclipse menu, choose Window, then choose Open Perspective, then Other, and then Oracle WebCenter Sites.

  4. Select the SynchUp icon. The synchronization tool enables you to either export data from WebCenter Sites to the Developer Tools workspace or import data to WebCenter Sites from your Developer Tools workspace.

Uninstalling Developer Tools

Uninstalling Developer Tools only takes a few clicks.

To uninstall Developer Tools:

  1. Close the Oracle WebCenter Sites Perspective (along with any views associated with the Oracle WebCenter Sites perspective).
  2. From the Eclipse menu, choose Window, then choose Preferences.

    The Preferences dialog opens.

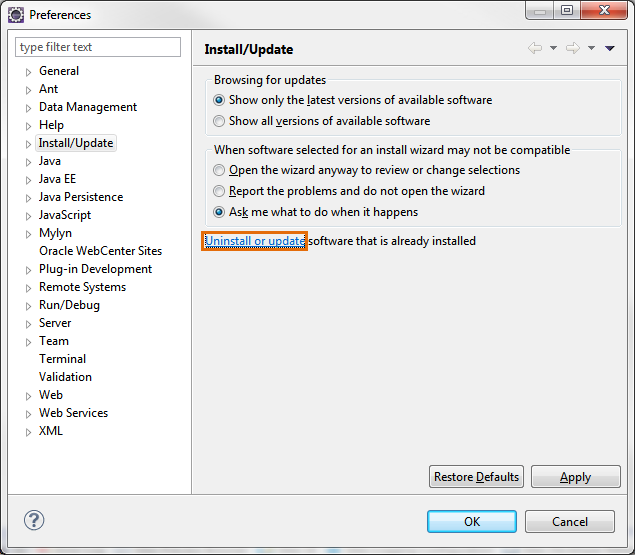
  3. Select Install/Update, then click the Uninstall or update link.

    Figure 71-14 Preferences: Install/Update

    Description of Figure 71-14 follows
    Description of "Figure 71-14 Preferences: Install/Update"
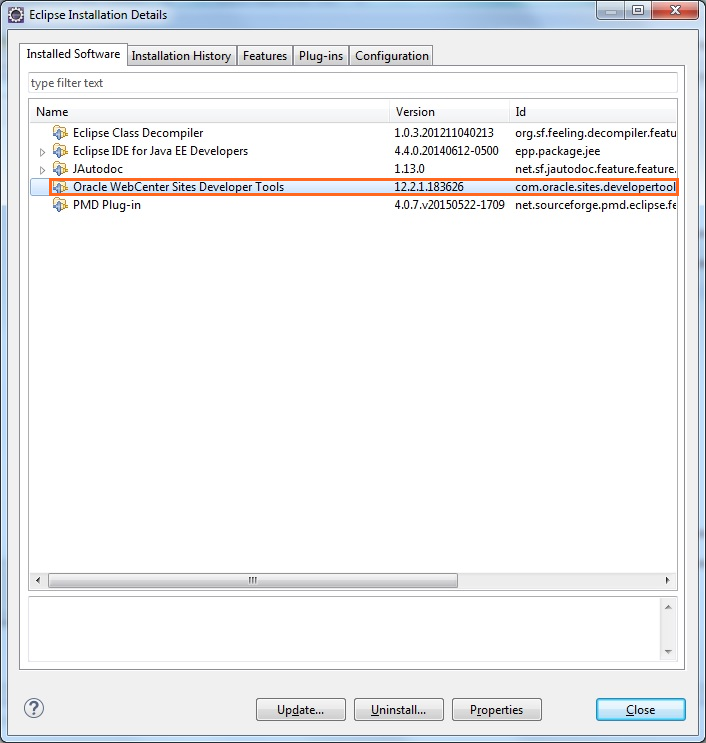
  4. On the Eclipse Installation Details page, select the Developer Tools plug-in and then click Uninstall .

    Figure 71-15 Eclipse Installation Details

    Description of Figure 71-15 follows
    Description of "Figure 71-15 Eclipse Installation Details"
  5. On the Uninstall Details page, click Finish to proceed with the process of uninstalling the Developer Tools plug-in.
  6. After the update completes successfully, the Software Updates dialog opens. Click Yes to restart Eclipse.

    Restarting Eclipse refreshes the plug-in cache and completely removes the Developer Tools plug-in from Eclipse.