4 About Contributor
About the Contributor Window
The Oracle WebCenter Sites: Contributor interface provides a variety of content management features to accommodate a wide range of WebCenter Sites users, including content contributors and marketers. The Contributor interface is used by content contributors to create, approve, and publish content to the website. Marketers use the Contributor interface to create and manage marketing campaigns, and monitor and track visitor activity, which enables them to update the content and appearance of the website with your visitors’ preferences in mind.
When the Contributor interface opens, you see the following:
-
The left navigation pane, which contains the following trees:
-
Site Tree: Shows the site navigations for each website whose content is supplied by the content management site you are logged in to.
-
Content Tree: Shows the name of each Parent asset. Expand a parent asset to display a list of all the parent asset’s child assets.
-
My Work: Provides the Bookmarks, History, and My Tags nodes which enable you to keep track of your workload. See Finding and Organizing Assets.
-
Marketing Tree: Shows promotion, segmentation, and recommendation information. Also shows site visitor attributes and definitions.
-
-
The dashboard, which displays the following widgets:
-
Bookmarks: Lists the assets you have bookmarked for easy retrieval at a future time. Bookmarked assets are also accessible from the Bookmarks node in the My Work tree.
See Bookmarking Assets.
-
Saved Searches: Lists all the search criteria that has been saved as a Saved Search.
See Saving Your Search Criteria to Your Saved Searches Widget.
-
Assignments: Lists the assets that are currently assigned to you through a workflow process.
-
Checkouts: Lists all the assets that are currently checked out to you. This list is only available if revision tracking is enabled. See Revision Tracking.
-
-
The menu bar, which contains the following options:
-
Content: Contains options to create new assets and manage existing assets.
See Creating Assets.
-
Edit: Only available if you are working with an asset. This option provides content management tools to modify, copy, and delete an asset.
See Editing Assets.
-
View: Only available if you are currently working with an asset. This option provides tools to view an asset in either Form View or Web View and options for previewing an asset in different ways.
See Previewing Assets.
-
Help: Provides links to online help for the Contributor interface.
-
-
The Search field, which you can use to enter a search query for a specific asset. You can also narrow your search down by asset type or use the Advanced Search function. See Finding and Organizing Assets.
-
The applications bar, which you open and close by clicking the Up/Down arrow on the right of the menu bar.
Your access to Contributor interface functions is determined by the roles assigned to you by the WebCenter Sites administrator. For more information about the Contributor interface, see the following topics:
Contributor Overview
The Contributor interface enables you to create and manage content for publication to your website. The content you create is stored in the WebCenter Sites database. The Contributor interface provides a simple and intuitive way of accessing and working with this content.
The content that you manage depends on the nature of your organization: a news site might produce articles, photos, and video clips; a human resources department might manage job postings and personnel policies; an online retailer might offer product descriptions, special offers, coupons, and so on. Content can be moved from its creation on the content management (CM) system to its completion in steps, from person to person, in a process called workflow. Along the way, collaborators can modify and comment on the content and use revision tracking to audit changes made to the content. Your end goal is to publish content so that site visitors can view it. Most publishing functions are available only in the Admin interface, such as scheduling publish events. However, if a content contributor is granted publishing permissions, assets can be published individually from the Contributor interface.
From the content entry form to the website
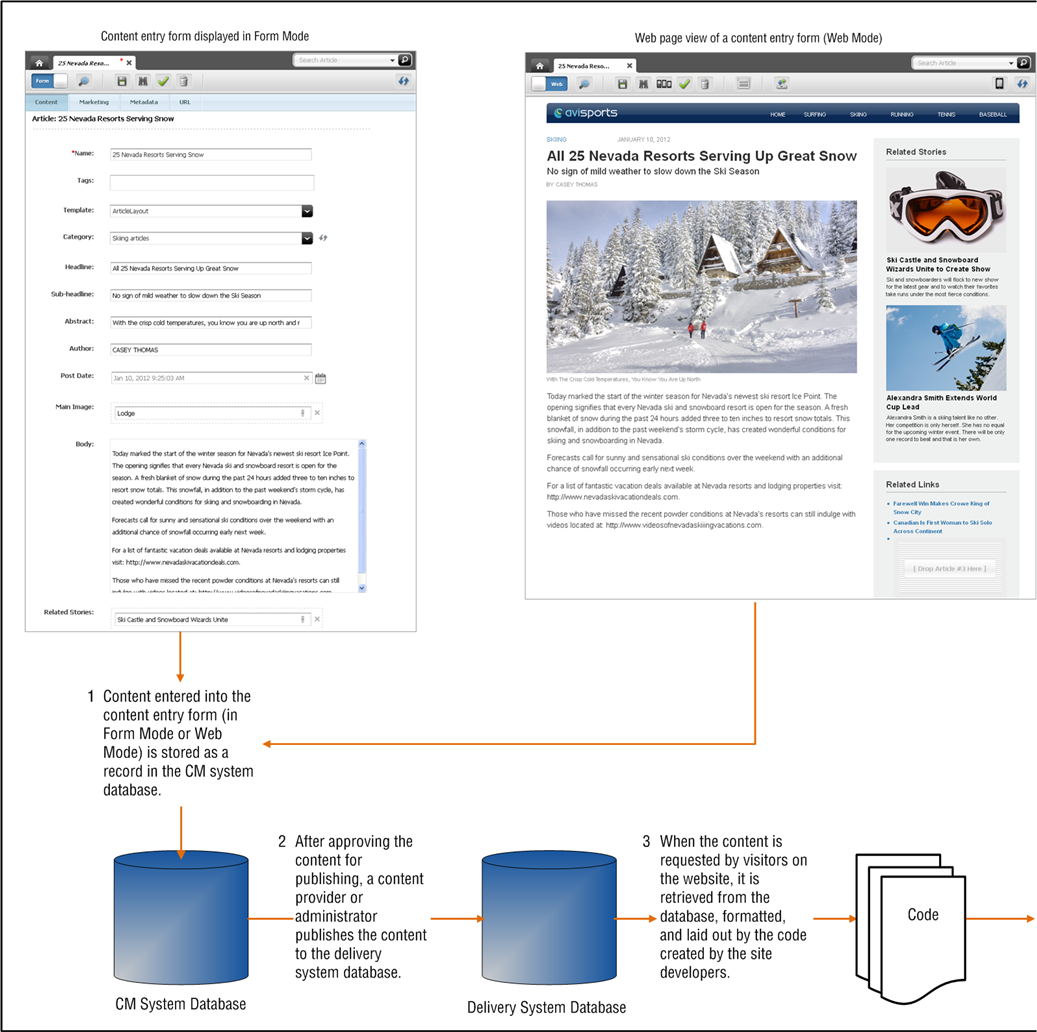
When creating and editing content in WebCenter Sites, you use content entry forms which are located on the CM system. Their purpose is to give you an easy, intuitive way to store content in the WebCenter Sites database, without having to access the database directly. When ready for public delivery, you approve the content for publishing and then the approved content is published to the website using RealTime publishing either automatically, based on a publishing schedule set up by your administrator, or manually, if needed.
For example, the RealTime publishing method publishes (copies) content from the CM system to the delivery system. The delivery system then delivers that content to the website. The steps for publishing content to the website are explained below:
Step 1, When you populate a content entry form (for example, the Article form) and save the content, WebCenter Sites stores the content in its CM system database.
Step 2, After you or another user approves the content and initiates the publishing process, the content is copied to the delivery system.
Step 3, The content requested by a site visitor is automatically retrieved from the delivery system, formatted, and laid out by code. This code is written by developers according to site designers' specifications.
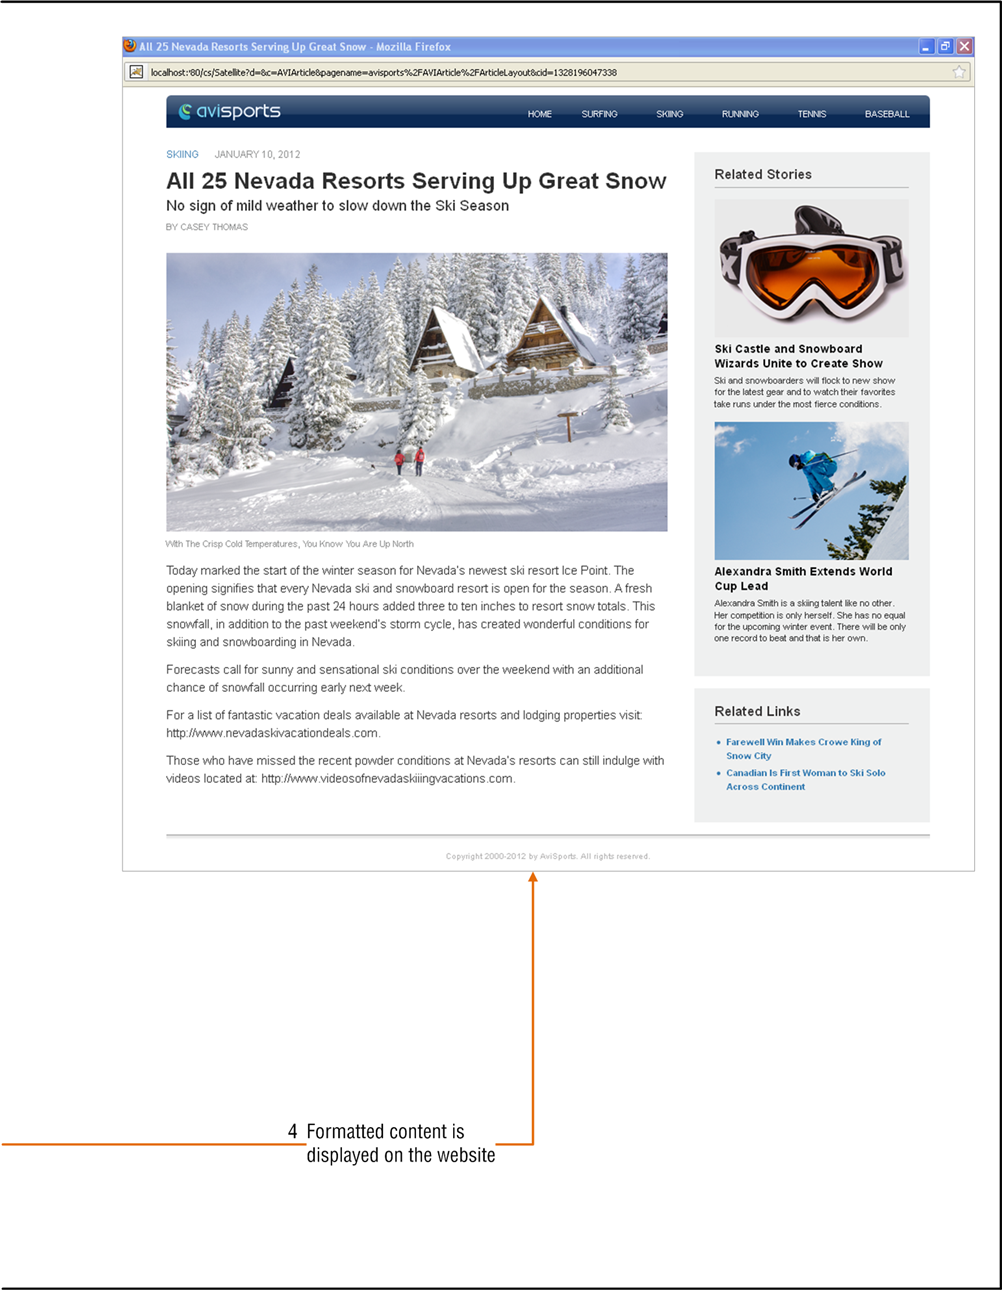
Step 4, The formatted content is delivered to the visitor's browser.
In simple terms, a content entry form accepts raw content for storage in the CM system database. When published content is requested by a site visitor, the delivery system renders the content (unless the content is cached) in viewer-ready form in the visitor's browser.
Note:
As a content provider, and throughout this guide, you will work with the CM system to create, modify, and perform other processes on the content that is delivered to the website.
A content entry form represents an asset (which is described later in this chapter). Content entry forms can be displayed in two modes:
-
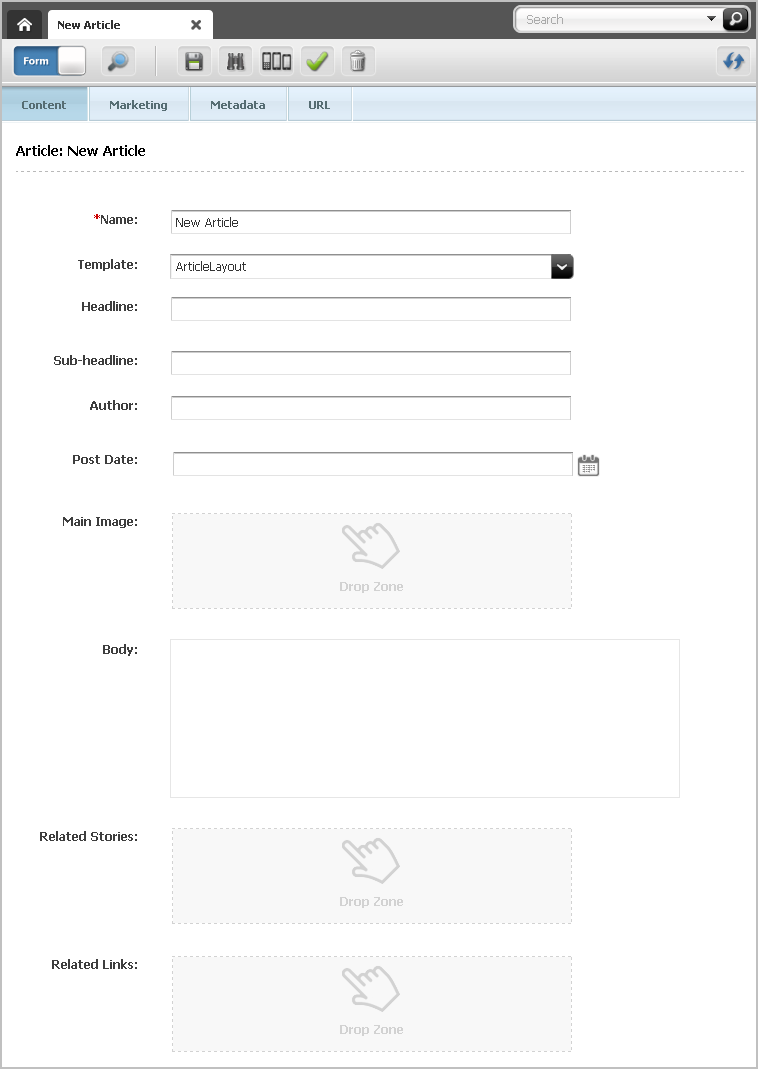
Form View displays a traditional form view that allows you to enter content into fields (shown on the left in Figure 4-1). You can then use the Preview option to see how the content would be displayed on the website if it were published.
-
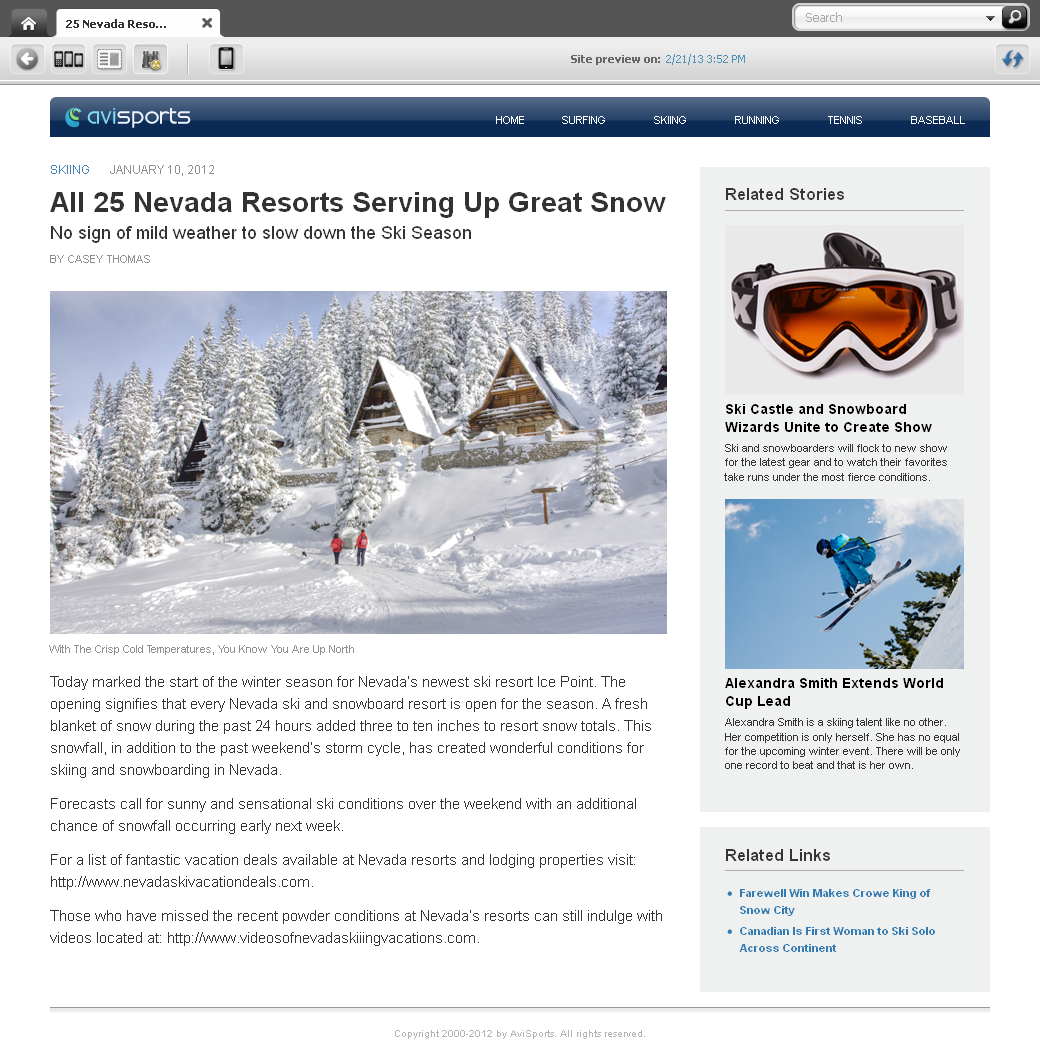
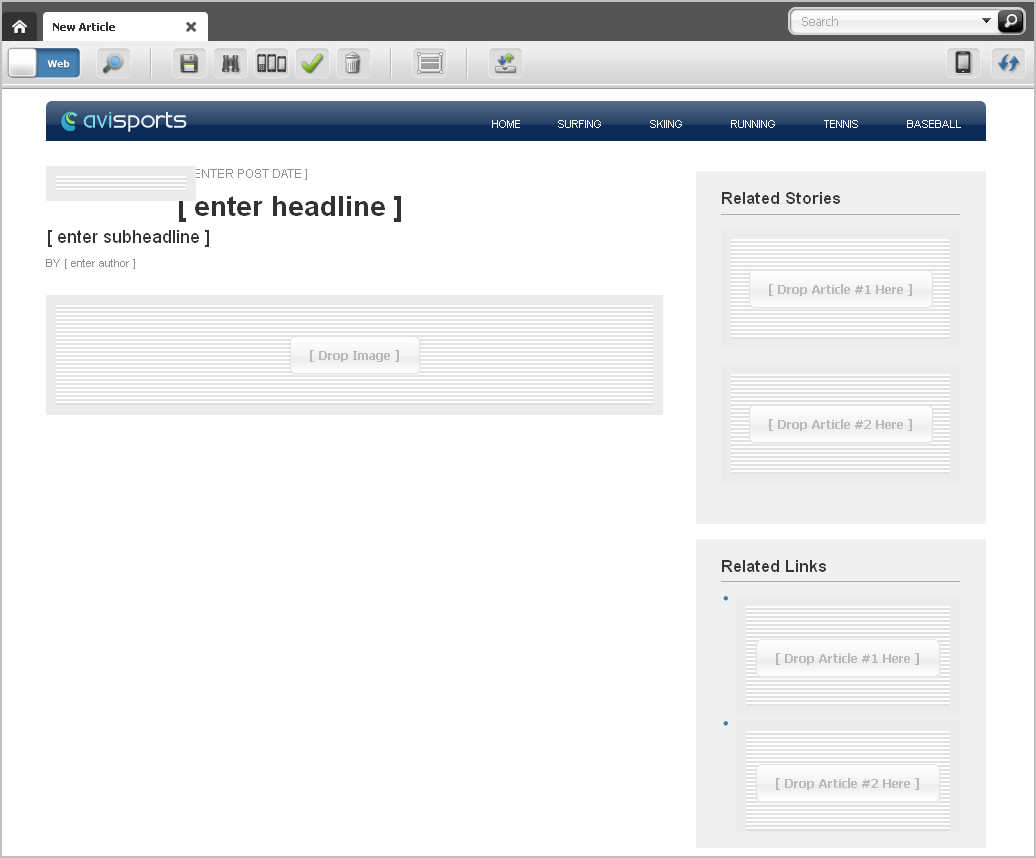
Web View allows you to enter information into the web page view of the content (shown on the right in Figure 4-2), which shows you how the content you are creating will be displayed when published to the website as you are creating it.
Content entry forms offer the following advantages:
-
Users don't have to learn the specifics of the WebCenter Sites database.
A content entry form can be thought of as a window into the WebCenter Sites database. Content that you enter into a form is stored in the database. Content that you retrieve is read from the database and displayed in an editorial version of the content entry form.
Because a content entry form provides a standard interface to the variety of databases that WebCenter Sites supports, it spares users from having to learn the specifics of any database in particular. If one database is replaced with another (for example, SQL Server is replaced with DB2) the switch is transparent to users.
-
Users don't have to know HTML or other markup languages.
No content entry form requires its users to format the content they enter or edit. A default format (specified in the templates) is applied when a user-defined format is unavailable. And when a field displays a WYSIWYG editor (What You See Is What You Get), you can use its tools to format the field's content – without having to know HTML. As a content provider, you have the option to remain strictly focused on the content, or to determine its appearance, as well.
-
Work in a drag and drop environment.
Certain fields in a content entry form may display a Drop Zone. Drop Zones support drag and drop functionality, which provides an easy way to associate one piece of content with another. Users can quickly find content (by performing a search or navigating the Content Tree), drag that content to the Drop Zone field, and then drop the content into the field.
-
Reusability and consistency are maximized.
Each piece of content that you enter into a form can be reused as many times as necessary, in as many formats as necessary, in as many locations within the website as necessary. Reusability ensures consistency across the site by eliminating the need for re-creating content each time you have to use it.
Figure 4-1 Content Entry Form (Displayed in Form View and Web View)
Description of "Figure 4-1 Content Entry Form (Displayed in Form View and Web View)"
Content entry modes
In the Contributor interface you can work with content entry forms using either Form View or Web View.
Figure 4-3 Content Entry Form Displayed in Form View
Description of "Figure 4-3 Content Entry Form Displayed in Form View"
Figure 4-4 Content Entry Form Displayed in Web View
Description of "Figure 4-4 Content Entry Form Displayed in Web View"
Form View displays a content entry form in its traditional form view, which contains clearly labeled fields into which you can enter information for the content you are creating. On the other hand, Web View allows you to work with the web page view of a content entry form. Instead of fields. Web View displays slots, predefined sample information, and other editable areas into which you can enter information. The information you enter in Web View is displayed exactly as it would be on the website (when the content is published).
In addition to the ability to work in two different modes, the Contributor interface supports drag-and-drop functionality which is available in both Form View and Web View.
Exploring Content Management Concepts
WebCenter Sites defines content in terms of assets, and asset types, which are used throughout this guide.
For more information, see the following topics:
Content: Asset types and Assets
Assets are content items that you manage using WebCenter Sites, for example, articles, product descriptions, advertisements, photos, and video clips. Assets are instances of asset types.
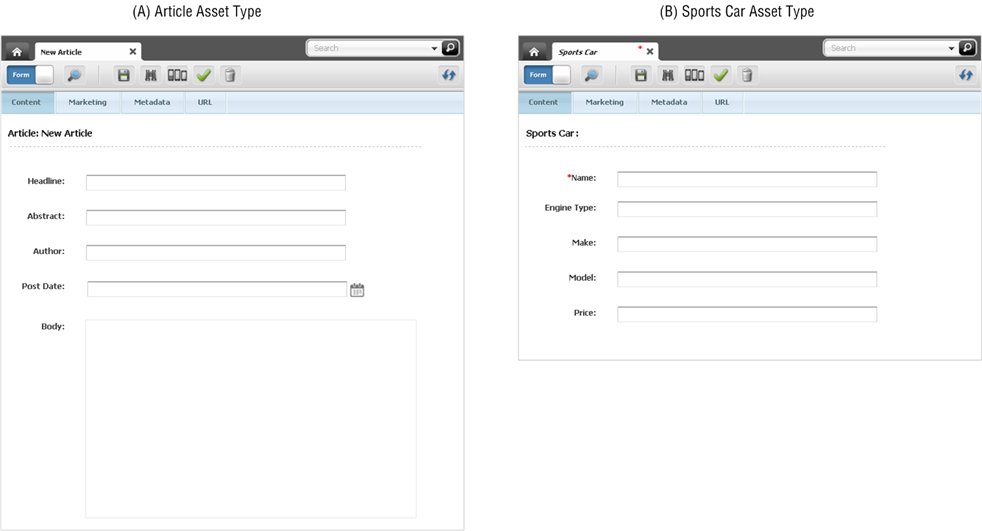
An asset type is an object that you use to create assets of that type. An asset type is represented by a content entry form, where the set of fields define the type of content you must provide.
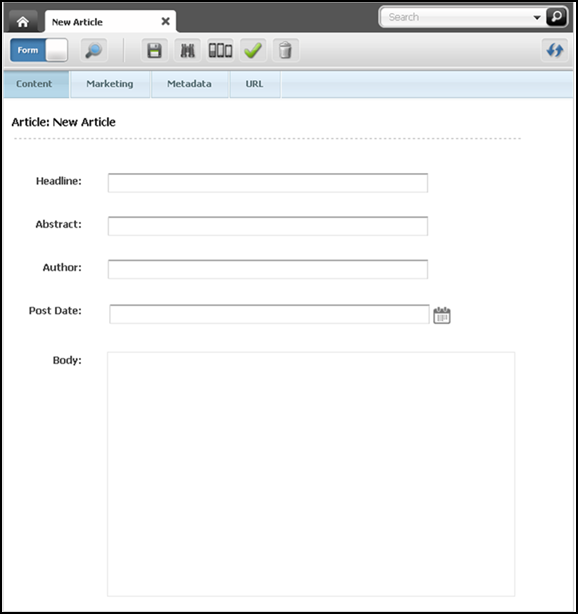
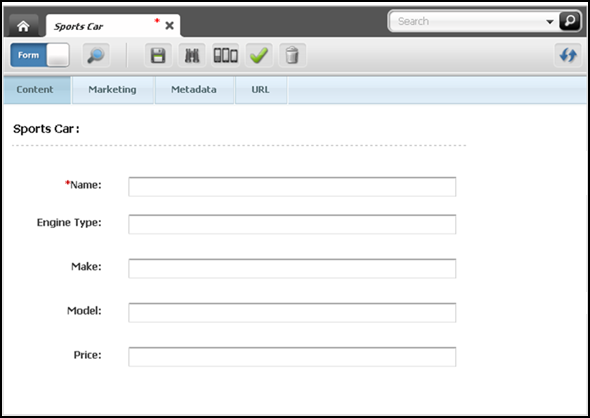
For example, the content entry form in Figure 4-5(A) belongs to an asset type named Article. Its fields Headline, Abstract, Author, Post Date, and Body prompt you for content that composes the article. The content entry form in Figure 4-5(B) belongs to an asset type named Sports Cars and has a different set of fields Name, Engine Type, Make, Model, and Price that call for information about sports cars.
Figure 4-5 Content entry forms for the Article and Sports Car asset types
Description of "Figure 4-5 Content entry forms for the Article and Sports Car asset types"
From the Article asset type, content providers can create the Finance Article asset, the Sports Article asset, the Gardening Article asset, and the Music Article asset (all of which are instances of the Article asset type).
From the Sports Car asset type, with a different set of fields, content providers can create the Lotus, Ferrari, Maserati, and Bughatti assets. All are instances of the Sports Car asset type.
Typically, developers create many different asset types, giving you an appropriate range and type of content to create and publish. Each asset type has its own content entry form with a unique set of fields. When saved, an asset is stored in the WebCenter Sites database. The asset can be edited, inspected, deleted, duplicated, placed into workflow, tracked through revision tracking, searched for, and delivered to the website.
Note:
To be technically accurate, field names in a content entry form are attributes. The distinction is important to administrators and developers, but does not affect the content provider's work or understanding of content management in WebCenter Sites. For this reason, the terms field and attribute are used interchangeably throughout this guide.
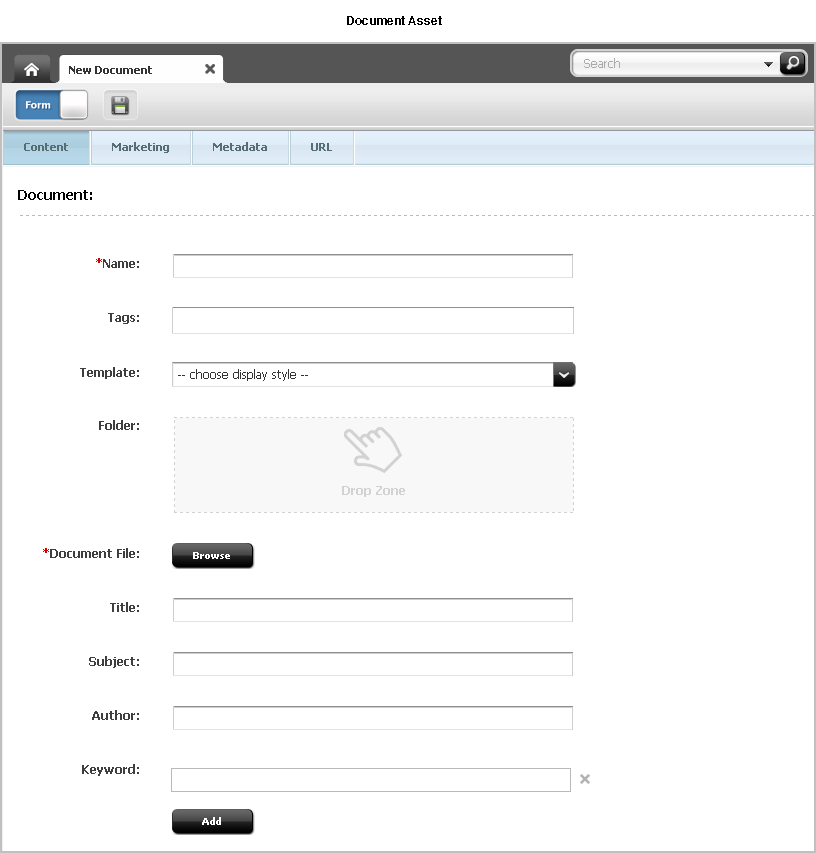
Structured Content Assets and Document Assets
As a content provider, you are likely to manage two kinds of assets: structured content assets and document assets.
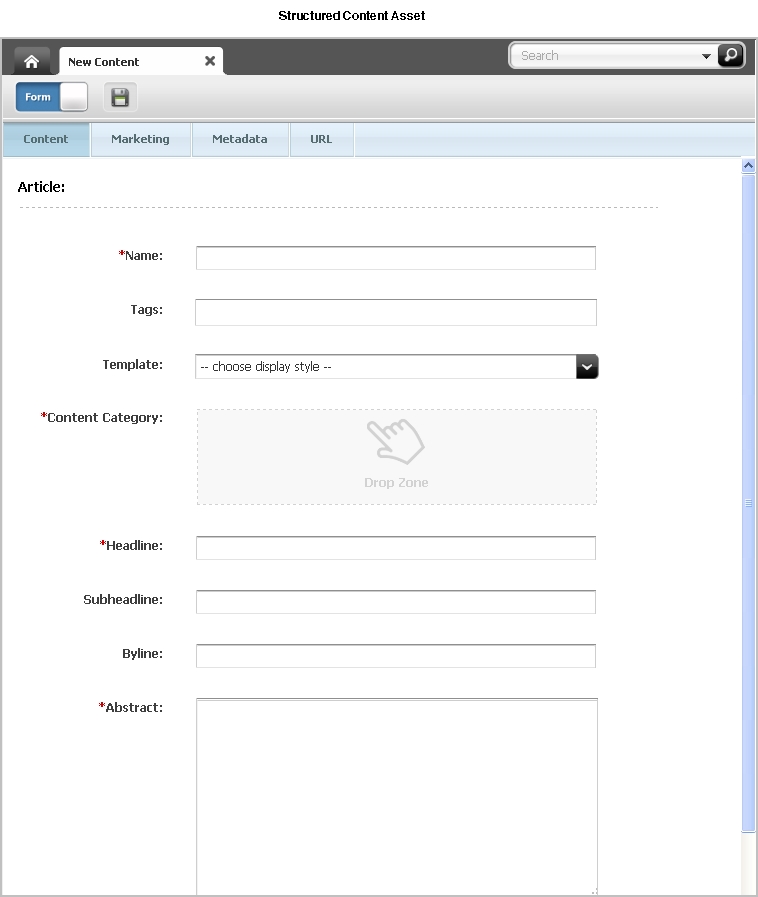
A structured content asset requires you to enter prescribed pieces of content directly into a form in the Contributor interface, whereas a document asset requires you to provide a file with the content (or layout) of your choice. The developer who creates the asset type specifies whether the asset type supports structured content, or documents, or both.
Structured content is used to enforce uniformity, standards, and reusability. By contrast, file-based content is used when a free-style approach is acceptable. File-based content gives you the freedom to compose content of your own choice, and to present it in your own format.
-
When creating a structured content asset, you enter the content directly into a form (as explained earlier). The fields impose content structuring by prompting you for specific information—for example, a headline, a byline, and body text.
When the content is published, its format and layout (predetermined by site designers) are implemented in the template that you choose to render the content.
-
When creating a document asset, you enter content into a file of the format of your choice (for example, a Word document), then attach the file to the document asset. You then enter information describing the content, such as name, file size, format, or associated keywords, into the additional fields that developers might have created to help you describe the file and its content.
Depending on how your site is designed by developers, the assets you work with could contain a mixed set of fields – some for content and others for documents.
Multilingual Assets
If your organization maintains localized sites for different geographic regions, each piece of content you create is likely to be translated into languages other than the one in which the content was originally created.
WebCenter Sites allows you to assign a locale designation to each asset, and to group assets with their translations. This way, you can easily track, manage, and publish multiple translations of your content.
For example, a global press release written in English can be translated into French, Spanish, and German, and the translations published on the respective regional sites. The press release and its translations exist in the WebCenter Sites database as separate assets, linked with each other into a multilingual set. Members of multilingual sets can be managed, passed through workflow, approved, and published to one or more destinations just like their non‐localized counterparts.
On the other hand, you are free to create assets in different languages and assign locale designations to them independently of one another, without creating the translation links. For example, you would treat in this way content that is specific to only one region and should not be translated nor published elsewhere.
When configuring your site for multilingual support, your developers provide the site visitors with a way to specify their preferred language. The delivery system then determines (by checking which locales are enabled for the site, and through locale filtering, if applicable) which translation of each asset is displayed on the website.
Design Assets
Structured content assets are called design assets if they are used to format and organize website content.
Design assets are created by developers for your use. Your access to design assets depends on which design assets were created and on the permissions granted to you by your WebCenter Sites administrator. The following list describes the design assets you can use (given the appropriate permissions).
-
Template assets create the look and feel of the website. As a content provider, you assign Template assets to structured content assets to apply specific formatting to your content. Each Template asset formats assets of a specific type. How your site developers code the templates determines how an asset's content entry form is displayed in Web View and how the asset will be displayed on the website. Consult your site developers for instructions on how to work with the Template assets available to you.
-
Page assets are containers that reference the assets constituting a page (or a portion of a page) in the website; they provide the structure and organization for the displayed content.
When you create a Page asset, you select a Template asset from the options provided to you by your developers to determine the appearance of that Page on the website. You can also access and modify an existing Page asset from the Site Tree or a list of search results.
WebCenter Sites Data Models
Asset data models define how content is stored in the WebCenter Sites database—in either a flat (single-level) or hierarchical (multi-level) structure.
In WebCenter Sites, the flat model is referred to as the basic model, and the hierarchical model as the flex model.
The data model is chosen by the developers during asset type creation to suit site design requirements. In most of your tasks as a content provider, the distinction between the asset models is not relevant, since the majority of the functions you perform in the Contributor interface are the same whether you are working with basic or flex assets. This guide indicates when a function or situation is unique to either basic or flex assets. Consult your administrator to determine the asset models used on your site.
The differences between the basic and flex asset models are summarized below:
-
Basic assets are instances of basic asset types and always have the same set of properties (attributes), as defined by the asset type. The information for one instance of an asset is stored in one row of a database table. These assets are standalone. They can be associated with other assets to form single-level parent-child dependencies, but they cannot inherit each other's properties. Thus, no complex hierarchies can be created with the basic asset model.
-
Flex assets have the ability to inherit structure and content from multiple parents and grandparents, which makes them excellent for building complex hierarchical data structures (for example, creating large online product catalogs). The flex asset model is more complex than the basic asset model. The information for one instance of a flex asset is stored in multiple database tables. Unlike basic assets, flex assets in a given flex family can have different properties (attributes) based on the established hierarchy and inheritance rules set up by the administrator. Flex asset types are composed of families of asset types. The members of a flex family are:
-
flex attribute type (required)
-
flex asset type (required)
-
flex definition (required)
-
flex parent (required)
-
flex parent definition (required)
-
flex filter type (optional)
The members of a flex family form an asset inheritance tree, where child assets inherit various attributes from their parents.
As a content contributor, you do not directly work with all of the members of the flex family. In fact, you mainly work with flex assets, which are the key members of flex families (all of the other members of a flex family contribute to the flex asset in some way). If you have the appropriate permissions, you can also create new flex attributes, which are characteristics of flex assets.
-
Site Design
In the Contributor interface, the site design for the CM site you are logged in to is represented as a hierarchy in the Site Tree on the navigation pane.
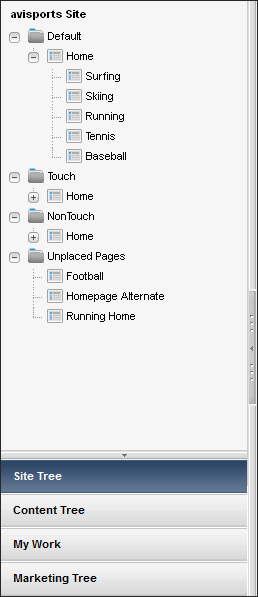
For example, Figure 4-10 shows a section of the Site Tree for the avisports sample site. Notice the hierarchical structure in which content is organized:
Figure 4-10 Site Tree for the avisports Sample Site
Description of "Figure 4-10 Site Tree for the avisports Sample Site"
The Site Tree contains a site navigation node for each website that uses the content of the CM site you are logged in to. For example, the Site Tree for the avisports sample site contains three site navigation nodes: Default, Touch, and NonTouch. Under each site navigation node is a list of Page assets displayed in a hierarchical order. A website's navigation is determined by the placement of the Page assets under the corresponding site navigation node. The Unplaced Pages node lists all of the Page assets that have not been placed under a site navigation. For more information, see Defining Website Navigation.
What can you do in the Contributor interface?
The Contributor interface provides the features you use to work with assets.
Whether you can access the assets and how you can work with them is determined by the following:
-
The roles assigned to your user name by the administrator. These roles grant you the permissions to work with features of the Contributor interface. If you do not have the right permissions, the function (such as creating content) is unavailable to you – which is indicated by being grayed out, hidden from your interface, or producing an error message when you attempt to use it.
-
Your access permissions (which are roles-based) determine the content management functions you can perform on individual assets (functions such as creating, viewing, or editing assets).
-
Whether an asset is part of a workflow and whether that asset is assigned to you or another user. If the asset is assigned to another user, you cannot work with it.
-
If revision tracking is enabled and another user has checked out the asset you want to work with, you cannot edit or delete that asset until the user checks the asset back in.
-
If an asset exists on your current site because it was shared from another site, you can work with that asset only in its native site (the site on which it was created).
-
If a publishing session is running and the asset you are accessing is included in that publishing session, you cannot edit or delete that asset until the publishing session is complete.
The rest of this section provides information about the features and functions available to users in the Contributor interface.
Create and Edit Assets
Creating assets is permissions-based. If you have the right permissions, you can create brand new assets from scratch.
If the asset you want to create is similar to an existing asset, you can copy the existing asset and make changes to the copy, which saves you a few steps. If an asset currently exists on one site and you have to create the same asset for a different site, you can share the asset so that you do not have to create it multiple times.
In the Contributor interface, you can create and edit assets in the following ways:
-
Create, copy, and edit assets in Form View
-
Create, copy, and edit assets in Web View
-
Add, replace, reposition assets on a Page
-
Delete assets
About Form View
If the administrator configured an asset type such that all assets of that type open in Form View, when you create an asset of that type, the asset is represented by a content entry form containing predefined fields into which you can enter information for the asset.
About Web View
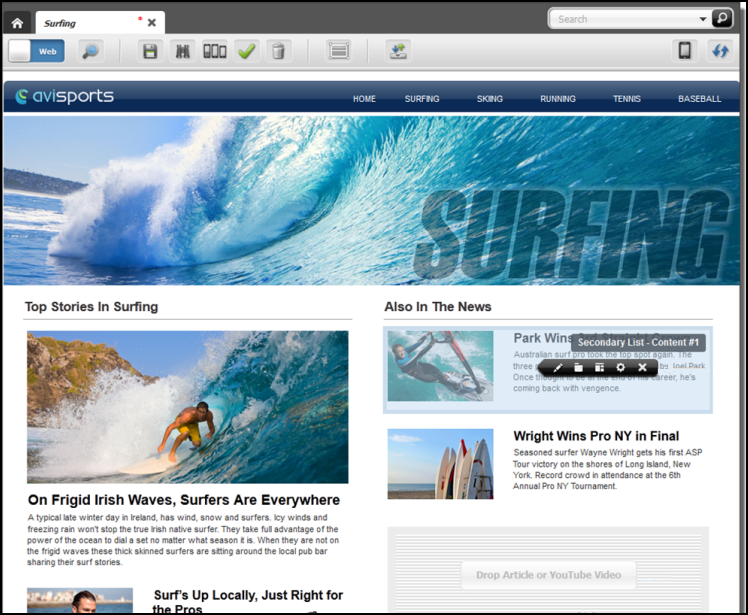
If an asset type is configured such that all assets of that type open in Web View, when you create or edit an asset of that type, the asset's web page view is shown to you. Web View offers in-context editing, which means you can work with assets directly in their published form (web page view). Instead of fields in a content entry form, it is the web page layout (template) assigned to the asset that determines the editable areas of an asset rendered in Web View. Editable areas can include simple text areas, WYSIWYG editor enabled text areas, and slots. Figure 4-11 shows an example Edit view of the Surfing page asset rendered in Web View displaying empty and occupied slots.
What is a Slot?
If the web page layout (template) assigned to the asset is configured to support slots, the asset's Create and Edit views display slots that are empty, or occupied, or both. Each slot accepts one piece of content –an asset (unless the slot is multi-valued, in which case the slot accepts multiple assets). If the slot supports drag and drop functionality, you can drag an asset from a tree or search results list and drop the asset into the slot. If the slot does not support drag and drop functionality, it usually contains a predefined asset (such as a recommendation asset) which your developers or administrators have configured in the web page layout (template) assigned to the asset.
Figure 4-11 Empty and Occupied Slots (Surfing Page Asset)
Description of "Figure 4-11 Empty and Occupied Slots (Surfing Page Asset)"
By adding an asset to a slot, you create an association between the asset with which you are working and the asset you placed in the slot. The type of asset each slot supports is determined by the configurations your developers made to the web page layout (template) assigned to the asset.
When you click a slot, a toolbar with content management options you can perform on the slot opens. Using the toolbar you can edit the content of the asset contained within the slot, change the content layout of the slot (which changes the appearance of the asset in the slot), view the slot's properties, and remove the asset from the slot. If you are working with a multi-valued slot, the toolbar provides a Manage option that allows you to reposition the order in which the assets contained within that slot are displayed on the web page. The options available in a slot's toolbar are determined by the configurations your developers made to the web page layout (template) assigned to the asset with which you are working.
What is the difference between Web Page Layout and Content Layout?
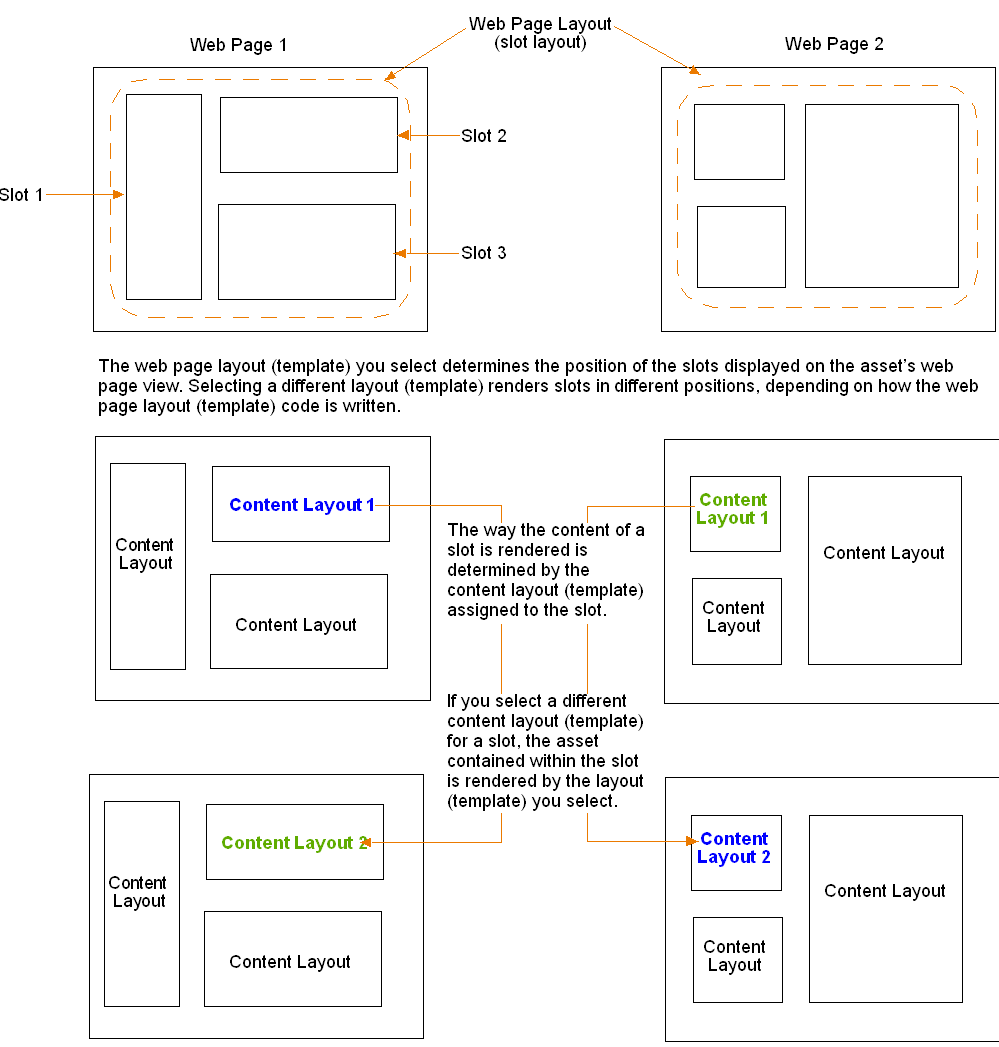
Web page layout is the layout (template) assigned to the asset with which you are working. When working with an asset in Web View, the web page layout assigned to the asset determines the arrangement of the slots in the asset's web page view. Content layout is the layout (template) assigned to an individual slot. The content layout assigned to a slot determines the appearance of the asset contained within that slot.
A slot enables you to select a different content layout with which to render the content contained within it. When you change the content layout of a slot, the asset contained within the slot is rendered using the layout you selected. Figure 4-12 provides a diagram showing the difference between web page layout and content layout.
Figure 4-12 Web Page Layout vs. Content Layout
Description of "Figure 4-12 Web Page Layout vs. Content Layout"
If you use Web View, will you need to switch to Form View?
When you are working with an asset in Web View, the editable areas you see are determined by the configurations your developers made to the web page layout (template) assigned to the asset. The fields you see in an asset's content entry form (when working with the asset in Form View) are not necessarily the same fields that are available to you when working with the asset in Web View. Therefore, certain fields such as Date and Locale fields may not be available in Web View. In addition, certain attribute editors are only supported in Form View (for example, Clarkii Online Image Editor). In such cases, you have to switch to Form View to fill in those fields.
WYSIWYG Editors
Your developers can enable WYSIWYG editors for fields in an asset's content entry form.
The following WYSIWYG editors can be enabled for fields in an asset's content entry form.
-
CKEditor
-
DatePicker
-
Image Picker
-
Clarkii Online Image Editor (OIE)
These WYSIWYG editors can be seen in both Form View and Web View. See Working with Attribute Editors.
Search for and Inspect System-Defined Asset Types
You can search for and inspect the following system-defined asset types in the Contributor interface, but you cannot edit them:
-
Template
-
CSElement
-
SiteEntry
-
DimensionSet
-
Dimension
-
Parent Definitions
-
Attributes
-
Flex Definitions
Find Assets
The Contributor interface is integrated with the Lucene search engine.
Because of this integration, the search behavior in the Contributor interface is as follows:
-
Before you can perform searches in the Contributor interface, the administrator must enable search indexing on your system (through the Admin interface).
-
The Contributor interface allows you to search across all asset types in a given site. You do not have to know the asset type of the asset you want to find to begin a search. You do, however, have the option to limit your search to a specific asset type.
-
The Contributor interface searches through the names and values of all fields within all assets. For example, you can search for all assets that contain the word flowers without having to select specific attribute names to search through.
-
The Contributor interface allows you to customize your searches by formulating your search queries, as described in Search Guidelines.
When searching for assets in the Contributor interface, you can perform either a simple search or an Advanced search:
-
Simple searches allow you to search for a keyword or phrase across names and values of all fields within all assets. Simple searches also enable you to narrow down the results of your search to a specific asset type. See Performing a Simple Search.
-
Advanced searches allow you to search for assets by attributes: creation date, start and end date, locale, unique identifier, name, description, tags, author, and type – or any combination of these items. See Performing an Advanced Search.
You can also save the search criteria you used to perform a search (simple or Advanced). You can either save your search criteria as a Saved Search so that you can run the search at another time, or as an asset (of type ContentQuery) which can then be placed on a page and the results of the query are displayed to site visitors who access that page.
Organize Assets
Organize assets in the following ways:
-
Work with the History node in the My Work tree. The History node lists assets you have worked with in the current session.
-
Share assets across sites
-
Bookmark assets for future reference
Preview Content
The Preview function enables you to view how the content you create or edit would look if it were published to the website.
Unlike working with content in Web View, when you preview a piece of content you are not able to edit it.
While you are planning upcoming changes to a website, you can assign start and end dates to an asset. When start and end dates are assigned, you can preview site assets as they will be displayed on a site at different times in the future. The feature you use to generate future versions of the website is known as Future Preview.
Start and end dates are a key part of Future Preview, which is an enhanced function of Site Preview. You can preview an asset without setting start and end dates (the regular Site Preview), but by assigning a start and end date range to an asset, you gain the ability to visualize upcoming changes to the website. When you assign a start or end date to an asset, you can see how the asset will change over time by selecting dates from the date picker on an asset's toolbar when you are previewing it.
To edit the content, you must work with it in either Form View or Web View. For more information about previewing assets, see Previewing Assets.
Link Assets Using CKEditor
Use the CKEditor to link assets in the following ways:
-
Create a hypertext link to another asset
-
Link two assets by inclusion
-
Link two assets through an image asset
-
Create a link to a URL
-
Embed links to other assets
-
Embed contents of other assets by reference
-
Embed links to external websites
For instructions on linking assets using CKEditor, see Linking Assets and URLs.
Asset Associations
Some asset Create and Edit views include fields (Form View) or slots (Web View) where you link another asset to the one in which you are working.
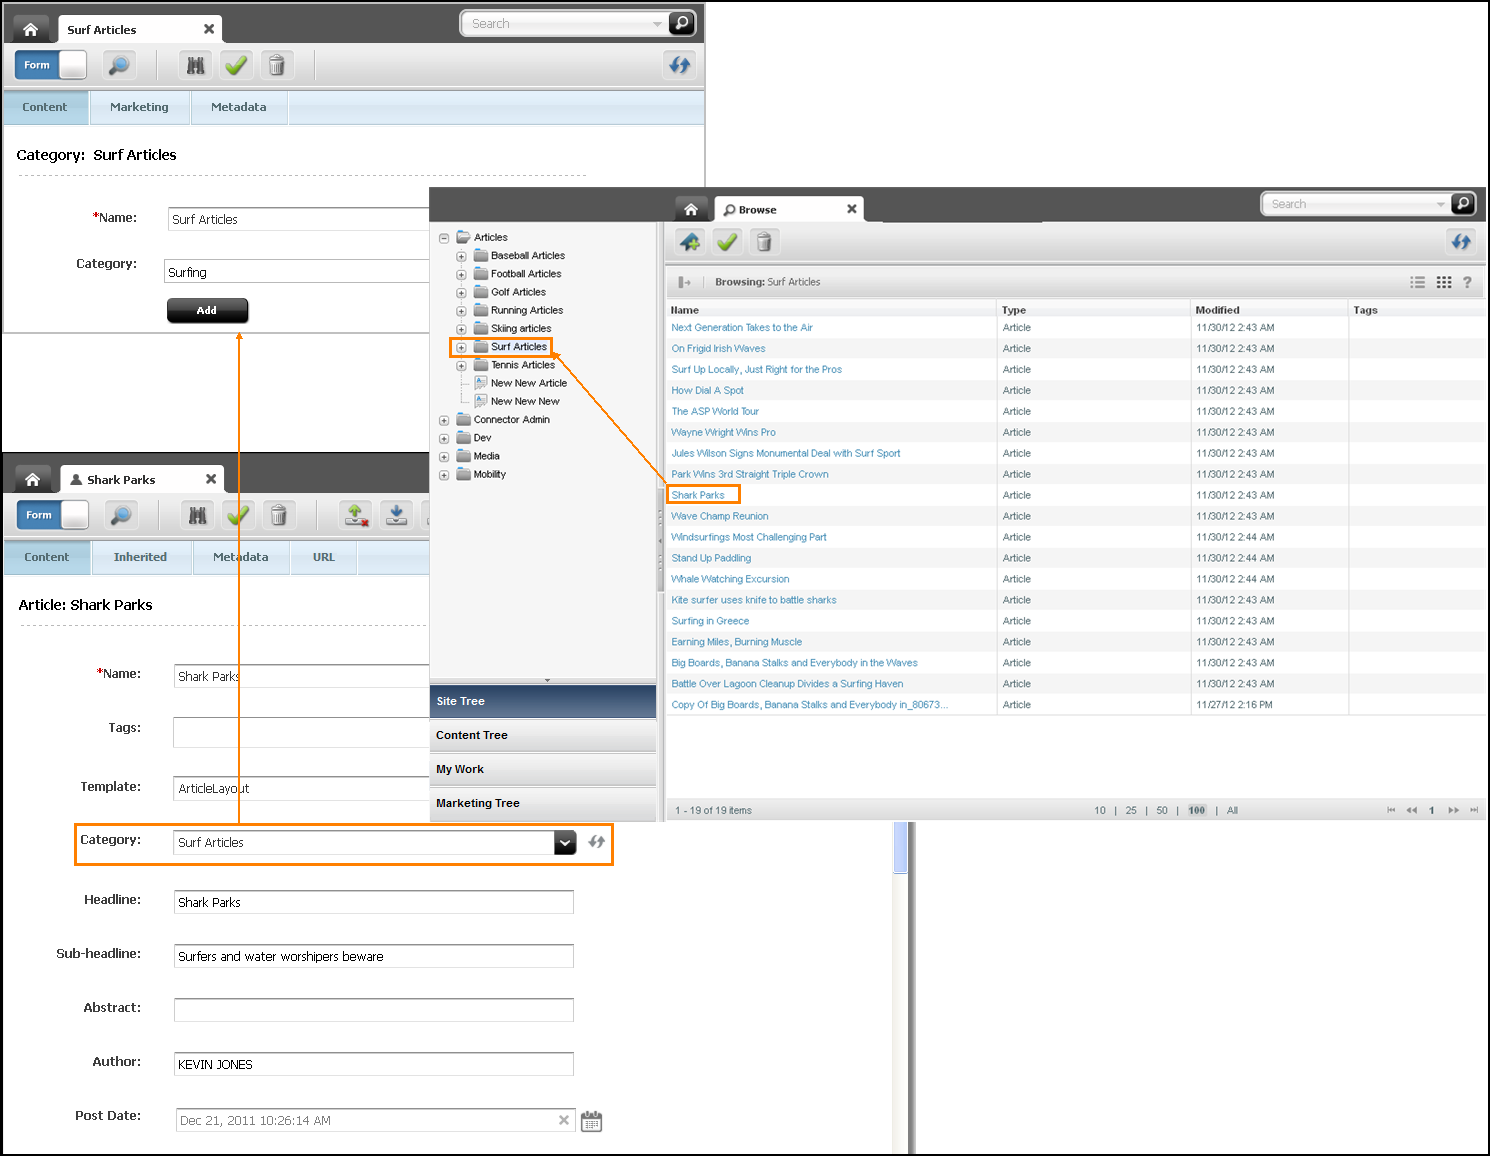
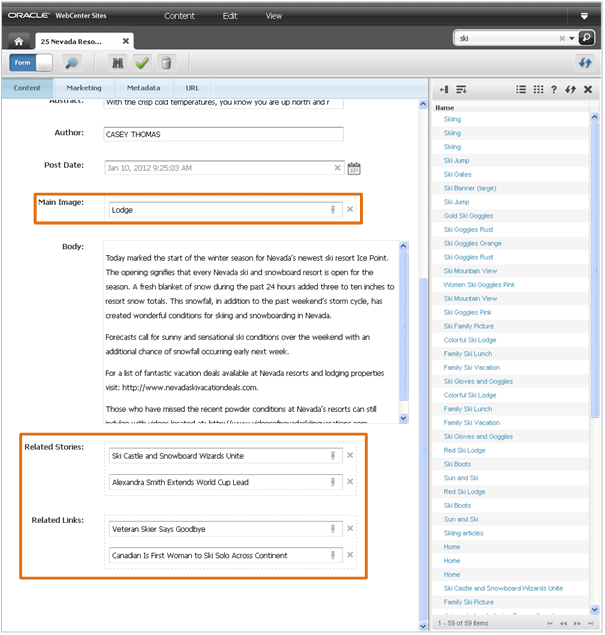
These types of fields are called associations. Figure 4-14 shows an Article asset (from the avisports sample site), displayed in Form View and Web View, which is associated with four other Article assets.
Figure 4-14 Association Field Displayed in Form View and Web View
Description of "Figure 4-14 Association Field Displayed in Form View and Web View"
An association field can be used to create relationships between assets. When you associate one asset with another asset you define a dependency between those assets. When one asset is dependent on another, both assets must be published together.
For example, suppose an asset of type Article has an association field that accepts an Image asset. In this case, you might associate an article about baseball with a picture of a baseball field. By associating the Image asset with the Article asset, you are indicating which image appropriately illustrates the article text. The Article asset and its associated Image asset are now dependent on one another. If you publish the Article asset, you must also publish the Image asset.
Which assets can be associated is determined by the data model. How associations are presented on the website is determined by content rendering templates. For example, a template can either display an associated asset or render it as a link.
Single-Valued and Multi-Valued Associations
An association field allows you to do one of the following, depending on the configurations of your developers:
-
Single-valued association field allows you to associate a single asset with the asset you are working with. For example, in the avisports sample site, assets of type Article contain a single-valued association field you can use to pair an Article asset with a single Image asset.
-
Multi-valued association fields allow you to associate multiple assets with the asset you are working with. For example, in the avisports sample site, assets of type Article contain two multi-valued association fields that allow you to associate several different assets of type Article with the Article asset you are working with.
Depending on your site design, an association field may be restricted to accept either a specific type or sub-type of asset, or it may be unrestricted, accepting different types of assets.
Parent-Child Associations
When you designate an asset as a parent of another asset, you are creating a hierarchical relationship between the two assets. An asset that is linked to a parent is called a child asset.
When a child asset is linked to a parent asset, it inherits the parent's attributes and values while retaining its own attributes. If the parent and the child share the same multi-valued attribute, the child inherits the parent asset's values and retains its original values. If the parent and child share the same single-valued attribute, the child retains the attribute's current value and does not inherit the value of the parent. Inherited attributes are shown on a separate tab. All the attributes that are available in the parent and are inherited are displayed on the Inherited tab. If there is more than one parent, the Inherited tab shows the attributes grouped by parent. The Inherited tab shows all supported data types.
Parent-child relationships are shown in the Content Tree. Parent-child relationships are taken into account during approval for publishing so that no broken links result on the published site. For more information about approval for publishing, see Performing Approval Tasks.
When an asset is assigned multiple parents, the asset is shown under multiple nodes in the Content Tree, as a child of each of its associated parent assets.
Create Multilingual Assets
Very often, organizations maintain one or more localized websites that serve different geographic regions. Such sites host content in one or more languages local to the region served by the site. In such cases, a piece of content can be translated to exist in multiple languages, or locales.
If two or more locales are set up on your site, you can translate assets into the languages that are enabled by the locales. When you create the first translation of an asset, the asset and its translation become a multilingual set, and the source asset is automatically designated as the master asset of the set. When an asset is designated as the master of a set, it remains so until you designate another member of the set as the master.
You can create subsequent translations either from the master asset, or from an existing translation. The master asset and its translations are linked to one another to indicate they are members of the multilingual set. Each member contains the same piece of content but in a different language. You cannot delete the master asset if at least one translation exists in the set. You have to delete all of the translations linked to the master asset before you can delete it.
Create Website Navigation
A website's navigation allows visitors to access the different sections (pages, articles, and so on) of the site and is determined by the placement of the Page assets under a site plan in the Site Tree. A site plan reflects the website's navigation and enables you to create a hierarchy for the pages of your site. Therefore, the structure of your site's navigation can start off general and drill down to specific.
Note:
Since, the content of a single CM site can be used by multiple websites, each site plan in the Site Tree represent a website using the content of that one CM site.
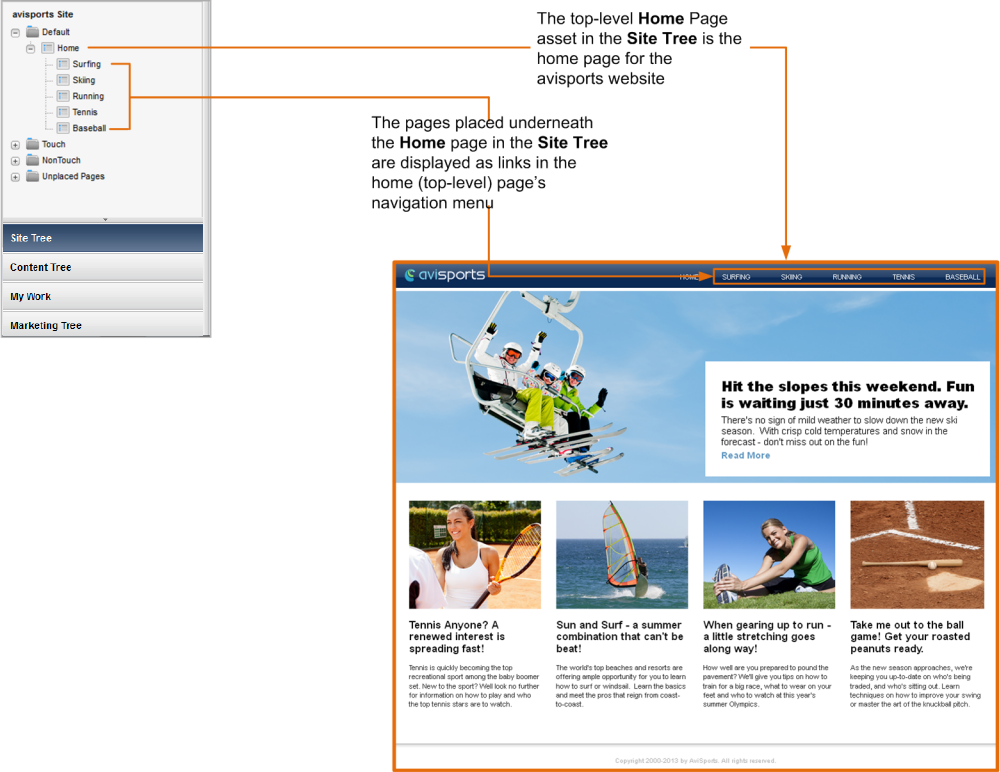
For example, when you place a Page under an already placed Page of a site plan in the Site Tree, the Page you placed becomes a sub-level of the Page under which you placed it. You can also copy the Pages placed under one site plan and paste them under another site plan. When the Pages are published to the website, the Page you placed as a sub-level is accessible from the top-level Page's navigation menu. Figure 4-16 shows the dynamic relationship between the placement of Pages under a site plan in the Site Tree and your website's navigation.
Figure 4-16 Relationship Between the Site Tree and Your Site's Navigation
Description of "Figure 4-16 Relationship Between the Site Tree and Your Site's Navigation"
Mobile Websites
The Mobility component enables you to create mobile websites for various mobile devices such as iPhone, iPad, Samsung Galaxy, and Blackberry.
You can create a brand new mobile website in the same manner as you create a default website for desktop/laptop computers. To help reduce your effort and site delivery time, WebCenter Sites also lets you copy the assets of any existing website for your mobile website. You can preview your mobile website so you know how your site will look on the screens of mobile devices when published.
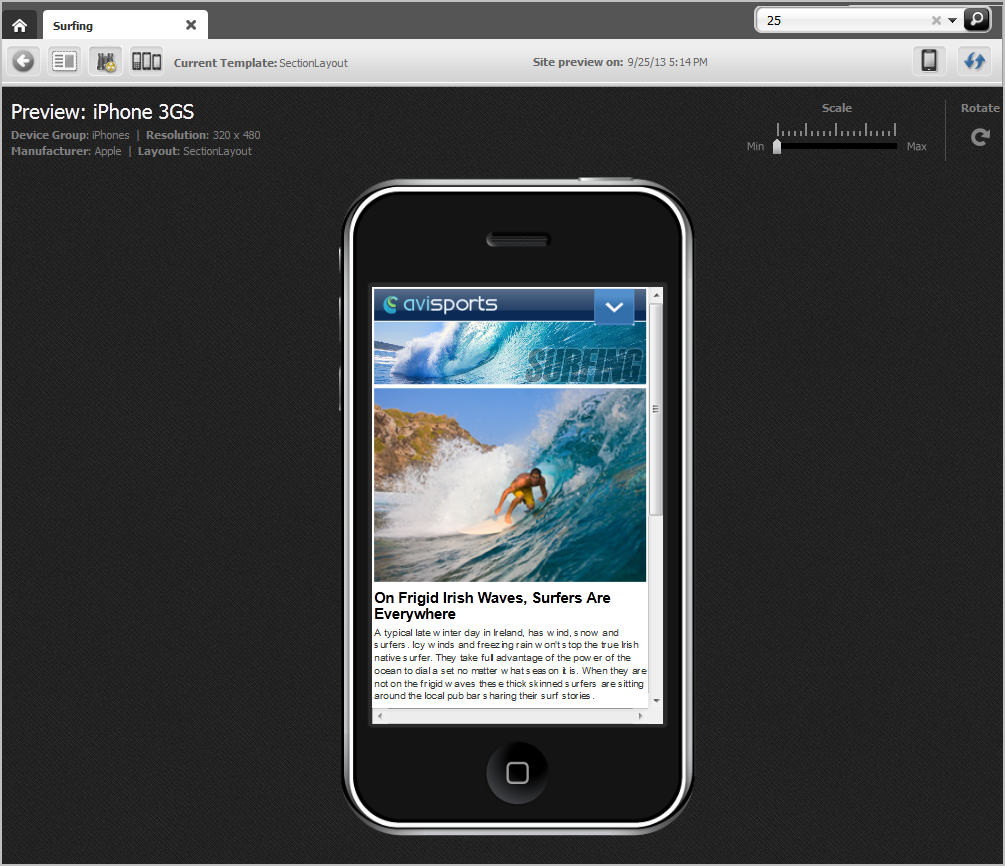
For example, Figure 4-17 shows the preview of the Surfing Page asset for the avisports sample site displayed on the screen of the iPhone 3GS mobile device (represented by a Device asset) as it would look on the screen of an actual iPhone 3GS if the Page was published.
Figure 4-17 Surfing Page Asset Preview Displayed on the Screen of a Mobile Device
Description of "Figure 4-17 Surfing Page Asset Preview Displayed on the Screen of a Mobile Device"
Approval and Publishing
Before an asset can be published, it must be approved for publishing.
Requiring approval is a safeguard against publishing an asset whose dependent assets are not ready to be published. This prevents broken links on the delivery system. You approve assets for one or more destinations that the administrator sets up on your site. Having multiple destinations allows for the use of multiple publishing methods.
You can participate in the publishing process in the following ways:
-
Approve assets for publishing
-
Remove assets from the publishing queue
-
Publish an approved asset directly from the Contributor interface
See About the Approval Process and About the Publishing Feature in the Contributor Interface.
Use Revision Tracking
Revision tracking allows you to check out assets.
When you check out an asset, you lock the asset, which prevents other users from editing or deleting it. When you are finished working with the asset, you can decide to check the asset back in with the changes you made or discard the changes you made to the asset by undoing the checkout. In either case, the asset is then again available for modification by other users. An asset that is checked out to you, however, can still be viewed and searched for by other users, and retrieved by queries or collections.
If revision tracking is enabled for the asset types on the site you are assigned, you can work with revision tracking in the following ways:
-
Track revisions to assets
-
Check assets in and out
-
Roll assets back to a previous version
See Revision Tracking.
Workflow
Assets can be assigned to a workflow.
A workflow routes an asset through a series of editorial tasks (states) by assigning the tasks to the appropriate users at the appropriate times. Either specific assets or all assets of a certain type can be assigned to a workflow. If an asset is assigned to a workflow process, users can participate in the workflow process as follows:
-
Pass assets through workflow
-
Work with workflow groups
-
Work with workflow reports
See About Workflow.
