44 Alternate Publishing Methods
In addition to Realtime publishing, you can use On Demand publishing where the delivery system is a database or an external system running an application other than WebCenter Sites, Export to Disk publishing where the delivery system is a web server, Mirror to Server publishing where the delivery system is a WebCenter Sites system, and Exporting Assets to XML where the delivery system is a database or an external system running an application other than WebCenter Sites.
Topics:
44.1 About Alternate Publishing Methods
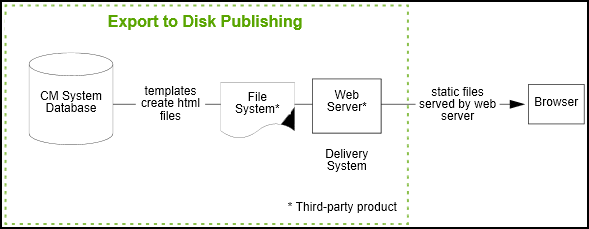
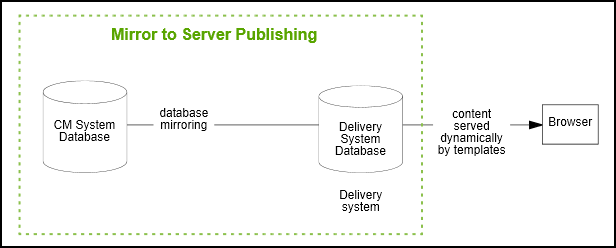
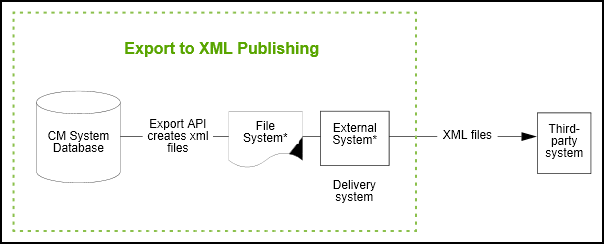
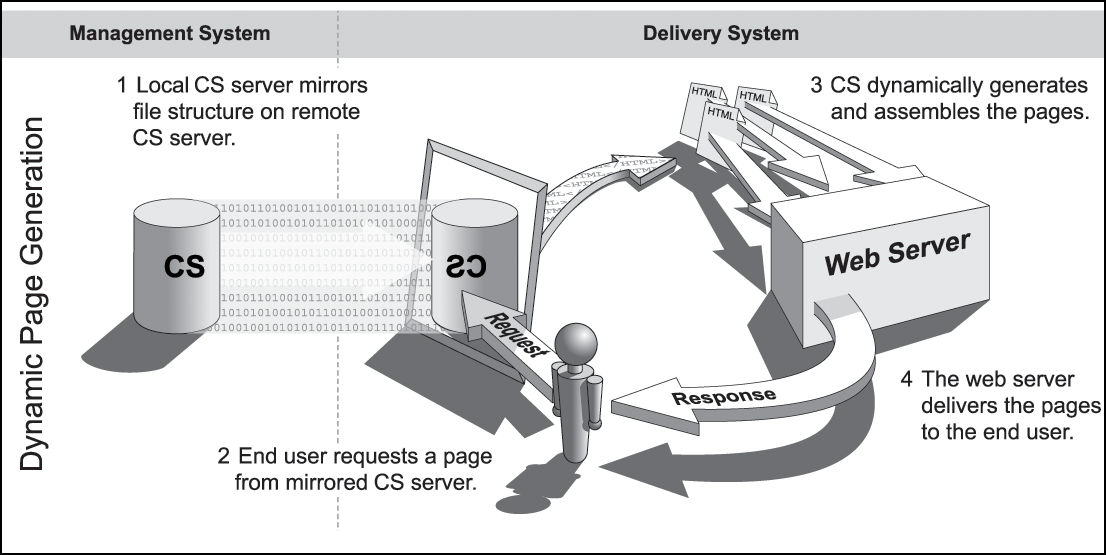
This section describes the publishing methods that WebCenter Sites supports. The following three figures summarizes the publishing methods.
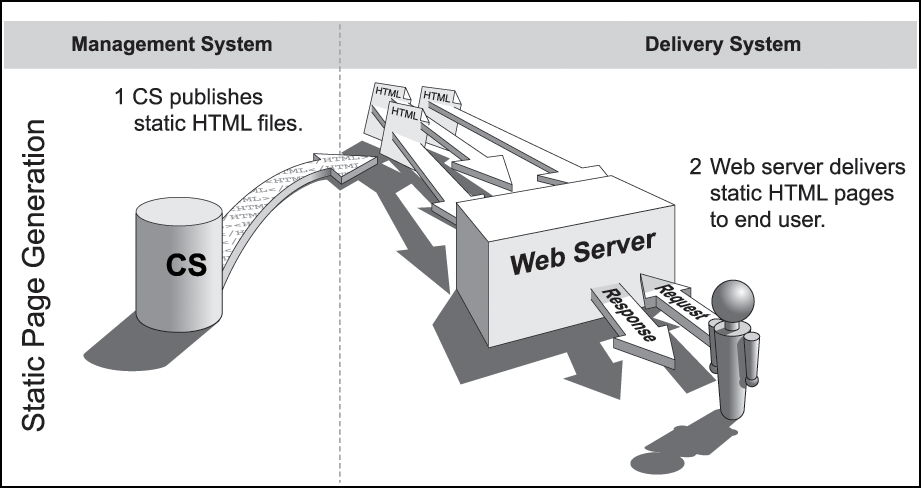
For Export to Disk publishing, the delivery system is a web server. Approved assets in the CM system database are rendered by templates into HTML files. The files are saved to a file system and subsequently published to the web server by an administrator using a transfer protocol, such as FTP. When published content is requested by site visitors, the HTML files are served as pages to the browser.
For Mirror to Server publishing, the delivery system is a WebCenter Sites system. Approved assets and their database tables are mirrored from the CM system database to the delivery system database. Throughout the publishing session, the publishing system communicates with the CacheManager on the delivery system. The CacheManager is a WebCenter Sites servlet that manages a system's page cache. CacheManager ensures caching of the pagelets or pages that refer to the mirrored assets. After the publishing session concludes, CacheManager generates those pages again to display the updated content, and caches the new pages and pagelets.
When published content is requested by site visitors, it is provided on-the-fly. The content is drawn from the delivery system database by templates and served to the browser, where it is finally rendered as pages.
For Export Assets to XML, the delivery system is a database or an external system running an application other than WebCenter Sites. The publishing method is a data transformation method that outputs XML files. Rather than creating pages that are ready to be displayed by a web server, this publishing method uses the Export API to create one XML file for each approved asset.
When published content is requested by site visitors, it is provided on-the-fly. The content is drawn from the delivery system database by templates and served to the browser, where it is finally rendered as pages.
44.2 Using On-Demand Publishing
When you publish, you can immediately and selectively publish any of the assets on the approved assets list. This is known as publishing assets on-demand.
As with scheduled RealTime publishing, an asset is published with all its dependent assets. Therefore, the dependent assets are also placed in the On-Demand Queue.
The list of approved assets is searchable, making it easier to find the assets you have to publish. After the selected assets are published, they are removed from the approved assets list for the next publishing session.
Note:
On Demand publishing can be either complete or delayed.
To select approved assets for immediate publication:
-
Open the Publish Console by clicking Publishing on the button bar.
-
From the Publish Destination drop-down list:
-
Select the RealTime publishing destination to which you will publish the assets.
-
Click Select Destination.
-
-
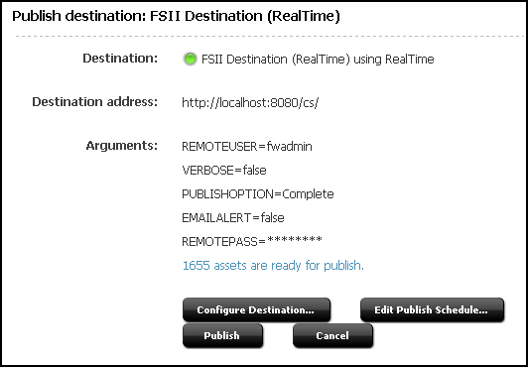
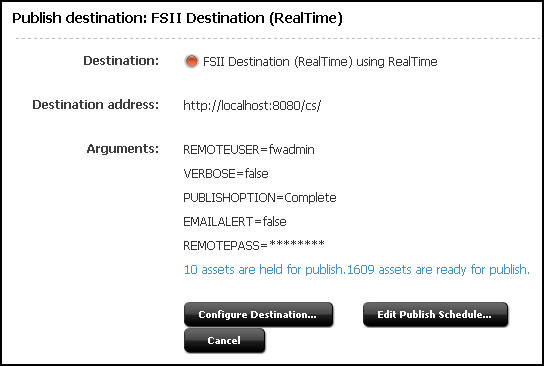
On the Publish Destination form, click the x assets are ready for publish link.
The On Demand Queue tab opens. The Approved Assets tab lists all assets approved for the upcoming publishing session.
-
(Optional) Search through the approved assets.
-
Enter a search term in the Search text box.
-
Search runs across asset names and descriptions.
-
You cannot use wildcard and Boolean operators.
-
-
Click Search.
The Search Results tab opens, displaying the results of your search.
-
-
Add assets to the On-Demand Queue.
Note:
On-Demand supports immediate publication. Selections that you place into the On-Demand queue remain there only throughout the current WebCenter Sites session. When you log out (or the system logs you out), the On-Demand queue is cleared.
On either the Approved Assets tab or the Search Results tab, select the assets you wish to add to the On-Demand Queue, then click Add to On-Demand Queue.
A message opens while the dependencies are calculated. The selected assets are removed from the Approved Assets tab (and Search Results tab, if open). The On-Demand Queue is updated with the selected assets and their dependent assets.
-
Publish the On-Demand Queue. Complete either:
-
If you are sure that the assets you selected can be published, click Publish On-Demand Queue (on the Approved Assets tab).
-
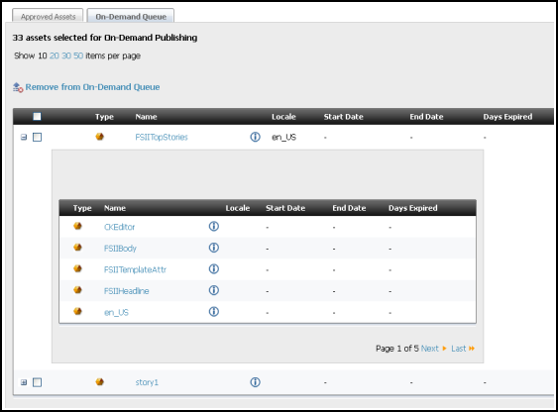
If you wish to review the assets before you publish them, switch to the On-Demand Queue by clicking the On Demand Queue tab.
-
To view an asset's dependencies, click the plus mark at the far left of the asset's row.
-
If you decide not to publish assets after you place them in the On-Demand Queue, select them and click Remove from On-Demand Queue. The assets are removed from the On-Demand Queue and placed back in the Approved Assets list. (A dialog box prompts you to confirm your action.)
-
-
Click OK.
The Publish Console opens showing the publishing session in process.
-
For instructions on observing the publishing session, see Using RealTime Publishing.
44.3 Unapproving Selected Assets from a Publishing Session
If you change your mind about publishing approved assets, you can selectively remove them from the approved assets list.
To unapprove assets:
-
Open the Publish Console by clicking Publishing on the button bar.
-
From the Publish Destination drop-down list:
-
Select the RealTime publishing destination you wish to publish assets to.
-
Click Select Destination.
-
-
On the Publish Destination form, click the link x assets ready for publish.
The On Demand Publishing form opens. This form displays the Approved Assets tab and the On-Demand Queue. The Approved Assets tab lists all assets approved for the upcoming publishing session.
-
(Optional) Search through the approved assets.
-
Enter a search term in the Search text box.
-
Search runs across asset names only.
-
You cannot use wildcard and Boolean operators.
-
-
Click Search.
The Search Results tab opens, displaying the results of your search.
-
-
On either the Approved Assets tab or the Search Results tab, select assets to unapprove. Click Unapprove.
The assets you selected are removed from the Approved Assets list. If the asset you unapprove has a dependent asset that is approved for this publishing session, it is placed into a hold queue.
-
(Optional) Approve assets held from publishing:
-
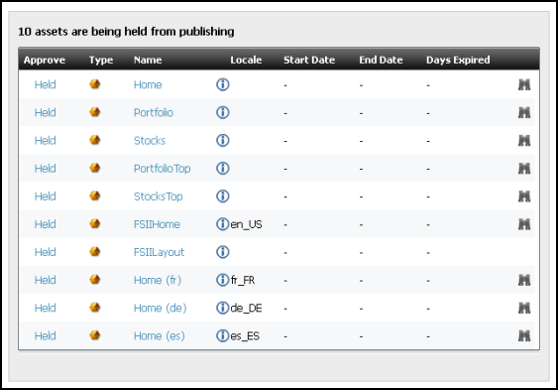
Click Back to return to the Publish Destination form. There are now two text links. One lists the assets held for publishing, the other the assets ready for publishing. Click the x assets are held for publish link.
The held queue opens.
-
Click the Held link for the asset you wish to approve for the publishing session.
The Assets Preventing Asset From Being Published to Destination form opens.
-
If the asset has no dependencies, a message opens stating that the asset is approved.
-
If the asset has dependencies, a list of those dependent assets is shown.
Figure 44-8 Assets Preventing Site From Being Published Form
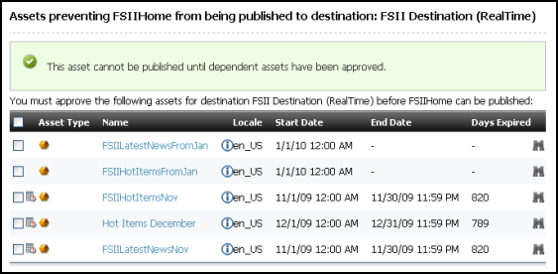
Description of "Figure 44-8 Assets Preventing Site From Being Published Form"After reviewing the list of dependent assets, select all of the assets on the list by selecting the check box in the header row of the table. Then click Approve.
The following occurs: A message indicates that the assets are approved and are ready for publishing, the asset and its dependent assets are placed in the approved assets queue, and you are returned to the held queue.
-
-
(Optional) Repeat step b to approve another held asset.
-
44.4 Learning Export to Disk Publishing Terminology
Compared to mirror publishing, where dependencies in both the approval and publishing stages are determined by the asset model, Export to Disk publishing is an entirely template-driven process. If the approval template and publishing templates differ with respect to the dependencies they specify—a condition we do not recommend—the likelihood of publishing unapproved content increases.
Coding templates is the responsibility of the developer. However, the administrator (and any users who publish) must understand which templates to call and what outcome to expect to prevent adverse effects on publishing sessions.
Note:
The terminology presented here refers only to Export to Disk publishing. Terms such as publish key, dependencies, and references have completely different meanings in mirror publishing.
This section covers the following topics:
44.4.1 Page
In the Export to Disk publishing context, a page is typically an HTML file that is exported to a disk. (The file is not to be confused with a Page asset type.) Each exported page is represented by a page.
44.4.2 Publish Key
A publish key (or pubkey) is strictly a publish-time term. A pubkey represents an atomic publishing unit, which in the case of Export to Disk publishing is an exported file, equivalent to a page, not to be confused with a Page asset type).
A pubkey is defined by two constructs: an asset, and a publish-time template (not to be confused with an approval template).
The initial pubkeys in Export to Disk publishing are the starting points defined by the user who initiates the publishing session. All other pubkeys are discovered and logged during publishing.
44.4.3 Publish Queue
A publish queue is a list of pubkeys awaiting publication. For a pubkey to be added to the publish queue, its primary asset must be approved.
44.4.4 Primary Asset
The primary asset participates in the definition of a pubkey. In layman's terms, its ID and type become the cid and c parameters for the template. A primary asset must be approved before its page or pages can be exported.
Note:
If it is determined that a page's primary asset is not approved, the page is not exported. This can lead to the creation of a broken link on the publishing destination, depending on which approval and publishing templates were used.
It is the developer's responsibility to code approval templates such that they can validate the dependencies that are expected to exist on the target destination.
44.5 Using Approvals and Export to Disk Publishing
Exporting a page first requires approval of the page's primary asset. Approval of the primary asset is contingent on the approval states of its dependent assets, which are dictated by the primary asset's approval template. The dependent assets' dependencies are further dictated by their own approval templates.
Note:
Because the approval template is not necessarily the one used to render the asset, it is possible to publish assets without passing them through the approval system. This implication and others are discussed and illustrated in Investigating Publishing Behavior and Functionality and Understanding the Approval and Publish-Time Templates: What Happens When They Differ?
Also note that compositional dependencies (involving non-primary assets of a page, as explained on Working with Export to Disk Publishing) do not require approval to appear on an exported page (to filter out unapproved assets, see the <render:filter> tag in the Tag Reference for Oracle WebCenter Sites Reference for more information).
This section covers the following topics:
44.5.1 Using the Approval Template
Approval in Export to Disk publishing allows the developer to define dependencies that ensure the correct content is published and that it is published intact.
Compared to mirror publishing, in which asset dependencies in both the approval stage and publishing stage are determined by the asset model, Export to Disk publishing is entirely template-oriented. As a result, approval behavior (and publish-time behavior) is defined by the developer who writes the approval templates (and the publish-time templates). WebCenter Sites then uses the approval template to discover an asset's dependencies. If an asset is published against the approval template, its approval dependencies are likely to be the same as its compositional dependencies. For more information, see Working with Compositional Dependencies.
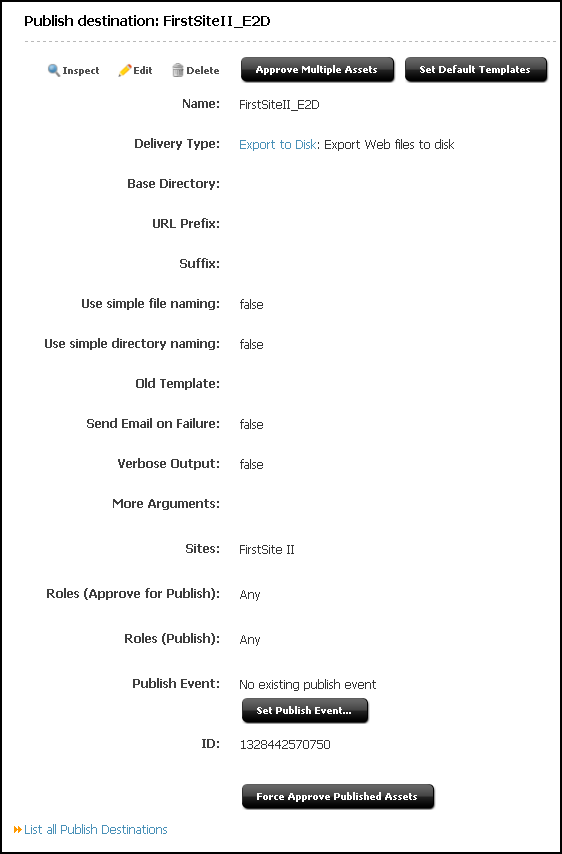
Approval templates are assigned by use of the Set Default Templates feature in the Publishing Destination form.
-
If a default template is not explicitly chosen, the approval system will choose the asset's default template.
-
If neither the approval nor default template is specified, the asset will be approved without an approval template (that is, it will have no approval dependencies).
If the approval template is shared among sites, the approval system will choose the site entry corresponding to the current site.
44.5.2 Using the Approval Queue
The approval queue handles asset modification events to keep approval tables up to date. For example, if an asset is approved for publication, but you then change it, the approval queue will handle this by unapproving the asset—rejecting it from the publish queue.
You never work directly with the approval queue. The queue runs every five minutes by default. However, if you call a feature that uses approval functionality (such as the Publishing tab), the approval queue is forced to run before it is rendered to keep approval information up to date.
44.5.3 Using Approval Dependencies
When you approve an asset, its approval template (see Using the Approval Template) is used to determine its approval dependencies. The following tags create approval dependencies:
-
<asset:load> -
<asset:loadall> -
<assetset:setasset> -
<assetset:setlistedassets> -
<render:logdep> -
<render:getpageurl> -
<render:gettemplateurl> -
<render:gettemplateurlparameters>
If you approve asset A whose template (or any element called by the template) references asset B using a tag listed above, an approval dependency is created from A to B. This typically means that when you want to approve A, you must also approve B.
Types of Approval Dependencies
Approval dependencies are created and used at approval-time, not to be confused with publish-time dependencies (even though they can be the same). Approval for Export to Disk publishing involves two types of approval dependencies:
-
Template dependencies
-
Reference dependencies
Template dependencies are created when an asset's approval template uses another asset to define the content. For example, if asset A's approval template loads asset B, then A has a template dependency on B. In more practical terms, if you have an approval template for a Page asset that shows an Article asset, the Article asset is used on the Page, so the dependency is of a template kind. The following tags generate template dependencies:
-
<asset:load> -
<asset:loadall> -
<assetset:setasset> -
<assetset:setlistedassets> -
<render:logdep>
Reference dependencies are generated when a link is created from one page to another. They are registered as reference dependencies between the primary assets of the two pages. For example, if we create a link from the approval template of asset A to a page where asset B is the primary asset, the approval system will register this as asset A's reference dependency on B. Tags that generate this kind of dependency are:
-
<render:getpageurl> -
<render:gettemplateurl> -
<render:gettemplateurlparameters>
Template dependencies (in Export to Disk publishing) are by default exact dependencies — to approve A, you must approve B if B has been changed. Reference dependencies are always exists dependencies—if you approved and published B one time, you are not required to approve it again to re-publish A.
The exception is when you set deptype="none" on any of the tags. In that case, no approval dependency at all is created by that tag. This means no record is created for it during approval; in all other contexts, such as Export to Disk publishing and live sites, the deptype attribute is ignored.
44.6 Working with Export to Disk Publishing
Three main components play a role in the Export to Disk publishing process:
44.6.1 Working with the Publish-Time Template
The purpose of the publish-time template is to render content as files. Typically, publish-time templates are identical to the approval templates. When they differ, content can be published without first being approved. Bypassing the approval system requires the developer to provide a means for publishable content to be validated.
44.6.2 Working with Starting Points
The starting point is the pubkey (or pubkeys) where export begins, which is at publish-time. Typically, starting points are selected to link to most if not all the pages on your site. (The page is not necessarily the home page. For example, it could be a sidebar with many links.) The Export to Disk publishing system crawls your site, beginning with the starting points, and logs new pubkeys as it discovers them.
44.6.3 Working with Compositional Dependencies
Compositional dependencies are the dependencies of a generated page on the assets that were used to generate that page. They are determined by the logic in that page's Working with the Publish-Time Template. Compositional dependencies dictate what is rendered on the exported page as prescribed by the template, completely ignoring any deptype attributes. The same tags that created template and reference dependencies in the approval template also create compositional dependencies at publish-time. The tags are listed in Using Approval Dependencies.
44.7 Frequently Asked Questions About the Export to Disk Publishing Process
How Do I Select an Approval Template?
The approval template (if specified) is the only template ever used by the approval system to validate a given asset. This template is not necessarily used at publish-time, depending on what the starting point is set to. The best advice is to set approval templates that most closely represent the asset's intended dependencies.
What if the template that contains the most representative set of dependencies is not the template to publish the asset with? Set it as the approval template for assets of that type, and use any template(s) as starting point(s).
Are Data Model Dependencies Accounted For in Any Way?
Associations, attributes, and so on, are not used in Export to Disk publishing. The only dependencies that matter are those established by templates.
Why Do We Track Publish-Time Compositional Dependencies?
After you export a page, its content is frozen. However, the assets used to generate that page may evolve, making the affected pages obsolete.
Because it records dependencies, is able to remind you which pages require updating, assuming you will want to republish those pages. gives you two republishing options: automatic refresh and manual refresh.
-
With automatic refresh, pages are queued automatically for the next publishing session, without your having to approving compositional dependencies that have changed.
If you choose this option, the modified assets do not have to be approved in order for the page to be queued for publishing; in other words, the article page is republished as soon as you change the image asset. To set up automatic refresh, specify
existsor no dependencies between the article and the image; this disables the approval system from prompting you to approve the assets. -
With manual refresh, you review the updated pages before publishing them.
If you choose this option, the affected pages will be
Helduntil approved; in other words, you must reapprove the article page every time the image changes. For this to work, you have to set upexactdependencies.
44.8 Investigating Publishing Behavior and Functionality
Following is a compilation of simple scenarios which demonstrate Export to Disk publishing behavior:
The participating asset types are Page and HelloArticle (from HelloAssetWorld). The templates are Ttemplate, RTemplate, and dummyTemplate.
For clarity, the asset IDs have been hard-coded into the templates. Normally, assets would be loaded somehow instead of being hard-coded, so developers would have to leverage the deptype='none' attribute in their tags if they do not wish to set up additional dependencies. For the template code, see Working with Sample Templates.
44.8.1 Investigating Template Dependencies
Setup: Page P asset uses Ttemplate for both approval and publishing. Ttemplate loads HelloArticle A, therefore establishing a template dependency.
Starting Point: P+Ttemplate
Pubkeys (exported files): P+Ttemplate
Approval Dependencies: Page P has template dependencies on Ttemplate because of <render:logdep>, and on HelloArticle A because of <asset:load>. Because Ttemplate does not create any links, there are no reference dependencies.
Publish Dependencies: Starting Point is the only pubkey; therefore only one file is exported.
Note that the exported page does not have any publish-time compositional dependencies because it is never actually used by the template. There is only reason why P had to be approved—P is the exported page's primary asset. So, the only compositional dependencies determined at publish-time are the exported page's dependencies on A and Ttemplate.
Table 44-1 Template Dependencies
| Action | Approval Status | Publish Status | Comments |
|---|---|---|---|
|
Initial |
Approved: |
Published: |
|
|
Edit |
|
Not affected by change. |
Since there are no compositional dependencies on |
|
Edit |
|
After approval, page is published again |
Template dependency on |
44.8.2 Investigating Reference Dependencies
Setup: Page P asset uses Rtemplate for both approval and publishing. Rtemplate references HelloArticle A, which is in turn rendered by dummyTemplate.
Starting Point: P+Rtemplate
Pubkeys (exported files): P+Rtemplate, A+dummyTemplate
Approval Dependencies: Page P has the routine <render:logdep> template dependency on its Rtemplate. In addition, it establishes a reference dependency on A because of <render:getpageurl> (but not on dummyTemplate, because dependencies between pages are logged only between their primary assets). Note that dummyTemplate does not participate in an approval dependency because it is not referenced by any tags.
Publish Dependencies: The relevant tags are <render:logdep> and <render:getpageurl>. These dictate the publish-time compositional dependencies as Rtemplate and A. As before, note that Page P does not have a compositional dependency because it is not used by any of the templates. When export encounters <render:getpageurl>, it detects that another page is involved, so it creates the A+dummyTemplate pubkey on-the-fly, and runs dummyTemplate to generate its contents. Note that dummyTemplate does not officially have a compositional dependency because it is not used by any tags—it participates only as a pubkey member; so, if dummyTemplate is changed, the approval/publishing cycle will not recognize the change. For this reason, we advise not altering <render:logdep>, which opens on every newly created template.
Table 44-2 Reference Dependencies
| Action | Approval Status | Publish Status | Comments |
|---|---|---|---|
|
Initial |
Approved: |
Published: |
|
|
Edit |
|
Not affected by change. |
Since there are no compositional dependencies on |
|
Edit |
|
|
|
44.9 Understanding the Approval and Publish-Time Templates: What Happens When They Differ?
Generally, using the same template for approval and for publishing does not create problems, because approval dependencies match compositional dependencies. Problems start to occur when you use a different template for approval than for publishing. This can happen in several situations. For template code, see Working with Sample Templates.
This section covers the following topics:
44.9.1 Differing Templates: Example 1
Asset A uses T1 for approval. T1 does not reference any assets. Asset A uses T2 for publishing. T2 references asset B using <asset:load>. T2 loads asset B, which was never approved, but B will nevertheless be on the exported A+T2 page.
Does this mean you can publish assets that were never approved?
Yes! Some users prefer this, only to avoid approving assets before publishing. Approval can be a taxing operation because exact dependencies cause primary assets to be given Held status if the dependent assets change. As a result, pages of those primary assets cannot be exported. However, a better way to handle such situations is to make good use of the deptype attribute with exists or none values to avoid unwanted approval dependencies.
Now, what happens after asset B is published and then we change B? In this case, there is no approval dependency between asset A and asset B, but there is a compositional dependency. Whenever asset B is changed, the affected pages are automatically re-published. (Because there are no dependencies, the automatic refresh option is chosen). So, A+T2 are placed in the publish queue automatically as soon as asset B is saved—not approved. For information about republication options, see Frequently Asked Questions About the Export to Disk Publishing Process.
44.9.2 Differing Templates: Example 2
Asset A uses T1 for approval. T1 references asset B using <asset:load> under an exact dependency. Asset A uses T2 for publishing. T2 does not reference asset B.
In this case, there is an approval dependency between asset A and asset B, but there is no compositional dependency. Whenever asset B is changed, asset B has to be approved before asset A can be approved, even though the published page does not make any use of asset B.
44.9.3 Differing Templates: Example 3
Asset A uses T1 for approval. T1 does not reference any assets. Asset A uses T2 for publishing. T2 references asset B using <asset:getpageurl>.
In this case, there are no approval dependencies, so A is the only approved asset. During publishing of A+T2, we realize there is another page to be created, with B as the primary asset. Now, remember that primary assets must be approved before their page is exported. However, B is not approved, so its page is not exported. A+T2 is exported, but has a broken link.
Unknown dependencies and Export to Disk publishing. Situations become complicated when you start using <render:unknowndeps>. This tag removes compositional dependencies, and it records unknown dependencies to the pubkey. Assets thus remain in the publish queue permanently (meaning they are refreshed with every publish cycle). This behavior is expected, because if unknown dependencies exist (that is, dependencies may change at any moment, such as query results), the system cannot determine which assets a given asset depends on. To be on the safe side, the system always republishes the assets.
Many exact dependencies. While this is not always avoidable, keep in mind that when a primary asset has exact dependencies on other assets, a change to any of the dependent assets will cause the approval system to change the primary asset's status to Held. The primary asset's page is not publishable unless approved again. If the modified asset is used by many pages, they will all require re-approval. Consider setting the deptype to exists, and make the dependent pages automatically publishable—but the modified asset must be ready when the publishing session begins.
Note:
The preferred way to customize export URLs (without using simplename) is to use PREFERREDFILE and PREFERREDDIR as parameters to <render:getbloburl> and <render:getpageurl> to specify arbitrary names. For example:
<render:getbloburl blobtable='MungoBlobs'
   blobcol='urldata' blobkey='id'
   blobwhere='1088466917821'  outstr='pagelogoURL'
   csblobid='1088466917821'>

<render:argument name='PREFERREDFILE'
   value='myBlob.out'/>
<render:argument name='PREFERREDDIR' value='myDir'/>
</render:getbloburl>
This code exports the blob with 1088466917821 to myDir/myBlob.out.
44.10 Working with Sample Templates
This section lists the template implementations used in the examples in Investigating Publishing Behavior and Functionality and Understanding the Approval and Publish-Time Templates: What Happens When They Differ? Taglib and import definitions have been skipped.
Ttemplate:
<%-- Record dependencies for the Template --%>
<ics:if
 condition='<%=ics.GetVar("tid")!=null%>'><ics:then><render:logdep
 cid='<%=ics.GetVar("tid")%>' c="Template"/></ics:then></ics:if>
<asset:load name='myArticle' type='HelloArticle'
 objectid='1156878442427'/>
Rtemplate:
<%-- Record dependencies for the Template --%>
<ics:if
 condition='<%=ics.GetVar("tid")!=null%>'><ics:then><render:logdep
 cid='<%=ics.GetVar("tid")%>' c="Template"/></ics:then></ics:if>
<render:getpageurl outstr="myURL" pagename='HelloAssetWorld/
 dummyTemplate' cid='1156878442427' c='HelloArticle'/>
 Got URL: <a href='<%=ics.GetVar("myURL")%>'> Click here</a><br/>
dummyTemplate:
completely blank, no logDep.
44.11 Rendering Export to Disk Pages
In basic terms, renders a Export to Disk page as follows:
-
A page name is submitted by the client browser to (through HTTP or another protocol).
-
locates the page in the SiteCatalog table, calls the root element, and renders the page to an HTML file.
-
You publish the file (either through FTP or another file transfer protocol) to the web server that is hosting your online site.
Typically, administrative users of the Export to Disk publishing method set up a quality assurance process to test the rendered files before moving them to the web server of the delivery system. This rendering is illustrated in the following figure.
Note:
Export to Disk publishing is not recommended. Instead, use the Site Capture application of WebCenter Sites.44.12 Understanding Export to Disk Publishing
When content is published using Export to Disk, the approval system, the publishing schedule, and your destination configurations all contribute to the export of your approved assets into static HTML files.
When an Export to Disk publishing session runs, this is what happens:
-
The publishing system notifies the CacheManager servlet that a session is starting for a specific destination. CacheManager clears all the pages that were previously exported to this destination from the page cache on the source system.
During a publishing session, exported files are cached to the page cache. If publishing sessions occur more frequently than the cache is configured to clear (expiration time), there could be exported pages in the cache that have the same names as the newly exported pages. To prevent this, the CacheManager servlet clears the page cache before a new publishing session starts.
-
WebCenter Sites creates an export queue and adds all references that can be published to it. A reference that can be published is:
-
A pubkey that has been designated as an export starting point. See Working with Export Starting Points.
There must be a starting point for the site and its asset must be approved, or the export session cannot begin. Every site that is exported must have at least one export starting point designated.
-
Any previously exported page or pagelet (reference) whose assets have changed and been approved again since the last publishing session to this destination. (After a site has been published, the publishing system knows which references have been published. It reads the data in the PublishedAssets table and then adds any references whose assets have been changed and approved again for this destination to the export queue.)
-
Any asset whose template uses
RENDER.UNKNOWNDEPStag.This tag alerts the approval system that the dependencies for the asset rendered by the template cannot be calculated because they are unknown. It is typically used for queries. When the dependencies are unknown, the system cannot determine if changed dependents would require publishing the asset. The presence of this tag means that the asset must be published every session.
-
Any page or pagelet (reference) that has not yet been published and is connected to another page or pagelet through a
RENDER.GETPAGEURLtag. (That is, it is referenced from another page and has not yet been published.) -
Any page or pagelet (reference) identified by a
RENDER.SATELLITEPAGEorsatellite.pagetag.
-
-
For the first export starting point, WebCenter Sites determines whether its asset has been approved:
-
If the asset has not been approved, the publishing session ends.
-
If the asset is approved, WebCenter Sites determines the page name of the template assigned to the asset.
-
-
WebCenter Sites renders the export starting point by passing the following information to WebCenter Sites:
-
The page name of the template for the starting point.
-
The
rendermodevariable set toexport[destinationID]. -
The name and location of the export directory where the rendered files should be saved.
-
-
WebCenter Sites calls the root element of the page name, and begins rendering every approved asset that is connected to that export starting point as a reference. WebCenter Sites writes the resulting rendered pages to files rather than posting them to the browser.
-
After each file is rendered, WebCenter Sites writes a message about that reference to the publish log for the session.
-
If there are multiple export starting points, the process cycles back to step 3 in this description.
-
When the publishing session is successful, WebCenter Sites concludes the session by writing information about the published references to the PubKey and PublishedAssets tables.
-
WebCenter Sites also writes information about the assets that were published to the ApprovedAssets and ApprovedAssetDeps tables. It logs the date from the assets' updated field at the time that the assets were published so the approval system can calculate dependencies correctly the next time an asset is approved.
44.13 Working with the Path Naming Convention
How WebCenter Sites names paths to exported files depends on the type of asset that is published and path information that could have been set for the asset. The export path can be as simple as a single directory or it can be a path of several directories, limited only by the number of characters that are supported by the operating system.
The export path naming convention is:
<cs.pgexportfolder>/<DIR>/<file_dir>
where <cs.pgexportfolder> is a required directory. The subdirectories are conditional. Whether <file_dir> is used depends on a publishing argument named SIMPLEDIR.
Before summarizing the possible export paths, we define the export path variables and the SIMPLEDIR publishing argument.
This section covers the following topics:
44.13.1 Working with Export Path Variables and SIMPLEDIR
Export path variables are defined as follows:
-
<cs.pgexportfolder>defines the root directory for all exported files.<cs.pgexportfolder>is the value of thecs.pgexportfolderproperty in thewcs_properties.jsonfile. It is a required value and applies to all Export to Disk publishing destinations.Typically,
<cs.pgexportfolder>names a testing location (a file system where the exported files are verified) rather than a location directly on the delivery system. -
<DIR>is the value of the publishing argumentDIR, which is used to create subdirectories of the root directory (specified bycs.pageportfolder). When<DIR>is specified, WebCenter Sites creates<cs.pgexportfolder>/<DIR>.Note:
The DIR publishing argument is available to administrators as the Base Directory field in the Add New Destination form (see Configuring an Export Destination). Throughout this section, we use
<DIR>to mean Base Directory.This argument is typically used to organize the contents of the root export directory when multiple export destinations exist for your sites.
Note:
The directory specified by
<cs.pgexportfolder>or<cs.pgexportfolder>/<DIR>is called the destination directory. -
<file_dir>takes a value listed below, depending on whether the exported asset is a page asset and whether path information is available.<file_dir>is determined hierarchically, as WebCenter Sites looks for the values listed below, in the order shown. It is assumed thatSIMPLEDIR=false.Table 44-3 Possible File_Dir values
Possible <file_dir> Values Description <ForDestination:Path>Value of the For Destination: Path field (the field is shown in the Specify Path/Filename for Destination form for a specific destination).
Setting a value in the ForDestination: Path field forces the asset to take the specified path when the asset is exported to the specified destination.
If
<ForDestination:Path>is not set, WebCenter Sites uses<parent_page's_path>.<parent_page's_path>Value of the Path field for the exported asset's parent page.
Note for Page Assets: When exported, a page asset takes the path that is set for its parent page, not the one set for itself. (As a rule, a page asset's Path is applied only to child assets.)
If
<parent_page's_path>is not set, WebCenter Sites uses<ID_of_parent_page>.<asset's_path>Value of the exported asset's Path field.
Note:
<asset's_path>is used only for assets that are not page assets. If<asset's_path>is not set, WebCenter Sites uses <ID_of_parent_page> as the value of<file_dir>. If both<parent_page's_path>and<asset's_path>are not set, WebCenter Sites uses<ID_of_parent_page>.<ID_of_parent_page>ID of the asset's parent page. This value is used if
<parent_page's_path>and<asset's_path>are unknown. -
SIMPLEDIR. Although this publishing argument is not explicitly part of the export path, it determines whether
<file_dir>is used when path information is unavailable. That is:-
If
SIMPLEDIRis set totrueand path information is unavailable,<file_dir>is omitted from the export path. Setting a path overridesSIMPLEDIR. -
If
SIMPLEDIRis set tofalseand path information is unavailable,<file_dir>takes<ID_of_parent_page>as its valuė.Note:
The SIMPLEDIR publishing argument is available to administrators as the Use simple directory naming check box in the Add New Destination form (see Configuring an Export Destination).
-
44.13.2 Working with Export Path Construction
This section summarizes the export paths that WebCenter Sites can construct using the convention:
<cs.pgexportfolder>/<DIR>/<file_dir>
Note that only <file_dir> varies in all the examples below
This section covers the following topics:.
44.13.2.1 Using a Forced Export Path
When <ForDestination:Path> (defined in Working with Export Path Variables and SIMPLEDIR) is specified, the asset being published to the named destination is forced to take the specified path, even if other path information is set. The asset's full export path is:
<cs.pgexportfolder>/<DIR>/<ForDestination:Path>
44.13.2.2 Using an Export Path for Page Assets
If <ForDestination:Path> is not set, constructs the export path as shown below (for examples, see alternate-publishing-methods1.html#GUID-D4D39637-FCD5-4455-A78A-E534C17C8D8C__BEIEIADI).
-
When
<parent_page's_path>is specified, the page asset's export path is:<cs.pgexportfolder>/<DIR>/<parent_page's_path>
(even if
<asset's_path>is specified).Note:
When exported, a page asset takes the path that is set for its parent page, not the one set for itself (that is,
<file_dir>takes the value<parent_page's_path>).As a rule, a page asset's Path information is applied only to child assets.
-
When
<parent_page's_path>is not specified:-
If
SIMPLEDIR=false, uses<ID_of_parent_page>:
<cs.pgexportfolder>/<DIR>/<ID_of_parent_page>
-
If
SIMPLEDIR=true, omits<file_dir>:
<cs.pgexportfolder>/<DIR>
-
44.13.2.3 Using an Export Path for Assets Other than Page
For an asset that is not a page, constructs an export path depending on which information is available (For examples, see alternate-publishing-methods1.html#GUID-D4D39637-FCD5-4455-A78A-E534C17C8D8C__BEIDHICI).
-
When
<asset's_path>is specified, the export path is:<cs.pgexportfolder>/<DIR>/<asset's_path>
-
When
<asset's_path>is not specified, uses<parent_page's_path>:<cs.pgexportfolder>/<DIR>/<parent_page's_path>
-
When both
<asset's_path>and<parent_page's_path>are unspecified:-
If
SIMPLEDIR=false, uses<ID_of_parent_page>:
<cs.pgexportfolder>/<DIR>/<ID_of_parent_page>
-
If
SIMPLEDIR=true, omits<file_dir>:
<cs.pgexportfolder>/<DIR>
-
44.13.2.4 Using Sample Export Paths
The following tables describe the sample export paths for assets.
Table 44-4 Sample Export Paths for Page Assets when SIMPLEDIR=false
| Page Asset | cs.pgexportfolder | DIR | file_dir (value 1) | file_dir (value 2) | file_dir (value 3) | Export path |
|---|---|---|---|---|---|---|
|
N/A |
N/A |
N/A |
asset's_path |
parent_page's_path |
ID_of_parent_page |
N/A |
|
Home |
|
N/A |
|
N/A |
N/A |
|
|
Home |
|
|
|
N/A |
N/A |
|
|
World News |
|
|
|
|
998877665 |
|
|
World News |
|
N/A |
|
|
998877665 |
|
|
World News |
|
|
|
N/A |
998877665 |
|
|
World News |
|
N/A |
|
N/A |
998877665 |
|
Table 44-5 Sample Export Paths for Assets Other Than Page when SIMPLEDIR=false
| Not Page Asset | cs.pgexportfolder | DIR | file_dir (value 1) | file_dir (value 2) | file_dir (value 3) | Export path |
|---|---|---|---|---|---|---|
|
N/A |
N/A |
N/A |
asset's_path |
parent_page's_path |
ID_of_parent_page |
N/A |
|
Oil Price |
|
|
|
N/A |
997766554 |
|
|
Oil Price |
|
|
|
|
997766554 |
|
|
Oil Price |
|
N/A |
|
|
997766554 |
|
|
Oil Price |
|
|
N/A |
|
997766554 |
|
|
Oil Price |
|
|
N/A |
N/A |
997766554 |
|
|
Oil Price |
|
N/A |
N/A |
N/A |
997766554 |
|
44.13.3 Working with Paths for Links Within Exported Files
URLs in links for HREFs within the exported files do not include the values that specify the destination directory (<cs.pgexportfolder>/<DIR>). Instead, they begin within the destination directory and are relative to that directory.
The URL Prefix field on the Destination Configuration form is used to resolve URLs by specifying the location of those files on the delivery system. That is, URLs for links within the exported files are created like this:
<URLPREFIX>/<path_of_parent_page>
The value for URL Prefix must match the value of the web alias that identifies the directory where the files are found. If you are using only cs.pgexportfolder to create the destination directory, the web alias that the URL Prefix represents must point to that location. And if you have set the Base Directory field on the Destination Configuration form to add a subdirectory to the root directory specified by cs.pgexportfolder, be sure that the web root or the web alias represented by URL Prefix points to this directory.
44.13.4 Working with File Naming Conventions
How WebCenter Sites names an exported file depends on whether a file name is provided by the asset (in the Inspect form) and whether Use Simple File Naming is selected on the Destination Configuration form. For more information about this setting, see Configuring Your System for Export to Disk Publishing. Possible file names are shown in the following table. The naming convention is explained after the table.
Table 44-6 File Naming Conventions
| File Name | Description |
|---|---|
|
|
Used for assets with a populated Filename field and Use Simple File Naming is not selected. |
|
|
Used for assets with a populated Filename field and Use Simple File Naming is selected. |
|
|
Used for assets with an empty Filename field and Use Simple File Naming is not selected. |
|
|
Used for assets with an empty Filename field and Use Simple File Naming is selected. |
Note:
When export files are named, these syntax changes are made:
-
Slash characters (
/) in page names are converted to hyphens (-) in file names. -
Equal signs (
=) in packed arguments are converted to hyphens (-) in file names. -
Ampersand characters (
&) in packed arguments are converted to underscores (_) in file names.
-
<pagename>is the name of the SiteCatalog page entry of the template that is used to render the asset. (All template assets have SiteCatalog page entries.)Note:
<pagename>is dropped when the Use Simple File Naming parameter is selected in the Destination Configuration form. Use the Use Simple File Naming option selectively. If your assets are rendered by multiple templates, do not select Use Simple File Naming. -
<packedargs(if any)>are passed in from the page entry's root element. If any packed arguments are passed in from the root element of the asset's rendering template, the values of those arguments are also included in the name of the file generated for the asset.For information about packed arguments and how they relate to URLs, see Using the referURL Variable in the Developing with Oracle WebCenter Sites.
-
<filename>is the value of the asset's Filename field. If the Filename field is empty, WebCenter Sites uses the asset_ID specified in the asset.Note:
A file name set for an asset for a specific destination in the Specify Path/Filename for Destination form supersedes the file name provided in the Filename field on the asset's New or Edit form when the asset is exported to that destination.
-
<asset_ID>is the ID that is specified in the asset.<asset_ID>is used if the asset's Filename field is empty or if the following note applies.Note:
WebCenter Sites requires both the asset's ID and type to determine whether a file name is provided for the asset. If the identity of the asset's type is not provided, the file name cannot be used. In such a case, WebCenter Sites uses the asset's object ID in place of its file name.
-
<SUFFIX>is a destination configuration option that specifies the extension of the file name..
The following table provides examples of how file names are created during Export to Disk publishing. In the examples given, Use Simple File Names is not selected in the destination configuration.
Table 44-7 Export File Naming Conventions
| Asset Name | SiteCatalogPagename | packedargs | filename | asset_ID | SUFFIX | Exported File Name |
|---|---|---|---|---|---|---|
|
Home |
BF/Page/Home |
cid=123 c=Page |
123 |
|
||
|
Home |
BF/Page/Home |
cid=123 c=Page |
123 |
.htm |
|
|
|
Home |
BF/Page/Home |
cid=123 c=Page |
home.html |
123 |
|
|
|
Home |
BF/Page/Home |
cid=123 c=Page |
home.html |
123 |
.htm |
|
|
Home |
BF/Page/Home |
cid=123 c=Page PACKEDARGS="topicword=oil" |
home.html |
123 |
|
44.13.5 Working with Export Starting Points
The Export to Disk publishing method cannot begin rendering files unless it knows where to start. You tell it where to start by designating at least one starting point: that is, a page asset and the template that should be used to render it. calls the root element of the template's page name, and begins rendering every approved asset that is connected to that export starting point — assets connected through an association, a link, a navigation bar, a query, and so on.
Note:
There must be at least one export starting point for an exported site. Typically it is your home page. However, depending on how your online site is designed, you may have to designate multiple export starting points. This is because if there is a section on your site that isn't connected to the rest of the site, it is not rendered. For example:
-
If your online site has multiple top-level page assets, you require an export starting point for each one.
-
If your site uses a combination of static pages and dynamic pages and there is a hard-coded static URL in an HREF on a dynamically-generated page, the asset that the URL points to should be designated as an export starting point.
44.14 Configuring Your System for Export to Disk Publishing
The main steps when configuring a system for Export to Disk publishing are these:
44.14.1 Creating the Batch User Account For Export Publishing (If One Does Not Exist)
This procedure must be performed only one time on each source system, regardless of the number and types of publishing destinations you are configuring.
If you have not done so, create the batch user account. For instructions, see Creating the Batch User Account (If One Does Not Exist).
If an account exists for your installation, skip to Specifying the Root Export Directory.
The purpose of creating a batch user account is two-fold:
-
Configure a batch user account for the publishing system on the source to use.
-
Specify where the publish logs should be stored.
The procedures in this section require you to set several properties in the wcs_properties.json file. Additional properties are also available to you for fine-tuning your system configuration. For a complete list of properties, see Oracle WebCenter Sites JSON Property File in the Property Files Reference for Oracle WebCenter Sites.
44.14.2 Specifying the Root Export Directory
As mentioned previously in this chapter, the directory that WebCenter Sites exports files to is determined by the cs.pgexportfolder property in the wcs_properties.json file. (If you wish to add subdirectories to this directory, you enter a value in the Base Directory field in the Destination Configuration form.)
Note:
Before you run an export publishing session, ensure this root export directory exists and that it has enough space for the HTML pages that will be created there.
To set the root directory for the exported files:
44.14.4 Mapping a URL Prefix for Your Web Server
To make your exported content available to the public at its final destination (your delivery system), you must configure your web server to map a URL path prefix to the place where the files will reside so that URLs can resolve.
See the vendor documentation for your web server for information about the appropriate procedure for mapping URL prefixes on your web server. Remember that the name you specify for this prefix must match the name that you specified with the URL Prefix destination configuration parameter for the destination. If you enter a URL Prefix, be sure that the web root or alias includes the directory you entered.
44.14.5 Creating the Export Starting Points
To create an export starting point:
-
Using the Admin interface on the source system, find the asset to specify as an export starting point.
-
Open the asset in its Status form and scroll to the Publishing Destination section.
-
Complete either:
-
If the asset is not yet approved for the destination you are currently configuring, select Approve for Publish from the toolbar (The green check mark icon) and go to step 4.
-
If this asset is approved for the destination you are currently configuring, go to step 6.
-
-
In the Publishing Approval form, select the destination for which you are approving the asset and click Approve.
calculates dependencies for all the assets linked to this asset and shows the results.
-
When the approval results are shown, click the Status icon (a clock face with a green check mark) from the toolbar.
-
Scroll down to the section of the Status form that shows the selected destination.
-
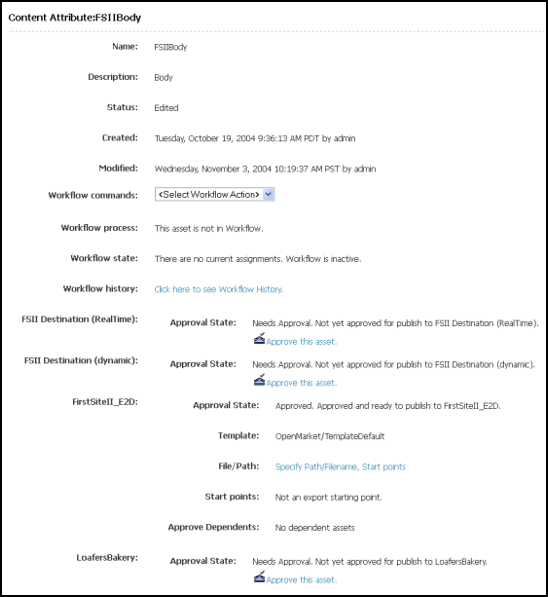
In the File/Path field, click Specify Path/Filename, Start points.
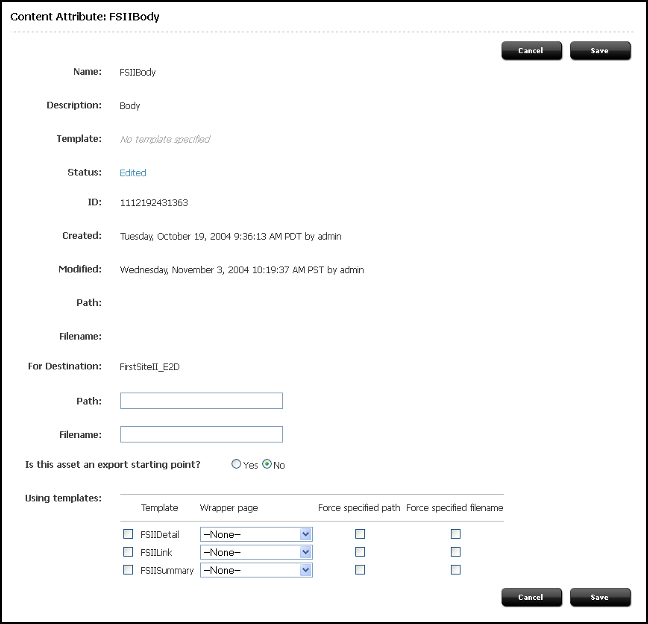
The File and Path fields are made available on the Content Attribute form.
Note:
If the starting point selected is a page, no templates are found, and then clicking Save results in the error "To make this asset a publish starting point, you must select a template," the
enableAssetFormsproperty must be set totrue.From the Property Management Tool, set
advancedUI.enableAssetForms=truethen set the page as the starting point in the Content Attribute form. -
In the Content Attribute form, fill in the fields:
-
(Optional) For Destination section:
Path: To specify unique path information for the asset being published to this destination (the path information is not provided elsewhere for this asset), enter the path in the Path field.
Filename: To specify file name information that is different for this destination, enter it in the Filename field. A file name entered in this form for this destination overrides any file name information provided elsewhere for the asset.
-
Select Yes for Is this asset an export starting point?
-
(Optional) Using Templates section:
Select a template.
Select a wrapper page.
Select Force specified path if you would like to force this asset to be exported to the path that is named in the For Destination section.
Select Force specified filename if you would like to force the use of the file name that is specified in the For Destination section.
-
-
Click Save.
-
Repeat steps 1–9 for each top-level page asset in the site.
44.14.6 Approving Your Assets for Export to Disk Publishing
To perform a simple test of your configuration, select the export starting point with the fewest number of dependent assets and approve each of those assets.
To complete a test publish of your entire site, approve all the assets for the site. See Approving Multiple Assets.
44.14.7 Publishing and Testing the Results
When the assets you want to publish to the selected destination are approved, run a test publishing session:
44.14.8 Setting Up the Schedule
After you have ensured that:
-
Your destination is configured correctly,
-
The file names and directory names are created according to your requirements, and
-
Your web server is delivering the files correctly,
you can finish configuring your publishing system by completing the following steps on the source system:
- Create scheduled publish events for the destination. For help with this step, see Scheduling a Publish Event.
- Plan how you will copy the generated files to your web servers, for both the testing area and the delivery system. For example, you can set up a script that automatically copies the files by FTP to a testing area after a publishing session completes.
44.15 Understanding Mirror to Server Publishing
The Mirror to Server publishing method gathers information from the approval system, the publishing schedule, and the destination configurations, copies data to the destination, unpacks that data on the destination system, and then calls the CacheManager servlet to refresh any pages that should be regenerated to take advantage of the new content.
Note:
Export to Disk publishing is not recommended. Instead, use the Site Capture application of WebCenter Sites.Whether your WebCenter Sites delivery system delivers content dynamically, you probably use the Mirror to Server publishing method to move data from your development systems to your management system. For information about that process, see Troubleshooting.
When a Mirror to Server publishing session runs, the followingfigure illustrates what occurs.
-
On the source system, Mirror to Server publishing uses the list of approved assets that the publishing system passed to it to create a mirror queue for the destination.
Mirror Queue for Basic Assets
For basic assets, the following information is added to the queue:
-
The asset's main table row. For example, for page assets, the asset's row in the
Pagetable. -
The appropriate rows in the
AssetPublicationtable. These rows list sites and which assets belong to them. -
Rows in the
AssetRelationTreetable that refer to any assets that are associated with the asset being published. -
The associated assets referenced by those rows in the
AssetRelationTreetable. The asset table rows,AssetPublicationrows, and associated assets of any dependent assets are also mirrored, if they are approved and have not yet been published.
Mirror Queue for Flex and Complex Assets
For flex asset types and the other multi-table asset types like template and CSElement, the information from the appropriate rows from all of their tables are serialized into an object and stored in the
_Publishtable for that asset type.For example, when a template is to be published, the appropriate rows from the
Template,SiteCatalog, andElementCatalogtables are serialized into an object and stored in theTemplate_Publishtable.Each item in a
_Publishtable is added to the mirror queue. -
-
WebCenter Sites uses the
AssetPublishListtable to create a list of all the assets that are in the mirror queue. -
The mirror operation starts.
First, the
AssetPublishListis mirrored from the source to the destination. -
The mirror queue is delivered and the publishing system unpacks the assets in the queue.
For flex assets, Mirror to Server publishing de-serializes objects in the
_Publishtables, and inserts the results in the appropriate tables.For basic assets, each row in the queue is copied.
-
When the items in the mirror queue are unpacked, the publishing system sends messages that the mirror publish concluded successfully. The destination system responds as follows:
-
The newly published assets are marked as changed on the destination system, which means that before they can be published from that system to another destination, they must be approved. Note that this feature is enabled by default. You can turn it off if you must. For details, see Turning Off Asset Invalidation on the Delivery System.
-
The CacheManager servlet on the destination regenerates the appropriate pages in the cache so that all pages that refer to the assets that were just published are updated. It also rebuilds any pages that have unknown compositional dependencies.
-
CacheManager then communicates a message about which pages must be refreshed to each Satellite Server identified by the
satellite.inifile on the destination system. It communicates with the co-resident version and any remote instances that are identified as belonging to this WebCenter Sites system. The Satellite Server applications then use that information to refresh the Satellite Server page caches. -
The
AssetPublishListtable is cleared, making it ready for the next publishing session.
-
-
On the source system, the publishing system updates the publish log file. Unlike the Export to Disk publishing method, which writes to the publish log after each asset is exported, Mirror to Server publishing waits until the entire mirror queue has been successfully mirrored before writing the results to the publish log.
-
When the publishing session is successful, WebCenter Sites concludes the session by writing information about the published references to the
PubKeyandPublishedAssetstables and by clearing theAssetPublishListtable on the source system. -
WebCenter Sites also writes information about the assets that were published to the
ApprovedAssetsandApprovedAssetDepstables so the approval system can calculate dependencies correctly the next time an asset is approved.
44.16 Pre-Configuring Mirror to Server Publishing
Before you configure the Mirror to Server publishing process, take into the consideration the topics that are presented in this section. Prior knowledge of the information you provide will help to ensure a smooth configuration process.
44.16.1 Working with Users and Mirror to Server Publishing
In addition to the batch user account on the source system that a publish event uses to process a publishing session, the Mirror to Server publishing method requires another user account: the mirror user account, which is located on the destination server. This is the user account that the publishing system uses to unpack the mirror queue on the destination system.
When you set up a Mirror to Server publishing destination, you must create the mirror user account on the destination system that the destination represents.
44.16.2 Working with CacheManager
The CacheManager is a servlet that maintains the page cache on any dynamic system, including the management system.
CacheManager is important because it locks the appropriate assets on the destination during a mirror publishing session and ensures the integrity of the page cache both before and after a mirror publishing session.
See About the CacheManager in Developing with Oracle WebCenter Sites.
44.16.3 Configuring a Mirror Destination
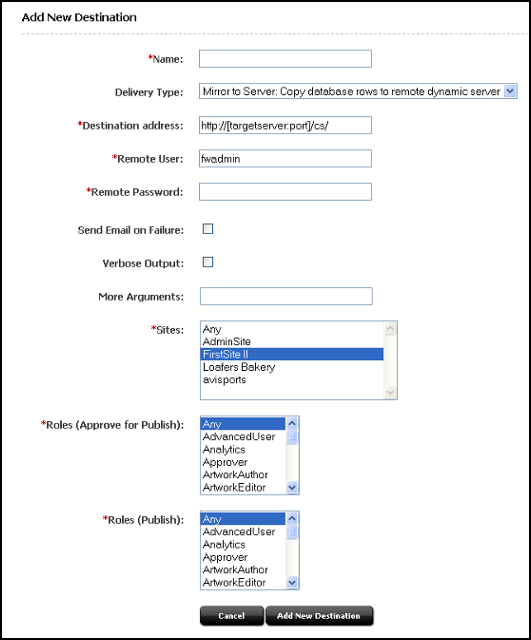
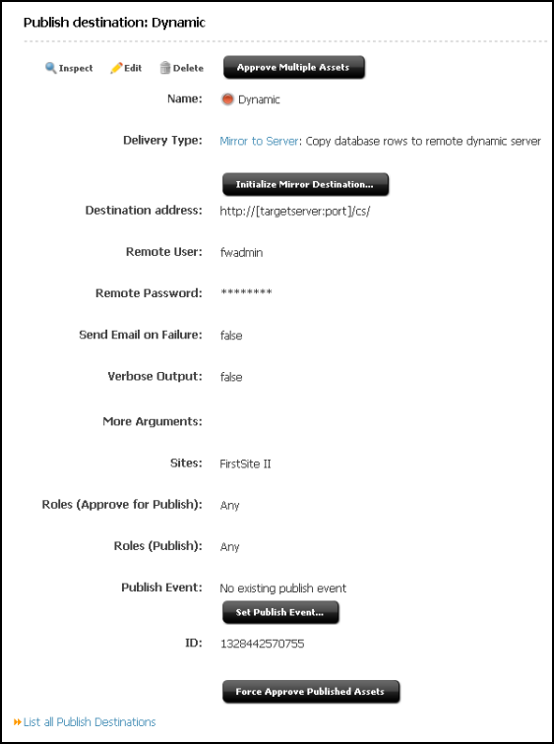
The Mirror to Server publishing method copies information for approved assets from one database to another. This information must be configured for the mirror destination. Configuring a mirror destination involves two steps: initializing the destination, and configuring the data for the destination.
Whenever you create a new mirror destination, you must initialize it before you can publish to it. To initialize a mirror destination, you specify the following information:
-
The sites. Based on the sites that you select, the appropriate rows from the
Publication,SitePlanTree, andPublicationTreetables are mirrored to the destination. -
Any custom table that supports or is directly related to your asset types. In other words, a table for assets that was not created by either AssetMaker or Flex Family Maker. Examples of these are
SourceandMimetype. These tables are called auxiliary tables.
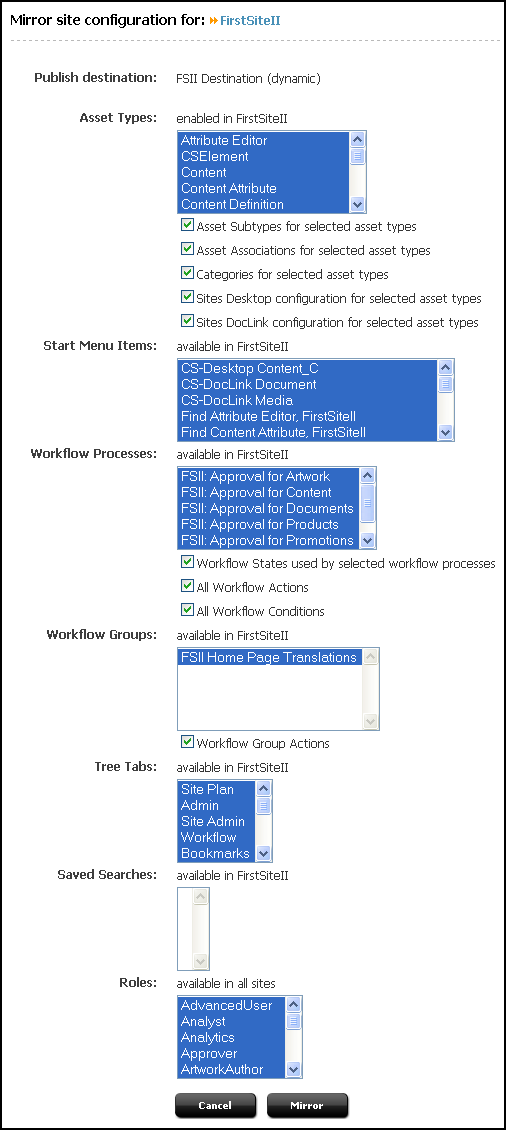
Mirror destination configuration is the process of indicating which data (for example, assets types, associations, and start menu items) is mirrored to the target destination. Mirror destination configuration moves configuration data and rows from auxiliary tables—which are non-asset database tables that are used for the dynamic display of the assets—from one database to another.
44.16.4 Determining When to Use Mirror Destination Configuration
You use Mirror Destination Configuration in several situations:
-
To set up a new mirror destination.
-
To move configuration items that support asset types (start menu items, associations, and so on) from a development system to a management system or to a delivery system.
-
To move workflow configuration data from a development system to a management system.
-
If you or your developers add any additional sites, asset types, or auxiliary tables to your system.
-
If you or your developers add any additional categories or subtypes for existing asset types.
-
When you must troubleshoot your configuration. If you can successfully initialize a mirror destination, that means that the source and the destination systems are communicating.
44.17 Configuring Your System for Mirror to Server Publishing
The main steps when configuring a system for Mirror to Server publishing are as follows:
-
Creating the Batch User Account for Mirror Publishing (If One Does Not Exist)
-
Identifying the Local Proxy Server to the Source System (If One Exists)
-
Turning Off Asset Invalidation on the Delivery System
Note:
Configuring a system for Mirror to Server publishing requires you to provide information that is specific to your WebCenter Sites installation and your business practices. Before starting the procedures in this section, it is best to read them to gather and confirm the information they prompt you to provide.
44.17.1 Creating the Batch User Account for Mirror Publishing (If One Does Not Exist)
This procedure must be performed only one time on each source system, regardless of the number and types of publishing destinations you are configuring.
If you have not done so, create the batch user account. For instructions, see Creating the Batch User Account (If One Does Not Exist).
If a batch user account exists on your source system, skip to Setting Up the Destination System.
44.17.2 Setting Up the Destination System
To mirror publish assets from one WebCenter Sites system to another, you must ensure that the sites and asset types are the same on both the source and the destination system. You must also create an additional user on the destination system, called the mirror user (as opposed to the batch user, which exists on the source). This user completes the mirror publish database transactions on the destination system.
Note:
Database properties on the source and destination systems, if not an exact match, must be compatible, particularly database schema options (set from the Property Management Tool). Be sure to restart the application server if you make changes to database properties.
To set up your destination system:
44.17.3 Identifying the Mirror User to the Source System
Next, you identify the name and password of the mirror user on the destination system to the source system by setting property values in the wcs_properties.json file on the source system.
Note:
Because the proxy server is used by both Mirror to Server and RealTime publishing, it may have been set up for RealTime publishing. In such a case, review the properties in the procedure steps to ensure they are set correctly.
To identify the mirror user to the source system:
44.17.4 Identifying the Local Proxy Server to the Source System (If One Exists)
Note:
This procedure must be performed only one time on each source system, regardless of the number and types of publishing destinations you are configuring. Skip to Creating a Mirror Destination if the local proxy has been identified to your source system, or a proxy server is not used.
To identify the local proxy to the source system:
44.17.5 Creating a Mirror Destination
A mirror destination must be configured, just as any other part of the process of publishing.
To create a mirror destination:
44.17.6 Initializing the Destination
You must initialize the destination system before you can publish to it. This creates the basic site information about the destination system. Specifically, the Publication and PublicationTree tables are updated with the site names and asset types published to the target.
To initialize the destination system:
-
In the General Admin tree, expand the Admin node, expand the Publishing node, and then expand the Destinations node.
-
Under the Destinations node, double-click the destination you want to initialize.
-
In the Publish Destination form, click Initialize Mirror Destination.
The Initialize Mirror Destination form opens.
-
Select the sites whose assets you want to publish to this destination.
-
In the Auxiliary tables fields, enter the names of the following tables:
-
Source, if you are using the source feature for any of your asset types -
Mimetype, if you are using flex filter assets, the ImageFile asset type, or if you are using this table for any of your custom asset types. -
Filters, if you are using flex filters on your site. (TheFilterstable lists the classes that are used by the flex filters. You must copyjarfiles and classes manually.) -
Any other auxiliary tables (such as lookup tables) for your asset types.
Note:
Only five fields are provided for table names. If you have to enter more than five table names, complete this procedure through step 6 for the first five tables, then repeat steps 3 through 6 for the remaining tables.
-
-
Click Mirror.
If the initialization is successful, displays a confirmation message; otherwise, an error message opens.
Based on the sites that you selected in step 4, the corresponding rows from the
Publication,SitePlanTree, andAssetTypetables are copied to the destination.Additionally, all the rows in the tables that you specified as auxiliary tables are copied to the destination.
Note:
You can also initialize the target destination from the Publish Console. In the button bar, click Publishing.
-
In the Publish Console, select your mirror destination from the drop-down list and then click Select Destination.
-
Click the Create Site on Target button. When the confirmation form opens, click Yes. This creates the basic site information about the destination system.
-
44.17.7 Configuring the Mirror Destination
Now you must configure the data that will be on your target destination. This configuration will vary depending on the purpose of the target destination. For example, if the target destination is strictly a delivery computer, it makes sense to only include asset types when mirroring. Before proceeding with configuring the destination, you may find it helpful to see Migrating a Site from One System to Another.
Note:
If Revision Tracking is turned on at the publishing target destination for either ElementCatalog or SiteCatalog, then the publishing of template will fail and the template may become corrupted.
It is not recommended to enable Revision Tracking on the target destination.
44.17.8 Approving Your Assets
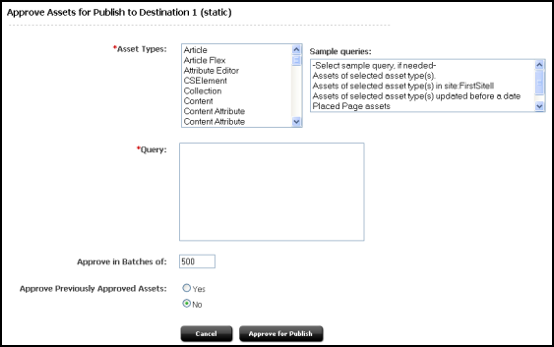
To test your published site, you must approve and publish all the assets for the site. See Approving Multiple Assets for help with approving many assets at one time.
To perform a simple test of your configuration, temporarily create a home page asset with only a few dependents.
44.17.9 Publishing the Assets
After you have approved assets that can be published to your destination, you can run a test publishing session:
44.17.10 Testing the Results
To test the results, point your browser to the home page asset on the destination system and examine the site.
If you have not done so, you must determine the asset's URL. A URL is constructed by concatenating the following values:
-
The host name or IP address (and sometimes the port number) of the destination system.
-
The CGI path, which the system obtains from the
ft.cgipathproperty in thewcs_properties.jsonfile. For example, for WebLogic and other application servers with servlet architectures, this default path is/servlet/. -
The string
ContentServer?pagename= -
A page name from a
SiteCatalogentry. -
Additional information that is passed in with the page criteria variables,
c,cid,tid, andp. (For information about these variables, see Template, CSElement, and SiteEntry Assets in the Developing with Oracle WebCenter Sites.)
Complete the following steps to determine the URL of your home page and test the site:
44.17.11 Setting Up the Schedule
After you have ensured that your destination is configured correctly, you can finish configuring your publishing system by completing the following steps on the source system:
- Create scheduled publish events for the destination. For help with this step, see Troubleshooting.
- If you are using images that are not assets in the design of your site — that is, your site designers want to store all images on the web server rather than manage them as assets — plan how you will move the image files from the web server for the management system to the web server for the delivery system. For example, you can set up a regular FTP transfer.
- If you are using elements and SiteCatalog page entries that are not CSElement and SiteEntry assets, you must use the CatalogMover tool to mirror them to the destination system. For help with CatalogMover, see CatalogMover in Developing with Oracle WebCenter Sites.
44.17.12 Turning Off Asset Invalidation on the Delivery System
By default, the publishing system is configured to select an asset as changed on the destination system when you publish an asset from one system to another (source to destination). Then, the newly published asset must be approved on the destination system before it can be published to another destination.
The default configuration is appropriate for development and management systems. However, when you are publishing to the delivery system, it is not necessary for the publishing system to take the time to mark the change—assets are published to the delivery system but not from it.
Therefore, on the delivery system, turn off this publishing feature by completing the following steps:
- In the Admin interface, open the Property Management Tool. (For instructions about accessing the Property Management Tool, see the Accessing the Property Management Tool in the Property Files Reference for Oracle WebCenter Sites.)
- In the Name field, enter
xcelerate.publishinvalidate. - Click Search.
- Select the name of the property. In the Value field, set its value to
false. - Click Save.
44.18 Retrieving Logs From Delivery WebCenter Sites Systems
provides a way to retrieve publishing-related logging information from the delivery system and display it in the Publishing console. To achieve this, inserts the publishing session ID into each relevant log entry. The management interface has the ability to retrieve the relevant entries for a publishing session and display them in the Log form for that session.
To enable remote publishing logging:
44.19 Exporting Assets to XML Publishing Method
The Export Assets to XML publishing method is a hybrid between the Export to Disk and dynamic publishing methods. Assets are rendered into files, but this publishing method uses the dynamic dependency calculation method rather than the method of Export to Disk publishing.
The Export Assets to XML publishing method differs from the other two in that it is really a data transformation method. While Export to Disk publishing creates one HTML file per page, which could mean that several assets are rendered into one file, Export Assets to XML creates one XML file for each asset that is approved to a destination configured to use this publishing method.
Export to Disk publishing creates Export to Disk files that are to be delivered from a Export to Disk WebCenter Sites delivery system. In contrast, Export Assets to XML creates XML files for delivery to a database or non-WebCenter Sites system.
When an Export Assets to XML publishing session runs, this is what happens:
-
On the source system, the approval system provides a list of the assets approved for this destination to Export Assets to XML.
-
Export Assets to XML renders each asset in the list to an XML file. The output file describes the asset, stating all the values for all of the asset's fields.
When you use the Export Assets to XML publishing method, typically you set up a quality assurance process to test the generated files before you move them to the external (non-WebCenter Sites) system.
The following topics provide information about exporting assets to XML:
44.19.1 Understanding the XML Output
The output from Export Assets to XML is well-formed XML that describes an asset object in terms of its field values. Fields are described as attributes.
For each of the asset's fields, there is a name/value pair. The statement of the value includes the data type of the field. For example, the Name field holds characters. So the name/value pair for an asset's Name field would appear as follows in the output:
<attribute name="Name">
   <string value="nameOfAsset"/>
</attribute>
Flex attributes serve as the fields for flex assets. In the output XML for a flex asset, the flex attribute values are prepended with Attribute_. Here's an example of an attribute value for the price of a sample site product asset:
<attribute name="Attribute_price">
   <decimal value="5.9"/>
</attribute>
Note that the XML output uses the column names rather than the field name of each field/attribute and that column names and field names can be different.
The following is a description of the XML file created by this publishing method, presented as a pseudo-dtd file:
<!-- ASSET:
-- ASSET defines an asset object
-- an asset is made up of attributes
-->
<!ELEMENT ASSET (ATTRIBUTE)*>
<!ATTLIST ASSET TYPE CDATA #REQUIRED>
<!ATTLIST ASSET ID CDATA #IMPLIED>
<!ATTLIST ASSET SUBTYPE CDATA #IMPLIED>

<!ELEMENT ATTRIBUTE (STRING | DATE | INTEGER | DECIMAL | BINARY | FILE | ASSETREFERENCE | ARRAY | STRUCT | LIST)>
<!ATTLIST ATTRIBUTE NAME CDATA #REQUIRED>

<!ELEMENT STRING>
<!ATTLIST STRING VALUE CDATA #REQUIRED>

<!ELEMENT DATE>
<!ATTLIST DATE VALUE CDATA #REQUIRED>

<!ELEMENT INTEGER>
<!ATTLIST INTEGER VALUE CDATA #REQUIRED>

<!ELEMENT DECIMAL>
<!ATTLIST DECIMAL VALUE CDATA #REQUIRED>

<!ELEMENT BINARY>
<!ATTLIST BINARY VALUE CDATA #REQUIRED>

<!ELEMENT FILE (CDATA) >
<!ATTLIST FILE NAME CDATA #REQUIRED>

<!ELEMENT FILE>
<!ATTLIST FILE NAME CDATA #REQUIRED>

<!ELEMENT ASSETREFERENCE>
<!ATTLIST ASSETREFERENCE TYPE CDATA #REQUIRED>
<!ATTLIST ASSETREFERENCE VALUE CDATA #REQUIRED>

<!ELEMENT ARRAY (STRING | DATE | INTEGER | DECIMAL | BINARY | FILE | ASSETREFERENCE | ARRAY | STRUCT | LIST)+>

<!ELEMENT STRUCT (FIELD)+>

<!ELEMENT FIELD (STRING | DATE | INTEGER | DECIMAL | BINARY | FILE | ASSETREFERENCE | ARRAY | STRUCT | LIST)+>
<!ATTLIST FIELD NAME CDATA #REQUIRED>

<!ELEMENT LIST (ROW)+>

<!ELEMENT ROW (COLUMN)+>

<!ELEMENT COLUMN ( STRING | INTEGER | DECIMAL | DATE | ASSETREFERNCE)>
<!ATTLIST COLUMN NAME CDATA #REQUIRED>
44.19.2 Understanding File Naming Conventions for Export Assets to XML
Exported XML files are named according to the following convention:
assetID.xml
For example, if the asset ID is 3344556677, the file name for the asset's XML file is:
3344556677.xml
The Export Assets to XML publishing method does not use any information that is entered in an asset's Path or Filename field.
44.20 Configuring Your System for Export Assets to XML
The main steps when configuring for the Export Assets to XML delivery type are as follows:
44.20.1 Creating the Batch User Account for XML Publishing (If One Does Not Exist)
Creating a batch user account is required before any type of publishing can take place. This procedure must be performed only one time, regardless of the number and types of publishing destinations you are creating.
If you have not done so, create the batch user account. For instructions, see Creating the Batch User Account (If One Does Not Exist).
If a batch user account exists for your installation, skip to Specifying the Root Export Directory.
44.20.2 Specifying the Root Export Directory
As mentioned earlier in this chapter, the directory to which exports files is determined by the cs.pgexportfolder property in the wcs_properties.json file.
To set the root directory for exported files:
44.20.3 Configuring an Export Assets to XML Destination
Next, create the Export to XML destination by completing the following steps:
44.20.4 Approving Your Assets for XML Publishing
To perform a simple test of your configuration, select an asset and approve it and any of its dependent assets.
To complete a test publish of your entire site, approve all the assets for the site. See Approving Multiple Assets for help with approving many assets at one time.
44.20.5 Publishing and Testing the Results
After you have approved assets that can be published to your destination, you can run a test publishing session:
44.20.6 Setting Up the Schedule
After you have ensured that your destination is configured correctly, that the directory names are created according to your requirements, you can finish configuring your publishing system by completing the following steps on the source system:
- Create scheduled publish events for the destination. For help with this step, see Troubleshooting.
- Plan how you will move the generated files to your external, non-WebCenter Sites systems. For example, you can set up a regular FTP transfer that automatically moves files to a testing area after a publishing session completes.
44.21 Migrating a Site from One System to Another
During the development phase for your sites, your site designers and developers develop sites and asset types with the sites' supporting configuration (subtypes, associations, start menu items, and so on), code templates. They also assist the administrators in customizing the user interface, when necessary, by writing elements for workflow and so on. This work is done on the development system.
When the site is ready for the content providers, you can use the Mirror Destination Configuration feature to migrate it to both the management and the delivery systems.
This section covers the following topics:
44.21.1 Moving a Site from a Development System to a Management System
The first part of moving a site from development to management requires setting up the support tables, the users, and if used, managing the flex family on the management system. This portion of the process of moving should only be done once.
Complete the following procedure only one time:
44.22 Approving Multiple Assets
Each publishing destination has an option to Approve Multiple Assets. It is especially useful for upgrades and for the first publishing session to a destination.
Note that the Approve Multiple Assets feature is not the BulkApprover utility. The BulkApprover utility approves only those assets that have been imported into the WebCenter Sites database with the BulkLoader utility. Both BulkLoader and BulkApprover are described in About the BulkLoader Utility and Approving Flex Assets with the BulkApprover Utility in Developing with Oracle WebCenter Sites.
To approve a group of assets:
44.23 Creating Destinations
The procedures for creating destinations are described in the previous section. For information about creating new destinations, use a procedure in the following list, as appropriate:
-
To create an export destination, see Configuring an Export Destination.
-
To create a mirror destination, see Creating a Mirror Destination.
-
To create an export assets destination, see Configuring an Export Assets to XML Destination.
44.24 Editing Destinations
In some cases, after a publishing destination is created, it will need to be modified. The basic procedure for editing all types of publishing destinations is covered here.
To edit a destination:
-
For an Export to Disk destination, see Configuring an Export Destination.
-
For a Mirror to Server destination, see Creating a Mirror Destination.
-
For an Export Assets to XML destination, see Configuring an Export Assets to XML Destination.
44.25 Deleting Destinations
Destinations are easily deleted once they are no longer required for publication.
To delete a destination:
44.26 Creating Export Starting Points
Export starting points are defined in Working with Export Starting Points. For information about creating them, see Creating the Export Starting Points.
