5 Exploring the Contributor Interface

Let’s take you through a quick tour of the Contributor interface. In this tour, you will learn what you need in order to use the Contributor interface and get an overview of using the interface. At the end of the tour, you will also learn how to switch to a different site.

5.1 About This Quick Tour

This quick tour is for new WebCenter Sites users who want to familiarize themselves with WebCenter Sites and its Contributor interface. In this quick tour, you will be using the default demo user (password: demo) to access each interface. Logging in to WebCenter Sites as the demo user grants you access to the Contributor interface and all the content management functions to which a user might have permissions.

Note:

In reality, access to the Contributor interfaces is focused on certain tasks such as creating or editing content.

To follow along with this quick tour, you can either perform the steps provided in each section in the order in which the topics are presented or you can navigate directly to the task you are interested in learning about.

5.2 Prerequisites for the Quick Tour

To follow along with the procedures in this quick tour, the avisports and FirstSite II sample sites must be installed with your WebCenter Sites system. If no sample sites are installed, contact your WebCenter Sites administrator.

For information about the sample sites, see What sample sites are used in this guide?.

The final procedure in this Quick Tour is Approve and Publish the Page. You will be able to publish the page manually only if an administrator has configured a publishing event for the destination to which you approve the assets.

5.3 Quick Tour of Using the Contributor Interface

Use the quick tour to orient yourself in the Contributor interface.

The quick tour of the Contributor interface comprises these topics:

5.3.1 Familiarize Yourself with the Contributor Interface

  1. Log in to WebCenter Sites as the demo user (password: demo), select the avisports sample site, and then select the Contributor interface.

    WebCenter Sites opens the Contributor interface for the avisports sample site.

  2. Browse the Contributor interface to familiarize yourself with the different content management operations you can perform.

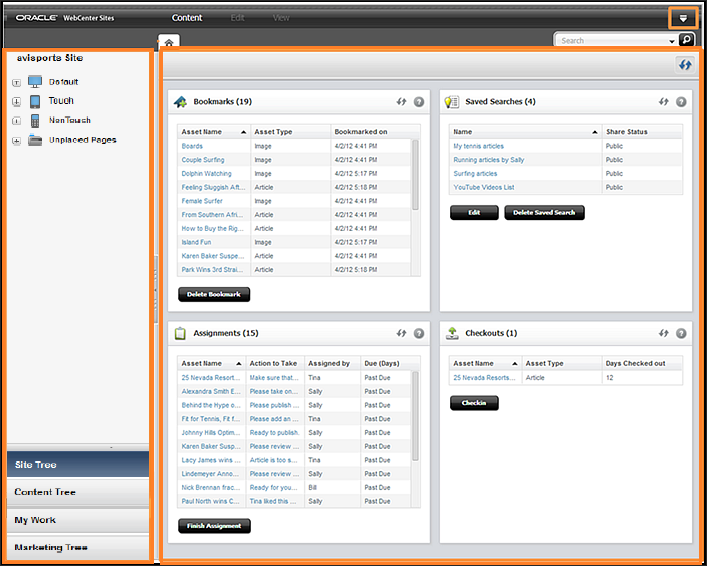
    Figure 5-1 The Contributor Interface for the Avisports Sample Site

    Description of Figure 5-1 follows
    Description of "Figure 5-1 The Contributor Interface for the Avisports Sample Site"

    The following is a list of features available in the Contributor interface:

    • The menu bar contains the Content, Edit, and View options, and the down-arrow icon.

      • The Content option enables you to create, save, approve for publishing, bookmark, share with different sites, and change the permissions of assets.

      • The Edit option enables you to inspect, modify, copy, and delete assets, work with revision tracking, and change the layout (template) assigned to an asset.

      • The View option enables you to preview assets, view an asset's status summary, and toggle between Form View and Web View.

      • The down-arrow icon is used to open the applications bar. From the applications bar you can switch to another site or application, edit your user profile, and log out of WebCenter Sites.

    • The main area of the Contributor interface is where your dashboard (workspace) is located.

      The Home tab is permanently displayed in the workspace and contains your dashboard. Your dashboard displays widgets that provide quick access to your saved search criteria, bookmarked assets, workflow assignments, and assets you have checked out using revision tracking. Each asset opens in its own tab (over the Home tab).

    • The navigation pane is located to the left of the dashboard (workspace) and allows you to access assets from the Site Tree, Content Tree, My Work and Marketing Tree.

    • The Search field allows you to enter your search criteria into it. When you click the magnifying glass button, your search results are displayed either in a Search tab or docked to the right of your workspace. From the Search field you can narrow down your search by selecting specific asset types to search for or by running an Advanced Search.

5.3.2 Organize Your Dashboard

Your dashboard contains the Bookmarks, Saved Searches, Assignments, and Checkouts widgets. In addition, your developers may have created custom widgets for your dashboard.

Organize the widgets on your dashboard by clicking a widget's title bar and then dragging it to and dropping it into a different position on the dashboard.

5.3.3 Explore the Trees in the Navigation Pane

The navigation pane enables you to access assets from the Site Tree, Content Tree, My Work tree and Marketing Tree. Follow the instructions in this section to familiarize yourself with the different trees in the navigation pane.

  1. In the navigation pane, click through the following bars:

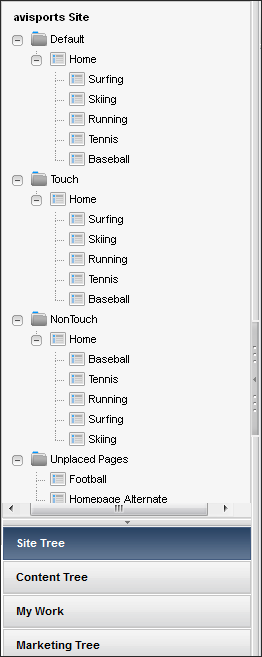
    Figure 5-2 Navigation Pane: Site Tree

    Description of Figure 5-2 follows
    Description of "Figure 5-2 Navigation Pane: Site Tree"
    • Site Tree: Enables you to browse the pages of your website. These pages can either be placed in a hierarchy under a site navigation or unplaced (meaning the pages are not part of any site navigation). A site navigation represents the navigation (organization) of a website. Multiple site navigations can exist within a single CM site, and each site navigation is displayed in the CM site's Site Tree.

    • Content Tree: Enables you to visually browse the flex asset hierarchies present in your site.

    • My Work: Contains the Bookmark, History and My tags nodes.

    • Marketing Tree: Contains segments, recommendations, promotion assets and assets associated with A/B Test.

    The navigation pane displays the tree you selected. For detailed information about the trees, see Navigation Pane.

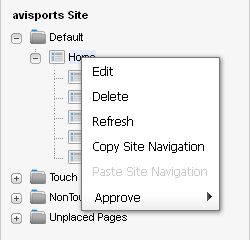
  2. Browse the assets in the tree. Right-click an asset to open a context menu containing content management options you can perform on that asset.
  3. Drill down the hierarchy. Click the plus sign next to a node to expand it and display its associated assets. If you are working with the Content Tree, double-click a parent asset to open a Browse tab containing a list of child assets.
  4. Right-click an asset. WebCenter Sites opens a context menu with content management functions you can perform on the asset.

    Figure 5-3 Context Menu for a Page Asset in the Site Tree

    Description of Figure 5-3 follows
    Description of "Figure 5-3 Context Menu for a Page Asset in the Site Tree"

    Assets in the Content Tree, My Work tree and Marketing Tree may have different content management options in their context menus, depending on the type of asset you select in the tree and your assigned permissions in the site.

5.3.4 Create an Asset

The Contributor interface allows you to create assets in Form View, Web View, and (if the Mobility feature is enabled) within the context of a mobile device:

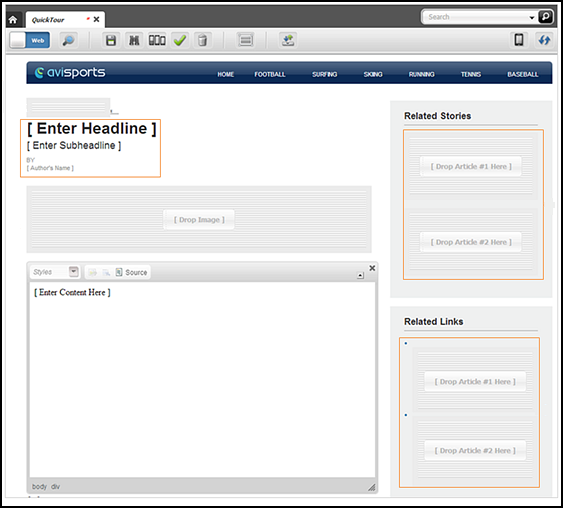
  • In Web View, you enter information into the web page view of the asset, which shows you how the asset will be displayed on the website as you are creating it.

  • In Form View, the asset is represented by a content entry form containing predefined fields into which you can enter information for the asset.

  • If the Mobility feature is enabled, you can create the asset in the context of mobile devices, which is the same as editing an asset in Web View, however, your asset is shown on a Device asset representing a mobile device.

For the purposes of this quick tour, create an asset of type Article. In the avisports sample site, the Article asset type is configured to open in Web View.

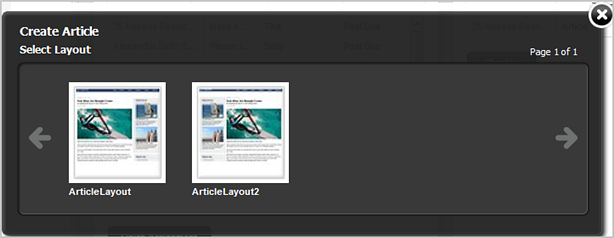
  1. In the menu bar, select Content, New, and then select Article.

    The Create Article dialog opens.

    Figure 5-4 Create Article Dialog

    Description of Figure 5-4 follows
    Description of "Figure 5-4 Create Article Dialog"
  2. In the Create Article dialog: in the Select Layout field, select ArticleLayout; in the Enter Name field, enter QuickTour; click Continue.

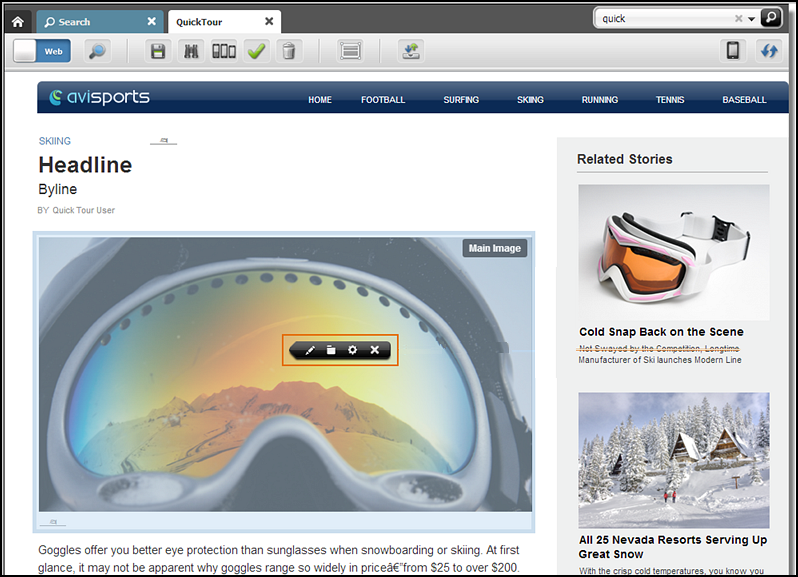
    A tab opens displaying the asset's content entry form in Web View.

    Figure 5-5 Asset Displayed in Web View

    Description of Figure 5-5 follows
    Description of "Figure 5-5 Asset Displayed in Web View"
  3. Click a slot to open the slot's toolbar, then select the Slot Properties option to determine the type of asset the slot supports.
  4. Open the Content Tree, expand the Media node, and then expand the Skiing images node. Now, drag-and drop the Rainbow Goggles Image asset into the slot that supports the Image asset type.
  5. Now associate some Article assets with your QuickTour asset: in the Content Tree, expand the Articles node, and then expand the Skiing articles node; in the Skiing articles node, drag and drop some Article assets into the slots in the Related Stories and Related Links sections of the asset.
  6. Categorize your asset by associating it with the Skiing articles category. In the Content Tree, navigate to the Skiing articles node and then drag and drop it into the slot that accepts assets of type Article Category.
  7. Click a text area to enter some content. When you click the text area, you will either see a simple text field or a WYSIWYG-enabled field.
  8. In the asset's toolbar, click Save to save your changes to the asset.
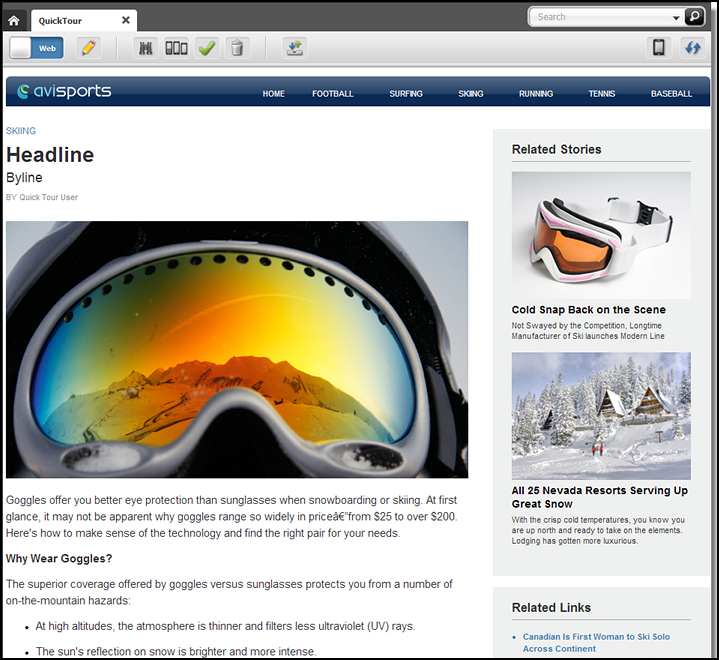
  9. Click Inspect to open the Inspect view of the asset. Your QuickTour asset will look similar to the one shown in Figure 5-6.

    Figure 5-6 Inspect View of the New QuickTour Asset

    Description of Figure 5-6 follows
    Description of "Figure 5-6 Inspect View of the New QuickTour Asset"

    When you inspect an asset, you cannot modify its content.

5.3.5 Switch Between Web View and Form View

Now that you are familiar with creating assets in Web View, switch to Form View to view the fields in the asset's content entry form.

  1. Click the Mode switch in the asset's toolbar.

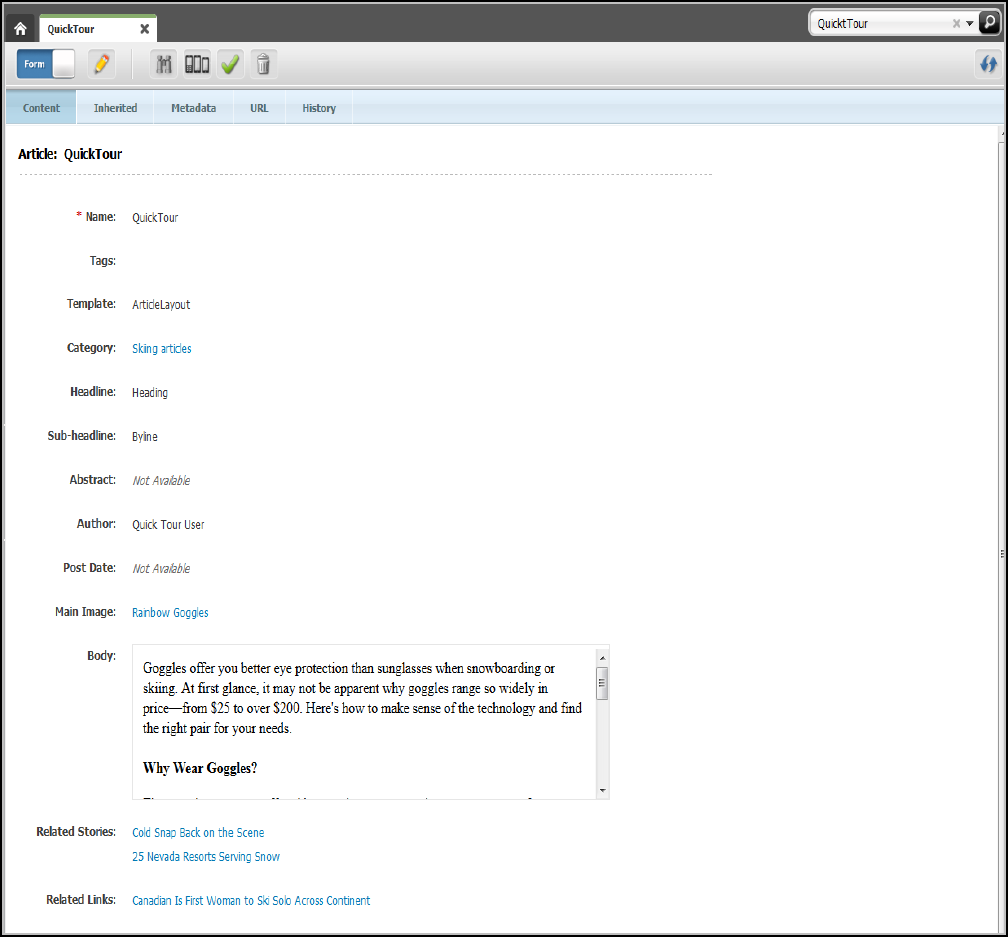
    The tab redisplays the asset in Form View (as shown in Figure 5-8).

    Figure 5-8 Asset Displayed in Form View

    Description of Figure 5-8 follows
    Description of "Figure 5-8 Asset Displayed in Form View"
  2. Click the Mode switch again to redisplay the asset in Web View.

5.3.6 Preview the Asset

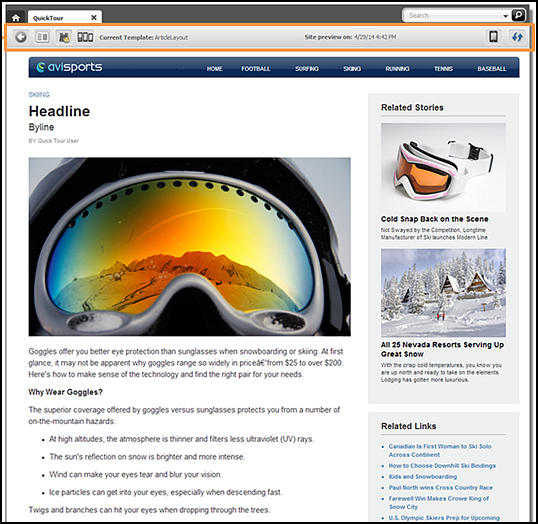
Now, preview the asset to see how it will look on the website when it's published.

  1. In the asset's toolbar, click the Preview icon.

    The tab displays the preview of the asset.

    Figure 5-9 QuickTour Asset Preview

    Description of Figure 5-9 follows
    Description of "Figure 5-9 QuickTour Asset Preview"
  2. In the toolbar, click the Go Back button to return to the asset's Inspect view.

5.3.7 Find and Open an Asset

Now that you have created an asset, find it by performing a search in the Contributor interface.

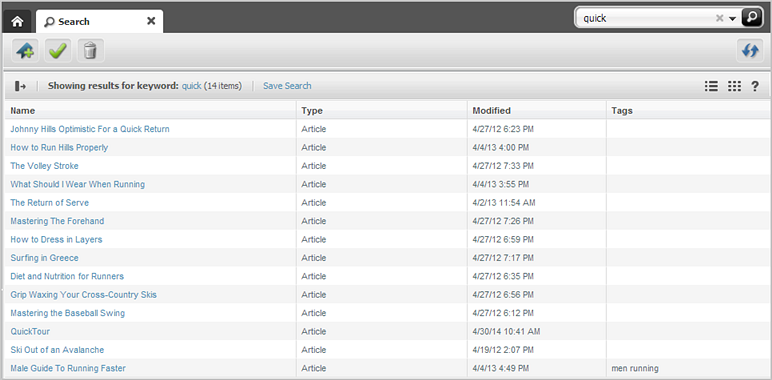
  1. In the Search field, enter your search criteria. For example, since your asset contains the word Quick, enter quick into the field.
  2. Click the down-arrow in the Search field and select Article from the Search Type menu to narrow down your search results to the Article asset type.

    Note:

    If you do not narrow down your search to a specific asset type, WebCenter Sites searches for any asset containing the word you specified in the Search field.

  3. Click the magnifying glass button in the Search field.

    A Search tab opens in the workspace displaying a list of assets matching your search criteria.

    The search results list shows a brief summary of information about each item in the list, such as name, asset type, and modification date.

  4. In the search results list, select the QuickTour asset.

    A tab opens in the workspace, showing the asset's Inspect view in Web View.

5.3.8 Edit the Asset in Web View

Since you are already viewing your asset in Web View, start off by editing it in Web View:

  1. In the asset's toolbar, click Edit.

    The Edit view of the asset opens in Web View.

  2. Click a slot to open its toolbar.

    1. Edit the content of the asset currently placed in the slot by clicking the Edit option.

    2. Replace the content of the slot with another asset by dragging and dropping an asset from the Content Tree, My Work tree, or a search results list into the slot.

  3. Click a text area. You will either see a simple text field or a WYSIWYG-enabled text field. Make changes to the content in the field.

  4. In the asset's toolbar, click the Save icon.

    WebCenter Sites saves the changes you made to the asset so far, but keeps the Edit view of the asset open.

  5. Since certain fields are only available in Form View, click the Mode switch to open the asset in Form View and then continue to Edit the Asset in Form View.

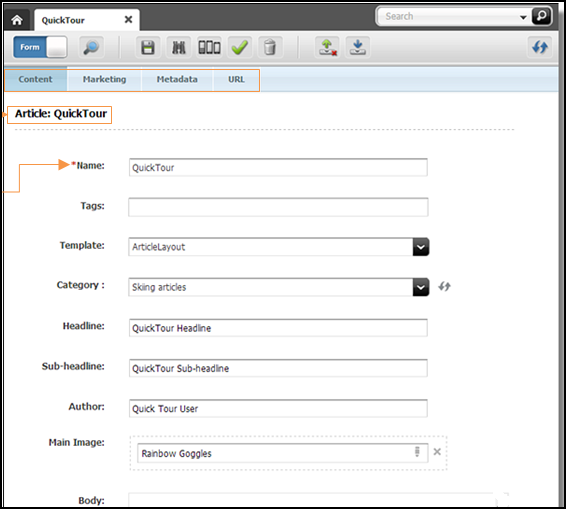
5.3.9 Edit the Asset in Form View

The tab displays the Edit view of the asset in Form View.

Figure 5-13 Edit View of an Asset in Form View
Description of Figure 5-13 follows
Description of "Figure 5-13 Edit View of an Asset in Form View"
  1. Make changes to the content in the Name and Headline fields.

    Note:

    Fields whose names have an asterisk next to them are required, which means you cannot leave them blank. If you leave a required field blank, you cannot save the asset.

  2. Click within the Body field to load CKEditor.
    The CKEditor displays the asset’s form with WYSIWYG editor controls.
    When CKEditor loads, make changes to the displayed text. If you are familiar with Microsoft Word, explore the features available in CKEditor – its functionality mimics that of Word.
  3. In the menu bar, click Save & Close.

    WebCenter Sites saves your changes and closes the asset's tab.

5.3.10 Work with the Asset in the Context of a Mobile Device

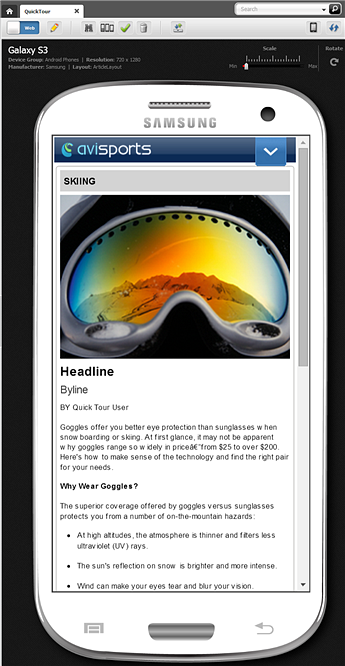
Let's say that your administrator enabled the Mobility feature and your website will be viewed, not only on desktop/laptop computers, but also on mobile devices. The Mobility feature enables you to create, edit, and preview content in the context of mobile devices.

Since you have already created your asset and viewed and edited it in both Web View and Form View familiarize yourself with Mobility by viewing and working with the asset in the context of a mobile device:

  1. If your asset is displayed in Form View, switch to Web View.
  2. In the asset's toolbar, click the Show/Hide Devices icon.

    The device selection panel opens to the right of the asset.

  3. Select the device on which you want to display the asset's content.

    The asset is displayed in the context of the selected mobile device.

    Figure 5-14 Asset Displayed in the Context of a Mobile Device

    Description of Figure 5-14 follows
    Description of "Figure 5-14 Asset Displayed in the Context of a Mobile Device"
  4. Click the Edit icon on the asset's toolbar. Edit the asset in the context of the mobile device as you would edit an asset displayed in Web View. For example, to change the Image asset displayed in the slot, do the following:
    • In the navigation pane, click the Content Tree bar.

    • In the Content Tree, expand the Media node, and then expand the Skiing images node.

    • Under the Skiing images node, drag-and-drop the Ski Goggles Rust Image asset to the slot containing the Image asset you want to replace.

  5. Save and close the asset. In the menu bar, select Content, and then Save and Close.

5.3.11 Create a Page Asset and Associate Your QuickTour Asset with It

When you are satisfied with the content of your asset, associate it with a Page asset. The Page asset provides the structure and organization for your asset on the website. In this procedure, you will be creating your own Page asset, and then you will associate the QuickTour asset with it:

  1. In the menu bar, select Content, New, and then select Page (Section).
  2. In the Select Layout dialog, do the following:
    • In the Select Layout field, select SectionLayout.

    • In the Enter Name field, enter QuickTourPage.

    • Click Continue.

  3. Add a banner to your Page asset:
    • In the navigation pane, click the Content Tree bar.

    • In the Content Tree, expand the Media node and then expand the Banners node.

    • Under the Banners node, select a banner and then drag-and-drop it into the Drop Banner Image slot at the top of the Page.

  4. Associate the QuickTour asset with the Page:
    • Run a search to find the QuickTour asset.

    • In the search results list that opens to the right of the Page asset, drag-and-drop the QuickTour asset into a slot on the Page that accepts assets of type Article.

  5. Populate the rest of the Page with other Article assets.
    • If necessary, clear any existing Search results. In the Search field, click the arrow icon and then select Article from the Search Type menu.

      The Search results list opens to the right of the Page asset.

    • Drag-and-drop an Article asset into each available slot on the Page that accepts assets of type Article.

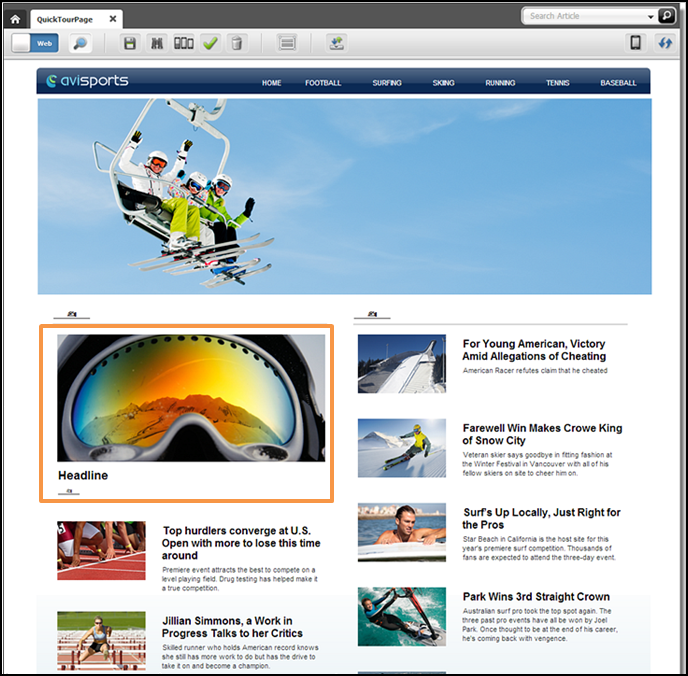
    At this point, your QuickTourPage asset should look similar to the one shown in Figure 5-15.

    Figure 5-15 QuickTourPage Asset Associated With the QuickTour Asset

    Description of Figure 5-15 follows
    Description of "Figure 5-15 QuickTourPage Asset Associated With the QuickTour Asset"
  6. In the menu bar, select Content, and then select Save & Close.

5.3.12 Include the Page in a Site Navigation

Now that you have associated your QuickTour asset with the QuickTourPage asset, place the Page under a site navigation in the Site Tree. The order in which you place Page assets under a site navigation is the order in which the links to those Pages are displayed on the website's navigation menu.
  1. In the navigation pane, click the Site Tree bar.

    The navigation pane displays the Site Tree.

  2. In the Site Tree, expand the Default site navigation, and then expand the Home Page asset node.
  3. Now, expand the Unplaced Pages node. You should see the QuickTourPage asset listed under this node.
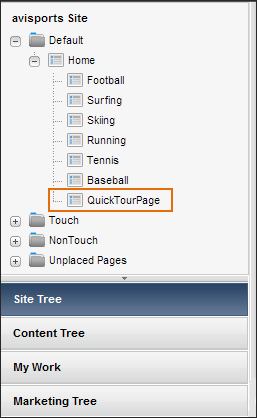
  4. Click the QuickTourPage asset, and then drag it to and drop it into its target position in the Default site navigation's hierarchy. For the purposes of this quick tour, drag-and-drop the QuickTourPage asset so that it is placed directly after the Baseball Page asset.

    Figure 5-16 Placed QuickTourPage Under Default Site Navigation

    Description of Figure 5-16 follows
    Description of "Figure 5-16 Placed QuickTourPage Under Default Site Navigation"

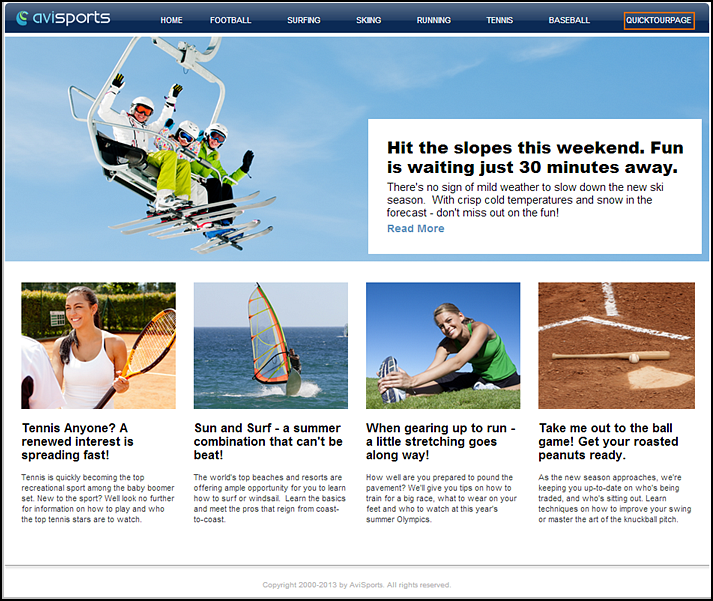
    When the Default site navigation is published, the link to the QuickTourPage will be displayed in the website's navigation directly after the Baseball link.

    Figure 5-17 Website Navigation Displaying a Link to the QuickTourPage

    Description of Figure 5-17 follows
    Description of "Figure 5-17 Website Navigation Displaying a Link to the QuickTourPage"

5.3.13 Approve and Publish the Page

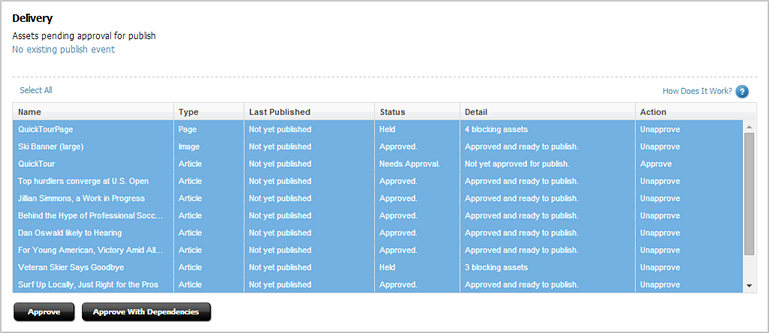
For your asset to be displayed on the appropriate web page, and for the Page to be displayed in the appropriate position in the website's navigation, approve the Page asset containing the asset you created.

  1. In the Site Tree, expand the site navigation node under which you placed the QuickTourPage asset.
  2. Right-click the placed QuickTourPage asset, select Approve from its context menu, and then select Delivery as the publishing destination.

    A tab opens displaying the QuickTourPage asset's Approval form.

    Figure 5-18 QuickTourPage Asset's Approval Form

    Description of Figure 5-18 follows
    Description of "Figure 5-18 QuickTourPage Asset's Approval Form"
  3. Click Approve with Dependencies.

    If the approval is successful, the Page asset and all of its dependencies are now approved to the Delivery publishing destination. The QuickTourPage can then be published during the next publishing session (which is set up by your administrator).

    If your administrator has created an associated publish event, you can publish the asset directly from the asset's Approval form by clicking Publish. The Publish button does not appear if there is no publish event (as in the example above).

5.4 Switch to a Different Site

Now that you have finished touring the Contributor interface, switch to a different site to which you have permissions.

  1. If the applications bar is not open, click the down-arrow, located on the right of the menu bar, to open it.
  2. In the Site list, select the site you want to access.

    WebCenter Sites logs you in to the selected site. If this is the first time you are accessing the site, you must select the application with which you want to work. Otherwise, the application with which you last worked while logged into this site opens.