The software described in this documentation is either no longer supported or is in extended support.
Oracle recommends that you upgrade to a current supported release.
Chapter 2 Setting up a Service Mesh
This chapter discusses how to install the Istio module to set up a service mesh, and the components deployed when you do this.
The high level overview of setting up a service mesh is:
-
Oracle Cloud Native Environment: Set up an environment in which to deploy the modules.
-
Kubernetes module: You can install a service mesh into an existing Kubernetes cluster, or deploy the cluster at the same time.
-
Helm module: Helm is a tool to manage Kubernetes packages and is used to install applications and resources into Kubernetes clusters. Helm interacts with the Kubernetes API server to install, upgrade, query and remove Kubernetes resources.
-
Istio module: The Istio module deploys the required containers to deploy a service mesh, including the Istio ingress and egress gateways, Prometheus (a time-series metric collection database), and the cluster visualization tool Grafana.
When you deploy the Istio module, an embedded instance of Prometheus is also deployed. Prometheus is used to monitor and gather metrics about the Kubernetes cluster.
Another embedded component deployed with the Istio module is Grafana. Grafana is a monitoring and visualization tool for time-series data stored in a database which in this case is Prometheus. Grafana enables you to visually query and monitor the network traffic and services in your Kubernetes cluster. Grafana includes browser-based dashboards to visualize the cluster metrics gathered from Prometheus. For information on using Grafana, see Monitoring and Visualization.
Prometheus and Grafana are automatically configured to provide standard metrics and dashboards for the Istio module. Persisting custom or manual configuration of these components is not possible.
You can enter all the information required to create a service mesh in a number of ways. The examples in this chapter show the following methods, although there are other combinations you can use:
-
Create all modules in one olcnectl module create command, including the Kubernetes module. The example in Section 2.1, “Deploying a Service Mesh (Simple Method)” shows this method.
-
Create all modules using multiple olcnectl module create commands. The example in Section 2.2, “Deploying a Service Mesh (Advanced Method)” shows this method.
-
Create all modules using the olcnectl module create command by being prompted for values, interactively. The example in Section 2.3, “Deploying a Service Mesh (Interactive Method)” shows this method.
In reality, the method you use to deploy the modules depends on your own environment and preference, and whether you want to deploy into an existing Kubernetes cluster, create a Kubernetes cluster at the same time as deploying the service mesh, or take it step by step in some other way. There are many variations and possibilities you can use to do the deployment of a service mesh, or any module deployment for that matter.
2.1 Deploying a Service Mesh (Simple Method)
You can deploy all the modules required to create a service mesh and a Kubernetes cluster using a single olcnectl module create command. This method might be useful if you want to deploy a service mesh at the same time as deploying a Kubernetes cluster. If you have an existing deployment of the Kubernetes module, you can specify that instance when deploying a service mesh.
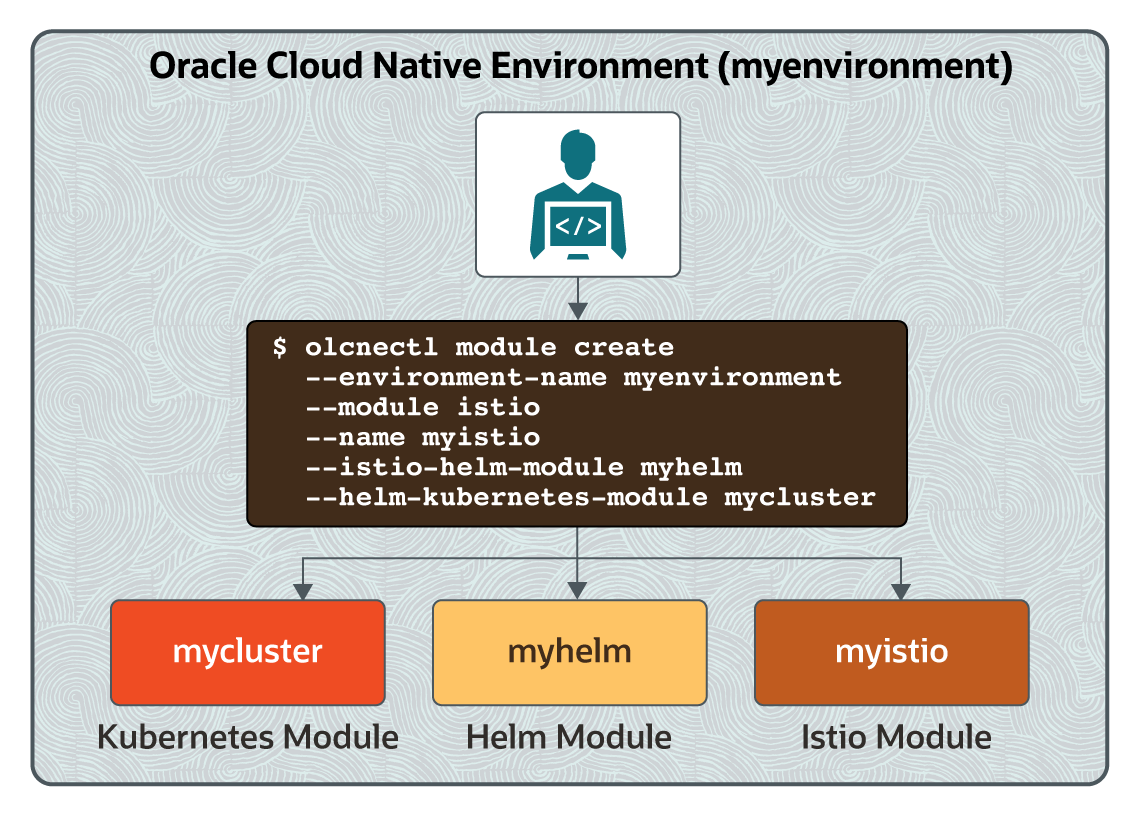
Figure 2.1, “Example Deployment” shows the modules deployed in this
example. The name of each module in the examples is shown in the
boxes. The examples create an Oracle Cloud Native Environment named
myenvironment, into which a
Kubernetes module named mycluster
is deployed, and then into which a Helm module named
myhelm is deployed, and finally, an
Istio module named myistio.
For the full list of the options available when creating modules, see the olcnectl module create command in Platform Command-Line Interface.
-
If you do not already have an environment set up, create one into which the modules can be deployed. For information on setting up an environment, see Container Orchestration . The name of the environment in this example is
myenvironment. -
If you do not already have a Kubernetes module set up or deployed, set one up. For information on adding a Kubernetes module to an environment, see Container Orchestration. The name of the Kubernetes module in this example is
mycluster. -
Create the service mesh by adding the required modules to the Kubernetes module in the environment using the olcnectl module create command. This example uses a Kubernetes module named
mycluster, into which it deploys a Helm module namedmyhelm, and finally, it creates an Istio module namedmyistio.olcnectl module create \ --environment-name myenvironment \ --module istio \ --name myistio \ --helm-kubernetes-module mycluster \ --istio-helm-module myhelm
The
--moduleoption sets the module type to create, which isistio. You define the name of the Istio module using the--nameoption, which in this case ismyistio.As the Istio module requires Kubernetes and Helm, you must also provide the options for those modules.
The
--helm-kubernetes-moduleoption sets the name of the Kubernetes module to use. The Kubernetes module should already be set up or deployed. If you have an existing Kubernetes module deployed, you can specify the name of the module using this option. If no Kubernetes module is deployed with the name you provide, a new module is deployed which allows you to deploy Kubernetes at the same time as a service mesh.The
--istio-helm-moduleoption sets the name of the Helm module to deploy.If you do not include all the required options when adding the modules you are prompted to provide them.
NoteThe Istio module and Grafana also require an instance of Prometheus. When you deploy an Istio module, an embedded instance of Prometheus is created and deployed. You do not need to provide any information for the embedded Prometheus instance.
-
If you are deploying a new Kubernetes module, validate whether the module can be deployed to the nodes using the olcnectl module validate command. You do not need to perform this step if you have an existing Kubernetes module deployed to the nodes. For example:
olcnectl module validate \
--environment-name myenvironment \
--name mycluster
-
If you are deploying a new Kubernetes module, use the olcnectl module install command to install it on the nodes. For example:
olcnectl module install \
--environment-name myenvironment \
--name mycluster
-
Use the olcnectl module validate command to validate the Helm module can be deployed to the nodes. For example:
olcnectl module validate \
--environment-name myenvironment \
--name myhelm
-
Use the olcnectl module install command to install the Helm module. For example:
olcnectl module install \
--environment-name myenvironment \
--name myhelm
The Helm software packages are installed on the control plane nodes, and the Helm module is deployed into the Kubernetes cluster.
-
Use the olcnectl module validate command to validate the Istio module can be deployed to the nodes. For example:
olcnectl module validate \
--environment-name myenvironment \
--name myistio
-
Use the olcnectl module install command to install the Istio module. For example:
olcnectl module install \
--environment-name myenvironment \
--name myistio
The Istio software packages are installed on the control plane nodes, and the Istio module is deployed into the Kubernetes cluster.
2.2 Deploying a Service Mesh (Advanced Method)
You can deploy each module required to create a service mesh in a
Kubernetes cluster individually. There are more steps in this method,
but you have explicit control of how each module is created and
deployed to your cluster. This example assumes a
Kubernetes module named mycluster
is already deployed into an environment named
myenvironment.
-
Use the olcnectl module create command to create a Helm module and add it to a Kubernetes module. For example, to create a Helm module named
myhelmand add it to the Kubernetes module namedmycluster:olcnectl module create \ --environment-name myenvironment \ --module helm \ --name myhelm \ --helm-kubernetes-module mycluster
The
--moduleoption sets the module type to create, which ishelm. You define the name of the Helm module using the--nameoption, which in this case ismyhelm.The
--helm-kubernetes-moduleoption sets the name of the Kubernetes module into which Helm should be installed. -
Use the olcnectl module validate command to validate the Helm module can be deployed to the nodes. For example, to validate the Helm module named
myhelmin the environment namedmyenvironment:olcnectl module validate \ --environment-name myenvironment \ --name myhelm
-
Use the olcnectl module install command to deploy the Helm module. For example, to deploy the Helm module named
myhelmin the environment namedmyenvironment:olcnectl module install \ --environment-name myenvironment \ --name myhelm
-
Use the olcnectl module create command to create an Istio module and associate it with the Helm module. For example, to create an Istio module named
myistioand associate it with the Helm module namedmyhelm:olcnectl module create \ --environment-name myenvironment \ --module istio \ --name myistio \ --istio-helm-module myhelm
The
--moduleoption sets the module type to create, which isistio. You define the name of the Istio module using the--nameoption, which in this case ismyistio.The
--istio-helm-moduleoption sets the name of the Helm module to use to deploy the Istio module. In this case, this is the Helm module namedmyhelm, which is already deployed.NoteThe Istio module also requires an instance of Prometheus. When you deploy an Istio module, an embedded instance of Prometheus is created and deployed. You do not need to provide any information for the embedded Prometheus instance.
-
Use the olcnectl module validate command to validate the Istio module can be deployed to the nodes. For example, to validate the Istio module named
myistioin the environment namedmyenvironment:olcnectl module validate \ --environment-name myenvironment \ --name myistio
-
Use the olcnectl module install command to deploy the Istio module. For example, to deploy the Istio module named
myistioin the environment namedmyenvironment:olcnectl module install \ --environment-name myenvironment \ --name myistio
The Istio software packages are installed on the control plane nodes, and the Istio module is deployed into the Kubernetes cluster.
2.3 Deploying a Service Mesh (Interactive Method)
You can also deploy each module required to create a service mesh in a Kubernetes cluster interactively, being prompted for each required value. As with the other deployment methods, you need to first have an Oracle Cloud Native Environment set up into which you can deploy the service mesh modules.
This example shows you the output when using the olcnectl module create command interactively to create the modules required for a service mesh. This example deploys into an existing Kubernetes cluster, using the same module names as the other examples in this chapter.
-
Use the olcnectl module create command to create the Istio module, and be prompted for all required values:
olcnectl module create
? Please enter a value for environment-name:myenvironment? Enter the module name:istio? Enter the name of the instance of the istio modulemyistio? Please select an option for istio-helm-module: New Entry ? Please enter a value for istio-helm-module:myhelm? Please select an option for helm-kubernetes-module:myclusterModules created successfully. Modules created successfully. -
Use the olcnectl module validate command to validate the Helm module can be deployed to the nodes. For example, to validate the Helm module named
myhelmin the environment namedmyenvironment:olcnectl module validate \ --environment-name myenvironment \ --name myhelm
-
Use the olcnectl module install command to deploy the Helm module. For example, to deploy the Helm module named
myhelmin the environment namedmyenvironment:olcnectl module install \ --environment-name myenvironment \ --name myhelm
-
Use the olcnectl module validate command to validate the Istio module can be deployed to the nodes. For example, to validate the Istio module named
myistioin the environment namedmyenvironment:olcnectl module validate \ --environment-name myenvironment \ --name myistio
-
Use the olcnectl module install command to deploy the Istio module. For example, to deploy the Istio module named
myistioin the environment namedmyenvironment:olcnectl module install \ --environment-name myenvironment \ --name myistio
2.4 Verifying the Istio Module Deployment
You can verify the Istio module is deployed and the
required containers are running in the
istio-system namespace. To verify the
containers are deployed, you need to use the
kubectl command. For information on setting up
the kubectl command, see
Container Orchestration.
To verify the required containers are running, list the containers
running in the istio-system namespace. You
should see similar results to those shown here:
kubectl get deployment -n istio-system

NAME                   READY   UP-TO-DATE   AVAILABLE   AGE
grafana                2/2     2            2           2m44s
istio-egressgateway    2/2     2            2           2m48s
istio-ingressgateway   2/2     2            2           2m48s
istiod                 2/2     2            2           3m2s
prometheus             2/2     2            2           2m44s
The output above shows Istio deployed into Oracle Cloud Native Environment Release 1.2. If you are using Oracle Cloud Native Environment Release 1.1, your output would look more like the following:
kubectl get deployment -n istio-system

NAME                   READY   UP-TO-DATE   AVAILABLE   AGE
grafana                2/2     1            1           5m31s
istio-citadel          2/2     1            1           5m31s
istio-egressgateway    2/2     1            1           5m31s
istio-galley           2/2     1            1           5m31s
istio-ingressgateway   2/2     1            1           5m31s
istio-pilot            2/2     1            1           5m31s
istio-policy           2/2     1            1           5m31s
istio-sidecar-injector 2/2     1            1           5m31s
istio-telemetry        2/2     1            1           5m31s
prometheus             2/2     1            1           5m31s
2.5 Removing a Service Mesh
You can remove a deployment of a service mesh and leave the Kubernetes cluster in place. To do this, you remove the Istio module from the environment.
Use the olcnectl module uninstall command to
remove the Istio module. For example, to uninstall
the Istio module named myistio in
the environment named myenvironment:
olcnectl module uninstall \
--environment-name myenvironment \
--name myistio
The Istio module and embedded Prometheus instance are removed from the environment.
You can confirm the Istio components are removed using the
kubectl command to query all deployments
running in the istio-system namespace. You
should see there are no deployments returned.
kubectl get deployment -n istio-system

No resources found in istio-system namespace.