8 Configuring Load Balancing
WARNING:
Oracle Linux 7 is now in Extended Support. See Oracle Linux Extended Support and Oracle Open Source Support Policies for more information.
Migrate applications and data to Oracle Linux 8 or Oracle Linux 9 as soon as possible.
This chapter describes how to configure the Keepalived and HAProxy technologies for balancing access to network services while maintaining continuous access to those services.
About HAProxy
HAProxy is an application layer (Layer 7) load balancing and high availability solution that you can use to implement a reverse proxy for HTTP and TCP-based Internet services.
The configuration file for the haproxy daemon
is /etc/haproxy/haproxy.cfg. This file must be
present on each server on which you configure HAProxy for load
balancing or high availability.
For more information, see
http://www.haproxy.org/#docs,
the
/usr/share/doc/haproxy-version
documentation, and the haproxy(1) manual page.
Installing and Configuring HAProxy
To install HAProxy:
-
Install the
haproxypackage on each front-end server:sudo yum install haproxy
-
Edit
/etc/haproxy/haproxy.cfgto configure HAProxy on each server. See About the HAProxy Configuration File. -
Enable IP forwarding and binding to non-local IP addresses:
echo "net.ipv4.ip_forward = 1" >> /etc/sysctl.conf
echo "net.ipv4.ip_nonlocal_bind = 1" >> /etc/sysctl.conf
sysctl -p
net.ipv4.ip_forward = 1
net.ipv4.ip_nonlocal_bind = 1
-
Enable access to the services or ports that you want HAProxy to handle.
For example, to enable access to HTTP and make this rule persist across reboots, enter the following commands:
sudo firewall-cmd --zone=zone --add-service=httpsuccess
sudo firewall-cmd --permanent --zone=zone --add-service=httpsuccess
To allow incoming TCP requests on port 8080:
sudo firewall-cmd --zone=zone --add-port=8080/tcpsuccess
sudo firewall-cmd --permanent --zone=zone --add-port=8080/tcpsuccess
-
Enable and start the
haproxyservice on each server:sudo systemctl enable haproxy ln -s '/usr/lib/systemd/system/haproxy.service' '/etc/systemd/system/multi-user.target.wants/haproxy.service' sudo systemctl start haproxy
If you change the HAProxy configuration, reload the
haproxyservice:sudo systemctl reload haproxy
About the HAProxy Configuration File
The /etc/haproxy/haproxy.cfg configuration
file is divided into the following sections:
-
global -
Defines global settings such as the
syslogfacility and level to use for logging, the maximum number of concurrent connections allowed, and how many processes to start in daemon mode. -
defaults -
Defines default settings for subsequent sections.
-
listen -
Defines a complete proxy, implicitly including the
frontendandbackendcomponents. -
frontend -
Defines the ports that accept client connections.
-
backend -
Defines the servers to which the proxy forwards client connections.
For examples of how to configure HAProxy, see:
Configuring Simple Load Balancing Using HAProxy
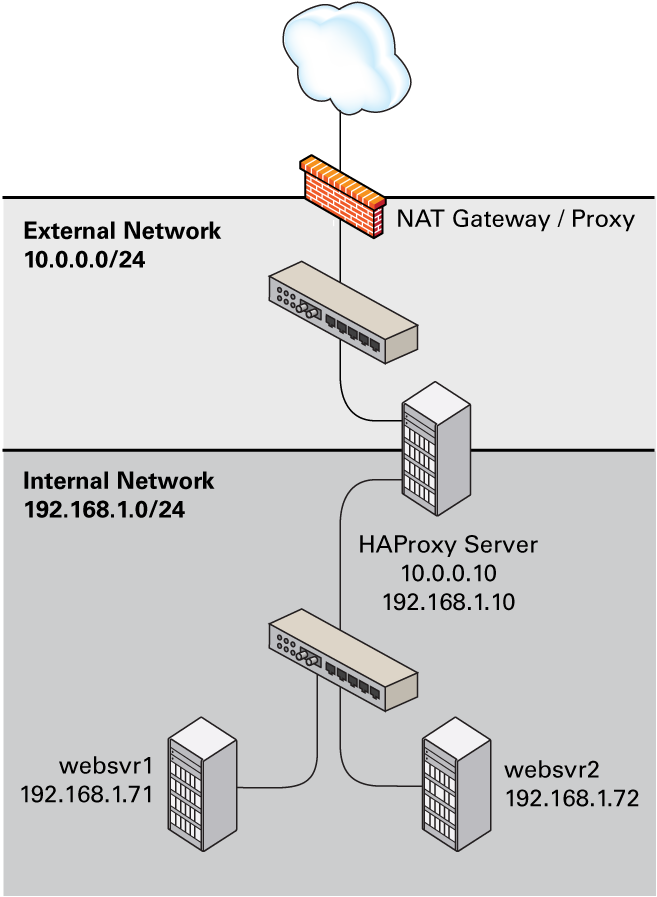
The following example uses HAProxy to implement a front-end server that balances incoming requests between two back-end web servers, and which is also able to handle service outages on the back-end servers.
Figure 8-1 shows an HAProxy server
(10.0.0.10), which is connected to an externally facing network
(10.0.0.0/24) and to an internal network (192.168.1.0/24).
Two web servers, websvr1 (192.168.1.71) and
websvr2 (192.168.1.72), are accessible on the internal
network. The IP address 192.168.1.10 is in the private address range
192.168.1.0/24, which cannot be routed on the Internet. An upstream network
address translation (NAT) gateway or a proxy server provides access to and from the Internet.
Figure 8-1 Example HAProxy Configuration for Load Balancing
You might use the following configuration in
/etc/haproxy/haproxy.cfg on the server:
global
    daemon
    log 127.0.0.1 local0 debug
    maxconn 50000
    nbproc 1

defaults
    mode http
    timeout connect 5s
    timeout client 25s
    timeout server 25s
    timeout queue 10s

# Handle Incoming HTTP Connection Requests
listen  http-incoming
    mode http
    bind 10.0.0.10:80
# Use each server in turn, according to its weight value
    balance roundrobin
# Verify that service is available
    option httpchk OPTIONS * HTTP/1.1\r\nHost:\ www
# Insert X-Forwarded-For header
    option forwardfor
# Define the back-end servers, which can handle up to 512 concurrent connections each
    server websvr1 192.168.1.71:80 weight 1 maxconn 512 check
    server websvr2 192.168.1.72:80 weight 1 maxconn 512 check
This configuration balances HTTP traffic between the two back-end
web servers websvr1 and
websvr2, whose firewalls are configured to
accept incoming TCP requests on port 80.
After implementing simple
/var/www/html/index.html files on the web
servers and using curl to test connectivity,
the following output demonstrate how HAProxy balances the traffic
between the servers and how it handles the
httpd service stopping on
websvr1:
$ while true; do curl http://10.0.0.10; sleep 1; done
This is HTTP server websvr1 (192.168.1.71).
This is HTTP server websvr2 (192.168.1.72).
This is HTTP server websvr1 (192.168.1.71).
This is HTTP server websvr2 (192.168.1.72).
...
This is HTTP server websvr2 (192.168.1.72).
<html><body><h1>503 Service Unavailable</h1>
No server is available to handle this request.
</body></html>
This is HTTP server websvr2 (192.168.1.72).
This is HTTP server websvr2 (192.168.1.72).
This is HTTP server websvr2 (192.168.1.72).
...
This is HTTP server websvr2 (192.168.1.72).
This is HTTP server websvr2 (192.168.1.72).
This is HTTP server websvr2 (192.168.1.72).
This is HTTP server websvr1 (192.168.1.71).
This is HTTP server websvr2 (192.168.1.72).
This is HTTP server websvr1 (192.168.1.71).
...
^C
$
In this example, HAProxy detected that the
httpd service had restarted on
websvr1 and resumed using that server in
addition to websvr2.
By combining the load balancing capability of HAProxy with the high availability capability of Keepalived or Oracle Clusterware, you can configure a backup load balancer that ensures continuity of service in the event that the primary load balancer fails. See Making HAProxy Highly Available Using Keepalived and Making HAProxy Highly Available Using Oracle Clusterware.
See Installing and Configuring HAProxy for details of how to install and configure HAProxy.
Configuring HAProxy for Session Persistence
Many web-based application require that a user session is persistently served by the same web server.
If you want web sessions to have persistent connections to the
same server, you can use a balance algorithm
such as hdr, rdp-cookie,
source, uri, or
url_param.
If your implementation requires the use of the
leastconn, roundrobin, or
static-rr algorithm, you can implement
session persistence by using server-dependent cookies.
To enable session persistence for all pages on a web server, use
the cookie directive to define the name of
the cookie to be inserted and add the cookie
option and server name to the server lines,
for example:
    cookie WEBSVR insert
    server websvr1 192.168.1.71:80 weight 1 maxconn 512 cookie 1 check
    server websvr2 192.168.1.72:80 weight 1 maxconn 512 cookie 2 check
HAProxy includes an additional Set-Cookie:
header that identifies the web server in its response to the
client, for example: Set-Cookie:
WEBSVR=N;
path=page_path
. If a client
subsequently specifies the WEBSVR cookie in a
request, HAProxy forwards the request to the web server whose
server cookievalue matches the value of
WEBSVR.
The following example demonstrates how an inserted cookie ensures session persistence:
while true; do curl http://10.0.0.10; sleep 1; done
This is HTTP server websvr1 (192.168.1.71).
This is HTTP server websvr2 (192.168.1.72).
This is HTTP server websvr1 (192.168.1.71).
^CC
curl http://10.0.0.10 -D /dev/stdout
HTTP/1.1 200 OK
Date: ...
Server: Apache/2.4.6 ()
Last-Modified: ...
ETag: "26-5125afd089491"
Accept-Ranges: bytes
Content-Length: 38
Content-Type: text/html; charset=UTF-8
Set-Cookie: WEBSVR=2; path=/

This is HTTP server svr2 (192.168.1.72).
while true; do curl http://10.0.0.10 --cookie "WEBSVR=2;"; sleep 1; done
This is HTTP server websvr2 (192.168.1.72).
This is HTTP server websvr2 (192.168.1.72).
This is HTTP server websvr2 (192.168.1.72).
^C
To enable persistence selectively on a web server, use the
cookie directive to specify that HAProxy
should expect the specified cookie, usually a session ID cookie
or other existing cookie, to be prefixed with the
server cookie value and a
~ delimiter, for example:
    cookie SESSIONID prefix
    server websvr1 192.168.1.71:80 weight 1 maxconn 512 cookie 1 check
    server websvr2 192.168.1.72:80 weight 1 maxconn 512 cookie 2 check
If the value of SESSIONID is prefixed with a
server
cookie value, for
example: Set-Cookie:
SESSIONID=N~Session_ID;,
HAProxy strips the prefix and delimiter from the
SESSIONID cookie before forwarding the
request to the web server whose server cookie
value matches the prefix.
The following example demonstrates how using a prefixed cookie enables session persistence:
while true; do curl http://10.0.0.10 --cookie "SESSIONID=1~1234;"; sleep 1; done
This is HTTP server websvr1 (192.168.1.71).
This is HTTP server websvr1 (192.168.1.71).
This is HTTP server websvr1 (192.168.1.71).
^C
A real web application would usually set the session ID on the
server side, in which case the first HAProxy response would
include the prefixed cookie in the
Set-Cookie: header.
About Keepalived
Keepalived uses the IP Virtual Server (IPVS) kernel module to provide transport layer (Layer 4) load balancing, redirecting requests for network-based services to individual members of a server cluster. IPVS monitors the status of each server and uses the Virtual Router Redundancy Protocol (VRRP) to implement high availability.
The configuration file for the keepalived
daemon is /etc/keepalived/keepalived.conf. This
file must be present on each server on which you configure
Keepalived for load balancing or high availability.
For more information, see
https://www.keepalived.org/documentation.html,
the
/usr/share/doc/keepalive-version
documentation, and the keepalived(8) and
keepalived.conf(5) manual pages.
Installing and Configuring Keepalived
To install Keepalived:
-
Install the
keepalivedpackage on each server:sudo yum install keepalived
-
Edit
/etc/keepalived/keepalived.confto configure Keepalived on each server. See About the Keepalived Configuration File. -
Enable IP forwarding:
sudo echo "net.ipv4.ip_forward = 1" >> /etc/sysctl.conf
sudo sysctl -p
net.ipv4.ip_forward = 1
-
Add firewall rules to allow VRRP communication using the multicast IP address 224.0.0.18 and the VRRP protocol (112) on each network interface that Keepalived will control, for example:
sudo firewall-cmd --direct --permanent --add-rule ipv4 filter INPUT 0 \
--in-interface enp0s8 --destination 224.0.0.18 --protocol vrrp -j ACCEPT
success
sudo firewall-cmd --direct --permanent --add-rule ipv4 filter OUTPUT 0 \
--out-interface enp0s8 --destination 224.0.0.18 --protocol vrrp -j ACCEPT
success
sudo firewall-cmd --reload
success
-
Enable and start the
keepalivedservice on each server:sudo systemctl enable keepalived sudo ln -s '/usr/lib/systemd/system/keepalived.service' '/etc/systemd/system/multi-user.target.wants/keepalived.service' sudo systemctl start keepalived
If you change the Keepalived configuration, reload the
keepalivedservice:sudo systemctl reload keepalived
About the Keepalived Configuration File
The /etc/keepalived/keepalived.conf
configuration file is divided into the following sections:
-
global_defs -
Defines global settings such as the email addresses for sending notification messages, the IP address of an SMTP server, the timeout value for SMTP connections in seconds, a string that identifies the host machine, the VRRP IPv4 and IPv6 multicast addresses, and whether SNMP traps should be enabled.
-
static_ipaddress -
static_routes -
Define static IP addresses and routes, which VRRP cannot change. These sections are not required if the addresses and routes are already defined on the servers and these servers already have network connectivity.
-
vrrp_sync_group -
Defines a VRRP synchronization group of VRRP instances that fail over together.
-
vrrp_instance -
Defines a moveable virtual IP address for a member of a VRRP synchronization group's internal or external network interface, which accompanies other group members during a state transition. Each VRRP instance must have a unique value of
virtual_router_id, which identifies which interfaces on the primary and backup servers can be assigned a given virtual IP address. You can also specify scripts that are run on state transitions toBACKUP,MASTER, andFAULT, and whether to trigger SMTP alerts for state transitions. -
vrrp_script -
Defines a tracking script that Keepalived can run at regular intervals to perform monitoring actions from a
vrrp_instanceorvrrp_sync_groupsection. -
virtual_server_group -
Defines a virtual server group, which allows a real server to be a member of several virtual server groups.
-
virtual_server -
Defines a virtual server for load balancing, which is composed of several real servers.
For examples of how to configure Keepalived, see:
Configuring Simple Virtual IP Address Failover Using Keepalived
A typical Keepalived high-availability configuration consists of one primary server and one or more backup servers. One or more virtual IP addresses, defined as VRRP instances, are assigned to the primary server's network interfaces so that it can service network clients. The backup servers listen for multicast VRRP advertisement packets that the primary server transmits at regular intervals. The default advertisement interval is one second. If the backup nodes fail to receive three consecutive VRRP advertisements, the backup server with the highest assigned priority takes over as the primary server and assigns the virtual IP addresses to its own network interfaces. If several backup servers have the same priority, the backup server with the highest IP address value becomes the primary server.
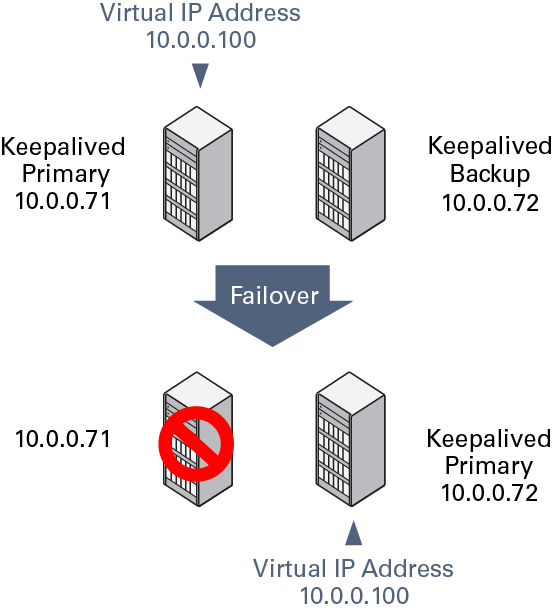
The following example uses Keepalived to implement a simple failover configuration on two servers. One server acts as the primary server and the other acts as a backup. The primary server has a higher priority than the backup server.
The following figure shows how the virtual IP address
10.0.0.100 is initially assigned to the primary
server (10.0.0.71). When the primary server
fails, the backup server (10.0.0.72) becomes
the new primary server and is assigned the virtual IP address
10.0.0.100.
Figure 8-2 Example Keepalived Configuration for Virtual IP Address Failover
You might use the following configuration in
/etc/keepalived/keepalived.conf on the primary
(master) server:
global_defs {
   notification_email {
     root@mydomain.com
   }
   notification_email_from svr1@mydomain.com
   smtp_server localhost
   smtp_connect_timeout 30
}

vrrp_instance VRRP1 {
    state MASTER
#   Specify the network interface to which the virtual address is assigned
    interface enp0s8
#   The virtual router ID must be unique to each VRRP instance that you define
    virtual_router_id 41
#   Set the value of priority higher on the primary server than on a backup server
    priority 200
    advert_int 1
    authentication {
        auth_type PASS
        auth_pass 1066
    }
    virtual_ipaddress {
        10.0.0.100/24
    }
}
The configuration of the backup server is the same, except for the
notification_email_from,
state, priority, and
possibly interface values, if the system
hardware configuration is different:
global_defs {
   notification_email {
     root@mydomain.com
   }
   notification_email_from svr2@mydomain.com
   smtp_server localhost
   smtp_connect_timeout 30
}

vrrp_instance VRRP1 {
    state BACKUP
#   Specify the network interface to which the virtual address is assigned
    interface enp0s8
    virtual_router_id 41
#   Set the value of priority lower on the backup server than on the primary server
    priority 100
    advert_int 1
    authentication {
        auth_type PASS
        auth_pass 1066
    }
    virtual_ipaddress {
        10.0.0.100/24
    }
}
In the event that the primary server (svr1)
fails, keepalived assigns the virtual IP
address 10.0.0.100/24 to the
enp0s8 interface on the backup server
(svr2), which becomes the primary server.
To determine whether a server is acting as the primary server, you can use the ip command to see whether the virtual address is active, for example:
sudo ip addr list enp0s8
3: enp0s8: <BROADCAST,MULTICAST,UP,LOWER_UP> mtu 1500 qdisc pfifo_fast state UP qlen 1000
    link/ether 08:00:27:cb:a6:8d brd ff:ff:ff:ff:ff:ff
    inet 10.0.0.72/24 brd 10.0.0.255 scope global enp0s8
    inet 10.0.0.100/24 scope global enp0s8
    inet6 fe80::a00:27ff:fecb:a68d/64 scope link
       valid_lft forever preferred_lft forever
Alternatively, search for Keepalived messages in
/var/log/messages that show transitions between
states, for example:
...51:55 ... VRRP_Instance(VRRP1) Entering BACKUP STATE
...
...53:08 ... VRRP_Instance(VRRP1) Transition to MASTER STATE
...53:09 ... VRRP_Instance(VRRP1) Entering MASTER STATE
...53:09 ... VRRP_Instance(VRRP1) setting protocol VIPs.
...53:09 ... VRRP_Instance(VRRP1) Sending gratuitous ARPs on enp0s8 for 10.0.0.100
Note:
Only one server should be active as the primary (master) server
at any time. If more than one server is configured as the
primary server, it is likely that there is a problem with VRRP
communication between the servers. Check the network settings
for each interface on each server and check that the firewall
allows both incoming and outgoing VRRP packets for multicast IP
address 224.0.0.18.
See Installing and Configuring Keepalived for details of how to install and configure Keepalived.
Configuring Load Balancing Using Keepalived in NAT Mode
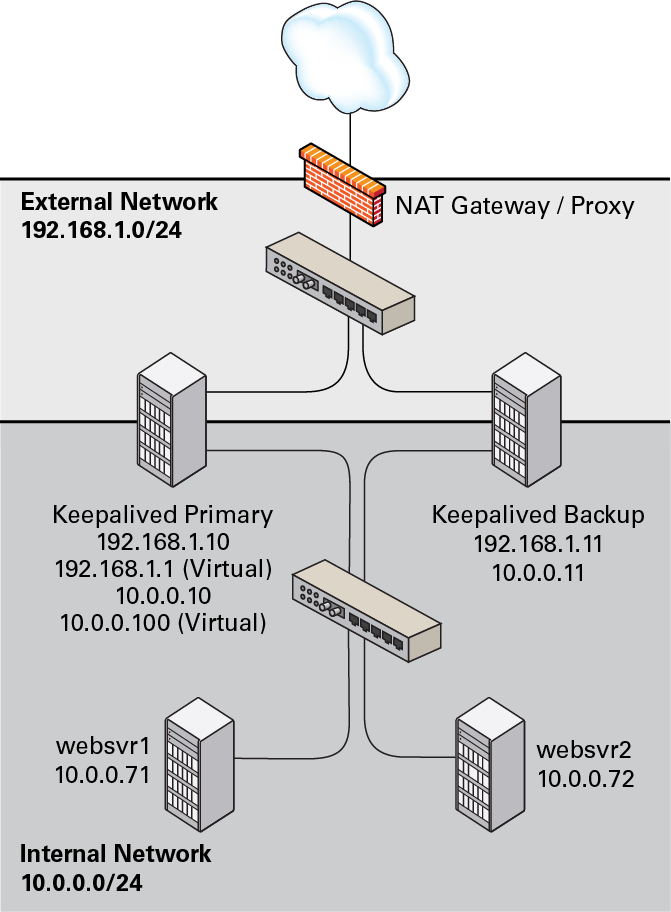
The following example uses Keepalived in NAT mode to implement a
simple failover and load balancing configuration on two servers.
One server acts as the primary server and the other acts as a
backup. The primary server has a higher priority than the backup
server. Each of the servers has two network interfaces, where one
interface is connected to the side facing an external network
(192.168.1.0/24) and the other interface is
connected to an internal network (10.0.0.0/24)
on which two web servers are accessible.
The following figure shows that the Keepalived primary server has
the network addresses 192.168.1.10,
192.168.1.1 (virtual),
10.0.0.10, and 10.0.0.100
(virtual). The Keepalived backup server has the network addresses
192.168.1.11 and 10.0.0.11.
The web servers, websvr1 and
websvr2, have the network addresses
10.0.0.71 and 10.0.0.72,
respectively.
Figure 8-3 Example Keepalived Configuration for Load Balancing in NAT Mode
You might use the following configuration in
/etc/keepalived/keepalived.conf on the primary
server:
global_defs {
   notification_email {
     root@mydomain.com
   }
   notification_email_from svr1@mydomain.com
   smtp_server localhost
   smtp_connect_timeout 30
}

vrrp_sync_group VRRP1 {
#   Group the external and internal VRRP instances so they fail over together
    group {
        external
        internal
        }
}

vrrp_instance external {
    state MASTER
    interface enp0s8
    virtual_router_id 91
    priority 200
    advert_int 1
    authentication {
        auth_type PASS
        auth_pass 1215
    }
#   Define the virtual IP address for the external network interface
    virtual_ipaddress {
        192.168.1.1/24
    }
}

vrrp_instance internal {
    state MASTER
    interface enp0s9
    virtual_router_id 92
    priority 200
    advert_int 1
    authentication {
        auth_type PASS
        auth_pass 1215
    }
#   Define the virtual IP address for the internal network interface
    virtual_ipaddress {
        10.0.0.100/24
    }
}

# Define a virtual HTTP server on the virtual IP address 192.168.1.1
virtual_server 192.168.1.1 80 {
    delay_loop 10
    protocol TCP
#   Use round-robin scheduling in this example
    lb_algo rr
#   Use NAT to hide the back-end servers
    lb_kind NAT
#   Persistence of client sessions times out after 2 hours
    persistence_timeout 7200

    real_server 10.0.0.71 80 {
        weight 1
        TCP_CHECK {
          connect_timeout 5
          connect_port 80
        }
    }

    real_server 10.0.0.72 80 {
        weight 1
        TCP_CHECK {
          connect_timeout 5
          connect_port 80
        }
    }
}
The previous configuration is similar to the configuration shown
in Configuring Simple Virtual IP Address Failover Using Keepalived, with the
additional definition of a vrrp_sync_group
section so that the network interfaces are assigned together on
failover, as well as a virtual_server section
to define the real back-end servers that Keepalived uses for load
balancing. The value of lb_kind is set to NAT
mode, which means that the Keepalived server handles both inbound
and outbound network traffic for the client on behalf of the
back-end servers.
The configuration of the backup server is the same, except for the
notification_email_from,
state, priority, and
possibly interface values, if the system
hardware configuration is different:
global_defs {
   notification_email {
     root@mydomain.com
   }
   notification_email_from svr2@mydomain.com
   smtp_server localhost
   smtp_connect_timeout 30
}

vrrp_sync_group VRRP1 {
#   Group the external and internal VRRP instances so they fail over together
    group {
        external
        internal
        }
}

vrrp_instance external {
    state BACKUP
    interface enp0s8
    virtual_router_id 91
    priority 100
    advert_int 1
    authentication {
        auth_type PASS
        auth_pass 1215
    }
#   Define the virtual IP address for the external network interface
    virtual_ipaddress {
        192.168.1.1/24
    }
}

vrrp_instance internal {
    state BACKUP
    interface enp0s9
    virtual_router_id 92
    priority 100
    advert_int 1
    authentication {
        auth_type PASS
        auth_pass 1215
    }
#   Define the virtual IP address for the internal network interface
    virtual_ipaddress {
        10.0.0.100/24
    }
}

# Define a virtual HTTP server on the virtual IP address 192.168.1.1
virtual_server 192.168.1.1 80 {
    delay_loop 10
    protocol TCP
#   Use round-robin scheduling in this example
    lb_algo rr
#   Use NAT to hide the back-end servers
    lb_kind NAT
#   Persistence of client sessions times out after 2 hours
    persistence_timeout 7200

    real_server 10.0.0.71 80 {
        weight 1
        TCP_CHECK {
          connect_timeout 5
          connect_port 80
        }
    }

    real_server 10.0.0.72 80 {
        weight 1
        TCP_CHECK {
          connect_timeout 5
          connect_port 80
        }
    }
}
Two further configuration changes are required:
-
Configure firewall rules on each Keepalived server (primary and backup) that you configure as a load balancer as described in Configuring Firewall Rules for Keepalived NAT-Mode Load Balancing.
-
Configure a default route for the virtual IP address of the load balancer's internal network interface on each back-end server that you intend to use with the Keepalived load balancer as described in Configuring Back-End Server Routing for Keepalived NAT-Mode Load Balancing.
See Installing and Configuring Keepalived for details of how to install and configure Keepalived.
Configuring Firewall Rules for Keepalived NAT-Mode Load Balancing
If you configure Keepalived to use NAT mode for load balancing with the servers on the internal network, the Keepalived server handles all inbound and outbound network traffic and hides the existence of the back-end servers by rewriting the source IP address of the real back-end server in outgoing packets with the virtual IP address of the external network interface.
To configure a Keepalived server to use NAT mode for load balancing:
-
Configure the firewall so that the interfaces on the external network side are in a different zone from the interfaces on the internal network side.
The following example demonstrates how to move interface
enp0s9to theinternalzone while interfaceenp0s8remains in thepubliczone:sudo firewall-cmd --get-active-zones
public
  interfaces: enp0s8 enp0s9
sudo firewall-cmd --zone=public --remove-interface=enp0s9
success
sudo firewall-cmd --zone=internal --add-interface=enp0s9
success
sudo firewall-cmd --permanent --zone=public --remove-interface=enp0s9
success
sudo firewall-cmd --permanent --zone=internal --add-interface=enp0s9
success
sudo firewall-cmd --get-active-zones
internal
  interfaces: enp0s9
public
  interfaces: enp0s8
-
Configure NAT mode (masquerading) on the external network interface, for example:
sudo firewall-cmd --zone=public --add-masquerade
success
sudo firewall-cmd --permanent --zone=public --add-masquerade
success
sudo firewall-cmd --zone=public --query-masquerade
yes
sudo firewall-cmd --zone=internal --query-masquerade
no
-
If not already enabled for your firewall, configure forwarding rules between the external and internal network interfaces, for example:
sudo firewall-cmd --direct --permanent --add-rule ipv4 filter FORWARD 0 \
-i enp0s8 -o enp0s9 -m state --state RELATED,ESTABLISHED -j ACCEPT
success
sudo firewall-cmd --direct --permanent --add-rule ipv4 filter FORWARD 0 \
-i enp0s9 -o enp0s8 -j ACCEPT
success
sudo firewall-cmd --direct --permanent --add-rule ipv4 filter FORWARD 0 \
-j REJECT --reject-with icmp-host-prohibited
success
sudo firewall-cmd --reload
-
Enable access to the services or ports that you want Keepalived to handle.
For example, to enable access to HTTP and make this rule persist across reboots, enter the following commands:
sudo firewall-cmd --zone=public --add-service=http
success
sudo firewall-cmd --permanent --zone=public --add-service=http
success
Configuring Back-End Server Routing for Keepalived NAT-Mode Load Balancing
On each back-end real servers that you intend to use with the Keepalived load balancer, ensure that the routing table contains a default route for the virtual IP address of the load balancer's internal network interface.
For example, if the virtual IP address is
10.0.0.100, you can use the
ip command to examine the routing table and
to set the default route:
sudo ip route show
10.0.0.0/24 dev enp0s8 proto kernel scope link src 10.0.0.71
sudo ip route add default via 10.0.0.100 dev enp0s8
sudo ip route show
default via 10.0.0.100 dev enp0s8
10.0.0.0/24 dev enp0s8  proto kernel  scope link  src 10.0.0.71
To make the default route for enp0s8 persist
across reboots, create the file
/etc/sysconfig/network-scripts/route-enp0s8:
sudo echo "default via 10.0.0.100 dev enp0s8" > /etc/sysconfig/network-scripts/route-enp0s8
Configuring Load Balancing Using Keepalived in DR Mode
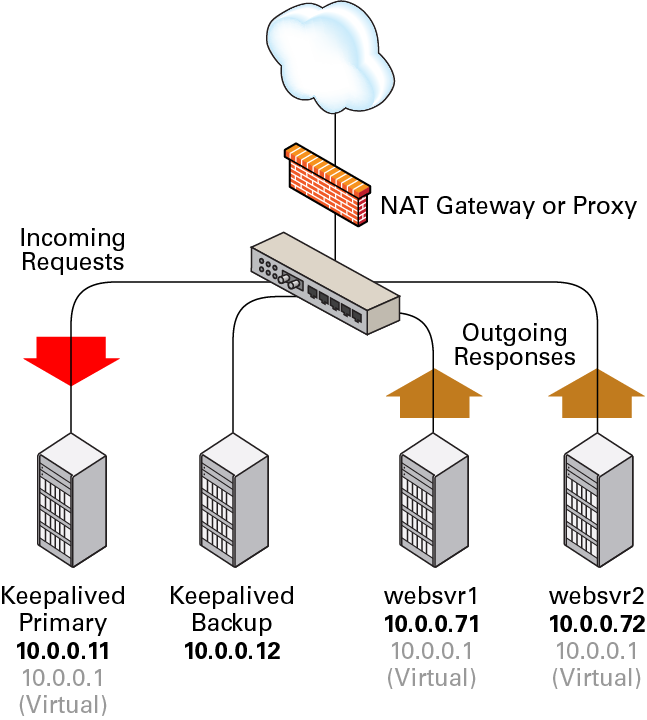
The following example uses Keepalived in direct routing (DR) mode to implement a simple failover and load balancing configuration on two servers. One server acts as the primary server and the other acts as a backup. The primary server has a higher priority than the backup server. Each of Keepalived servers has a single network interface and the servers are connected to the same network segment (10.0.0.0/24) on which two web servers are accessible.
Figure 8-4
shows that the Keepalived primary server has network the addresses
10.0.0.11 and 10.0.0.1
(virtual). The Keepalived backup server has the network address
10.0.0.12. The web servers,
websvr1 and websvr2, have
the network addresses 10.0.0.71 and
10.0.0.72, respectively. In addition, both web
servers are configured with the virtual IP address
10.0.0.1 so that they accept packets with that
destination address. Incoming requests are received by the primary
server and redirected to the web servers, which respond directly.
Figure 8-4 Example Keepalived Configuration for Load Balancing in DR Mode
You might use the following configuration in
/etc/keepalived/keepalived.conf on the primary
server:
global_defs {
   notification_email {
     root@mydomain.com
   }
   notification_email_from svr1@mydomain.com
   smtp_server localhost
   smtp_connect_timeout 30
}

vrrp_instance external {
    state MASTER
    interface enp0s8
    virtual_router_id 91
    priority 200
    advert_int 1
    authentication {
        auth_type PASS
        auth_pass 1215
    }
    virtual_ipaddress {
        10.0.0.1/24
    }
}

virtual_server 10.0.0.1 80 {
    delay_loop 10
    protocol TCP
    lb_algo rr
#   Use direct routing
    lb_kind DR
    persistence_timeout 7200

    real_server 10.0.0.71 80 {
        weight 1
        TCP_CHECK {
          connect_timeout 5
          connect_port 80
        }
    }

    real_server 10.0.0.72 80 {
        weight 1
        TCP_CHECK {
          connect_timeout 5
          connect_port 80
        }
    }
}
The virtual server configuration is similar to that given in
Configuring Load Balancing Using Keepalived in NAT Mode except that the value
of lb_kind is set to DR
(Direct Routing), which means that the Keepalived server handles
all inbound network traffic from the client before routing it to
the back-end servers, which reply directly to the client,
bypassing the Keepalived server. This configuration reduces the
load on the Keepalived server but is less secure as each back-end
server requires external access and is potentially exposed as an
attack surface. Some implementations use an additional network
interface with a dedicated gateway for each web server to handle
the response network traffic.
The configuration of the backup server is the same, except for the
notification_email_from,
state, priority, and
possibly interface values, if the system
hardware configuration is different:
global_defs {
   notification_email {
     root@mydomain.com
   }
   notification_email_from svr2@mydomain.com
   smtp_server localhost
   smtp_connect_timeout 30
}

vrrp_instance external {
    state BACKUP
    interface enp0s8
    virtual_router_id 91
    priority 100
    advert_int 1
    authentication {
        auth_type PASS
        auth_pass 1215
    }
    virtual_ipaddress {
        10.0.0.1/24
    }
}

virtual_server 10.0.0.1 80 {
    delay_loop 10
    protocol TCP
    lb_algo rr
#   Use direct routing
    lb_kind DR
    persistence_timeout 7200

    real_server 10.0.0.71 80 {
        weight 1
        TCP_CHECK {
          connect_timeout 5
          connect_port 80
        }
    }

    real_server 10.0.0.72 80 {
        weight 1
        TCP_CHECK {
          connect_timeout 5
          connect_port 80
        }
    }
}
Two further configuration changes are required:
-
Configure firewall rules on each Keepalived server (primary and backup) that you configure as a load balancer as described in Configuring Firewall Rules for Keepalived DR-Mode Load Balancing.
-
Configure the
arp_ignoreandarp_announceARP parameters and the virtual IP address for the network interface on each back-end server that you intend to use with the Keepalived load balancer as described in Configuring the Back-End Servers for Keepalived DR-Mode Load Balancing.
See Installing and Configuring Keepalived for details of how to install and configure Keepalived.
Configuring Firewall Rules for Keepalived DR-Mode Load Balancing
Enable access to the services or ports that you want Keepalived to handle.
For example, to enable access to HTTP and make this rule persist across reboots, enter the following commands:
sudo firewall-cmd --zone=public --add-service=http
success
sudo firewall-cmd --permanent --zone=public --add-service=http
success
Configuring the Back-End Servers for Keepalived DR-Mode Load Balancing
The example configuration requires that the virtual IP address is configured on the primary Keepalived server and on each back-end server. The Keepalived configuration maintains the virtual IP address on the primary Keepalived server.
Only the primary Keepalived server should respond to ARP
requests for the virtual IP address. You can set the
arp_ignore and
arp_announce ARP parameters for the network
interface of each back-end server so that they do not respond to
ARP requests for the virtual IP address.
To configure the ARP parameters and virtual IP address on each back-end server:
-
Configure the ARP parameters for the primary network interface, for example
enp0s8:sudo echo "net.ipv4.conf.enp0s8.arp_ignore = 1" >> /etc/sysctl.conf sudo echo "net.ipv4.conf.enp0s8.arp_announce = 2" >> /etc/sysctl.conf sudo sysctl -p
net.ipv4.conf.enp0s8.arp_ignore = 1
net.ipv4.conf.enp0s8.arp_announce = 2
-
To define a virtual IP address that persists across reboots, edit
/etc/sysconfig/network-scripts/ifcfg-ifaceand addIPADDR1andPREFIX1entries for the virtual IP address, for example:... NAME=enp0s8 ... IPADDR0=10.0.0.72 GATEWAY0=10.0.0.100 PREFIX0=24 IPADDR1=10.0.0.1 PREFIX1=24 ...
This example defines the virtual IP address
10.0.0.1forenp0s8in addition to the existing real IP address of the back-end server. -
Reboot the system and verify that the virtual IP address has been set up:
sudo ip addr show enp0s8
2: enp0s8: <BROADCAST,MULTICAST,UP,LOWER_UP> mtu 1500 qdisc pfifo_fast state UP qlen 1000
    link/ether 08:00:27:cb:a6:8d brd ff:ff:ff:ff:ff:ff
    inet 10.0.0.72/24 brd 10.0.0.255 scope global enp0s8
    inet 10.0.0.1/24 brd 10.0.0.255 scope global secondary enp0s8
    inet6 fe80::a00:27ff:fecb:a68d/64 scope link
       valid_lft forever preferred_lft forever
Configuring Keepalived for Session Persistence and Firewall Marks
Many web-based application require that a user session is persistently served by the same web server.
If you enable the load balancer in Keepalived to use persistence,
a client connects to the same server provided that the timeout
period (persistence_timeout) has not been
exceeded since the previous connection.
Firewall marks are another method for controlling session access so that Keepalived forwards a client's connections on different ports, such as HTTP (80) and HTTPS (443), to the same server, for example:
sudo firewall-cmd --direct --permanent --add-rule ipv4 mangle PREROUTING 0 \
-d virtual_IP_addr/32 -p tcp -m multiport --dports 80,443 -j MARK --set-mark 123
success
sudo firewall-cmd --reload
These commands set a firewall mark value of 123 on packets that are destined for ports 80 or 443 at the specified virtual IP address.
You must also declare the firewall mark
(fwmark) value to Keepalived by setting it on
the virtual server instead of a destination virtual IP address and
port, for example:
virtual_server fwmark 123 {
   ...
}
This configuration causes Keepalived to route the packets based on their firewall mark value rather than the destination virtual IP address and port. When used in conjunction with session persistence, firewall marks help ensure that all ports used by a client session are handled by the same server.
Making HAProxy Highly Available Using Keepalived
The following example uses Keepalived to make the HAProxy service fail over to a backup server in the event that the primary server fails.
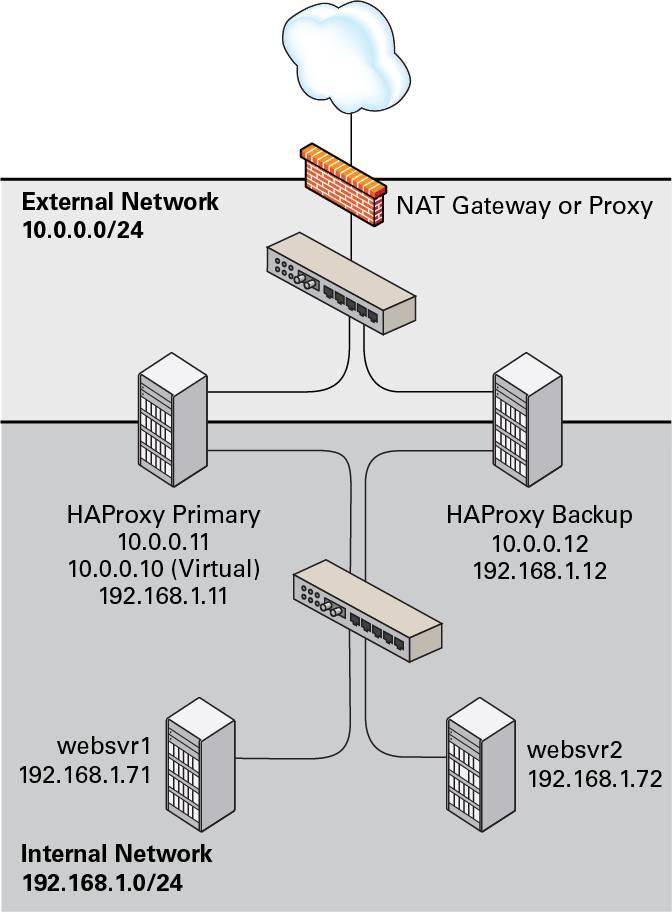
The following figure shows two HAProxy servers, which are
connected to an externally facing network
(10.0.0.0/24), as 10.0.0.11
and 10.0.0.12, and to an internal network
(192.168.1.0/24), as
192.168.1.11 and
192.168.1.12. One HAProxy server
(10.0.0.11) is configured as a Keepalived
primary server with the virtual IP address
10.0.0.10 and the other
(10.0.0.12) is configured as a Keepalived
backup server. Two web servers, websvr1
(192.168.1.71), and websvr2
(192.168.1.72), are accessible on the internal
network. The IP address 10.0.0.10 is in the
private address range 10.0.0.0/24, which cannot
be routed on the Internet. An upstream network address translation
(NAT) gateway or a proxy server provides access to and from the
Internet.
Figure 8-5 Example of a Combined HAProxy and Keepalived Configuration with Web Servers on a Separate Network
The HAProxy configuration on both 10.0.0.11 and
10.0.0.12 is very similar to
Configuring Simple Load Balancing Using HAProxy. The IP address on which
HAProxy listens for incoming requests is the virtual IP address
that Keepalived controls.
global
    daemon
    log 127.0.0.1 local0 debug
    maxconn 50000
    nbproc 1

defaults
    mode http
    timeout connect 5s
    timeout client 25s
    timeout server 25s
    timeout queue 10s

# Handle Incoming HTTP Connection Requests on the virtual IP address controlled by Keepalived
listen  http-incoming
    mode http
    bind 10.0.0.10:80
# Use each server in turn, according to its weight value
    balance roundrobin
# Verify that service is available
    option httpchk OPTIONS * HTTP/1.1\r\nHost:\ www
# Insert X-Forwarded-For header
    option forwardfor
# Define the back-end servers, which can handle up to 512 concurrent connections each
    server websvr1 192.168.1.71:80 weight 1 maxconn 512 check
    server websvr2 192.168.1.72:80 weight 1 maxconn 512 check
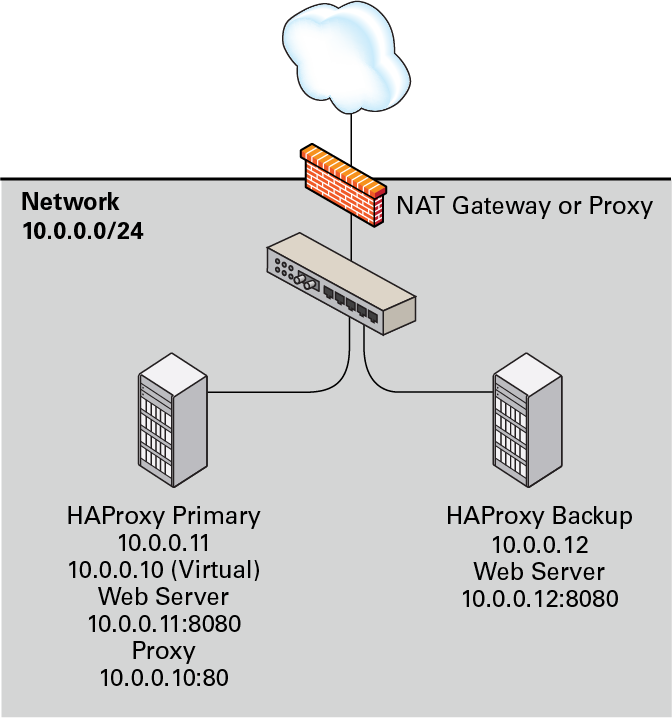
It is also possible to configure HAProxy and Keepalived directly
on the web servers as shown in the following figure. As in the
previous example, one HAProxy server
(10.0.0.11) is configured as the Keepalived
primary server, with the virtual IP address
10.0.0.10, and the other
(10.0.0.12) is configured as a Keepalived
backup server. The HAProxy service on the primary server listens
on port 80 and forwards incoming requests to one of the
httpd services, which listen on port 8080.
Figure 8-6 Example of a Combined HAProxy and Keepalived Configuration with Integrated Web Servers
The HAProxy configuration is the same as the previous example, except for the IP addresses and ports of the web servers.
...
    server websvr1 10.0.0.11:8080 weight 1 maxconn 512 check
    server websvr2 10.0.0.12:8080 weight 1 maxconn 512 check
The firewall on each server must be configured to accept incoming TCP requests on port 8080.
The Keepalived configuration for both example configurations is similar to that given in Configuring Simple Virtual IP Address Failover Using Keepalived.
The primary (master) server has the following Keepalived configuration:
global_defs {
   notification_email {
     root@mydomain.com
   }
   notification_email_from haproxy1@mydomain.com
   smtp_server localhost
   smtp_connect_timeout 30
}

vrrp_instance VRRP1 {
    state MASTER
#   Specify the network interface to which the virtual address is assigned
    interface enp0s8
#   The virtual router ID must be unique to each VRRP instance that you define
    virtual_router_id 41
#   Set the value of priority higher on the primary server than on a backup server
    priority 200
    advert_int 1
    authentication {
        auth_type PASS
        auth_pass 1066
    }
    virtual_ipaddress {
        10.0.0.10/24
    }
}
The configuration of the backup server is the same, except for the
notification_email_from,
state, priority, and
possibly interface values, if the system
hardware configuration is different:
global_defs {
   notification_email {
     root@mydomain.com
   }
   notification_email_from haproxy2@mydomain.com
   smtp_server localhost
   smtp_connect_timeout 30
}

vrrp_instance VRRP1 {
    state BACKUP
#   Specify the network interface to which the virtual address is assigned
    interface enp0s8
    virtual_router_id 41
#   Set the value of priority lower on the backup server than on the primary server
    priority 100
    advert_int 1
    authentication {
        auth_type PASS
        auth_pass 1066
    }
    virtual_ipaddress {
        10.0.0.10/24
    }
}
In the event that the primary server (haproxy1)
fails, keepalived assigns the virtual IP
address 10.0.0.10/24 to the
enp0s8 interface on the backup server
(haproxy2), which then becomes the primary
server.
See Installing and Configuring HAProxy and Installing and Configuring Keepalived for details on how to install and configure HAProxy and Keepalived.
About Keepalived Notification and Tracking Scripts
Notification scripts are executable programs that Keepalived invokes when a server changes state. You can implements notification scripts to perform actions such as reconfiguring a network interface or starting, reloading or stopping a service.
To invoke a notification script, include one the following lines
inside a vrrp_instance or
vrrp_sync_group section:
- notify program_path
-
Invokes program_path with the following arguments:
-
$1 -
Set to
INSTANCEorGROUP, depending on whether Keepalived invoked the program fromvrrp_instanceorvrrp_sync_group. -
$2 -
Set to the name of the
vrrp_instanceorvrrp_sync_group. -
$3 -
Set to the end state of the transition:
BACKUP,FAULT, orMASTER.
-
- notify_backup program_path
- notify_backup"program_patharg ..."
-
Invokes program_path when the end state of a transition is
BACKUP. program_path is the full pathname of an executable script or binary. If a program has arguments, enclose both the program path and the arguments in quotes. - notify_fault program_path
- notify_fault"program_patharg ..."
-
Invokes program_path when the end state of a transition is
FAULT. - notify_master program_path
- notify_master"program_patharg ..."
-
Invokes program_path when the end state of a transition is
MASTER.
The following executable script could be used to handle the
general-purpose version of notify:
#!/bin/bash

ENDSTATE=$3
NAME=$2
TYPE=$1

case $ENDSTATE in
    "BACKUP") # Perform action for transition to BACKUP state
              exit 0
              ;;
    "FAULT")  # Perform action for transition to FAULT state
              exit 0
              ;;
    "MASTER") # Perform action for transition to MASTER state
              exit 0
              ;;
    *)        echo "Unknown state ${ENDSTATE} for VRRP ${TYPE} ${NAME}"
              exit 1
              ;;
esac
Tracking scripts are programs that Keepalived runs at regular intervals according to a
vrrp_script definition:
vrrp_script script_name {
  script       "program_path
                  arg ..."
  interval i  # Run script every i seconds
  fall f      # If script returns non-zero f times in succession, enter FAULT state
  rise r      # If script returns zero r times in succession, exit FAULT state
  timeout t   # Wait up to t seconds for script before assuming non-zero exit code
  weight w    # Reduce priority by w on fall
}
In the example, program_path is the full pathname of an executable script or binary.
You can use tracking scripts with a
vrrp_instance section by specifying a
track_script clause, for example:
vrrp_instance instance_name {
  state MASTER
  interface enp0s8
  virtual_router_id 21
  priority 200
  advert_int 1
  virtual_ipaddress {
    10.0.0.10/24
  }
  track_script {
    script_name
    ...
  }
}
If a configured script returns a non-zero exit code
f times in succession, Keepalived
changes the state of the VRRP instance or group to
FAULT, removes the virtual IP address
10.0.0.10 from enp0s8,
reduces the priority value by w and
stops sending multicast VRRP packets. If the script subsequently
returns a zero exit code r times in
succession, the VRRP instance or group exits the
FAULT state and transitions to the
MASTER or BACKUP state
depending on its new priority.
If you want a server to enter the FAULT state
if one or more interfaces goes down, you can also use a
track_interface clause, for example:
  track_interface {
    enp0s8
    enp0s9
  }
A possible application of tracking scripts is to deal with a potential split-brain condition in the case that some of the Keepalived servers lose communication. For example, a script could track the existence of other Keepalived servers or use shared storage or a backup communication channel to implement a voting mechanism. However, configuring Keepalived to avoid a split brain condition is complex and it is difficult to avoid corner cases where a scripted solution might not work.
For an alternative solution, see Making HAProxy Highly Available Using Oracle Clusterware.
Making HAProxy Highly Available Using Oracle Clusterware
When Keepalived is used with two or more servers, loss of network connectivity can result in a split-brain condition, where more than one server acts as the primary server and which can result in data corruption. To avoid this scenario, Oracle recommends that you use HAProxy in conjunction with a shoot the other node in the head (STONITH) solution such as Oracle Clusterware to support virtual IP address failover in preference to Keepalived.
Oracle Clusterware is a portable clustering software solution that allow you to configure independent servers so that they cooperate as a single cluster. The individual servers within the cluster cooperate so that they appear to be a single server to external client applications.
The following example uses Oracle Clusterware with HAProxy for load balancing to HTTPD web server instances on each cluster node. In the event that the node running HAProxy and an HTTPD instance fails, the services and their virtual IP addresses fail over to the other cluster node.
The follow figure shows two cluster nodes that are connected to an externally facing network. The nodes are also linked by a private network that is used for the cluster heartbeat. The nodes have shared access to certified SAN or NAS storage that holds the voting disk and Oracle Cluster Registry (OCR) in addition to service configuration data and application data.
Figure 8-7 Example of an Oracle Clusterware Configuration with Two Nodes
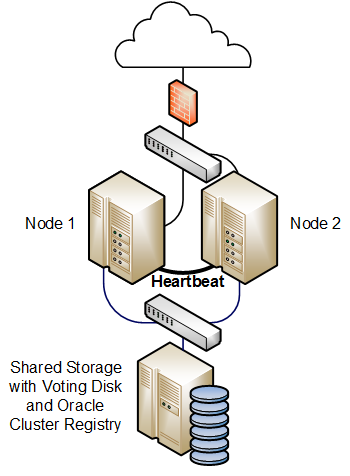
For a high availability configuration, Oracle recommends that the network, heartbeat, and storage connections are multiply redundant and that at least three voting disks are configured.
The following steps describe how to configure this type of cluster:
-
Install Oracle Clusterware on each system that will serve as a cluster node.
-
Install the
haproxyandhttpdpackages on each node. -
Use the appvipcfg command to create a virtual IP address for HAProxy and a separate virtual IP address for each HTTPD service instance. For example, if there are two HTTPD service instances, you would need to create three different virtual IP addresses.
-
Implement cluster scripts to start, stop, clean, and check the HAProxy and HTTPD services on each node. These scripts must return 0 for success and 1 for failure.
-
Use the shared storage to share the configuration files, HTML files, logs, and all directories and files that the HAProxy and HTTPD services on each node require to start.
If you have an Oracle Linux Support subscription, you can use OCFS2 or ASM/ACFS with the shared storage as an alternative to NFS or other type of shared file system.
-
Configure each HTTPD service instance so that it binds to the correct virtual IP address. Each service instance must also have an independent set of configuration, log, and other required files, so that all of the service instances can coexist on the same server if one node fails.
-
Use the crsctl command to create a cluster resource for HAProxy and for each HTTPD service instance. If there are two or more HTTPD service instances, binding of these instances should initially be distributed amongst the cluster nodes. The HAProxy service can be started on either node initially.
You can use Oracle Clusterware as the basis of a more complex solution that protects a multi-tiered system consisting of front-end load balancers, web servers, database servers and other components.
For more information, see the Oracle Clusterware 11g Administration and Deployment Guide and the Oracle Clusterware 12c Administration and Deployment Guide.