About the useradm Application
The useradm tool can be used as a command line or interactively. This section focuses on the interactive mode of that tool.
The interative useradm application replaces the Visual Panels User Manager. This application is a remote administration daemon (RAD) client which provides a menu-driven interface for setting up and managing user accounts. Though the application connects to local RAD servers by default, it can connect to remote RAD servers too. The application provides easier user management, password management, and role management options. Any terminal emulator like putty or the Secure Shell (ssh) service can be used to start this application locally or remotely.
Whether in command line mode or interactive mode, use of useradm requires that you must be an administrator or assume a role which has been assigned the User Security rights profile. See Using Your Assigned Administrative Rights in Securing Users and Processes in Oracle Solaris 11.4.
For more details about the useradm command, see the useradm(8) man page.
How to Install the useradm Application
useradm application is not included in a regular Oracle Solaris installation. To use the application, install the package first.
Using the Interactive useradm Command
useradm is activated only by using the add or modify subcommand and with only the -S, -q, or -R options, used singly or in combination.
-Sspecifies the naming service repository to use. The choices arefilesto store account information locally orldapto have the information managed by LDAP.-qspecifies the hostname or netgroup to use for the attributes maintained in theuser_attrLDAP container. This option applies only to existing accounts that are maintained by the LDAP name service.-Rspecifies the URI to connect to a remote RAD server.
- Creating a new user account jdoe. The information is stored locally.
$ useradm add -S files jdoe - Modifying user jsmith's attribute settings stored in LDAP.
$ useradm modify -S ldap jsmith - Modifying user jack's account information in LDAP so that the attributes are applicable only when the user is using the system with the host name system1.
$ usermod modify -S ldap -q system1 jack
useradm interactively. Ensure that the rad:remote SMF service is enabled.
- Starting the useradm application locally while specifying a remote RAD server.
$ useradm modify -S ldap -R ssh://login-name@server johnsmith@example.com - Starting the
useradmapplication directly on the remote server.$ ssh joe@server -t useradm modify jane - Using two systems to manage user accounts remotely.
$ ssh -t jane@server1 useradm modify -R rads://jean@server2?auth=pam maryIn this example, the application is started on one server to modify a user on another server. The user account to log in to the server specified with
-Roption –jeanin this example – is used to manage mary's account settings. Ensure thatjeanis assigned either the User Security rights profile or has thesolaris.auth.delegateauthorization onserver2.
Attributes in the useradm Window
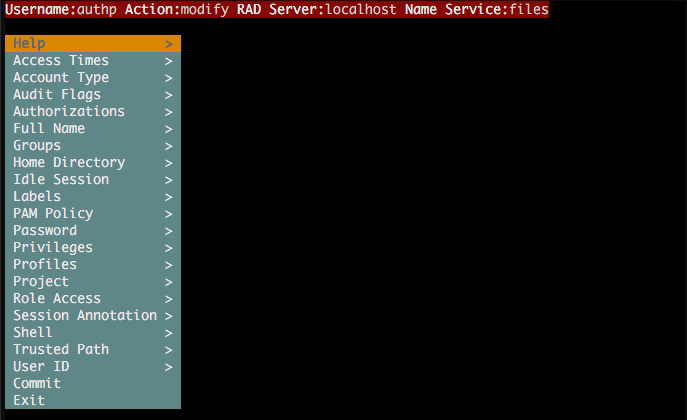
When you use the useradm command as previously explained, the following window appears:
The following list explains the different options or attributes you can set for users:
- Access Times
- Specify the days and times at which specific services can be accessed.
- Account Type
- Specify whether the account you are working with is a normal user account or a role.
- Audit Flags
- Specify the audit preselection flags of the user.
- Annotation
- Specify whether the user must provide an explanation if they are assuming a role or using an authenticated rights profile.
- Authorizations
- Assign authorizations to user accounts from a list of available options. The names of granted authorizations are listed under the Assigned Groups list.
- Groups
- Assign a primary group and secondary group to user accounts. Available choices in the Group list depends on your system's configuration. When you specify
-S files, the list of groups that is displayed is the local list. Otherwise, the list of groups is a combination of local and LDAP groups. - Home Directory
- (Optional) If you do not provide any information, the system automatically assigns a default home directory
- Idle Sessions
- Specify the timeout for a user account in case the user is inactive for a certain amount of time. You can also specify the action to be taken at timeout.
- Labels
- Assign a minimum label and clearances to each user account to restrict their access to confidential process information.
- PAM Policy
- Specify the PAM policy for the user. For more information, see the pam_user_policy(7) pam_user_policy(7) man page.
- Privileges
- Specify default privileges that are assigned to the user's initial login shell.
- Profiles
- Assign the rights profile to a user from a list of available profiles. You can also specify if they need re authentication when used.
- Project
- Displays a list of available projects that can be assigned as the user's default.
- Role Access
- Assign a role to a user from a list of available choices.
- Shell
- Assign the user's login shell.
- Trusted Path
- Specify whether the user can remotely access the Trusted Path to manage the RAD services running in immutable zones.
