- Oracle Exadata Storage Server X9-2 EF, HC, and XT Service Manual
- Servicing the Disk Backplane
- Remove the Disk Backplane
Remove the Disk Backplane
-
Prepare the server for service.
- Power off the server and disconnect the power cords from the power supplies.
- Extend the server into the maintenance position.
- Attach an antistatic wrist strap to your wrist, and then to a metal area on the chassis.
- Remove the server top cover.
- Remove the air baffle.
-
Remove the fan modules from the server.
See Remove a Fan Module.
-
Remove the fan tray from the server.
See Remove the Fan Tray.
-
Pull each storage drive out far enough to disengage it from the
backplane.
Note:
It is not necessary to completely remove the storage drives from the server; simply pull them out far enough to disengage them from the backplane. If you do remove the storage drives from the server, make a note of their locations so that you can reinstall them in the same locations. -
Disconnect the cables from the disk backplane.
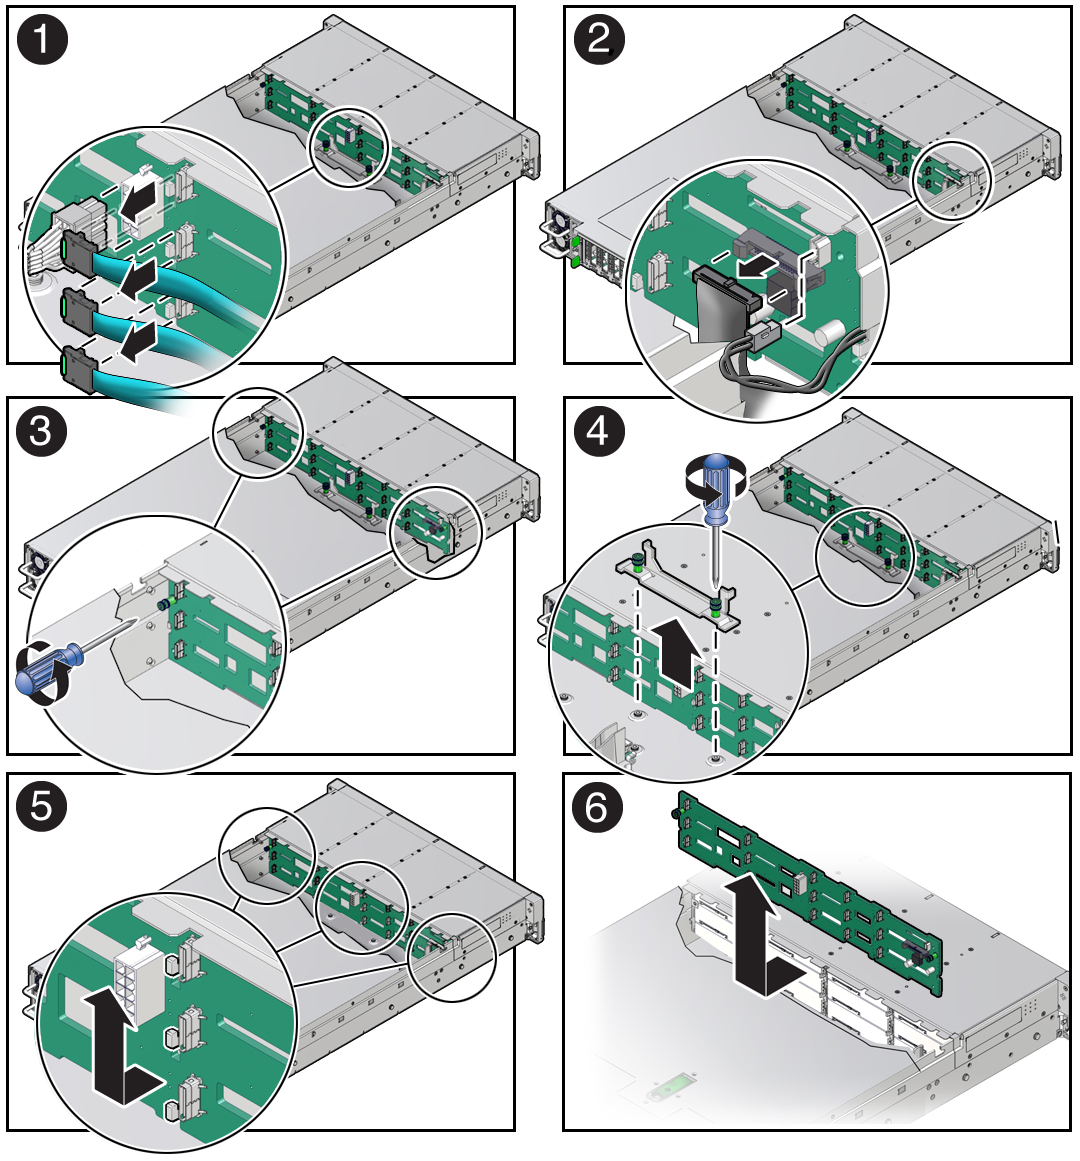
- Disconnect the power cable from the disk backplane [1].
-
Depending on your storage drive configuration, do one of the
following:
- Disconnect the three SAS cables (not shown) from the disk backplane
[1].
Press and hold the green button on the connector to disengage the locking mechanism, then gently pull the connector from the disk backplane. Note the cable connections in order to ease proper reconnection of the cables.
- Disconnect the twelve NVMe cables from the disk backplane [1].
Note:
Up to twelve NVMe cables are used when storage drive slots 8 through 11 contain NVMe SSDs.Press and hold the green button on the connector to disengage the locking mechanism, then gently pull the connector from the disk backplane. Note the cable connections in order to ease proper reconnection of the cables.

- Disconnect the three SAS cables (not shown) from the disk backplane
[1].
- Disconnect the temperature sensor cable from the disk backplane [2].
- Disconnect the auxiliary signal cable from the disk backplane [2].
- Using a Torx T15 screwdriver, loosen the right-side and left-side spring-mounted screws that secure the disk backplane to the chassis [3].
- Using a Torx T25 screwdriver, loosen the spring-mounted screws that secure the backplane bracket to the chassis, then lift the bracket from the server [4].
- Lift the disk backplane up to release it from the standoff hooks and out of the chassis [5 and 6].
- Place the disk backplane on an antistatic mat.
Related Topic: