Provision the Service

Provision the service on the Oracle Cloud Infrastructure for Microsoft Azure Portal, which has the look and feel of the Azure Portal. Provisioning an Exadata System combines the creation flows for provisioning Oracle Exadata Cloud Infrastructure, creating the Exadata VM Cluster, and provisioning the Exadata database.

Note:

It's important to provision the system in order, as that's the way the resources are added to the system. It will take a few hours for the process to finish provisioning the VM Cluster.
The portal uses wizards to guide you through the provisioning steps. Two methods are available:
  • Provision all resources at once. Click Create, then select Create Exadata System. This option launches a single wizard to provision the Exadata Infrastructure, VM Cluster and Exadata Database.
  • Provision each resource separately. Click the Create Resource for each resource to launch separate wizards to create the Exadata Infrastructure, VM Cluster, and Exadata Database.

This example uses the second option to create each resource separately.

Provision the Oracle Exadata Cloud Infrastructure

Provision the Oracle Exadata Cloud Infrastructure from the Oracle Database Service for Microsoft Azure (OracleDB for Azure) Portal. Complete the required fields in the wizard to provision the infrastructure.

Before beginning, ensure that the Exadata Database Server Count and Exadata Storage Count service limits for your database and storage servers in your tenancy are sufficient to provision an Exadata System with the model and configuration of your choice.

  1. Identify the primary OracleDB for Azure Network Link region you want to use as your default region for OracleDB for Azure resource provisioning.
    During onboarding, this region becomes the primary OCI region associated with your OCI account.
  2. Log into the OracleDB for Azure Portal, then click the Create a resource icon.
  3. Click the + Create link, then select Exadata Infrastructure.
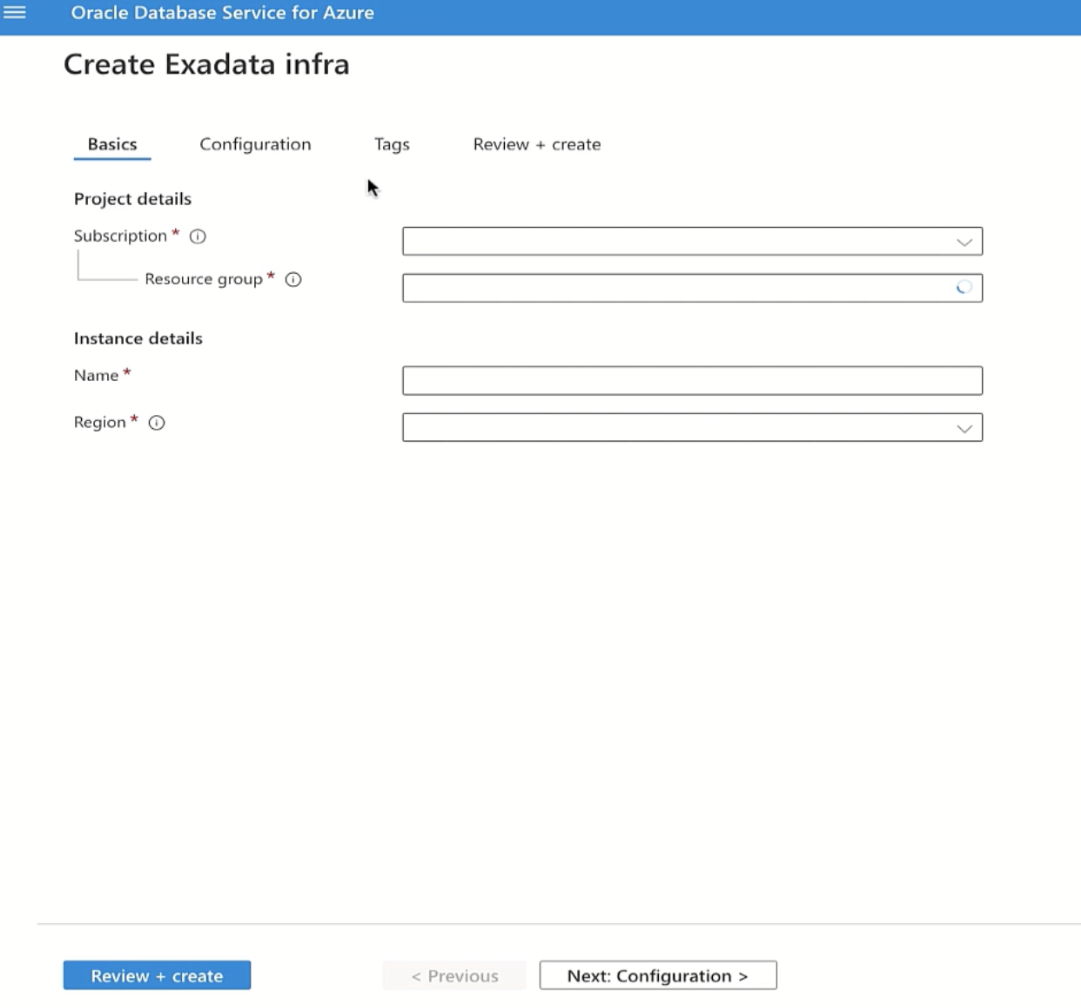
    The Create Exadata infra wizard appears. Description of create-exadb-infra.png follows
    Description of the illustration create-exadb-infra.png
  4. Complete the required fields in the Basics tab, then click Next: Configuration >.
    1. Subscription: Select a subscription from the list of subscriptions that are linked to your OCI tenancy through OracleDB for Azure. If you have a single subscription, you cannot change the value in this field.
    2. Resource group: Select a group for the resource.
      A resource group contains related resources for an Azure solution that you want to manage as a group. You decide which resources belong in a resource group based on what makes the most sense for your organization.

      All resources in your resource group should share the same lifecycle. You deploy, update, and delete them together. If one resource, such as a server, needs to exist on a different deployment cycle it should be in another resource group.

    3. Exadata System Name: Enter a unique name for your subscription.
      The name must be between 2 to 64 characters in length, begin with a letter or number, end with a letter, number, or _ (underscore), and may contain only letters, numbers, underscores, periods, or hyphens.
    4. Region: Select the Azure Region where you want to provision the Exadata Infrastructure. If you only have a single region, you cannot change the value in this field.
  5. Complete the required fields in the Configuration tab, then click Next: Tags >.
    1. Exadata system model: Select an Exadata system model.

      The model represents the type of Oracle Exadata Database Machine you want to allocate to this resource.

    2. Database servers: Select the number of database servers you want to allocate to this Exadata Infrastructure resource.
    3. Storage servers: Select the number of storage servers you want to allocate to this Exadata Infrastructure resource.
    4. Database name: Enter a name between 1 and 8 characters in length that is unique to your Subscription.
  6. (Optional) Add tags to apply to OCI provisioned resources. Click Next: Review + create >.
  7. The wizard displays and validates your selections on the Review + create tab.
    A failed validation message appears on the page if any of your settings are incorrect. You must resolve validation issues before continuing.
  8. Click Create to create the Exadata Infrastructure.

Provision the Oracle Exadata VM Cluster

Provision an Oracle Exadata VM Cluster from the OracleDB for Azure Portal. The Oracle Exadata Cloud Infrastructure must exist before you can provision an Oracle Exadata VM Cluster and you must provision the cluster before provisioning the databases.

  1. Navigate to the Exadata Database Home page on the OracleDB for Azure Portal and click the Create a resource icon.
  2. Click the + Create link, then select Exadata VM Clusters.
    The Create VM Cluster wizard appears.
  3. Complete the required fields in the Basics tab, then click Next: Configuration >.
    1. Subscription: Select a subscription from the list of subscriptions that are linked to your OCI tenancy through OracleDB for Azure.
    2. Resource group: Select a group for the resource.
      All resources in your resource group should share the same lifecycle. You deploy, update, and delete them together. If one resource, such as a server, needs to exist on a different deployment cycle it should be in another resource group.
    3. Name: Enter a unique name for your Exadata VM Cluster.
      The name must be between 2 to 64 characters in length, begin with a letter or number, end with a letter, number, or _ (underscore), and may contain only letters, numbers, underscores, periods, or hyphens.
    4. Region: Select the Azure Region where you want to provision the Exadata VM Cluster.
  4. Complete the required fields in the Configuration tab, then click Next: Networking >.
    1. Infrastructure: Select an Exadata Infrastructure resource.
    2. OCPU: The number of OCPUs per node displayed is based on how you configured the Infrastructure resource. To change the number, click Configure the VM Cluster, then select a value. A minimum of 2 OCPUs per node is required. Click OK.
      For example, if the Exadata Infrastructure resource that you selected was provisioned with 2 Database servers, then the total Requested OCPU count is 4 with 2 OCPU count per node.
    3. Oracle Grid Infrastructure version: Select the version for the Exadata Infrastructure resource.
    4. License type: If you have an existing Oracle Database license, then you can choose Bring Your Own License (BYOL). Otherwise, select License included to include a license with this new resource.
  5. Complete the required fields in the Networking tab, then click Next: Security >.
    1. Hostname prefix: Enter a unique string value. Select an Exadata system model.
      The value must be unique within the subscription chosen for the Exadata VM Cluster.
    2. Virtual networks: Select a network from the list of existing virtual networks.
    3. OCI CIDRS: Enter a CIDR block notation designation of IP address ranges to be assigned to your network.
      The range cannot overlap the CIDR range of the selected virtual network.
  6. Generate or upload an SSH key pair, then click Next: Tags >.

    To upload an existing public key, click Upload existing public key. To generate a new pair, click Generate pair and save private key.

  7. (Optional) Add tags to apply to OCI provisioned resources. Click Next: Review + create >.
  8. The wizard displays and validates your selections on the Review + create tab.
    A failed validation message appears on the page if any of your settings are incorrect. You must resolve validation issues before continuing.
  9. Click Create to create the VM Cluster.
You can check the status on the Deployments blade.

Provision the Exadata Database

Provision the Oracle Exadata Database Service. Complete the required fields in the wizard to provision the database. The Oracle Exadata Cloud Infrastructure and Oracle Exadata VM Cluster must exist before you can provision the databases.
  1. Navigate to the Exadata Database Home page on the OracleDB for Azure Portal.
  2. Click Databases on the left navigation.
  3. Click Create, then Create Exadata Database to launch the wizard.
  4. Complete the required fields in the Basics tab, then click Next: Configuration >.
    1. Subscription: Select from the list of subscriptions that are linked to your OCI tenancy through OracleDB for Azure. If you have a single subscription, you cannot change the value in this field.
    2. Resource group: Select a group for the resource.
    3. Exadata Database Name: Enter a unique database name for your subscription.
      The name must be between 2 to 64 characters in length, begin with a letter or number, end with a letter, number, or _ (underscore), and may contain only letters, numbers, underscores, periods, or hyphens.
    4. Region: Select the Azure Region where you want to provision the Exadata Infrastructure. If you only have a single region, you cannot change the value in this field.
  5. Complete the required fields in the Configuration tab, then click Next: Security >.
    1. VM cluster: Select a VM cluster resource for the new Exadata Database.
    2. Database version: Select the version that best works for you environment.
    3. Database name: Enter a name between 1 and 8 characters in length that is unique to your Subscription.
  6. Enter a password for the Base Database administrator in the Password and Confirm Password fields in the Security tab, then click Next: Management >.
    The Base Database administrator user name cannot be changed. The password must contain two (2) uppercase characters, two (2) lowercase characters, two (2) numeric characters, two (2) special characters within _, #, and -, and must be between 14 and 255 characters long.
  7. Complete the required fields in the Management tab, then click Next: Tags >.
    1. Backup retention period: Select from the list of available options.
    2. Backup scheduling (UTC): Select a two-hour window for backup from the list of options.
  8. (Optional) Add tags to apply to OCI provisioned resources. Click Next: Review + create >
  9. The wizard displays and validates your selections on the Review + create tab.

    If any of your settings are incorrect, you will see a failed validation message. You must resolve validation issues before continuing.

  10. Click Create to submit the creation process to the queue.
The status appears on the Deployments and Exadata Database blades. The status overview appears when the database is provisioned and the deployment completed successfully.