Set Up the Café Supremo Marketing Website Application
Set up the Café Supremo marketing website application using Oracle Visual Builder and Oracle Content Management components.
To get started, you’ll need to download the asset pack containing the assets, the zip file containing the component layouts, and the zip file containing the sample code for the Café Supremo marketing website application.
- In the left navigation menu of this solution playbook, under Download Code, click Asset Pack.
- On the downloads page, locate the OCE SamplesAsset Pack.zip file and download it.
The zip file contains the asset pack. Extract the contents of the zip file (OCE SamplesAsset Pack.zip) to a folder named OCE SamplesAsset Pack on your local computer.
Download the zip file containing layouts:
In the left navigation menu of this solution playbook, under Download Code, click Layouts to download the VB_MarketingSite_Layouts.zip file.
The zip file contains the component layouts. Extract the contents of the zip file (VB_MarketingSite_Layouts.zip) to a folder named VB_MarketingSite_Layouts on your local computer.
Download the application zip file:
In the left navigation menu of this solution playbook, under Download Code, click GitHub Repository to download the oce-vb-marketing-sites-sample.zip file.
The zip file contains a readme file, license files, and the sample code.
Note:
The images used in the asset pack and component layouts are Shutterstock images. If you reuse these images, then they must be licensed through Shutterstock. You can also replace these images with your own images.Import and Publish Component Layouts
- Sign in to Oracle Content Management as an administrator. If you don't see an ADMINISTRATION section in the left navigation menu in the Oracle Content Management web interface, you don't have administrator privileges. In that case, contact your service administrator.
- In the left navigation menu, click Developer, and then View all Components.
- On the Components page, click Create, and choose Import Component.
- In the Pick a File dialog, navigate to the folder where you want to upload the file or create a new folder, and click Upload.
- Locate and select the component layouts (Ad-Highlight, Blog-Default, Blog-Details, Blog-Highlight, MenuCombo-Default, MenuItem-Default, Promo-Default, and Promo-Details) within your local computer’s VB_MarketingSite_Layouts folder you created earlier (by extracting VB_MarketingSite_Layouts.zip file).
- Click Open. Wait for the file to be uploaded. Once the file is uploaded, it will be available for selection.
- Select the check box next to the component layout's zip file and click OK. In the list of components on the Components page, you'll now see the component layout you imported. Repeat this step for each of the component layouts.
- On the Components page, select the component layouts you imported and click Publish. In the Publish Component dialog, select Confirm to proceed and click OK.
Enable Front Channel Cross Origin Resource Sharing
As Oracle Visual Builder is hosted in a different domain, add the browser application domain to Oracle Content Management’s Front Channel Cross Origin Resource Sharing (CORS) origins list.
- In the left navigation menu, click System under ADMINISTRATION.
- Select Security from the drop-down list.
- In the Front Channel CORS Origins field, add the Oracle Visual Builder domain URL and click Save.
Create a Publishing Channel and a Repository
A publishing channel is a specific context in which an asset in a repository can be used. Content items must be published through a publishing channel. A repository is a storage location to manage all the assets you use in your website. Therefore, create a publishing channel and a repository.
- Sign in to Oracle Content Management as an administrator. If you don't see an ADMINISTRATION section in the left navigation menu in the Oracle Content Management web interface, you don't have administrator privileges. In that case, contact your service administrator.
- Click Content under ADMINISTRATION in the left navigation menu.
- Choose Publishing Channels from the drop-down list and click Create in the upper right corner.
- In the Name field, enter a meaningful channel name (for example, Cafe-Supremo).
- Set the Localization field to None.
- Click Save.
The newly created publishing channel is now included in the list of publishing channels on the Content page.
Note:
Click the publishing channel you created, expand the sidebar to view the Properties pane, and then make a note of the Channel Token value from the API tab. - Choose Repositories from the drop-down list, click Create in the upper right corner and then choose Asset Repository.
- In the Name field, enter a meaningful repository name (for example, CafeSupremo).
- In the Publishing Channels field, select the publishing channel you created (Cafe-Supremo).
- In the Default Language field, ensure that English (United States) (en-US) is selected.
- Click Save.
The newly created repository is now included in the list of repositories on the Content page.
Import the Assets into the Repository
Your website application can include digital assets and content items. Import the assets for the website application into the repository you created earlier.
- Click Content under ADMINISTRATION in the left navigation menu.
- Choose Repositories from the drop-down list
- Select the CafeSupremo repository and click Import Content in the menu bar.
- Now, upload the OCE_VBSampleAssets.zip package available within your local computer’s OCE SamplesAsset Pack folder (which you downloaded and extracted earlier).
- Once the file is uploaded, select it and click OK to import the contents into the asset repository.
- Once the content is imported successfully, navigate to the Assets page and select the CafeSupremo repository. The imported assets (such as images and content items) are displayed on the page.
- Choose Select All on the top, click More, and then choose Publish Now to publish all the assets to the publishing channel you created earlier (Cafe-Supremo).
- On the Validation Results page, select Cafe-Supremo publishing channel as a selected channel and then click Validate.
- After the assets have been validated, click Publish to publish all the assets to the selected channel.
Set Up the Application
Import the Café Supremo marketing website application into Oracle Visual Builder.
- Sign in to Oracle Visual Builder.
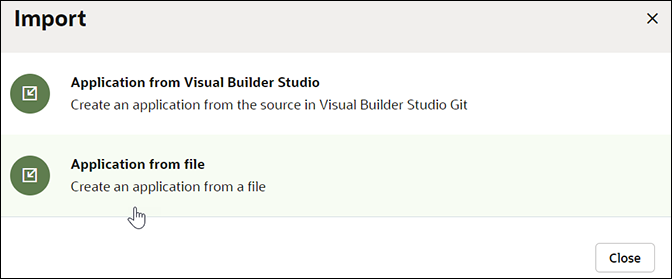
- Click Import.
- In the Import dialog, select Application from file.
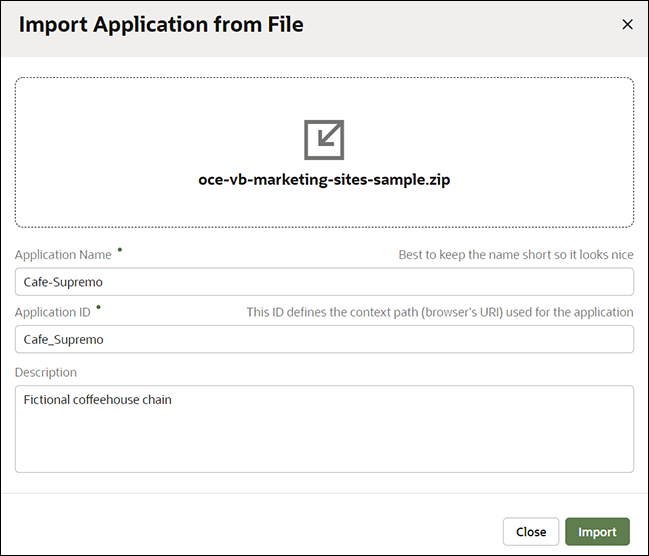
- In the Import Application from File dialog, upload the zip file (oce-vb-marketing-sites-sample.zip) you downloaded earlier.
The Application Name and Application ID fields are automatically populated.
- Edit the Application Name field to enter a name for your website application (such as Cafe-Supremo).
- Click Import.
Configure the Integration
In order to use Oracle Content Management components in Oracle Visual Builder applications, there are certain specific integration settings that you need to configure.
To add a component to an Oracle Visual Builder application page, you'll need to first install the Oracle Content Management component from a component exchange connected to your Oracle Visual Builder instance.
- Open the Oracle Visual Builder instance’s Tenant Settings page.
- In the Component Exchange panel, enter the URL and credentials for the component exchange.
If you are adding a connection to a private component exchange, it is recommended that the credentials you provide are for an administrator who is a member of the VB Studio project hosting the exchange or the project owner.
After an exchange is added to the Oracle Visual Builder instance, you'll be able to use the Components tab in the navigator to install and manage the components (you want to use in your applications) from the exchange.
The variables such as contentServer and channelToken need to be set in Oracle Visual Builder using the URL and Channel Token value of Oracle Content Management. The contentServer variable needs to be set if you are accessing a public channel and the channelToken variable needs to be set to the Channel Token value of the publishing channel you created earlier.
- Navigate to the Oracle Content Management instance and copy the URL. Don't worry about sub-directories. For example, both of these will work:
- https://example.cec.ocp.oraclecloud.com/documents/home
- https://example.cec.ocp.oraclecloud.com
- This property will be initialized as an application-level variable by default when you add the component to your page. In Oracle Visual Builder, open your application, click cafesupremodemo in the left navigation tree and then click the Variables tab.
The application-level variables are shown on the Variables tab.
- Select contentServer from the list of variables and then expand its properties.
- On the General tab, update the Default Value field to the Oracle Content Management URL value you copied earlier (such as https://example.cec.ocp.oraclecloud.com).
Note:
Once the variable is updated, when you add another Oracle Content Management component that requires this attribute, the attribute will default to the same variable initiated by the first component that was imported.
- On the Variables tab, now select the channelToken variable from the list of variables and then expand its properties.
- On the General tab, update the Default Value field to the Channel Token value (of the publishing channel) you made a note of earlier.
Oracle Content Management components that place assets on an Oracle Visual Builder application page only work for published content items.
Other Oracle Content Management components for Oracle Visual Builder applications may have additional requirements. Detailed component configuration instructions, including requirements and options, are found in the Readme file of each component.

