Configure Oracle Sales and Service Application Integration
In this section, you will add the Oracle Sales and Service application common functionality needed to communicate with OCM. This entails creating new web services to communicate with the OCM document REST APIs, Oracle Sales, and Service application global functions to call these new web services, and an Oracle Sales and Service application mashup to expose the OCM embedded UI integration.
Create a Sandbox
To create a sandbox to implement the Oracle Sales and Service Application changes for this integration:
- Sign in as the Oracle Sales and Service administrator.
- Click
 in the upper left corner of the page. Select the Configuration
option from the menu and then select Sandboxes.
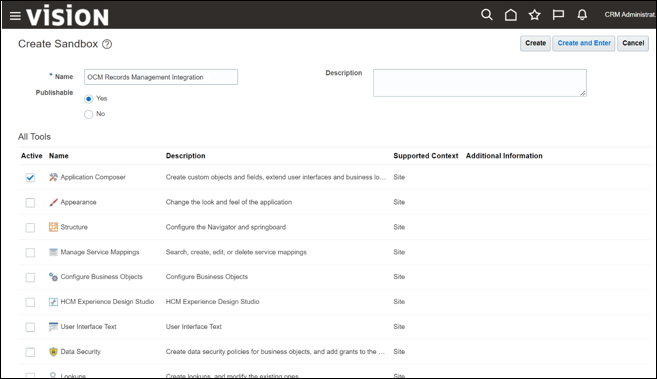
 - On the Create Sandbox page, complete the following fields:
- On the Sandboxes page, click Create Sandbox.
- On the Create Sandbox page, specify a name for this sandbox in the Name field (for example, OCM Records Management Integration).
- From the All Tools list, select the Application Composer check box.
- Click Create and Enter.
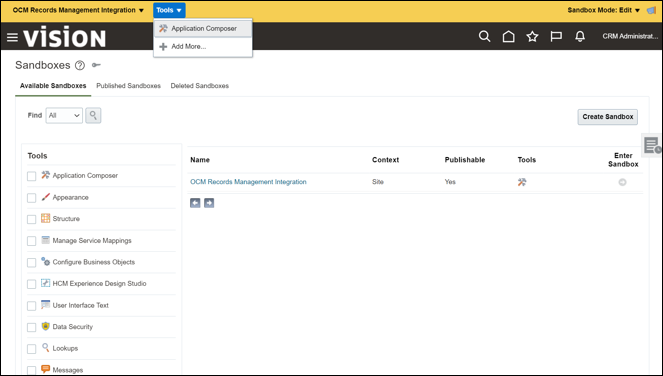
- To enter the application composer where you will be making your OCM
integration changes, click Tools in the upper left corner of the page and
then select Application Composer from the drop-down list.
Create Web Services
Web Services are used to communicate with OCM through the OCM document REST APIs.
OCMCreateRepositoryCollectionService
- Choose Common Setup and then Web Services from the left navigation menu.
- On the Web Services page, click the Create a new Web Service icon.
- In the Select Connection Type dialog, select the REST option and click OK.
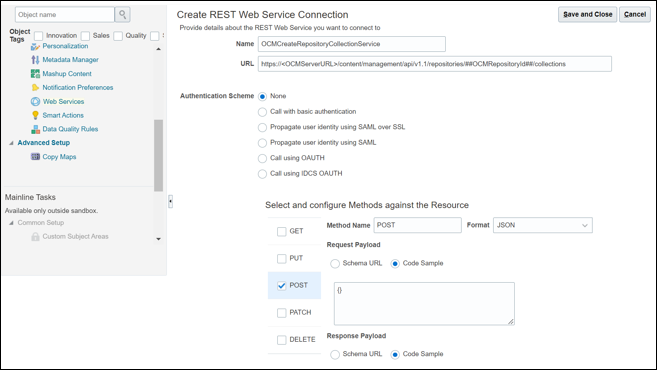
- On the Create REST Web Services Connection page, complete the
following fields:
- In the Name field, specify the name of the folder as OCMCreateRepositoryCollectionService.
- In the URL field, enter the web service URL as
https://<OCMServerURL>/content/management/api/v1.1/repositories/##OCMRepositoryId##/collectionsthat is needed to create the OCM repository collection. Where<OCMServerURL>is the Oracle Content Management server that is used for this integration (for example,https://mycloud.com/content/management/api/v1.1/repositories/##OCMRepositoryId##/collections). - In the Authentication Scheme section, select the None option as it will be configured in the next step.
- In the Select and Configure Methods against Resource section, select the POST check box.
- In the Request Payload section, select the Code
Sample option and add
{}to the multi-line text box. - In the Response Payload section, select the Code
Sample option and add
{}to the multi-line text box.
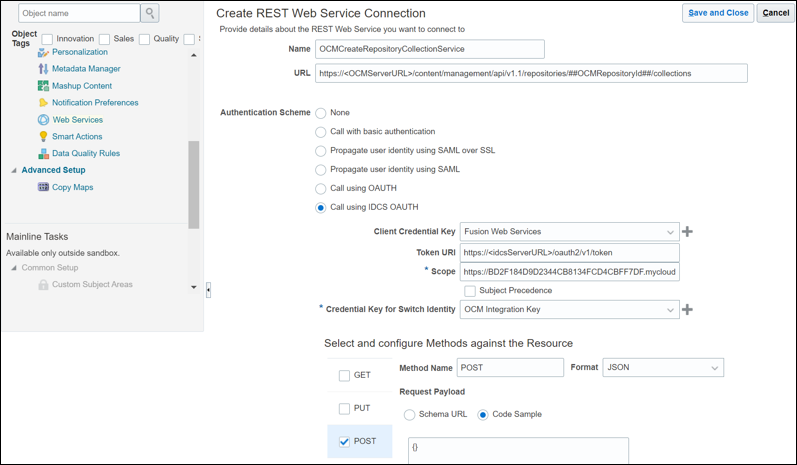
- To create the IDCS OAUTH authentication scheme that will be used
for the web services, in the current Create REST Web Services Connection page,
complete the following fields:
Note:
These steps are only required when you are creating a web service to OCM for the first time.- In the Authentication Scheme section, select the Call using IDCS OAUTH option.
- In the Token URI field, enter the IDCS server URL
https://<idcsServerURL>/oauth2/v1/token. Where<idcsServerURL>is the URL to the IDCS server that is used for this integration. - In the Scope field, enter the scope that was copied
above when creating the IDCS OAUTH authentication scheme (for example,
https://BD2F184D9D2344CB8134FCD4CBFF7DF.mycloud.com:443/urn:opc:cec:all). - To create the client credential key, complete the following
fields:
- Select the Create Credential Key icon next to the Client Credential Key field.
- In the CSF Key field, enter the key (for example, Fusion Web Services).
- In the User Name field, enter the client ID that was copied above when creating the IDCS OAUTH authentication scheme (for example, c585b2d3e97c40e491ca99112281e36).
- In the Password field, enter the client secret that was copied above when creating the IDCS OAUTH authentication scheme (for example, 768b9513-658e-4854-bac7-2fe72d19011).
- Click OK.
- To create the OCM credential key for switch identity,
complete the following fields:
- Select the Create Credential Key icon next to the Credential Key for Credential Key field.
- In the CSF Key field, enter the key (for example, OCM Integration Key).
- In the User Name field, enter the OCM integration user (the one you used login into OCM earlier to create the base asset repository) that is used to communicate with OCM (this must be an enterprise user in OCM).
- In the Password field, enter the OCM integration user password.
- Click OK.
- Click Save and Close.
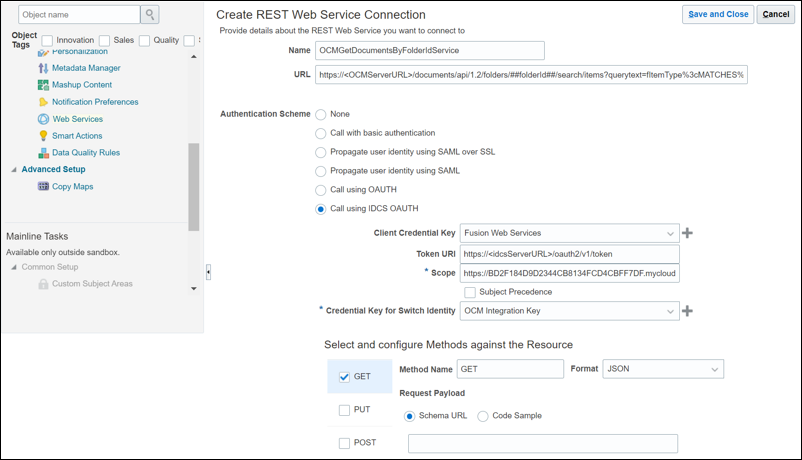
OCMGetDocumentsByFolderIdService
Note:
This web service is only required if the Oracle Sales and Service business object has the resolve option and has been configured with OCM Document integration. See Learn About How to Extend Oracle Sales and Service Business Objects with Document Collaboration for more information on Document Integration.- In the Name field, specify the name as OCMGetDocumentsByFolderIdService.
- In the URL field, specify the URL as
https://<OCMServerURL>/documents/api/1.2/folders/##folderId##/search/items?querytext=fItemType%3cMATCHES%3e%60File%60. Where<OCMServerURL>is the Oracle Content Management server that is used for this integration. - In the Authentication Scheme section, select the Call using IDCS OAUTH option and use the same values as used above for the IDCS OAUTH parameters.
- In the Select and Configure Methods against Resource section, select the GET check box.
- In the Response Payload section, select the Code Sample option
and add
{}to the multi-line text box.
OCMBulkOperationsService
To create the OCM Bulk Operations web service in a new Create REST Web
Service Connection page, complete the following fields: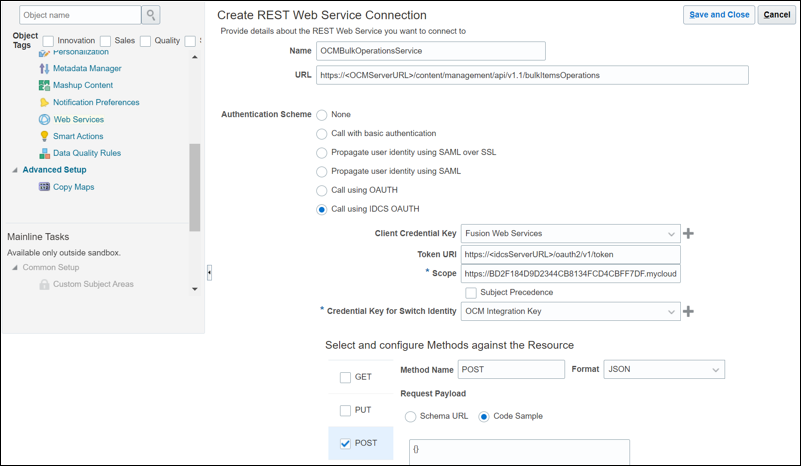
Description of the illustration bulkoperations.png
- In the Name field, specify the name as OCMBulkOperationsService.
- In the URL field, specify the URL as
https://<OCMServerURL>/content/management/api/v1.1/bulkItemsOperations. Where<OCMServerURL>is the Oracle Content Management server that is used for this integration. - In the Authentication Scheme section, select the Call using IDCS OAUTH option and use the same values as used above for the IDCS OAUTH parameters.
- In the Select and Configure Methods against Resource section, select the POST check box.
- In the Request Payload section, select the Code Sample option and
add
{}to the multi-line text box.
OCMRepositoryCollectionPermissionsService
To create the OCM Repository Collection Permissions web service in a new
Create REST Web Service Connection page, complete the following fields: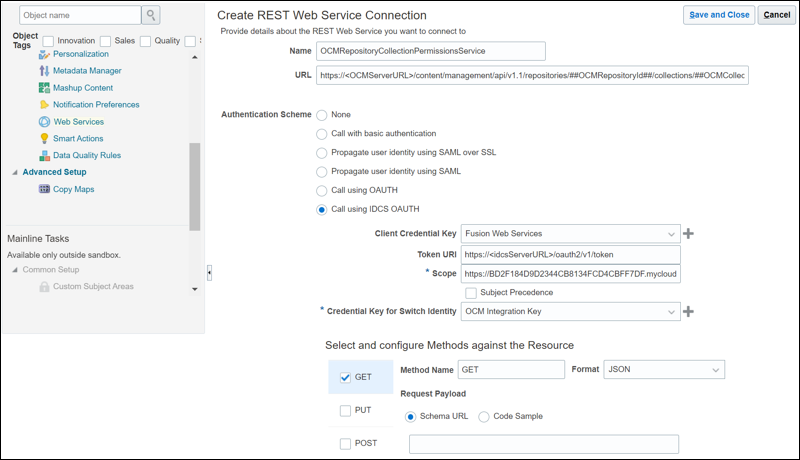
Description of the illustration permissionservice.png
- In the Name field, specify the name as OCMRepositoryCollectionPermissionsService.
- In the URL field, specify the URL as
https://<OCMServerURL>/content/management/api/v1.1/repositories/##OCMRepositoryId##/collections/##OCMCollectionsId##/permissions. Where<OCMServerURL>is the Oracle Content Management server that is used for this integration. - In the Authentication Scheme section, select the Call using IDCS OAUTH option and use the same values as used above for the IDCS OAUTH parameters.
- In the Select and Configure Methods against Resource section, select the GET check box.
- In the Response Payload section, select the Code Sample option
and add
{}to the multi-line text box.
OCMPermissionOperationsService
To create the OCM Permissions Operations web service in a new Create REST
Web Service Connection page, complete the following fields: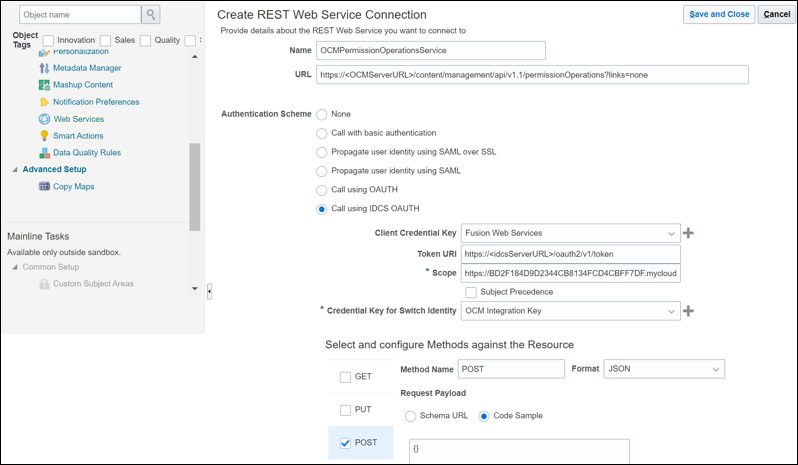
Description of the illustration operationservice.png
- In the Name field, specify the name as OCMPermissionOperationsService.
- In the URL field, specify the URL as
https://<OCMServerURL>/content/management/api/v1.1/permissionOperations?links=none. Where<OCMServerURL>is the Oracle Content Management server that is used for this integration. - In the Authentication Scheme section, select the Call using IDCS OAUTH option and use the same values as used above for the IDCS OAUTH parameters.
- In the Select and Configure Methods against Resource section, select the POST check box.
- In the Request Payload section, select the Code Sample option and
add
{}to the multi-line text box. - In the Response Payload section, select the Code Sample option and add
{}to the multi-line text box.
Create a Mashup
A Mashup is a window into an independent external application such as OCM.
To create a Mashup to embed the OCM embedded UI so that it can be exposed in an Oracle Sales and Service business object:
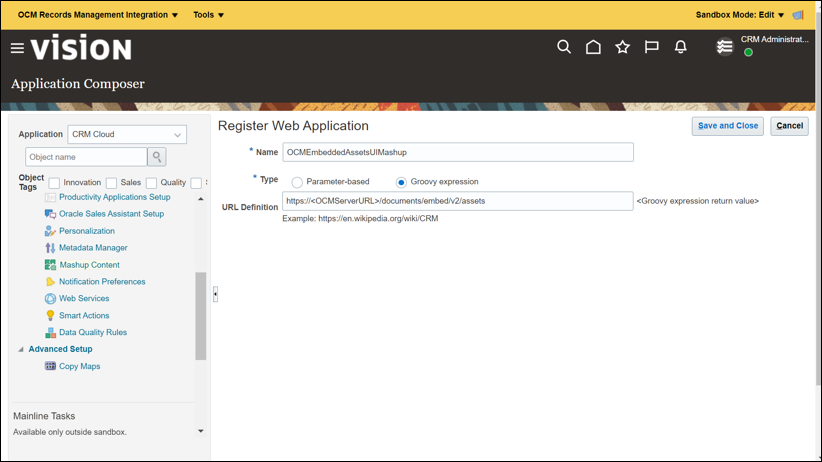
- Choose Common Setup and Mashup Content from the left navigation menu.
- On the Mashup Content: Web Applications page, click the Register Web Application button.
- On the Register Web Application page, complete the following
fields:
- In the Name field, specify the name of the application as OCMEmbeddedAssetsUIMashup.
- For the Type field, select the Groovy Expression option.
- In the URL Definition field, enter the OCM embedded UI
URL as
https://<OCMServerURL>/documents/embed/v2/assets. Where<OCMServerURL>is the Oracle Content Management server that is used for integration. - Click Save and Close.

