Configure Specific Business Object Integration
In this last section, you will perform the steps required to add the OCM embedded asset repository UI within a specific Oracle Sales and Service application business object.
In this section, we will once again be using service requests, but any business objects can be updated using these steps such as opportunities, campaigns, events, etc. This entails custom fields within the service request to store the OCM base asset repository ID as well as the unique OCM collection ID. These steps will also add an Assets tab into the service request details page that exposes the OCM embedded asset repository UI through a Mashup using the OCM collection ID specific to the service request. And once a service request has been resolved any related OCM documents will also be copied to the OCM asset repository collection.
Create Custom Fields
A custom field is specific to the business object it is created in. These variables are accessible by the business object and can be unique to each instance of the business objects that are created.
OCM Collection ID
A custom field is specific to the business object it is created in. These variables are accessible by the business object and can be unique to each instance of the business objects that are created.
- To re-enter the application composer, click Tools in the upper left corner of the page and then select Application Composer from the drop-down list.
- Choose Objects, then Standard Objects, then Service Request, and then Fields from the left navigation menu.
- On the Fields page, select the Custom tab and click the Create a custom field icon.
- In the Select Field Type dialog, select the Text option and click OK.
- On the Create Text Field page, complete the following fields:
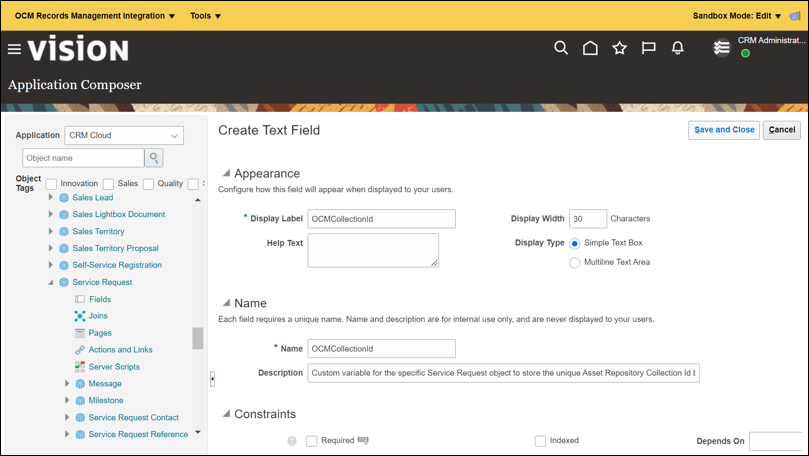
- In the Display Label field, specify the name as OCMCollectionId. The Name field is automatically filled in based on the value specified in the Display Label field.
- In the Description field, enter the text “Custom variable for the specific Service Request object to store the unique Asset Repository Collection Id being used the OCM Asset Repository Records Management integration.”.
- Click Save and Close.
OCM Base Repository ID
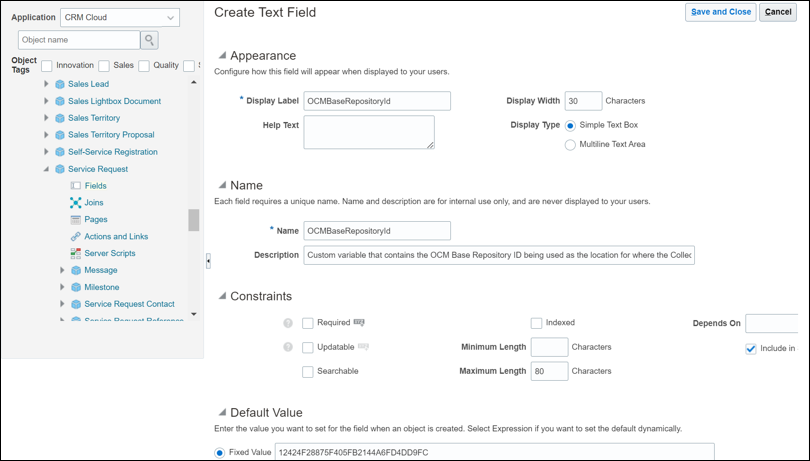
- In the Display Label field, specify the name as OCMBaseRepositoryId. The Name field is automatically filled in based on the value specified in the Display Label field.
- In the Description field, enter the text “Custom variable that contains the OCM Base Repository ID being used as the location for where the Collections will be created for the OCM Asset Repository Records Management integration.”.
- In the Constraints section, unselect Updatable.
- In the Fixed Value field, enter the value of the OCM base asset repository ID that was saved above (for example, 12424F28875F405FB2144A6FD4DD9FC).
- Click Save and Close.
Extend the Business Object
Business Objects can be extended using a Mashup (like the one we created above) to expose an external application such as OCM within the Business Object UI.
- Choose Objects, then Standard Objects, then Service Request, and then Pages from the left navigation menu.
- On the Service Request: Pages page, in the Details Page Layouts
section, click the Duplicate Details Page Layout icon.
Note:
If a custom page has already been created, then that page can be used for the OCM Asset Integration instead of creating a new one and step 3 can be skipped. - In the Duplicate Layout dialog, complete the following fields:
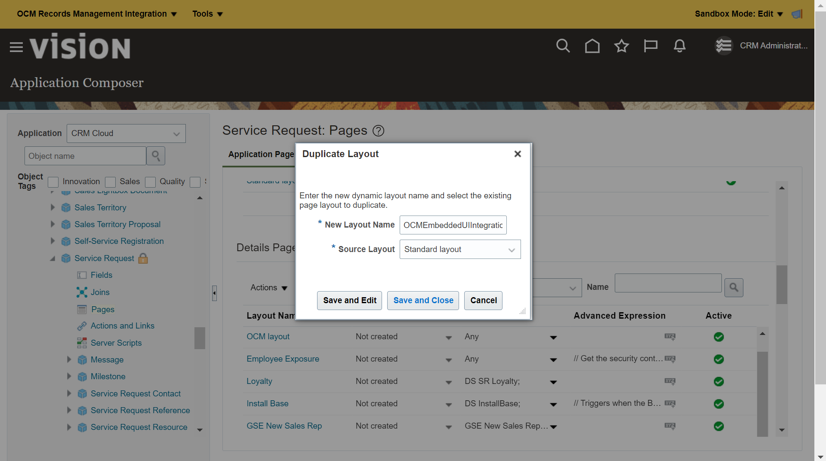
- In the New Layout Name field, specify the name as OCMEmbeddedUIIntegration.
- In the Source Layout field, select Standard layout from the drop-down menu.
- Click Save and Edit.
- In the Details Layout page, select the Add icon from the bottom of the left navigation menu in the Subtabs Region section to add the OCM embedded UI.
- Select the Mashup Content option. Click Next.
- On the next page, select the OCMEmbeddedAssetsUIMashup option that was created earlier and click Insert.
- On the next page, complete the following fields:
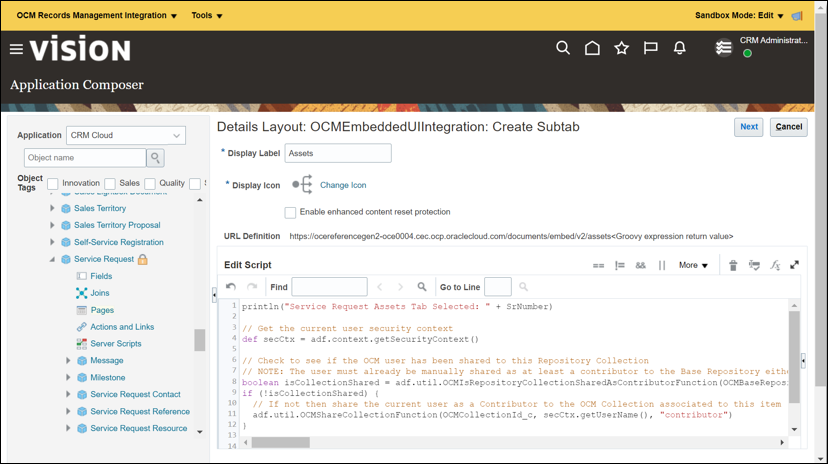
- In the Display Label field, enter Assets.
- For the Display Icon, click Change Icon if you want to change the default icon that shows up in the service request UI as a tab.
- In the Edit Script field, paste the following
script:
println("Service Request Assets Tab Selected: " + SrNumber)

// Get the current user security context
def secCtx = adf.context.getSecurityContext()

// Check to see if the OCM user has been shared to this Repository Collection
// NOTE: The user must already be manually shared as at least a contributor to the Base Repository either directly or indirectly through a group for this integration to work
boolean isCollectionShared = adf.util.OCMIsRepositoryCollectionSharedAsContributorFunction(OCMBaseRepositoryId_c, OCMCollectionId_c, secCtx.getUserName())
if (!isCollectionShared) {
  // If not then share the current user as a Contributor to the OCM Collection associated to this item
  adf.util.OCMShareCollectionFunction(OCMCollectionId_c, secCtx.getUserName(), "contributor")
}

println("Loading OCM Embedded Assets UI")
return '?options={"assetsView":{"select":"single","layout":"grid","sort":"relevance","header":{"add":{"upload":true,"documents":true},"collections":true},"filter":{"bar":{"capsules":false},"repositories":["' + OCMBaseRepositoryId_c + '"],"collections":["' + OCMCollectionId_c + '"]},"filterValue":{"repositoryId":"' + OCMBaseRepositoryId_c + '","collectionId":"' + OCMCollectionId_c + '","includeChildCategories":false},"sidebar":{"categories":true,"conversation":true,"properties":true},"actions":{"open":true,"download":true,"uploadNewVersion":true,"delete":true},"card":{"status":false}},"assetViewer":{"header":{"annotate":true,"fullScreen":true,"close":true},"actions":{"download":true,"uploadNewVersion":true,"makeCurrent":true},"sidebar":{"categories":true,"conversation":true,"properties":true,"renditions":true}},"dialogs":{"addToRepository":{"sidebar":{"categories":true},"default":{"collections":["' + OCMCollectionId_c + '"]}}}}'
Note:
This script automatically assigns the contributor role to each user accessing the specific asset repository collection. This could potentially be further refined, for example, to grant the service request owner the manager role while giving other users the contributor role. - Click the Next button.
- Click Save and Close.
Add Event Triggers
An event trigger checks for an event and when that event occurs, it runs the code associated with the trigger.
OCMCreateCollectionTrigger
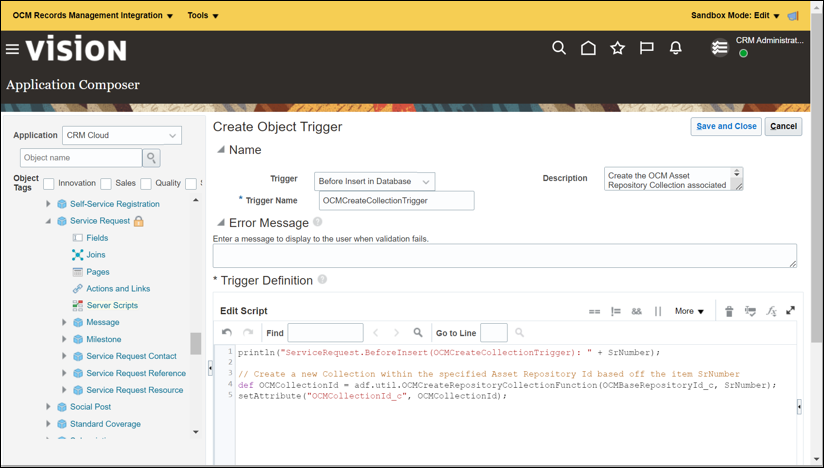
To add a server script object trigger to create the related OCM asset repository collection when the service request is created:
- Choose Objects, then Standard Objects, then Service Request, and then Server Scripts from the left navigation pane.
- On the Server Scripts Service Request page, select the Triggers tab.
- Under the Object Triggers section, click Add a new Trigger.
- On the Create Object Trigger page, complete the following fields:
- From the Trigger drop-down menu, select Before Insert in Database.
- In the Trigger Name field, specify the trigger name as OCMCreateCollectionTrigger.
- In the Description field, enter the text “Create the OCM Asset Repository Collection associated to the ServiceRequest being created.”.
- In the Edit Script field, paste the following
script:
println("ServiceRequest.BeforeInsert(OCMCreateCollectionTrigger): " + SrNumber); // Create a new Collection within the specified Asset Repository Id based off the item SrNumber def OCMCollectionId = adf.util.OCMCreateRepositoryCollectionFunction(OCMBaseRepositoryId_c, SrNumber); setAttribute("OCMCollectionId_c", OCMCollectionId); - Click Save and Close.
OCMCopyDocumentsToCollectionTrigger
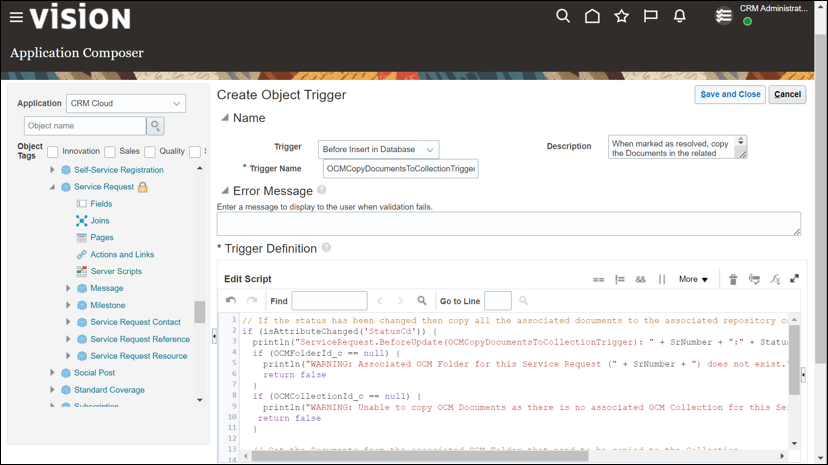
To add a server script object trigger in a new Create Object Trigger page to copy the documents in a related OCM folder and its child folders to the OCM repository collection when the service request is resolved, complete the following fields:
Note:
This trigger is only required if the Oracle Sales and Service business object has the resolve option and has been configured with OCM Document integration. See Learn About How to Extend Oracle Sales and Service Business Objects with Document Collaboration for more information on Document Integration.- From the Trigger drop-down menu, select Before Update in Database.
- In the Trigger Name field, specify the trigger name as OCMCopyDocumentsToCollectionTrigger.
- In the Description field, enter the text “When marked as resolved, copy the Documents in the related OCM Folder and its child Folders to the related Collection for Records Management.”.
- In the Edit Script field, paste the following
script:
// If the status has been changed then copy all the associated documents to the associated repository collection if (isAttributeChanged('StatusCd')) { println("ServiceRequest.BeforeUpdate(OCMCopyDocumentsToCollectionTrigger): " + SrNumber + ":" + StatusCd + "(" + OCMFolderId_c + ":" + OCMCollectionId_c + ")") if (OCMFolderId_c == null) { println("WARNING: Associated OCM Folder for this Service Request (" + SrNumber + ") does not exist.") return false } if (OCMCollectionId_c == null) { println("WARNING: Unable to copy OCM Documents as there is no associated OCM Collection for this Service Request(" + SrNumber + ").") return false } // Get the Documents from the associated OCM Folder that need to be copied to the Collection def documents = (java.util.List)adf.util.OCMGetDocumentsByFolderIdFunction(OCMFolderId_c) if (documents.size() > 0) { // Copy the documents adf.util.OCMCopyDocumentsToRepositoryCollectionFunction(OCMBaseRepositoryId_c, OCMCollectionId_c, documents) } return true } - Click Save and Close.
