Create an Oracle Cloud Infrastructure API Gateway

You'll need to set up an API Gateway and configure it with a dynamic group and a policy.

Create an Oracle Cloud Infrastructure API Gateway

Create an API gateway to handle your REST API traffic.

You can create the gateway within Oracle Cloud Infrastructure. Note that you cannot deploy the API deployment file (API Gateway defines its APIs using a JSON file called API Deployments) until you’ve deployed the function, because you will need the function's OCID. This is only available after the function has been deployed and remains the same for redeployments.

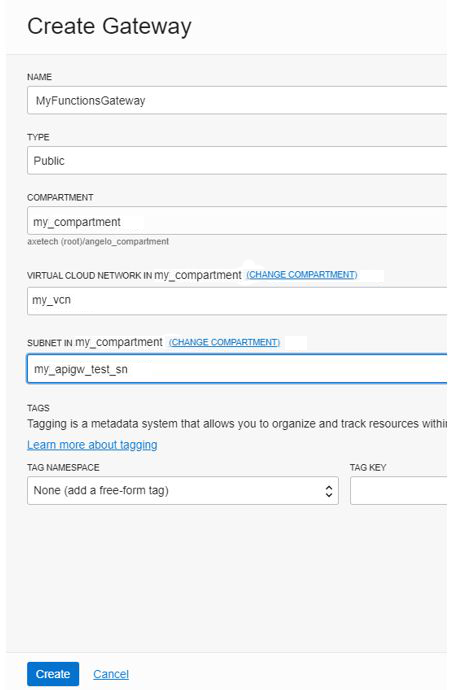
When creating the API gateway in the cloud console, ensure it is created as a public gateway and associated with a VCN. For example:


  1. In the Oracle Cloud Infrastructure console, confirm you're viewing the compartment that contains the VCN to which you want to add the API gateway.
  2. Open the navigation menu. Under Developer Services, click API Gateway.
  3. Under List Scope, click the compartment list to select the compartment in which you want to create your gateway.
  4. Click Create Gateway.
  5. Enter values: a name, the Type (Public), verify the compartment, choose a VCN in your compartment, a subnet in your compartment, and optionally, any tags you want to apply.
  6. Click Create.
    The API gateway is then created and displayed on the API Gateways page in the compartment you chose. The gateway allows traffic through it by default.
  7. Verify that your subnet is allowing port 443 (SSL):
    1. On the Gateway Details page, in the Gateway Information tab, click the Subnet name.
    2. On the Subnet Details page, click the security list for the VCN.
    3. Review the Ingress Rules. Verify or add a rule permitting TCP traffic to port 443.
Do not create Deployments in API Gateway yet.

Create a Dynamic Group

You need a dynamic group for API Gateway.

Dynamic groups allow you to group Oracle Cloud Infrastructure computer instances as "principal" actors (similar to user groups). You can then create policies to permit instances to make API calls against Oracle Cloud Infrastructure services. When you create a dynamic group, rather than adding members explicitly to the group, you instead define a set of matching rules to define the group members. For example, a rule could specify that all instances in a particular compartment are members of the dynamic group. The members can change dynamically as instances are launched and terminated in that compartment.

  1. In the Oracle Cloud Infrastructure console, navigate to the left icon under the Governance and Administration section, click Identity, and then select Dynamic Groups.
  2. Select Create Dynamic Group.
  3. Enter a name for the dynamic group. Record the name for future use. The name must be unique across all groups within your tenancy. You can't change this name later.
  4. Enter a description. You can't change the description later using the console, but you can change it by using the API.
  5. In the Matching Rules section, manually enter a rule in the text box, or select Launch Rule Builder to define a matching rule. For example:
    ANY {resource.type = 'ApiGateway', resource.compartment.id = '<Compartment_OCID>'}
    You can enter additional rules as needed by selecting +Additional Rule.
  6. Select Create Dynamic Group.
    The matching rule syntax is verified, but the OCIDs are not. Be sure that the OCIDs you enter are correct.

Create a Policy in Your Compartment

A dynamic group has no permissions until you write at least one policy that gives that dynamic group permission to either the tenancy or a compartment.

A Policy is an Oracle Cloud Infrastructure Identity and Access Management (IAM) document that specifies who has what type of access to your resources. When writing a policy, you can specify the dynamic group by using either the unique name or the dynamic group's OCID. However, even if you specify the dynamic group name in the policy, IAM internally uses the OCID to determine the dynamic group.
  1. In the Oracle Cloud Infrastructure console, open the navigation menu. Under Governance and Administration, go to Identity and click Policies.
    A list of the policies in the compartment you're viewing is displayed.
  2. If you want to attach the policy to a compartment other than the one you're viewing, select the desired compartment from the list on the left. Where the policy is attached controls who can later modify or delete it.
  3. Select Create Policy.
  4. Enter the following:
    • Name: A unique name for the policy. The name must be unique across all policies in your tenancy. You cannot change this later.
    • Description: A friendly description. You can change this later if you want to.
    • Policy Versioning: Select Keep Policy Current if you'd like the policy to stay current with any future changes to the service's definitions of verbs and resources. Or if you'd prefer to limit access according to the definitions that were current on a specific date, select Use Version Date and enter that date in format YYYY-MM-DD format.
    • Statement: Add the following statements:
    allow dynamic-group <apgw-group> to use virtual-network-family in compartment <CompartmentName>
    allow dynamic-group <apgw-group> to manage public-ips in compartment <CompartmentName>
    allow dynamic-group <apgw-group> to use functions-family in compartment <CompartmentName>
  5. Select Create.