Create an OCM IDCS Confidential Application
In this first step, you'll need to create an IDCS confidential application. It is required to communicate with OCM REST APIs via Oracle Visual Builder web services. The steps given below will walk you through creating this confidential application which will be used later during the creation of the web services within Oracle Visual Builder.
- To get the Visual Builder IDCS root signing certificate:
- If the IDCS authentication server is not known for the Visual
Builder system being used for this integration, then follow these steps to
get that location:
- Create a new tab in your web browser.
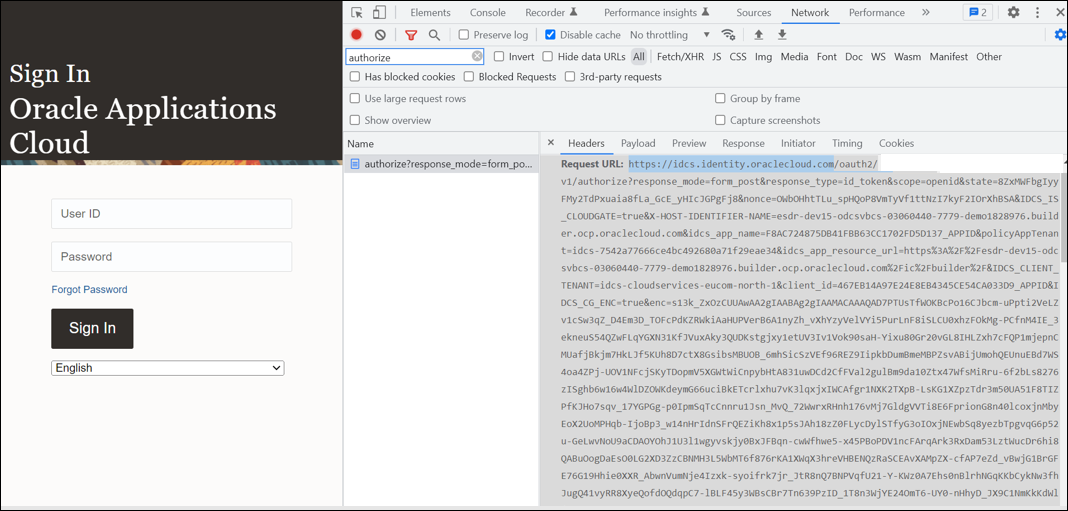
- Open the developer console and select the Network tab.
- Load the URL to your Visual Builder service.
- In the network tab of the developer console, search for the keyword authorize.
- Get the IDCS server URL from the request URL value and
save it as it will be needed in the steps below. For example,
https://idcs.identity.oraclecloud.com.
- Append
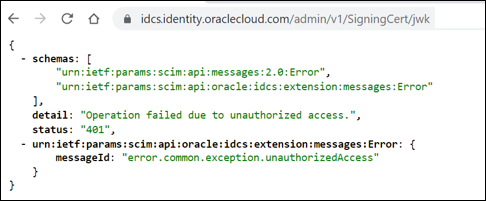
/admin/v1/SigningCert/jwkto the IDCS server URL and execute it in your browser. For example,https://idcs.identity.oraclecloud.com/admin/v1/SigningCert/jwk.Note:
In the screenshot, a Chrome plugin is being used to format the JSON. - If the returned page has an “Operation failed due to
unauthorized access” error, then the following additional steps will
need to be performed to get the IDCS root signing certificate:
- Append
/ui/v1/adminconsoleto the IDCS server URL above, execute it in your browser, and log in as the IDCS administrator. For example,https://idcs.identity.oraclecloud.com/ui/v1/adminconsole. - Click
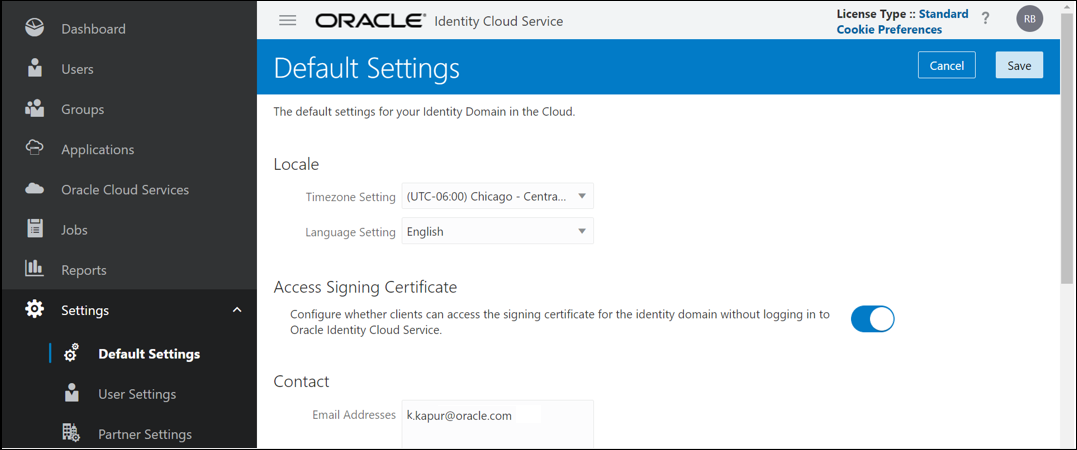
 in the upper left corner of the page and then from the
drop-down menu, select Settings, and then select the
Default Settings option.
Note:
If this option is not available, then the currently logged-in user does not have enough permissions. - In the Access Signing Certificate section, enable the Configure whether clients can access the signing certificate for the identity domain without logging in to Oracle Identity Cloud Service option.
- Select the Save button in the upper right corner of the page.
- Re-execute step b in a new browser window.
- In the Access Signing Certificate section, disable the Configure whether clients can access the signing certificate for the identity domain without logging in to Oracle Identity Cloud Service option and save the changes so that the IDCS server goes back to its original state.
- Append
- To create the IDCS root signing certificate file that will be
used to communicate to the OCM APIs from within Visual Builder:
- Copy the second value in the
x5cparameter of the JSON as this is the value that will be used to create the IDCS root signing certificate file. For example,MIIDdDCCAlygAwIBAgIG…i3yVKZNwdSEUTfmCsvhScX99Y. - Create a new file (i.e.
VBCS IDCS Root Signing
                                    Certificate.crt
) and paste the IDCS root signing certificate value. - On a new line add “-----BEGIN CERTIFICATE-----” before
the certificate value and add “-----END CERTIFICATE-----“ after the
certificate value.
For example:
-----BEGIN CERTIFICATE----- MIIDdDCCAlygAwIBAgIG...i3yVKZNwdSEUTfmCsvhScX99Y -----END CERTIFICATE----- - Save the file as this will be used in the steps below to create the OCM IDCS confidential application needed for 2- Legged authentication between Visual Builder and the OCM APIs.
- Copy the second value in the
- If the IDCS authentication server is not known for the Visual
Builder system being used for this integration, then follow these steps to
get that location:
- Create the confidential application that will be used for accessing the
OCM APIs from within the Visual Builder web services. To create the confidential
application:
- Sign in as the OCM IDCS administrator.
Note:
If the URL to the OCM IDCS server is not known, then you can load the URL for Oracle Content Management and once the login dialog appears, obtain it from the current URL in the browser, and then append/ui/v1/adminconsoleto the base server URL. For example,https://idcs.identity.oraclecloud.com/ui/v1/adminconsole. - Click
 in the upper left corner of the page. From the drop-down menu,
select the Applications option.
Note:
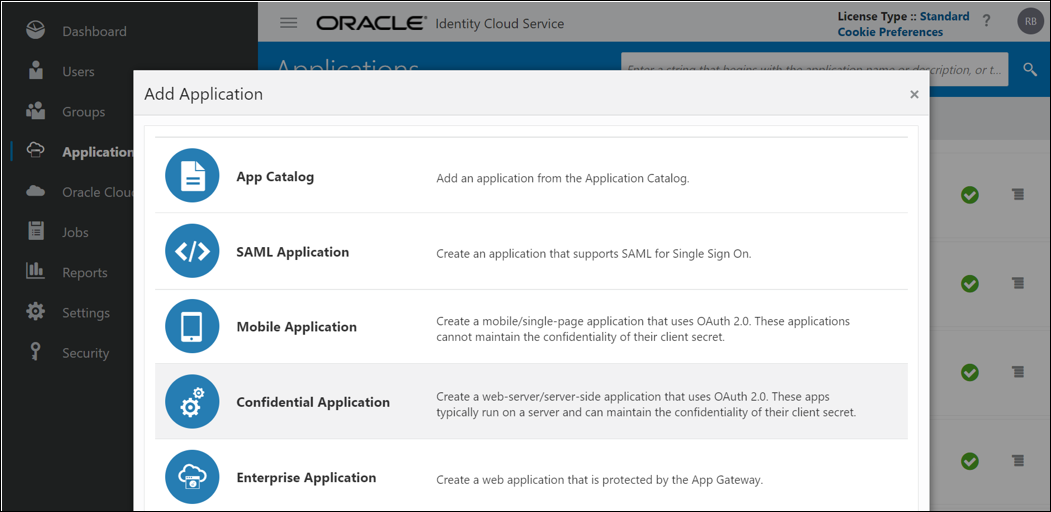
If this option is not available, then the logged-in user does not have sufficient permissions. - Select the Add button on the main page.
- In the Add Application dialog, select Confidential
Application.
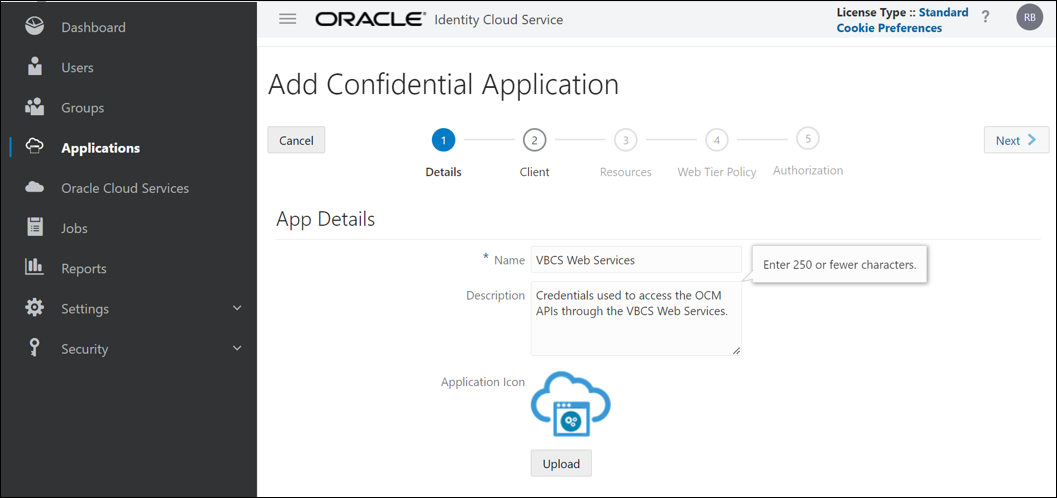
On the Add Confidential Application page, do the following:
- In the Name field, specify the name as VBCS Web Services.
- In the Description field, enter the text "Credentials used to access the OCM APIs through the VBCS Web Services".
- Click the Next button in the upper right corner of the page.
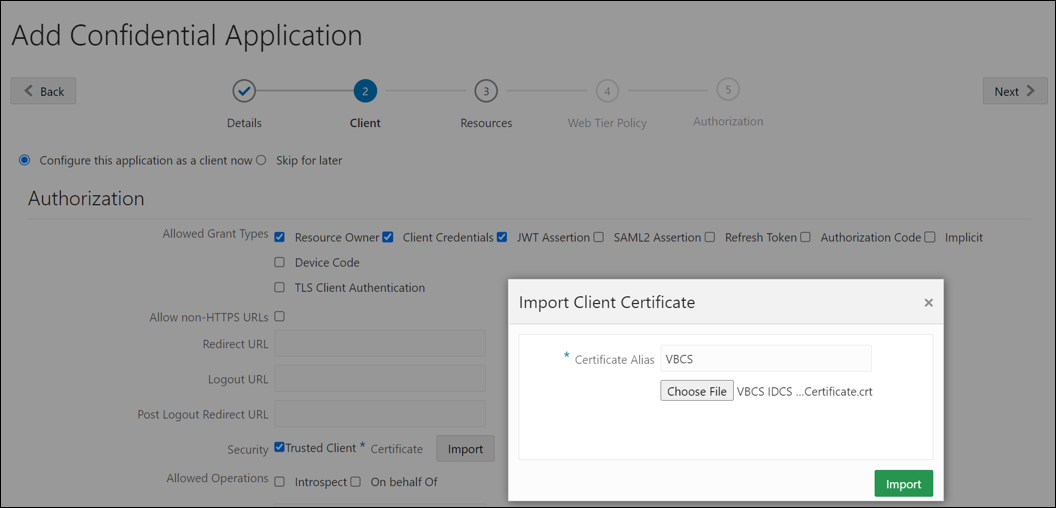
- Select the Configure this application as a client now option.
- In the Allowed Grant Types section, select the following check boxes: Resource Owner, Client Credentials, and JWT Assertion.
- In the Security field, select the Trusted
Client check box and also, click the Import button to
import the Visual Builder root signing certificate file created
above in the previous steps.
In the Import Certificate dialog, in the Certificate Alias field, enter the value as VBCS.
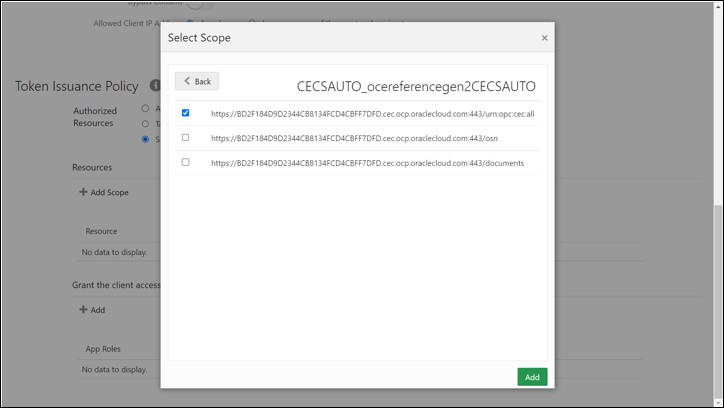
- In the Resources section, select Add Scope.
Select the right arrow to the right of the specific OCM server that will be used in this integration.
In the Select Scope dialog, select the check box next to the line with the URL ending in
opc:cec:all.Select the Add button to add this specific scope as it is required for this integration.
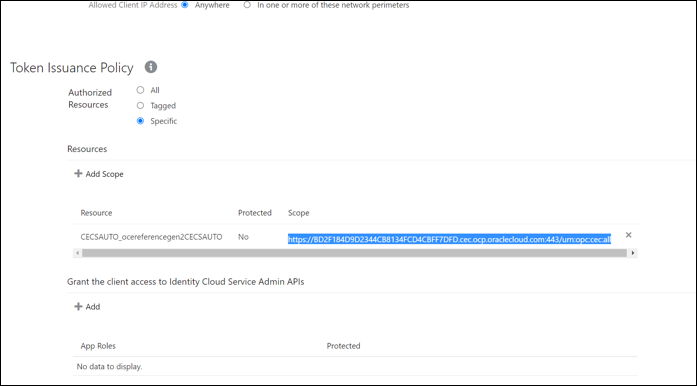
- Copy the Scope URL that was just added as we will
use this later when creating the Visual Builder apps web services to
communicate with the OCM APIs.
For example,
https://BD2F184D9D2344CB8134FCD4CBFF7DFD.cec.ocp.oraclecloud.com:443/urn:opc:cec:all. - Click the Next button until you reach the end of the Add Confidential Application train and then click the Finish button.
- In the Application Added dialog, copy the Client
ID as well as the Client Secret as these will be used
in the Visual Builder application web services to communicate with
the OCM APIs as well.
For example, Client ID: c585b2d3e97c40e491ca99112281e36d and Client Secret: 768b9513-658e-4854-bac7-2fe72d19011f.
- Sign in as the OCM IDCS administrator.
