Migrate Hadoop to Oracle Using WANdisco LiveData Migrator
LiveData Migrator is deployed on an edge node of the Hadoop cluster. Deployment is performed in minutes with no impact to current production operations. Users can begin to use the product immediately by using the command line, REST API, or user interface (UI) to perform the migration.
About Migrating Hadoop Data
The following are the typical steps involved in an Apache Hadoop to Cloud migration:
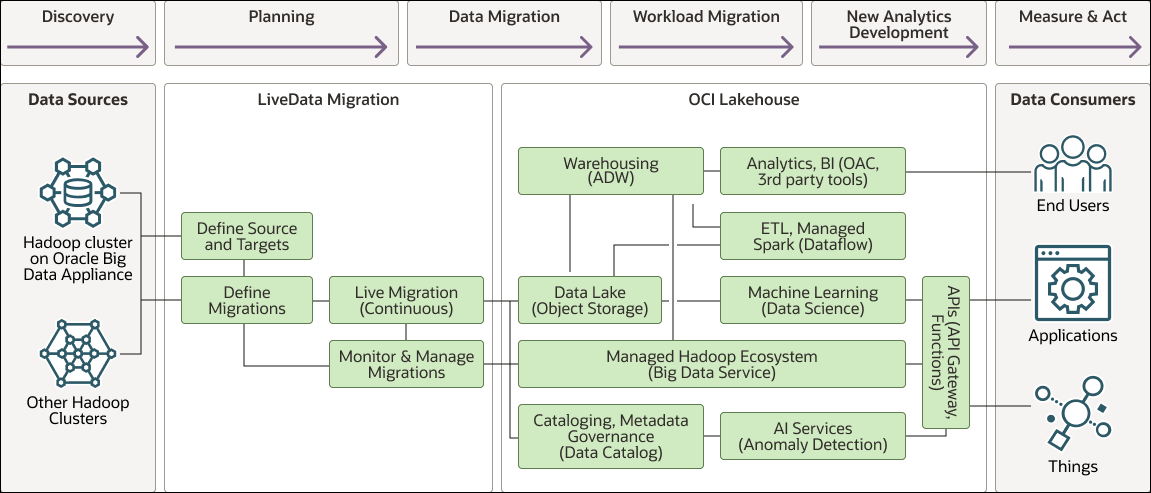
The following diagram illustrates the flow architecture and components.

Description of the illustration hadoop-lakehouse-migration.png
hadoop-lakehouse-migration-oracle.zip
- Discovery: Identify the data sets and workloads that are to be migrated to the cloud.
- Planning: Develop a plan and timeline for the phases in which the migration will be performed.
- Data Migration: Perform migration of the required data from the on-premises Hadoop environment to the cloud.
- Workload Migration: Perform migration of the workloads and/or applications from the on-premises environment to the cloud.
- New Analytics Development: Begin to develop new analytics, AI, and machine learning, thereby leveraging the new cloud environment.
- Measure & Act: Perform analytics to measure KPIs, assess performance, make predictions, and enable the business to act appropriately.
To try and simplify their cloud migration, many organizations choose to follow a “lift and shift” migration strategy. This strategy makes the simplistic assumption that the migration can be performed without making any changes to data or the applications. The logic is “just move them as they are to the cloud.” This assumption results in many failed projects or projects that exceed their time and costs. It requires either that existing systems be brought down to ensure no data changes occur, or requires that organizations spend time developing custom solutions to handle data changes. Other downsides to this strategy are, first, that it requires organizations to perform a big-bang cut-over of all applications and data at the same time, and second, it doesn’t take advantage of new cloud capabilities.
WANdisco promotes a data-first approach to data lake migrations. A data-first approach focuses on getting the data moved quickly and not trying to migrate all the existing applications at the same time. This focus makes the data available to the data scientists faster so they can begin working with the migrated data from day one. This enables for much faster time to new insights and new AI innovations. Organizations can demonstrate a much faster ROI on the cloud migration while the existing on-premises production workloads can continue to run unaffected. This approach also provides flexibility for the application and workload migration. It avoids any big-bang approaches and it provides organizations with time to optimize the workloads for the new cloud environment, ensuring it runs optimally and takes advantage of new capabilities available to them. Organizations can do as much parallel testing as needed to ensure they won’t experience any hidden costs, and a data-first approach also gives them time to determine if some of the applications may not need to be migrated at all, but instead replaced with the new development that has been occurring.
Define Sources and Targets
During deployment, WANdisco LiveData Migrator automatically discovers the source Apache Hadoop Distributed File System (HDFS) cluster so that you only need to define the target environment.
Define the Migration
Migrations transfer existing data from the source to the defined target. WANdisco LiveData Migrator migrates any changes made to the source data while it is being migrated and ensures that the target is up-to-date with those changes. It does this while continuing to perform the migration.
Users will typically create multiple migrations so they can select specific content from the source filesystem by path. You can also migrate to multiple independent filesystems at the same time by defining multiple migration targets.
To create a migration, provide a migration name, select the source and target filesystems, and specify the path on the source filesystem to be migrated. Optionally, you can apply exclusions to specify rules for data that should be excluded from a migration, and can apply other optional configuration settings.
LiveData Migrator also supports migration of Hive metadata from source to target metastores. LiveData Migrator connects to metastores through the use of local or remote metadata agents. Metadata rules are then used to define the metadata to be migrated from source to target.
When defining the migrations, you can specify to automatically start the migration and to determine whether it should be a live migration, meaning it will continuously apply any ongoing changes from source to target.