Expanding the SL8500
Storage Expansion Modules (SEMs) are added to the SL8500 to increase its capacity. The SEMs are inserted between the Customer Interface Module (CIM), which includes the CAP, and the SEM or Robotics Interface Module (RIM) that is currently attached to the CIM.
When an SL8500 is expanded:
-
The library configuration changes, and you must reconfigure ACSLS using either the ACSLS Dynamic Configuration utility while ACSLS is up, or run
acsss_configwhile ACSLS is down. -
Cartridges must be removed to expand the SL8500. When placing these cartridges back into the library, leave the cell arrays that they were formerly in, empty.
-
After the expansion is complete, the SL8500 must be rebooted twice. First to discover the new configuration, and second, to restart all library components with the updated configuration.
-
The library must update the locations of all cartridges with a physical audit.
The library begins a physical audit automatically when the access door is closed. The library's physical audit completes when all robot movement stops for at least a minute.
-
After the library's physical audit is complete, use the procedure Auditing an Expanded SL8500 to update the ACSLS database.
Note:
Do not start automated library operations until the ACSLS audits are complete, and the ACSLS database has been updated with the new cartridge locations.
What is Involved
Physically expanding an SL8500 involves the following:
-
A new SEM(s) is inserted between the existing SEMs or RIM and the CIM.
The panel numbers on the new SEM(s) and the CIM are now higher than the panel numbers on the existing SEMs and RIM.
-
Because the CIM must move out, new and higher panel numbers are assigned to the three cell panels (columns) on the CIM. When the cell panels on the CIM are assigned higher panel numbers, the addresses of all cartridges on the CIM change.
-
Many cartridges must be removed to expand the SL8500. Cell arrays must be removed to both unbolt existing rails, and bolt-in new ones, to jack-up the CIM.
-
After the new rails are installed and the SL8500 is expanded, the cartridges that were removed may be loaded back into the library. Leave the cell arrays that were temporarily removed to expand the library, empty.
After expansion, audit the library so ACSLS can update its database with the new addresses of these cartridges. When cartridges are placed in new locations, ACSLS' attempts to find the cartridges that were previously in the cells can seriously degrade library performance during an audit. To optimize both ACSLS and library performance, complete the following procedure:
- Let the library's physical audit complete before starting an ACSLS audit. The combined audits will finish faster if the library is able to report cartridge locations to ACSLS from its database. Otherwise, the library must re-verify cartridge locations before responding to ACSLS'
auditrequests. - For the cartridges that were removed to expand the library, use one of these strategies to re-insert them back into the library:
- Remove the cartridges from the library,
auditthe library from ACSLS, thenenterthe cartridges that were removed back into the library. - Insert the cartridges only into the panel numbers that were added to the library, then
auditthese panels, first.If you are not using ACSLS scratch pools to track scratch cartridges, no special procedure is required, if you have absent volume retention enabled (the default). When you
auditthe library, the cartridges that were moved are often marked absent, butauditfinds them in their new locations and reactivates them. The location of the cartridges is updated, and no important information is lost.If you are managing scratch cartridges by assigning cartridges to ACSLS scratch pools, and you do not want to have the cartridges' scratch status cleared, place the cartridges in the newly added panels, and
auditthese panels, first.-
Insert the cartridges that were removed into the panels that were added to the library. This means, only insert them into panels (columns) beyond the three panels that are closest to the drives in the first new SEM. (The first three panels in the first SEM have the panel numbers that were formerly assigned to the three panels in the CIM.
-
Then,
auditthe panels in the ACS or LSMs from the highest panel number down, through all of the new panel numbers that were added:Use
auditcap_idpanelpanel_id -
Finally,
auditthe rest of the ACS or LSMs:Use the
auditcap_idacsacs_idauditcap_idlsmlsm_id commands.
This procedure is described in full detail in Auditing an Expanded SL8500.
-
- Remove the cartridges from the library,
Diagram of SL8500 Modules:
In the following diagram, the three cell panels in the Customer Expansion Module (#5) are the three columns of cartridges on both the outside and inside walls on the drive side of the CEM. These are the only cell addresses in the CIM that HandBots can access when the service safety door is activated.
Figure C-3 SL8500 Customer Expansion Module
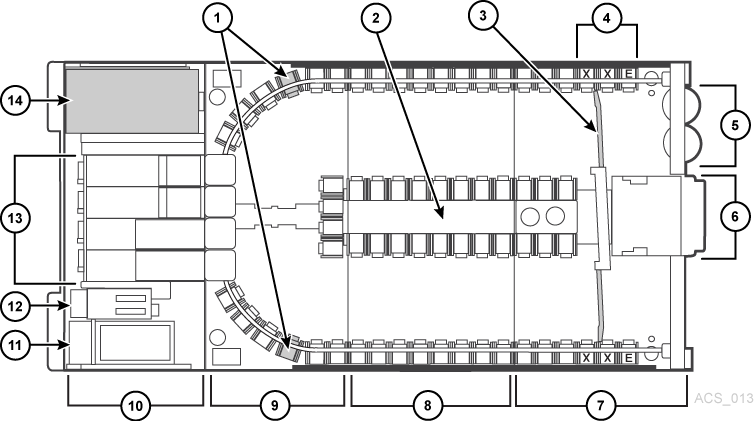
Description of "Figure C-3 SL8500 Customer Expansion Module"
Legend:
- Cartridge Access Ports (2) Caps
- Facade Operator Panel (Optional) Icey Pad
- Customer Interface Module
- Storage Expansion Module
- Robotics Interface Module
- PTP (Pass Thru Port)
- Drive Electronics Module
- AC Power Supplies Electronic Control Module
- DC Power Supplies
- Tape Drives
- Accessory Racks
- Inner wall
- Service Door
- Reserved Columns
- E = End Stop
- S = System Cell
Auditing an Expanded SL8500
Before expanding the SL8500:
- If you want to preserve the cartridges' scratch status:
- Determine the highest panel number for the LSMs in the library by running the following command:
display panel acs,lsm,*
Where:
-
acsis the ACS -
lsmis one of the LSMs. All rails (LSMs) on the SL8500 have the same number of panels. -
*displays all panels in the LSM.
-
- Record the highest panel number.
- Determine the highest panel number for the LSMs in the library by running the following command:
Varythe LSMs to a diagnostic state until the configuration is updated and cartridge addresses have been updated withaudit.- Backup the ACSLS database.
- Expand the SL8500:
During the expansion, cartridges must be removed to install new or expanded rails, and to add the Storage Expansion Modules.
Note:
Do not insert these cartridges back into the cell arrays that were temporarily removed to expand the library. This avoids a severe degradation in library performance when these locations are first audited. - Insert the cartridges that were removed into the panels that were added to the library.
This means, you should only insert these cartridges into panels (columns) beyond the three panels that are closest to the drives in the first new Storage Expansion Module. (The first three panels in the first Storage Expansion Module retain the numbers formerly assigned to the panels in the CIM.)
After physical expansion of the SL8500 is complete:
- Reboot the library twice.
- Leave the LSMs in a diagnostic state.
- Update the configuration in the ACSLS database using one of the following methods:
-
ACSLS is running:
config acs acs_idor, for each LSM (rail) in the SL8500:
config lsm lsm_id -
Shutting down ACSLS:
-
Bring down ACSLS:
acsss disable
-
Update the ACSLS configuration:
acsss_config
-
Bring up ACSLS:
acsss enable
-
If you want to preserve the cartridges' scratch status,
auditthe library using steps 9 through 11. If you are not tracking the cartridge scratch status using ACSLS scratch pools, skip to step 12. -
- Determine the new highest panel number for the LSMs in the library, and record this number using the following command:
display panel acs,lsm,*
Where:
-
acsis the ACS. -
lsmis one of the LSMs. All rails (LSMs) on the SL8500 have the same number of panels -
*displays all panels in the LSM.
-
Auditthe panels that were added during the expansion, from the new highest panel number to the old highest panel number+1.Auditthese panels in descending order using the following command:audit cap_id panel panel_id
Where:
-
cap_id is the CAP where cartridges with duplicate
vol_idsor unreadable labels should be ejected. -
panel_id is the panel being audited (
acs,lsm,panel)
-
- Perform a separate audit for each added panel in each LSM.
Note:
You can only run as many concurrent audits as you have CAPs in your library complex. Each concurrent audit needs a separate CAP. If the audit ejected any cartridges to the CAP, they must be removed before the audit finishes. Auditeach entire LSM in the expanded SL8500 (or audit the entire ACS).- Backup the ACSLS database.
Varythe LSMs online.- Resume automated library operations.
Connecting SL8500s with Pass-Thru-Ports
You may need to audit SL8500(s) to update cartridge addresses when adding SL8500 libraries to an existing SL8500 library complex.
LSMs in the SL8500 complex are numbered from top-down and right-to-left when viewed from the CAP end, as shown in the following figure.
Figure C-4 Four connected SL8500 Libraries
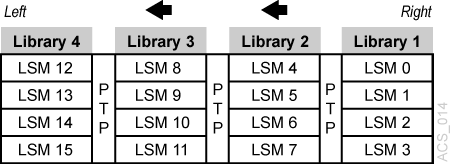
Description of "Figure C-4 Four connected SL8500 Libraries "
Depending on how your site is set up, you may be adding a new SL8500 to the right or left of an existing SL8500. As a result:
-
When a a new SL8500 is added on the left, the new LSMs have higher numbers, and existing LSMs are not renumbered. The disruption is minimal.
-
When a new SL8500 is added on the right, all existing LSMs are renumbered. This causes the home cell addresses of all existing cartridges to change.
Before You Install SL8500 PTP Connections
- Apply all relevant maintenance to ACSLS before installing SL8500 connections.
- Enable absent cartridge support.
When absent cartridge support is enabled, ACSLS will not delete cartridges in an LSM that is deleted or when
auditdoes not find them in their old address. These cartridges are marked absent, preserving all information about them, except for the scratch status. When these cartridges are later found byaudit, they are reactivated.-
Absent cartridge support is enabled when the
ABSENT_VOLUME_RETENTION_PERIODvariable is not zero. The default value is 5 days. -
Use
acsss_config(option 3). For procedures, refer to Setting CSI Tuning Variables and the variableABSENT_VOLUME RETENTION_PERIOD.
-
- Update your configuration by one of the following methods:
-
With ACSLS up, use the following command:
config acsacs_id -
Shutting ACSLS down, use the following command:
-
Bring down ACSLS:
acsss disable -
Update the ACSLS configuration:
acsss_config -
Bring up ACSLS:
acsss enableACSLS cannot be running when you run
acsss_config.For more information, refer to Setting CSI Tuning Variables or under the The acsss Macro.
-
-
Adding New SL8500s
When additional SL8500s are added to an existing SL8500 library complex, the new ACSLS configuration must be updated. If the addition of new SL8500s causes the LSMs in the existing SL8500s to be renumbered, the cartridge addresses in those LSMs must be updated.
The cartridge addresses should be updated without losing the other information associated with the cartridges. This includes cartridge information, such as scratch status, pool, locks, and ownership and cleaning cartridge usage counts, and the date and time that cartridges were entered.
LSMs in connected SL8500s are numbered from top-to-bottom and right-to-left (as viewed from the CAP end). See Figure C-4 .
Adding a New SL8500 to the Left
In the case of the non-disruptive addition of a new SL8500 on the left (from the CAP end) of the original SL8500(s), use the host software (ACSLS) to dynamically configure the additional drives and libraries.You do not need to recycle ACSLS if Dynamic Configuration is installed. Mount requests continue as normal to the existing SL8500s during this phase.
If cartridges were placed in cells in the new SL8500, an ACSLS audit must be run on the LSMs of the new SL8500 to add these cartridges to the ACSLS database.
The LSMs in the pre-existing SL8500s can be online during the audit.
Adding a New SL8500 to the Right
If you want to add a new SL8500 to the right, the existing LSMs will be renumbered, as shown in the following figures.
Considerations When Adding an SL8500 to the Right
When new SL8500s are added to the right, all existing LSMs will be renumbered and cartridge addresses will change. The change to LSM numbers causes all existing cartridge addresses to change. If ACSLS attempts to mount a cartridge whose address changed, the mount will fail because ACSLS cannot find the cartridge.
-
Quiesce mount activity until all cartridge addresses have been updated.
-
Varyall LSMs in the ACS to diagnostic state to prevent mounts. -
Update the cartridge addresses by auditing the LSMs in the existing and new SL8500s in a specific sequence.
Dynamically Configuring the New ACSLS Configuration
To a update the ACSLS Configuration Dynamically after adding a new SL8500(s):
-
Varyexisting LSMs in diagnostic state (varylsm_iddiag).Caution:
These LSMs must remain in diagnostic state until they have been audited. Otherwise, the following problems will occur:
-
Mounts will fail because cartridges cannot be found in their last-known addresses.
-
Until the audits update the ACSLS map of the empty cells in the renumbered LSMs:
-
Enters of new cartridges will collide with existing cartridges.
-
Movements of cartridges to existing (renumbered) LSMs will collide with cartridges already in the cells.
-
-
-
Add the new SL8500(s) to the library complex.
-
Backup ACSLS (before making any configuration changes).
-
Update the ACSLS configuration dynamically using the following command:
config acsacs_idNote:
As an alternative, update the ACSLS configurations while ACSLS is down. First, bring ACSLS down using the
acsss disablecommand. Change the configuration withacsss_config, and finally, bring ACSLS back up withacsss enable.Note:
New LSMs are added when in an online state.
Varythese LSMs to a diagnostic state until they have been audited. -
Backup ACSLS (after the configuration change).
-
Auditthe library to update cartridge addresses (since they were renumbered).Use the following sequence:
-
A
uditeach LSM in the pre-existing SL8500s that were renumbered.-
Auditthe pre-existing SL8500s in a careful sequence to avoid losing cartridges.Auditeach LSM (rail) in sequence from the highest numbered LSM to the lowest numbered LSM ID. The audit finds all of the cartridges in their (renumbered) LSM addresses. -
For ACSLS, you must
auditeach LSM separately, and allow the audit of one LSM to finish before auditing the next LSM.Auditchecks the cartridges' former home cell addresses (in the LSM to the right), and then updates the cartridges' addresses. The audits for the LSMs in the left most SL8500 will take a long time. The audits in all of the other SL8500s will be faster.The reason that the audits of the left of most LSMs take longer is that they will trigger a cascade of
Cartridge Recoveryrequests. When audit finds a cartridge that has a different home cell address,auditchecks the cell address recorded in the database. If that cell has a different cartridge,Cartridge Recoveryinvestigates that cartridge, and so on. Because all of the LSM addresses have changed, these recoveries will cascade across the SL8500 library complex. -
Keep the LSMs in diagnostic state until they have been audited. After they have been audited, you can
varythem online.Audithas updated the addresses of cartridges in this LSM, so you can resume automatedmountactivity with the audited LSMs' cartridges.
-
-
Last,
auditthe LSMs in the newly added SL8500 (that have the lowest LSM IDs).After these LSMs have been audited, they can be varied online, and cartridges in them can be mounted on tape drives, as shown in the following figure:
Figure C-5 Auditing Order for Renumbered LSMs
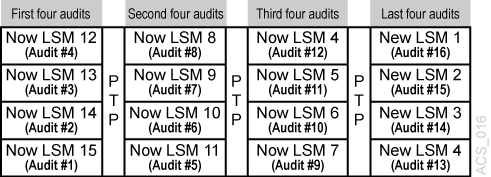
Description of "Figure C-5 Auditing Order for Renumbered LSMs" -
-
Backup ACSLS after the audits have completed.
Procedures for Merging ACSs
SL8500 PTP supports the merging of multiple, separate SL8500s into a single ACS. To minimize the loss of information about cartridges and operational downtime, follow these recommended procedures.
Note:
When the ACSLS configuration is updated, global cartridge address changes are not madeFor ACSLS, two scenarios are described below. In the first, the ACSs to be merged are numbered from right-to-left (as you face them from the CAP-side). In the second, they are numbered from left-to-right. It is assumed that the resulting ACS will use the lower/lowest ACS ID.
Merging ACSs Numbered from Right to Left
In the following scenario, the ACSs to be merged are numbered from right-to-left (as you face them from the CAP side).
Figure C-7 Desired Configuration: Single ACS
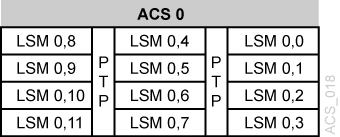
Description of "Figure C-7 Desired Configuration: Single ACS "
Merging ACSs Numbered from Left-to-Right
In the following scenario, the ACSs to be merged are numbered from left-to-right.
Figure C-8 Existing Configuration: Three Separate ACSs
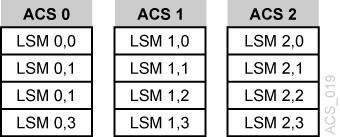
Description of "Figure C-8 Existing Configuration: Three Separate ACSs "
Figure C-9 Desired Configuration: Single ACS

Description of "Figure C-9 Desired Configuration: Single ACS "
Procedure for Merging ACSs Numbered from Left-to-Right
Varyall ACSs offline.This prevents mounts and dismounts while cartridge addresses are being updated.
StopACSLS:acsss disable.- Backup ACSLS before making any configuration changes.
- Update the ACSLS configuration (while ACSLS is down) using
acsss_config. - Bring up ACSLS:
acsss enable. Varythe new LSMs (that were added to the ACS) to a diagnostic state.(These LSMs were added while in online state).
- Backup ACSLS after the configuration change.
Varythe new LSMs that were added to the left, to a diagnostic state.You do not want to perform mounts and dismounts until you have audited these LSMs.
Auditthe newly configured LSMs.The order in which they are audited does matter.
Auditin this order:- First, audit the LSMs in the SL8500(s) that retains the same ACS number first.
-
You want
auditto find these cartridges in their new LSM addresses before youauditthe LSMs that now are assigned to these cartridges' old addresses. -
The LSM addresses will be updated for all cartridges in these SL8500(s).
-
For ACSLS,
auditeach LSM separately, and allow the audit of one LSM to finish before auditing the next LSM. -
Keep the LSMs in diagnostic state until they have been audited.
After they have been audited, you can
varythem online.Audithas updated the cartridges' addresses, so you can resume automatedmountactivity with the audited LSMs' cartridges. -
- Last,
auditthe SL8500s that were merged into the lowest ACS. The cartridges in these SL8500s will be re-activated.-
All of these LSMs can be audited at the same time.
-
The order in which these LSMs are audited does not matter.
-
- First, audit the LSMs in the SL8500(s) that retains the same ACS number first.
- Backup ACSLS (after the audits are complete).
Varyall LSMs online and resume normal automated processing.
Removing PTPs and Splitting ACSs
You may decide to remove the PTP mechanisms that connect two SL8500s, and split a single ACS into two separate ACSs. This configuration change is the reverse of merging two ACSs into a single ACS.
It is much easier to add the new ACS with the SL8500(s) on the left-hand side of the split. This assigns the higher numbered LSMs to the new ACS, and avoids renumbering the LSMs that remain in the existing ACS.
Splitting ACSs, with the new ACS Created from SL8500(s) on the Left - Possible Scenarios
Figure C-10 Existing Configuration: One ACS

Description of "Figure C-10 Existing Configuration: One ACS"
Figure C-11 Desired Configuration: Two ACSs

Description of "Figure C-11 Desired Configuration: Two ACSs"
ACSLS Procedure for Splitting an ACS
With Dynamic Configuration, ACSLS can add ACSs while it is running. However, Dynamic Configuration does not make global cartridge address changes.
Adding the New ACS on the Right Hand side of the Split
If the new ACS is added on the right-hand of the split, all cartridge addresses will be re-mapped.
As this is not recommended, a detailed procedure is not provided.
However, some considerations, are:
-
When the LSMs in the right-hand SL8500(s) are removed from the existing ACS, the cartridges in these LSMs will be marked absent (if absent cartridge retention is active). They will be reactivated when the new ACS is audited.
-
The LSMs in pre-existing ACS must be audited one LSM at a time to update the addresses of the cartridges in these LSMs.
Auditthe highest numbered LSM first, followed by the next lower LSM. Theauditof one LSM must finish before the next audit is started.
