Chapter 10 Converting Physical Hosts to Virtual Machines
Converting hosts involves creating hardware virtualized guest images from existing physical computers. This chapter explains how to use the Physical to Virtual (P2V) conversion utility to convert hosts.
10.1 Introduction to the P2V Utility
The P2V utility lets you convert the operating system and application software on a computer to an Oracle VM hardware virtualized guest image. The P2V utility is included on the Oracle VM Server ISO image.
Requirements for Using the P2V Utility
-
The host operating system that you are converting must be supported as a guest operating system by Oracle VM. See the Oracle VM Release Notes for a list of the supported guest operating systems.
-
The host computer must have a CPU that supports PAE (Physical Address Extension).
-
The P2V utility included with Oracle VM Release 3.4 applies to 64-bit operating systems only.
Conversion Process Overview
You can run the P2V utility interactively or as an automated process using a kickstart configuration file.
To use the P2V utility, you boot from the
Oracle VM Server ISO
on the physical computer you want to convert to a hardware
virtualized guest. The P2V utility then creates a
virtual
machine configuration file
(vm.cfg) and creates raw
virtual disk
images from the disks on the computer.
The first four virtual disk images are created as IDE disks (hda, hdb, hdc, and hdd) on the guest, using the original disk names. Up to seven additional disks are created as SCSI devices (sda, sdb, sdc, and so on).
The following is an example of disk entries in the
vm.cfg file:
disk = ['file:System-sda.img,hda,w',
'file:System-sdb.img,hdb,w',
'file:System-sdc.img,hdc,w',
'file:System-sdd.img,hdd,w',
'file:System-sde.img,sda,w',
'file:System-sdf.img,sdb,w',
'file:System-sdg.img,sdc,w',
'file:System-sdh.img,sdd,w',
'file:System-sdi.img,sde,w',
'file:System-sdj.img,sdf,w',
'file:System-sdk.img,sdg,w',
]
Oracle VM Manager limits virtual machines with the HVM domain type to a
maximum of four virtual disks. In this case, if the
vm.cfg file has more than four disk
entries, then Oracle VM Manager imports only the first four virtual
disks.
At the end of the conversion process, the P2V utility starts a
web server that hosts the vm.cfg file and
virtual disk file(s). You can then import the hardware
virtualized guest into Oracle VM Manager as a virtual machine template.
10.2 Converting Hosts in Interactive Mode
To convert the operating system and applications on a physical computer to a hardware virtualized guest with the P2V utility, complete the following steps:
Converting the Host with the P2V Utility
Before you begin, burn the Oracle VM Server ISO image to bootable physical media, such as a DVD-ROM.
-
Insert the Oracle VM Server installation media into the optical disc drive of the computer you want to image.
-
Change the boot order to start from the optical disc drive in the BIOS or UEFI settings.
-
Boot the computer with the Oracle VM Server installation media.
The Oracle VM Server boot screen displays.
-
At the
boot:prompt, enterp2vand then press Enter.
The Oracle VM Server installer initializes. The first step in the conversion process is for the network manager to configure the network interface.
-
If the host has one network interface, the network manager automatically configures it.
-
If the host has two or more network interfaces, the network manager prompts you to select one network interface and then automatically configures it.
-
If the network manager cannot successfully configure the network interface, you are prompted to configure TCP/IP settings.
-
-
If prompted, configure the TCP/IP settings as appropriate.
Setting
Description
Enable IPv4 support
Enables Internet Protocol Version 4 (IPv4) in the network interface.
Dynamic IP configuration (DHCP)
Uses the Dynamic Host Configuration Protocol (DHCP) network service to automatically assign an IPv4 address to the hardware virtualized guest and retrieve DNS settings.
Manual configuration
Lets you specify the following:
IPv4 address for the hardware virtualized guest.
IP address of the gateway server for your network.
IP address of the name server for your network.
Enable IPv6 support
Enables Internet Protocol Version 6 (IPv6) in the network interface.
Automatic
Uses the DHCP network service to automatically assign an IPv6 address to the hardware virtualized guest and retrieve DNS settings.
Automatic, DHCP only
Uses the DHCP network service to automatically assign an IPv6 address for the hardware virtualized guest.
Manual configuration
Lets you specify the following:
IPv6 address for the hardware virtualized guest.
IP address of the gateway server for your network.
IP address of the name server for your network.
-
After the network interface is configured, you are prompted to test the media for errors. Do one of the following:
-
Select OK and then press Enter to test the bootable media for errors.
NoteYou must reboot after the test is complete.
-
Select Skip and press Enter to continue without testing the bootable media.
The disk selection screen displays.
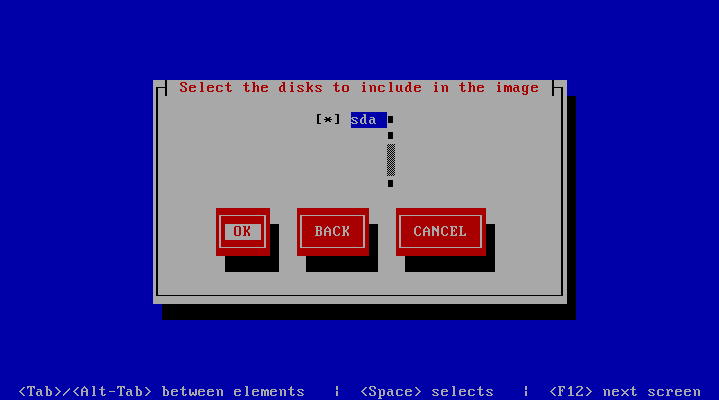
-
-
Select the disk partition(s) on the computer to include in the guest image.
-
Select OK and then press Enter.
The virtual machine parameters screen displays.
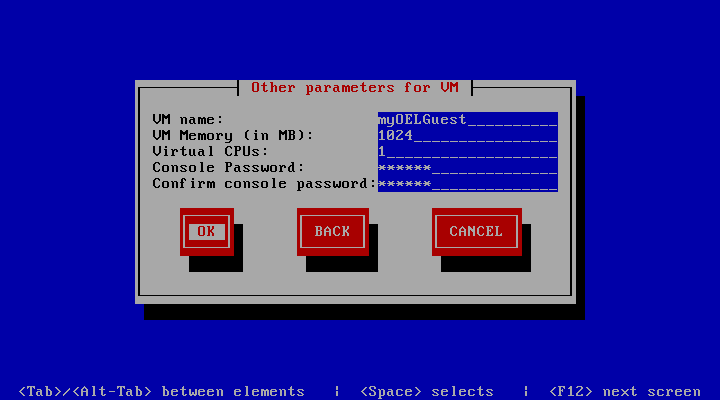
-
Specify values for each parameter as appropriate.
Parameter
Description
VM name
Specifies a name for the virtual machine.
VM Memory (in MB)
Specifies the amount of RAM, in megabytes, to allocate to the virtual machine when it is running. The amount of RAM that you specify will be requested from the host operating system. For this reason, it must be available or made available as free memory on the host when attempting to start the virtual machine and will not be available to the host while the virtual machine is running.
Virtual CPUs
Specifies the number of CPU cores to allocate to the virtual machine.
Console Password
Specifies a password for the virtual machine console.
Confirm console password
Verifies the console password.
-
Select OK and then press Enter.
A secure web server (HTTPS) starts. The IP address of the computer and port number where the web server is available displays.

You can now access the vm.cfg and virtual
disk(s) that the P2V utility created on the web server. Proceed
to Section 10.4, “Importing Guests as Virtual Machine Templates to Oracle VM Manager”.
10.3 Converting Hosts Silently with a Kickstart File
To convert physical hosts to a guest image silently, you use a kickstart file to pass parameters to the P2V utility.
The following steps provide a high-level overview of how to convert hosts silently:
-
Create a P2V kickstart file and copy it to your kickstart server.
-
Insert the Oracle VM Server installation media into the optical disc drive of the computer you want to image.
-
Change the boot order to start from the optical disc drive in the BIOS or UEFI settings.
-
Boot the computer with the Oracle VM Server installation media.
The Oracle VM Server boot screen displays.
-
At the
bootprompt, enter the following:# mboot.c32 xen.mb.efi --- vmlinuz p2v ksdevice=
9C:B6:54:82:15:ACks=http://example.com/mypath/ks.cfg --- initrd.imgWhere:
-
ksdevice specifies the network interface to use.
-
ks is the path to the P2V kickstart file.
-
The P2V utility begins the conversion process. If there are any missing parameters in the kickstart file, you are prompted to enter them.
When the conversion process completes, you can import the hardware virtualized guest into Oracle VM Manager as a virtual machine template. See Section 10.4, “Importing Guests as Virtual Machine Templates to Oracle VM Manager”.
Considerations for Using a Kickstart File
Before you attempt to convert hosts with a kickstart file, you should consider the following:
-
The P2V utility converts disks on the computer to virtual disk images. The virtual disk images are created as IDE disks (hda, hdb, hdc, hdd, and so on) on the guest, using the original disk names. When you use a P2V kickstart file, up to four disks are automatically deployed in the guest. Any extra disks are converted and added to the guest configuration file (
vm.cfg) but are not deployed in the guest.To deploy the additional disks in the guest, edit the guest configuration file to remove the comments from the disk entries and map the additional disks to SCSI device names; for example, sda, sdb, and sdc. The boot disk must always be mapped to device hda. Any files on the guest that contain references to these devices must also be changed; for example, the
/etc/fstabfile might contain references to/dev/hda1,/dev/sda1, and so on. -
At least one network interface must use DHCP so that the computer on which the P2V utility is running can read the kickstart file over the network.
-
If you want the P2V utility web server to listen using a network interface other than the one that initiates the kickstart session, specify the network configuration for that network interface in the kickstart file.
P2V Kickstart Parameters
To converting hosts with a kickstart file, you must specify parameters at the boot prompt and in a P2V kickstart file.
At the boot prompt, you must specify parameters as follows:
# mboot.c32 xen.mb.efi --- vmlinuz p2v ksdevice=deviceks=ksfile--- initrd.img
Boot Parameters
|
Option |
Description |
|---|---|
|
|
Loads the P2V conversion utility. |
|
|
Specifies the name and location of a P2V kickstart file. |
|
|
Specifies the network interface to use. You can set one of the following values:
|
Kickstart File Options
|
Option |
Description |
|---|---|
|
|
Indicates the kickstart file is intended to automate a P2V conversion. It accepts no parameters. |
|
|
Sets the end destination for the guest image. Sets the P2V utility to operate in HTTPS server mode to transfer the guest image to a running instance of Oracle VM Manager. |
|
|
Denotes a disk to be included in the guest image. The
P2V utility uses device mapper-based snapshotting to
copy the disk as a
The
The device to image.
diskimage --device /dev/sda
Sets the type of disk. Must be one of
diskimage --device /dev/hda --type IDE |
|
|
Configures network information for the computer.
The
Sets the method by which the network configuration is
determined. Must be
network --bootproto dhcp
network --bootproto static --ip 10.0.2.15
  --netmask 255.255.255.0 --gateway 10.0.2.254
  --nameserver 10.0.2.1
The
The IP address for the computer.
The IP address for the default gateway.
The IP address for the primary nameserver.
The netmask for the computer. |
|
|
Sets the configuration options for the guest.
The
The name of the guest.
The memory allocation for the guest in Mb.
The number of VCPUs for the guest.
The console password for the guest. This option is ignored by Oracle VM Manager when the guest is imported. For example: vm_options --name MyVM --mem 2048 --vcpus 2
--consolepasswd |
P2V Kickstart File Example
The following provides an example of a P2V kickstart file:
p2v
target --ovmmanager
network --device eth0 --bootproto dhcp
diskimage --device /dev/sda --type IDE
vm_options --name myVM --mem 2048 --vcpus 2 --consolepasswd password
10.4 Importing Guests as Virtual Machine Templates to Oracle VM Manager
After the P2V utility successfully converts a physical host to a hardware virtualized guest, you can import the guest as a virtual machine template into Oracle VM Manager.
You must ensure that the vm.cfg file and
virtual disk(s) reside at a location where you can import them
before you attempt to import the hardware virtualized guest as a
virtual machine template,
The web server that hosts the vm.cfg and
virtual disk(s) uses port 443. You can import the files directly
into a Oracle VM repository with Oracle VM Manager. However, you must
ensure that the Oracle VM Server that is designated as the administration
server for that repository can access the web server on port 443.
Alternatively, you can download the vm.cfg
and virtual disk(s) from the web server and then host them at a
location that Oracle VM Server can access.
The web server provides a serial HTTP connection. For this reason, multiple requests to import guests as virtual machine templates are issued sequentially. For example, if you start a second download while another download is in progress, the second download does not start until the first download is complete.
-
Open a browser and navigate to the location of the web server that is hosting the
vm.cfgand virtual disk(s); for example,https://192.168.1.13/
The browser displays a directory listing of the files that the P2V utility created.
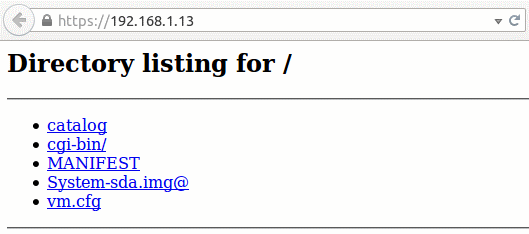
-
Copy the URLs for the
vm.cfgfile and*.imgfile(s). -
Import the files into Oracle VM Manager as a virtual machine template.
-
Log in to Oracle VM Manager.
-
Click the Repositories tab and then select the repository in which to store the template.
-
Select VM Templates in the navigation tree.
-
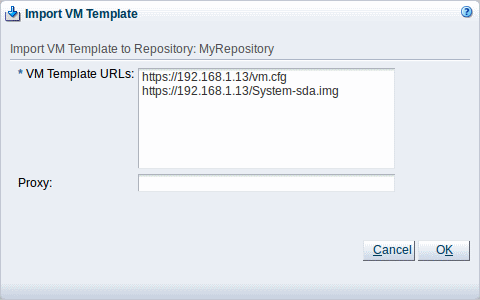
Select Import VM Template from the toolbar in the management pane.
-
Specify the URLs for the
vm.cfgfile and*.imgfile(s) as separate lines in the VM Template URLs pane. -
Click OK to import the files.
Refer to the Oracle VM Manager Online Help for more information about importing virtual machine templates.
-
The hardware virtualized guest is available in the repository as a virtual machine template.
The hardware virtualized guest must have a unique network configuration. For this reason, you should configure a new network device and ensure that it is detected before you start the virtual machine that you created with the P2V utility. If you use the same network configuration as the original computer, a network clash might occur because two computers on the network have the same IP and MAC addresses.
After you successfully import the hardware virtualized guest as a virtual machine template, press Control+C to interrupt the P2V utility on the host computer. You can then remove the Oracle VM Server bootable media from the drive and restart the computer.