Chapter 2 Performing a Secure Oracle VM Installation
This section provides an overview to planning an installation, and instructions for installing a secure system. It describes security-related deployment issues for each installed component; for example, MySQL database and Oracle WebLogic Server.
Oracle VM Manager automatically installs into a secure state. This section explains any security implications for choices made in the installation procedure, and how to enable any high security options, such as SSL. As the installation instructions suggest, the user should avoid installing or running components that are not needed in a specific deployment.
Security measures applied in a default installation include:
-
Active software firewalls which only open standard required ports.
NoteIf your firewall has been disabled prior to installation, you should enable the
iptablesorfirewalldservice after installation to allow the firewall rules to take effect. -
SSL encryption for all Oracle VM Agent communications.
NoteIf you are upgrading from an Oracle VM version older than build 3.1.1.165, some Oracle VM Agent communications that were previously unencrypted are automatically reconfigured. From this build forward, SSL encryption is set by default for all Oracle VM Agent communications.
-
HTTPS access to the Oracle VM Manager GUI.
-
User credentials and authentication managed by Oracle WebLogic Server security realms:
https://docs.oracle.com/middleware/1213/wls/SCOVR/realm_chap.htm#SCOVR186
-
Small footprint JeOS-like operating system: Oracle Linux without unused packages in order to minimize attack surface.
2.1 Oracle VM Pre-Installation Tasks
This section describes any security configuration that must be applied before installation.
2.1.1 Preparing the Oracle VM Management Server
The Oracle VM management server must run one of the following operating systems:
-
Oracle Linux (or Red Hat Enterprise Linux) 6 64-bit or later.
-
Oracle Linux (or Red Hat Enterprise Linux) 7 64-bit or later.
It is recommended to leave all ports closed except the ones required by Oracle VM Manager. The required ports are:
-
For inbound web browser connection: TCP/7002 (HTTPS, default).
-
For inbound connection from Oracle VM Servers: TCP/7002 (HTTPS, default), UDP/123 (NTP).
-
For outbound connection to Oracle VM Servers: TCP/8899 (Oracle VM Agent), TCP/6900-xxxx (VNC, 1 secure tunnel per virtual machine).
-
For SSH access: TCP/22 (likely open by default).
-
For CLI access using SSH: TCP/10000.
The Oracle VM Manager Command Line Interface (CLI) is part of Oracle VM as of Release 3.2.
As part of the installation procedure, a script is included named
createOracle.sh. You can run this script to perform a number of
installation tasks in an automated way, including the standard firewall configuration.
For Oracle Linux (or Red Hat Enterprise Linux) 6, if the iptables package is
installed, then the iptables rules are added during the installation.
However, for Oracle Linux (or Red Hat Enterprise Linux) 7 and beyond, if the
firewalld package is installed, then the firewalld
rules are added.
Note that if iptables or firewalld has been
disabled on the target host prior to the installation of Oracle VM Manager, the
createOracle.sh script does not automatically re-enable the
iptables or firewalld service. No rules are added if
the firewall managements tools are not installed. Any rules added take
effect when the service is enabled.
If firewall management tools are enabled, even if there are no rules defined, each packet is checked by the firewall management tools, which can have an impact on performance.
If you prefer or need to configure the firewall manually, follow these instructions.
iptables, open the required ports in iptables as follows:-
Log on to the Oracle VM management server as the
rootuser. -
At the command prompt, enter the appropriate command for each port to be opened; for example:
# iptables -A INPUT -m state --state NEW -m tcp -p tcp --dport 7002 -j ACCEPT
# iptables -A INPUT -m state --state NEW -m udp -p udp --dport 123 -j ACCEPT
# iptables -A INPUT -m state --state NEW -m udp -p udp --dport 10000 -j ACCEPT
-
Save the
iptablesconfiguration.# service iptables save
This does not require
iptablesto be restarted as the commands open the ports whileiptablesis running. The save ensures they are opened on reboot/restart in future.
firewalld, open the required ports in firewalld as follows:-
Log on to the Oracle VM management server as the
rootuser. -
At the command prompt, enter the appropriate command (which persists over reboot) for each port to be opened; for example:
# firewall-cmd --permanent --zone=public --add-port=7200/tcp
# firewall-cmd --permanent --zone=public --add-port=123/udp
# firewall-cmd --permanent --zone=public --add-port=10000/tcp
# firewall-cmd --reload
2.1.2 The Oracle VM Firewall Rules
The diagram and table below illustrate the firewall rules and requirements for Oracle VM.
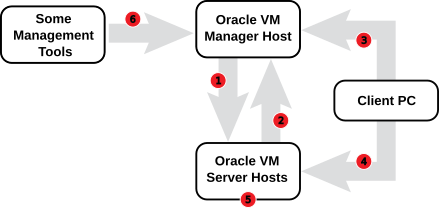
| No. | Component Relationship | Ports and Description | Optional |
|---|---|---|---|
|
1 |
Oracle VM Manager to Oracle VM Server |
|
No |
|
2 |
Oracle VM Server to Oracle VM Manager |
|
No |
|
3 |
Client PC to Oracle VM Manager |
|
No, although access to services should be limited to requirements |
|
4 |
Client PC to Oracle VM Server |
|
Yes |
|
5 |
Oracle VM Server to Oracle VM Server |
|
No |
|
6 |
Some Management Tools to Oracle VM Manager |
|
Yes |
2.1.3 Preparing the Management Network
All physical servers in the Oracle VM environment are connected to the management network. Oracle VM Manager and the Oracle VM Servers communicate over the management network through the Oracle VM Agent, which runs on each server.
Strictly speaking, none of the physical servers need to be reachable externally, so it is recommended that the management network uses a private subnet. This private subnet may be reachable from within your corporate network or a portion of it. If the management network is not a private subnet, or if further security hardening is required, you can restrict access to the IP addresses of the Oracle VM Servers only. The goal is to protect the management network so that it is not exposed to users and machines that do not need to access the physical Oracle VM environment.
In addition to firewall configurations in your corporate network, the use of a VLAN may further shield the management network from unauthorized access. If management network access from outside the corporate network is required, consider enabling it through a VPN tunnel.
For all firewall configurations in your corporate network you must reckon with the
same port requirements as described above for iptables or
firewalld on the Oracle VM management server.
Depending on your server hardware and network resources you may want to further segregate network traffic by network role (management, storage, migration, virtual machines, heartbeat). The network model and its security implications are described in detail in Section 3.1, “Oracle VM Network Model”.
2.1.4 Installing Oracle VM Manager
This section describes how to install and configure Oracle VM Manager securely.
All applications and components required to run Oracle VM Manager are packaged in an installer ISO image. To install, burn the image onto a DVD-ROM and insert it into the host server, or mount the image onto the host server file system. The components involved in the Oracle VM Manager installation are:
Oracle VM Manager
The Oracle VM Manager web application is provided as an Oracle WebLogic Server domain and container.
Oracle WebLogic Server
Oracle VM Manager runs on top of Oracle WebLogic Server 12c, including Application Development Framework (ADF) Release 12c. See the Oracle WebLogic Server documentation for more information:
http://docs.oracle.com/middleware/1213/index.html
Oracle VM Manager has a simple domain topology that consists of a single Oracle WebLogic Server on which the Oracle VM Web Services API, Oracle VM Manager Web Interface, and Oracle VM Manager Online Help run.
MySQL Database
Oracle VM uses an Oracle MySQL Enterprise database as a back end repository.
Oracle VM Manager includes a restricted-use license of these databases for use as the Oracle VM Manager Management Repository only.
The installation process in Oracle VM Release 3.4, allows you use of the bundled local MySQL database only.
Prior to installation of Oracle VM Manager for the first time, you should
run the provided createOracle.sh script to
properly setup the installation directory, file system
permissions, users and groups and default firewall rules on the
host where you are installing the product.
During installation, you set the users and passwords to use for the Oracle VM Manager database, Oracle WebLogic Server, and Oracle VM Manager during the installation. Choose clear user names and secure passwords. The password rules are:
-
Must be 8-16 characters in length, but be aware that an 8 character password is still considered fairly weak and you should aim for 12 characters at a minimum.
-
Contains at least 1 uppercase letter.
-
Contains at least 1 lowercase letter.
-
Contains at least 1 numeric value.
For more details, see Installing Oracle VM Manager in the Oracle VM Installation and Upgrade Guide.
For all security information related to the database, consult the following Oracle Technology Network (OTN) resources:
-
MySQL home page: http://www.oracle.com/technetwork/database/mysql/index.html
-
MySQL Security Guide: http://dev.mysql.com/doc/mysql-security-excerpt/8.0/en/index.html
Installing Oracle VM Manager as a guest on an Oracle VM Server in your managed environment is possible for testing and demo purposes, but not a recommended practice. Before you decide to create this setup, consider the following:
-
The setup procedure is relatively complicated.
-
The virtual machine running Oracle VM Manager could easily be shut down by accident.
-
If the server pool goes offline, recovering the environment will be difficult or may fail.
-
In addition to the risk of data loss or corruption, a race condition may occur because of the way the NTP service works: Oracle VM Manager is normally the NTP source for the entire environment, but as a virtual machine it is also a client of the NTP service.
2.1.5 Installing Oracle VM Server
This section describes how to install and configure Oracle VM Server securely.
Oracle VM Server runs a lightweight, optimized version of Oracle Linux. It is based upon an updated version of the Xen hypervisor technology and includes Oracle VM Agent. The installation of Oracle VM Server in itself is secure: it has no unused packages or applications and no services listening on any ports except for those required for the operation of the Oracle VM environment.
During the installation process you must provide passwords for the
Oracle VM Agent and the root user account on the
server. Be sure to choose secure passwords and share them only
among administrators who need access to the Oracle VM Servers. Use the
password rules described in
Section 2.1.4, “Installing Oracle VM Manager”. Place the servers in a
private network segment with restricted access, as described in
Section 2.1.3, “Preparing the Management Network”.
2.1.6 Recommended Oracle VM Deployment Configurations
Proposing a number of recommended Oracle VM configurations is next to impossible, due to the nature of the product: server virtualization. Simply put, any server and any service or application a server makes available, can be virtualized. Consequently, the number of configurations possible is limited only by the capabilities of the physical hardware on which the virtual environment is deployed. An Oracle VM deployment can be a small-scale highly privileged setup with no external connectivity and access limited to only a few pairs of eyes; it could just as well be a battery of virtualized web servers hosting a variety of internet-facing services and applications; or it could be anything in between.
We try to categorize Oracle VM environments by their degree of access, and have documented a number of categories based on the network model. By itself, a privileged domain, or dom0, of a host Oracle VM Server is difficult to compromise because it has such a small footprint with very few moving parts and no obsolete packages. Exposure to attacks is highly influenced by the network configuration of both the physical and the virtual environment. In light of this, we identify the following categories according to their network security:
-
No network connection.
-
Isolated local network.
-
Trusted internal network.
-
Untrusted internal network.
-
Internet-facing service.
Depending on the purpose of your particular Oracle VM configuration, the servers hosted, the services they offer, and who needs to access them, your environment will fall into one or several of these categories. The more users have access to the environment and the larger the network from where the environment can be accessed, the greater the exposure to attacks. What we recommend, is that you use the tightest restrictions possible for your environment, consistent with the purpose of the hosted servers, services and applications. In any case, you must make sure that administrative access to your Oracle VM environment is possible from a trusted network location only. Local system administration is the most secure way, but less practical. If system administration from a remote connection is required, enforce VPN and use encryption.
For detailed information about the categorization based on network connectivity, see Section 3.1, “Oracle VM Network Model”.
2.1.7 Oracle VM Post-Installation Configuration
The purpose of this section is to describe any security configuration changes that must be made after installation. However, the installers for Oracle VM components have been designed to minimize security risks by default, so potential issues are addressed automatically during the installation procedure. Some general security considerations are listed here:
-
It is good practice to remove or disable components that are not needed in a given type of deployment. However, Oracle VM is based on a lightweight, optimized version of Oracle Linux: obsolete packages and components are simply not included in the installation media.
-
Installation requires the creation and assignment of superusers and root passwords so that software can be installed and configured. As soon as the installation and configuration tasks have been completed, it is recommended that you create individual user accounts for each Oracle VM administrator. Consider disabling root access where possible.
-
Weak or plain-text protocols, such as FTP or standard HTTP, must be disabled by default. For demo and testing purposes it would be acceptable to use them, but you must always be aware that this is insecure. Communications between Oracle VM components are properly secured by default. Oracle VM Manager and the Oracle VM Servers communicate via the Oracle VM Agents, and all agent communication is SSL-encrypted. Access to the Oracle VM Manager is configured to use HTTPS by default. By default, the SSL certificate, used to encrypt communications, is signed by an internal CA certificate that is generated for the Oracle VM Manager instance during installation. Since most client applications, including user web browsers, will not have this CA certificate installed it is not possible for many client applications to validate the SSL certificate presented when accessing an Oracle VM Manager service over HTTPS. Some client applications may fail entirely if an SSL certificate cannot be validated, while other applications may simply issue a warning and allow users to proceed at their own risk. To minimize the likelihood of a man-in-the-middle attack, it is important that validation can actually take place. Therefore, it is appropriate to take one of the following courses of action:
-
Install the CA certificate for the Oracle VM Manager instance into the trusted CA certificate store for all client applications that will have access to Oracle VM Manager.
-
Change the SSL certificate used for HTTPS communications by Oracle VM Manager to use a certificate that is signed by a trusted third-party CA, for which all of your client applications already have the CA certificate installed.
These operations are discussed in detail in the Oracle VM Administrator's Guide.
-
-
Any files that may contain sensitive information should have restrictive file permissions by default. These files include audit logs, password files and configuration. Oracle VM is configured in such a way that no sensitive data, for example clear text passwords, can be disclosed in any logs or temporary files. File permissions are kept strict by default to prevent unauthorized access, and encryption is applied where required.
Access to the physical servers is tightly restricted by default, which implies that the risk of information being compromised is very small. Therefore, sensitive data such as log files, password files and configuration data are generally well protected in an Oracle VM environment. After successful installation or upgrade of Oracle VM Manager, be sure to remove the log files from
/tmp, as instructed by the installer.
2.1.7.1 Changing Oracle VM Agent SSL Certificates
Communications between Oracle VM Agents and Oracle VM Manager are
SSL-encrypted using an RSA algorithm and 2048-bit private key.
The relevant files are located in
/etc/ovs-agent/cert:
-
certificate.pem -
key.pem -
request.pem
Any changes to the SSL certificates used by the Oracle VM Agent causes authentication failure for the Oracle VM Manager instance that currently has ownership of the server. To resolve this, after a change, you must release ownership of the server (this may include a requirement to remove a server from any server pool that it may belong to), and then rediscover the server and take ownership of it again as if it was a new server.
To replace the default self-signed certificate with your own trusted certificate, replace the certificate file and key files.
To generate a new certificate and key files, log on to an
Oracle VM Server and execute the command
ovs-agent-keygen. The command is used as
follows:
# ovs-agent-keygen -h
Usage: ovs-agent-keygen [OPTION]
Generate SSL certificate and key files for Oracle VM Agent XMLRPC Server.
Options:
-f, --force      override existing files
-v, --version    show version number and exit
-h, --help       show this help message and exit
The generated files are placed in the directory mentioned above.
If you use the "-f" option, the existing
files are overwritten.
As of Oracle VM Release 3.3, the Oracle VM Agent password is only used for authentication during the initial discovery process. Thereafter, all subsequent authentication between the Oracle VM Manager and Oracle VM Agent is achieved using certificates. This approach improves security and helps to limit access to the Oracle VM Agent to the Oracle VM Manager instance that has ownership of the Oracle VM Server where the agent is running. Nonetheless, it is good practice to change the Oracle VM Agent password for any server when ownership is released. A mechanism is in place to do this when you release ownership of a server within the Oracle VM Manager Web Interface and in the Oracle VM Manager Command Line Interface.
2.1.7.2 Enabling LDAP Authentication on Dom0
You can enable LDAP authentication on each Oracle VM Server instance to control and log access attempts on Dom0. Enabling LDAP authentication can enhance security for a critical asset (Dom0) for the same reasons that make centralized user control valuable in other contexts.
Setting up LDAP authentication requires configuration settings that are specific to your business needs. It is beyond the scope of this documentation to provide detailed examples of the different methods to enable LDAP authentication. However, the following procedures provide basic steps to guide you through an initial configuration.
To enable LDAP authentication on Dom0, you can do either of the following:
-
Follow the procedure in the Oracle Linux 6 Administration Guide to configure and install the
openldap-clients,sssd, andsssd-clientpackages. You must use the authconfig command to enable LDAP authentication instead of running the Oracle Linux Authentication Configuration GUI.For more information, see Enabling LDAP Authentication at: http://docs.oracle.com/cd/E37670_01/E41138/html/ol_enblcli_ldap.html
-
Configure LDAP authentication on Oracle VM Server as follows:
-
Verify that the required packages are available and install them, if required.
# rpm -qa | egrep -i 'nss-pam-ldap|pam_ldap' pam_ldap-
185-11.el6.x86_64 nss-pam-ldapd-0.7.5-20.el6_6.3.x86_64 -
Copy the LDAP server SSL or TLS certificate to the following directory:
/etc/openldap/cacerts/openldap.pem -
Set permissions on the certificate.
# chmod 644 /etc/openldap/cacerts/openldap.pem
-
Rehash the CA certificates.
# cacertdir_rehash /etc/openldap/cacerts
-
Enable LDAP authentication. Either use the authconfig command or start the interface for configuring system authentication.
-
# authconfig --enableldap --enableldapauth --ldapserver=ldap://
hostname:389 \ --ldapbasedn="dc=example,dc=com" --update -
# authconfig-tui
-
-
The following are example configurations for LDAP authentication:
-
/etc/openldap/ldap.confTLS_CACERTDIR /etc/openldap/cacerts BASE dc=example,dc=com URI ldap://
hostname:389 -
/etc/pam_ldap.confssl start_tls tls_cacertdir /etc/openldap/cacerts base dc=example,dc=com uri ldap://
hostname:389 pam_password md5 -
/etc/nslcd.confssl start_tls tls_cacertdir /etc/openldap/cacerts base dc=example,dc=com uri ldap://
hostname:389 uid nslcd gid ldap
2.1.7.3 Enabling FIPS for OpenSSL on Oracle VM Server
Consider enabling FIPS mode for OpenSSL to ensure that your OpenSSL is compliant with Federal Information Processing Standard (FIPS) Publication 140-2, which is a standard that establishes security requirements for cryptographic modules. This action can optionally be performed on each system that forms part of the infrastructure of your Oracle VM deployment. Further information on enabling FIPS mode for OpenSSL is provided in the Oracle Linux 6 Security Guide available at:
http://docs.oracle.com/cd/E37670_01/
In this section we outline the steps required to enable FIPS for OpenSSL on Oracle VM Server. It should be noted that there are some minor differences between Oracle VM Server and Oracle Linux 6 and therefore some of the steps to set up and configure FIPS mode for OpenSSL may differ from the instructions provided for Oracle Linux 6.
The Oracle VM Server must have been registered with ULN. The
openssl-fips package is available on the
ol6_x86_64_addons channel.
To make an Oracle VM Server compliant with Federal Information Processing Standard (FIPS) Publication 140-2, perform the following steps:
-
First check that FIPS is not already enabled:
# cat /proc/sys/crypto/fips_enabled
0
-
Log in to ULN and enable the
ol6_x86_64_addonschannel for your system. -
Install the
dracut-fipspackage:# yum install dracut-fips
This package must be installed so that the system checks the integrity of the kernel components at boot time.
-
Remove the existing
opensslpackage and install theopenssl-fips-1.0.1*package. You can use yum shell to perform these transactions as shown here:# yum -y shell <<EOF remove openssl install openssl-fips-1.0.1* run EOF
You cannot use separate yum remove and yum install commands as yum itself depends on the OpenSSL library being available.
Alternatively, download the
openssl-fips-1.0.1*package and use the rpm command instead:# rpm -e --nodeps openssl # rpm -ivh openssl-fips-1.0.1*.rpm
-
Identify the device UUID for your boot partition. There are a variety of ways to do this, the following shell command should return the UUID of the device being used for your boot partition:
# blkid `mount |grep \/boot|awk '{print $1}'`Note that if you have partitioned the disk in such a way that
/bootis not on its own partition, the above command will not return any output. -
Edit
/etc/default/grub:-
If
/bootor/boot/efiis located on a separate partition from/and you have obtained the UUID for the device where this partition is located, you must add the following line to ensure that when grub is updated FIPS is enabled automatically and that the system is able to identify the appropriate device to boot from:GRUB_CMDLINE_LINUX_DEFAULT="splash=verbose verbose crashkernel=224M-:112M showopts fips=1 \ boot=UUID=boot_UUIDroot=UUID=root_UUID"Where
boot_UUIDandroot_UUIDare the UUIDs that you obtained in the previous step.CautionIf
/bootor/boot/efiexist on a separate partition from/and you do not specify a validboot=entry, the system crashes because it cannot locate the kernel's.hmacfile. -
If
/bootor/boot/efiis not located on a separate partition from/, then you do not need to specify the boot partition:GRUB_CMDLINE_LINUX_DEFAULT="splash=verbose verbose crashkernel=224M-:112M showopts fips=1"
-
-
Rebuild the GRUB config to use the changes that you have made to
/etc/default/grub:-
On BIOS-based systems, issue the following command as root:
# grub2-mkconfig -o /boot/grub2/grub.cfg
-
On UEFI-based systems, issue the following command as root:
# grub2-mkconfig -o /boot/efi/EFI/redhat/grub.cfg
-
-
Edit
/etc/sysconfig/prelinkand setPRELINKING=no.Prelinking must be disabled to allow the system to verify the integrity of modules correctly.
-
Remove all existing prelinking from binaries and libraries:
# prelink -u -a
CautionIf you do not disable and remove all prelinking, users cannot log in and
/usr/sbin/sshddoes not start. -
Recreate the
initramfsfile system:# dracut -f
This can take some time to complete. You may run this with the
-vor--verboseswitch to monitor the process. -
Remove the existing SSH host keys:
# rm /etc/ssh/ssh_host*
OpenSSH uses the FIPS-validated OpenSSL library modules to generate new, FIPS-approved keys when the system is next rebooted. (Under FIPS mode, ssh-keygen can create new RSA host keys in
/etc/ssh, but not DSA keys, and it displays key fingerprints as SHA1 hashes instead of as MD5 hashes.) -
Shut down and reboot the system into FIPS mode.
NoteWhile the system is rebooting, generate input events by pressing keys at random or by moving the mouse. You should create at least 256 such events to ensure that the system has sufficient entropy available for key generation.
-
When the system has rebooted, check that FIPS is enabled:
# cat /proc/sys/crypto/fips_enabled
1
-
To test that FIPS is functioning correctly, run the following OpenSSL command and check that an error is returned:
# openssl md5 /etc/hosts
Error setting digest md5
140297679636296:error:060A80A3:digital envelope routines:FIPS_DIGESTINIT:disabled for fips:fips_md.c:180:
The error is returned when you attempt to obtain an MD5 hash, because MD5 is not a FIPS approved Hash Standard.