3 Setting Up Enterprise Manager Plug-In for Oracle GoldenGate

After deploying the Enterprise Manager plug-in, there are a number of tasks that must be completed before you can begin to use the plug-in to monitor your processes. This section shows you how to complete these tasks.

3.1 How do I Create the Oracle Wallet

You must perform the following steps to create the Oracle Wallet and to add the password that the Oracle Management agent uses to connect to the Oracle GoldenGate agent to receive metric values.

To create the Oracle Wallet:

  1. Navigate to the OGG_AGENT_ORA_HOME directory.

    Note:

    Oracle GoldenGate 12c (12.1.2.0.0) introduced the storing of passwords for extract and replicats in Oracle Wallets. However, both the Oracle GoldenGate core replication and Oracle GoldenGate Monitor Agent (JAgent) wallets cannot reside in the same location. If both Oracle GoldenGate core and JAgent are using the Oracle Wallet then Oracle GoldenGate core must use a non-default location. This configuration can be set by using the GLOBALS parameter WALLETLOCATION.

  2. Run the appropriate pw_agent_util script using the runtime argument specifying that you’re using only the Java agent (and not Oracle GoldenGate Monitor Server):
    • Windows: Go to the command line and enter Shell> pw_agent_util.bat -jagentonly
    • UNIX: Enter the command Shell>./pw_agent_util.sh -jagentonly

    If a wallet does not exist, then one is created.

  3. Enter and confirm the Oracle Enterprise Manager agent password when you see this prompt:

    Please create a password for Java Agent:

    Please confirm password for Java Agent:

    Attention:

    If a wallet already exists in the dirwlt directory, a message is returned and the utility stops. If this happens go to the next step.

  4. Optional: Run the utility to create the JAgent password by entering one of the following commands. (Note that the command options are not case sensitive):

    Caution:

    Only perform this step if the wallet already exists in the dirwlt directory.
    • Windows: Go to the command line and enter: Shell> pw_agent_util.bat -updateAgentJMX
    • UNIX: Enter the command Shell> ./pw_agent_util.sh -updateAgentJMX

3.2 How do I Configure Oracle GoldenGate to Run with Oracle Enterprise Manager

You must configure your Oracle GoldenGate instance to work with Oracle Enterprise Manager by setting property values for hosts, ports, and monitoring type.

To configure monitoring for Oracle Enterprise Manager:

  1. Navigate to the OGG_AGENT_ORA_HOME directory
  2. Edit the cfg/Config.properties file:
    1. Set the property that determines the monitoring type to Oracle Enterprise Manager:

      agent.type.enabled=OEM

    2. Verify that the port you assign to the jagent.rmi.port property is free and available:

      UNIX,: netstat -anp | grep [port_number]

      Windows: netstat -an|findstr [port_number]

    3. Set the Remote Method Invocation (RMI) port for the Oracle Enterprise Manager agent. The default is 5559.

      jagent.rmi.port=[port_number]

    4. Set the property that identifies the host of the JAgent.

      This is the host of the Oracle GoldenGate instance. The value may be a name or an IP address.

      jagent.host=[Oracle_GoldenGate_host_name]

    5. Set the port of the JAgent. The default for this property is 5555.

      jagent.jmx.port=[port_number]

    6. Set the user name for the connection to the JAgent.

      jagent.username=[user_name]

    7. Set the SSL value for the connection to false.

      jagent.ssl=false

3.3 How do I Start the Oracle GoldenGate Instances

This topic shows you how to start your Oracle GoldenGate and the monitor or JAgent agent using GGSCI commands.

For more details see, Oracle GoldenGate GGSCI Commands.

  1. Navigate to the Oracle GoldenGate installation directory.
  2. Start a GGSCI session:

    Shell> ./ggsci

  3. Create the data store that persists monitoring data if this is the first time you’re starting Oracle GoldenGate after enabling monitoring,

    GGSCI> CREATE DATASTORE

  4. Create the sub-directories if this is the first time you’re starting Oracle GoldenGate after enabling monitoring.

    GGSCI> CREATE SUBDIRS

  5. Stop and restart running Oracle GoldenGate Manager processes if you just added the GLOBALS parameter to enable monitoring.

    You must perform this step to activate the new setting.

    GGSCI> STOP MANAGER

  6. Start the Oracle GoldenGate Manager process.

    GGSCI> START MANAGER

  7. Start the Oracle GoldenGate agent.
    GGSCI> START JAGENT

    Tip:

    The Oracle Wallet must be successfully created and the password entered before starting the agent. See How do I Create the Oracle Wallet.

3.4 How do I Create SSH Named Credentials

This topic shows you how to create SSH Key named credentials.

To create SSH Key named credentials:
  1. Generate keys on your server using the ssh-keygen utility

    A directory with the name .ssh is created and two files are included in the directory.

    rw- — — — — — — 1 cllamas dba 1675 Mar 21 13:58 id_rsa

    rw- r — — r – – 1 cllamas dba 400 Mar 21 13:58 id_rsa.pub

  2. Use the client, such as Putty Key Generator, to generate the Private key and the Public key.
  3. Save both the Public and Private keys.
  4. Use the Conversions, Export OpenSSH Key in the Putty Key Generator dialog to convert the key.
  5. Save the converted key.
  6. Select the OpenSSH key in the Putty Key Generator dialog, then copy and paste the contents in a file called authorized keys using the command vi authorized keys.
  7. Save the file.
  8. Use the Putty agent to load the key that you just generated.
  9. Log in to the server using the key.
  10. Go to the Enterprise Manager Cloud Control.
  11. Select Setup, Security, Named Credentials to open the Named Credentials dialog and create a named credentials.
  12. Click Create.
    1. Select Host in the dropdown for Authoring Target Type.
    2. Select SSH Key Credentials in the dropdown for Credential type.
    3. Select Global as the scope if the same SSH Key is going to be used for all the targets.
    4. Go to the Credential Properties section and upload the open SSH public key as well as the private key.
    5. Click Add Grant and set the access privilege for the user.
    6. Click Change Privilege and in the dialog box that’s displayed, select Full from the drop down list.
    7. Click Test and Save to check the connection.

      A confirmation message appears if the connection is successful.

(Optional) Enter the result of the procedure here.

3.5 How do I Set the Preferred Credentials

This topic shows you how to set the preferred credentials on all agents where you want to deploy Enterprise Manager Plug-In for Oracle GoldenGate.

To set the preferred credentials:

  1. Go to Enterprise Manager Cloud Control and select Setup, Security, Preferred Credentials to open the Preferred Credentials page.
  2. Select the required target type from the list.

    You can narrow your search by entering search criteria, or you can just scroll through the list of target types if there are not too many.

  3. Click Manage Preferred Credentials to open the Preferred Credentials page.

    The Preferred Credentials page is divided into two sections:

    Default Preferred Credentials:

    These credentials are set as default for the selected target type. When set, these credentials are applicable to all the targets of this type, for which credentials are not specifically provided.

    Target Preferred Credentials:

    These credentials are specific to the individual targets. They are provided if the selected target requires separate credential values than those set for its target type by default. Setting target credentials overrides the default credentials for that target.

  4. Go to the Target Credentials section and select the host name for the host that is running the Management agent where the Enterprise Manager Plug-In for Oracle GoldenGate has to be deployed. Click Set to open the Select Named Credential dialog.
  5. Enter values for the host credential and the administration credential.
    • Host Credential: This sets host credentials of the EM agent so that the Enterprise Manager Plug-In for Oracle GoldenGate can communicate with it.

      For example, if the EM agent is on host myhost and this machine is accessible using credentials X1 and X2; and X1 was used to install the EM agent, then you must use the X1 as the host credentials.

    • Administration Credential: Set the Administration credential by adding the username to the config.properties file of the Oracle GoldenGate instance and defining the password when the Oracle Wallet is created.

    Attention:

    If Oracle GoldenGate Core setup is done on a different system, which isn’t running the OMS and EM Agent, you must provide the OMS host credential for host credential set, and not the Oracle GoldenGate Core system credentials.
  6. Click Save.

    The credentials are saved as named credentials, making them available for use later. The Select Named Credential dialog box closes and a confirmation message appears on the Security page.

  7. Click Test to ensure that there are no errors. If your test runs successfully, then your credentials are set correctly.
  8. Run the OS Command job for the Management agent where the Enterprise Manager Plug-In for Oracle GoldenGate is deployed:
    1. Log in to Enterprise Manager Cloud Control.
    2. Click Enterprise, Job, Activity to open the Job Activity page.
    3. Select OS Command from the Create Job list, then click Go.
    4. Enter the details required in the following pages, and click Submit to run the job.
      If the job runs successfully, then your credentials are set correctly.
  9. Repeat host credentials for the other GoldenGate target types:
    • Oracle GoldenGate Manager

    • Oracle GoldenGate Extract

    • Oracle GoldenGate Replicat

3.6 How do I Monitor High Availability Features

This topic explains the monitoring of High Availability features for Oracle GoldenGate Management Pack. For the High Availability feature to properly function with Oracle GoldenGate plug-in, virtual IP (not the physical IP) of the Oracle GoldenGate host must be provided at the time of Oracle GoldenGate target discovery.

There can be two scenarios where High Availability is required:

  • Oracle GoldenGate instance is failed over from one node to another in the cluster: In this scenario, the existing Master Agent continues monitoring the Oracle GoldenGate instance in a seamless manner and the Host Name parameter oin the Oracle GoldenGate Manager page displays the physical host name of the new node.

  • Current Master Agent stops functioning: In this scenario, the EM Agents that are currently running, must be marked as Slave for this Oracle GoldenGate instance. When the current Master Agent stops functioning, one of the Slave agents is assigned as Master for the Oracle GoldenGate instance, and monitoring continues.

This procedure uses both the Oracle Enterprise Manager Cloud Control portal and a console connection.

  1. Start Oracle Enterprise Manager Cloud Control.
  2. Login using the provided credentials.

    The user must have sysman privilege.

  3. Select Setup, Manage Cloud Control, Agents to open the Agents page.

    All the agents are listed on this page.

  4. Select Targets, GoldenGate .
  5. In the GGSCI console, type the command info all to view the current status of the processes.
    All the processes are displayed as running.
  6. Select Setup, Add target, Configure Auto Discovery.
  7. Select the host and click Discovery Modules to provide credentials details by selecting Goldengate discovery.
  8. Click Discovered Targets for a particular Agent Host Name.
    The dialog lists all the targets on hosts, select a particular host.
    1. Click Promote to promote the particular process. A Confirmation dialog displays when the promotion process is completed.
  9. Click Submit from the Manage Agents page. A confirmation dialog displays.

    This page displays after successful completion of the promotion of the targets. It includes the recently promoted Oracle GoldenGate instance with a list of all EM agents where Oracle GoldenGate plug-in is deployed.

    The agent through which these targets were discovered and promoted, is shown as Master for this Oracle GoldenGate instance. All other agents are marked as None, which means that they’re not associated with this Oracle GoldenGate instance. You can select any number of these agents as Slave, and click Submit to save he changes.

    If you don’t want to make any such changes, you can click Oracle GoldenGate Home and navigate back to the GoldenGate plug-in home page.

  10. Click Targets, GoldenGate and then select the Data Pump process.
  11. Click Stop on the Extract:DPUMP page. Click Yes in the confirmation dialog to stop the process. Click Close on the process complete dialog.
  12. Select Targets, GoldenGate .

    The DPUMP process is displayed as stopped. Click Refresh to refresh the page if the process still shows as running.

  13. Select the DPUMP process to open the Extract:DPUMP page.
  14. Click Start. Select Normal on the confirmation dialog box and then click Start.
  15. Click Close when the Process Complete dialog displays.
  16. Click OGG Home to go back to the home page.

    All the processes are displayed as running.

  17. Select the Manage Agents tab. .

    Note that in the list of Agents, one displays as Master and the other displays as None.

  18. Using the dropdown list, change the Status from None to Slave.
  19. Click Submit. In the confirmation dialog click OK.
  20. Select Setup, Manage Cloud Control, Agents to open the Agents page.
  21. Click Targets and then on the next page click OGG Home.

    All the processes display as running.

  22. Go to the console to stop the running processes by using the stop * command.
  23. Next, stop the JAgent process using the stop jagent command.
  24. Type Y to confirm the action.
  25. Stop the MANAGER process using the stop manager command.
  26. Type Y to confirm the action.
  27. In the console, use the command info all to view the current status of the processes.

    All the processes display as stopped.

  28. Next, start the MANAGER process using the start manager command.
  29. Start the other processes using the start * command.
  30. Start the JAgent process using the start jagent command.
  31. In the management portal, refresh the OGG Home tab to view the updated status of the processes.

    Note that it can take few moments for the page to update. All the processes display as running.

  32. Select the DPUMP process on the Extract:DPUMP page and stop the process. box.

    Click Yes in the confirmation dialog. Click Close in the Process Complete dialog

  33. Use the console to view the status of all the processes using the info all command.

    All the processes display as running.

  34. In the Enterprise Manager portal, click OGG Home.

    All the processes display as running.

  35. Go to the console and stop the running processes using the stop * command.
  36. Stop the JAgent and MANAGER processes as mentioned previously.

    Type Y to confirm the actions.

  37. Use the command info all to view the current status of the processes.

    All the processes display as stopped.

  38. Start the processes using the start * command.
  39. Start the MANAGER and JAgent processes.
  40. In the console, type the command info all to view the current status of the processes.

    All the processes display as running.

  41. In the portal, click Refresh to update the status of the processes.

    All the processes display as running.

  42. Go to the OGG Home tab, and select the DPUMP process to open the Extract:DPUMP page.
  43. Click Stop. Click Yes in the confirmation dialog.
  44. Click Close to complete the process.

3.7 How do I Verify and Validate the Plug-in Deployment

Before verifying and validating the Enterprise Manager Plug-In for Oracle GoldenGate, you must promote the GoldenGate target that is found during auto-discovery.

For more details, see Discovering, Promoting, and Adding Targets.

After waiting a few minutes for the Enterprise Manager Plug-In for Oracle GoldenGate to start collecting data, use these steps to verify and validate that Enterprise Manager is properly monitoring the plug-in target:

  1. Click the Oracle GoldenGate target link from the All Target page to open the Oracle GoldenGate Home Page.
  2. Select Target, Monitoring and then Metric Collection Errors to verify that no metric collection errors are reported.
  3. Select Target, Information Publisher Reports to view reports for the Oracle GoldenGate target type, and ensure that no errors are reported.
  4. Select Target, Configuration, Last Collected Ensure that configuration data can be seen. If configuration data doesn’t immediately appear, click Refresh on the Latest Configuration page.

3.8 How do I Add Instances for Monitoring

After successfully deploying the Enterprise Manager Plug-In for Oracle GoldenGate, you must add the plug-in target to Enterprise Manager Cloud Control for central monitoring and management.

  1. Select Setup, Add Target, Configure Auto Discovery .
  2. Click on the GoldenGate Discovery Module to display the Configure Target Discovery for Target Types page.
  3. Select the agent host name and click Edit Parameters to open the Edit Parameters: GoldenGate Discovery dialog.
  4. Enter the information required to connect to the Oracle GoldenGate agent:
    • JAgent Username - Valid user name for the connection. This name is specified in the Config.properties file.

    • JAgent Password - Password for the user, which is set when you create the Oracle Wallet.

    • JAgent RMI Port - The Remote Method Invocation port to use for the connection.

    • JAgent Host Name - Enter the Cluster Virtual IP (VIP) for your high availability cluster environment (HA/RAC) instead of the Physical IP of your Oracle GoldenGate machine; for all other environments, use the default, localhost.

      For HA/RAC environments, when the targets are promoted, the host property of the targets is updated with VIP. When these targets are relocated or failed over to another node, they’re still accessible using the same monitoring details. This is because the EM agent continues monitoring the OGG instance irrespective of where OGG instance is actually running.

  5. Click Ok when finished.

    Target discovery has been configured on this host.

  6. Click Discover Now to discover targets immediately.
  7. After the discovery job executes, check for discovered hosts that may contain potential targets. You can do this two ways:
    • Select the job in the Host Discovery page, then click View Discovered Targets.
    • Select Setup, Add Target, Auto Discovery Results.
  8. Select a target to promote, then click Promote to open a promotion wizard for this target type.
  9. Select the Targets on Hosts tab, and choose one or several OGG targets to promote.
  10. Check the target type home page to verify that the target is promoted as a Cloud Control target.

    Once a target is successfully promoted, the Management Agent installed on the target host begins collecting metric data on the target.

3.9 How do I Configure Instance-Level Security

Enterprise Manager provides instance-level security flexibility to provide target-level privileges to administrators. For example, if an Enterprise Manager Plug-In for Oracle GoldenGate is managing three Oracle GoldenGate (OGG) instances (for example, OGG1, OGG2, and OGG3), a user can be granted privileges to any of these instances and their sub-targets (that is, their OGG processes).

To grant target-level access:
  1. Log in as a super admin (for example, sysman).
  2. Select Setup, Security, Administrators to open the Administrators page.
  3. Click Edit to modify access for an existing user.
  4. Click Create/Create Like to create a new user and to assign the appropriate user roles.
  5. Select the Properties tab, enter the required credentials for the new user, and click Next to open the Create Administrator userName: Roles page.

    This page lets you to assign roles to the named user by moving the role from the Available Roles column to the Selected Roles column.

  6. Select one or more roles from the Available Roles list and click Move to add them to the new user.

    At a minimum, you must select the EM_BASIC_SUPPORT_REP role in addition to the preselected roles. This table shows the different roles.

    RM Role Name Edit/View Parameter View Report View Discard

    EM_ALL_ADMINISTRATOR

    Yes

    No

    No

    EM_ALL_OPERATOR

    Yes

    No

    No

    EM_ALL_VIEWER

    No

    No

    No

    PUBLIC

    No

    No

    No

    EM_PLUGIN_USER

    No

    No

    No

    Do not select any ALL roles in this step, such as EM_ALL_ADMINISTRATOR, EM_ALL_OPERATOR, and so on, else the user role you’re creating will be entitled to all OGG instances.

    Enterprise Manager (EM) supports object-level access control so administrators can be given roles for specific targets only. See Creating Roles for Systems Infrastructure Administration in Enterprise Manager Cloud Control Administrator’s Guide.

  7. Click Next to open the Target Privileges page.
  8. Select the Target Privileges tab, scroll down to the Target Privileges section and select the Execute Command Anywhere and Monitor Enterprise Manager roles, and then click Add.

    These two roles are required for full functionality and multi-version support.

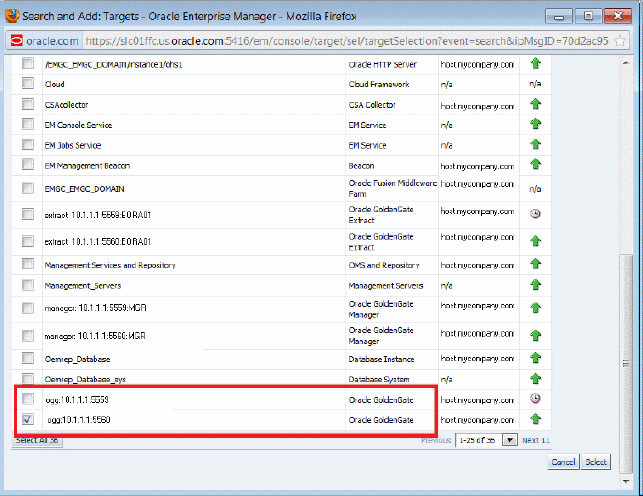
  9. Scroll below the Privileges Applicable to All Targets table to the Target Privileges section. This section gives the Administrator the right to perform particular actions on targets. Click Add to open the Search and Add: Targets page appears in a new browser window.
  10. Select the instances you want the user to have access.

    Remember:

    You’re only assigning Oracle GoldenGate instances at this time. You’re not assigning Manager, Extract, or Replicat processes.

    Here is an example of two Oracle GoldenGate instances ( port numbers 5559 and 5560). Access to only one of them (port number 5560) is being assigned to this user.

    Description of GUID-0849E965-8D13-411D-8FE2-199C0E645C02-default.gif follows
    Description of the illustration GUID-0849E965-8D13-411D-8FE2-199C0E645C02-default.gif
  11. Click Select to save the changes.

    You’re returned to the Add Targets page and the Target Privileges list is refreshed to show your selection.

  12. Click the Edit Individual Privileges link, in the right-most column for each target, to set the required privileges for the target.

    Select from the following privileges:

    Privilege Name Description

    Full

    Perform all operations on the target, including delete the target.

    View contents of OGG report file

    View content of the report files for OGG targets.

    View contents of OGG discard file

    View content of the discard files for OGG targets.

    Run OGG command

    Run OGG commands (Start, Stop, Kill) for OGG targets.

    Edit OGG parameter file

    Edit parameter files for OGG targets.

    Connect Target

    Connect and manage target.

    Don’t select both the Full and Connect Target privileges because Full includes Connect Target .

  13. Click Continue.
  14. Click Review to review your user's privileges, then click Finish.

    The user now has access to the selected instance(s).

    These privileges are automatically assigned from top to bottom in the hierarchy. For example, if the Run OGG Command privilege is assigned to an OGG instance, it’s automatically assigned to all its child processes. However, you can also provide process specific privileges. Suppose the Edit OGG parameter file privilege is assigned to a process, it’s specific to that process and is not assigned to other processes in the instance.

  15. Test the instance-level security to confirm that all edited processes are operating with their assigned privileges:
    1. Log in as the newly created or edited user.
    2. Select Targets, GoldenGate to open the Oracle GoldenGate page.
    3. Confirm that only the OGG instances that you have access to are visible.
    4. Log out and log in again as root.
    5. Select Targets, GoldenGate to open the Oracle GoldenGate page.
    6. You should now see all the managed OGG instances.
For more details, see Security.

3.10 How do I Configure JAgent to Support Remote Monitoring Using JMX Server

You must configure the JAgent to support remote monitoring using JMX Server.

To configure the JAgent to support remote monitoring using JMX Server.

  1. Edit the Config.properties file.
    1. Set jagent.rmi.port for OEM mode
    2. Set jagent.jmx.port for OGGMON mode
    3. Set agent.type.enabled = OEM or OGGMON
  2. Optional: Add the following parameters only when Oracle GoldenGate and JAgent are running on cloud or within a firewall.
    1. The jmx.enable.remote.monitoring = true or false.
    2. The jmx.broker.port = default ( any valid port number).
  3. Set jmx.enable.remote.monitoring = true.
  4. Set jmx.broker.port = any valid firewall enabled port.
    It uses two ports, either the jagent.rmi.port or jagent.jmx.port as the registry port depending on agent.type.enabled property, and jmx.broker.port as the communication port.
  5. Optional: Enable SSH tunneling for the ports.
    1. ssh -i opc_rsa -f opc@192.0.2.1 -L 9020:192.0.2.1:9020 -N
    2. ssh -i opc_rsa -f opc@192.0.2.1 -L 5559:192.0.2.1:5559 -N
    3. ssh -i opc_rsa -f opc@192.0.2.1 -L 7809:192.0.2.1:7809 -N

    The IP 192.0.2.1 is the public IP address of the cloud device.

    Important:

    You must repeat the command sequence if the client system is restarted.