4 Working with Users
This section describe how to set up and work with Oracle GoldenGate Monitor users. These topics are:
Note:
Only users granted Super Administrator and Administrator roles can access the User Management tab. If you log in as an Operator or Power Operator, the User Management tab will not appear in the Oracle GoldenGate Monitor UI.4.1 Understanding User Security Roles
Each person who uses Oracle GoldenGate Monitor must be granted a security role. This role controls which functions of the interface that user can perform. There are three security roles in Oracle GoldenGate Monitor, as described in Table 4-1:
Table 4-1 Oracle GoldenGate Monitor Security Roles
| Role | Functions this user can perform | Description |
|---|---|---|
|
Super Administrator (SuperAdmin) |
All |
The Super Administrator is the highest-priority role in Oracle GoldenGate Monitor. The Super Administrator can assign instances to Administrators, Operators, and Power Operators. There is always one Super Administrator. The Super Administrator can edit user information, such as the first and last name and email details on the Edit User screen of the logged in user (SA), and for other users like Administrator, Power Operator and Operator |
|
Administrator |
All |
The Administrator can perform all of the Oracle GoldenGate Monitor functions. The Administrator can map and un-map the instances (that is, instances that are accessible by the current logged in Administrator) for only Operator and Power Operator. the Administrator is not authorized to make any changes on the instances mapped to Super Administrator and other Administrators. Furthermore, the Administrator cannot edit the details for Super Administrator or other Administrators. The Administrator can edit the user information such as the first and last name and email details by using the Edit User screen of the logged-in user (Administrator) and for other users, such as a Power Operator or Operator. |
|
Power Operator |
All but User Management |
The Power Operator can perform all of the Oracle GoldenGate Monitor functions except managing users. The Power Operator cannot see the User Management tab. |
|
Operator |
Metrics and Alerts History User Profile |
The Operator can only manage his or her user profile, and can only view the monitoring tabs. The Operator cannot see the following tabs:
|
4.2 Managing Users
Managing users refers to editing a user's profile and administering Oracle GoldenGate instance access. If you are an Oracle GoldenGate Monitor Super Administrator (SuperAdmin) or an Administrator, you can use the User Management tab to view and manage information about the Oracle GoldenGate Monitor users. This tab displays the existing users, with columns that show the login name, the actual name of the person who owns that login name, that person's email address, and that person's security role within Oracle GoldenGate Monitor. It also displays the instances assigned to the users.
While you can use the User Management tab to edit user information, such as name and email address, and to assign instances, you can only add and delete users, assign and change their passwords, and assign them to groups from the Oracle WebLogic Server Administration Console.
This section describes how to:
-
Add a user; see To add a user:
-
Add a user to a group; see To add a user to a group:
-
Edit user information; see To change user properties:
-
Delete a user; see To remove a user:
4.3 Adding, Changing, and Removing Users
Weblogic administrators can use the Oracle WebLogic Server Administration Console to do the following:
-
Create new users.
-
Delete existing users.
-
Update the user names and passwords
An Oracle GoldenGate Monitor Super Administrator or Administrator can edit user information by using User Management tab in Oracle GoldenGate Monitor Server Console.
Note:
As of Oracle GoldenGate Monitor 12c (12.2.1), you can only add a user by using the WebLogic Administration Console. The following procedure requires that you access that console before you begin.-
Log into the Oracle WebLogic Server Administration Console.
-
In the Domain Structure panel (left side of console), select Security Realms.
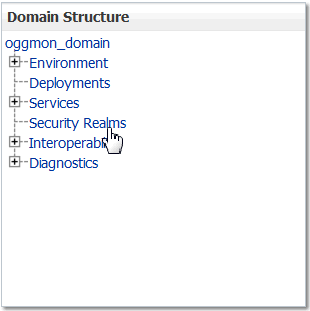
Description of the illustration ''wls_dom_strct.gif''
-
On the Summary of Security Realms page select the name of the realm (for example, myrealm).
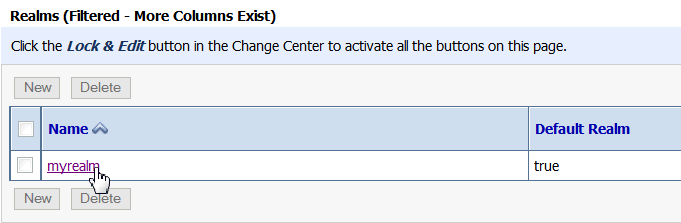
Description of the illustration ''wls_realms.gif''
-
On the Settings for Realm Name page select Users and Groups then Users.
The User table displays the names of all users defined in the Authentication provider.
-
Click New.
The Create New User screen appears.
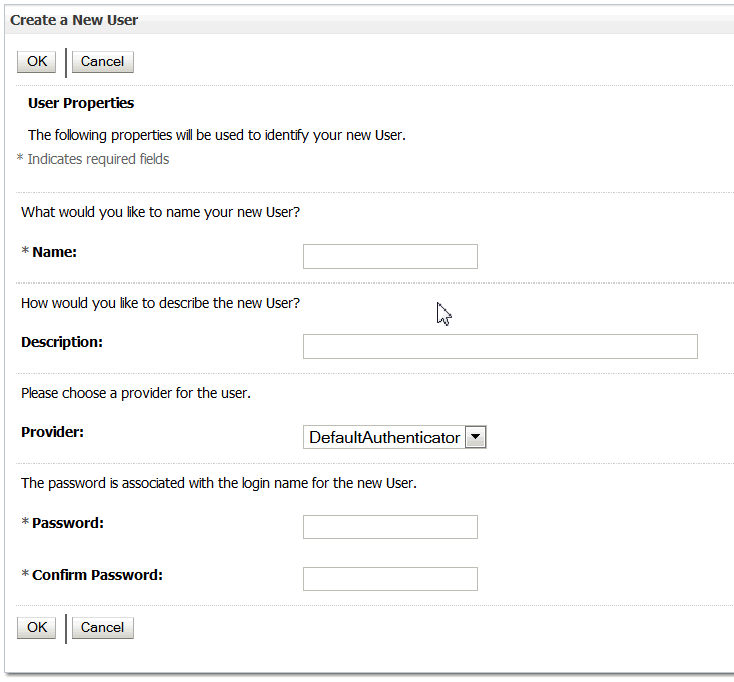
Description of the illustration ''wls_crt_nu_usr.gif''
-
In the Name field of the Create New User page enter the name of the user.
User names must be unique. For the WebLogic Authentication provider (
DefaultAuthenticator), user names are case insensitive. User names must not include tabs or any of the following characters:-
Semicolons: ;
-
Commas: ,
-
Plus signs: +
-
Equal signs:=
-
Single backslash character: \ (note that two consecutive backslashes may be used; for example smith\\)
In addition, user names must not begin with either of the following characters:
-
Pound sign: #
-
Double quotations: "
Important:
If a user is created with any of the preceding invalid characters, the WebLogic domain can become corrupted. -
-
(Optional) In the Description field, enter a description. The description might be the user's full name.
-
In the Provider drop-down list, select the Authentication provider for the user.
If multiple Authentication providers are configured in the security realm, they will appear in the list. Select the Authentication provider that corresponds to the database in which the information for the new user is to be stored.
-
In the Password field, enter a password for the user.
The minimum password length for a user defined in the WebLogic Authentication provider is 8 characters. Do not use the username/password combination weblogic/welcome1 in production.
Note:
Oracle recommends that you configure the Password Validation provider in the security realm after you create a domain. The Password Validation provider can be configured to impose additional password composition rules. For more information, see Configure the Password Validation provider. -
Re-enter the password for the user in the Confirm Password field.
-
Click OK to save your changes.
The user name appears in the User table. You can now add this user to a group.
-
In the Users table select the user you want to add to a group.
-
On the Settings for User Name page select Groups.
The Groups tab appears:
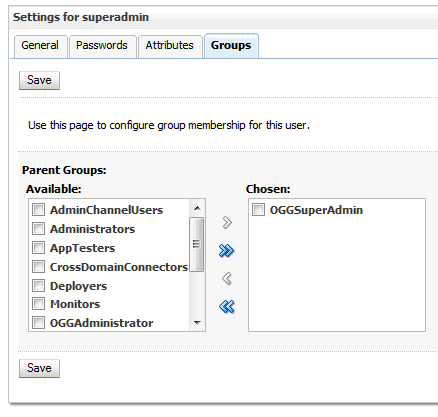
Description of the illustration ''cons_groups.gif''
-
Select a group or groups from the Available list box:
-
To select multiple groups, Ctrl-click each group and then click the double right arrow to move the selection to the Chosen list box.
-
To add a user to a group, click the right arrow to move the selection to the Chosen list box.
-
To remove a user from a group, select the group in the Chosen list box and click the left arrow. You can remove multiple groups by selecting them and clicking the double left arrow.
-
-
Click Save.
-
In the Manage Users list of the User Management tab, click the name of the user that you want to change. The Edit User screen appears.
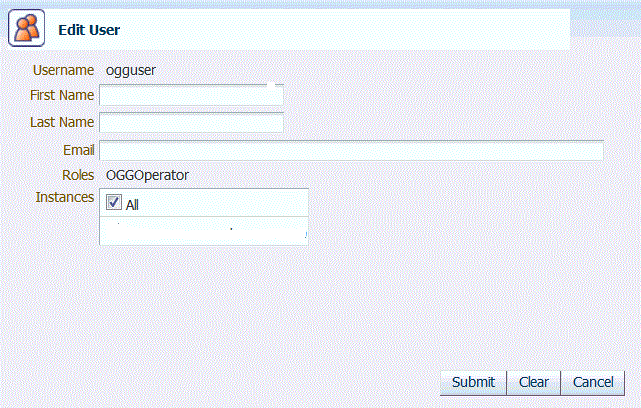
Description of the illustration ''edit_user.gif''
-
Change the properties as needed. You can change the following properties:
-
User's proper name (first and/or last)
-
User's email address.
-
The instances to which the user has access (see Assigning Instances to a User).
-
-
Click Submit.
-
Log in (or remain logged in) to the Oracle WebLogic Server Administration Console.
-
In the left pane select Security Realms.
-
On the Summary of Security Realms page select the name of the realm (for example, myrealm).
-
On the Settings for Realm Name page select Users and Groups then Users.
-
In the Users table select the check box next to each user name you want to delete.
If you have a large number of users, use the Customize this table link to retrieve and list only the users that match your search criteria. The Filter By field uses the asterisk (*) as the wild card character.
Note:
The Administration Console displays a maximum of 1000 users. If the number of users that are defined exceeds 1000, you can apply a search filter to limit the display. -
Click Delete.
-
Click Yes to confirm.
4.4 Assigning Instances to a User
As described in Understanding User Security Roles, all Oracle GoldenGate Monitor users are granted a security role. The Super Administrator or Administrator can assign or un-assign the instances to other users on the Edit Users screen, accessed from the User Management tab. This is referred to as "instance level security" and allows one to restrict the access different users have to different hosts/instances. Before attempting this procedure, you should familiarize yourself with how instance level security is managed. See Chapter 6, "Understanding Instance Level Security" in Administering Oracle GoldenGate Monitor.
To assign instances to a user:
-
In the Manage Users list of the User Management tab, click the name of the user that you want to change. The Edit User screen appears. The instances to which that user can be assigned will appear in the Instances list box. Note that Role is a non-editable column in the Edit Users screen for all the users.
-
Select the check box next to each instance you want to assign to t hat user. If you want to assign all available instances, select All.
-
Click Submit.
To delete an instance assignment, deselect the specific instance(s) or All and click Submit.
4.5 Managing Your User Profile
Use the User Profile to change your log-in password and select the kinds of notifications that you want to receive.
-
In the Utility Bar, click User Profile. The User Profile dialog box appears.
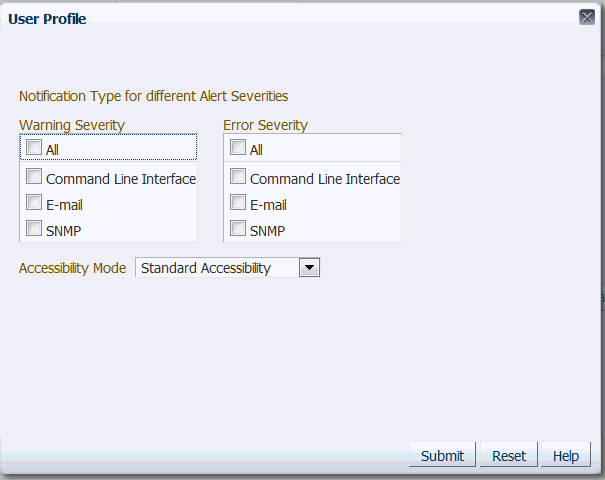
Description of the illustration ''user_profile.gif''
-
Under Notification Type for different Alert Severities, specify the notification method that you want to use for each level of alert severity. This option is visible only if alerts are enabled by an administrator. An alert can have a severity of either Warning or Error, depending on how it was defined. You might want to receive Error alerts by email, SNMP, and CLI (only options that were enabled by an administrator are shown). Conversely, you might only need to receive Warning alerts by email, depending on your business protocols. The following status indicators appear in the status bar and workspaces for triggered alerts. See About the Status Indicators.

Warning-level alert 
Error-level alert -
For Accessibility Mode, set the accessibility mode for users with disabilities.
-
None: Accessibility features are excluded.
-
Standard Accessibility: Supports standard accessibility features provided by supported browsers.
-
Screen Reader Optimized: Enables accessibility features that improve usability with a screen reader, but may affect other users negatively.
-
-
Submit: Click to save the changes that you made to your profile, or click Reset to cancel any changes that you made to your profile.