5 Configuring Domain for Oracle GoldenGate Veridata
This chapter describes how to create and configure the domain for the Oracle GoldenGate Veridata standard installation topology.
This chapter includes the following sections:
5.1 Creating the Database Schema
Before you can configure the topology for your agent, make sure you have created the necessary schema in your database. See Chapter 4, "Creating the Oracle GoldenGate Veridata Repository Schema" for instructions.
5.2 Configuring a Domain
This section describes the procedure for creating an Expanded WebLogic domain for the Veridata agent using the configuration wizard.
For more information about other methods available for domain creation, see "Additional Tools for Creating, Extending, and Managing WebLogic Domains" in Creating WebLogic Domains Using the Configuration Wizard.
The following topics are covered in this section:
5.2.1 Starting the Configuration Wizard
To configure a domain, navigate to the ORACLE_HOME/oracle_common/common/bin directory and start the WebLogic Server Configuration Wizard.
On UNIX operating systems:
./config.sh
On Windows operating systems:
config.cmd
5.2.2 Navigating the Configuration Wizard Screens to Configure the Domain
Follow the instructions in this section to create and configure the domain for the topology.
Note:
You can use the same procedure described in this section to extend an existing domain. If your needs do not match the instructions given in the procedure, be sure to make your selections accordingly, or refer to the supporting documentation for additional details.Domain creation and configuration includes the following tasks:
-
Task 1, "Selecting the Domain Type and Domain Home Location"
-
Task 10, "Configuring the Administration Server Listen Address"
-
Task 13, "Reviewing Your Configuration Specifications and Configuring the Domain"
-
Task 14, "Reviewing Your Domain Home and Administration Server URL"
- Task 1 Selecting the Domain Type and Domain Home Location
-
On the Configuration Type screen, select Create a new domain.
In the Domain Location field, specify your Domain home directory.
It is recommended that you locate your Domain home in accordance with the directory structure summarized in "Understanding the Recommended Directory Structure" in Planning an Installation of Oracle Fusion Middleware, where the Domain home is located outside the Oracle home directory. This directory structure will help you avoid issues when you need to upgrade or reinstall your software.
Tip:
More information about the other options on this screen can be found in Configuration Type in Creating WebLogic Domains Using the Configuration Wizard. - Task 2 Selecting the Configuration Templates
-
On the Templates screen, make sure Create Domain Using Product Templates is selected, then select Oracle GoldenGate from the Template Categories. The following templates are selected:
-
Veridata Standard WebLogic Server Domain - 12.2.1.0.0 [veridata]
Selecting this template automatically selects the following as dependencies:
-
Oracle JRF - 12.2.1 [oracle_common]
-
WebLogic Coherence Cluster Extension - 12.2.1 [wlserver]
-
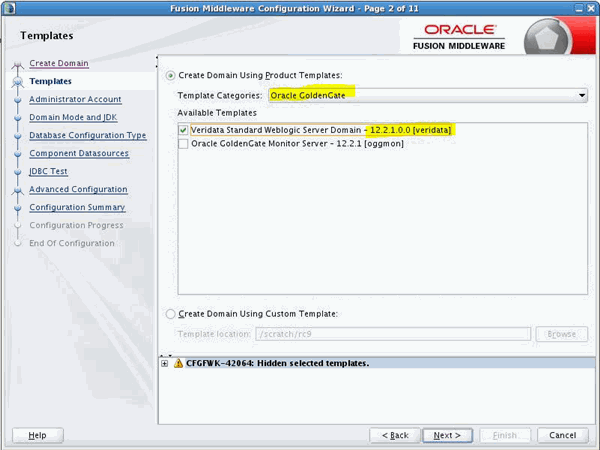
Description of the illustration ''config_templates_jee.gif''
Tip:
More information about the options on this screen can be found in Templates in Creating WebLogic Domains Using the Configuration Wizard. -
- Task 3 Configuring the Administrator Account
-
On the Administrator Account screen, specify the user name and password for the default WebLogic Administrator account for the domain.
It is recommended that you make a note of the user name and password specified on this screen; you will need these credentials later to boot and connect to the domain's Administration Server.
- Task 4 Specifying the Domain Mode and JDK
-
On the Domain Mode and JDK screen:
-
Select Production in the Domain Mode field.
-
Select the Oracle HotSpot JDK in the JDK field. JDK Version 1.8.0_40 or higher is required.
Tip:
More information about the options on this screen can be found in Domain Mode and JDK in Creating WebLogic Domains Using the Configuration Wizard. -
- Task 5 Specifying the Datasource Configuration Type
-
Select RCU Data to activate the fields on this screen. The RCU Data option instructs the Configuration Wizard to connect to the database and Service Table (STB) schema to automatically retrieve schema information for the schemas needed to configure the domain.
Note:
If you choose to select Manual Configuration on this screen, you will have to manually fill in the parameters for your schema on the JDBC Component Schema screen.After selecting RCU Data, specify the database connection details in the following fields:
Field Description DBMS/Service Enter the database DBMS name, or service name if you selected a service type driver. Host Name Enter the name of the server hosting the database. Port Enter the port number on which the database listens. Schema Owner Schema Password
Enter the username and password for connecting to the database's Service Table schema. This is the schema username and password that was specified for the Service Table component on the "Schema Passwords" screen in RCU (see Section 5.1, "Creating the Database Schema"). The default username is
prefix_STB, whereprefixis the custom prefix that you defined in RCU.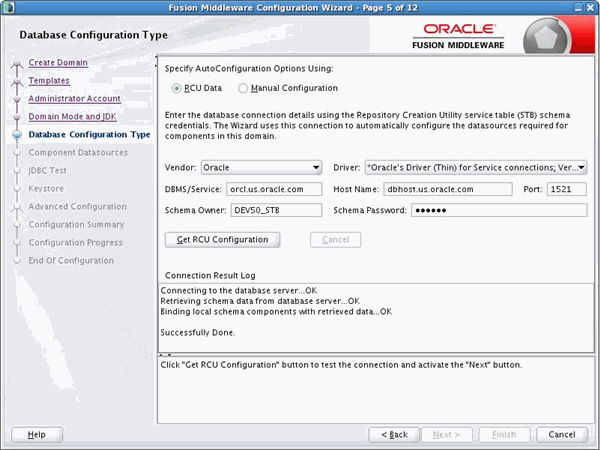
Description of the illustration ''config_db.gif''
Click Get RCU Configuration when you are finished specifying the database connection information. The following output in the Connection Result Log indicates that the operation succeeded:
Connecting to the database server...OK
Retrieving schema data from database server...OK
Binding local schema components with retrieved data...OK

Successfully Done.
Tip:
More information about the RCU Data option can be found in "Understanding the Service Table Schema" in Creating Schemas with the Repository Creation Utility.More information about the other options on this screen can be found in Datasource Defaults in Creating WebLogic Domains Using the Configuration Wizard
- Task 6 Specifying JDBC Component Schema Information
-
Verify that the values on the JDBC Component Schema screen are correct for all schemas. If you selected RCU Data on the previous screen, the schema table should already be populated appropriately.
Tip:
More information about the other options on this screen can be found in JDBC Component Schema in Creating WebLogic Domains Using the Configuration Wizard. - Task 7 Testing the JDBC Connections
-
Use the JDBC Test screen to test the datasource connections you have just configured.
A green check mark in the Status column indicates a successful test. If you encounter any issues, see the error message in the Connection Result Log section of the screen, fix the problem, then try to test the connection again.
Tip:
More information about the other options on this screen can be found in Test Component Schema in Creating WebLogic Domains Using the Configuration Wizard - Task 8 Specifying Keystore Details
-
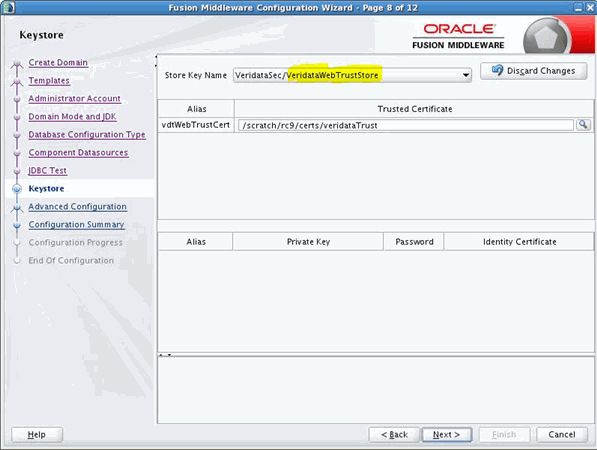
Use the Keystore screen to specify the path to the trusted certificate for each keystore. You can also specify the path to each keystore's private key, the password for the private key and the path to the Identity Certificate for the private key.
To select an Identity certificate, select the Identity keystore name from the Store Key Name drop down list and specify the paths to the private key and the identity certificate.
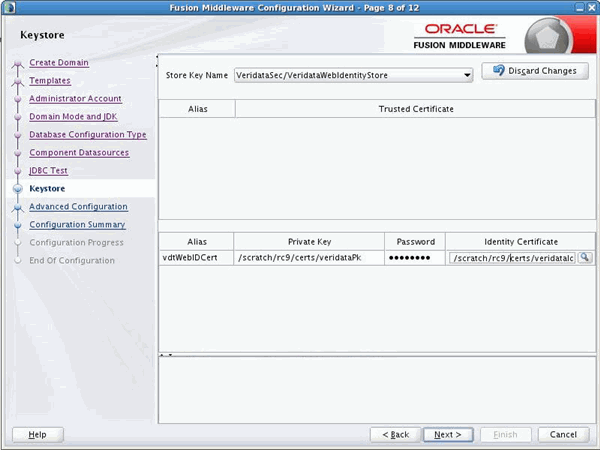
When you select the Trust Store from the Store Key Name drop-down list, the path to the sample certificate provided with the Veridata installation is displayed by default. You can specify the path to your trusted certificate on this page.
Tip:
More information about the other options on this screen can be found in Keystore in Creating WebLogic Domains Using the Configuration Wizard - Task 9 Selecting Advanced Configuration
-
To complete domain configuration for the topology, select the following options on the Advanced Configuration screen:
-
Administration Server
This is required to properly configure the listen address of the Administration Server.
-
Node Manager
This is required to configure Node Manager.
-
Managed Server, Clusters and Coherence
This is required to configure the Oracle GoldenGate Veridata Managed Server.
-
- Task 10 Configuring the Administration Server Listen Address
-
On the Administration Server screen, select the drop-down list next to Listen Address and select the IP address on the host where the Administration Server will reside. Do not use "All Local Addresses."
Do not specify any server groups for the Administration Server.
- Task 11 Configuring Node Manager
-
The Node Manager screen can be used to select the type of Node Manager you want to configure, along with the Node Manager credentials.
Select Per Domain as the Node Manager type, then specify the Node Manager credentials.
Tip:
More information about the options on this screen can be found in Node Manager in Creating WebLogic Domains Using the Configuration Wizard.More information about the types of Node Manager can be found in "Node Manager Overview" in Administering Node Manager for Oracle WebLogic Server.
- Task 12 Configuring Managed Servers
-
On the Managed Servers screen, a new Managed Server named
VERIDATA_server1is created:-
In the Listen Address drop-down list, select the IP address of the host on which the Managed Server will reside. Do not use "All Local Addresses."
-
In the Server Groups drop-down list, select VERIDATA-MANAGED-SERVERS. This server group ensures that the Oracle JRF services are targeted to the Managed Servers you are creating.
Server groups target Fusion Middleware applications and services to one or more servers by mapping defined application service groups to each defined server group. A given application service group may be mapped to multiple server groups if needed. Any application services that are mapped to a given server group are automatically targeted to all servers that are assigned to that group. For more information, see "Application Service Groups, Server Groups, and Application Service Mappings" in Domain Template Reference.
These server names and will be referenced throughout this document; if you choose different names be sure to replace them as needed.
Note:
You must make a note of the IP address and port number for the Managed Server. You will need this information when you configure the agent.Tip:
More information about the options on this screen can be found in Managed Servers in Creating WebLogic Domains Using the Configuration Wizard. -
- Task 13 Reviewing Your Configuration Specifications and Configuring the Domain
-
The Configuration Summary screen contains the detailed configuration information for the domain you are about to create. Review the details of each item on the screen and verify that the information is correct.
You can go back to any previous screen if you need to make any changes, either by using the Back button or by selecting the screen in the navigation pane.
Domain creation will not begin until you click Create.
Tip:
More information about the options on this screen can be found in Configuration Summary in Creating WebLogic Domains Using the Configuration Wizard. - Task 14 Reviewing Your Domain Home and Administration Server URL
-
The Configuration Success screen will show the Domain home location and URL of the Administration Server you just configured.
You must make a note of both items as you will need them to start the servers in your domain.
Click Finish to dismiss the configuration wizard.
5.3 Performing Next Steps
Chapter 7, "Next Steps After Configuring an Oracle GoldenGate Veridata Domain" contains basic administration tasks. You should familiarize yourself with the tasks described in this section and perform them as needed to verify that your domain is properly configured.