4 Creating the Oracle GoldenGate Veridata Repository Schema
This chapter describes how to create the Veridata Repository database schemas using the Repository Creation Utility (RCU).
This step is required before any domain is configured for your Oracle GoldenGate Veridata instance.
This chapter includes the following sections:
4.1 Configuring a Certified Database
Before you begin, make sure you have installed and configured a certified database. For more information about the supported database, see the certification matrix at http://support.oracle.com.
For more information, see Section 2.2.3, "Install a Certified Database for Configuring Veridata Repository".
4.2 Starting Repository Creation Utility
Navigate to the ORACLE_HOME/oracle_common/bin directory and start RCU.
-
Set the
JAVA_HOMEenvironment variable to your JDK location.On UNIX operating systems:
setenv JAVA_HOME/home/Oracle/Java/jdkversionOn Windows operating systems, right-click on the desktop, then select My Computer, then select Properties. Click Advanced System Settings in the left column, then click Environment Variables in the System Properties window.
In the Environment Variables window, set
JAVA_HOMEto your JDK location. -
Navigate to the
ORACLE_HOME/oracle_common/bindirectory. -
Start RCU.
On UNIX operating systems:
./rcu
On Windows operating systems:
rcu.bat
4.3 Navigating the RCU Screens to Create the Schema
Follow the instructions on this section to complete schema creation for Oracle GoldenGate Veridata.
Refer to "Understanding Repository Creation Screens" in Creating Schemas with the Repository Creation Utility for more information about any of the screens mentioned in this section.
- Task 1 Introducing RCU
-
Click Next.
- Task 2 Selecting a Repository Creation Method
-
If you have the necessary permission and privileges to perform DBA activities on your database, select System Load and Product Load Concurrently. This procedure assumes that you have the necessary privileges.
For Oracle database, if you do not have the necessary permission or privileges to perform DBA activities in the database, you must select Prepare Scripts for System Load on this screen. This option will generate a SQL script, which can be provided to your database administrator. See "Understanding System Load and Product Load" in Creating Schemas with the Repository Creation Utility.
- Task 3 Providing Database Connection Details
-
Provide the database connection details for RCU to connect to your database.
Click Next to proceed, then click OK on the dialog window confirming that connection to the database was successful.
- Task 4 Selecting Components
-
Select Create new prefix, specify a custom prefix, then select the Oracle GoldenGate Veridata Repository schema.
The custom prefix is used to logically group these schemas together for use in this domain only; you must create a unique set of schemas for each domain as schema sharing across domains is not supported.
Ensure that the Oracle Platform Security Services (OPSS) schema is selected in addition to the Veridata Repository schema as shown below:
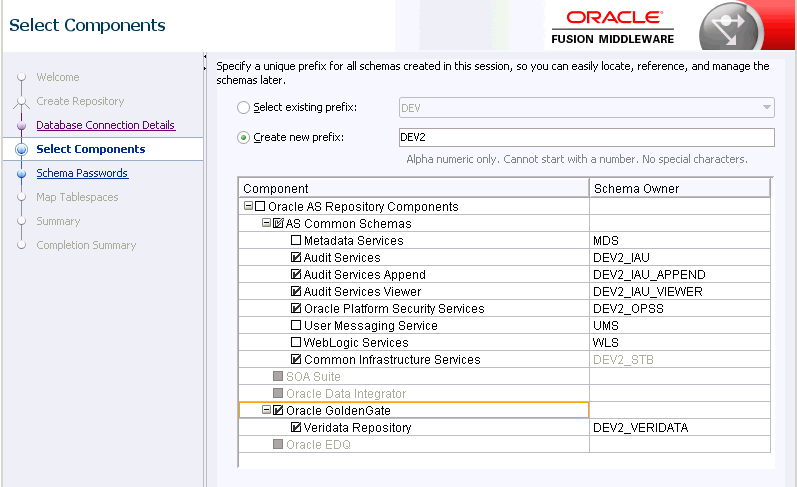
Description of the illustration ''rcu_select_components_jee.gif''
For more information about custom prefixes, see "Understanding Custom Prefixes" in Creating Schemas with the Repository Creation Utility.
For more information about how to organize your schemas in a multi-domain environment, see "Planning Your Schema Creation" in Creating Schemas with the Repository Creation Utility.
Tip:
You must make a note of the custom prefix you choose to enter here; you will need this later on during the domain creation process.Click Next to proceed, then click OK on the dialog window confirming that prerequisite checking for schema creation was successful.
- Task 5 Specifying Schema Passwords
-
Specify how you want to set the schema passwords on your database, then specify and confirm your passwords.
Tip:
You must make a note of the passwords you set on this screen; you will need them later on during the domain creation process.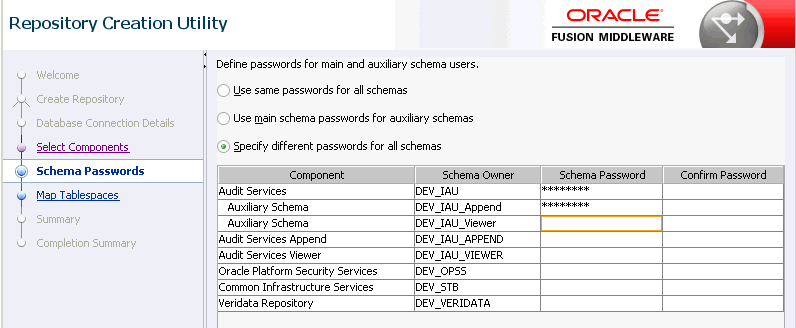
Description of the illustration ''rcu_custom_variable.gif''
- Task 6 Map Tablespaces
-
Specify the Tablespaces for the Oracle GoldenGate Veridata Repository.
Tip:
More information about the fields on this screen can be found in Creating Schemas with the Repository Creation Utility. - Task 7 Completing Schema Creation
-
Navigate through the remainder of the RCU screens to complete schema creation. When you reach the Completion Summary screen, click Close to dismiss RCU.