2 Configure Argus Interchange
This section is intended for Argus Interchange Administrators. The flowchart shows the steps to follow when configuring, reviewing, and administering Argus Interchange.
2.1 Argus Interchange Mapping Utility
Argus Interchange mapping utility enables you to configure the Argus Interchange Service. This chapter provides the following information:
Note:
Most features of the Interchange have been moved to the web-based console.2.1.1 Configure the Argus Interchange Service
You can configure the Argus Interchange Service by updating the initialization (INI) file from the Argus Interchange Mapping interface.
-
In the Windows 2012/2012R2 server, navigate to Apps and click the ESM Mapping tool. This opens the Service INI Set up dialog box.
-
Use the items in the Service INI File Setup dialog to configure the Argus Interchange Service INI file.
-
Enter the data for each field as required.
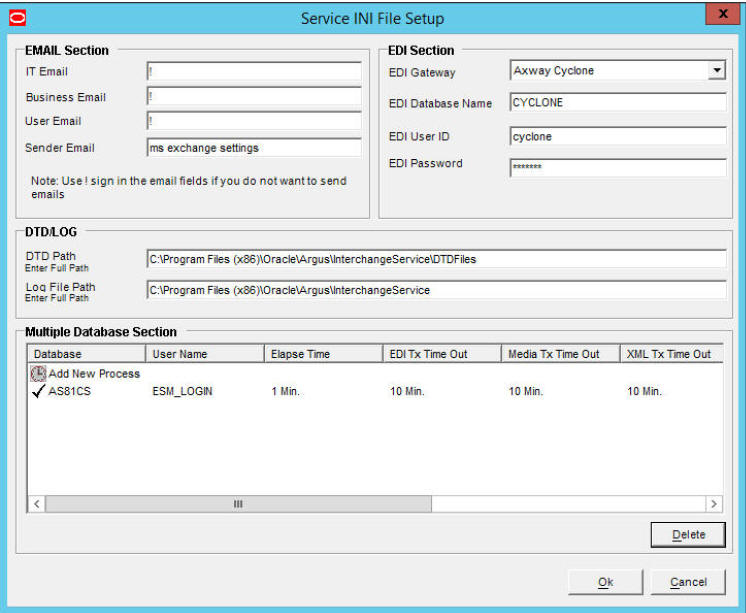
2.1.1.1 Service INI File Setup Dialog Box
The following tables lists and describes the fields in the Service INI File Setup dialog box.
| Item | Description |
|---|---|
| IT E-mail | Enter the e-mail address that Argus Interchange Service should use to send e-mails, if the transmit time out occurs for Physical Media or EDI Gateway. |
| Business E-mail | Enter the e-mail address that Argus Interchange Service should use to send e-mails, if the Receive ACK time-out value is reached. |
| User E-mail | Enter the e-mail address that Argus Interchange Service should use to send e-mails, when the user does not process the E2B Report within the time-out value. The Argus Interchange Service uses SMTP as its mail system. |
| Sender E-mail | Enter the e-mail address that Argus Interchange Service should display, as the 'From' address in the e-mails that it sends. |
| EDI Gateway | Select the name for the EDI Gateway - from either Axway Cyclone or Oracle B2B. |
| EDI Database Name | Enter the database name for the EDI software. |
| EDI User ID | Enter the user name for EDI database. |
| EDI Password | Enter the password for the user name associated with the EDI database. |
| DTD Path | Enter the path for the DTD file. |
| Log File Path | Enter the path where the Argus Interchange Service will write the log files. |
| Multiple Database Section | Displays all the configured databases for ESM Service. |
| Delete Button | Click Delete to remove the entire Database Configuration from ESM Service INI File. |
2.1.2 Add a Database for Argus Interchange Service
You can configure the Argus Interchange Service to support multiple database.
To configure a database:
-
In the Setup INI File dialog box, double click Add New Process to open the Service DB Setup dialog.
-
Use the items in the Service DB Setup dialog to configure the ESM Service INI file.
-
Enter the data in the fields as required.
Note:
ESM Service.ini can be configured for MAX_FILES_IMPORT_PER_RUN at database level under the Database section. This should be set to a number. This determines how many files are read from incoming folder so as to allocate to Receive Process(es). This includes both ICSR reports and Acknowledgments. If it is not defined, an internal limit of 1000 is assumed.
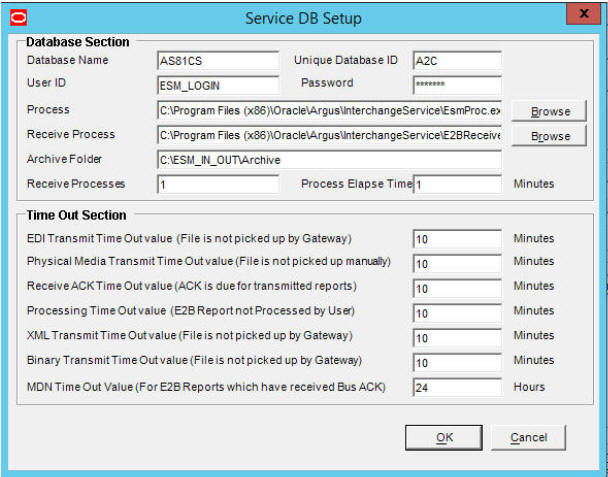
2.1.2.1 Service DB Setup Fields
The following table lists and describes the fields in the Service DB Setup dialog box.
| Item | Description |
|---|---|
| Database Name | Enter the name of the Adverse Event database. |
| Unique Database ID | Identifies each database uniquely. In the case of multiple databases, the value of this field should be unique. |
| User ID | Enter the user name for the Service. |
| Password | Enter the password associated with the User Name entered in the USER ID field. |
| Process | Enter the full path of the ESMProc.exe file. The system uses this path to locate the ESMProc.exe file. |
| Receive Process | Enter the full path of the E2BReceive.exe file. The system uses this to locate the E2BReceive.exe file. |
| Archive Folder | Enter the full path where the system places the file processed by Argus Interchange. |
| Receive Processes Count | Enables you to specify multiple E2B receive processes
You can specify from 1 to 5 E2B receive processes The default is 1. |
| Process Elapse Time | Enter the time interval for the Argus Interchange Process to run. |
| Enter EDI Transmit Time out Value | The amount of time, in minutes, that must pass before the system sends an e-mail message when an E2B Report has not been transmitted within a specified time period.
Note: The minimum value for the time-out is 10 minutes. |
| Enter Physical Media Transmit Time out Value | Enter amount of time, in minutes, that must pass before the system can send an e-mail message when an E2B Report has not been sent manually by a specified person within a specified time period.
Note: The minimum value for the time-out is 10 minutes. |
| Enter Receive ACK Time Out Value | Enter the amount of time, in minutes, that must pass before the system can send an e-mail message when an ACK message has not been received within a specified time period.
Note: The minimum value for the time-out is 10 minutes. |
| Enter Processing Time Out Value | Enter the amount of time, in minutes, that must pass before the system can send an e-mail message when an Incoming Report has not been processed within a specified time period.
Note: The minimum value for the time-out is 10 minutes. |
| Enter XML Transmit Time Out Value | Enter the amount of time, in minutes, that must pass before the system can send an e-mail message when an XML file is not picked up by the Gateway.
Note: The minimum value for the time-out is 10 minutes. |
| Enter Binary Transmit Time Out Value | Enter the amount of time, in minutes, that must pass before the system can send an e-mail message when a binary file is not picked up by the Gateway.
Note: The minimum value for the time-out is 10 minutes. |
| Enter MDN Time Out Value | Enter the amount of time, in hours, that must pass before the system stops polling the MDN information from the EDI server after receiving the Business ACK for a transmitted report. |
2.2 E2B Extensions (Applicable for R2 only)
You can use the existing reporting destination configuration to choose an extended E2B profile. The system uses the agency and company identifier to identify the profile to use and sends the information in the following XML elements:
<messagesenderidentifier>Company X</messagesenderidentifier>
<messagereceiveridentifier>Agency Y</messagereceiveridentifier>
The Interchange mapping utility also supports the defined extended E2B elements as follows:
-
A switch in the Interchange mapping tool identifies a profile as either a standard profile or an extended E2B profile but only for the Receive tab. The additional fields are formatted as follows:
<XXX>_EXTENSION []
where:
XXX is the tag name followed by _EXTENSION to indicate that this is an extended E2B tag element
When using this switch:
-
Do not enter any blank spaces or underscore characters ( _ ) in the XXX naming convention.
-
In the extended E2B tags, the element number in the brackets ( [ ] ) is always empty. For example, Patient Ethnicity, Event Hospitalized Start Date / Stop Date.
-
This switch is enabled only for profiles copied from the Factory profiles (default unchecked). This flag is disabled for all factory profiles.
-
During configuration, GPS updates the DTD profile with this information before it adds any additional E2B elements.
-
The system maps extended E2B fields are mapped to existing Argus fields or to user-defined fields, as appropriate. For example, the system maps the following extended E2B fields to the following Argus tables.
E2B + Field Argus Case Form UI Field Name Argus Field Label Description patientethnicity_extension PATIENT | Patient Ethnicity Patient Ethnicity reactionintensity_extension EVENTS | Event Intensity Event Intensity reactionhospstartdateformat_extension Argus Date entry format YYYYMMDD or YYYYMM or YYYY Hospitalized Start Date Format reactionhospstartdate_extension EVENTS | Hospitalized Start Date Hospitalized Start Date reactionhospstopdateformat_extension Argus Date entry format YYYYMMDD or YYYYMM or YYYY Hospitalized Stop Date Format reactionhospstopdate_extension EVENTS | Hospitalized Stop Date Hospitalized Stop Date -
The system sends an acknowledgement if the message import is successful and a rejection if the message import is not successful.
-
You can view the extended elements for the following:
-
E2B Viewer
-
No updates to the CIOMS / MedWatch Reports
-
The Decoded View / SGML View displays the additional elements added as a part of the Extended E2B
-
-
E2B Difference Report
-
When imported, the system displays the additional fields in the current difference report viewer.
-
-
E2B Selective Intake for Initial and Follow up E2B Reports
-
You can selectively import the additional fields the system adds to the Extended E2B in the Argus case.
-
The PDF reports display the additional fields added to the Extended E2B.
-
-
The E2B Warnings/Errors display the warnings/errors if warnings or errors defined for the fields added to the Extended E2B.
2.3 Web Console
The Web Console enables you to configure the Regulatory Authorities to which E2B Reports need to be submitted. In accordance with ICH Guidelines, you can configure additional Code List items with new E2B codes.
2.3.1 Configure Regulatory Authorities
Transmitting E2B reports to an Agency/Trading Partner, requires you to create a regulatory authority entry in the Code List. After creating the regulatory authority, you can transmit regulatory reports to it.
To configure a regulatory authority:
-
On the Argus Console, Click Code Lists -> Argus.
-
When the system opens the Code List Maintenance screen, select Reporting Destination from the list.
Note:
If a report has already been generated for a Regulatory Authority, the system disables the Delete button in the Code List dialog box for the particular Regulatory Authority. However, it is still possible to modify these reports there.Refer to the Argus Safety Guide for information on using the first three tabs of the Reporting Destination.
-
Click the EDI tab, select the appropriate data for each item, and enter the data in the fields as required.
2.3.1.1 EDI Tab Fields
The following table lists and describes the fields on the EDI tab.
For Argus J users, an additional field called "Message Profile 2" shows up for the configuration of the PMDA - J profile. This field is required for PMDA agency to specify PMDA J profile.
| Field | Purpose |
|---|---|
| SGML/XML | Enables you to select whether to send the report in SGML or XML format. |
| Mark as Auto Submit | Enables you to mark the report for auto submission. |
| Imported Cases are assigned to | Enables you to select the country where imported cases need to be assigned.
Note: This list contains the configured Argus sites. The default value is the site of the importing user. |
| Initial Workflow State | Enables you to configure the initial workflow state for the case.
Note: This list contains Argus workflow states. The default value is blank. If you select blank as the workflow state, the system treats the case as a new case being booked-in. |
| Agency Identifier | Enables you to enter the routing ID configured in Cyclone for the sender community. |
| Identification Code | Enables you to enter the agency Duns code, a unique code that identifies a trading partner. |
| Code Qualifier | Enables you to enter the code qualifier. The system uses the code qualifier to interpret the identification code. |
| XML Source Classification | Defines the E2B source file classification during the E2B import. The system populates this drop-down from the Attachment Classification code list. |
| Selection Source Classification | Defines the classification of the PDF for initial intake or the difference report during E2B import. The system populates this drop-down from the Attachment Classification code list. |
| Message Profile | Enables you to select a message profile. |
| Message Profile 2 | Enables you to select a message profile for J elements. This profile is enabled for J users. |
| ACK Profile | Enables you to select the acknowledgement profile. |
| Primary Receive Agency | Indicates that this is the primary agency receiving E2B reports. |
| Auto Accept ICSR's | Enables or disables the auto-accept E2Bs for the agency. |
| Transmit E2B Attachments | Enables or disables transmission of E2B attachments for the agency. |
| Use Japanese Aware Date for Reporting | Check this checkbox to use Japanese Aware Date for reporting. |
| Allow multiple reports for Marketed Drugs | Check this checkbox to allow multiple reports for Marketed Drugs. |
| Allow multiple reports for Investigational Drugs | Check this checkbox to allow multiple reports for Investigational Drugs. |
| Identification Code | Enables you to enter the company Duns code, a unique code that identifies a trading partner. |
| Company Identifier | Enables you to enter the company identifier. |
| Code Qualifier | Enables you to enter the code qualifier. The code qualifier is used to interpret the identification code. |
| File Name | Enables you to enter the file name |
| SGML Declaration File | Enables you to enter the SGML Declaration File. |
| Maximum # of reports to include in the msg | Enables you to enter the maximum number of reports that will be transmitted in one message. |
| Method | Enables you to select a method. This field contains E2B-EDI Gateway, E2B Physical Media, and E2B-XML Transmission values. |
| EDI Header Required | Enables you to generate the required EDI Header. |
| XML Version | Enables you to enter the XML Version. |
| URL of Message DTD | Enables you to enter the path where the message DTD resides on the Internet or to enter the full path, if it is located on the disk. |
| Encoding | Enables you to select the character set encoding used in XML |
| Use Japanese Aware Date for Reporting | Enables you to ensure that reporting is based on the Japanese Aware Date. If this checkbox is not checked, reporting is based on the English Aware Date. |
| Allow multiple reports for Marketed Drugs | Checking this checkbox allows the system to schedule multiple reports for marketed drugs. |
| Allow multiple reports for Investigational Drugs | Checking this checkbox allows the system to schedule multiple reports for investigational drugs. |
| URL of ACK DTD | Enables you to enter the path where the ACK DTD resides on the Internet or enter the full path, if it is located on the disk. |
Note:
In the File Name field, be sure to enter the appropriate naming convention followed by "####" before the transmission extension.2.3.2 Configure SMTP
Argus Interchange Mapping Utility can be configured to send emails to notify the appropriate people on the occurrence of some incidents or errors while processing E2B reports. These emails are sent using Argus Safety Service. You can use Argus Console if you need to configure these emails to be sent using SMTP.
To enable Argus Safety Service to use the SMTP protocol to send e-mail to the e-mail server, use the SMTP Configuration Utility in the following way.
To configure SMTP:
-
Open Argus Console.
-
When the system opens the Code List Maintenance screen, click System Configuration -> SMTP Configuration.
-
When the system opens the SMTP Configuration dialog box, enter the appropriate data in each field.
2.3.2.1 SMTP Configuration Dialog Box Fields
The following tables lists and describes the fields in the SMTP Configuration dialog box.
| Item | Description |
| Server IP or Name | The SMTP server IP address or name. |
| Port | The port number. The default port number is 25. |
| Authentication | The authentication type to use.
Basic Authentication -- The user must enter a user name and password in the Username and Password fields. No Authentication -- The Username and Password fields are disabled. NTLM Authentication, the authentication of the OS user logged into the system is automatically passed. Additionally, the Username and Password fields are disabled in this authentication. |
| SMTP Username | The SMTP username. |
| SMTP Password | The SMTP password. |
| Enable SMTP? | Select this check box to ensure that AG Service uses SMTP to send e-mail. |
2.3.3 Configure Code List Items
Argus Safety is currently shipped with E2B Codes for the applicable factory data items. If you enter new items, E2B codes must be derived from ICH guidelines and entered as described here.
Note:
From Argus Console, click Code Lists -> Argus to open the Code List Maintenance screen.2.3.3.1 Configure an Action Taken
Use the following procedure to configure action taken:
-
From the Argus Console, select Code Lists -> Argus -> Action Taken.
-
When the system opens the Code List Maintenance screen, click Action Taken in the Code List in the left pane.
-
The system puts the corresponding data for the selected item in the right pane.
-
Click Add New and enter the E2B code for the new action in the Add New Action Taken section.
-
Click Save.
2.3.3.2 Configure Age Groups
Use the following procedure to configure age groups:
-
From the Argus Console, select Code Lists -> Argus -> Age Groups.
-
When the system opens the Code List Maintenance screen, locate and click Age Groups in the Code List in the left pane.
-
The system places the corresponding data for the selected item in the right pane.
-
Click Add New and enter the E2B Code for the new age group in the Add New Age Groups section.
-
Click Save.
2.3.3.3 Configure Age Units
Use the following procedure to configure age units.
-
From the Argus Console, select Code Lists -> Argus -> Age Units.
-
When the system opens the Code List Maintenance screen, click Age Units in the Code List in the left pane.
-
The system places the data for the selected item in the right pane.
-
Click Add New and enter the E2B Code for the new age unit in the Add New Age Units section.
-
Click Save.
2.3.3.4 Configure Attachment Classifications
Use the following procedure to configure attachment classifications:
-
From the Argus Console, select Code Lists -> Argus -> Attachment Classification.
-
When the system opens the Code List Maintenance screen, click Attachment Classification in the Code List in the left pane.
-
The system places the data for the selected item in the right pane.
-
Click Add New and click the E2B Additional Doc check box in the Add New Attachment Classification section.
-
Click Save.
2.3.3.5 Configure Dosage Units
Use the following procedure to configure dosage units:
-
From Argus Console, Code Lists -> Argus -> Dosage Units.
-
When the system opens the Code List Maintenance screen, click Dosage Units in the Code List in the left pane.
-
The system places the data for the selected item in the right pane.
-
Select an existing Dosage Unit and enter the new E2B code in the Modify Dosage Units section.
-
Click Save.
2.3.3.6 Configure an Event Outcome
Use the following procedure to configure an Event Outcome:
-
From the Argus Console, select Code Lists -> Argus -> Event Outcome.
-
When the system opens the Code List Maintenance screen, click Event Outcome in the Code List in the left pane.
-
The system places the data for the selected item in the right pane.
-
Enter the E2B Code for the new event outcome in the Add New Event Outcome section.
-
Click Save.
2.3.3.7 Configure Gender
Use the following procedure to configure Gender.
-
From Argus Console, select Code Lists -> Argus -> Gender.
-
When the system opens the Code List Maintenance screen, click Gender in the Code List in the left pane.

-
The system places the data for the selected item in the right pane.
-
Enter the E2B Code for the gender in the Add New Gender section.
-
Click Save.
2.3.3.8 Configure Report Type
Use the following procedure to configure Report Type:
-
From the Argus Console, select Code Lists -> Argus -> Report Type.
-
When the system opens the Code List Maintenance screen, click Report Type in the Code List in the left pane.
-
The system places the data for the selected item in the right pane.
-
Enter the E2B code for the new report type in the Add New Report Type section.
-
Click Save.
2.3.3.9 Configure Reporter Type
Use the following procedure to configure Reporter Type:
-
From the Argus Console, select Code Lists -> Argus -> Reporter Type.
-
When the system opens the Code List Maintenance screen, click Reporter Type in the Code List in the left pane.
-
The system places the data for the selected item in the right pane.
-
Enter the E2B Code for the new reporter type in the Add New Reporter Type section.
-
Click Save.
2.3.3.10 Configure Routes of Administration
Use the following procedure to configure Routes of Administration:
-
From the Argus Console, select Code Lists -> Argus -> Routes of Administration.
-
When the system opens the Code List Maintenance screen, click Routes of Administration in the Code List in the left pane.
-
The system places the data for the selected item in the right pane.
-
Enter the E2B Code for the new route of administration in the Add New Routes of Administration section.
-
Click Save.
2.3.3.11 Configure a Message Type
Use the following procedure to configure a Message Type:
-
From the Argus Console, select Code Lists -> Argus -> Message Type.
-
When the system opens the Code List Maintenance screen, click Message Type in the Code List in the left pane.
-
The system places the data for the selected item in the right pane.
-
Enter the new message type and other relevant data in the Modify Message Type section.
-
Click Save.
2.3.3.12 ICSR Length Check
When you select ICSR Length Check, the system generates a report that prints the code list item length check and M2 validation warnings. This menu item has been added under Argus Console -> Tools -> ICSR Length Check.
The following table lists the Code List items the length check is run on.
| Data Element | LM Field | Argus Field Length | DTD Allowed Length |
|---|---|---|---|
| A.2.1.1d | LM / Clinical Studies / Study Information / Study Description.
The application needs to consider the EUDRA-CT length (35) while displaying the message. |
2000 | 100 |
| A.3.1.3b | LM / Regulatory Authorities / Local Company Contact / Title | 40 | 10 |
| A.3.1.4a | LM / Regulatory Authorities / Local Company Contact / Address | 120 | 100 |
| A.3.1.4f | LM / Regulatory Authorities / Local Company Contact / Phone | 20 | 10 |
| A.3.1.4g | LM / Regulatory Authorities / Local Company Contact / Phone / Ext. | 10 | 5 |
| A.3.1.4i | LM / Regulatory Authorities / Local Company Contact / Fax | 50 | 10 |
| A.3.1.4j | LM / Regulatory Authorities / Local Company Contact / Fax / Ext. | 10 | 5 |
| A.3.2.2c | LM / Regulatory Authorities / Agency Information / Contact Information / Title | 40 | 10 |
| A.3.2.2f | LM / Regulatory Authorities / Agency Information / Contact Information / Last Name | 40 | 35 |
| A.3.2.3a | LM / Regulatory Authorities / Agency Information / Contact Information / Address | 120 | 100 |
| A.3.2.3f | LM / Regulatory Authorities / Agency Information / Contact Information / Phone | 20 | 10 |
| A.3.2.3g | LM / Regulatory Authorities / Agency Information / Contact Information / Phone / Ext. | 10 | 5 |
| A.3.2.3i | LM / Regulatory Authorities / Agency Information / Contact Information / Fax | 50 | 10 |
| A.3.2.3j | LM / Regulatory Authorities / Agency Information / Contact Information / Fax / Ext. | 10 | 5 |
| A.2.1.2c | LM / Reporter Information / Address | 120 | 100 |
| B.4.k.2.2 | LM / Products / Key Ingredient | 120 | 100 |
| B.4.k.4.1 | LM / Licenses / License Information / Number | 40 | 35 |
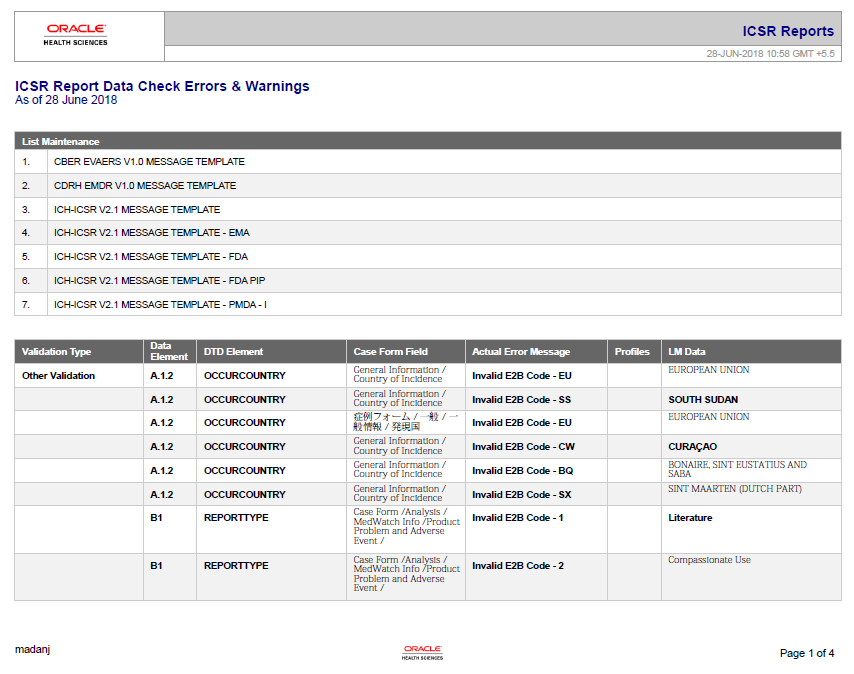
2.3.3.13 E2B Code Validation
The following table lists the E2B Code Validation items.
| Tag Name | DTD Element | Case Form Field | LM Field |
|---|---|---|---|
| primarysourcecountry | A.1.1 | Case Form / General / Reporter Information / Country | LM / Countries / Code (A2) |
| occurcountry | A.1.2 | Case Form / General / General Information / Country | LM / Countries / Code (A2) |
| reporttype | A.1.4 | Case Form / General Information / Report Type | LM / Report Type / E2B Code |
| reportercountry | A.2.1.3 | Case Form / General / Reporter Information / Country | LM / Countries / Code (A2) |
| qualification | A.2.1.4 | Case Form / General / Reporter Information / Reporter Type | LM / Reporter Type / E2B Code |
| observestudytype | A.2.3.3 | Case Form / General / Study Information / Observe Study Type | LM / Case Classification / E2B Code |
| sendertype | A.3.1.1 | LM / Regulatory Authorities / Local Company Contact / Sender Type | LM / Regulatory Authorities / Local Company Contact / Sender Type |
| sendercountrycode | A.3.1.4e | LM / Regulatory Authorities / Local Company Contact / Country | LM / Countries / Code (A2) |
| receivertype | A.3.2.1 | LM / Regulatory Authorities / Agency Information / Agency Type | LM / Regulatory Authorities / Agency Information / Agency Type |
| receivercountrycode | A.3.2.3e | LM / Regulatory Authorities / Agency Information / Contact Information / Country | LM / Countries / Code (A2) |
| patientonsetageunit | B.1.2.2b | Case Form / Patient / Patient Information / Age Units | LM / Age Units / E2B Code |
| patientagegroup | B.1.2.3 | Case Form / Patient / Patient Information / Age Group | LM / Age Group / E2B Code |
| patientsex | B.1.5 | Case Form / Patient / Patient Information / Gender | LM / Gender / E2B Code |
| parentageunit | B.1.10.2.2b | Case Form / Patient / Parent / Age Unit | LM / Age Units / E2B Code |
| parentsex | B.1.10.6 | Case Form / Patient / Parent / Gender | LM / Gender / E2B Code |
| reactionoutcome | B.2.i.8 | Case Form / Events / Event Information / Outcome of Event | LM / Event Outcome / E2B Code |
| testunit | B.3.1e | Case Form / Patient / Lab Data / Lab Data / Units | LM / Dossage Units / E2B Code |
| obtaindrugcountry | B.4.k.2.3 | Case Form / Products / Product Information / Obtain Drug Country | LM / Countries / Code (A2) |
| drugauthorizationcountry | B.4.k.4.2 | LM / Licenses / License Information / Country | LM / Countries / Code (A2) |
| drugstructuredosageunit | B.4.k.5.2 | Case Form / Products / Dosage Regimens / Dose Units | LM / Dosage Unit / E2B Code |
| drugcumulativedosageunit | B.4.k.5.7 | Case Form / Products / Total Dose to Primary Event | LM / Dosage Unit / E2B Code |
| drugadministrationroute | B.4.k.8 | Case Form / Products / Dosage Regimens / Patient Route of Administration | LM / Routes of Administration / E2B Code |
| drugparadministration | B.4.k.9 | Case Form / Products / Dosage Regimens / Parent Route of Administration | LM / Routes of Administration / E2B Code |
| drugintervaldosagedefinition | B.4.k.5.5 | LM / Dosage Frequency / Unit | LM / Dosage Frequency / Unit |
| actiondrug | B.4.k.16 | Case Form / Products / Product Details / Action Taken | LM / Action Taken / E2B Code |
| mhlwadmicsrcasenumclass | J.4a | Case Form / Analysis / PMDA / General / Report Category | LM / Reporting Category / E2B Code |
| mhlwadmicsrnewdrugclass | J.8 | Case Form / Analysis / PMDA / Comments / Category of the new drug | LM / License Category / E2B Code |
| mhlwphaseofstudies | J.12.i.2 | Business Configuration / Studies / Study Development Phase | LM / Study Development Phase / E2B Code |