4 Case Actions
4.1 Finding and Opening Existing Cases
-
Hover over the Case Actions menu and select Open to view the Case Open form.
-
Enter the appropriate search criteria and click Search.
-
From the search results, locate the appropriate case in the list.
-
Click the link associated with the Case ID.
Under Active Cases, you can open the 10 most recently-accessed cases. On opening an unassigned case in the Edit mode from any module, it is automatically assigned to the user who has opened it.
4.1.1 Case Open Form—Fields Descriptions
| Field/Control | Description |
|---|---|
| Search For | You can search for cases based on multiple study identifiers. The option, Pri/Stdy/Othr/Cntr/Rptr/Pat supports the entry of Project ID, Study ID, Other ID, Center ID, Reporter ID, and Patient ID values separated by the / (forward slash) character. |
| Date Range | To enter a customized date range, select Custom Date Range from the list.
|
| Advanced Condition | Click AC to create a new advanced condition.
Select an Advanced Condition for the case, if applicable. |
| Result from Argus Insight | Create a search result with the same cases as the Active Case Series in Argus Insight. |
4.1.2 Total Number of Rows—Descriptions
The search results under Total Number of Rows display a list of cases as specified in the Search Criteria (default criteria is date range of the last 30 days). The previous search results are displayed if a search was performed by the user during the same session without logging out.
4.2 Creating a New Case
When your company receives initial case information, you enter this information on the Initial Case Entry form. After entering this information, it must be verified, or checked for duplicates (possibly by another user) to ensure that duplicate information is not entered in the database.
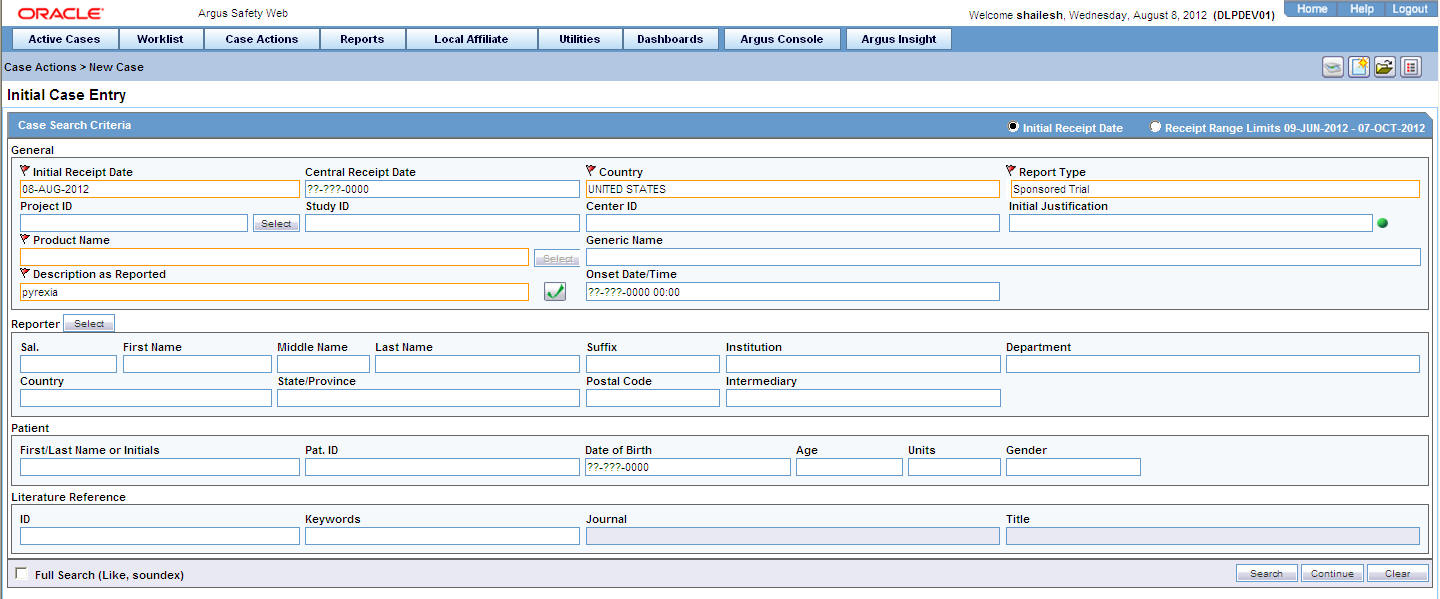
4.2.1 Booking in Cases and Entering Initial Case Information
From the Initial Case Entry form, you can decide to bookin a case before entering further case information in the Case Form.
To enter initial case information
-
Hover over the Case Actions menu and select New to open the Initial Case Entry form.
-
Enter preliminary case information in the form.
-
Click Search to determine whether information related to this case has already been entered.
-
A list of cases that match the criteria you entered on the form is displayed. Inspect the search results for a duplicate case.
If a duplicate case exists, open the case to enter further information (if any) related to the existing case. Click the link associated with the case.
-
If a duplicate case does not appear, click Continue in the Initial Case Entry form to display the BookIn and Attachments and References sections.
-
Enter relevant information in sections such as Causality, Seriousness, Attachments and References.
-
Under Reported Causality, select the reporter's assessment of causality. The causality relationship is the causal relationship between the clinically most important event and the suspect drug that is entered in the Initial Case Entry form.
-
For Seriousness Criteria, check the appropriate checkboxes to indicate the seriousness of the case, as appropriate.
When a duplicate search is performed, the system remembers the results until the user logs out of the system or performs a duplicate search again. When the Bookin screen is opened, the search results from the last search are displayed again.
-
Attachments and References
-
To insert a file attachment
1. Click Add on the Attachments and References tab.
2. Enter the Classification and Description, as applicable. Select File Attachment from the drop-down list and click Add.
3. On the File Attachment -Webpage dialog box, double-click Browse and navigate to the relevant file. Click B.
Contact your system administrator to configure this location.
-
To insert a URL Reference
-
1. Select URL Reference from the drop-down list.
-
2. Enter the URL after http://.
-
-
To search for and insert a document
1. Select Documentum Link and click Add.
2. The Document Lookup dialog box is displayed.
You can search for a document from the database by specifying a search criterion in this dialog box.
-
-
-
Click BookIn.
Once clicked, this button is hidden from the screen. The button is enabled only if the Save operation fails or when the case is booked-in successfully.
-
If the Administrator has configured the system for automatic numbering of cases, the automatically assigned case number opens. If the numbering of cases is manual, you can enter the appropriate case number.
-
When a case is booked in, the case may be assigned to a specific user and it will be given a particular state, depending on the configuration set up by the Administrator.
-
You must populate these fields: Product, Event, Receipt Date, Report Type, Country of Incidence, and Seriousness.
Tip:
When you bookin a case, a dialog box that prompts you to open the newly created case is displayed.Click Yes to open the case.
-
4.2.2 Initial Case Entry—Fields Descriptions
| Field | Description |
|---|---|
| Initial Receipt Date | Enter the complete date on which your company became aware of the case. The Receipt Date cannot be entered as a partial date. |
| Central Receipt Date | Enter the date on which this information was received by Central Safety. |
| Country of Incidence | Select the country where the adverse event occurred. This may or may not be the reporter's or the patient's country of residence. |
| Report Type | Select the item that best describes the type of report. This determines the fields that are made available for entering case information.
The report type also impacts duplicate search. For example, selecting Sponsored Trial makes the Study ID and Protocol ID fields available. The Administrator can adjust the information in this list. |
| Study ID(applicable to clinical trial cases only) | Click Select to choose the study ID from the Clinical Trial Selection dialog box. |
| Center ID
(applicable to clinical trial cases only) |
Click Select to choose the Center ID from the Clinical Trial Selection dialog box. |
| Initial Justification | The values of this field are configurable through the standard Argus Justifications dialog box. This field is reflected in the General tab of the Case Form and is also available for duplicate searching for cases.
Click the green dot to view and select justifications from the Argus Justification dialog box. |
| Product Name | If the adverse event(s) are associated with more than one product, each additional product can be added from the Case Form.
Enter the most suspect product here. Click Select to search for a product from the Trade Name Product Lookup dialog box. Several items are automatically entered on the Case Form based on the product selected here. |
| Generic Name | This field can be used to enter the generic name of the product. This field is automatically entered when a product is selected from the Trade Name Product Lookup dialog box. |
| Description as Reported | Enter a brief verbatim description from the reporter describing the event that is most clinically important in the case. The icon denotes that the event is encoded. Click the icon to populate the MedDRA hierarchy dialog box. |
| Onset Date/Time | Enter the date/time for the onset of adverse event symptoms. |
| ID | Enter the value to search for a Reporter Reference number, Case Reference, and Case number. |
| Journal and/or Title | These items are applicable to literature cases only. Click Select to choose a journal and/or title from the Literature Reference dialog box. The Administrator can adjust this list. |
4.2.3 Checking for Duplicates
-
Enter the information related to the case in the Initial Case Entry form.
-
Select the Receipt Range Limits option to check for duplicates based on the dates entered in the form and click Search.
-
Inspect the list to determine if any case contains duplicate information.
4.2.3.1 Receipt Range—Fields Descriptions
| Field | Description |
|---|---|
| No date | 90 days before System Date and 2 days after System Date. |
| Full Onset Date | 10 days before Onset date and 90 days after Onset Date. |
| Full Initial Receipt Date | 60 days before Initial Receipt Date and 60 days after Initial Receipt Date.
Note: This default date range for searching on Initial Receipt Date can be disabled by un-checking the Receipt Range Limits option on the Initial Case Entry dialog box. |
| Partial Onset Date | Based on the Full Date Range - if only the year is entered, the date range becomes: 10 days before the end of the previous year and 90 days after end of the year. |
| Partial Initial Receipt Date | Based on Full Date Range - if only a year is entered, the date range becomes: 60 days before end of previous year and 60 days after the end of the year. |
Note:
- If an Initial Receipt Date is not entered but an Event Onset Date has been entered, the search will default to look for cases with Initial Receipt Dates 10 days before and 90 days after the Event Onset Date. This feature can be disabled directly on the dialog box by un-checking the Receipt Range Limits checkbox. If you do not check anything, the default date range is 90 days before and 2 days after the current date.
-
The Duplicate Search permits you to sort in ascending or descending order in the duplicate search results. You can also use wild card searches on all text fields in the Book-in dialog box.
4.3 Closing a Case
-
Hover over the Case Actions menu and select Close.
-
On the Save Case dialog box, click Yes to save and close the case.
OR
Click No to close the case without saving it.
-
The system opens the next active case, if you have active cases that you are working on. If there are no active cases, the system displays the default Worklist.
-
If the default Worklist option is <None>, the Personal Argus Status appears.
-
4.4 Saving a Case
-
Click the Case Number of the case you want to save.
-
When the system opens the Case Form, hover over the Case Actions menu and select Save.
-
When the system opens the Case Form Saving dialog box, click OK.
4.5 Copying a Case
Argus enables you to save all or part of a case and stores the copy in the database as a separate case. Clicking the case reference in any copied case opens the original case.
If your system is configured for manual case numbering, the system prompts you to enter a new Case ID. Otherwise, the system automatically assigns a new Case ID.
-
Hover over the Case Actions menu and select Copy.
-
When the system opens the Case Copy - Webpage dialog box, enter the number of copies you want to make and click Yes to copy the case.
-
When the system displays the Case Copy dialog box, check the appropriate checkboxes to select the portions of the case you want to copy
OR
Click Select All to copy the entire case.
-
Click Copy.
Depending on whether the system is configured for automatic case numbering, the system either generates a case ID or enables you to enter the case ID for this case.
Null flavor data is copied along with Case Form data on Case Copy.
4.6 Using the Medical Review Function
-
Hover over the Case Actions menu and select Medical Review.
The system opens the Medical Review form.
-
Click on the appropriate tab.
4.6.1 Using the Medical Review Tab
The system displays the user-defined fields in the Medical Review dialog box, if they have been enabled on the Case Form Analysis tab.
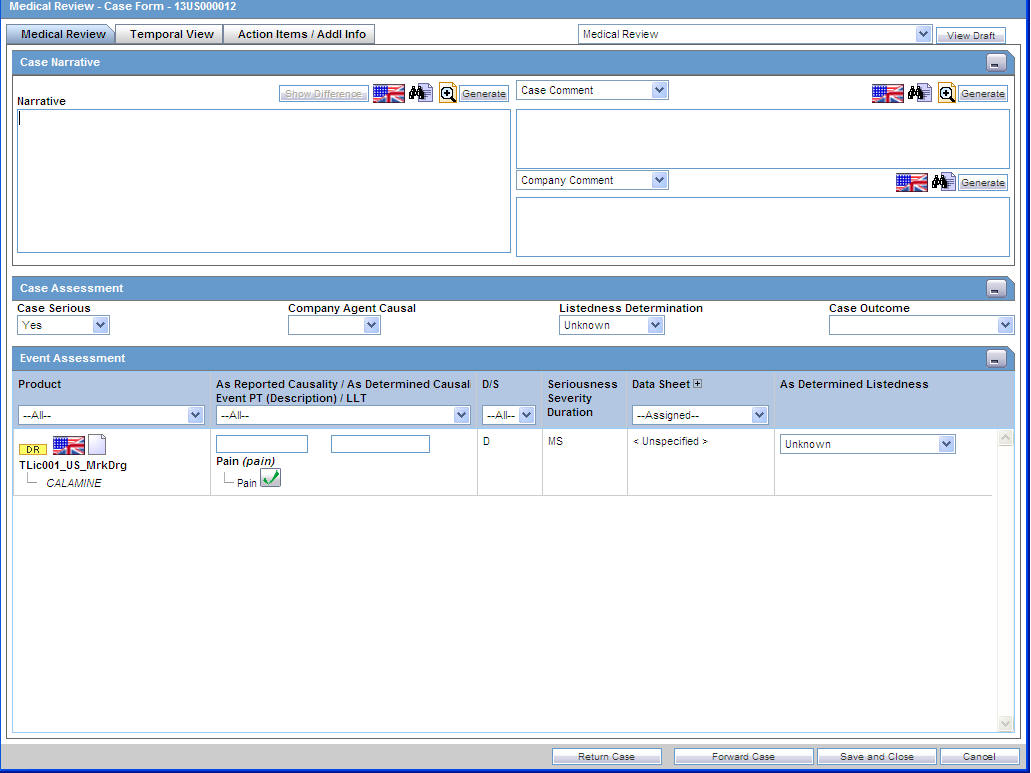
Enter information in the Case Narrative, Case Assessment and Event Assessment sections.
4.6.1.1 The Case Narrative Section
You can choose from the drop-down options associated with the fields to view any of the other narrative fields. The system saves the view as a default and uses it when you open the Medical Review for another case.
4.6.1.2 The Case Assessment Section
This section enables you to provide information about case details.
Select whether the case is serious or not from the Case Serious drop-down list. In a similar manner, select relevant information about Company Agent Causal, Listedness, and Case Outcome from the drop-down lists.
4.6.1.3 The Event Assessment Section—Fields Descriptions
| Field | Description |
|---|---|
| Product | Populated when events are entered in the Products tab and is displayed in the following format:
Product Name Generic Name |
| Causality as Reported/
Causality as Determined Event PT (Description)/LLT |
Causality as Reported - Indicates the degree of reported causality.
Causality as Determined - This field is populated with information entered in the Reported Causality field. Event PT/Description/LLT - This field is populated when events are entered in the Events tab and displays in the following format: Event PT Verbatim LLT |
| D/S | Displays the Diagnosis/Symptom details by D or S in line with the Events. |
| Seriousness Severity Duration | Displays the Seriousness, Severity and the Duration of the Event. |
| Data Sheet | Displays the data sheets for the agent. |
| License | Displays the licenses for the agent. |
| As Determined Listedness | Indicates whether the system found the event on the datasheet for this product. |
Filtering in the Event Assessment Section
The following table describes how the each field of the Event Assessment section is filtered:
| Field | Description |
|---|---|
| Product | The product filter drop-down list contains all products listed in the event assessment. The user can filter on all products that are present in the Event Assessment dialog box. |
| Event | Contains a drop-down of values of distinct Event PT. The user can filter on all products that are present in the Event Assessment dialog box. |
| Diagnosis | Contains a drop-down list of values of D for Diagnosis or S for Symptoms. |
| Data Sheet | Contains a drop-down of values of distinct data sheets. All blank data sheets display as a single row of <Unspecified>. |
| Licenses | Contains a drop-down of values of distinct countries of the licenses. All licenses not associated with a data sheet appear under <Unspecified> or are aligned with the data sheet view. |
Only the assessment rows that match the selected criteria are displayed in the filtering results.
Event Assessment—User Actions and Results
| User Action | Result |
|---|---|
| Click Datasheet column's plus icon | Displays the license, data sheet views and the license column and enables the - for the License Column. |
| Click Product Name | Displays the Product Information dialog box for the selected product. |
| Click Event Description | Displays the Event Information dialog box for the selected event. |
| Click License Description | Displays the Product Information as defined in the License Configuration. |
| Click Datasheet Description | Displays all the configured terms in the data sheet. |
Attaching Cases from the Medical Review Screen
The Notes and Attachments and Contact Log sections appear on the Case Form Additional Info tab to the Medical Review screen. The system displays user-defined fields in the Medical Review dialog box if they have been enabled on the Case Form Analysis tab.
4.6.2 Using the Temporal View Tab
Click the Temporal View tab to view a read-only version of the case before routing.
The information displayed in the Temporal View tab is taken from the information entered in the Case Form section.
4.6.2.1 The Summary Section—Fields Descriptions
| Field | Description |
|---|---|
| First Suspect Product | Displays the name of the primary suspect product. |
| Generic Name | Displays the generic name of the primary suspect product. |
| Coded Indication | Displays information about the product indication. |
| Company Agent Causal | Displays the case causality status. |
4.6.2.1.1 The Display Options Section—Fields Descriptions
| Field | Description |
|---|---|
| Suspect Products | Check the checkbox to view Suspect Products in the Event Assessment Section. |
| Non-Suspect Products | Check the checkbox to view Non-Suspect Products in the Event Assessment Section. |
| Patient History | Check the checkbox to view Patient History in the Event Assessment Section. |
| Patient Lab Data | Check the checkbox to view Patient Lab Data in the Event Assessment Section. |
| Relevant Tests | Check the checkbox to view Relevant Tests in the Event Assessment Section. |
| Events - All Events, Serious Events Only | Check the checkbox as required to view All Events/Serious Events Only in the Event Assessment Section. |
4.6.2.1.2 The Event Assessment Section—Fields Descriptions
| Field | Description |
|---|---|
| ID | Denotes the type of event. For example, HOSP means Hospitalized. |
| Info | Click the Info icon (i) to view details about the selected entity. |
| Item | Displays the item name. |
| Start | Displays the date from when the event assessment began. |
| Stop | Displays the last date of the event assessment. |
| Duration | Displays the duration of the event assessment. |
The system opens a unique dialog box for the event you have chosen to view.
| View Death Information | The system presents death information in this dialog box. |
| View Event Information | The system presents event information in this dialog box. |
| View Hospitalization Information | The system presents hospitalization information in this dialog box. |
| View Patient History | The system presents patient history information in this dialog box. |
| View Product Information | The system presents product information in the Temporal Information Product dialog box. |
4.6.2.2 The Relevant Tests Section—Fields Descriptions
| Field | Description |
|---|---|
| Relevant Tests | Displays information about any relevant tests, if any. |
| Zoom/Unzoom | Click the Zoom icon to view the report on a bigger scale.
Click the Unzoom icon to revert to the earlier view. |
| Flag Icon | This icon displays the language text that is supported. |
| Notes Icon | Click this icon to view/enter notes. |
4.6.3 Using the Action Items/Additional Info Tab
The Action Items/Additional Info tab enables you to enter contact log information, information about action items, and notes and attachments.
4.6.3.1 The Contact Log Section
For more information, refer to Section 5.7.1, "Contact Log Section,".
4.6.3.1.1 Generating Letters
-
Go to Contact Log in the Action Items/Additional Info Tab tab and click New Letter.
The Custom Letter Templates dialog box opens.
-
Select the required letter template from the list and click OK to open the letter in a separate window.
-
Make the necessary changes to the letter text.
-
Select File > Save to save the changes.
-
If you modified the letter, select Yes.
This attaches the letter to the Case Form by browsing to the location where you saved the changes.
-
After saving the letter, the system displays it in the Contact Log section of the Activities tab.
-
The system creates an action item for following-up on this letter in the Action Items section of the Activities tab.
-
A letter is only added to a search if the Correspondent checkbox is checked.
-
The Administrator can configure the system to generate letters automatically and to schedule them for a specific number of days after receiving details of an adverse event. For example, the system might schedule an Initial Response Letter to be sent the day after an adverse event is received. Auto letter scheduling is triggered when a case is initially saved.
-
Letters cannot be auto-generated unless the Date [contact log date] is reached, to ensure that the latest information for the case has been updated to the letter.
-
If the Primary Reporter is marked as a correspondence contact, the system sends auto-scheduled letters to the Primary Reporter. Otherwise, the letter is sent to the first correspondence contact.
-
Auto-scheduled letters appear in the Contact Log section of the Case Form. You can view or print them by double clicking the letter icon. You can also edit letters that have not been sent. You must send or remove letters manually.
-
In addition to auto-scheduling letters, you can configure auto action items, which prompt you to follow-up with a correspondent after a letter has been scheduled and sent. Auto action item scheduling is triggered once the sent date has been entered for a letter. Auto action items appear in the Action Items section on the Case Form and in the Action Items tab of the Worklist.
4.6.3.2 The Action Items Section—Fields Descriptions
| Field | Description |
|---|---|
| Date Open | Enter the date the action item was created. Open action items appear in the Worklist of the user who is responsible for the action item. They also appear in the Open Action Items Report. |
| Due
Completed |
Enter the date on which the action item is to be completed.
Enter the date on which the action item was actually completed. |
| Code
Description |
Select an Action Item code from the drop-down list. This displays the description of the selected Action Item Code. Contact your system administrator to adjust this list.
Selecting an Action Item code automatically enters information into this field. The text can be modified as required. Contact your system administrator to adjust this list. |
| Group/User | Select a group responsible for the Action Item from the given drop-down list. From the drop-down list below this, select a user from the selected group who will be responsible for the action. The Action Item appears in the Worklist for the selected user. If Any is chosen as the group, the Action Item appears in all the users' Worklist. Contact your system administrator to adjust these lists. |
4.7 Using the Coding Review Function
The Coding tab provides a single entry point for viewing and coding several kinds of information.
4.7.1 The Coding Tab
4.7.1.1 General Information—Fields Descriptions
| Field | Description |
|---|---|
| Report Type | Identifies the case type. |
| Study Info | Displays study information about of the case. |
| Patient Info | Identifies the patient's age and gender. |
| Literature Info | Displays information about the Primary Literature of the case. |
4.7.1.2 Product Information—Fields Descriptions
| Field | Description |
|---|---|
| Product Name | Displays the product name. |
| Formulation | Select the formulation from the drop-down list.The Administrator can adjust the information in this list. |
| Concentration / Units | Displays the configured Concentration and Units for the drug. |
| Reported Indication | Enter the indication as reported. |
| Coded Indication LLT | Enter the indication to be coded. Click Encode to display the associated coding dictionary. |
4.7.1.3 Event Information—Fields Descriptions
| Field | Description |
|---|---|
| Preferred Term (LLT) | Displays the Preferred term for the selected term. |
| Seriousness | Displays the Event Seriousness for the Event. |
| Intensity | Displays the Event Intensity for the Event. |
| Duration | Displays the Event Duration for the Event. |
4.7.1.4 Death Information—Fields Descriptions
| Field | Description |
|---|---|
| Verbatim | Displays the coded or un-coded event verbatim for cause of death. |
| Coded PT (LLT) | Displays the Coded PT with LLT in parenthesis. |
4.7.1.5 Patient Information—Fields Descriptions
| Field | Description |
|---|---|
| Condition Type | Displays the condition type of the patient's previous history. |
| Verbatim | Displays the condition of the patient's previous history. |
| Coded PT (LLT) | Displays the Coded PT with LLT in parentheses. |
4.7.1.6 Lab Data—Fields Descriptions
| Field | Description |
|---|---|
| Test Name (LLT) | Displays the Lab Data Verbatim for the Lab Data. |
| Results | Displays the entered Results for the Lab Data. |
| Units | Displays the entered Units for the Lab Data. |
| Coded PT (LLT) | Displays the Coded PT with LLT in parenthesis. |
| Normal High | Displays the configured Normal High with Units for the Lab Data. |
| Normal Low | Displays the configured Normal Low with Units for the Lab Data. |
4.8 Using the Action Item Tab

4.8.1 Action Item—Fields Descriptions
| Field | Description |
|---|---|
| Show | Enables you to show all action items (open and closed) or show on the open action items. |
| Date Open | Enter the date the action item was created. Open action items appear in the Worklist of the user who is responsible for the action item. They also appear in the Open Action Items Report. |
| Date Due
Completed |
Enter the date the action item is due to be completed.
Enter the date the action item was actually completed. |
| Code | Select an Action Item code from the drop-down list. This will display the description of the selected Action Item Code. The Administrator can adjust this list. |
| Description | Selecting an Action Item code automatically enters information into this field. The text can be modified as required. The Administrator can adjust this list. |
| Group User | Select the user responsible for handling the action item. |
4.9 Using the Print Function
4.9.1 Printing a Case Form
To access print Case Form functions
-
Open a case.
-
Hover over the Case Actions menu and select Print > Case Form.
The system opens the Print Case tabbed dialog box.
To print sections of the Case Form
-
Check the checkbox for each section of the Case Form you want to print
OR
Click Select All to select all the sections of the Case Form.
-
Click Print to print the case.
4.9.1.1 Viewing and Printing Letters
The Letters tab enables you to view and print completed letters.
-
Click the Description link to display the letter.
-
When the system opens the letter, click Print.
4.9.1.2 Viewing and Printing Attachments
The Attachments tab enables you to view and/or print case attachments. The system prints date/time information:
-
As footers on all printouts (except letters).
-
In the following format: dd-mmm-yyyy hh24: mm: ss.
-
Click the Description link to display the attachment.
-
When the system opens the letter, click Print to print it.
4.10 Deleting a Case
-
Hover over the Case Actions menu and select Delete.
-
When the system opens the Action Justification dialog box, do one of the following:
Enter the justification manually in the Please enter a justification for performing this action: field
OR
Select a pre-defined justification from the Select a standard justification field.
-
Type your Argus login password in the Password field.
-
Click OK.
When you delete a case, you can no longer access it from the application. However, the system retains the case information from the database. Before the system permits you to delete a case, you must provide a justification.
4.11 Viewing Case Revisions
-
Open a case.
-
Hover over the Case Actions menu and select Case Revisions.
The system opens the Argus Safety Case Details dialog box. The dialog box provides the following information for the current case:
-
Scheduled Reports
-
Submitted Reports
-
Case Revisions
-
-
Select the desired report from this list.
The system displays the Audit Log Details screen containing a list of all revisions.
-
Revision History dialog box of Case Actions | Case Revisions displays the Lock icon for the revisions in which the case is in locked state.
-
Unlock icon is displayed for the revisions where the case is in unlocked state.
-
Archive icon is displayed for the revisions where the case is in archived state.
You can track the revision where follow-up information was appended to the case. The follow-up designations are as follows:
-
(S) F/U - Indicates that Significant Follow- up information is attached to the case.
-
(NS) F/U -Indicates that the Follow-up information attached to the case is not Significant.