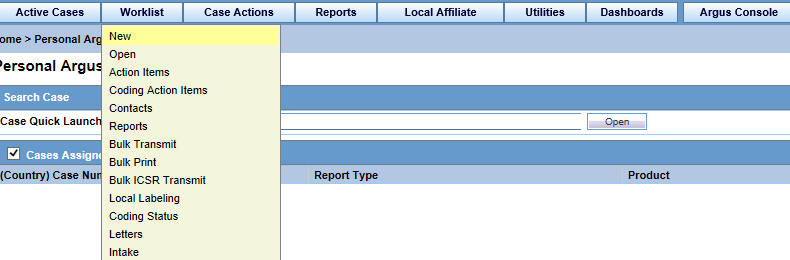
3 Worklist
Use the Worklist menu to view the following:
-
New cases created in the system
-
Cases that are already assigned to users
-
To Do items such as letters, reports, and other action items
-
Transmission status of reports
-
All bulk printed reports
User Options—Field Descriptions
| Option | Description | Option available under Worklist |
|---|---|---|
| Open Read Only | Opens the selected case in read-only mode. | New, Open |
| Accept Case | Allows the user to accept the case and assign a user name as responsible for that case. A case marked with their name as responsible moves the case from the user's New tab to their Open tab. | New |
| View Case | Opens the case. | Action Items |
| Accept Action Item | This option is displayed to users who have access to Worklist > Action Items.
On clicking this option, the username of the current user is populated in the Assigned To column under Case Form > Activities tab > Action Items > Worklist > Action Item list. The user who accepted the action item can see it under the assigned action item in Dashboard > Personal Argus Status. |
Action Items |
| Assign Action Item | This option is displayed only to Workflow Managers, and is displayed in the context menu.
On selecting this option, a drop-down list (of all active users) is displayed in the Assigned To field for the selected row, with (Unassigned) as the default value. On selecting a user from this drop-down list, the assigned user is populated in the Assigned To column under Case Form > Activities tab > Action Items > Worklist > Action Item list. The user who accepted the action item can see it under the assigned action item in Dashboard > Personal Argus Status. |
Action Items |
| Case Summary | Displays the Summary dialog box so the user can view a summary of the case form data. | Action Items, Open, Reports |
| Adjust Priority | Allows the Workflow Manager to modify the priority level of the case. | New, Open |
| Close Multiple Cases | Enables the user to close multiple cases. | New, Open |
| Adjust Assignment | Enables the user to adjust assignment. | New, Open |
| Close Case | Enables the user to close the case. | New, Open |
| Adjust Case Owner | Enables the (re-)assignment of a Case Owner by a Workflow Manager. | New, Open |
| View Report | Allows users to open the report. | Reports |
| Report Details | Allows users to open the report details. | Reports |
| View Multiple Reports | Allows users to open multiple reports. | Reports |
| Accept Report | Allows the user to accept the unassigned report. | Reports |
| Approve Report | This option is enabled only if the report is in the Generated state. Select this option to automatically open the Routing tab of the Report Details pop-up window, with the Comment field active waiting for user input. | Reports |
| Local Labeling | Allows the user to open the local labeling for the case that the Expedited report belongs to, showing all the non-assessed local labeling rows. | Reports |
| Mark for Non-Submission | Allows the user to mark the report required for Non-Submission. The report details dialog box is displayed with focus to the Submission tab. | Reports |
| Mark Multiple for Non-Submission | Allows the user to also mark multiple reports for Non-Submission. The notes and date entered are also reflected in all the reports. | Reports |
| Mark Multiple for Approval | Allows the user to also mark multiple reports for approval. | Reports |
| Close Action Item | Allows the user to close the highlighted action item.
Only the Owner of the action item can view this option. |
Action Items |
| Assign Multiple Cases | Allows the user to make assignments for multiple cases. | Open |
| Allows the user to print a Case Form from the New and Open worklist tabs. | New, Open | |
| Print Multiple Cases | Allows the user to print a Case Form from the New and Open worklist tabs. | New, Open |
| Medical Review | Allows the user to view the Medical Review dialog box (if he has the access rights to view it). | New, Open, Reports |
| Print Medical Summary | Allows the user to view the Medical Summary Report (if he has the access rights to view it). | Reports |
| Coding Review | Allows the user to view the Coding Review dialog box if the user belongs to a group with access rights to Coding Review). | New, Open |
| Route Multiple Cases | Allows the user to route multiple cases to the selected workflow state. | New, Open |
3.1 Worklist Options
3.1.1 New and Open
-
Hover over the Worklist menu and select New or Open.
-
When the New or Open screen appears, enter the information in the fields as necessary.
-
When you select New, the system displays new worklist items that have been assigned but not yet accepted. You can also see unassigned cases.
-
When you select Open, the system displays all cases that have been assigned and accepted.
-
The New/Open Worklist displays the Workflow Group and the Workflow State currently associated with the case.
-
If the user has cases open, the system skips those cases.
3.1.1.1 Filtering Functions—Field Descriptions
| Option | Description |
| Workflow State | Displays only those workflow states that occur in the given worklist, considering other filter elements such as Case Owner, Assigned to, and so on. |
| Product | Displays only those products that occur in the given worklist, considering other filter elements such as Case Owner, Assigned to, and so on. |
| Event Preferred Term (PT) | Displays only those Event PTs that occur in the given worklist, considering other filter elements such as Case Owner, Assigned to, and so on. |
| Event as Reported | Displays the name of the event as reported. |
| Case Report Type | Displays only those report types that occur in the given worklist, considering other filter elements such as Case Owner, Assigned to, and so on. |
| Product Group | Displays product groups where the Primary Suspect Drug occurs. |
The Worklist filter in each Worklist entity contains the following filtering options:
-
View Individual
-
View Group
-
View All
The default filter is Case Number. This lets you enter a Case Number to search for results matching a specified case number.
3.1.1.2 Total Number of Rows—Field Descriptions
| Field | Description |
|---|---|
| Lock Status | Enables the user to view the Locked state of the case by the icon. The type of case (Initial or Follow-up) is also displayed along with the icon.
If the case is a Follow-up, additionally, the Follow-up number is also displayed. For example: Initial or F/U: 1. The icon (displayed in the lock state column) denotes a SUSAR (Suspected Unexpected Serious Adverse Reaction) case. |
| Receipt Date | If the option Display Initial Receipt Date always is configured, the Initial Received date of the case is displayed in the Receipt Date column on the Worklist screen.
If the option Display Initial Receipt Date or the latest Follow-up Receipt Date is chosen, and if a Follow-up entry exists, the latest Follow-up Received Date regardless of significant or not is displayed in the Receipt Date column on the Worklist screen. If Follow-ups do not exist, the Initial Received date of the case is displayed in the Receipt Date column on the Worklist screen. |
| Aware Date | The Aware date is the latest significant Follow-up which is received in the case or the Initial Receipt Date if there are no Significant Follow-ups present in the case. |
| Days Open | Displays the number of days that have elapsed between the Initial Receipt Date or the latest significant Follow-up Receipt Date (if it exists) and the current system date (Database server). |
| Days Remaining | Displays the number of days that are remaining, as configured in the Administration module for Case Processing. |
| Event PT | Displays the Preferred term of the Primary Event. |
| Event Verbatim | Displays the Verbatim text for the Primary Event. |
| S/U/R | Displays the Case Level Assessments:
|
| F, LT or H |
If any of the above are present together, then Fatal takes precedence followed by LT followed by H. If the case is neither of the above, No is displayed. |
| Study ID | Displays the Study ID of the study cases.
If Study ID is not present, this field is blank. |
| Reporter Type | Displays the Reporter type for the Primary Reporter in the case.
If Reporter type is not present, this field is blank. |
| Assigned To | Displays the current owner or text Unassigned to indicate the assignment status of the Case. This option is not available if the user selects the Individual option from View. |
| Owner | Displays the Owner of the case. If Owner is not present, this field is blank.
By default, the first user to accept a case after book-in becomes the Case Owner. The Case Owner has access rights to assign cases that he owns to another user. A Case Owner cannot be reassigned automatically after the initial assignment. However, he can be reassigned manually by a Workflow Manager. |
| Print List Button | Allows the user to print the current worklist for reference. |
| Routing Details | Displays the case routing details. |
3.1.2 Action Items
-
Hover over the Worklist menu and select Action Items.
-
When the system opens the Action Items screen, enter the information in the fields as necessary.
The Worklist Action Items displays the entire description of the action item selected in the Description field on the dialog box.
The system generates open Query Action Items based on the advanced conditions rules for the action item type.
-
When the user saves the case or clicks the Generate Query icon on the Quick Launch toolbar, the system creates an open action item based on the profile switch.
-
The Due Date for the action item is the System Date + the Due Date (in days) as defined in the codelist.
-
The Open Date is the system date on the day the Query was created for the case.
When you click the Generate Queries icon, the system generates the action item queries. These queries are based on the rules defined for the action item types in codelist Maintenance where the Advance Condition satisfies the case criteria.
This item displays on the Quick Launch Toolbar when the case is open.
Short cut key: CTRL+ALT+X
If, after the system schedules the action item query, unresolved queries are resolved or there are queries that do not meet the criteria of the Advance Conditions, the system closes the action item and uses the system date as the close date.
If there are open query action items, the system does not create new action items with the same name when the system tries to resolve the open queries list in the Case Form.
3.1.2.1 Query Action Items
-
You can query only query action items by selecting View Query Action Items.
-
You can filter only overdue action items by clicking Overdue Action Items. The Worklist displays those action items where the due date is before today's date (system date).
-
The system allows all open query type action items to be populated in a Letter template by adding the place holder: [OPEN_QUERY]. This populates the open queries letter template content as configured in the codelist when the letter is being generated in a separate line for each open query.
| Attribute | Tool Tip | Example |
|---|---|---|
| Query Name | Name of Query to be included in the letter template. | QUERY_Preg_LMP (must begin with QUERY_). |
| Query Condition | Advanced condition. If the condition is true, then insert text into the generated letter. | Patient is pregnant and date LMP missing (Advanced Condition). |
| Query Letter Text | Text to be inserted in generated letter if Query Condition is True. If Query Condition is no true, the no query item is created. | Please provide the Date of Last Menstrual Period (LMP) for the patient. |
| Query Item Text | Text to be display on the list of open queries. | Patient missing Date of LMP. |
For example:
-
Please provide Reporter Name (Adv. Cond is Reporter name is null)
-
Please provide Physician's address (Adv. Cond is Reporter address is null)
-
Please provide Physician's phone number (Adv. Cond is Reporter phone number is null)
-
If the case is saved and the Reporter Name exists, the system creates two action items.
3.1.2.2 Filter Function—Field Descriptions

For more details on fields in this section, refer Total Number of Rows—Field Descriptions.
3.1.3 Coding Action Items
To view the Coding Action Items page
-
Hover over the Worklist menu and select Coding Action Items.
-
When the system opens the Coding Action Items page, enter the information in the fields as necessary.
3.1.4 Contacts
-
Hover over the Worklist menu and select Contacts.
-
When the system opens the Contacts screen, enter the information in the fields as necessary.
3.1.5 Reports
-
Hover over the Worklist menu and select Reports.
-
When the system opens the Reports screen, enter the appropriate information as necessary.
3.1.5.1 Filtering Options—Descriptions
| Option | Description |
|---|---|
| Reporting Destination | Displays the report destination (agency) for which the report is scheduled. |
| Report Status | Displays the status of the report as Approved, Generated or Scheduled. |
| Report Form | Displays the description of the report. |
| Filtering Reports | You can click the respective magnifying glass icons to filter reports based on Destination, Product Family, and Country of Incidence. The system displays the standard lookup dialog box. |
| By Destination | The Report Destination filter multi-selection screen list contains the names of all agencies as configured in the Argus Regulatory Authority CodeList. |
| By Product Family | The Product Family filter multi-selection screen contains a list of all product family names as configured in the Argus Products codelist. |
| By Country of Incidence | The Country of Incidence filter multi-selection screen contains a list of all available countries. |
-
The filter options Study ID and Reporting Group elements let the user filter cases within the list (not deleted).
-
The system displays the Report Details dialog box and permits the user to enter the approval notes that are applied to all selected reports. The system skips any reports selected by the user that have the following statuses:
-
Scheduled
-
Disapproved
-
Approved
-
-
The system hides the reports fields from the report details dialog box and does not permit the user to access or modify any other tabs.
-
The system hides the Route button to prevent users from modifying the Report Status.
-
Workflow Enterprise users can access, view, and modify the report details for all reports for all cases across multiple sites in their lists.
3.1.5.2 Total Number of Rows—Field Descriptions
| Field | Description |
|---|---|
| Selected | Allows the user to select one or more reports, on which actions can be performed. |
| Suspect Product | Displays the Trade name for which the report has been scheduled. A "+" displayed at the end of a Product Name indicates that more than one Suspect Company Products exist.
A Device Name is also displayed for those reports which were scheduled for the Device. |
| Diagnosis | Displays the Primary Event Diagnosis PT. |
| Event Verbatim | Displays the event verbatim (verbatim as reported) of the Primary Event. |
| F or LT | Indicates whether a case is fatal or life threatening as follows:
If any of the above are present together, then Fatal takes precedence followed by LT. If the case is neither of the above, No is displayed. |
| 7/15 | Displays 7 if the report is due within 7 days.
Displays 15 if the report is due in more than 7 days. |
| Report Form | Displays the description of the report.
Click the link to view the DRAFT report PDF. |
| Initial / Follow-up (#) | Displays if the report is Initial or Follow-up.
If it is a Follow-up, the follow-up number is printed. |
| Downgrade | Displays Yes if the report is a Downgrade report. |
User Options—Field Descriptions
| Option | Description |
|---|---|
| View Report | Enables the user to view the report as a PDF. |
| Local Labeling | Enables the user to view the local labeling dialog box.
|
3.1.6 Bulk Transmit
The Bulk Transmit function lists the status for all transmission events against your assigned cases.
To view the Bulk Transmit page
-
Hover over the Worklist menu and select Bulk Transmit.
-
When the system opens the Bulk Transmit screen, enter the appropriate information as necessary.
3.1.6.1 Total Number of Rows—Field Descriptions
| Field | Description |
|---|---|
| Report Form | Displays the description of the report.
Click the link to view the DRAFT report PDF. |
| Recipient Company | Displays the name of the company of the report recipient |
| Date Created | Displays the date on which the report was created. |
| Date Sent | Displays the date on which the report was transmitted to the recipient. |
| # of Pages | Displays the number of pages in the report. |
| Attempts | Displays the number of attempts made to transmit the report. If you are using Right Fax, the value of this field is displayed as 0 even if the Right Fax had attempted it multiple times. This is an unsupported feature in Right Fax. |
| Sender | Displays the name of the sender of the report. |
| Lock State | Displays the lock status of the report. |
| Sender Agency Name | Displays the name of the agency that has generated the report |
| Status | Displays the Report Status such as Scheduled, Generated, and so on. |
3.1.6.2 User Options—Field Descriptions
| Option | Description |
|---|---|
| View Transmission | Displays the report in a PDF format. |
| Mark report as Submitted | Marks the report for the selected row as submitted.
This option is displayed to only those users who have the access rights to mark a report as submitted. |
| Remove transmission | Failed transmissions can be removed using this option as it removes the transmission log entry from the list.
A report whose status is pending cannot be transmitted. |
| Re-transmit | This options allows reports to be re-generated and re-transmitted if report generation had failed earlier. For failure in other stages of report transmission, this option performs only retransmission. |
| Submit Multiple Reports | Multiple reports that are selected from the list can be marked as submitted simultaneously. |
| Re-transmit Multiple | The status of multiple reports that are selected from the list can be changed to pending, and those reports can be re-transmitted. |
| Remove Multiple Transmissions | Transmission of multiple reports that are selected from the list can be removed. |
3.1.7 Bulk Print
The Bulk Print function displays a separate list for all Bulk Print events against reports.
-
Hover over the Worklist menu and select Bulk Print.
-
When the system opens the Bulk Print page, enter the appropriate information.
3.1.7.1 Bulk Print User Options—Field Descriptions
| Option | Description |
|---|---|
| Remove Print Job | Removes the print job entry from the list.
A report whose status is pending cannot be printed. |
| Re-print | This option is displayed if the selected row has a status of failure or success. Select this option to change the status back to pending and the re-print the report. |
| Submit Multiple Reports | Multiple reports that are selected from the list can be marked as submitted simultaneously. |
| Re-print Multiple | The status of multiple reports that are selected from the list can be changed to pending, and those reports can be re-transmitted. |
| Remove Multiple Print Jobs | Print jobs of multiple reports that are selected from the list can be removed. |
3.1.8 Bulk ICSR Transmit
The Bulk ICSR Transmit function displays only those ICSR Reports that are awaiting submission (not in submitted state) when transmitted from Bulk Report By Form to the Trading partner.
To view the Bulk ICSR Transmit page
-
Hover over the Worklist menu and select Bulk ICSR Transmit.
-
When the system opens Bulk ICSR Transmit page, entered the appropriate information as necessary.
The Bulk ICSR Transmit page has two tabs as follows:
-
Reports -- Displays the status of individual ICSR Reports that are in the process of being transmitted.
-
Messages -- Displays the status of ESM Messages which may contain multiple reports.
3.1.8.1 Reports Tab
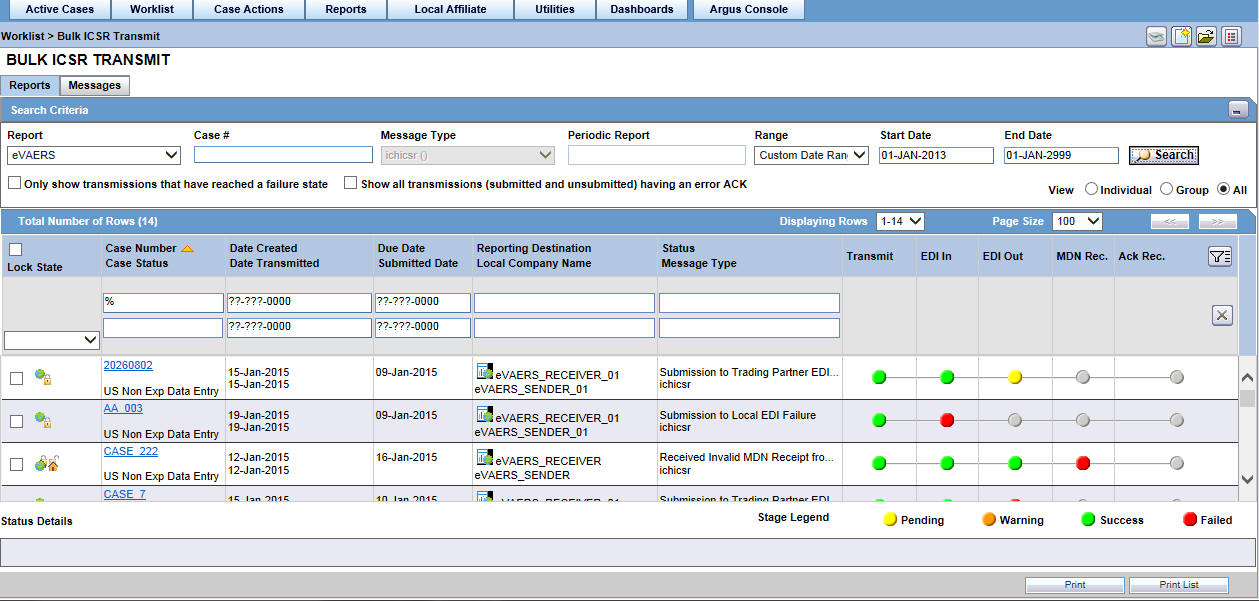
Search Criteria Section—Field Descriptions
| Field | Description |
|---|---|
| Report | Select the type of report from the drop-down list, as applicable.
Select E2B, eVAERS or eMDR from the list to view the transmission status of the report. |
| Message Type | Select a pre-defined message type.This field is set to ichicsr and is disabled if report is set as eMDR or eVAERS. |
| Periodic Report | This field is enabled for message type that are marked as Periodic in the Message type codelist.
This field is disabled for eVAERS and eMDR. |
| Range | Select a date range. |
| Search button | Triggers search based on the search criteria. |
| Only show transmissions that have reached a failure state | Check this checkbox to search for only those transmissions that have a failed status. |
| Show all transmissions (submitted and unsubmitted) having a error ACK | When this checkbox is checked by the user during the Search action, the system brings back any ICSR report that has received an error ACK (acknowledgement), irrespective of whether it has been marked as submitted or not.
When this checkbox is checked, the checkbox Only show transmissions that have reached a failure state is automatically unchecked. |
| Stage Legend | Shows the status (through colors) corresponding to each stage. |
3.1.8.2 Total Number of Rows Section—Field Descriptions
| Field | Description |
|---|---|
| Action | Displays the icon containing the available user actions.
Tip: Click on the case lock status (unlocked, locked or archived) for further options. |
| Local Company Name | Displays the name of the local company that has sent the report. |
| Transmit | Denotes Processing Report. |
| EDI In | Denotes EDI In. |
| EDI Out | Denotes EDI Out. |
| MDN Rec. | Denotes MDN Received. |
| ACK Rec. | Denotes Acknowledgement Received. |
| Status Details | Contains the details of the latest failure / success message for the selected row. |
| Prints the row selected by the user |
3.1.8.3 Reports Tab User Options—Field Descriptions
| Option | Description |
|---|---|
| View Report Details (read -only) | Opens the existing Report Details dialog box in read-only mode. |
| View ICSR Report (ICSR Viewer for the report) | Opens the existing ICSR Viewer report. |
| ICSR Transmission History (Transmission History for the selected report) | Opens the new Transmission History screen |
If the ICSR report in a result set row was already submitted, the system does not display the following pop-up windows:
-
Remove Transmission
-
Re-Transmit
-
Mark as Submitted
-
Re-Transmit Multiple
-
Submit Multiple Reports
-
ICSR Transmission History
For the same record above, the system, however, keeps the View Report Details and View ICSR Report menus enabled.
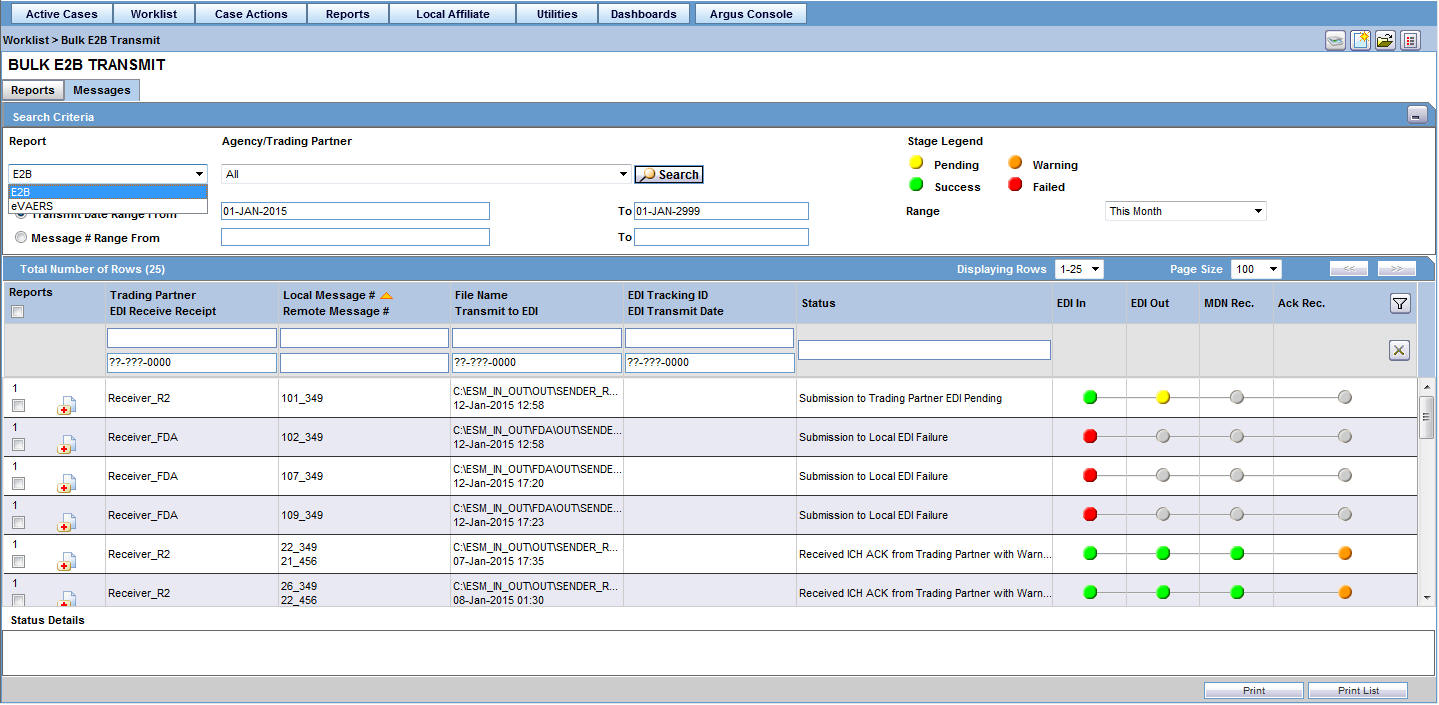
3.1.8.5 Search Criteria Section—Field Descriptions
| Field | Description |
|---|---|
| Report | Select E2B, eVAERS or eMDR from the drop-down list to view the transmission status of these reports. |
| Agency Trading Partners | Enter the agency or trading partner. |
| Transmit Date Range From | Select the transmit date range. |
| Range | Select a range to auto-populate the Start Date and End Date.
The Range option is cleared if the Start Date or End Date is changed. |
3.1.8.6 Total Number of Rows Section—Field Descriptions
| Field | Description |
|---|---|
| Reports | Displays the number of reports. |
| Action | Displays the icon containing the available user actions. |
| Trading Partner | Displays the name of the agency or the trading partner. |
| EDI Receive Receipt | Displays the EDI Receipt status. |
| Local Msg # | Displays the Local Message Number. |
| Remote Msg # | Displays the Remote Message Number. |
| File Name | Displays the File Name. |
| Transmit to EDI | Displays the Transmit to EDI Status. |
| EDI Tracking ID | Displays the EDI Tracking ID. |
| EDI Transmit Date | Displays the EDI Transmit Date. |
| EDI In | Denotes EDI In. |
| EDI Out | Denotes EDI Out. |
| MDN Rec. | Denotes MDN Received. |
| ACK Rec. | Denotes Acknowledgement Received. |
| Status Detail | Contains the details of the latest failure / success message for the selected row. |
| Print button | Prints the row selected by the user. |
3.1.8.7 Message Tab User Options—Field Descriptions
| Option | Description |
|---|---|
| ICSR Transmission History (Transmission History for the selected report) | Opens the new Transmission History screen |
| View Acknowledgement (Read only) | Displays the Acknowledgment report.
This menu option is not displayed if ACK has not been received for message. |
| View Reports | Opens the Bulk Transmit ICSR in the report view for all the reports in the message. |
| View xml acknowledgement | Displays business level acknowledgement |
3.1.9 Local Labeling
To view the Local Labeling page
-
Hover over the Worklist menu and select Local Labeling.
-
When the system opens the Local Labeling screen, select the appropriate information as necessary.
-
Filtering by Product Family: You can filter products in the Event Assessment dialog box based on the selected product families. Click the magnifying glass icon to filter the search results by product family.
-
The system displays the number of cases currently in view and automatically updates the range based on the page size specified in the Search dialog box (read only). For example, if you select 100, the system divides the displays rows into groups of 100 cases.
-
Events assessment can show all listedness values. By default, it shows listedness only for the core datasheets and countries you have permission to access.
-
Diagnosis -- The Diagnosis Filter contains a drop-down list with the following values:
-
D (Diagnosis)
-
S (Symptoms)
-
In the Events Assessment dialog box, you can filter on either the diagnosis or the symptom.
-
-
By default, the system displays all events with the <ALL> option.
-
Datasheets
-
The Datasheets drop-down list contains a list of distinct datasheets.
-
All the blank datasheets display as a single row of Unspecified.
-
When you click the Datasheet hyperlink, the system displays the datasheet notes.
-
-
Licenses
-
The Licenses drop-down list contains a list of distinct countries for the licenses.
-
All licenses not associated with a datasheet appears under Unspecified and are aligned with the datasheet view.
-
When you click the Licenses hyperlink, the system displays the license references.
-
-
The Process button triggers all the applicable rules (both global and local) for the country/license type for the licenses that are assessed through this screen.
For more information about Local Labeling, see the LAM User Guide for Worklist - Local Labeling requirements.
3.1.10 Coding Status
To view the Coding Status page
-
Hover over the Worklist menu and select Coding Status.
-
When the Coding Status screens appear, enter the information in the fields as necessary.
3.1.10.1 Coding Status Icons
| Icon | Description |
|---|---|
| Displays that the verbatim text has not yet been coded. | |
| Displays that the verbatim text has been successfully coded. | |
| Is displayed if the verbatim text has been submitted to Central Coding, but no result has been returned to Argus yet. | |
| Is displayed if the term was submitted to Central Coding for coding and returned a status of error either from Central Coding or Argus. |
3.1.10.2 Search Conditions Section—Field Descriptions
| Field | Description |
|---|---|
| Date Range | Select a relevant Date Range, if applicable.
To enter a customized date range, select Custom Date Range from the list. |
| Advanced | Select an advanced condition for the case, if applicable.
Click AC to create a new advanced condition. |
3.1.10.3 Total Number of Rows Section—Field Descriptions
| Field | Description |
|---|---|
| Seriousness Criteria | Displays the Case level Seriousness Criteria. In case the case has any Fatal or Life Threatening event, it is displayed as such. |
| Aging (Days) | If all codeable items of the case are coded completely, Aging is displayed as the Number of days from the Initial Receipt Date to the date when latest item of the case was coded.
If any code-able item of the case is not coded, Aging is displayed as the Number of days from the Initial Receipt Date to the system date (Database Server). |
| Coding State | If all the events / products are encoded, the coding state is denoted with a green check mark.
If the case has even a single code-able item as not coded, the coding state is shown as a red cross mark. |
Refer to the Case Form chapter for details on sending emails, forwarding emails, and so on.
3.1.11 Letters
This Worklist functions displays a list all emails across all cases.
To access the Worklist - Letters page
-
Hover over the Worklist menu and select Letters.
-
When the system opens the Letters page, enter the appropriate information.
3.1.11.1 Search Case Section—Field Descriptions
| Field | Description |
|---|---|
| Current Letter | Select the current letter from this list |
| Date Range | Allows the user to select a date range from which cases may be selected. The selection made from the Date Range drop-down list automatically populates the From and To fields. |
| Show only those cases with no previous notifications | Allows the user to filter the case list search to only those cases that have not had any correspondence letters sent. |
| AC | Creates a query for an Advanced Condition |
3.1.12 Intake
The Intake function enables you to view a list of incoming attachments in the Worklist View where you can select an attachment for creating a case.
To access the Worklist - Intake page
-
Hover over the Worklist menu and select Intake.
-
When the system opens the Intake page, enter the appropriate information.
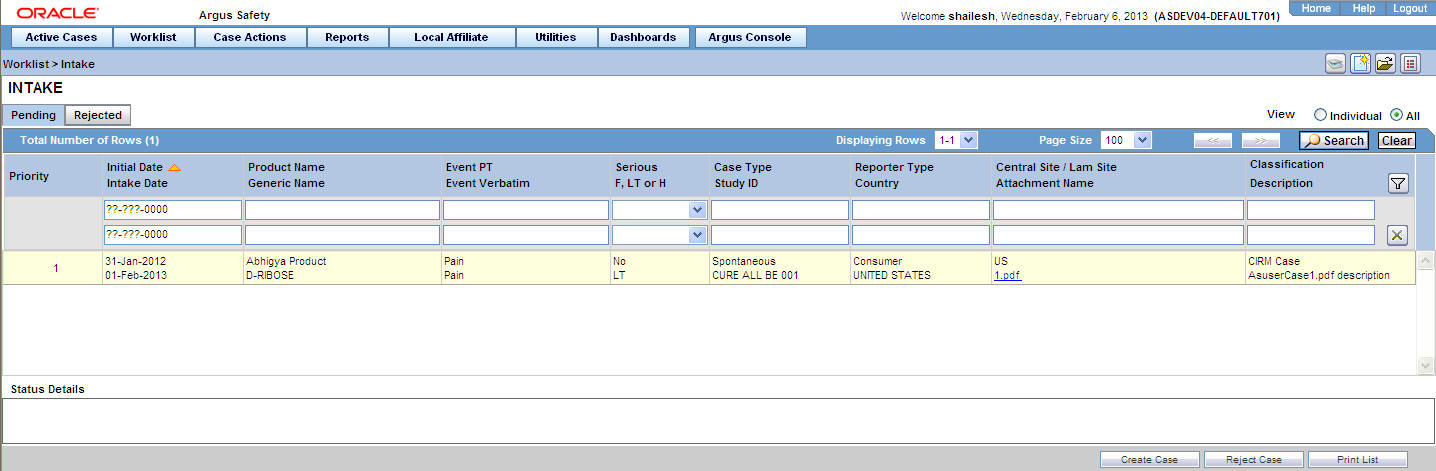
3.1.12.1 Pending Tab—Field Descriptions
Use this tab to o create case, reject case, and so on. Users other than Workflow Managers can reject a case from the Intake Worklist.
| Field | Description |
|---|---|
| Priority | Allows the user to view the priority of the case. |
| Case Type | Allows the user to view report type information. |
| Reporter Type | Allows the user to view the Reporter type for the Primary Reporter in the case. |
| Group | Allows for the current group owner or Unassigned group to be assigned to the case. |
| Central Site/LAM Site | Allows the user to view the current Site (Argus or Affiliate) of the Case - If there are no Sites defined, ALL users can access the case attachment. |
| Attachment Name | Allows the user to view the attachment which is associated to the case. |
| Classification | Allows the user to view the attachment classifications which is associated with the case. |
| Description | Allows the user to view the attachment description which is associated with the case. |
3.1.12.2 Rejected Tab—Field Descriptions
| Field | Description |
|---|---|
| Generic Name | Allows the user to view the generic name of the suspect product in question. |
| F, LT or H | Allows the user to view Fatal, Life-Threatening or Hospitalized cases. |
| Reporter Type | Allows the user to view the Reporter type for the Primary Reporter in the case. |
| Country | Allows the user to view the Country of incident. |
| Classification | Allows the user to view the attachment classifications which is associated to the case. |
| Description | Allows the user to view the attachment description which is associated to the case. |
| Rejected Date | Allows the user to view the date when the case was rejected. |