2 Getting Started
2.1 Logging In and Out
To Log into the Argus Application
-
Open Microsoft Internet Explorer and enter the Uniform Resource Locator (URL) for Argus Safety Web in the address bar.
Note:
If you need to use ActiveX controls, make sure that you have administrative privileges when you run Internet Explorer. -
When the Argus login screen opens, enter your username and password.
-
Select the appropriate database from the Database drop-down list and click Login.
-
The number of times a user is permitted to enter an incorrect password is configurable. The default is 3.
-
The date/time format reflects the 24-hour format used by the Web server.
-
Oracle recommends that you use the Application Access portlet to open the Argus Safety application for different enterprises, as it takes care of closing the previous enterprise before opening the new one.
To Log out of the Argus Application
-
Click Logout on the top-right frame of the window.
2.2 Personal Argus Status
The Argus Safety application Home page displays a list of cases assigned, Contact Log entries, and Action Item entries for the logged-in user.
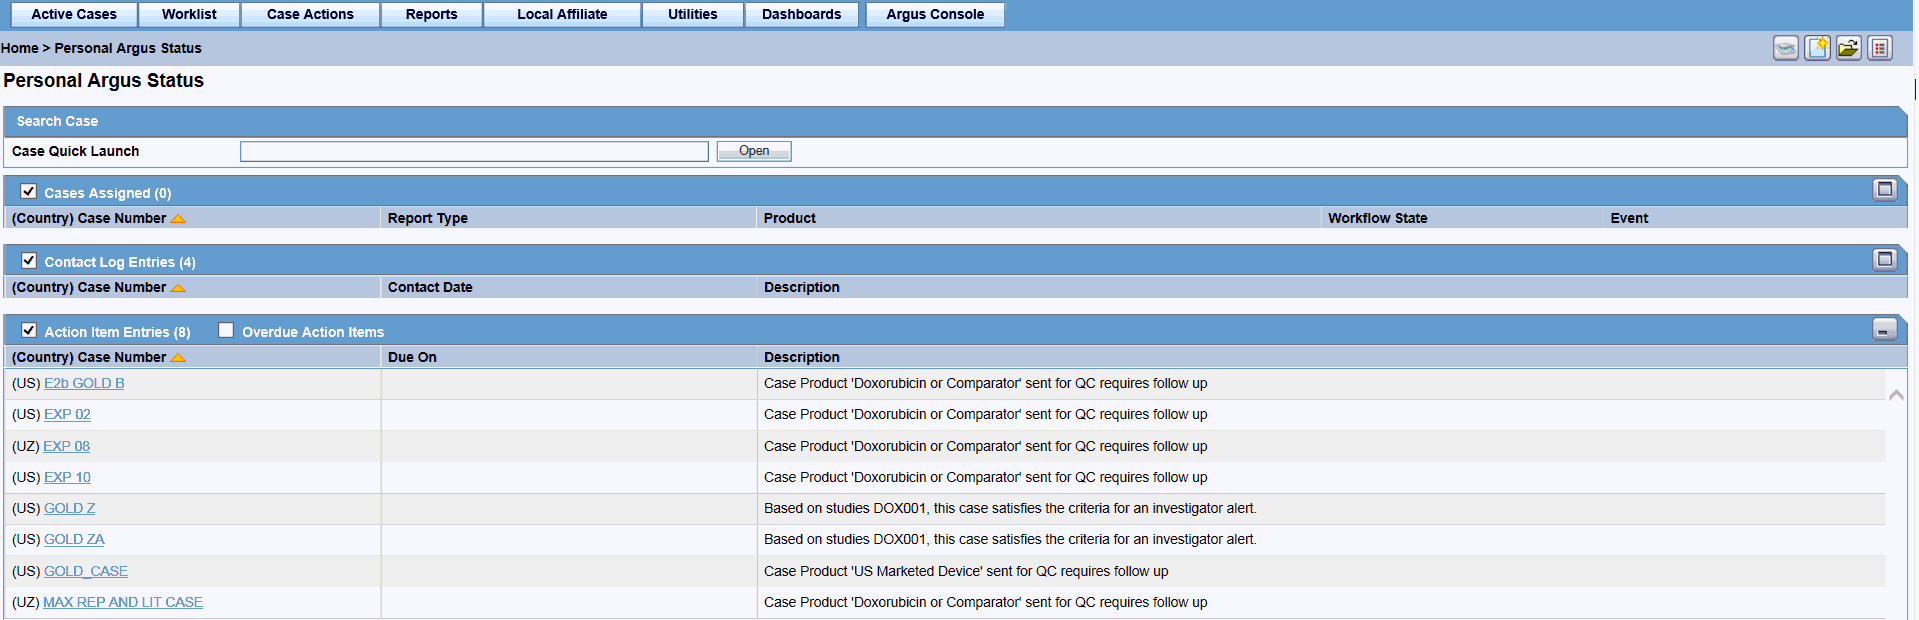
Personal Argus Status Page—Field Descriptions
| Section Name | Field/ Control Name | Description |
|---|---|---|
| Search Case | Case Quick Launch | Enables you to enter a case number when searching for a specific case. |
| Cases Assigned/
Contact Log Entries/ Action Item Entries |
(Country) Case Number | Displays the name of the country the case belongs to. The Country is in brackets. |
2.3 Quick Launch Toolbar
The Quick Launch Toolbar is on the top right side of the screen.
Place the cursor over each icon to view the tool tip, which describes the role of each icon.
Note:
Shortcut keys are driven off a combination of Common Profile switches and menu access rights. For example, the Case Save shortcut/icon is visible only to users who have been granted access to save the case in the group configuration. If the menu option is disabled in the group configuration for a user, the respective shortcut /icon is also removed.Certain shortcuts/icons such as Field Validation are enabled only through a common profile switch. These switches are described in the Common Profile Switch document. Shortcuts/icons that are driven through common profile switches are global to all users and are not controlled by group permissions.
| Icon | Tool Tip | Description |
|---|---|---|
| New Case from Image | Displays a new case from an image. | |
| New Case | Displays the Initial Case Entry dialog box. | |
| Open Case | Displays the Case Search dialog box. | |
| Close Case | Closes the case. | |
| Print Case | Displays the Case Print dialog box. | |
| Save Case | Saves the case with any changes made. | |
| Forward Case | Displays the Case Routing dialog box and enables you to forward the case. | |
| Return Case | Displays the Case Routing dialog box and enables you to return the case. | |
| Worklist | Displays the Worklist dialog box.
If no default Worklist option is defined, then Worklist - New is displayed. |
|
| Lock Case | Displays the Case Lock or Case Unlock dialog box. This icon is enabled only for a Local PRPT Case and only if the case has been globally locked. | |
 |
Local Lock | Displays the Local Lock or Local Unlock dialog box to allow a user to locally lock or unlock a case.
This icon is a toggle icon that allows users to do a Local lock or Local unlock depending on the global and local lock state of the case. Note: This icon is visible only for a Local Potential Reportable Case (Local PRPT Case) and only if the case has been globally locked. |
| Medical Review | Displays the Medical Review dialog box. | |
| Coding Review | Displays the Coding Review dialog box. | |
| Draft Report | Displays the Report List of All Expedited Reports. | |
| ICSR Check | Performs the function that prints the ICSR Report - DTD Length Check Warnings and ICSR report - DTD Validation. | |
| Validation Check | Performs case validation. |
2.4 Basic Features and User Actions
The icons shown below are common to all modules within Argus:
| Icons | Description |
|---|---|
| These icons help the user to traverse to the left or right side in a page. They are not visible if there you do not need to scroll through the tabs. | |
| A standard Notes dialog box is available. If the notes are filled in, the dialog box displays a Notepad icon. Otherwise, it is shown as empty, without any flags. | |
| Re-arranges the entered items by moving them up or down. | |
| Depicts the column that is being sorted currently.
You can sort on all columns by clicking the header column. Click the same column header again to toggle between the ascending and descending order. |
|
| Enters a justification for an field validation warning. | |
| Indicates that a justification comment has been added. For example, when a system calculated field has been overwritten. | |
| Indicates which mandatory validation error exists. A case cannot be saved until it meets the field entry requirements. |
2.4.1 Field Validations
-
Click the icon next to a field to view its corresponding Field Justification dialog box.
-
This field warning justification dialog box asks the user for a justification to perform the selected action. To overwrite the warning:
-
Enter a specific reason.
OR
-
Select a standard reason from the message box.
-
-
Click OK to overwrite the field justification warning.
The orange icon changes to green.
The fields in the application are either required or optional. Each field type displays with a different colored icon:
-
A red icon signifies that a mandatory validation check has not been met.You need to correct the data entry before being able to save a case.
-
An orange icon signifies that an optional validation check has not been met. You need to enter justification but can then continue to save the case.
2.4.2 Field-Level Help
To get information about a particular field on the Case Form, double-click the label associated with the field.
For instance, on the Case Form, you can double-click the Country label to obtain information about the field.
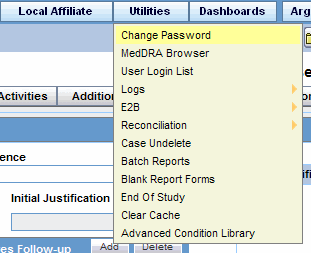
2.4.3 Changing Your Password
-
Hover over the Utilities menu and click Change Password.
-
Enter your current password in the Old Password field.
-
Enter the new password in the New Password field and confirm the new password by re-entering it.
-
Click OK to change your password.
Note:
When you log on to the system for the first time, change the password that has been assigned to you. LDAP users cannot change their passwords.2.4.4 Entering Dates
Several fields in the Argus Safety user interface enable you to enter dates. Fields that accept full dates appear in the dd-mmm-yyyy format. You enter the month using numbers, or alphabetic characters.
Appropriate formats for entering English dates are as follows:
-
DDMMMYYYY where MMM is the three-character abbreviation for the month (such as MAR, APR, JUN, and so on.)
-
DDMMMYY where MMM is the three-character abbreviation for the month and YY is the two-digit numeric value for the year (such as 09, 10, and so on.)
-
DDMMYYYY where MM is the two-digit value identifying the month (such as 01 = January, 02 = February, etc.) and YYYY is the four-digit value for the year.
The dot (.), dash (-) and backslash(/) are acceptable separators.
2.4.5 Using Null Flavor Data
Null Flavors are used to describe the reason for missing data. ICH E2B (R3) and regional agencies such as CBER, EMA, and PMDA have published guidelines on the allowed Null Flavors for various fields that are part of the E2B (R3) report. A Null Flavor set is a collection of Null Flavors and sets are provided by default for various combinations of Null Flavors in the Flexible Re-categorization Codelist.
Null Flavor data can be selected for fields in the Case Form by clicking on the Null Flavor button ( ![]() ) next to the fields. On clicking the button, a drop-down list appears and allows you to select Null Flavor data as configured in the Field Properties Configuration in the Argus Console. The background color of the NF button changes (from grey to blue) when a Null Flavor is selected from the drop-down list.
) next to the fields. On clicking the button, a drop-down list appears and allows you to select Null Flavor data as configured in the Field Properties Configuration in the Argus Console. The background color of the NF button changes (from grey to blue) when a Null Flavor is selected from the drop-down list.
When the Case Form field has data and the user clicks the button, the system displays a warning message that data will be cleared on switching to the Null Flavor field. The data is cleared or retained based on user confirmation. When data pertaining to the field is received, Null Flavor data can be overwritten by actual data by clicking the NF button.
2.4.6 Entering Multiple Language Text
Certain fields on the Case Form let you enter text in languages other than English. The non-English text that is entered in these fields can also appear on Expedited reports.
To enter text in a language other than English:
-
Click the English language icon.
-
Use the pane associated with English to enter the English language text. Select the required language from the Select Language drop-down list to enter text in that language.
-
After completing text entry, you can perform a spell-check for the text.
The table below displays different icons representing different languages.
| Icon | Language |
|---|---|
English |
|
Japanese |
|
Language other than English or Japanese |
2.5 Integrating with Argus Insight
Argus Safety has the following integration points with Argus Insight. All these integration point operate within the same enterprise for both Argus Safety and Insight.
Note:
This integration is available only to Argus Enterprise Edition users.-
Case Series Sharing: In case of multi-tenant installations, Argus Safety > Case Actions > Case Open screen > Result from Argus Insight imports the active case series for the user from the same enterprise partition of Insight which is currently opened in Argus Safety.
-
Argus Insight Application Launch: The Argus Insight button in the main Argus Navigation bar opens the same enterprise partition of Insight which is currently opened in Argus Safety.
Sharing a Case Series in Argus with Argus Insight
-
In the Case Search dialog box, search for and select a case in Argus Safety.
-
Open Argus Insight.
-
The system writes case series belonging to the alert to the Argus case-sharing table.
-
Check Make Active from Argus to make the Case Search dialog box case series active in Argus Insight.
-
If Argus Insight was already open, the Active Case series in Argus Insight is replaced with cases from Argus.
Sharing a Case Series in Argus Insight with Argus
A case series can be made available from Argus Insight through Active Case Series. To share a case series in Argus Insight with Argus Safety:
-
Hover over the Case Actions menu and click Open.
-
Click Result from Argus Insight to create a search result with the same cases as the Active case series in Argus Insight.