2 Learning the Common Tools
Oracle Clinical Remote Data Capture Onsite (RDC Onsite) organizes information into several pages, which are oriented towards tasks. These tasks include searching for patients or CRFs, opening patient casebooks, reviewing patient data, and printing reports.
Each page has common tools and controls that you use to complete your tasks. This chapter includes the following topics:
These pages facilitate review of data and serve as a means to navigate to the Data Entry window to work with a specific Case Report Form (CRF).
The Data Entry window is a separate browser window that displays the CRF you select and open from either the Patient Casebooks page or the Review pages. You can enter data or update a CRF only from within a Data Entry window. For more information on using the Data Entry window, see Chapter 3, "Entering and Updating Patient Data."
Selecting Your Current Study and Site
Before you enter or update patient data in a CRF, you should always check that you are using the correct study and site.
At the top-right of the Home page and the Patient Casebooks page, RDC Onsite displays the name of the study and site that you are currently using. For example:
![]()
Description of the illustration ''study_site01.gif''
RDC Onsite lists the studies and sites available to you in alphabetical order. Note that:
-
When you log in the first time, RDC Onsite accesses and displays the first study and site available to you.
-
When you log in again, RDC Onsite accesses and displays the study you last visited.
Available Studies and Sites
The studies and sites available to you depend on the studies you are participating in, your user role, and the privileges assigned to you by the study sponsor.
Most users work exclusively on a single site in a study. If that is the case for you, the study and site you work on are your only choices. You do not need to select the study and site.
However, if you work on more than one study or more than one site, always check that you are using the correct study and site before you add or modify any data.
The lists displayed in the Study and Site fields include only valid sites and studies. A valid site must have an investigator and at least one patient assigned. A valid study must have at least one valid site assigned. If the study or site you need is unavailable, contact your Help Desk.
Your Current Study and Site
To select a study and a site:
-
Open the Home page.
Alternatively, you can go to the Patient Casebooks page, which also has the same fields for selecting your study and site.
-
Click the Study field and then select a study from the list. Note that RDC Onsite inserts a --Select Site-- message into the Site field and updates the list of sites based on the study you selected:

Description of the illustration ''study_site02.gif''
-
Click the Site field and then select a site from the list. RDC Onsite accesses the selected study and site.
Caution:
Always make sure you select the site when changing studies in order to refresh the screen with current data.Summary Report of the Current Study and Site
You can review information and metrics about a study and site using the Study and Site Summary link located on top on the following pages:
-
Home page
-
Patient Casebooks page
-
Reports page
For example:
See Chapter 11, "Viewing Summary Reports" for more details on the information in the Study and Site Summary Report.
Using the Patient Selection List on the Home Page
When you open the Home page, the Patient Selection List displays all the patients for the current site in the study. The Patient Selection List has two major components:
-
The Patient Search pane
-
The Patients list
By default, the Patient Search pane is collapsed. You can click the ![]() button to expand the Patient Search pane. You can then specify criteria to search for and display a subset of patients.
button to expand the Patient Search pane. You can then specify criteria to search for and display a subset of patients.
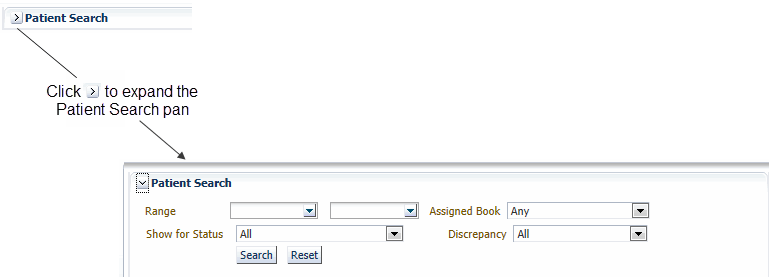
Description of the illustration ''homepg_patsearch1.gif''
The Patients list provides:
-
Several ways that you can select one or more patients. See Action.
-
Colored icons that indicate the status of the data already entered. See Patient Icon.
-
Information about each patient, such as patient number, date when patient data was last modified, and the assigned casebook.
-
If configured for your installation, clicking the patient number opens the Single Patient Casebooks page for the patient. See Patient Number.
-
Options for the task you want to complete from the Action menu once you select one or more patients. See Action.

Description of the illustration ''homepg_patlist.gif''
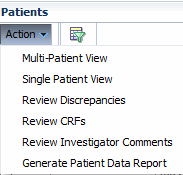
The Action menu lists the actions available to execute on the selected patients. For example, you can:
-
Open the casebooks for the selected patients and enter new data
-
Review CRFs already entered for the selected patients
-
Review discrepancies or investigators comments for the selected patients
-
Generate a Patient Data Report for the selected patients
The first two options in the Action menu are Multi-Patient View and Single Patient View. They both open the Patient Casebooks page for the patient or patients selected. Single Patient View provides a way to view a single patient's casebook CRFs across visits. See "Single Patient View", or "Multiple Patient View" for more information about these pages.
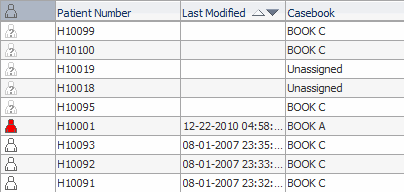
The icon column displays a patient icon that resembles a human figure. The color of the icon is significant and provides valuable information about the patient data. Table 2-1 defines the meaning of the color of each icon.
| Icon | Color | Description |
|---|---|---|
|
|
Gray with a question mark |
No data has been entered for this patient number. You can use the patient number to enter data for a new patient. |
|
|
White |
The patient data has no open discrepancies. |
|
|
Red |
The patient data has one or more active discrepancies. An active discrepancy requires attention by you or a member of your user group. |
|
|
Yellow |
The patient data has one or more other discrepancies. An other discrepancy requires attention from another user or user group. |
The Patient Number column displays the system-assigned unique number for each patient.
If the single patient view of the Patient Casebooks page is available and patient links are active in your installation, the patient number is a link that opens the Single Patient Casebooks page for the patient.
The Last Modified column displays the date of the latest modification to the patient's data. A modification can be any of the following actions:
-
Updating data
-
Routing or resolving discrepancies
-
Verifying, approving, locking, or unlocking a CRF
The Casebook column displays the name of the casebook to which the patient is assigned, or displays Unassigned if the patient is not assigned to any casebook.
Selecting Patients and CRFs
On many pages in RDC Onsite, you select one or more rows for processing. Depending upon the page, this could be patients or CRFs.
On the Home page, for example, you first select the patients and then you select the action you want to perform. You may want to open casebooks to update CRFs, review discrepancies, review investigator comments, or generate reports.
Your options for selecting patients are as follows:
-
To select one patient or CRF, click the respective row.
-
To select several patients or CRFs displayed on contiguous rows, hold down the Shift key, and click the row for the first and the last row for the patients in the group you want to select.
-
To select patients or CRFs that are displayed on non-contiguous rows, hold down the Ctrl key, and click the rows that you want to select.
-
To select all patients or CRFs displayed on the current page, click one row and then press Ctrl + A. Alternatively, you can click on the table header for the patient icon.
Note:
You can use combinations of keys including Ctrl on all supported devices except for iPad.Selecting Your Task
Once you select the patients or CRFs that you want to process, you select the task you want to perform.
The Action drop-down menu displays a list of actions you can take on the selected patients or CRFs. The options available in the list depend on the page and on your user role.
To select your next task:
-
Select one or more patients that you want to process.
-
Click the Action menu in the toolbar and then select the action you want to perform from the list.
Description of the illustration ''pat_list_todoact.gif''
Sorting the Entries in a List
RDC Onsite displays information in rows and columns. You can sort the data by certain columns in ascending or descending order. For example, on the Home page, you can click any of the following column headers to sort the list based on the contents in that column:
-
Patient Number
-
Last Modified
-
Casebook
When you initially open the Home page for a session, RDC Onsite automatically sorts the patient list in alphanumeric order by patient number. For example, A1, A2, A11, A12, A40, G6, J1, J2, J11. Note that the column headers do not indicate the initial sort:
Description of the illustration ''sort_cols_auto.gif''
To sort the list in another order, click a column header. An up arrow indicates the list is sorted in ascending order; a down arrow indicates the list is sorted in descending order. You can click the same column heading to toggle between an ascending and a descending sort.
Description of the illustration ''icon_sort.gif''
Examples of Sorting Columns
Because clinical studies tend to have many patients, sorting a list can help you find information quickly and efficiently. Sorting has many benefits.
Sorting to Find Available Patient Numbers
When you sort the Last Modified column in descending order, RDC Onsite displays the blank entries at the top of the list. A blank entry indicates that no modifications have been made, and therefore, the associated patient number has not yet been used. This sort provides an alternate way for you to locate available patients numbers when you need to enter data for a new patient.
Description of the illustration ''sort_lastmod_exam.gif''
Sorting to Find Patients with Recently Modified Data
As you enter and modify data for a set of patients, you may also find it useful to sort the patient list by the Last Modified column. The ascending sort places those patients with the oldest date of modification at the top of the list, followed by the most recently modified and the blank entries (no data yet entered so no modifications).
Navigating from Page to Page
There are many ways to navigate from page to page. The way you choose to navigate depends on your current task and your preference for how to work. In addition, each navigation method has advantages.
To navigate from page to page, you can:
-
Click one of the page tabs
-
Drill down to the appropriate page
-
Click a breadcrumb
-
Click an Activities link
Using the Page Tabs
You can use the page tabs to navigate from page to page in RDC Onsite. The tabs provide direct access to a page.
Note that for convenient access, the page footer has four links that correspond to each page tab. You can click either a page tab or a page link to navigate directly to that page.
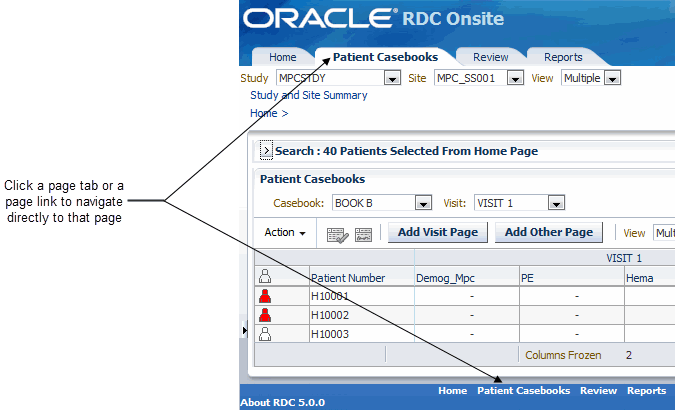
Description of the illustration ''page_tabs01.gif''
Whenever you navigate directly to a page by clicking a page tab or page link, RDC Onsite always resets the search criteria to the default values and displays the page in its default state. For example:
-
Whenever you click the Home tab, RDC Onsite opens the Home page, displays patient data for the current study and site, resets the search criteria to the default values, and collapses the Search pane.
-
When you click the Patient Casebooks tab, RDC Onsite opens the Casebooks page, displays no patient data, resets the search criteria to the default values, and expands the Search pane. You can change the criteria in the Search pane; you must click Search to retrieve and display the patient data.
Returning or navigating directly to a page is useful when you have finished a set of tasks in other parts of the application and are ready to begin another task. In addition, you may want to use tabs to navigate to the Patient Casebooks and Review pages if you either have a preference for using a particular page or make frequent use of searches.
Drilling Down and Using Breadcrumbs
Drilling down is the process of selecting one or more patients or CRFs, and then selecting an action. The action opens another page in the application and displays data only for the patients or CRFs you selected.
You can drill down to navigate:
-
From the Home page to the Patient Casebooks page or to any of the Review pages
-
From the Patient Casebooks page to any of the Review pages
-
From the Review CRFs page to the Review Discrepancies page or the Review Investigator Comments page
Visual Clues of Drilling Down
When you drill down to a page, RDC Onsite displays several visual clues, or indicators, on the page:
-
The tabs indicate the current page. In Figure 2-1, Review CRFs is the current page.
-
Breadcrumbs, which appear directly below the page tabs, show the path you took to arrive at the current page. Breadcrumbs keep track of your location within RDC Onsite and provide a path (or trail) for you to follow back to your starting point.
The greater than sign (>) separates each part of the path. You click a link to navigate back to another point in the path.
-
The title in the Search pane indicates the number of patients or CRFs you selected for the drill-down action.
Figure 2-1 Breadcrumb and Selection Indicator Display
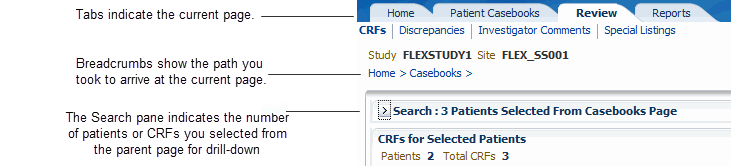
Description of ''Figure 2-1 Breadcrumb and Selection Indicator Display''
Drill-down Return: Breadcrumb versus Page Tab
To return from a drill-down, you can use the breadcrumbs or the page tabs. However, the functionality is not the same. For example, clicking the Casebooks breadcrumb is not the same as clicking the Patient Casebooks tab. Each method has advantages depending on what you want to do.
To return from a drill-down, you can use either of the following methods:
-
Breadcrumb — Click a link in the breadcrumb to return to that particular page. In this case, RDC Onsite re-displays the selected page and rolls back to the previous set of search parameters, patients, and CRFs. Note that this is different from what happens when you use the page tabs to return from a drill-down.
-
Page Tabs — Click the Home, Patient Casebooks, or Review tab to navigate directly to that page. In this case, RDC Onsite re-displays the selected page in its default state and resets all search criteria to the default values.
For the Home page, RDC Onsite displays all patients for the site, regardless of the set of patients last displayed. For the Patient Casebooks or Review CRFs page, RDC Onsite does not display any data on the page. You must click Search in the Search pane to retrieve data.
Example: Drilling Down to Patient Casebooks and Discrepancies
The following example steps through the process of drilling down from the Home page to the Patient Casebooks page and then to the Discrepancies page.
To drill down:
-
Go to the Home page.
-
Expand the Patient Search pane.
-
Search for all open discrepancies.
-
Click the Discrepancy Status field and then select Open (Active&Other) from the list.
-
Click Search.
-
-
Select five patients from the Patients list.
-
Click the Action menu and then select Multi-Patient View from the list.
Note that RDC Onsite:
-
Opens the Patient Casebooks page and displays only the five selected patients in the casebook spreadsheet.
-
Displays a collapsed Search pane. The title bar of the Search pane indicates that 5 patients were selected from the Home page.
-
Displays a Home > breadcrumb to indicate your path to this point.
-
-
Select two red or yellow colored patient icons from the casebook spreadsheet
-
Click the Action menu and then select Review Discrepancies from the list.
Note that RDC Onsite:
-
Opens the Review Discrepancies page and lists only the discrepancies for the two selected patients.
-
Displays a collapsed Search pane. The title bar of the Search pane indicates that 2 patients were selected from the Patient Casebooks page.
-
Updates the breadcrumb trail and now displays Home > Casebooks > to indicate the path you took to get to this point.
-
To return from the drill down, you can:
-
Click the Casebooks > breadcrumb to return to the Patient Casebooks page. In this case, RDC Onsite displays only the five patients you previously selected from the Home page. You can now perform another action with this set of patients.
-
Click the Home > breadcrumb to return to the Home page. In this case, RDC Onsite displays only those patients that satisfy the results of your current search (only patients with open discrepancies).
-
Click a page tab. In this case, RDC Onsite opens the page in its default state and resets the search parameters to the default values for the page. Clicking a page tab is useful when you want to start a new task or work with a new set of patients.
Searching for Patients or CRFs
Every page in RDC Onsite provides a Search pane that helps you locate and focus on the patients, CRFs, discrepancies, and reports that you need for your work.

Description of the illustration ''srch_casebookspg.gif''
Although the available search criteria varies on each page, the Search pane provides you with many search options. For example, you can:
-
Search for patients by range or by whether any data has been entered
-
Search for CRFs that have discrepancies, need verification, or need approval
-
Search for CRFs by name or by visit
In addition, you can combine search criteria to narrow your results. For example, you can search for all CRFs that are for Visit 1 and have a name of VITALS and need to be approved. For more information, see Chapter 10, "Using Search."
Working with Customized News, Activities, and Links
As shown in Figure 2-2, the Home page includes the following three sections that can be customized by your sponsor:
-
The News section
-
The Activities section
-
The Links section
These sections are located on the left side of the Home page.
Figure 2-2 News, Activities, and Links Sections on the Home Page
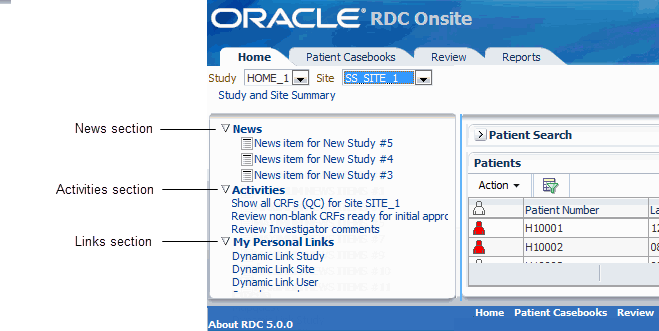
Description of ''Figure 2-2 News, Activities, and Links Sections on the Home Page''
Using the News, Activities, and Links Sections Effectively
To customize your use of the News, Activities, and Links sections, you can:
-
Click the Preferences link in the page header to define how many items to display in the News, Activities, and Links sections at a time. The default is 20 items per section.

Description of the illustration ''pref_newsactlinks.gif''
-
Click the section title to sort the list in ascending order. Click the title again to sort in descending order.
Reading the Daily News
Your sponsor publishes important information you need to know in the News section on the Home page. See Figure 2-3.
Figure 2-3 Reading the Daily News on the Home Page
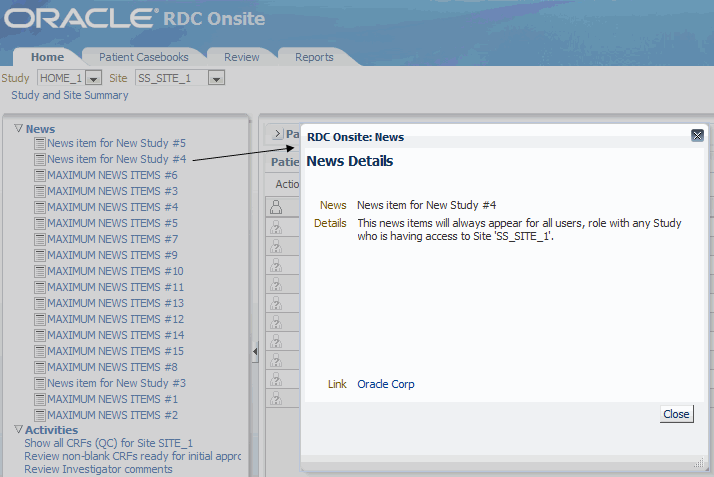
Description of ''Figure 2-3 Reading the Daily News on the Home Page''
News items can be about any topic, including:
-
Notices of group meetings, training classes, or other events
-
Changes to the study protocol or procedures
-
Progress reports
-
Upgrades to the RDC Onsite application
News may be specific to your site and your role. Each time you log in, scan the News section for newly listed items, and ensure you are up-to-date with the latest information specific to your study and site.
When you click a News item, RDC Onsite displays the news headline and text in the News Details window.
In addition, your sponsor can include a link that lets you get more information. For example, suppose a News item announces an updated terminology list. When creating the News item, your sponsor can include a link to the terminology Web site. When you click the link, RDC Onsite displays the information in a new browser window.
Tip:
To avoid cluttering your display, close each window as you finish reading the news.Taking a Shortcut to Your Activities
Your sponsor can customize tasks to suit your role and then display these tasks as links in the Activities section of the Home page. These links are a shortcut to your most common tasks.
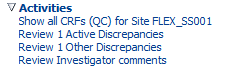
Description of the illustration ''activities02.gif''
Your list of activities may be different from another system user. Your sponsor can define activities for a user role, a set of users, or all roles.
In addition, RDC Onsite includes a default set of activities that your sponsor may or may not include. Your sponsor can add other activities as well. Contact your Help Desk for questions about the links in your Activities section.
Following Your Activities Trail
Clicking an Activities link on the Home page lets you navigate directly to the Review pages of the application with a built-in set of search criteria, rather than with a selected set of patients. RDC Onsite opens the appropriate page and displays the data defined by the customized search.
When you navigate using Activities, the target page opens with the Search pane collapsed, and the name of the activity displayed on the pane. Note that RDC Onsite displays the Home > breadcrumb at the upper left of the page.
If you click an Activities link, RDC Onsite displays the appropriate page with the data automatically filtered for you. For example, if you click the Review Active Discrepancies link, RDC Onsite automatically opens the Review Discrepancies page and displays only those discrepancies that require your action.
Using the Default Activities Links
RDC Onsite includes the following default links in the Activities section.
-
To open the Review CRFs page and list the CRFs ready for verification, click Review Non-blank CRFs ready for Initial Verification. This link is displayed only if you have CRA privileges.
-
To open the Review CRFs page and list the CRFs ready for approval, click Review Non-blank CRFs ready for Initial Approval. This link is displayed only if you have investigator privileges.
-
To open the Review Discrepancies page and list all discrepancies that require action by you or your user group, click Show Active Discrepancies.
-
To open the Review Discrepancies page and list all discrepancies that require action by other users or groups, click Show Other Discrepancies.
In case you have a custom review type privilege, you also see displayed:
-
Review non-blank CRFs ready for your_review_type
-
Set your_review_type requirement for new CRFs
Your sponsor may have created different activities, so you can have a different default view. For more information, see Oracle Clinical Remote Data Capture Onsite Administrator's Guide.
Using Customized Shortcuts to Relevant Web Sites
Your sponsor lists relevant Web addresses in the Links section on the Home page. For example, your sponsor may include a link to the National Institute of Health, to the Oracle Thesaurus Management System for standard terminology, or to a medical dictionary.
When you click a link, RDC Onsite displays the associated Web site in a separate browser window.

Description of the illustration ''links_section01.gif''
Viewing a Summary Report for a Patient
You can click a patient icon to view and print the latest overall metrics for that patient. The report includes the following information:
-
General (birth date, gender, age, site, last update)
-
Number of active, other, and closed discrepancies
-
Number of CRFs with active, other, or no open discrepancies
-
CRF Verification, Approval and Custom Review status, depending on your privileges
-
Dates of visits
-
Links to other information such as adverse events
See Chapter 11, "Viewing Summary Reports" for more information on the Patient Summary Report.