12 Repository Maintenance
You maintain the terms and relations in the Oracle Thesaurus Management System (TMS) Repository from windows under the TMS menus Repository Maintenance and Translation Reports. Windows under both menus are available to users with the tms_maintain_priv role.
Repository Maintenance includes:
About Repository Data
As described in Chapter 6, the core of the TMS Repository consists of one or more predefined dictionaries. After dictionary loading, you can manipulate this dictionary data by adding, deleting, or changing dictionary terms and the relationships between them.
Note:
By default, you can only edit company or domain terms. In rare cases, you may want to grant users with the tms_maintain_priv role the ability to edit external terms as well. To open this functionality to these TMS users, navigate to the Installation Reference Codelists window, query for the codelist TMS_CONFIGURATION, and set the long value for MAINTAINEXT to Y.TMS enables you to make these changes to the Repository using two windows under the Repository Maintenance menu in Maintain Repository Data and Repository Authoring. You can use either of these windows to manipulate term data, browse relations, or create strong relationships, but you can create named relations in Repository Authoring only. While strong relationships are possible only in Strong Dictionaries, you can create named relations for any type of dictionary. For example, named relations are commonly used to link terms in data-driven Weak Dictionaries, but you can also define named relations between two terms in MedDRA.
Because strong dictionary relationships link terms in the same dictionary, and are used for derivation and autoclassification purposes, you cannot define strong cross-dictionary links. As a result, all cross-dictionary links are named relations, and are created in the Repository Authoring window.
The first two sections of this chapter describe how to create terms and relations in the Maintain Repository Data and Repository Authoring windows. For information on using the Maintenance Wizard to perform more complex manipulations of terms and relations, see "Using the Maintenance Wizard". To define Informative Notes for terms and relations, see "Creating Informative Notes for Terms and Relations".
Data Currency and Data Source Filters
The top of this window enables you to focus your search in two areas. Use the Data Currency option in the upper left part to view all data or only current data, and you can choose to view preliminary data and/or historical data as well as current data by making a selection in the Data Source list to the upper right. See "Modifying Repository Data in the Maintain Repository Data Window" for more information.
Controlling the Default Approval Status of New Terms
When you create new terms in the Maintain Repository Data and Repository Authoring windows, you can designate them as Approved or Nonapproved by selecting or clearing the Appr? (Approved?) box for that record. The TMS_CONFIGURATION reference codelist setting DTAPPRFLAG controls the default setting of the approved box in each window: if DTAPPRFLAG is set to Y, the default setting for Appr? is checked; if DTAPPRFLAG is set to N, the default setting is unchecked.
For instructions about changing the DTAPPRFLAG setting, see "Other Installation-wide Codelists". You must have the tms_define_priv role to change reference codelist settings.
For more instructions about creating new terms, see:
-
"Adding and Deleting Relationships Between Terms" for adding new terms using the Maintain Repository Data window.
-
"Creating New Terms" for adding new terms using the Repository Authoring window.
About the Maintain Repository Data Window
The Maintain Repository Data window has a dictionary hierarchy tree structure on the left. See "Using the Tree Structure" for information on how to interpret it. When you click on a dictionary level you see the following:
Term and Relation Icons
In the leftmost column on the right side of the screen, TMS displays T and line (_) icons that represent the state of each term and its relation to the current term, respectively. For the current term, which is highlighted in the middle block, TMS displays only the term icon.
TMS indicates that a term has been deleted by displaying a red X in place of the T icon to the left of the term. TMS indicates that a relation has been deleted by displaying a red X in place of the line icon to the left of the term. Visible black T and line icons indicate current terms and relations, respectively.
If one of these icons is not displayed, and there is no red X in its place, the term or relation is in a predict table awaiting Activation.
Current Level and Term
The current level is the level displayed in the Current Level block at the middle of the screen at any given time. You can select the current level by clicking on it in the dictionary hierarchy tree structure, at which point TMS displays the short name of the current level in the Term column in this block. To view data, you must then execute a query in the middle block.
The current term is the term displayed on a blue background in the Current Level block. After a query, TMS makes the first record the current term by default. You can change the current term by selecting another one with your cursor, or by querying for it. TMS displays data on screen as it relates to the current level and term—that is, the upper block displays terms in the level above the current level and related to the current term, and the lower block displays terms in the levels below the current level that are related to the current term.
To move related terms of the current term into the Current Level block, click on the level you want in the tree structure while the current term is displayed on the right, or double-click on the related term.
To see unrelated terms in any level, click on the level you want in the tree structure and then execute a query in the Current Level block.
The Current Level block in the middle of the window is the only one in which you can change the sort order (see "Changing the Sort Order").
Display of Relationships in Strong Dictionaries
In strong dictionaries, the Maintain Repository Data window displays the parent and child relationships for the current term. The parent terms are in the Level Above block: if the current term is related to a reference term in the dictionary level above the current level, this reference term will appear in the Level Above block. If two (or more) levels are related to the current level just above it in the hierarchy, the current level is displayed twice (or more) in the tree structure. The level displayed in the Level Above block depends on which display of the current level you highlight in the tree structure.
Note:
If you query in this block, TMS retrieves only terms that meet the query criteria AND are related to the current term. To create a new relation for the current term, either type the name of the term to which you want to create a relation or press F9 and select a term from the Parent Terms window. You must save your work.Similarly, each row in the Level Below block represents a child term and its relation to the current term. The same rules apply as in the Level Above block: each row represents a relationship from the current term to a child term one level below it in the hierarchy.
Figure 12-1 shows parent and child relationships in the Maintain Repository Data window. In this example, named relations have been suppressed. You can either display or hide (suppress) the display of named relations in the Maintain Repository Data window by changing the setting SUPPRESNAMDRELS in the installation reference codelist TMS_CONFIGURATION. A description of this setting is.
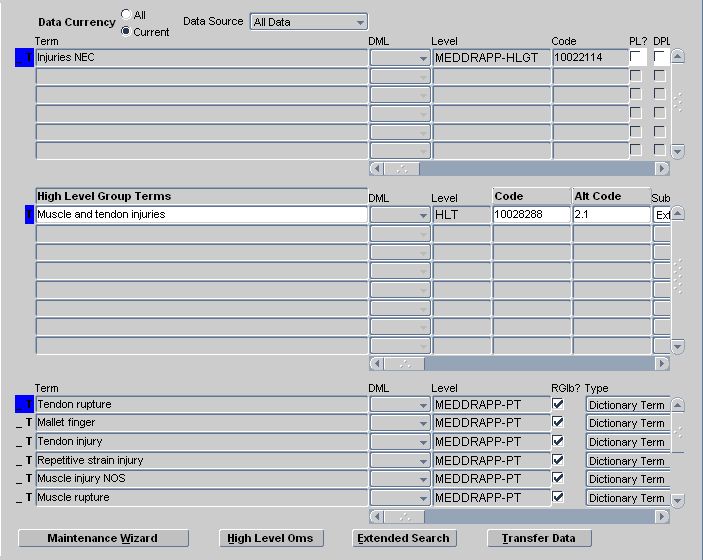
In the example in Figure 12-1, the current term "Muscle and tendon injuries" has a parent term of "Injuries NEC" and several child terms including "Tendon rupture" and "Repetitive strain injury."
Display of Named Relations
Because the terms in weak dictionary folders do not necessarily belong to a hierarchy of dictionary levels, the Maintain Repository Data window cannot organize the relationships into parent and child terms. Instead, this window arranges the terms by their use of Indicator and Reciprocal Indicator halves of named relations.
To illustrate the presentation of these relations with an example, assume that a TMS installation contains the named relations in the following table.
Table 12-1 Named Relations Defined for this Example
| Indicator | Reciprocal Indicator |
|---|---|
|
Broader Term Partitive |
Narrower Term Partitive |
|
Is a |
(none) |
|
Abbreviation |
(none) |
In Figure 12-2, the term "California" is currently selected from a weak dictionary folder of geographic place names.
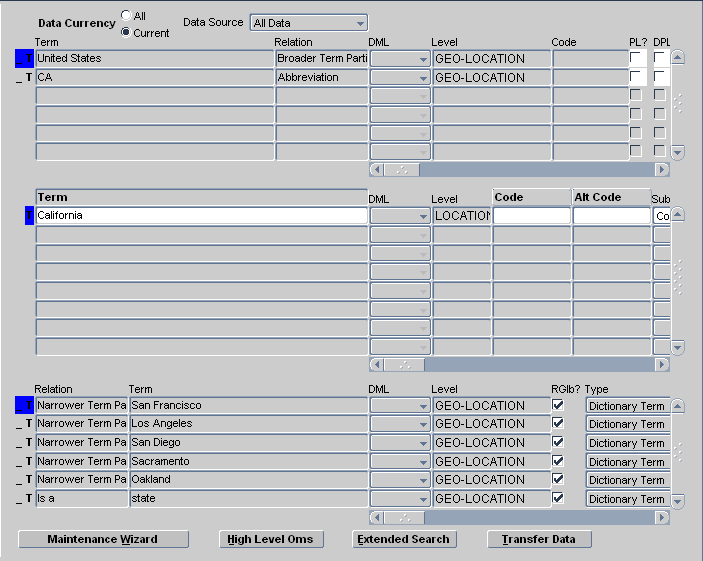
The window organizes relations into two groups:
-
In the upper block, TMS displays relations in which the current term is the reference term in the relation. Relations appearing in the upper block always use the Indicator half of a named relation, so you can read them from the upper block downward to the current term. In the geography dictionary example, the relations read "CA – Abbreviation – California" and "United States – Broader Term – California."
-
In the lower block, TMS displays relations in which the current term is the first term in the relation. The direction in which you read these relations depends on the type of named relation. One-directional relations such as "California – is a – state" use the Indicator relationship, so you should read these relations from the current block to the lower block. Bi-directional relations that appear in the lower block such as "Los Angeles – Narrower Term – California" use the Reciprocal Indicator relationship, so read these relations from the lower block to the current block.
You can also use the Maintain Repository Data window to view the named relations you define for strong dictionaries. For both parent and child terms, the Maintain Repository Data window shows whether the given relation is linked via a strong or a named relation. If STRONG appears in the Relation field, that row represents a strong relationship; if either an Indicator or Reciprocal Indicator relationship appears, the given terms are linked by a named relation.
Using an Extended Search
Extended Searches enable you to search all domains, dictionaries and levels for a term. You can focus your Extended Searches in the following ways:
-
Choose a Search Type. You can use a Cross Search (which searches all domains, dictionaries, and levels), or choose a user-defined search object. See "Defining Search Objects".
-
Choose a Data Currency option. You can restrict searches to current data only, or all data (current and expired data).
-
Choose a Data Source. You can restrict Extended Searches to pre-dictionary data only, dictionary data only, or the combination of both.
-
Enter search criteria about the term. The Extended Search window includes fields for every detail about a term.
To perform an Extended Search, from the Maintain Repository Data window:
-
Click Extended Search, or choose Options, then Extended Search. The Extended Search window opens.
If you are working on the Verbatim Term Level in the Maintain Repository Data window and you choose a Search Type other than Open Query (see "Defining Search Objects"), TMS populates the Verbatim Term field with the current term from the Maintain Repository Data window and uses it as a filter in the query. You can modify it, but you cannot effectively delete it. The search algorithm must have a verbatim term parameter and it will use the last one entered.
If you choose a Search Type of Open Search, TMS does not use the value entered in the Verbatim Term field, and the Extended Search window opens in Query mode.
-
If desired, enter your search criteria and execute the query. TMS returns any matches.
-
Choose the term you want. If you click OK, TMS populates the Current Level block of the Maintain Repository Data window with the results of your Extended Search. If you click Cancel, TMS displays the same data in the Maintain Repository Data window as before you executed the search.
Navigating to Data in the Maintain Repository Data Window
Take the following steps to open the Maintain Repository Data window and navigate to the data you want to modify:
STEP 1: Open the Window and Select Domain and Dictionary
-
From the Repository Maintenance menu, choose Maintain Repository Data.
If you have selected a domain during your TMS session, TMS opens the Maintain Repository Data window and displays that domain in the window's title bar. If you have not selected a domain during this session, the Choose Domain window opens. You must choose a domain before you can modify any Repository data.
-
If the Choose Domain window opens, click the name of the domain in which you want to make your changes and the dictionary containing the data you want to modify, and click OK.
Note:
If you do not want to use any of the displayed domains to make your changes, you can click Cancel to close this window, then select Definition, and then Define Domains, to create a new domain. See "Creating Domains and Assigning Dictionaries to Domains" for full instructions. -
TMS displays the Maintain Repository Data window, with the current TMS domain in the window's title bar. You can change TMS domains at any time by selecting Options, then Change Domain.
STEP 2: Choose or Create an Activation Group
TMS activates data in groups. Each term and relation you modify must be part of an Activation Group. TMS activates all data in the group in the same batch job. Therefore:
-
Put only those terms and relations you want to have activated at the same time into the group.
-
Put all terms with links to each other in the same group, or TMS will not be able to validate their relations.
Activation Groups are associated with one or more dictionaries. You can view and modify terms belonging only to the dictionaries associated with the Activation Group you choose. The dictionaries associated with each Activation Group are listed below it in the tree structure. You can associate dictionaries with more than one Activation Group.
Terms and relations awaiting Activation are stored in the predict (pre-dictionary) tables. When TMS successfully activates data, it moves them to the production tables. Terms and relations that TMS cannot activate because they violate hierarchy definitions remain in the predict tables with an error message.
Activation Groups continue to exist after Activation, even if all the terms and relations they contain are successfully activated. Data that fails Activation remains in the Activation Group.
Choosing an Activation Group In the tree structure, current Activation Groups are listed with a quill pen icon. To see information about an Activation Group, click on it in the tree structure in the Maintain Repository Data window. The Activation Group window appears.
The dictionaries that are associated with the Activation Group are listed in the box at the bottom of the window. The In Domain? box shows whether or not each dictionary is associated with the current TMS domain. If it is not, even though it is associated with the current Activation Group, the dictionary does not appear in the tree structure below the Activation Group and you cannot view or modify it without changing TMS domains or associating it with the current TMS domain.
Creating a New Activation Group To create a new Activation Group in this database:
-
Highlight the words Activation Group in the tree structure.
-
Select Insert Record. TMS populates several of the fields on the right with default values.
-
Enter the new group's name, description, the short name, and name of the dictionary or dictionaries you want to associate with the group. You can find current dictionary information by selecting Define Dictionaries under the Definition menu.
-
Save. TMS enters a value in the In Domain? box for each dictionary and populates the tree structure below the Activation Group with all the dictionaries that are associated with it.
Deleting an Activation Group To delete an Activation Group from this database:
-
Click the Activation Group's name in the tree structure.
-
Delete all dictionaries from the Activation Group by clicking in the rows in the dictionaries within the Activation Group block and deleting every row.
-
Click in the Activation Group field on the right side of the Maintain Repository Data window and delete the record.
TMS removes the Activation Group from the installation.
STEP 3: Choose a Data Currency Option
You can view deleted terms and relations by choosing All from the Data Currency option at the top of the window.
You can differentiate deleted data from current and historical data by checking the line and T icons in the left-hand column. If the line icon has been replaced by a red X, the relation has been deleted. If the T icon has been replaced by a red X, the term has been deleted. If a term has been deleted, all of its relations have been deleted as well.
Note:
Selecting the Current Data option does not prevent you from seeing preliminary data (selecting Pre-Dictionary Data or All Data from the Data Source list).STEP 4: Choose a Data Source
The Maintain Repository Data window enables you to view pre-dictionary data (terms awaiting Activation), including:
-
Terms and relations that are being added, modified, or deleted but have not yet been activated.
-
Terms and relations that could not be activated because they violated a level relation definition or other user-defined rule, with their error messages.
You can choose to display Active dictionary data only, pre-dictionary data only, or all data, by selecting a value from the Data Source list at the top of the screen.
If you choose to view all data, you can differentiate between dictionary and pre-dictionary terms by checking the column to the left of the term. Pre-dictionary terms do not have any icons in that column. Pre-dictionary terms that have failed Activation also have a value in the Error Message field.
Note:
Terms with a DML value of Update or Delete exist in the production and predict tables simultaneously until they undergo Activation. TMS displays these terms twice; the term displayed with a value in the DML field exists in the predict tables as preliminary data, and the term without a DML value exists in the production tables as active data.Terms with a DML value of Insert exist in the predict tables only.
STEP 5: Choose a Level and Term
TMS does not display any data in the window until you complete Steps 1 and 2 in this section.
-
In the tree structure on the left, highlight the level in which you want to add, modify or delete a term.
-
Enter a query in the middle section of the window on the right (the Current Level block). See "Querying in Windows" for information on how to enter a query.
-
Execute the query. If the current level is a group level, terms from all its sublevels are displayed, with the sublevel identified in the Level column.
-
Highlight the term you want to work with in the Current Level block. This becomes the current term. TMS arranges the data on the screen as it relates to the current term; related terms in the level above the current level are listed in the block above, and related terms in the level below are listed in the block below.
Modifying Repository Data in the Maintain Repository Data Window
In the Maintain Repository Data window, you can perform two basic types of dictionary data maintenance:
Maintaining Terms, Relations, and VTAs
You can add company and domain terms to an external dictionary within its hierarchical structure (company terms and company relations are available to all TMS domains; domain terms and domain relations are available only within the TMS domain in which you define them). You can define strong relations between VTAs, company and domain terms, and external terms (terms supplied in an external dictionary such as MedDRA or WHO-Drug).
You can modify or delete company and domain dictionary terms, and their relations. See "Deleting Terms from a Dictionary" and "Modifying a Term".
Note:
TMS only allows you to create an external relation between the terms in a strong dictionary when the level relation is defined as mandatory.Verbatim Term Assignments (VTAs) are represented by their verbatim term and Verbatim Term Individuals (VTIs) are represented by their verbatim term and auxiliary information. VTAs may be available either globally or only in a TMS domain (see "Global and Domain VTAs"), and inherit the global/domain status of their verbatim term. VTIs are available only in a TMS domain (see "Nonunique Coding Level Dictionaries").
When you save your changes, TMS creates a new record in the predict tables for the term or relation to be inserted, updated, or deleted. When you requery you can see both the current record from the production tables and the new record in the predict tables. When you activate data, records that pass Activation move from the predict to the production tables, and the old production records are no longer current. Terms and relations that do not pass Activation remain in the predict tables with an error message.
This section includes general instructions for tasks, followed by detailed information on the fields in each block of the window, as follows:
Adding and Deleting Relationships Between Terms
To add a relationship between terms:
-
Highlight the lower level term in the Current Level block.
-
In the upper block, either enter the upper level term or choose it from a list of values.
-
Save.
Note:
You can also modify information about a relation, such as the Relation Status or Relation Comment, by editing these fields in the upper block.You cannot directly change the type from VTA to VTI or vice versa. If term uniqueness changes and such a change is legitimate, you must delete the existing relation and create a new one.
To delete a relationship between terms:
-
Highlight the lower level term in the Current Level block.
-
Highlight the higher level term in the upper block.
-
Either select Record and then Delete, or press Shift+F6.
-
Save.
Deleting relations from established dictionaries can be more complex because dictionary rules require mandatory relations between levels.
Deleting Terms from a Dictionary
When you delete a term from a dictionary, you also delete all relations from that term to other dictionary terms. Before activating data after deleting a term, you may want to examine pre-dictionary DML statements to reassign the relations before they are deleted.
Further, if you delete a term from a dictionary's classification level (or group level), TMS automatically marks all associated VTAs and VTIs for deletion as well. This deletion applies both to automatically and manually classified VTAs and VTIs. The verbatim terms that had mapped to this classification level term will become omissions upon the next Synchronization.
To delete a term and the relations to it from a dictionary, highlight the term and either select Record and then Delete, or press Shift+F6, then save. TMS creates a delete statement for the term and its relations in the pre-dictionary tables.
Note:
If you accidentally delete the wrong term or relation, you can undo the change by either requerying or by exiting the window before you save the changes. When exiting, TMS prompts you to save your changes; click No in these situations.Adding a Term to a Dictionary Level
To add a term to the desired dictionary level:
-
Highlight the level to which you want to add it in the tree structure.
-
Place your cursor in the Terms column of the Current Level block in the middle of the window and select Insert Record.
Note:
You cannot add terms directly to a group level. However, if the current level is a group level, you can modify or delete terms in any of its sublevels. -
Fill in the fields as necessary to define the term the way you want. For descriptions of the fields, see "Current Level Block Fields". If you choose the Subtype Company, the term will be available in all domains. If you choose the Subtype Domain, the term will be available only in the current domain.
-
Save. TMS enters the term in the predict contents table. You must activate the current Activation Group before you can use the new term. See "Activating Data".
After adding a term to a dictionary level, you can create relations between the new company or domain term and terms in related levels. Where the dictionary structure defines level relations as mandatory, you must create a relation. Where the dictionary structure defines a level relation as requiring a Primary Link, you must create a Primary Link. See "Define Strong Relations to Terms in Other Levels".
Modifying a Term
To modify a term:
-
In the tree structure, highlight the level of term you want to modify.
-
In the Current Level block in the middle of the screen, query for the term.
-
Highlight the term.
-
Fill in the fields as necessary to redefine the term the way you want. For descriptions of the fields, see "Current Level Block Fields".
-
Save. TMS enters the updated term in the predict contents table. You must activate the current Activation Group before you can use the new term. See "Activating Data".
Define Strong Relations to Terms in Other Levels
You can define a link, or relation, between terms in related levels. Relations between terms must follow the rules defined for the relation between their levels:
-
If the level relation is defined as Mandatory, you must create a relation between the new term and at least one term in each level with a mandatory relation to the current level.
-
If the relation between the two levels is defined as One-to-one, you can define only one relation. If the relation is defined with Many Cardinality on the side of the noncurrent level, you can create relations with any number of terms in the noncurrent level.
-
If the relation is defined as requiring a Primary Link, you must define a Primary Link (this applies only to relations defined with Many Cardinality on the side of the noncurrent level). See "Defining Domain and Company Primary Links".
Reading Defined Level Relations You can see the level relation rules defined for the dictionary in the tree structure on the left side of the window.
-
Optionality. The tree structure shows mandatory relations between levels with a solid line; optional relations have a dotted line. A relation may be optional at one end and mandatory at the other.
-
Cardinality. The tree structure shows Many Cardinality (a level relation where a term in one level may have a relation with more than one term in another level) with a branch; if only one relation is allowed, the relation line is not branched.
The following diagram shows a level relation that is Mandatory and Single Cardinality on the parent level end and Optional and Many Cardinality on the child level end; that is, terms in the child level must have a relation to only one term in the parent level, and terms in the parent level may or may not have one or more relations with terms in the child level.
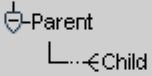
Description of the illustration ''manycrd1.gif''
-
Primary Links. If many relations are allowed but a Primary Link to one of them is required, TMS displays a p above the relation icon. Similarly, if a Primary Path link is required, TMS displays a pp above the relation icon.
Defining Domain and Company Primary Links You must define a Primary Link between a company or domain term and a term in another level where the level relation requires a Primary Link. If the lower-level term is a domain term, the Relation Subtype is automatically entered as Domain, and the Primary Link applies only within the current domain, because the term exists only in the current domain.
The following rules apply to creating Primary Links (with the PL? box) between domain terms and company or external terms:
-
A Primary Link between a lower-level domain term and a higher-level domain term (in the same domain) is allowed. The Primary Link applies only to the domain where the terms exist.
-
A Primary Link between a lower-level domain term and a higher-level company or external term is allowed. The Primary Link applies only to the domain where the term exists.
-
A Primary Link between a lower-level company or external term and a higher-level company or external term is allowed. The Primary Link applies to all domains.
-
A Primary Link between a lower-level company or external term and a higher-level domain term is not allowed.
You can override a Global Primary Link (PL) within a particular domain by defining a Domain Primary Link (DPL), using the DPL? box. You can use this box only for company or external terms that already have a Global Primary Link defined, and only for a relationship that is already activated.
(You cannot create a Primary Link in a relation of subtype Domain between two company or external terms. However, you can create a relation of Subtype Company or External, activate the relation, and then define a Domain Primary Link (DPL) between the terms.)
Defining a Relation Between Terms You can create relations only between terms that have already been loaded or defined and activated. You can create terms only in the Current Level block. To define a strong relation, take the following steps:
-
Highlight the term in the current level for which you want to create a relation to another term.
-
Put your cursor in the Term field in the upper block and select Record, then Insert.
-
If you know the term you want to link to, enter it.
If not, press F9 to display a list of values. TMS displays a shortcut menu labeled Terms and Relations. Enter free-form text and wildcards to limit the search. For example, a search on
PH%finds terms beginning with ph. Select the term to which you want to link the new term. -
Check the information about the relation. The only value you can change is Sub Type (see "Sub Type").
-
Save. TMS enters the relation in the predict tables.
You must activate the relation before you can use, or create a DPL for the new relation. To activate the current Activation Group with all its terms and relations, click Transfer Data at the bottom of the window.
Current Level Block Fields
The Current Level block, in the middle of the Maintain Repository Data window, provides the following term information.
Level_Name Under this heading, which is the name of the dictionary level, the system displays a term name in each row. Free-form text of up to 300 alphanumeric characters.
DML Display-only. The transaction to be performed on the term. When you save changes, TMS enters a value here (for update and delete transactions, you cannot see the new value until you requery). The next time you run Activation on this Activation Group, TMS will try to perform this transaction on this term.
Level The short name of the level to which the term belongs.
Type Displays the term type: Dictionary Term, VTA, or VTI.
Code Optional. Enter a value here according to your company's policy. This field is designed to serve as the primary key within this dictionary; must be unique within the dictionary. Free-form text; up to 30 alphanumeric characters. You can create an LOV and validation for this field in the Details window; see "Defining Level Details".
Alt Code Optional user-defined field. You can create an LOV and validation for this field in the Details window; see "Defining Level Details". Indexed. Designed to accommodate a TMS-wide unique ID. Free-form text up to 30 alphanumeric characters.
Sub Type TMS creates new terms in dictionary levels as Company terms unless you deselect Glb?, in which case TMS creates them as Domain terms. TMS creates new terms in the Verbatim Term Level as Accepted unless you choose Misspelled from the Sub Type list.
See "Misspelled VTAs and VTIs" for more information.
Glb? (Global?) If selected, this term is available in all domains. If not selected, it is either available company-wide or only in the current domain, depending on the term's subtype.
Appr? (Approved?) This option has a somewhat different meaning depending on whether it refers to a VTA or a dictionary term.
-
If selected for a VTA, the VTA is approved and does not require manual approval. TMS can use the VTA in Autoclassification.
-
If selected for a dictionary term at the classification level, the term is valid in the current dictionary version and approved as a potential classification in all domains.
Note:
It is possible to allow classification to nonapproved dictionary terms in a specific dictionary domain. See "Assigning a Dictionary to a Domain" for more information.
Status Optional. Enter a value to describe the status of the term.
Category Optional. MedDRA supplies categories for some of its terms, such as Diagnosis, Adverse Event, or Undefined Procedures. These are displayed here. For other dictionaries, you can assign categories to terms according to your company's policies. Free-form text; up to 65 alphanumeric characters. You can create an LOV and validation for this field in the Details window; see "Defining Level Details".
ID Display-only. For each term, TMS creates an ID that is unique across TMS and serves as the primary key in TMS.
Comment Text Optional. Use for any information that would be helpful to others using the dictionary. For example, "This drug should be included in the next version of WHO-Drug, and I have submitted it," or "This may seem wrong, but I've checked with the investigator." Free-form text; up to 200 alphanumeric characters.
Error Msg Display-only. Populated by TMS during Activation. If TMS cannot activate this term, TMS leaves it in the predict tables and enters an error message in this field giving the reason(s) it failed Activation.
Created By Display-only. The user ID of the person who added the current term or executed the load script.
Creation Display-only. The creation timestamp for the current term.
Valid Until Display-only. TMS uses this value to maintain an audit trail of terms. When a term is created, it receives a default end timestamp in the distant future (currently August 3500). When a term is updated, a new term record is created and the old term's end timestamp is set to the creation timestamp of the new term. This field is used to recreate the dictionary at a given point in time.
Deleted By Display-only. The TMS user who deleted this term, if any.
Trans.Id. Not used in this release.
Values 1-4 User-definable fields. Use these fields according to your company's policies and study design. You can define up to four fields, their data type and length, and LOV to appear here. See "Defining Level Details". If no values are defined for these fields, they will not appear on the screen.
When you enter data for a term record in any of the Value 1-4 fields, you can also choose <null> from the LOV.
Upper Block Fields
The upper block provides the following term and relation information:
Term The name of the term. Free-form text of up to 300 alphanumeric characters.
Relation The named relation instantiated between the current term and the term in this upper block row. Displays STRONG for strong relations.
DML Display-only. The transaction to be performed on the relation. When you save changes, TMS enters a value here (for update and delete transactions, you cannot see the new value until you requery). The next time you run Activation on this Activation Group, TMS will try to perform this transaction on this relation.
Level Display-only. The Dictionary Short Name and Level Short Name of the dictionary and level to which the term belongs.
Code Optional, user-defined field. Enter a value here according to your company's policy. This field is designed to serve as the primary key within this dictionary; must be unique within the dictionary. This field is free-form text, up to 30 alphanumeric characters, and indexed. You can create an LOV and validation for this field in the Level Details tab window of the Define Dictionaries form; see "Defining Level Details" for detailed instructions.
PL? The Primary Link?/Primary Path Link? box, if selected, denotes that the current term is either a Primary Link or Primary Path Link this level for the current term. Refer to the relation line between the levels in the TMS tree structure to determine the relationship between the selected levels.
DPL? (Domain Primary Link?) If selected, this term is the Primary Link in this level for the current term in the current domain.
RGlb? (Relation Global?) If selected, this relation is valid across all domains.
Type Relation Type. In general, the relation inherits the type of the higher-level term. The Domain Restricted type is used for relations that have been defined as Domain Primary Links and have not yet been activated.
Sub Type Relation Subtype. Initially inherits the subtype of the higher-level term. To make a relation valid only in the current domain, you can change relations of subtype External or Company to Domain. You can change the subtype to External or Company (both of which are global relations) from Domain only if the higher-level term in the relation is an external or company (global) term.
If the subtype is Accepted or Misspelled, the relation is a VTA; you can change this subtype at any time. You can also change a VTA's status from Global to Domain or vice versa in the Promote/Demote window under the VTA Maintenance menu.
R. Status (Relation Status) Optional. Enter a value to describe the status of the relationship.
R. Trans. Id (Relation Transaction ID) Not used in this release.
Alt Code Optional, user-defined field. You can create an LOV and validation for this field in the Details window; see "Defining Level Details". Indexed. Designed to accommodate a TMS-wide unique ID. Free-form text up to 30 alphanumeric characters.
ID Display-only. For each term, TMS creates an ID that is unique across TMS and serves as the primary key in TMS.
Appr? (Approved?) Display-only, refers to the term on this line, not the relation. This setting has a somewhat different meaning depending on whether it refers to a VTA or a dictionary term. Selected by default.
If selected for a VTA, the VTA is approved; TMS can use the VTA in Autoclassification and manual approval is not required.
If selected for a dictionary term, the term is approved as a potential classification. If you are adding one or more domain or company terms that you want to use instead of an external dictionary term, you can clear the Appr? box for the external dictionary term.
Category Optional. MedDRA supplies categories for some of its terms, such as Diagnosis, Adverse Event, or Undefined Procedures. These can be displayed here. For other dictionaries, you can assign categories to terms according to your company's policies. Free-form text; up to 65 alphanumeric characters. You can create an LOV and validation for this field in the Level Details tab window of the Define Dictionaries form; see "Defining Level Details" for detailed instructions.
Relation Comment Optional. Use for any information that would be helpful to others using the dictionary. Free-form text; up to 200 alphanumeric characters.
Relation Error Msg Display-only. Populated by TMS during Activation. If TMS cannot activate this relation, TMS leaves it in the predict tables and enters an error message in this field giving the reason(s) it failed Activation.
Relation Created By Display-only. The user ID of the person who added the current term or executed the load script.
Relation Created Display-only. Timestamp for the creation of this relation.
Relation Valid Until Display-only. TMS uses this value to maintain an audit trail of relations. When a relation is created, it receives a default end timestamp in the distant future (currently August 3500). When a relation is updated, a new relation record is created and the old relation's end timestamp is set to the creation timestamp of the new relation. This field is used to recreate the dictionary at a given point in time.
Relation Deleted By Display-only. The TMS user who deleted this relation, if any.
Entry Ts Display-only. The creation timestamp for the current term.
Values 1-4 User-definable fields. Use these fields according your company's policies and study design. You can define up to four fields, their data type and length, and LOV to appear here. See "Defining the Dictionary Levels". If no values are defined for these fields, they will not appear on the screen.
Resolving High-Level Omissions
When a derivable term is not related to any terms in the next higher derivable level, TMS cannot derive a term from the higher level, and creates a high-level omission.
TMS does not return high-level omissions to the external system as discrepancies. It creates these omissions within TMS and returns values to the external system for all the derivable levels possible. When a high-level omission is resolved in TMS, the missing high-level value is derived to the external system during the next data exchange (Batch Validation in Oracle Clinical).
-
Open the Maintain Repository Data window via the Repository Maintenance menu.
-
Select High Level Oms. TMS displays the High-level Omissions window.
-
Execute a query for the high-level omissions you want to resolve. For each omission TMS displays the verbatim term, its classification level term, and the derivable higher level where there is no related term.
-
Click on the omission you want to resolve.
-
Click OK to return to the Maintain Repository Data window. In the block in the middle of the window, TMS displays the dictionary term that needs a relation to a term on the higher derivable level. If the current term ever had any relations in the higher level, these are displayed in the upper block with the term and/or relation icon shown as deleted (displayed with a red X).
-
Find a higher-level term to which to link the current term. There are two ways to do this:
-
Press F9 to display a list of values for terms in the level above the current term. TMS displays a shortcut menu labeled Terms and Relations. Enter free-form text and wildcards to limit the search. For example, a search on
PH%finds terms beginning with ph. -
Query on any field(s) in the upper block.
-
-
Select the higher-level term you want to derive.
-
Save.
Using the Repository Authoring Window
The Repository Authoring window enables you to instantiate strong and named relations between terms, both in strong dictionaries and in weak dictionary folders. You can also use this window to create new terms in any dictionary, maintain existing terms and relationships, launch the Maintenance Wizard, run Activation in Check or Transfer mode, and query for particular terms and relationships that may have failed Activation.
This section includes:
Structure of the Window
Organizationally, the Repository Authoring window has three sections that follow the creation of a relation between terms (Figure 12-3).
Figure 12-3 The Repository Authoring Window
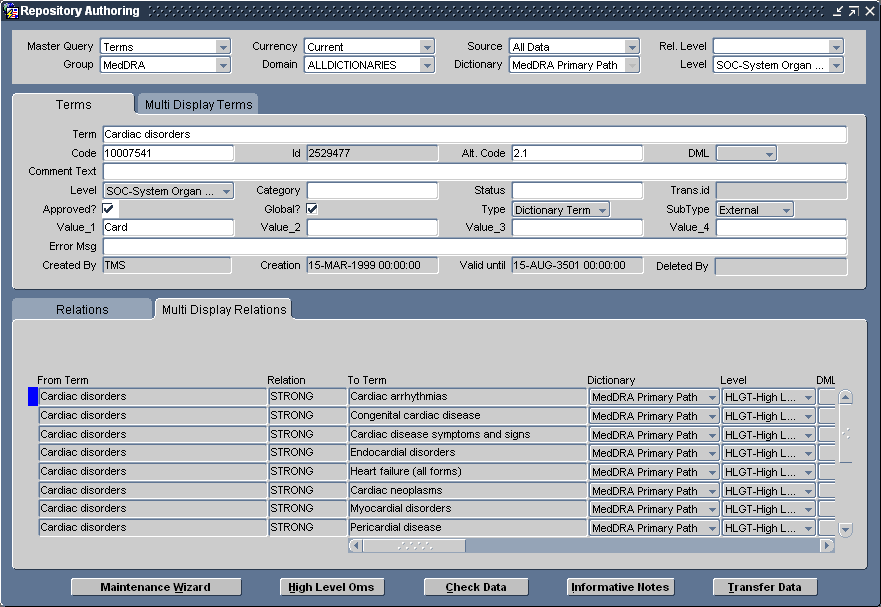
Description of ''Figure 12-3 The Repository Authoring Window''
There are three sections in the window:
-
The Filter block at the top of the window enables you to narrow the parameters of your query.
-
The Terms block displays information about one term in the relation. You can view detailed information about one term in the Terms tab window, or view all terms that match your query in the Multi Display Terms tab window.
-
The Relations block displays information about the other term in the relation, as well as information about the strong or named relation between the terms. As with the Terms block, you can view detailed information in the Relations tab window, or view less detailed data about all matches by using the Multi Display Relations tab window. In the example shown in Figure 12-3, TMS displays relations in the lower block that contain "Cardiac disorders," the term selected in the upper block.
When you double-click a record in the Relations block, TMS requeries for relations that contain the other term in the selected row. In the example in Figure 12-3, if you double-click the second row shown in the Multi Display Relations block ("Cardiac disorders – STRONG – Congenital cardiac diseases"), TMS displays "Congenital cardiac diseases" in the Terms block, and displays relations that contain that term in the Relations block.
There are four major functions you can perform in the Repository Authoring window: creating (or modifying, or deleting) terms in the Repository, creating (or deleting) relations between terms in the same dictionary, creating (or deleting) relations between terms in different dictionaries, and querying for named relations that failed Activation.
Creating New Terms
Creating new terms using the Repository Authoring window requires the Terms block only. To create a new term using the Repository Authoring window:
-
From the Repository Maintenance menu, select Repository Authoring. The Repository Authoring window opens.
-
From the Filter block at the top of the window:
-
Choose Terms from the Master Query field. You can only modify Repository data when this value is set to Terms. The Relations setting is used to query for relationships that failed Activation; see "Grooming Data that Failed Activation".
-
Choose an Activation Group, Domain, Dictionary and Level in which you want to create the new term.
-
Use the defaults for all other Filter lists.
-
-
In the Terms block, enter the required information in the fields. The fields in this block correspond to those in the current block of the Maintain Repository Data window.
-
Save. TMS records your new term in the predict tables for the selected dictionary.
Note:
You can modify terms in the same manner. Query for the term you want to modify, then change any of the modifiable fields and click Save.
Creating Named Relations Between Terms
The Repository Authoring window enables you to link dictionary terms with any strong or active named relations that have been defined in your TMS installation. If you do not want to use any of the relationships that display in the Relationship field, from the Definition menu, select Define Named Relations to define a new one.
If a relationship already exists between two terms, you cannot change it to a different named relation. Instead, select the relationship in the Relations block, delete it, then create the new one you prefer.
To create a named relation between terms:
-
If the Repository Authoring window is not open, open it now. (From the Repository Maintenance menu, select Repository Authoring.)
-
From the Filter block at the top of the window:
-
Choose Terms from the Master Query field. You can only modify Repository data when this value is set to Terms. The Relations settings is used to query for relationships that failed Activation; see "Grooming Data that Failed Activation".
-
Choose an Activation Group, Domain, Dictionary and Level in which you want to create the new term.
-
In the Level field, you can further focus your search within the selected dictionary by specifying a level in which you want to query, or search across all levels by selecting the blank value at the end of the list (Figure 12-4).
Figure 12-4 Selecting Blank Value from the Level Field in Repository Authoring
Description of ''Figure 12-4 Selecting Blank Value from the Level Field in Repository Authoring''
-
Choose a related level in the Rel. Level field if you know the level of the reference term you want to use. If you leave this field blank, TMS enables searches of the entire dictionary for relations from the selected term.
-
Use the defaults for all other filter lists.
-
-
In the Terms block, query for the term you want to use as the starting point of the relationship. If this term is linked to any terms in the selected reference level, TMS displays these matches in the Relations block. You can view all matches by clicking the Multi Display Relations tab.
-
Click in the bottom block and choose Record, then Insert. TMS creates a new, blank row in the Relations block and displays the Relations Filter at the top of the block. The Relations Filter specifies information about the named relation, including the dictionary in which your desired reference term is stored, the directionality of the relationship, the named relation you want to use, and the level in which the reference term is stored.
-
From the Relations Filter:
-
Choose a dictionary. This example describes linking terms within the same dictionary; to view the steps required for creating a cross-dictionary link, see the next section, "Setting Up Cross-Dictionary Relations".
-
Choose a relationship and direction for the relation shown in the Relation fields. If you choose:
-
a uni-directional named relation and choose From in the Direction Filter, TMS populates your selected term on the left side of the Relation. If you choose To for a uni-directional relationship, the selected term appears on the right side.
-
a bi-directional named relation, your selected term appears on the left side in all cases. Making a selection from the Direction Filter in this situation controls whether the Relationship field displays Indicator or Reciprocal Indicator relationships.
-
-
Choose a named relation to create between the selected terms.
-
Decide if you want to use a uni-directional relationship or a bi-directional relationship. Bi-directional relationships contain reciprocal relationships in the reverse direction.
-
Choose a level to query in the dictionary, or the blank row to query all levels.
-
-
In the Relations block rows, choose the reference term from the list of values.
-
Save. TMS inserts your new relationship into the pre-dictionary tables.
Defining a Primary Path
You can also use the Repository Authoring window to define Primary Path Links. To define a primary path, make the following changes to the directions above:
-
Choose a source term as described in the previous section.
-
In the Rel. Level filter, choose a group level that contains the levels in your selected derivation path.
-
Query in Multi Display Relations for the terms to which you want to create primary path relations.
-
Select the PL? flag for each term in the derivation path you want, and save.
Note:
You can query for primary path relations in a similar way. Choose the parent group level from the Rel. Level list in the Filter Query block, then query for the source term from the main part of the Repository Authoring window.Deleting Terms
When you delete a term from a dictionary, you also delete all relations from that term to other dictionary terms. Before activating data after deleting a term, you may want to examine pre-dictionary DML statements to reassign the relations before they are deleted.
Further, if you delete a term from a dictionary's classification level (or group level), TMS automatically marks all associated VTAs or VTIs for deletion as well. This deletion applies both to automatically coded VTAs and VTIs and those created by manual classification. The verbatim terms that had mapped to this classification level term will become omissions upon the next Synchronization.
To delete a term and the relations to it from a dictionary, highlight the term and either select Record and Delete, or press Shift+F6, then save. TMS creates a Delete Statement for the term and its relations in the pre-dictionary tables.
Note:
If you accidently delete the wrong term or relation, you can undo the change by either requerying or by exiting the window before you save the changes. When exiting, TMS prompts you to save you changes; click No in these situations.Setting Up Cross-Dictionary Relations
TMS enables you to define, maintain, and browse named relations between base dictionaries by using the Repository Authoring window. By using cross-dictionary links, you can migrate a study from one base dictionary to another more easily.
You can only define relations between terms whose dictionaries are linked via a cross-dictionary link. If the terms you want to relate are in dictionaries that are not linked, see "Defining a Cross-Dictionary Link" to create the cross-dictionary link you need. Note that both dictionaries in a cross-dictionary link must be active base dictionaries.
You can only define named relations as cross-dictionary links; strong relationships are allowed only for intra-dictionary relationships. Definition of relationships is the same as for defining named relations within a single dictionary: you can only define one relationship at a time.
Assign Both Dictionaries to the Same Activation Group and Domain
In order to create linkage between terms in two dictionaries, you must add both dictionaries to the same Activation Group and domain. You can add dictionaries to an Activation Group in the Maintain Repository Data window, and add dictionaries to a domain in the Define Domains window.
Creating Cross-Dictionary Relations Between Terms
You can insert, modify, and delete relationships between terms in different dictionaries by using the Repository Authoring window. In the same window, you can browse cross-dictionary links by using the multi-record portion of the Relations block.
To insert a relation between terms in different dictionaries:
-
If the Repository Authoring window is not already open, open it now. (From the Repository Maintenance menu, select Repository Authoring.)
-
In the filter at the top of the window:
-
Choose the Activation Group and domain in which you want to work.
-
Choose the dictionary of one of the terms in the Dictionary field.
-
In the Level field, you can further focus your search within the selected dictionary by specifying a level in which you want to query, or search across all levels by selecting the blank value at the end of the list as shown in Figure 12-4.
-
-
In the Terms block, query for a term in the dictionary/level combination you specified in the Filter block.
If the term selected has any relationships to terms in any dictionary including its own, these relationships are shown in the Relations blocks below.
Note:
Click the Multi Display Relations tab to view all of the terms to which the selected term is related, including any cross-dictionary relationships. -
Select Record, then Insert, in a Relations block.
-
Query for the dictionary, level, and term to which you want to link, along with the type of relationship and directionality.
-
Save. TMS records the relation in the predict tables.
You can delete links between dictionaries in much the same manner; select one term in the Terms block, find the term to which it is linked in a Relations block, and select Record, then Delete to delete the link between them.
Grooming Data that Failed Activation
You can use the Repository Authoring window to examine either the terms or relations have failed Activation. Browse this data by performing the following steps:
-
From the Filter block at the top of the window:
-
Choose either Terms or Relations from the Master Query list. Errors relating to Term Activation are shown in the upper blocks, and those relating to relations in the lower blocks.
-
Choose the Activation Group, domain, and dictionary that you want to query.
-
In the Data Source list, choose Pre-Dictionary Data. Data that fails Activation remains in the pre-dictionary tables.
-
-
In either a Terms or Relations block, query for data that failed Activation. To query for all terms or all relations that failed in this Activation Group, domain, and dictionary, enter % in the Error Msg field. TMS returns all data for which the Error Msg field is not null.
TMS displays the relations that failed Activation, with the reason for each failure listed in the Error Msg field. In this mode, update is not allowed. You cannot resolve these failed relations, so browse them to determine the problem with the relation before deleting them in this window.
Creating Informative Notes for Terms and Relations
You can use Informative Notes to supply additional information for a single term or relation record. All Informative Notes are based on attributes that you define database-wide; see "Defining Informative Note Attributes".
Notes:
You can also create Informative Notes for all terms and relations in a dictionary, or for individual VTAs and VTIs. See "Defining Dictionary-wide Informative Notes" or "Using the Status/Notes Pop-up Window".TMS does not allow you to associate Informative Notes with two types of relation: Domain Primary Links, and relations that are part of a primary path.
-
In either the Maintain Repository Data or Repository Authoring window, query for and select a term.
-
Click the Informative Notes button.
The Maintain Informative Notes window Multi Display tab opens, listing all Informative Notes that currently apply for the selected record, if any, except dictionary-wide notes inherited by the record. To see those, go to the Browse Informative Notes window; see "Browsing Informative Notes".
-
Click in an empty row to create a new Informative Note.
-
In the Informative Note field, click the ellipsis (…). The list of values displays all the Informative Note Attributes available in the current dictionary/domain combination and with Applies To defined for the appropriate item: term, relation, term history, algorithm, or dictionary.
-
Find an attribute to use, and click OK. TMS populates the Informative Note and Type fields with your attribute selection.
-
Enter a Value:
-
For most Standard type notes, enter the text, date, or numeric value to display in the note.
-
For Standard type notes with a data type Memo, TMS displays the word Memo in blue type. To enter the text:
-
Double-click the word Memo or select the drill-down option. TMS opens the Memo (Attribute Name) window.
-
Enter or paste the text you want to store in this field.
-
Click OK. The text is stored as a CLOB (character large object).
-
-
For URL type notes, enter the URL beginning with a protocol (http:// or ftp://). To use variables, see "Entering Variables in URL Informative Notes."
-
For Algorithm type notes, enter the actual algorithm in a form TMS can interpret; see "Defining Informative Notes for SMQ Algorithms".
-
-
Select the All Versions? box to apply this Informative Note to this term or relation despite any changes to the record.
Clear the box if you want the Informative Note to apply only to this version of the term or relation.
-
Enter a status for this Informative Note in the Status field (optional).
-
Save. TMS saves the Informative Note to the pre-dictionary tables. To move the record to production, you must run Activation.
Entering Variables in URL Informative Notes
You can use variables to add information in the text of the URL. For example, if you include the variable %TERM% in a dictionary-wide URL Informative Note, TMS substitutes the term name in the text of the URL. Thus, when you define the dictionary-wide URL Informative Note https://www.google.com/#q=%TERM%, the term rubeola inherits https://www.google.com/#q=rubeola as an Informative Note. You can connect to this URL from the Browse Informative Notes window.
During URL Informative Note definition, TMS restricts the available variables available.
In URLs for either terms or relations, you can include the following variables that map columns in the TMS_DEF_DETAILS table and apply to Informative Notes: DICT_INFO_HDR_ID, LABEL_TEXT, DEF_DETAIL_ID, LABEL_TEXT_UPPER.
For terms, TMS allows you to include the following variables that map to their counterpart columns in the TMS_DICT_CONTENTS table: TERM, TERM_UPPER, CATEGORY, COMMENT_TEXT, DICT_CONTENT_ID, DICT_CONTENT_CODE, DICT_CONTENT_ALT_CODE, and the VALUE_1 through VALUE_4 columns.
For relations, TMS allows the following variables that map to their counterpart columns in the TMS_DICT_RELATIONS tables, or to columns in the TMS_DICT_CONTENTS tables for the terms in the relation. Where _REF follows the term, you can include the same information from the reference term. The list of values includes: TERM (_REF), TERM_UPPER (_REF), DICT_CONTENT_ID (_REF), DICT_CONTENT_CODE (_REF), DICT_CONTENT_ALT_CODE (_REF), TERM_COMMENT_TEXT (_REF), DICT_RELATION_ID, and COMMENT TEXT.
To add a variable to a URL Informative Note:
-
Click in the Value field and enter the basic URL.
-
While the cursor is in the Value field, press F9 or select Edit to see the list of values.
-
Select a variable and click OK. TMS appends %variable% to any text in the Value field.
You can also cut and paste variables in the Value field to create a valid URL.
Using the Maintenance Wizard
The Maintenance Wizard performs the moving and exchange of terms selected in either the Maintain Repository Data or Repository Authoring window. Using this tool, you can perform six different functions: move relations, move terms up or down a dictionary hierarchy, move a term and copy its relations, move and merge a term, merge a term, or exchange terms. Maintenance Wizard functions are available for strong relations in strong dictionaries only.
You can launch the Maintenance Wizard from either the Maintain Repository Data window or the Repository Authoring window. This section includes the following Maintenance Wizard topics:
Overview of Maintenance Wizard Tasks
To launch the Maintenance Wizard:
-
Select the term you want to modify, and click the Maintain Wizard button at the bottom of the Maintain Repository Data window. The Maintain Data window opens, with your term's Name, ID Number, Current Level, and Level Code at the top of the window.
-
Select a function to perform on this term, and click Next.
-
Complete the steps in the appropriate section:
Data Pending in the Predict Tables
If the changes you elect to make using the Maintenance Wizard either involve terms that are awaiting Activation in the predict tables or would create duplicates of terms that already exist, TMS will prompt you with an error message. Close the Maintenance Wizard and refresh data in the Maintain Repository Data window to determine the problem before you continue.
Move Relation
The Move Relation function enables you to delete one relation between the selected term and a term in a related level and to create a new relation on the same related level. To move a relation:
-
In the first window of Maintain Data, select Move Relation and click Next.
-
Select a level from the Related Level list, highlight the relation you want to remove, and click Next.
-
Query for a new term to which you want to link the selected term, and click Next. TMS summarizes your changes in the Maintain Data window.
-
Click Finish to execute the changes.
Move Term
When you move a term to a new level:
-
TMS deletes the term from its original level and deletes all the relations to the deleted term, with the following exception: TMS does not delete an original relation when the relation to the new level is still valid—for example, when the term has moved between levels of a group. In this case, the relation moves with the term.
For example, in a drug dictionary the classification level is a group level with two sublevels, Preferred Name and Synonym. You move Synonym A to the Preferred Name level, using the Move Term function. Verbatim Term A, which had been a child of Synonym A, becomes a child of the new term Preferred Name A.
Caution:
When you move a term to a new level, all its old relations are deleted (unless the relation is a VTA and you are moving the term from one sublevel of a classification group to another). If its old relations were optional, the new term and relations will be activated and you may lose relations that you need. If the old relations were mandatory, the new terms and relations cannot be activated unless you create current relations.You can use the Activation Check mode to see whether Activation will work without actually activating the new terms and relations. You may want to set up an Activation Group just for this purpose. See "Activating Data" and "Creating a New Activation Group".
TMS validates the new term and relations during Activation. To undo the moving of a term before Activation, see "Undoing a Change Before Activation".
To move a term:
-
In the Maintain Data window, select Move Term and click Next.
-
Select the Related Level to which you want to move the selected term, from the list.
-
If you want TMS to delete all VTAs that would be orphaned as part of moving this term, select the Delete VTAs when Mapped box. TMS does not delete any VTAs whose relations are preserved.
If you choose not to select this box, you must manually reassign VTAs before performing Activation. Click Next.
-
TMS summarizes the changes. Click Finish to execute the move.
Move Term and Copy Relations
The Move Term and Copy Relations function expands upon the Move Term functionality by enabling the moved term to inherit all of the relationships of one of its parent terms. For dictionaries with group coding levels such as the MedDRA primary path dictionary, this inheritance is important because it ensures that you do not have to re-create the relationships for every term you move.
-
Select Move Term and Copy Relations from the Maintain Data window, and click Next.
-
Select a Related Level from the list.
-
If you want TMS to delete all VTAs that would be orphaned as part of moving this term, select the Delete VTAs when Mapped box. TMS does not delete any VTAs whose relations are preserved.
If you choose not to select this box, you must manually reassign VTAs before performing Activation. Click Next.
-
TMS summarizes your selections in the final window. Click Finish to execute your changes.
Move and Merge Term
The Move and Merge Term command:
-
Moves a term to a related level, and
-
Merges all relations of the moved term to a different term on the same level
For example, if you move the MedDRA High Level Term HLT1 up to the High Level Group Term level, the Move and Merge Term function enables you to move all relations of HLT1 to another term on the High Level Term level.
To perform the Move and Merge Term function:
-
Select Move and Merge Term from the Maintain Data window, and click Next.
-
Select a Related Level from the list.
-
Query and select the term to which you want to merge the relations, and click Next.
-
TMS summarizes your selections in the final window. Click Finish to execute your changes.
Merge Term
The Merge Term function enables you to delete a term and merge all of the deleted term's relations to a different term on the same level. When you perform the Merge Term function, TMS deletes your selected term; you select the term to which you want to merge relations from the Maintenance Wizard.
To perform the Merge Term function:
-
Select Merge Term from the Maintain Data window, and click Next.
-
Query and select the term to which you want to merge relations, and click Next.
-
TMS summarizes your selections in the final window. Click Finish to execute your changes.
Exchange Terms
When you use the Exchange Terms function, TMS moves the parent term to its child level and creates relations with all its former child's related terms, while moving the child term to its parent level and creating relations with all its former parent's related terms. In other words, TMS exchanges the two terms while maintaining the same relations in related levels.
TMS validates the new term and relations during Activation. To undo the moving of a term before Activation, see "Undoing a Change Before Activation".
To exchange terms:
-
Select Exchange Terms from the Maintain Data window, and click Next.
-
Select the level with which you want to exchange a term. TMS populates the list with applicable terms.
-
Select the term that you want to exchange with the selected term, and click Next.
-
TMS summarizes your selections in the final window. Click Finish to execute your changes.
Undoing a Change Before Activation
To undo a change made in the Maintenance Wizard, manually delete all affected terms in the predict table.
-
In the Maintain Repository Data window, select the same Activation Group you selected when you originally made the change.
-
For each term:
-
In the middle block, query for the term in its new level. It will have an entry in the DML column.
-
Highlight the term and delete it, using Record, and then Delete.
-
-
For each relation:
-
In the upper block, query for the relation by querying for the higher-level term.
-
Highlight the term and delete it, using Record, and then Delete.
-
Viewing and Deleting Dictionary Loading Error Logs
TMS generates an error log whenever one or more errors arise during dictionary loading. This section includes:
Browsing Dictionary Loading Error Logs
To browse the contents of a Dictionary Loading Error Log:
-
From the Repository Maintenance menu, select Maintain Dictionary Loading Error Logs. The window opens with the upper part in Query mode.
-
In the upper part of the window, query for the log you want to examine. You can query by Error Log ID, the User ID of the TMS user who loaded the dictionary, or the time and date that the dictionary was loaded.
-
Click in the row for the error log you want to examine. Error details are displayed in the lower part of the window.
Deleting Dictionary Loading Error Logs
You can also delete specific error logs by clicking in the log's row and selecting Record, then Delete, or delete all Dictionary Loading Error Logs by clicking the Delete All button at the bottom of the window.
Note:
The Delete All button deletes all of the Dictionary Loading Error Logs for all users in the installation.Using the Release Label Authoring Window
This section includes:
You can use the Release Label Authoring window (under the Repository Maintenance menu) to create named relations of type Release Label between dictionary terms.
Release Label named relations allow you to track complex changes to dictionary terms in different versions of the same dictionary such as:
-
merging two terms into a single term
-
splitting a single term into two terms
-
replacing one term with another term
Because these changes involve multiple inserts and deletes in a single audit transaction, TMS cannot automatically maintain a record that these terms are related. You can create relations here and view them in the TMS Lite Browser using the Terminology search facility; see "Related Release Label Terms".
You can also create relations between terms in different dictionaries in this window. You can view those relations in the TMS Lite Browser as well.
TMS applies the named relation from the first term listed in the window (in the section that starts with the Domain field) toward the second term listed in the window (in the section that starts with the Ref. Domain field).
Defining a Release Label Named Relation Between Two Terms
To define a relation between terms using the RL named relationship, complete the following steps:
-
From the Repository Maintenance menu, select Release Label Authoring.
-
Across the top of the screen, select the a value for each of the following:
-
Group. Select the Activation Group to use to activate this new relation.
-
Source. Select either Pre Dictionary Data, Dictionary Data, or All Data. This value determines whether TMS retrieves terms from the predictionary tables, production tables, or both.
-
Named Relation. Select the predefined named relation that you want to apply to the relation you are defining. TMS displays only named relations of type Release Label.
Note:
If you select a Release Label that is not linked to a dictionary that is linked to the Activation Group you selected, the list of values in the Dictionary and Ref. Dictionary fields will not contain any values. You must either select a different Release Label or link the Release Label you selected to the dictionary you need; see "Defining Dictionary NRLs".
-
-
The window includes two identical groups of fields, one for the first term in the relation and one for the reference term. TMS applies the named relation from the term in the Domain section toward the term in the Ref. Domain section.
Description of the illustration ''rel_label_authoring.gif''
Enter fields in both sections as follows. You can click in most fields to activate the link to the list of values on the right-hand side of the field.
-
Domain. Select the domain associated with the term or select Global if the term is a global term. The list of values is restricted by the Activation Group you selected in the Group field.
-
Dictionary. Select the dictionary that includes the term. The list of values is restricted by the domain you selected and the dictionaries associated with the named relationship you selected. It displays Release Labels and cut-off dates for all dictionary versions.
-
Release Label. The system displays the Release Label of the dictionary/Release Label combination you selected in the Dictionary field. You can select a different Release Label of the same dictionary from the list of values or select NEXT or LATEST:
-
NEXT. Use NEXT when one side of the relationship is in the predictionary table. When you click Transfer Data, the Activation process sets the Release Label to the one it creates for that Activation.
For example, you can create the RL named relations from MedDRA 7 HLTs "Liver and spleen infections" and "Gallbladder infections" to the MedDRA 8 single term, "Hepatobiliary and spleen infections" before you activate MedDRA, 8 and include the named relations in the same Activation Group as MedDRA 8, specifying NEXT for the MedDRA Release Label. See "Release Label Named Relation Example 1" for more information.
-
LATEST. TMS sets the relation timestamp to the latest (current) version of the dictionary.
-
-
Cut-off Date. The system automatically displays the cut-off date associated with the dictionary Release Label you specify.
-
Level. Select the level of the dictionary that contains the term.
-
Term. Select the term. TMS enters the appropriate subtype for the term in the Term Subtype field.
-
-
Use the instructions above to enter values that apply to the reference term in the relation in the reference section (beginning with Ref. Domain).
-
Select a Relation Subtype:
-
Company. Available for global terms only. Select Company if the relation is between two company terms or between a company term and an external term.
-
Domain. Select Domain if the relation is between two domain terms or if one of the terms is a domain term.
-
External. Available for global terms only. Select External if the relation is between two external terms.
-
-
Save. TMS saves the new data with the Activation Group in the predict tables.
Checking Data Before Activation
Click the Check Data button to verify the data. If TMS detects any errors, it displays a notification in the Error Msg field. See "Activating Data" for more information.
Transferring Data
To transfer the defined relation and any other terms and relations currently in the selected Activation Group from the predictionary tables to the production tables, click the Transfer Data button. See "Activating Data" for more information.
Additional Fields
The following read-only fields are displayed at the bottom of the window:
DML This field displays the DML transaction being performed on the defined relation.
TMS uses a series of Insert and Delete transactions (collectively known as DML--Data Manipulation Language--transactions) to move data from the predictionary tables to the production tables. Each of these transactions are explained as follows:
-
When a predictionary record is saved, the DML value changes to Insert.
-
After a record is transferred into the production tables, the DML field displays a null value.
-
When a record is deleted from the production tables, a replica of that record gets automatically inserted within the predictionary tables. This replica is created with a DML value of Delete.
Error Msg TMS displays a notification in this field if any errors are encountered on your clicking the Check Data button.
Created By This field automatically displays the user name of the individual who created the relation. It is populated after the relation is saved the first time.
Creation This field automatically displays the date and time the relation was created. It is populated after the relation is saved the first time.
Deleted By This field is populated only when a relation is deleted from the production tables and activation/transfer of data is performed after such a deletion. It displays the user name of the individual who deleted the relation.
Valid Until This field automatically displays the date and time until which the relation remains valid. It is populated after the relation is saved the first time.
Activating Data
The Activation process includes validation; TMS will not activate terms and relations that violate level definitions and other user-defined rules. See "About Activation".
When you run Activation in Check mode, TMS invokes the Activation process but stops short of transferring the data to the production tables. You can view results of a Check mode Activation in either Maintain Repository Data or Repository Authoring windows, or by running the Preliminary Repository Report. In the Maintain windows, data that went through Activation still has DML statements displayed. Data that would fail Activation also now has error messages. You can make the necessary changes before activating the data using Transfer mode.
In Transfer mode, TMS runs the Activation process to completion, moving valid preliminary data to the production table. Invalid preliminary data remains in the predict tables associated with an error message.
There are two ways to invoke Activation in the GUI:
-
Click the Transfer Data button in the Maintain Repository Data or Repository Authoring windows. TMS immediately runs the Activation job on the current Activation Group and transfers valid preliminary data to the production tables.
You can also run Activation in Check mode from the Repository Authoring window by clicking the Check Data button at the bottom of the window.
-
Use the Activate Data batch job from the menu. This option allows you to choose any Activation Group and run the job in either Check or Transfer mode.
To invoke Activation from the menu:
-
From the Repository Maintenance menu, select Activate Preliminary Data. The Activation batch job window appears.
-
In the first line enter the Activation Group you want to activate from the list. See "Modifying Repository Data in the Maintain Repository Data Window" for information about Activation Groups.
-
In the Activation Mode field, choose Check to run in Check mode or Transfer to run in Transfer mode.
-
Schedule or submit the job. For more information on running and scheduling batch jobs, see Appendix P, "Reports and Batch Jobs".
You can also run Activation from a SQL*Plus prompt by issuing the following command:
exec tms_user_activation.activateTerms(pActivationGroupId, pMode)
where pActivationGroupId is the internal ID number of the Activation Group, and pMode is 'C' for Check mode, and 'T' for Transfer mode.
Repository Maintenance Reports
The Repository Maintenance Reports are:
Preliminary Repository Report
In an Activation process, some terms and relations in the predictionary data fail activation or are not validated. The Preliminary Repository Report lists these terms and relations within a specified Activation Group. Specify the Activation Data Scope to view a set of predictionary data. To run this report, you must have maintenance privileges. The Preliminary Repository Report displays the following:
-
Errors Only: These are terms and relations that have failed activation or have not been validated via the Check option in the Activation process. The Errors list also includes terms and relations associated with Informative Notes that have not been activated and validated.
-
All: A list of terms and relations that have add, delete or update (DML) statements against them but do not get activated. Also, those terms and relations associated with Informative Notes that have DML statements but remain unactivated, are listed.
The Preliminary Repository Report displays data in four sections.
-
Pre-dictionary Contents: Displays term names sorted by Activation Group, Domain, Dictionary and Dictionary level. For each term, the report also lists DML statements and error message.
-
Pre-dictionary Relations: Displays relations sorted by Activation Group, Domain, Dictionary and Dictionary level. The report lists the source term and the reference term with their respective dictionary levels, the DML statement for the relation and the error message.
-
Dictionary Contents with Pre-dictionary Informative notes: Displays content similar to that in the Pre-dictionary Contents section.
-
Dictionary Relations with Pre-dictionary Informative Notes: Displays content similar to that in the Pre-dictionary Relations section.
The Preliminary Repository Report does not describe the Informative Notes in detail. To view the Notes, select the term or relation in the Repository Authoring window. Click on Informative Notes. The Maintain Informative Notes window displays information for the selected term.
To generate a Preliminary Repository Report:
-
Select Repository maintenance in the navigator window.
-
Select Preliminary Repository Report.
-
Fill in the general report specifications. See "Setting Parameters."
-
Enter a value for Job Specific parameters:
-
Activation Group: Select an Activation Group from the list.
-
Activation Data Scope: Select the kind of data to be returned. The options are All and Errors Only.
-
Template: Select the template you want to use for this report. If your company has created a custom template, it appears in the list of values. The Oracle Template is the default template.
-
-
Submit the job. See "Running a Job."
Dictionary Version and Release Information Report
TMS creates a new dictionary version each time you do one or more of the following and run Activation:
-
add, modify, or delete a dictionary term
-
modify a dictionary relation
-
modify a cross-dictionary relation
-
modify a dictionary term Informative Note
For example, suppose your current dictionary version is MedDRA 9. When you add a new dictionary term and run Activation for the first time, a new build of the dictionary is created (build =1) and now the dictionary version is MedDRA 9.1.
Note:
A dictionary is assigned a version number which is the same as its Release Label Prefix. For every subsequent activation of the dictionary a build number is generated. This build number is appended to the Release Label Prefix to provide the Release Label.In our example, MedDRA9.1, 9. is the Release Label Prefix and 1 is the build number. The Release Label is 9.1.
The Dictionary Version and Release Information Report tracks dictionary versions. The unique identifier for each version is the date and time stamp. If you have associated a virtual dictionary with your dictionary version, then it is also listed.
The Dictionary Version and Release Information Report displays the following data:
-
Release Labels with cut-off dates
-
Virtual Dictionaries, if any
The report identifies the name of the active dictionary that it was run for. It then lists the following information in a row:
-
Dictionary Name: The full name of the active dictionary.
-
Dictionary Short Name: The short name of the active dictionary as entered in the Define Dictionaries form.
-
Release Label Prefix: This is the label prefix of the dictionary as entered in the Define Dictionaries form. See "Defining a Dictionary".
For each build of the active dictionary, the report gives the following information:
-
Release Label: This column shows the Release Label of the dictionary version.
-
Cut-off Date: This column lists the cut-off date and time for each release.
-
Virtual Dictionary Information: In these columns you can see information related to any virtual dictionaries associated with the release.
-
Dictionary Name: This is the virtual dictionary name.
-
Short Name: This is the short name for the virtual dictionary as entered in the Define Dictionaries form.
-
To generate a Dictionary Version and Release Information Report:
-
Select the Dictionary Version and Release Information Report from the Repository Maintenance menu.
-
Fill in the general report specifications. See "Setting Parameters."
-
Enter a value for each Job Specific parameter:
-
Active Dictionaries: Select the dictionary for which you want to run this report.
-
Template: Select the template for the report. If your company has created a custom template, it appears in the list of values. The Oracle template is the default.
-
-
Submit the job. See "Running a Job."
Translation Reports to Identify Inconsistent Data
TMS uses Translation Derivation Links to associate terms from the global and local dictionaries via the dictionary code. Even though TMS requires that these two dictionaries have the same structure, the system does not validate that the dictionaries' term and relation data match exactly. Thus, for example, when TMS attempts to derive a term in the local dictionary with a matching dictionary content code, the corresponding term might not exist in the linked dictionary, or reside on a different dictionary level, or in a different domain.
TMS provides three reports that display many of these inconsistencies. All three reports are available under the Translation Reports node, which is accessible to all users who can access the Repository Maintenance node (that is, users with the tms_maintain_priv role).
-
The Inconsistent Dictionary Codes Report shows the terms with dictionary content codes that exist in one dictionary but not the other, or terms in the two dictionaries with the same dictionary content code that exist in different domains or dictionary levels.
-
The Duplicate and Null Dictionary Codes Report shows the dictionary contents for codes that exist more than once in the same domain/dictionary combination. If two or more terms have null codes, the report includes these terms in the report as well.
-
The Inconsistent Dictionary Relations Report shows the relations to a term in one dictionary that are different than those relations to the same term in the other dictionary. The report includes differences in the relation's domain, related term, level, or relation type.
You can generate any of these reports in PDF or HTML format, and output in Preview mode, to a file, or to a printer. All three reports are resource-intensive, so run them sparingly.
Both the Inconsistent Dictionary Codes Report and Inconsistent Dictionary Relations Report require two input dictionaries. For TMS to generate either report properly, the input dictionaries must have a Translation Derivation Link defined. If the input dictionaries are not linked, or if you enter the same dictionary twice, TMS outputs the report with an error message that instructs you to choose two different input dictionaries with a Translation Derivation Link between them.
Inconsistent Dictionary Codes Report
This report compares terms in the two dictionaries that share the same dictionary code. There should be a one-to-one relationship between the code values in these dictionaries, and the terms should reside in the same domain (whether or not the terms are global) and dictionary level. The Inconsistent Dictionary Codes Report thus generates a list of terms in each dictionary whose dictionary codes:
-
exist in one dictionary but not the other.
-
match, but reside in different domains or levels.
To run the Inconsistent Dictionary Codes Report:
-
Select Inconsistent Dictionary Codes from the Translation Reports menu.
-
Fill in the general report specifications. See "Setting Parameters."
-
Enter a value for each Job Specific parameter:
-
-
Translation Dictionary
-
Second Translation Dictionary
A Translation Derivation Link must exist between these dictionaries for the report to run correctly.
-
-
Submit the job. See "Running a Job."
Duplicate and Null Dictionary Codes Report
For Translation Derivation to work correctly, dictionary codes should be unique within a dictionary. The Duplicate and Null Dictionary Codes Report examines all of the dictionary content codes in one dictionary, and outputs term information where terms share the same code. If two or more terms have null codes, the report includes those terms in the report as well. For each duplicate dictionary code, the report flags the code, its Dictionary Level, its Domain, and the number of times it appears in the dictionary.
To run the Duplicate and Null Dictionary Codes Report:
-
From the Translation Reports menu, select Duplicate and Null Dictionary Codes.
-
Fill in the general report specifications. See "Setting Parameters."
-
Enter a value for each Job Specific parameter:
-
Translation Dictionary
-
Template
-
-
Submit the job. See "Running a Job."
Inconsistent Dictionary Relations Report
Because TMS uses the dictionary hierarchies when deriving translation values, it is important that relations in these dictionaries match exactly. The Inconsistent Dictionary Relations Report shows relations to a term in one dictionary that are different than a relation to the same term in the linked dictionary. The report only considers relations between dictionary terms; VTAs are not included.
Any of the following qualifies two relations as inconsistent:
-
The terms in the relation are not the same.
-
The relations are in different domains.
-
The terms in the relation are the same in both dictionaries, but terms with the same dictionary code reside on different levels in the two dictionaries.
-
The relation types are different.
For both dictionaries, the report lists each inconsistent relation's Domain and Relation Type, and the Code, Level, and Term Name for the terms involved.
To run the Inconsistent Dictionary Relations Report:
-
From the Translation Reports menu, select Inconsistent Dictionary Relations.
-
Fill in the general report specifications. See "Setting Parameters."
-
Enter a value for each Job Specific parameter:
-
-
Translation Dictionary
-
Second Translation Dictionary
A Translation Derivation Link must exist between these dictionaries for the report to run correctly.
-
-
Submit the job. See "Running a Job."