2 Getting Started
Note:
If your encounter issues resulting in Internet Explorer 11 incompatibility, see the Oracle® Healthcare Translational Research Installation Guide for upgrade patch instructions to resolve them.Landing Page
Tip:
For optimal viewing, ensure that your screen resolution is at least 1024 pixels.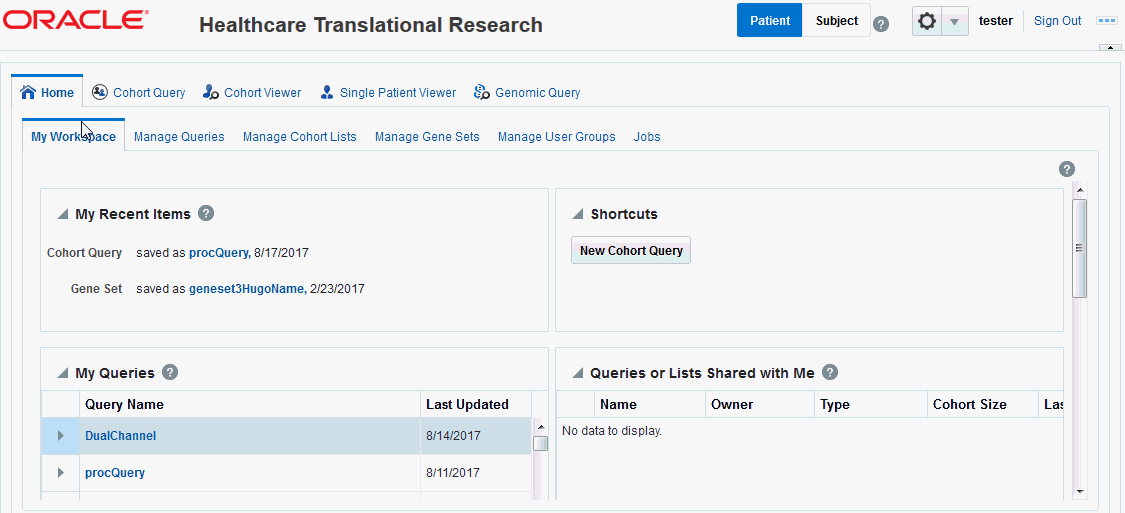
The My Workspace page is the landing page for OHTR. Depending on the license purchased, you may have access to most or all of the sections on this web page. With a standalone OHTR license, you can only view the Cohort Queries and Cohort Lists details.
This page is a dashboard display of the recent items you have worked on, shortcuts and queries or lists shared with you by other users. Click the individual items on each page to view its details.
Managing Queries
The Manage Queries tab helps you:
-
search through saved queries
-
view a list of queries, either created by or shared with you
-
modify queries
-
set or modify restrictions to available queries
For details on modifying criteria for queries, inclusions and exclusions, see Chapter 3, "Working with Cohort Criteria and Queries".
Searching and Viewing Your Queries
You can only search for queries that you have access to. To search for a query:
-
Navigate to Home > Manage Queries.
-
In the Search My Queries section, enter the criteria to search for your query, for example, Query Name.
-
Click Search. The results are displayed in the My Queries section.
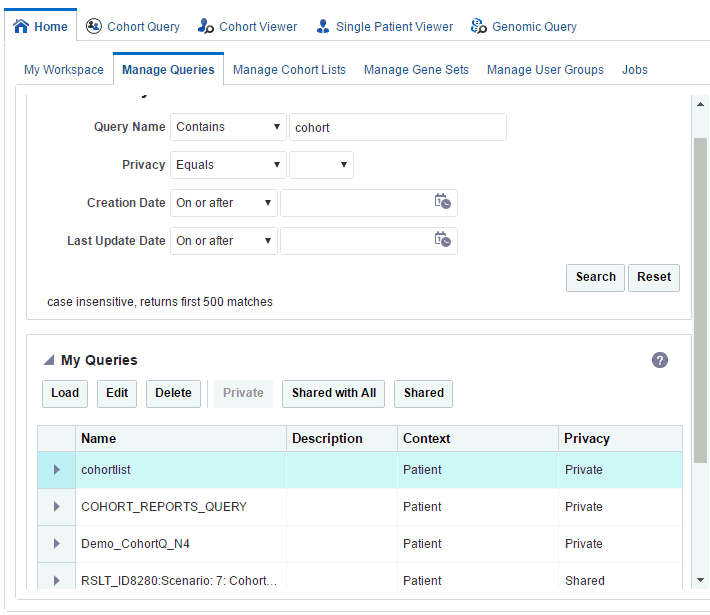
Description of the illustration ''trc120.gif''
To clear the search and enter new criteria, click Reset.
-
To view a query, select the query and click Load.
Modifying Queries
Use the buttons at the top of the My Queries section to modify your queries.
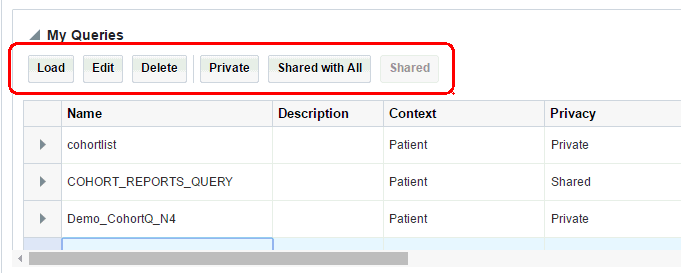
Description of the illustration ''trc121.gif''
Editing Query Name
To modify the query name:
-
Select the query in the My Queries section and click Edit.
The Edit Query window is displayed.
-
Modify the query name and/or description.
-
Click Submit.
Deleting a Query
To delete a query:
-
Select the query in the My Queries section and click Delete.
A confirmation window is displayed.
-
To delete the query, click Submit.
If you do not want to delete the query, click Cancel.
Setting Restrictions on Queries
To set restrictions on who can access your queries:
-
Select the query in the My Queries section.
-
To ensure that no one else can access to the query, click Private.
-
To ensure that everyone else can access to the query, click Shared With All.
-
To share a private query, click Shared.
Managing Cohort Lists
The Manage Cohort Lists tab helps you:
-
search through available saved cohort lists
-
view a list of cohorts, either created by or shared with you
-
modify cohort lists
-
set or modify restrictions to available queries
Searching and Viewing Your Cohort Lists
You can only search for cohort lists that you have access to. To search for a cohort list:
-
Navigate to Home > Manage Cohort Lists.
-
In the Search My Cohort Lists section, enter the criteria to search for your saved cohort list, for example, List Name.
-
Click Search. The results are displayed in the My Cohort Lists section.
To clear the search and enter new search criteria, click Reset.
-
To view a cohort list, select the cohort list in My Cohort Lists and click Load.
Modifying Cohort Lists
Use the buttons at the beginning of the My Cohort Lists section to modify your cohort lists.
Editing List Name
To modify the cohort list name:
-
Select the cohort list in the My Cohort Lists section and click Edit.
The Edit Cohort List window is displayed.
-
Modify the list name and/or description.
-
Click Submit.
Deleting a List
To delete a cohort list:
-
Select the list in the My Queries section and click Delete.
A confirmation window is displayed.
-
To delete the query, click Submit.
If you do not want to delete the query, click Cancel.
Setting Restrictions on Cohort Lists
To set restrictions on who can access your cohort lists:
-
Select the list in the My Cohort Lists section.
-
To ensure that no one else can access the list, click Private.
-
To ensure that everyone else can access the list, click Shared With All.
-
To share a private query, click Shared.
Working with Gene Sets
Gene Set refers to groups or lists of genes. This set might comprise of a couple of genes or hundreds of genes. The concept of Gene Set lets you group genes into convenient collections for reuse. You can group a few genes for quick search retrieval or for use in a cohort query.
-
There are no restrictions on genes that can be included in a Gene Set. You can mix genes from multiple species or assembly versions.
-
The same gene can be part of many different Gene Sets.
-
Gene sets are private and cannot be shared among users.
-
Gene set names are not case- sensitive.
-
When genes are compared using the Contains or Starts With option, the limit is 512 characters.
Creating a New Gene Set
The create a new gene set:
-
Navigate to Manage Gene Sets > Create New or Edit.
-
Specify the genes you want to include in the gene set. This can be done in the following ways:
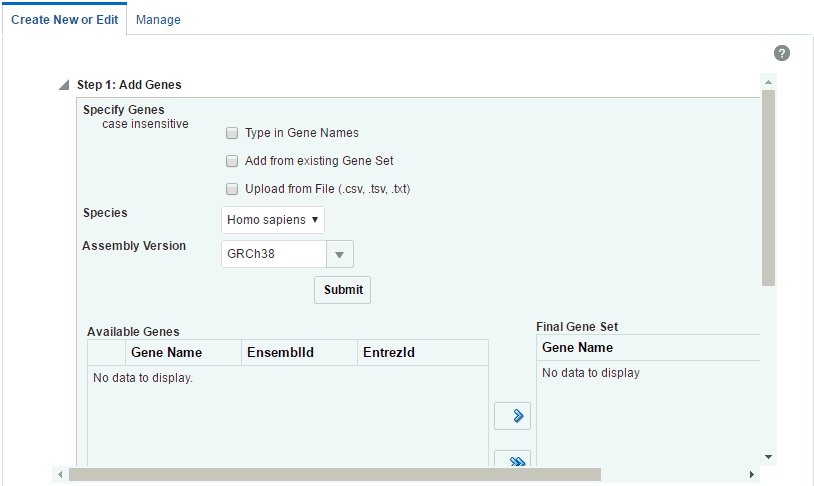
Description of the illustration ''trc46.gif''
-
Type in Gene Names - Search for genes using their Ensembl or HUGO names. You can enter multiple gene names separated by space, comma or semicolon.
-
Add from existing gene set - Search for genes based on an existing Gene Set.
-
Upload from a file - Select a text file from your desktop where the genes are delimited by comma, space or tab. Click Choose File to browse for the file. The file size limit is less than 5MB when genes are matched using Equals.
-
-
Specify Species.
-
Specify Assembly Version.
-
Click Submit. The matching genes appear in the Available Genes pane.
-
Use the arrow buttons to move available genes to the Final Gene Set panel. To remove genes from the Final Gene Set panel, use the Remove or Remove All buttons.
-
In the Save Gene Set section, enter a name for your gene set.
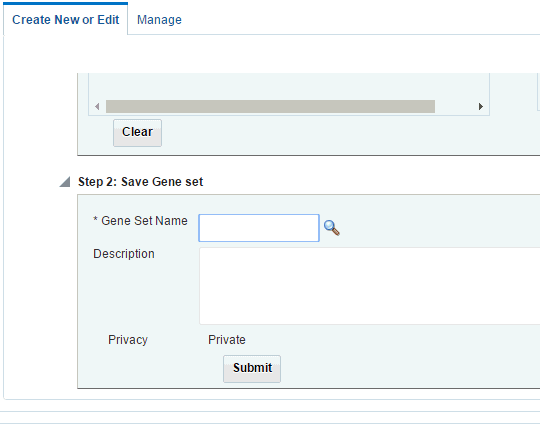
Description of the illustration ''trc122.gif''
-
Enter a description, if desired.
-
Click Submit. The system saves the new Gene Set and a confirmation box appears.
Editing a Gene Set
You can add or remove genes from an existing gene set. The edit a gene set:
-
Navigate to Manage Gene Sets > Create New or Edit.
-
Search for the gene set you want to edit using the Add from existing Gene Set option.
Description of the illustration ''trc46.gif''
-
Specify Species.
-
Specify Assembly Version.
-
Click Submit. The gene set appears in the Available Genes pane.
-
Specify the genes you want to include in the gene set. This can be done in the following ways:
Description of the illustration ''trc46.gif''
-
Type in Gene Names - Search for genes using their Ensembl or HUGO names. You can enter multiple gene names separated by space, comma or semicolon.
-
Add from existing gene set - Search for genes based on an existing Gene Set.
-
Upload from a file - Select a text file from your desktop where the genes are delimited by comma, space or tab. Click Choose File to browse for the file. The file size limit is less than 5MB when genes are matched using Equals.
-
-
Specify Species.
-
Specify Assembly Version.
-
Click Submit. The selected genes appears in the Available Genes pane.
-
Use the arrow buttons to move available genes to the Final Gene Set panel. To remove genes from the Final Gene Set panel, use the Remove or Remove All buttons.
-
Click Submit. The system saves the Gene Set and a confirmation box appears.
Managing a Gene Set
You can delete gene sets and view their metadata in this section. Gene Set metadata includes the name, description, owner of the gene set, privacy setting, the creation and updated dates and summary of how many genes are in a gene set.
To manage a gene set:
-
Navigate to Manage Gene Sets > Manage.
-
Enter the gene set you would like to modify.
-
Click Submit. Detailed information of the gene set is displayed.
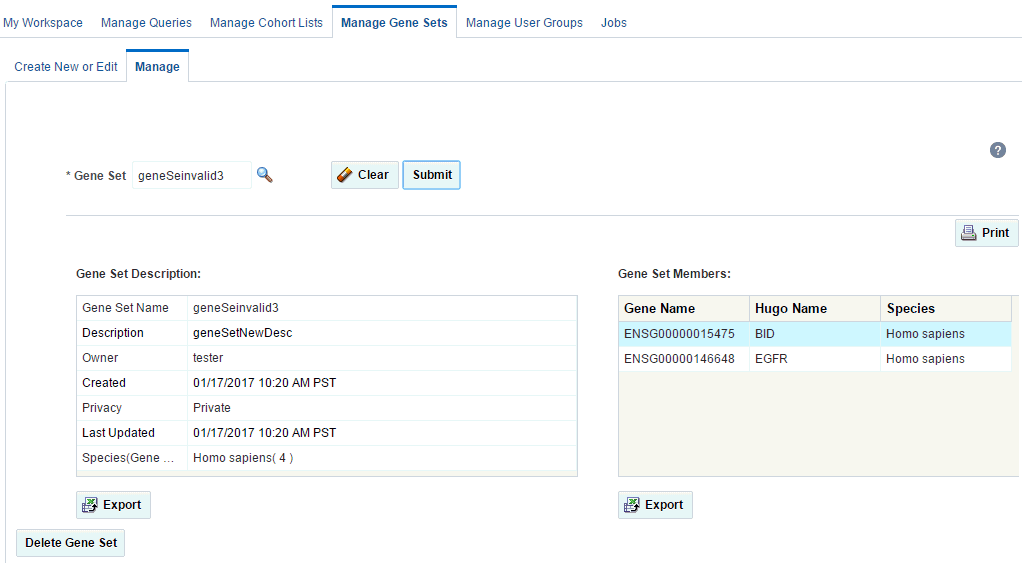
Description of the illustration ''trc48.gif''
-
To print the data, click Print on the top right.
-
To export the data, click Export at the bottom.
-
To delete a gene set, click Delete Gene Set at the bottom. A confirmation box appears to ensure you are performing the proper action.
When you delete a gene set, its record is still available in the database but it can only be restored by a system administrator.
Working with Jobs
Currently, jobs are scheduled only for Genomic Data Export. To schedule a job, navigate to Genomic Data Export screen under the Cohort Viewer tab.
Note:
Any job executed prior to applying OHTR 3.1 will have its status changed back to 'Scheduled'.The following screen demonstrates how to create and schedule the job.
To create and schedule a job, perform the following steps:
-
Select the patient IDs source from one of the following options:
-
active query
-
library query
-
list
-
ad-hoc
-
Omics query
-
-
Select the DNA reference version.
-
Select the location for the gene from the following options:
-
Ad-hoc Gene List
-
Pathway
-
Gene Set
-
-
Select one of the following file formats to export:
-
Mutation-VCF
-
Copy Number Variation-SEG
-
Microarray Expression-RES
-
Microarray Expression Dual Channel-GCT
-
-
Select the Schedule export option. This prompts for the job name and description.
-
Click Submit. The job ID is created.
To view the job information and its progress, navigate to My Workspace, and click the Jobs tab. All the jobs created by the OHTR UI are displayed. Only the authorized user can see the job lists.
The following table describes the columns and buttons in the My Job page.
Table 2-1 Columns and Buttons in My Jobs Page
| Column Name | Description |
|---|---|
|
Job name |
Job name specified when scheduling the job. |
|
Job ID |
Job ID generated while scheduling the job. |
|
Job type |
Only File Export job type is supported. |
|
Scheduled on |
Date and time on which the job is scheduled. The format is yyyy-mm-dd hh:mm:ss. |
|
Repeat |
You can schedule the job to run only once or recurrent. |
|
Status |
You can set the status to succeeded, failed, or canceled. |
|
No. of times job executed |
Count of how many times the job is run. |
|
First execution started |
Date and time when the job is scheduled to run. The format is yyyy-mm-dd hh:mm:ss. |
|
Last execution successfully completed |
Date and time when the job is last executed. The format is yyyy-mm-dd hh:mm:ss. |
|
Search |
You can search job by name or job ID. |
|
Reset |
You can reset your search criteria. |
|
Delete |
You can delete a job. A confirmation box appears to make sure you are performing the proper action. This is a soft delete, which means the job is still in the database but only the delete flag set to Y. |
|
Abort |
You can abort a job before it runs. You can also abort a queued or scheduled job but cannot abort a succeeded or canceled job. |
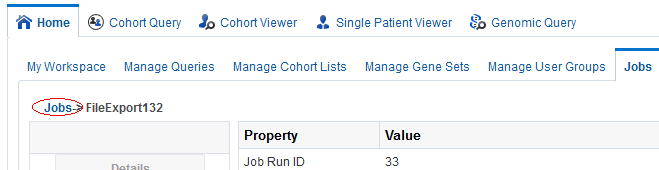
Job Details
This page provides complete information about a single job.
-
To view details for a particular job, from the Jobs page, click the link in the Job Names column.

-
To return to the main Jobs page, click the Jobs breadcrumb link.
The following table describes job details.
| Column Name | Description |
|---|---|
|
Job run ID |
Job instance ID generated when job is scheduled. |
|
Job ID |
Job ID generated while scheduling the job. |
|
Job name |
Name of the job. |
|
Job type |
Only File Export job type is supported. |
|
Description |
Description of the job. |
|
Status |
Status of the job (succeeded, failed, or canceled). |
|
Owner |
User who created the job. |
|
Start date |
Date and time the job is scheduled to run. The format is yyyy-mm-dd hh:mm:ss. |
|
End date |
Date and time when the job is last executed. The format is yyyy-mm-dd hh:mm:ss. |
Job Inputs
This section provides the details of parameters provided when scheduling a job.
To view the details of the job created, click the Jobs tab and click Inputs.
The Load input parameter values into Genomic Data Export page link directs you to the genomic data screen with these values loaded. This occurs only when the job context matches the applications context. If not, the following note is displayed in place of link:

Description of the illustration ''trc114.gif''
Job Outputs
This section shows the result files of a job. The following files are generated:
-
Error log file - contains the log file of the application if any exception or error occurred while running the job.
-
User log file - contains the log file, which shows the error occurred while generating the export files.
-
Admin log file - is for DB administrator.
You can download error and user log files but cannot download the admin log file.
Note:
When you try to export a file that does not have any Patients or Subjects linked to the specimen, an empty file is generated in Schedule mode.Patient vs Subject Context
OHTR can be run in either Patient or Study Subject context. In patient context, all queries are directed at patient tables in Cohort Data Model schema, while in the study subject context, all queries are routed to the subject tables in CDM.
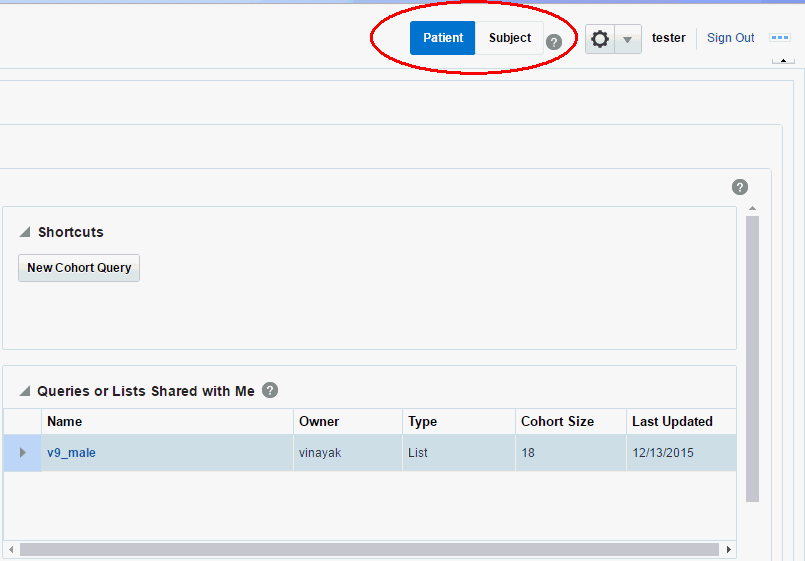
Description of the illustration ''trc55.gif''
-
By default, the context is set to Patient. You can change this to subject by clicking Subject on the upper right hand corner of the screen as shown above.
-
The new context persists till the next time you change it.
-
Switching context clears loaded data but not the criteria. Only the applicable criteria for the selected context is displayed. For example, Encounter criteria is not supported in the Subject context and will be disabled. When you switch back to the Patient context, it is enabled again.
-
For a Subject to be considered deleted and not visible for selection, a given Subject's delete flag in CDM should be set to Y.