8 User Management
This section contains the following topics:
User Accounts
In the current release of OHTR, the user has permissions to make a few changes to basic accessibility options. However, the viewing screens cannot be customized.
If Oracle Access Manager (OAM) is configured, the user has the following functions:
-
The user can log into the OHTR application by using the single sign-on interface, which can be shared among multiple applications.
For example, with an Oracle Business Intelligence Enterprise Edition Plus (OBIEE) full license, the same credentials can be used for generating OBIEE reports.
-
The user creates the password, which is not visible to an administrator.
-
After a configurable number of unsuccessful login attempts, the user is locked out.
-
After a configurable amount of inactive time, the login session times out.
-
Roles are automatically setup as described in Roles and Permissions.
If OAM is not configured, the identified roles must be manually set up in a WebLogic instance. For more information, see Create Users and Add Users to Groups in the Oracle® Fusion Middleware Oracle WebLogic Server Administration Console Online Help available at
https://docs.oracle.com/middleware/1221/wls/WLACH/taskhelp/security/ManageUsersAndGroups.html
You may need to perform policy migration in OBIEE to see the roles. For details on policy migration, see the Oracle® Healthcare Translational Research Installation Guide.
Roles and Permissions
The OHTR user is assigned one or more of the following roles:
| Role | Permissions | Accessible Screens |
|---|---|---|
| trc-bioinformatician-group |
|
|
| trc-cohort-group |
|
|
| trc-limited-user-group |
|
|
| trc-omics-group |
|
|
| trc-comics-limited-user-group |
|
|
| trc-pi-user-group |
|
|
| trc-admin-group |
|
Manage User Group |
Users belonging only to the following groups have limited functionality based on the assigned roles:
-
trc-comics-limited-user-group
-
trc-limited-user-group
-
trc-basic-user-group
Working with User Groups
To simplify sharing, create user groups and assign users to them. Instead of sharing queries or lists with each user individually, set up a list of users to share multiple items.
Note that only the user that is the owner of a given list can modify members of a given list. However, any user can elect to utilize a given list for sharing and see members of a list, even if he or she is not the owner.
Creating a User Group
To create a user group:
-
Navigate to Manage User Groups > User groups.
-
Click Create. The Create User Group box is displayed.
-
Enter a name and description for the user group.
-
Click Submit.
Assigning Users to a Group
To assign users to a group:
Immediately After you Create a Group
-
Navigate to Manage User Groups > Group has members.
-
Click Add. The Add Users box is displayed.
-
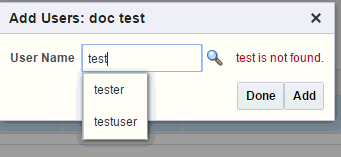
Enter the user name you want to add. A drop-down list displays the matching choices.

Description of the illustration ''trc123.gif''
-
Select the names you want to add.
-
Click Add. The selected users are added to the group.
-
Click Done.
Searching for a Group you Created Earlier
-
Navigate to Manage User Groups > Search User Groups.
-
Enter the details of the group you want to find.
-
Click Search. The user group and its details are displayed.
-
Navigate to Manage User Groups > Group has members.
-
Click Add. The Add Users box is displayed.
-
Enter the user name you want to add. A drop-down list displays the matching choices.
-
Select the names you want to add.
-
Click Add. The selected users are added to the group.
-
Click Done.
Removing Users from a Group
To remove users from a group:
-
Navigate to Manage User Groups > Search User Groups.
-
Enter the details of the group you want to find.
-
Click Search. The user group and its details are displayed.
-
Navigate to Manage User Groups > Group has members.
-
Select the user you want to remove.
-
Click Remove.
Managing User Groups
You can edit, duplicate or delete a user group using the buttons at the top of the User Groups section.

Description of the illustration ''trc124.gif''
Editing a User Group
To edit the name and description of a user group:
-
Navigate to Manage User Groups > Search User Groups.
-
Enter the details of the group you want to find.
-
Click Search. The user group and its details are displayed in the User Groups section.
-
Select the user group you want to modify.
-
Click Edit.
-
The Edit User Group box is displayed. Modify the name and description of the gene set.
-
Click Submit.
Duplicating a User Group
To edit the name and description of a user group:
-
Navigate to Manage User Groups > Search User Groups.
-
Enter the details of the group you want to find.
-
Click Search. The user group and its details are displayed in the User Groups section.
-
Select the user group you want to duplicate.
-
Click Duplicate.
-
The Duplicate User Group box is displayed. Modify the name and description of the user group.
-
Click Submit.
Deleting a User Group
To delete a user group:
-
Navigate to Manage User Groups > Search User Groups.
-
Enter the details of the group you want to find.
-
Click Search. The user group and its details are displayed in the User Groups section.
-
Select the user group you want to delete.
-
Click Delete. A confirmation box is displayed.
-
Click Submit. The user group is deleted.