2 Modify criteria for queries using the Cohort Query
In this chapter you can find out how to:
Before you begin building your query
Before you start creating your query, let's go through these tips. Keep this section in mind, you will probably come back to it from time to time.
-
Prepare the query definition in a structured format (line-by-line) before creating it in OHTR. Visualizing your definition helps you organize it in a simpler way.
-
When you want to search for a criterion, but can't exactly remember the name or the code, just click Search without selecting any conditions, or adding a keyword. The entire list of codes and names appears.
-
Every criterion you want to add in your query can be included as an inclusion or exclusion. When you select either option, it applies to all of the elements in that criterion.
-
By default, most dialog boxes for choosing criteria use the Equals operator and list the first 100 types only. If there are more than 100 types for one criterion that you want to include in your query, you can search for them using other operators such as Starts with, Contains, and so on.
Build a cohort query
You can query on any combination of the following data:
Patient Information
Demographics
-
On the Home page, on the left, click the Cohort Query icon(
 ).
). -
In the Cohort Query screen, on the left, click the Patient Information category, then click Demographics.
-
Either enter the Patient ID or click the search icon (
 ).
).To search for a Patient ID:
-
Select a condition and enter part of a patient ID.
-
Click Search.
-
Select the patient ID that you want to use from the left side and move it to the right side using the arrow (
 ).
). -
Click Submit.
-
-
Set any other criteria that you want to use in your query:
-
Gender: Select the gender from the drop-down list.
-
Marital Status: Select the status from the drop-down list.
-
Age: Select a condition, and then add the age in years, as a single value or a range.
-
Date of Birth: Select condition, and then enter the date.
-
Deceased: Select this check box, if needed.
-
Ethnicity: Select the appropriate ethnicity.
-
Race: Select the appropriate race.
-
Location: Enter either a city, state, zip code, county or country.
-
Data Source: Enter or search for a Data Source.
-
-
Under Insert as select:
- Inclusion to include the criteria in the query.
- Exclusion to exclude the criteria from the query.
-
Click Submit.
Consent
-
On the left, click the Patient Information category, then click Consent.
-
Enter a Consent Type or click the search icon (
).To search for a Consent Type:
Note:
Follow the same steps for the Consent Status.-
In the Select Consent Type window, select a condition for Consent Type Name or Consent Type Code and enter part of the consent name or type.
-
Click Search.
-
Select the consent type or code that you want to use from the left side and move it to the right side using the arrow (
). -
Click Submit.
-
-
Set any other criteria that you want to use in your query:
-
Consent Status: Enter a consent status, or follow steps from 2a to 2d, to search for a consent status.
-
Consent Start Date: Select a condition, and then add the date.
-
Consent End Date: Select a condition, and then add the date.
-
Data Source: Enter or search for a Data Source.
-
-
Under Insert As select:
- Inclusion to include the criteria in the query.
- Exclusion to exclude the criteria from the query.
-
Click Submit.
Back to "Build a cohort query".
Have you checked "Before you begin building your query" yet?
Clinical Data
Diagnosis
-
On the left, click the Clinical Data category, then click Diagnosis.
-
Either enter the diagnosis or click the search icon (
).To search for a Diagnosis:
-
Select one of the Search Modes.
- Classic Search. Select it to use more search conditions for Diagnosis Name, Code, and Code System.
- Hierarchy Drill-in Search. Select it to search all of the codes in a hierarchy that are associated with a single Code System, and have only one parent code.
Note:
This feature does not support mixed hierarchy, meaning different levels of codes belonging to different Code Systems or multi-parent hierarchy, meaning one code having multiple parent codes. -
Select a condition for one or all: Diagnosis Name, Diagnosis Code or Code System.
-
Click Search.
-
Select the diagnosis codes that you want to use from the left side and move them to the right side using the arrow (
). -
Click Submit.
-
-
Set any other criteria that you want to use in your query:
-
Diagnosis Status: Enter or search for a Diagnosis Status.
-
Onset Date: Select a condition, and enter a date.
-
Reported Date: Select a condition, and enter a date.
-
End Date: Select a condition, and enter a date.
-
Age At First Onset: Select a condition, and then add the age in years, as a single value or a range.
-
Anatomical Site: Enter or search for an anatomical site.
See To search for an Anatomical Site: for more details.
-
Data Source: Enter or search for a source of data.
-
-
Under Insert as select:
-
Inclusion to include the criteria in the query
-
Exclusion to exclude the criteria from the query
-
-
Click Submit.
Back to "Build a cohort query".
Have you checked "Before you begin building your query" yet?
Clinical Encounter
-
On the left, click the Clinical Data category, then click Clinical Encounter.
-
Either enter the Encounter Type or click the search icon (
).To search for an Encounter Type:
-
In the Select Encounter Type window, select a condition for Encounter Name or Encounter Code and enter part of the encounter name or code.
-
Select the consent encounter codes and names that you want to use from the left side and move them into the right side using the arrow (
). -
Click Submit.
-
-
Set any other criteria that you want to use in your query: Location, Time or Data Source.
-
Location: Enter or search for a location.
-
Time: Select a condition, and then enter a time in days or in the form of a date.
-
Data Source: Enter or search for a source of data.
-
-
Under Insert as select:
- Inclusion to include the criteria in the query.
- Exclusion to exclude the criteria from the query.
-
Click Submit.
Back to "Build a cohort query".
Have you checked "Before you begin building your query" yet?
Procedure
-
On the left, click the Clinical Data category, then click Procedure.
-
Either enter the Procedure and Procedure Type or click the search icon (
).To search for a Procedure and Procedure Type:
-
In the new window, select a condition for Procedure Name, Procedure Code or Code System and enter part of the procedure name, code or code system.
-
Click Search.
-
Select the procedure code, name and code system that you want to use from the left side and move them into the right side using the arrow (
). -
Click Submit.
-
-
Set any other criteria that you want to use in your query: Procedure Start Date, Procedure End Date, Anatomical Site, Procedure Outcome or Data Source.
-
Procedure Start Date: Select a condition, and enter the date.
-
Procedure End Date: Select a condition, and enter the date.
-
Anatomical Site: Enter or search for an anatomical site.
See To search for an Anatomical Site: for more details.
-
Procedure Outcome: Enter or search for a procedure outcome.
-
Data Source: Enter or search for a data source.
-
-
Under Insert as select:
- Inclusion to include the criteria in the query.
- Exclusion to exclude the criteria from the query.
-
Click Submit.
Back to "Build a cohort query".
Have you checked "Before you begin building your query" yet?
Medication
-
In the Cohort Query screen, click the Clinical Data category, then click Medication.
-
Either enter the medication or click the search icon (
).To search for Medication:
-
Select one of the Search Modes:
- Classic Search. More search conditions are available.
- Hierarchy Drill-in Search. Select it to search all of the codes in a hierarchy that are associated with a single Code System, and have only one parent code.
Note:
This feature does not support mixed hierarchy, meaning different levels of codes belonging to different Code Systems or multi-parent hierarchy, meaning one code having multiple parent codes. -
Search for a medication either by Medication Name, Medication Code or Code System and click Search.
-
Select the medication codes that you want to use from the left side and move them into the right side using the arrow (
). -
Click Submit.
-
-
Set any other criteria that you want to use in your query:
-
Medication Start Date: Select a condition and enter a date.
-
Medication End Date: Select a condition and enter a date.
-
Dosage: Select a condition and enter a date.
-
Dosage Units: Enter or search for dosage units.
-
Medication Outcome: Select a condition and enter a date.
-
Data Source: Enter or search for a data source.
-
-
Under Insert as select:
- Inclusion to include the criteria in the query.
- Exclusion to exclude the criteria from the query.
-
Click Submit.
Back to "Build a cohort query".
Have you checked "Before you begin building your query" yet?
Patient History
-
In the Cohort Query screen, click the Clinical Data category, then click Patient History
-
Either enter the Patient History code or click the search icon (
).To search for Patient History:
-
In the Select Patient History window, select a condition for History Name, History Code or History Type and enter part of the History Code or History name.
-
Select the history code, name and type that you want to use from the left side and move them into the right side using the arrow (
). -
Click Submit.
-
-
Set any other criteria that you want to use in your query:
-
Patient History Start Date: Select a condition and enter a date.
-
Patient History End Date: Select a condition and enter a date.
-
Amount: Select a condition and enter a numeric value.
-
Amount Units: Enter or search for the amount units.
-
Frequency: Select a condition and enter a numeric value.
-
Frequency Units: Enter or search for frequency units.
-
Patient History Value: Enter or search for a patient history value.
-
History Applicable To: Then select whom is it applicable to.
-
Data Source: Enter or search for a data source.
-
-
Under Insert as select:
- Inclusion to include the criteria in the query.
- Exclusion to exclude the criteria from the query.
-
Click Submit.
Back to "Build a cohort query".
Have you checked "Before you begin building your query" yet?
Test or Observation
-
In the Cohort Query screen, click the Clinical Data category, then click Test or Observation.
-
Either enter the test or observation code or click the search icon (
).To search for a Test or Observation:
-
In the Select Test or Observation window, select a condition for Test or Observation Name, Code or Type and enter part of either the code, the name or enter the Test or Observation Type.
-
Select the test or observation code, name and type that you want to use from the left side and move them into the right side using the arrow (
). -
Click Submit.
Note:
In the Search Test or Observation window, the Test or Observation Type by default uses the Equals operator and lists the first 100 types only. If there are more than 100 Test or Observation type values in your data, you can search using other operators like ”Starts with”, ”Contains”, and so on. -
-
Set any other criteria that you want to use in your query: Test Date, Result (Numeric) Search, Operator, Units, Result String, or the Data Source.
-
Test Date: Select a condition, and enter a date.
-
Result (Numeric) Search: For Based on absolute values, select an Operator, and enter the units. For Based on Reference Range select an Operator, and an option for the Compare field.
-
Result String: Enter or search for a result string.
-
Data Source: Enter or search for a data source.
-
-
Select an Anatomical Site.
See To search for an Anatomical Site: for more details.
-
Under Insert as select:
- Inclusion to include the criteria in the query.
- Exclusion to exclude the criteria from the query.
-
Click Submit.
Back to "Build a cohort query".
Have you checked "Before you begin building your query" yet?
Specimen
-
In the Cohort Query screen, click the Clinical Data category, then click Specimen.
-
Either enter the codes in the mandatory fields (marked with a double asterisk) or click the search icon (
).To search for a Specimen Type:
-
In the Select Specimen Type window, select a condition for the specimen type, type code, or code system and enter part of either the code, the name or the code system.
-
Select the specimen code, name and code system that you want to use from the left side and move them into the right side using the arrow (
). -
Click Submit.
Note:
Repeat the same steps when searching for a Specimen Number and Specimen Vendor Number. -
-
Set any other criteria that you want to use in your query:
-
Anatomical Site: Enter or search for an anatomical site.
See To search for an Anatomical Site: for more details.
-
Specimen Collection Date: Select a condition and enter a date.
-
Specimen Amount: Select a condition and a numeric value.
-
Units: Enter or search for units.
-
Data Source: Enter or search for a data source.
-
-
Under Insert as select:
- Inclusion to include the criteria in the query.
- Exclusion to exclude the criteria from the query.
-
Click Submit.
Back to "Build a cohort query".
Have you checked "Before you begin building your query" yet?
Study
-
In the Cohort Query screen, click the Clinical Data category, then click Study.
-
Either enter the code for a study or click the search icon (
).To search for a Study:
-
In the Select Study window, select a condition for Study Name or Study Identifier and enter part of the name or identifier.
-
Select the study identifier and study name that you want to use from the left side and move them into the right side using the arrow (
). -
Click Submit.
-
-
Set any other criteria that you want to use in your query:
-
Study Start Date: Select a condition and enter a date.
-
Study End Date: Select a condition and enter a date.
-
Data Source: Enter or search for a data source.
-
-
Under Insert as select:
- Inclusion to include the criteria in the query.
- Exclusion to exclude the criteria from the query.
-
Click Submit.
Back to "Build a cohort query".
Have you checked "Before you begin building your query" yet?
Relative Time Events
You can search for patients who have a particular diagnosis, procedure, or medication combination in a particular chronological order. For example, you can search for patients who:
-
Received a diagnosis of X disease any time after starting medication A.
-
Had procedure K 30 days or more after receiving a diagnosis of Y.
-
Started medication B at the same time as having procedure M.
-
In the Cohort Query screen, click the Clinical Data category, then click Relative Time Events.
-
Under ”Select Patients who have, Step 1" select Diagnosis, Procedure, Medication, Test or Observation, or Genomic Variant.
-
Specify how the events in Step 1 and Step 3 are time-related: ”at any time while” or specify a condition.
-
Under Step 3, specify the related event: having Diagnosis, undergoing Procedure, or taking Medication.
-
Under Insert as select:
- Inclusion to include the criteria in the query.
- Exclusion to exclude the criteria from the query.
-
Click Submit.
Back to "Build a cohort query".
Have you checked "Before you begin building your query" yet?
Genomic Data
Sequence Variants
-
In the Cohort Query screen, click the Genomic Data category, then click Sequence Variants.
-
You can search on Specimen Type or Anatomical Site.
To search for a Specimen Type:
-
Either enter part or all of the value for Specimen Type or click the search icon (
). -
In the Select Specimen Type window, select the condition for Specimen Type Name, Specimen Type Code or Code System and enter part of the code.
-
Select the specimen code, name and code system that you want to use in your query from the left side and move them into the right side using the arrow (
). -
Click Submit.
To search for an Anatomical Site:
-
Either enter part or all of a value for Anatomical Site or click the search icon (
). -
In the Select Anatomical Site window, select one of the Search Modes:
- Classic Search. More search conditions are available.
- Hierarchy Drill-in Search. You can drill down to see the patient count for any sub-level.
-
Search for an anatomical site either by Anatomical Site Name, Anatomical Site Code or Code System and click Search.
-
Select any Anatomical Site codes, names and code systems that you want to use from the left side and move them into the right side using the arrow (
). -
Click Submit.
-
-
You can also search for patients by different genomic criteria. In the Select Patients based on section, select one:
-
having Variants in selected Genes: this enables you to search variants in specific genes.
-
having selected Genomic Variants enables you to search for variants by their Cosmic or dbSNP identifiers.
-
having Variants within specified Genomic Region enables you to search variants in specified genomic location.
-
having Zygosity enables you to search variants with specific zygosity: Any, Homozygous, Heterozygous or Hemizygous.
-
having Genotypes enables you to search for specific genotypes like AT, or AA, or wildtype (same as reference), and so on.
-
-
After selecting the genomic criteria, expand the Variant Location section and specify a value for the selected option.
-
Select either at Genomic Variant or at Genomic Position. Add a value.
-
Select an Assembly Version.
-
Click View Available Genotypes.
-
-
Under Insert as select:
- Inclusion to include the criteria in the query.
- Exclusion to exclude the criteria from the query.
Tip:
This applies to all of the criteria specified above. -
Click Submit.
(Optional) Step 2 Additional criteria
To add additional parameters to your query in the Step 2 tab:
-
In the Sequence Variants window, click Step 2 (Optional).
-
Select any or all of the following parameters:
-
Variant Attribute:
-
Specify Variant Types from the options below: Substitution, Insertion, Deletion, Indel, or Complex.
-
Select a Variant Impact: Synonymous, Missense, Nonsense, Unknown.
-
Select a Variant Status: Select Any, Known, or Novel.
-
Strand: Select Any, + for forward, or - for reverse.
-
-
Nonsynonymous Substitution Scores:
-
Select either with Polyphen option or the with SIFT option.
-
Select a condition for the Version.
-
Either enter a Transcript ID or search for one by clicking the search icon
.
-
-
Variant Parameters Depending on the Sequencing File Type:
-
Select either VCF, MAF or CGI master var.
-
Select the condition for all active fields according to your choice in Step a.
-
-
-
Under Insert as select:
- Inclusion to include the criteria in the query.
- Exclusion to exclude the criteria from the query.
-
Click Submit.
See "Metadata Filters".
Back to "Build a cohort query".
Have you checked "Before you begin building your query" yet?
Copy Number Variation
-
In the Cohort Query screen, click the Genomic Data category, then click Copy Number Variation.
To search for a Specimen Type:
-
Either add the Specimen Type or click the search icon (
). -
In the Select Specimen Type window, select the condition for Specimen Type Name, Specimen Type Code or Code System and enter part of the code.
-
Select the specimen code, name and code system that you want to use from the left side and move them into the right side using the arrow (
). -
Click Submit.
To search for an Anatomical Site:
-
Either enter part or all of a value for Anatomical Site or click the search icon (
). -
In the Select Anatomical Site window, select one of the Search Modes:
- Classic Search. More search conditions are available.
- Hierarchy Drill-in Search. You can drill down to see the patient count for any sub-level.
-
Search for an anatomical site either by Anatomical Site Name, Anatomical Site Code or Code System and click Search.
-
Select any Anatomical Site codes, names and code systems that you want to use from the left side and move them into the right side using the arrow (
). -
Click Submit.
-
-
In the CNV Attributes, specify the CNV Result Type using the two options: numeric or categorized.
-
If you select numeric, specify a time value for the SNP Log2 Ratio (Segment Mean).
-
If you select categorized, specify a condition for the CNV Type, a value for the CNV Type Score, a condition for Called Ploidy and a value for the Ploidy score.
-
-
Specify the CNV Location using any or all options from the in Genes from list: Ad-hoc List, Pathway or Gene Set.
-
Enter or search for a value for any or all of the options you selected above.
-
Select a value for in Gene Region.
-
Specify the Assembly Version.
-
Specify the DNA Reference Version.
About the DNA Reference Version: it represents the Ensembl reference version for getting gene annotations. This is related to Assembly Version and by default displays the preferred DNA Reference Version, which is set in OHO. The sample value for this is Ensembl Version 70.
-
Select the radio button for at Genomic Position and enter a value for it.
-
Under Insert as select:
- Inclusion to include the criteria in the query.
- Exclusion to exclude the criteria from the query.
Tip:
This applies to all of the criteria specified above. -
Click Submit.
See Metadata Filters.
Back to "Build a cohort query".
Have you checked "Before you begin building your query" yet?
Microarray Expression
-
In the Cohort Query screen, click the Genomic Data category, then click Microarray Expression.
-
To select patients with Microarray Expression Results:
-
Either add the Specimen Type or Anatomical Site (both are optional) or click the search icon (
).To search for a Specimen Type:
-
In the Select Specimen Type window, select the condition for Specimen Type Name, Specimen Type Code or Code System and enter part of the code.
-
Select the specimen code, name and code system that you want to use in your query from the left side and move them into the right side using the arrow (
). -
Click Submit.
To search for an Anatomical Site:
-
Either enter part or all of a value for Anatomical Site or click the search icon (
). -
In the Select Anatomical Site window, select one of the Search Modes:
- Classic Search. More search conditions are available.
- Hierarchy Drill-in Search. You can drill down to see the patient count for any sub-level.
-
Search for an anatomical site either by Anatomical Site Name, Anatomical Site Code or Code System and click Search.
-
Select any Anatomical Site codes, names and code systems that you want to use from the left side and move them into the right side using the arrow (
). -
Click Submit.
-
-
-
Select the Microarray Attributes: the Array Type, the conditions and values for Intensity, P-value and/ or Call.
-
The Array Type: one-channel or two-channel.
If you select one-channel, specify the needed conditions and values for Intensity, P-value< and Call.
If you select two-channel, specify a condition for the Log2Ratio.
-
-
In the Expression for Genes from select either: Ad-hoc list, Pathway or Gene Set. Then select the Assembly Version and the DNA Reference Version.
-
Under Insert as select:
- Inclusion to include the criteria in the query.
- Exclusion to exclude the criteria from the query.
-
Click Submit.
See Metadata Filters.
Back to "Build a cohort query".
Have you checked "Before you begin building your query" yet?
RNA-seq Expression
-
In the Cohort Query screen, click the Genomic Data category, then click RNA-seq Expression.
To select patients with RNA-seq Expression Results:
-
Either add the Specimen Type or Anatomical Site (both are optional) or click the search icon (
).To search for a Specimen Type:
-
In the Select Specimen Type window, select the condition for Specimen Type Name, Specimen Type Code or Code System and enter part of the code.
-
Select the specimen code, name and code system that you want to use in your query from the left side and move them into the right side using the arrow (
). -
Click Submit.
To search for an Anatomical Site:
-
Either enter part or all of a value for Anatomical Site or click the search icon (
). -
In the Select Anatomical Site window, select one of the Search Modes:
- Classic Search. More search conditions are available.
- Hierarchy Drill-in Search. You can drill down to see the patient count for any sub-level.
-
Search for an anatomical site either by Anatomical Site Name, Anatomical Site Code or Code System and click Search.
-
Select any Anatomical Site codes, names and code systems that you want to use from the left side and move them into the right side using the arrow (
). -
Click Submit.
-
-
-
Select a condition for the RNA-seq Expression Attributes: RPKM, Raw Counts, Median Length (Normalized) or Strand.
-
Select an option for the RNA-seq Location: Ad-hoc list, Pathway and Gene.
-
For each, either enter a value or click the search icon (
). -
-
Select if the location is available for a certain Transcript ID and select the Assembly Version and the DNA Reference Version.
-
Select at which Genomic Position the patient is (optional).
-
-
Under Insert as select:
- Inclusion to include the criteria in the query.
- Exclusion to exclude the criteria in the query.
-
Click Submit.
See Metadata Filters.
Back to "Build a cohort query".
Have you checked "Before you begin building your query" yet?
Metadata Filters
This option is available at the bottom of each of the genomic criteria screens.
To add metadata filters:
-
Expand the Metada Filters option.
-
Click Add Metadata Filter to open the Select Metadata Attribute window.
-
Search for a metadata filter based on Attribute Name, Scope or Category to get a list of attributes associated with metadata.
-
Select the attributes from the list that you want to use and click Add to Filter. When you have added all the filters you need, click Done.
-
For each attribute name from the table, select a condition in the Operator column, then enter a value for it in the Value column.
-
Under Insert as select:
- Inclusion to include the criteria in the query.
- Exclusion to exclude the criteria from the query.
-
Click Submit.
Back to "Build a cohort query".
Have you checked "Before you begin building your query" yet?
Combine inclusion and exclusion criteria
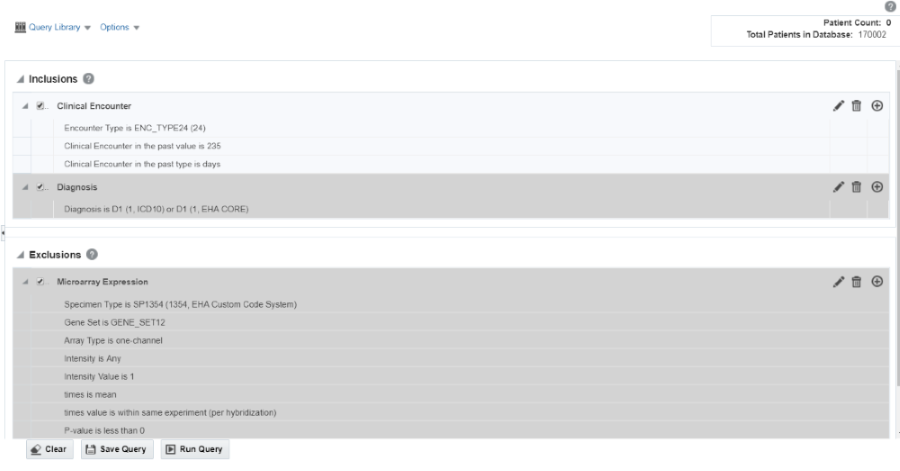
For you to get the best results, you can use a combination of inclusion and exclusion criteria that can give the exact data that you need.
Once you have added several criteria to your query, you can:
-
Expand or collapse the display for the Inclusions or Exclusions criteria.
-
Select the arrow to the left of the criteria to expand or collapse their details.
Modify details of an existing criteria statement
You can continue to adjust the details of an existing statement using the icons on the right.
-
The pencil icon (
 ) displays and edits your criteria selection.
 -
The trash can icon (
 ) removes any particular statement.
 -
The plus icon (
 ) adds another set of criteria from the same topic. For example, clicking the plus icon from within a Demographics tab prompts you to select additional Demographics criteria.
Understand the logic behind Inclusion and Exclusion criteria
Within an Inclusion statement, distinct criteria statements related to the same data element (Procedure, Medication, Gender, etc.) is considered with an OR criteria.
Example 2-2 Examples of how Inclusion and Exclusion criteria work
INCLUDE: Diagnosis = Diabetes AND (Demographics = Male OR Demographics = Married)
Within an Exclusion statement, distinct criteria statements related to the same topic will be considered with an AND.
EXCLUDE: Diagnosis = Diabetes OR (Demographics = Male AND Demographics = Married)
This function can be used to simplify your query structure, where you can address each data topic and category one at a time rather than having the same topic listed in both the Inclusion and Exclusion sections.
View Patient or Subject Count and data
With this functionality, you can see the number of patients or subjects who meet specified criteria and the total number of patients or subjects in the database. You can also see those patients' or subjects' data.
-
On the Home page, on the left, click the Cohort Query icon (
). -
Select at least one row of criteria defined in the Inclusions or Exclusions options.
-
Click Run Query. The patient count is visible in the top right.
-
To view patient data, click Patient Count.
View Specimen Count
-
Along the top, click the Options drop-down.
-
Select Show Specimen Count.
-
The specimen count is displayed. This is the count of all the specimens in the cohort that match the selected criteria.
Note:
This count is shown for all specimens associated with a patient or subject, not just the ones specific to the selected criteria.Save a query
After selecting the criteria for your query:
-
In the Cohort Query screen, click Query Library.
-
Click Save Query in the drop-down menu.
-
In the Save Query window, select:
-
create new to save it as a new query
-
search existing to save the query under an already existing name in the query library.
-
-
Click Submit.
Load a saved query
-
In the Cohort Query screen, click Query Library.
-
Click Load Query in the drop-down menu.
-
In the Load Query window, enter all or part of a Query Name.
-
Click Search.
-
Select the query.
-
Click Submit.
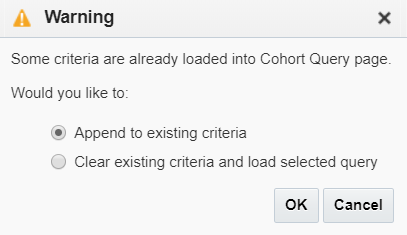
Note:
If an existing query is currently running, you can either add the loaded query to the newly created one or you can clear the existing criteria and use only your loaded query.