Release 9.0.2
Part Number A95995-01
 Contents |
 Index |
| Oracle Internet File System Setup and Administration Guide Release 9.0.2 Part Number A95995-01 |
|
The Developer's section of the Oracle 9iFS Manager allows you to control objects often used by developers within Oracle 9iFS. Many of these tasks can be performed using XML. For more information, see the Oracle Internet File System Developer Reference.
Topics include:
Oracle Internet File System (Oracle 9iFS) is a development platform for content management applications written using Java and XML. For developers, using Oracle 9iFS offers several specific advantages:
What does adding these customized components to an Oracle 9iFS mean for you, the administrator?
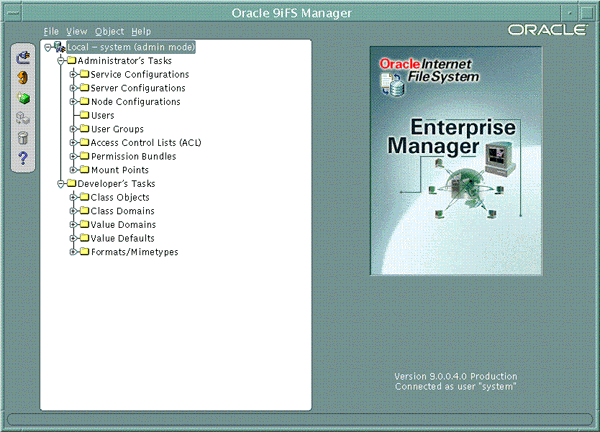
As a system administrator, developers may ask you to perform simple development tasks involving the objects shown in the Developer's section of Oracle 9iFS Manager (see Figure 6-1, "Developer's Section of Oracle 9iFS Manager"). Or, you may assign developers administrative privileges so that they may perform these tasks themselves. For more information on developing applications with Oracle 9iFS, see the Oracle Internet File System Developer Reference.
Using Oracle 9iFS Manager, you can create, modify, and delete class objects. A class object represents a class whose instances are persistently stored and managed by the Oracle 9iFS repository. During installation, Oracle 9iFS creates a number of class objects. Some of these are used internally; others are for commonly encountered data types in content management applications. An application can use the class objects provided, or create its own by subclassing them. Each class object may define one or more attributes for its data. In addition to these, a class object inherits the attributes of its superclass.
You can subclass an existing class by creating a new class object and specifying the parent class for the new class object. The new class object inherits all the attributes of the parent class and allows you to define additional attributes. For example, to create a custom document type, you would create a new class object, such as Purchase Order with a parent class of Document, and specify any additional attributes you want associated with the purchase order (Due Date, Customer Number, etc.). You can subclass object types using Oracle 9iFS Manager by creating new class objects.
Table 6-1, "Class Hierarchy Descriptions" describes each classof the class hierarchy. Note that the classes are subdivided into three groups under each abstract superclass: public object, system object, and schema object. The class hierarchy shows which child classes inherit from which parent classes. For example, Primary User Profile is a child class of User Profile and inherits all the attributes of User Profile. You can add or create new classes through subclassing.
Table 6-1 Class Hierarchy Descriptions
To manage the domain configuration, note that three class objects have been added to the Oracle 9iFS class hierarchy:
serviceconfiguration--Specifies the configuration of a service. This information is currently stored in the service properties file. This class object is uniquely identified by name and specified by name in starting a service on a node.
serverconfiguration--Specifies the configuration of a server. This class object is specified by name in starting a server on a node.
nodeconfiguration--Specifies the configuration of a node, including the node location (as a URL), the services to be automatically started, the servers to be automatically loaded, and whether these servers should be automatically started. This class object is uniquely identified by name. The set of active nodeconfigurations forms the domain controller's node list.
Creating a new class object involves the following tasks:
To create a new class object, use the Create Class Object window:

getAttribute and setAttribute methods inherited from oracle.ifs.beans.LibraryObject. If you specify a value other than the default, you must manually create a new Java class whose name is the value specified. You must compile this new class and ensure it is in the Java classpath before instances of the new class object can be instantiated. This is an advanced topic.
getAttribute and setAttribute methods inherited from oracle.ifs.server.S_LibraryObject. If you specify a value other than the default, you must manually create a new Java class whose name is the value specified. You must compile this new class and ensure it is in the Java classpath before instances of the new class object can be instantiated. This is an advanced topic.
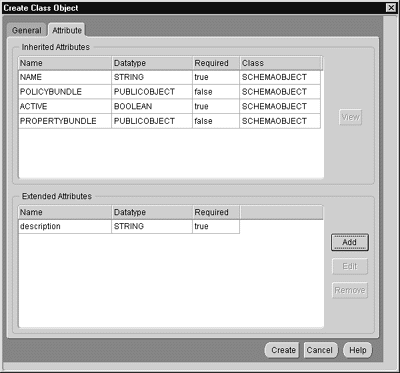
When subclassing objects, to create extended attributes, use the Add button on thee the Attribute tab on the Create Class Object window to display the Class Object Attribute Definition window (see Figure 6-4).

PublicObject, DirectoryObject, PublicObject_Array, and DirectoryObject_Array The referential integrity rule value is ignored for all other datatypes. For these four datatypes, a referential integrity rule value of Restrict prevents a PublicObject or DirectoryObject (or subclass) referenced by instances of this attribute from being freed. This is analogous to a "Delete Restrict" database constraint. A referential integrity rule value of Clear allows a PublicObject or DirectoryObject (or subclass) referenced by instances of this attribute to be freed, causing the value of the referencing attribute (or attribute element, for array-type attributes) to become null.
PublicObject, DirectoryObject, SystemObject, SchemaObject, PublicObject_Array, DirectoryObject_Array, SystemObject_Array, and SchemaObject_Array. Specifies an optional class domain on attributes of these datatypes. A class domain performs basic data validation upon creating an instance of a class object or updating the attributes of an existing instance of a class object. For example, without a class domain, a PublicObject attribute could be set to any PublicObject: a Document, a Folder, etc. You could use a class domain to restrict this to, for example, only Documents, or only Documents and any subclasses of Documents. See "Creating a Class Domain" for more information on class domains.
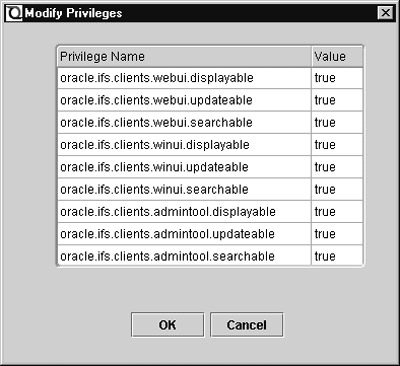
The only modifications allowed for class objects are adding or editing an extended attribute and modifying the privileges of attributes.
You edit custom client privileges on the Modify Privileges dialog (see Figure 6-5).
Using Oracle 9iFS Manager, you can create and modify class domains. A class domain is used in conjunction with class objects. For attributes that point to objects, you can limit values to specific classes by using class domains. For example, the AccessControlList attribute for public objects has a class domain which restricts the value to objects of the AccessControlList class.
Each attribute has a datatype, such as int or String. As you would expect, Oracle 9iFS supports:
In addition, Oracle 9iFS supports four top-level object datatypes unique to Oracle 9iFS:
You can use a value domain to validate any of these four datatypes. But, if you want to be more specific and limit an attribute's value instance of a single class, you need a validation technique to ensure that the value entered is not, for example, just any Public Object, but specifically, a Document object. In this case, you would use a class domain to specify the single class that the attribute's datatype must match.
If an attribute's datatype is a subclass of one of the four unique Oracle 9iFS top-level datatypes listed above, you can specify a class domain on that attribute (see Figure 6-6). Oracle 9iFS will throw an exception if the attribute is of any other class.

When modifying a class domain, the Description field is the only field that can be updated. To modify a selected class domain:
If a class domain is deleted, the data validation performed by that class domain no longer occurs. To delete a class domain:
In many cases, the number of possible valid values for an attribute is limited. A frequently used form of data validation takes the value entered and checks it against a list of valid values, returning an error message if the value entered is not valid.
A value domain is a separate class which can contain a list of values used by developers for custom applications. You can limit attribute values to specific values by using value domains. Limiting the possible values helps with data validation. User input is checked against the list, and if the input value is not on the list, Oracle 9iFS throws an exception. Use the Create Value Domain window (Figure 6-7).

To create a new value domain with Oracle 9iFS Manager:
You can make the following modifications to value domains:
Note: To find a specific value, click the Create Search button.
Value defaults are particularly useful if you need to apply the same default value to a large number of attributes. Using a value default lets you specify the default value once, and apply it to many attributes. If the default value needs to be changed, you can then change the value default in one place, and all attributes that use the value default will now have access to the new value (see Figure 6-8).
By using value defaults, you can specify an initial value for an attribute. If no value is set, the repository sets the default value for the attribute. Should the default value be outside the value domain when the value domain validation is on, the Oracle 9iFS server throws an exception upon setting the attribute with the invalid default value.

To create a new value default with Oracle 9iFS Manager:
Assume that ExpenseReport has an attribute called ApproverName. You could use a value default on ApproverName to specify the name of your department's vice president, Chris Stevens. When an ExpenseReport object is created, "Chris Stevens" would be the default Approver Name. This same ApproverName attribute might be used for approving hiring requests, as well as approving expense reports. If there was a reorganization and Kim Naser became the new vice president, you could change the value default object, and the new name would become the default approver for both expense reports and hiring requests.
You can modify the Description field and set primitive-type values in the Enumerated Values list. Only one object can be added at a time.
To modify the description of a value default:
You can edit any non-multi-type value default. If the value default is multi-typed, you can click Edit Value to open the Multi-value Editor (see Figure 6-9, "Edit Multi-valued Object Dialog"). Using the Multi-value Editor, you can add/edit primitive values, but only view non-primitive values.
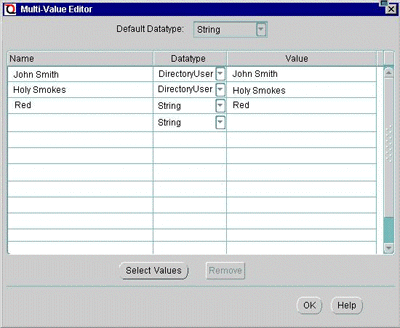
To set object type values for a value default:
Java Server Pages (JSPs) are a way to create web-based applications based on Oracle 9iFS. (In fact, the Oracle 9iFS Web interface uses JSPs.) JSPs use JavaBeans to extract data from the repository and display information on the Web by generating HTML documents. Although JSPs provide a way for users to view and manipulate documents, providing functionality parallel to that of renderers, using a JSP is not technically "rendering" because it does not involve a specific renderer class. The JSP lookup is created with Oracle 9iFS Manager by registering the JSP.
The /ifs/jsp-bin folder is provided for developers to place JSPs in to be executed. The list of these JSP-executable directories, however, is configurable. To add more JSP-executable directories, modify the property IFS.SERVER.PROTOCOL.DAV.Jsp.AllowedDirs in the domain configuration.
You do not have to register a JSP for it to execute. You do have to register it if you want the JSP to be the way you display a particular class through the Web. Using Oracle 9iFS Manager, you can view, register, and edit JSPs. When a JSP is added, it is added to the JSP registry.
To register a JSP, use the Java Server Page (JSP) Lookup Register window (Figure 6-10):


At its simplest, parsing simply means reading a document and performing some automated data extraction. Parsing occurs when a document is being inserted or updated, and may involve storing the resultant parts of the document inside the repository. Since the platform itself supports such a broad spectrum of document types, the parsing framework necessarily supports a wide variety of parsing scenarios. The parsing behavior assigned to new or existing file types can be managed using the Oracle 9iFS Manager.
Oracle 9iFS exposes this parsing framework in several ways. In addition to relatively easy customization, the Oracle 9iFS Java API includes classes and interfaces that can be extended to handle additional use cases and business problems. These custom objects can easily be deployed within the existing parsing framework, minimizing your work.
When you want to create objects in Oracle 9iFS, you can either use the standard parsers provided, or, if your application requires special treatment, you can create a custom parser.
Parsers are associated with file extensions, where the parser is invoked by Oracle 9iFS when a file of corresponding extension is stored in the system. The parser will process the file according to the functionality implemented by the parser. Parsers and file extensions are registered in the ParserLookupByFileExtension property bundle. For example, Oracle 9iFS associates the parser "IfsXmlParser" with the "xml" file extension. In this way, the "IfsXmlParser" is invoked whenever a file with the "xml" file extension is stored in the system. (See "Registering Parsers" for information on how to associate a parser with a file extension using Oracle 9iFS Manager.)
Custom parsers can invoke other parsers, including IfsSimpleXmlParser, during the parsing process. This feature is important to compound documents, which may create instances of multiple Oracle 9iFS subclasses, perhaps based on a variety of XML or other file formats. Custom parsers also give you control over whether you create a Document Object Model (DOM) object during parsing.
For more information on working with custom parsers, see the Oracle Internet File System Developer Reference.
The IfsXmlParser is the standard XML parser class that is registered for the "xml" file extension. The IfsXmlParser creates an object in the Oracle 9iFS repository from an XML document body and is used as the default parser for all XML documents stored in Oracle 9iFS. The parser provides a flexible mechanism for invoking different XML parsers, based on the content of the XML file. These XML parsers are registered in the XmlParserLookup property bundle.
When the IfsXmlParser finds an XML Namespace specified for the root element of the XML file, it invokes the parser associated with the specified namespace in the XmlParserLookup property bundle. If there is no entry for the namespace in the property bundle, IfsXmlParser looks for an entry associated with the key CustomXmlParser. If there is no such entry, the parser invokes the LiteralDocumentParser, which simply stores the document.
When there is no namespace specified for the root element, the IfsXmlParser will check to see if the root element is the name of an Oracle 9iFS class, or one of "SimpleUser" or "ObjectList," and, if so, it will invoke the parser associated with the key IfsDefaultNamespace in the XmlParserLookup property bundle. If the root element is not the name of an Oracle 9iFS class, or one of "SimpleUser" or "ObjectList," then the IfsXmlParser will look for an entry associated with the key CustomXmlParser and invoke the parser pointed to by that key. If there is no CustomXmlParser, IfsXmlParser will invoke the LiteralDocumentParser.
Out of the box, the XmlParserLookup property bundle has the following parser entries:
Table 6-2 XmlParserLookup Property Bundle
| Name | Value |
|---|---|
|
IfsDefaultNamespace |
http://xmlns.oracle.com/ifs |
|
http://xmlns.oracle.com/ifs |
oracle.ifs.beans.parsers.IfsSimpleXmlParser |
|
LiteralDocumentParser |
oracle.ifs.beans.parsers.LiteralDocumentParser |
As shown in Figure 6-12, "Parsing Sequence", the XML parsing framework is invoked when a document is inserted or updated through one of the default protocols provided with the Oracle 9iFS.
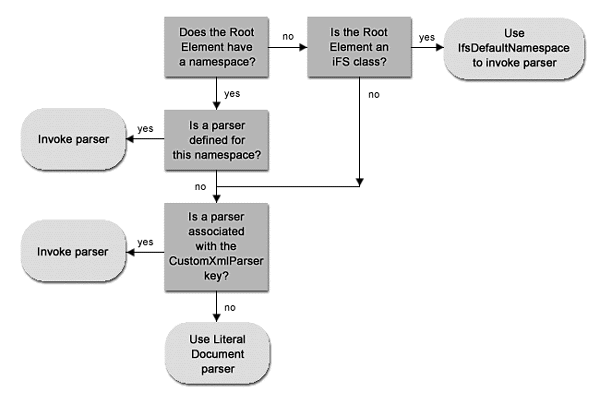
The Oracle 9iFS XML parser examines the root element of the document during pre-parsing. If there is no namespace associated with the root element, AND, the root element represents an Oracle 9iFS class (or one of ObjectList or SimpleUser), then the parser invokes the parser associated with the namespace pointed to by the property IfsDefaultNamespace, whose default value is http://xmlns.oracle.com/ifs, which, in turn, points to the Oracle 9iFS simple xml parser.
In the given example, the first XML file will change the value of IfsDefaultNamespace. When the second XML file is dropped in, since there is no namespace associated with the root element, AND, the root element represents an Oracle 9iFS class, the parser tries to use the parser associated with the namespace pointed to by the property IfsDefaultNamespace. But such parser has not been defined yet, hence the exception.
There are two workarounds:
IfsDefaultNamespace.
Additionally, once the parser gets into this erroneous state, where no more XML files can be parsed, to fix the problem (since there is no way to get to the IfsSimpleXmlParser via the IfsDefaultNamespace), the workaround is to specify the Oracle 9iFS namespace in the XML file that is either trying to reset IfsDefaultNamespace back to its original form, or to add the new property associating the new namespace with the new custom parser. For example:
<?xml version = '1.0' standalone = 'yes'?>
<PROPERTYBUNDLE xmlns="http://xmlns.oracle.com/ifs">
<update reftype="valuedefault">XmlParserLookup</update><properties><property><name>IfsDefaultNamespace</name></property></properties></PROPERTYBUNDLE>
In general, if you want to use a namespace-specific parser based on the namespace used in your XML files, you need not change the value of IfsDefaultNamespace. Instead, add a new property whose name is the namespace name and whose value is the intended parser class. The intended use of the property, IfsDefaultNamespace, is to allow people who want to write their own custom parser to handle XML files whose root element is an Oracle 9iFS class, to be able to do so without having to add a namespace to all their XML files. To continue creating Oracle 9iFS objects (such as a PropertyBundle) using XML, their custom parser should have the required functionality to enable it.
The Oracle 9iFS parser framework lets the XML parser validate your XML file against a Document Type Definition (DTD). A DTD describes the structure of an XML document and specifies various validation rules that the document must follow. If the document does not conform to the expected structure of these rules--for example, a required element is missing--the document is invalid. The DTD information can be embedded in the document itself, or it can reside at a URL; e.g., the Oracle 9iFS system itself.
There is a property called IfsDefaultDTDValidation defined in XmlParserLookup. Oracle 9iFS uses this property to determine whether or not to validate XML documents that are handled by the LiteralDocumentParser. Custom parsers that are registered in the XmlParserLookup property bundle can also use this property to determine whether or not to validate XML files. The default value of IfsDefaultDTDValidation is FALSE; that is, DTD validation is turned off by default.
If the XML parser discovers that a file is invalid, an error is generated that you can trap in a parser callback mechanism or some other piece of an application. Additionally, the protocol server used to upload the file displays an error message.
If the file is not valid, Oracle 9iFS does not store it. The user needs to correct the errors in the file and upload it again.
Using Oracle 9iFS Manager, you can register custom parsers created for special applications, and edit or delete parsers. When a parser is added, it is added to the parser registry.
The Parser Lookup Registry Window displays the existing parsers by extension and XML parsers listed.

This dialog provides three functions:
If you've created a parser for a particular document type, you will register it by the document extension on the Parser by Extension tab (see Figure 6-14). For example, if you want to enable the ClassSelection parser, you need to register it with any extension with which you want to associate it.

To register an XML parser, use the XML Parser tab on the Parser Lookup Registry window (Figure 6-16):

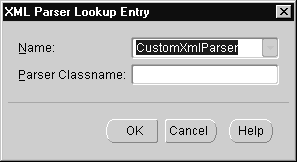
A common way to customizeOracle 9iFS is to create subclasses of Document and add custom attributes to them. You can specify the default Document subclass instance to be created when a document is inserted into the repository, through any Oracle 9iFS protocol. To use this feature, your subclass must be associated with a certain file extension. The ultimate goal is that when a file is inserted into the repository, an instance of the desired subclass is created. Two simple steps are required to invoke this behavior:
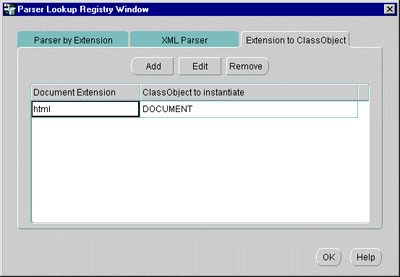
For example, say you have determined a set of custom attributes for the following three subclasses of Document: Presentation, Memo, and Report. You want all .ppt files to become instances of Presentation, all .mem files to become instances of Memo, and all other files to be saved as instances of Report. The first thing to do is to cause all files to invoke the ClassSelectionParser. In this case, all files are designated to invoke the ClassSelectionParser by setting the Key to equal an asterisk, and setting the Value to the ClassSelectionParser's fully qualified name.
Next, the ClassSelectionParser needs to know which subclass to invoke for which file suffix. This key/value bundle is placed in the ObjectTypeLookupByFileExtension property bundle.
With these registrations done, all documents inserted into the repository will be instances of either the MyReport, MyMemo, or MyPresentation class objects.
If you use "parse on upload" when loading XML files, the XML files are not saved in the system once parsing is complete. To delete the class objects and class instances created, you can delete them through the Web interface if they are foldered. If they are unfoldered, use the Command Line Utility Protocol (CUP):
login system/manager
ls -class <CLASSNAME> "name='<NAMEOFTHE INSTANCE>'" -attr name
The output will contain the name of the instances and their IDs will be in parentheses.
rm -id <ID>
ls -class classobject "name='<NAMEOFTHE CLASSOBJECT>'" -attr name
Then:
rm -id <ID OF THE CLASSOBJECT>.
Note that you cannot delete the object unless it has no dependencies. If there are still any instances left, you cannot delete the classobject.
A renderer accesses information stored in Oracle 9iFS and outputs the information in a certain format. In a sense, it is the opposite of a parser. While the information output by a renderer may be identical to the document as it was input, it doesn't have to be. Once information has been stored in Oracle 9iFS, it can be rendered in any format the developer defines. For example, a custom XML renderer can perform the following task:
Data can be combined from several documents and displayed as a single, new document. For example, information that is collected from e-mail messages may be displayed dynamically in a Web browser window.
The rendered representation is typically some combination of the following:
The following table lists the Oracle 9iFS standard renderer classes provided out-of-the-box.
| Class | Description |
|---|---|
|
Simple XML Renderer |
Generates a complete XML representation of a LibraryObject. |
|
Content Renderer |
Renders the content of a document. |
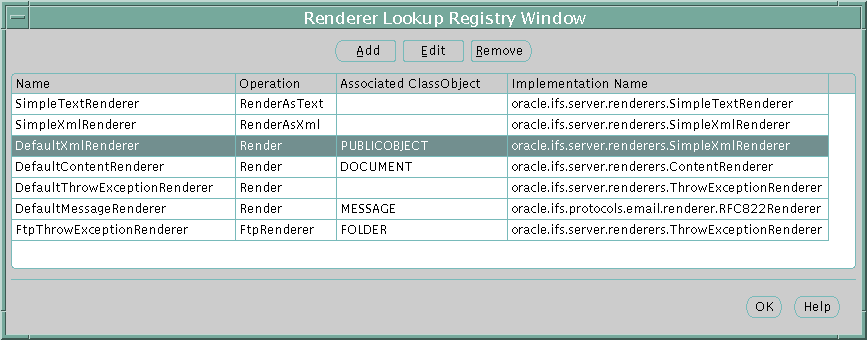
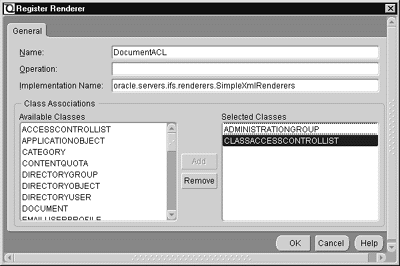
Using Oracle 9iFS Manager, you can register and edit custom renderers. When a renderer is added, it is added to the renderer registry.
To add and register a renderer, use the Renderer Lookup Registry window (Figure 6-19):
Oracle 9iFS associates a format (mimetype) with each document. The format of a document specifies the way the document information is stored, retrieved, and rendered. Internet browsers need to know the format of documents to determine how to store content and index their contents. The format determines:
You can either:
To create a format or mimetype, use the Create Format dialog (Figure 6-21) :

Categories are new attributes that you can apply to any file or folder in Oracle 9iFS. A category is a package of attributes that you define in Oracle 9iFS Manager. These are then visible to users through the Windows interface. You cannot create an instance of Category; however, you can create a subclass of the Category class. You can then assign a category to a file or edit the attributes of a category using the Windows interface.
Oracle 9iFS lets you define arbitrary metadata, called categories, that you can apply to any file or folder. Previously, extended attributes were based on the type of file: for example, you could add the ReadyForPublication property to all HTML files. Now, with categories, you can define one set of related attributes and then apply them to any file or folder. For example, you could define a category that describes all the information needed in a review process-NextReviewer, ReadyForPublication, and so forth-and then apply them to HTML, GIF, JPG, AVI, or any other files that form your web site.
Out of the box, Oracle 9iFS provides several categories (see Figure 6-22, "Out-of-the-box Categories"):

Using Oracle interMedia Annotator, Oracle 9iFS automatically extracts color depth, play length, closed caption text, and other types of information encoded in audio, video, and image files, then makes this information into searchable and editable attributes of these files.
This feature requires that the Oracle Text option for Oracle 9iFS is enabled.
If you subclass one of these existing categories, the subclass inherits the attributes and behavior of that category.
You can always subclass an existing class to add attributes. To create a subclass of Category, attributes are added to the class. To create an instance of a Category, use a CategoryDefinition.
For more information on subclassing, see the Oracle Internet File System Developer Reference.
The ACL of a category cannot be altered directly. The ACL of a category is derived from the associated public object; therefore, you must alter the ACL of that public object.
The most efficient way to make use of the various characteristics of different file types is to obtain metadata automatically. You can then use the custom attributes to search and perform other custom processing to certain types of files with minimal user intervention.
Previously, to extract existing metadata from multimedia files, you were required to write your own parser to extract this data and associate the parser with the appropriate file extension. In fact, this is still the preferred strategy for dealing with exotic file types. However, for the majority of multimedia files, you can use the automatic metadata extraction capability built into Oracle 9iFS.
A set of categories has been pre-defined for multimedia files, and special handling has been added so that when audio, video, and image files are inserted into the repository, the metadata accompanying these files is extracted and used to populate categories for these files. To perform this "offline" extraction of metadata, the interMediaAnnotator agent identifies new multimedia content and invokes the appropriate interMedia Annotator parsing engine.
Oracle 9iFS uses only a subset of the capabilities of interMedia. For more information on the rich content capabilities of interMedia, consult the interMedia Java Classes User's Guide and Reference.
NOTE: In case you want to disable this automatic extraction of multimedia metadata, you can halt the interMediaAnnotator agent.
Examples of typical multimedia metadata include the number of colors in an image, the sound quality in an audio file, and the compression format for a video file. Using Oracle 9iFS, you can extract extra metadata that exists in many multimedia file formats and associate that metadata with Oracle 9iFS files. By associating the metadata with Oracle 9iFS, it becomes searchable using the Oracle 9iFS API. The text track; for example, closed captioning for a video, may be extracted and searched.
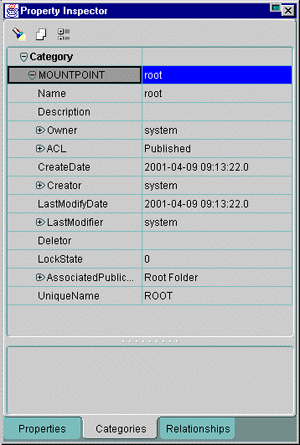
Using Oracle 9iFS Manager, you can search on categories then use the Property Inspector to view the attributes of the category (see Figure 6-23, "Property Inspector: Categories Tab").
Categories are also visible from a Windows client machine with the Oracle 9iFS Utilities for Release 9.0.1 (see Figure 6-24, "Add a Category to a File with the Oracle 9iFS Utilities").

Because they are based on the Category class, you can use these metadata objects the same way you use categories.
Text Captioning Closed. Caption text tracks accompanying a video or audio file are extracted using this same process.
Searching on Extracted Text. This integration facilitates Oracle Text indexing on any text track present in the multimedia content, so you do not have to modify code to benefit from this enhancement.
The Oracle 9iFS repository. Identifies files containing multimedia content recognized by the interMedia Annotator. Using the interMediaAnnotatorAgent, interMedia Annotator components are invoked to parse these files and the resulting metadata is associated with those Oracle 9iFS documents.
|
 Copyright © 1999, 2002 Oracle Corporation. All Rights Reserved. |
|

