Right-click the Question Screens folder in your screens file and select New Question Screen.
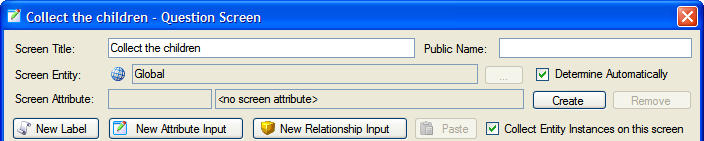
Enter an appropriate name for the screen in the Screen Title text box. TIP: The screen name should include the relationship text.
Select the Collect Entity Instances on this screen check box.
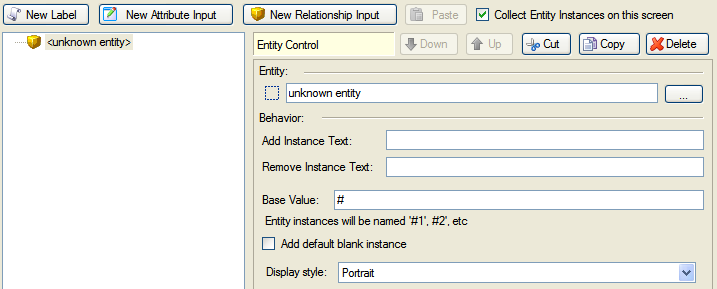
The Entity Control window will be displayed:
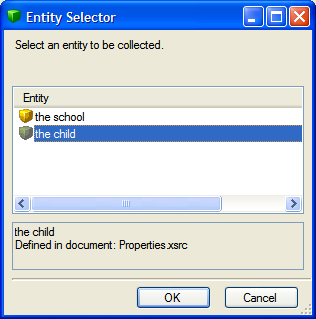
Click the browse button next to the Entity field to open the Entity Selector dialog. Select the appropriate entity.
Click OK. The entity name will now appear in the Entity text box in the Entity Control window. The Screen Entity is also shown, based on the containment relationship defined for the entity you have selected. TIP: The entity control is displayed as a cube in the screen control list on the left hand side of the question screen dialog. You can return to the entity control window at any point by clicking on this icon.
Specify the Add Instance Text and Remove Instance Text, if you wish to customize the text for the Add and Remove Instance buttons on the entity collect screen. If you leave these fields blank, the default text used for these buttons is "Add New Instance" and "Remove Instance(s)".
Specify the Base Value for the names of entity instances (eg "instance #", "child #", "pet #"). This is the base name used to generate the entity instance ID which is set behind the scenes. There are two circumstances in which you might see it on screens: either on automatic data review screens, or in a decision report that lists the entities associated with a relationship node where you have not specified an identifying attribute for the entity in question.
Select the Add default blank instance checkbox if you want a blank instance of the entity instance created by default when the screen is displayed.
Select the Display style from the drop-down list. This will determine how entity instances are displayed on the screen. The options are: Portrait, Landscape, Tabular and Custom. (If you select the Custom display style you will also need to specify the Custom style.)
Click OK.
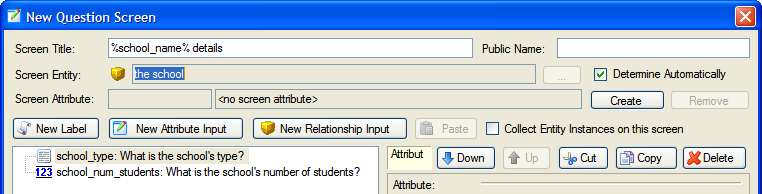
Collect attributes for the entity
On your entity collect screen, you should also collect some basic information about each entity instance in order to identify the entity instances at later points in the interview; for example, the identifying attribute. To collect an attribute for the entity, do the following:
Double-click on the entity collect screen in your screens file to open it for editing.
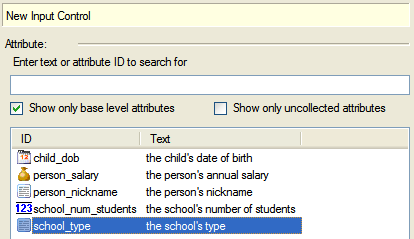
Click on the New Attribute Input button.
In the New Input Control window, select the attribute you want to place on the screen as a question for each instance of the entity.
NOTE: You can only add attributes which belong to the target entity as questions to the screen. Adding attributes which do not belong to this entity will cause problems at runtime and will be reported as compilation errors.
Click Create.
Select the attribute on the left hand side of the screen. The right side of the question screen edit dialog will be replaced with a set of edit controls for the question based on its data type. Here you can customize questions and customize user input options.
Click OK.
Create entity question screens
Further question screens can be created to collect additional information about each entity instance. Each question screen can only collect attributes which belong to a particular entity, so for example, you cannot collect a global attribute and an entity attribute on the same screen. (Adding attributes from multiple entities to the same screen will cause problems at runtime and will be reported as compilation errors.)
Select the Screen Entity. If the Determine Automatically checkbox is selected for the screen, the entity to which the questions relate is automatically determined based on the entity of the attributes on the screen.
(If the Determine Automatically checkbox is not selected for the screen, you will need to manually select the screen entity. To do this, use the browse button next to the Screen Entity field to open the Entity Selector and then select the entity for the screen.)
Click OK.
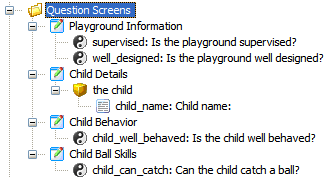
Control the order of entity question screens
The default behavior of entity question screens is to show a screen for all instances of an entity before moving on to the next screen. For example, the following screen structure:
would ask "Is the child is well behaved?" for all children before asking the next question "Can the child catch a ball?" for all children.
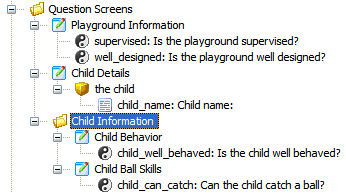
To collect all information about an entity instance before moving on to the next instance of the entity, simply group the entity-level screens into a folder together. For example, the following screen structure:
would display all screens in the "Child Information" folder for one child (where relevant) before moving on to the next child.
The entity-level folder must only contain entity-level question screens for it to be identified as an entity-level folder and behave in this way.
Note that the entity collect screen "Child Details" is only shown once in the interview (to collect how many children there are) so should not be placed in the entity-level folder.
Use substitution on entity screens to identify the entity instance
Where questions on a screen could be taken to relate to one of several instances of an entity, it is necessary to place the questions in context by clarifying the entity instance to which the questions relate. For example, a screen heading "The child's hobbies" will not provide enough information for the user to answer the questions if there is more than one child.
TIP: The concatenation function can be used to create substitution variables such as "Bob (claimant, 32 years)", "Jane (daughter, 3 years)".
Associate an entity instance with another set of entity instances via a reference relationship
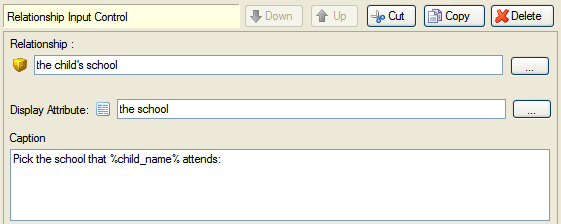
On question screens, a relationship input control is used to set a relationship between entity instances that already exist in the interview. For example, if you wanted to collect a list of children (ie 'the child' entity instances) and collect a list of schools (ie 'the school' entity instances), then you would also want to find out which school (of the previously entered schools) each child goes to (ie to set the relationship 'the child’s school'). To do this you would use a relationship input on a question screen as per the steps below.
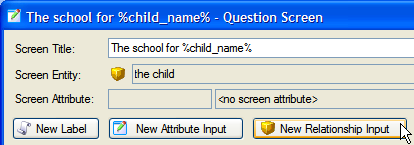
After defining your entity collect screens for the two entities in the relationship, create a new question screen. TIP: The screen title should include substitution for the name of the source entity (eg "The school for %child_name%") so that it is clear to which entity instance the screen is referring.
Click on the New Relationship Input button.
In the Relationship Input window, click the browse button next to the Relationship field to open the Relationship Selector where you can pick the relationship that you want to set for the entities (eg 'the child's school').
Click the browse button next to the Display Attribute field to open the Attribute Selector where you can pick the attribute that is used to identify the target entity instances (eg 'the school'). This will be the attribute that is shown for each of the target entity instances, from which the user will select to set up the relationship. Note that you can control the list of target entity instances that is displayed - see Filter the list of available target entities below for more information.
Enter a Caption. This is the text that will appear next to the display attribute (eg "Pick the school that %child_name% attends:"). TIP: You can use substitution of the name of the target entity in the caption to further clarify who you are setting the relationship for.
Click OK.
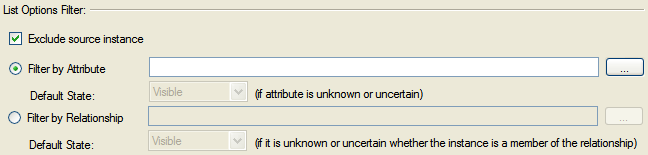
Filter the list of available target entities
You can filter the list of entity instances that are able to be selected as a target of the relationship being collected. There are three options available to do this in the List Options Filter section for a relationship input control:
Exclude source instance: This option is useful where the source and target entities of the relationship you are collecting are the same. Selecting this option means that the source entity instance will not show up in the list of possible targets. (This option is selected by default.) For example, if you had an entity "the person" and a relationship "the person's spouse" where both the source and the target of the entity were the same. Since a person can not be their own spouse, selecting this option would remove the source instance from the list of target entity instances.
Filter by Attribute: This option lets you specify a boolean attribute in the relationship's target entity that (i) if true, will make that entity instance appear in the list of targets, and (ii) if false, will hide that entity instance in the list of targets. The Default State option can be used to specify what happens if the attribute is unknown or uncertain.
Filter by Relationship: This option lets you specify a relationship whose known targets are to be used as the set of possible targets for the relationship you are collecting. The source and target entities of the filter relationship must be the same as the relationship you are collecting. The Default State option is useful where the filter relationship is inferred and lets you control whether a target instance should be displayed in the list if it is unknown or uncertain whether it is a member of the relationship.
Note that the last two options are mutually exclusive.