Exascale Database - AKV
Oracle Exadata Database Service on Exascale Infrastructure supports integration with Azure Key Vault (AKV). This capability allows you to manage transparent data encryption (TDE) master encryption keys (MEKs) using Azure customer-managed keys.
To configure Azure Key Vault to encrypt your database, complete the following steps:
- Create an Azure Key Vault from the Azure Portal
- Create a Key on Azure Key Vault from the Azure Portal
- Create an Exascale VM Cluster from the Azure Portal
- Disable Azure Key Vault Public Access from the Azure Portal
- Obtain Azure Key Vault DNS Zones Information from the Azure Portal
- Add Private AKV DNS Zones from the OCI Console
- Create the Network Requirements for Creating an Identity Connector from the Azure Portal
- Create an Identity Connector for Exascale VM Cluster from the OCI Console
- Create an IAM Policy for Accessing Azure AKV Key Resources from the OCI Console
- Enable the Azure Key Management from the OCI Console
- Configure Microsoft Entra ID Permissions for Key Vault Access from the Azure Portal
- Register Azure Key Vault in the OCI Console
- Create a Database and Use Azure Customer-Managed Key (CMK) as the Key Management Solution from the OCI Console
- Modify the Key Management from Oracle Wallet to Azure Customer-Managed Key (CMK) from the OCI Console
- Create an Azure Key Vault
For step-by-step instructions, see Prerequisites.
- Create a Key on Azure Key Vault
For step-by-step instructions, see Prerequisites.
- Create an Exascale VM Cluster
For step-by-step instructions, see Exascale VM Cluster.
- Disable Azure Key Vault Public Access
- From the Azure portal, select Key vaults.
- Select the Name field of the Key vault that you want to use.
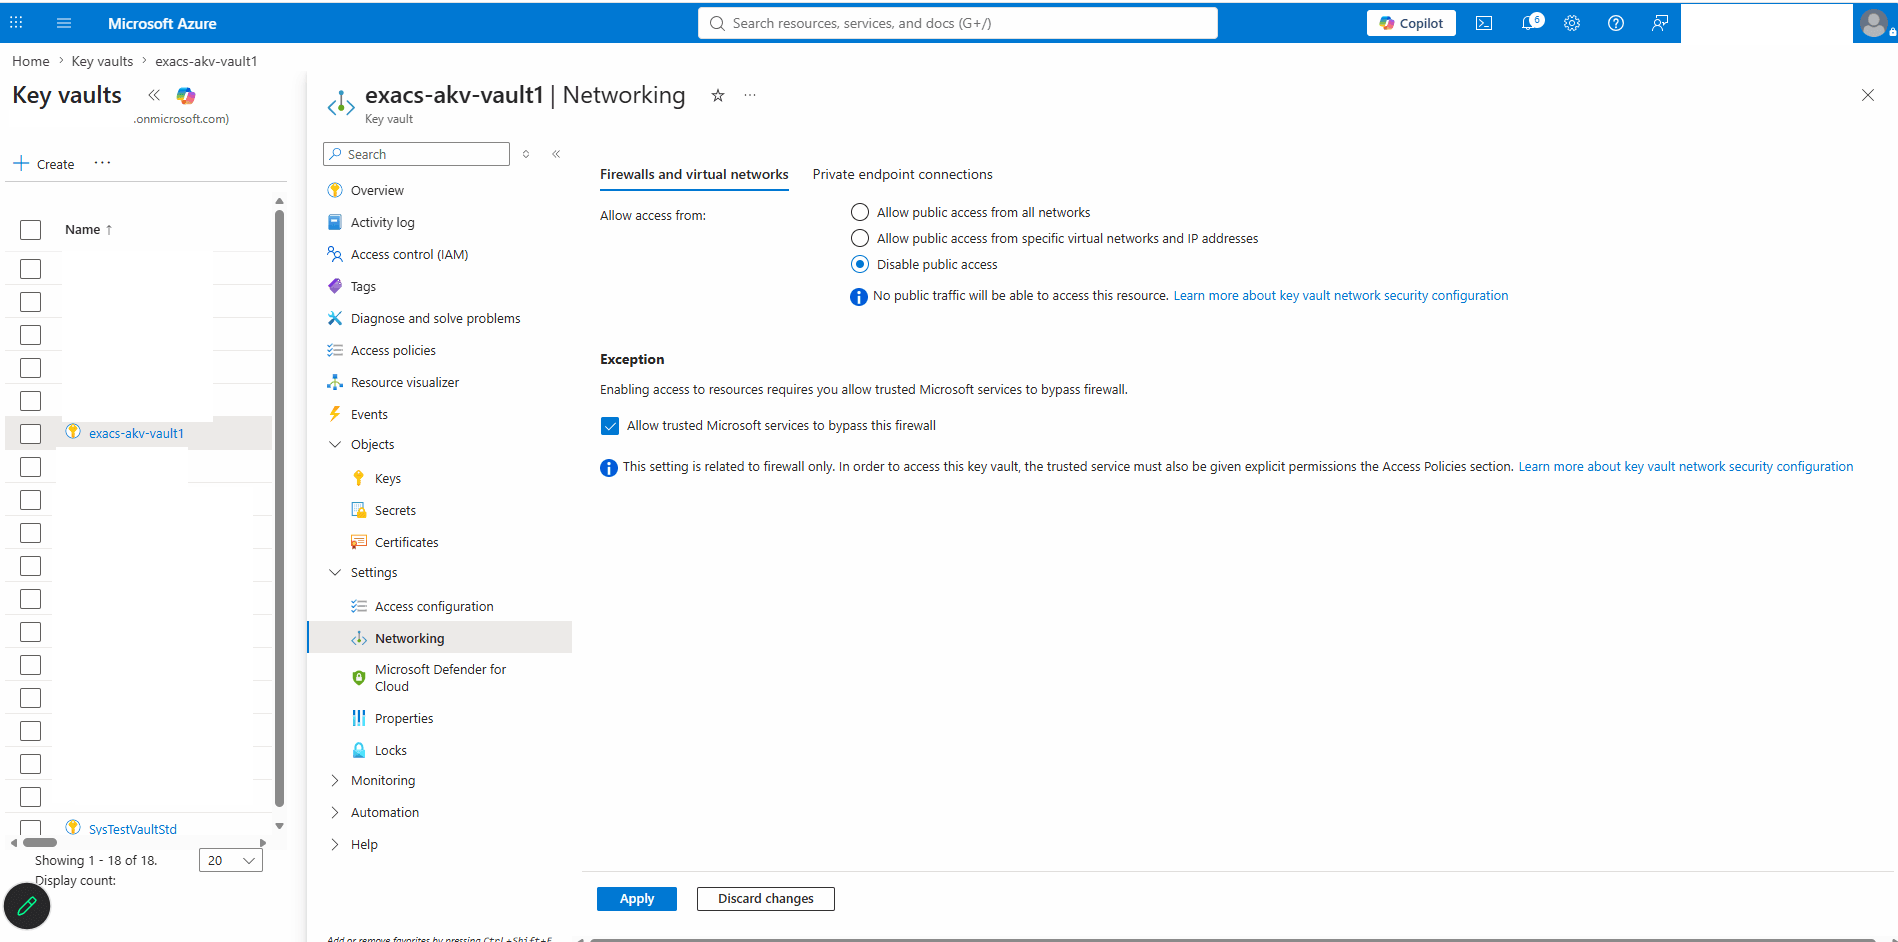
- Expand the Settings section, and then select Networking.
- From the Firewalls and virtual networks tab, you can optionally disable public access.
Note
After the public access is disabled, Azure Key Vault is accessible only through a Private Endpoint. - Select the Apply button to save the changes.
- Obtain Azure Key Vault DNS Zones InformationNote
During Azure Key Vault creation, when the private endpoint (privatelink.vaultcore.azure.net) is set up, a private DNS zone is created by the workflow. Two Private DNS Zones need to be added in OCI to allow the Exascale Database to resolve private endpoint URLs to the correct private IP addresses.- From the Azure portal, select Key vaults.
- Select the Name field of the Key vault that you want to use.
- Expand the Settings section, and then select Networking.
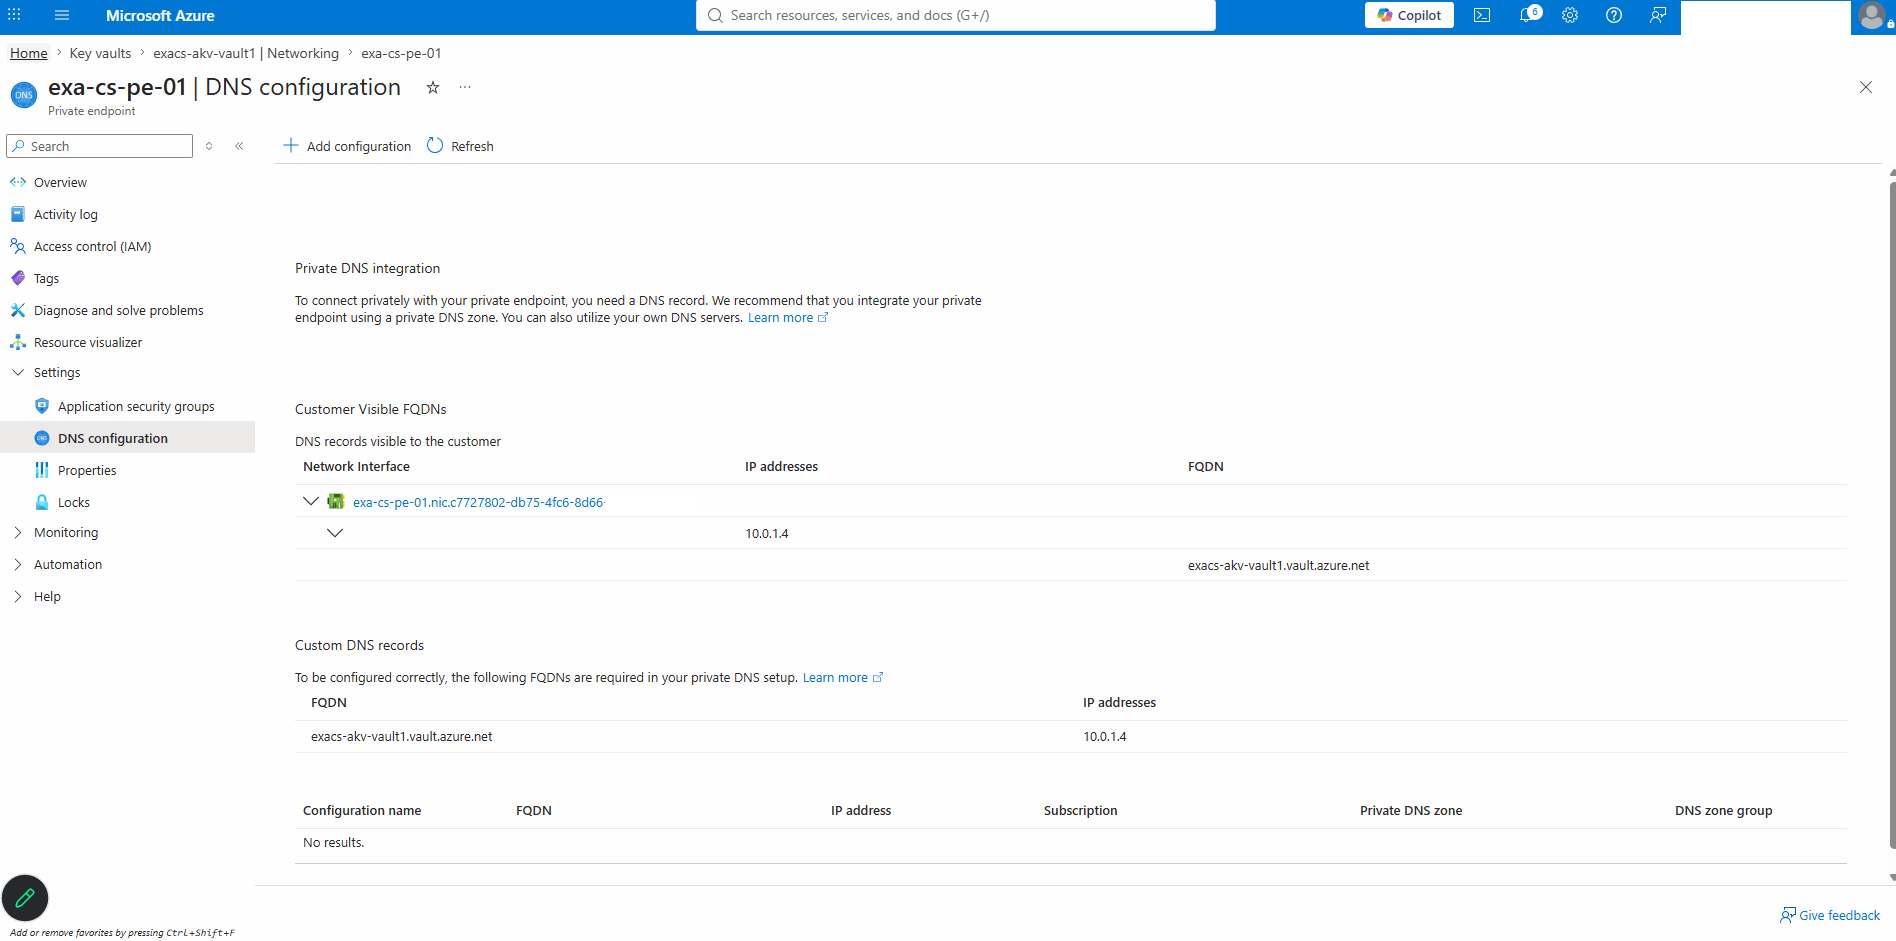
- From the Private endpoint connections tab, select the Private endpoint name.
- From the left menu, expand the Settings section, and then select DNS configuration. Note the FQDN and IP addresses information.
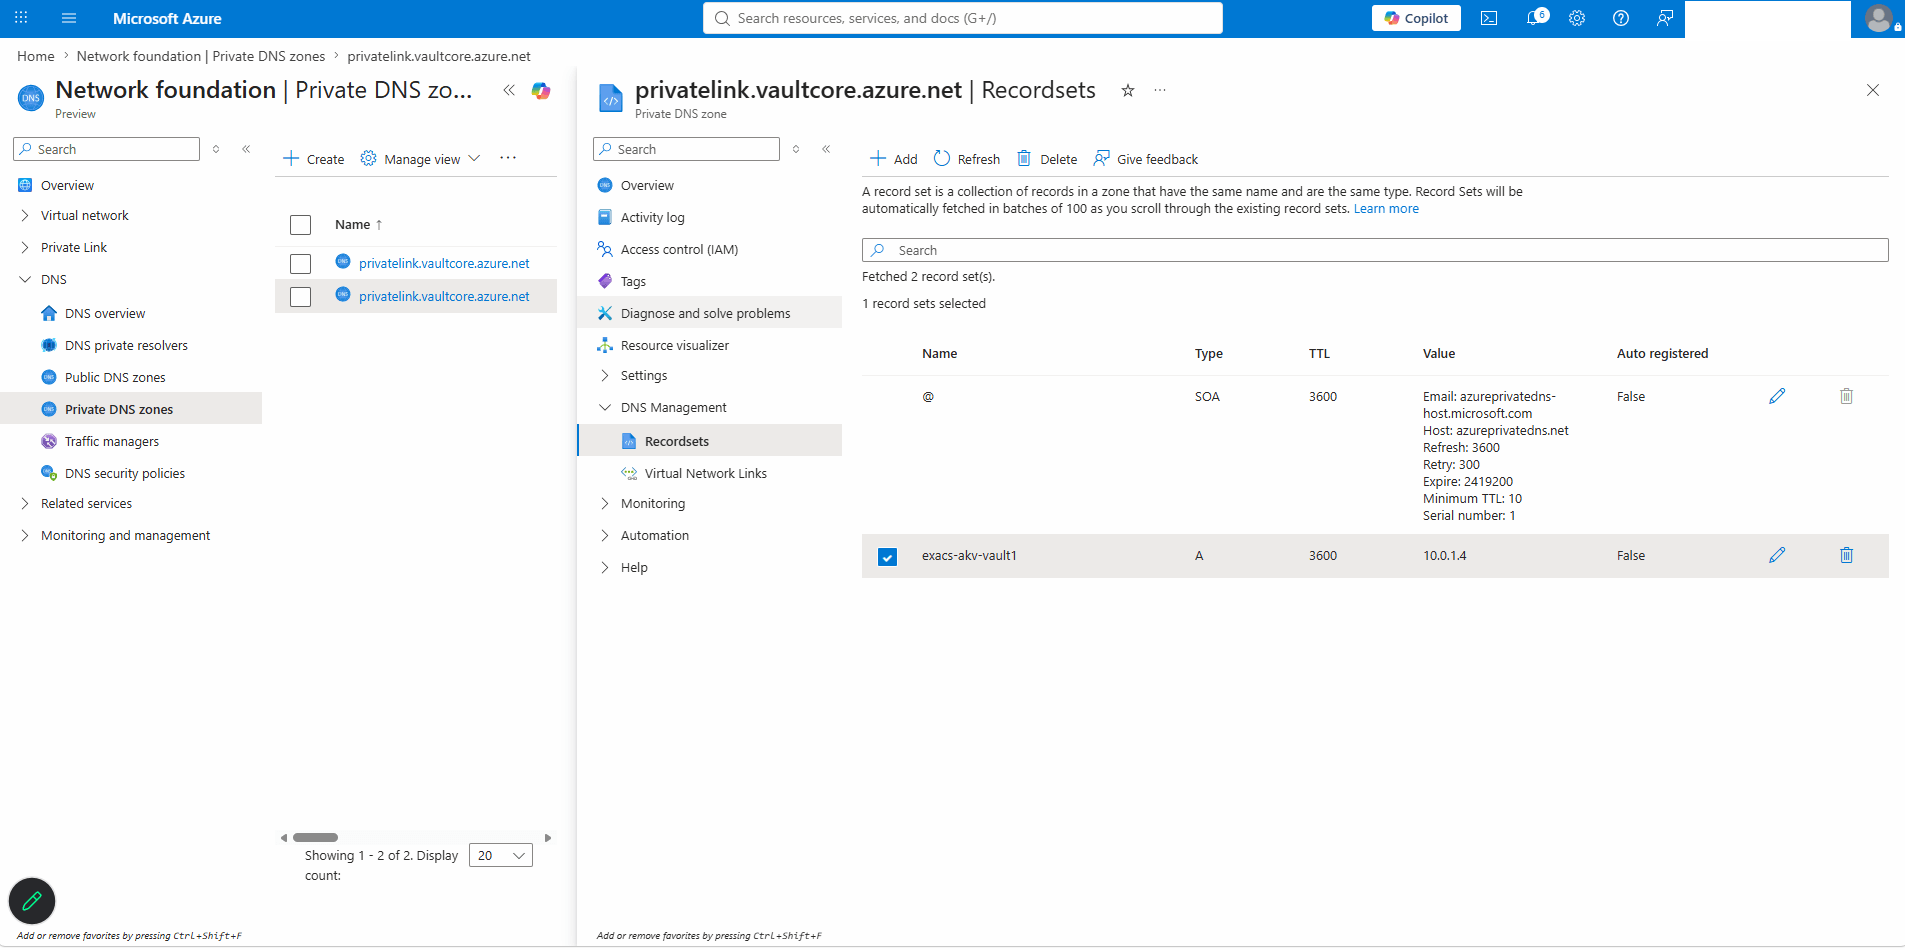
- Navigate to the Azure portal, and then select Private DNS zones.
- From the list, select the
privatelink.vaultcore.azure.netDNS zone. Expand the DNS Management section, and then select Recordsets. - Take a note of the A record created for Azure Key Vault.
- Add Private AKV DNS Zones
Complete the step-by-step instructions from the OCI Console.
- Create the Network Requirements for Creating an Identity ConnectorAzure Key Management Service (KMS) resources support both public and private connectivity. Azure Key Vault Managed HSM requires private connectivity, whereas Azure Key Vault Premium and Standard tiers support both public and private connectivity options.
- Configuration Using Private Network
To create an Identity Connector over a private network, you must configure an Azure Arc Private Link Scope and a Private Endpoint through the Azure Portal.
- Create Azure Arc Private Link Scopes
- From the Azure portal, navigate to Azure Arc.
- Expand the Additional setup section, and then select Private link scopes.
- Select the + Create button to start the creation process.
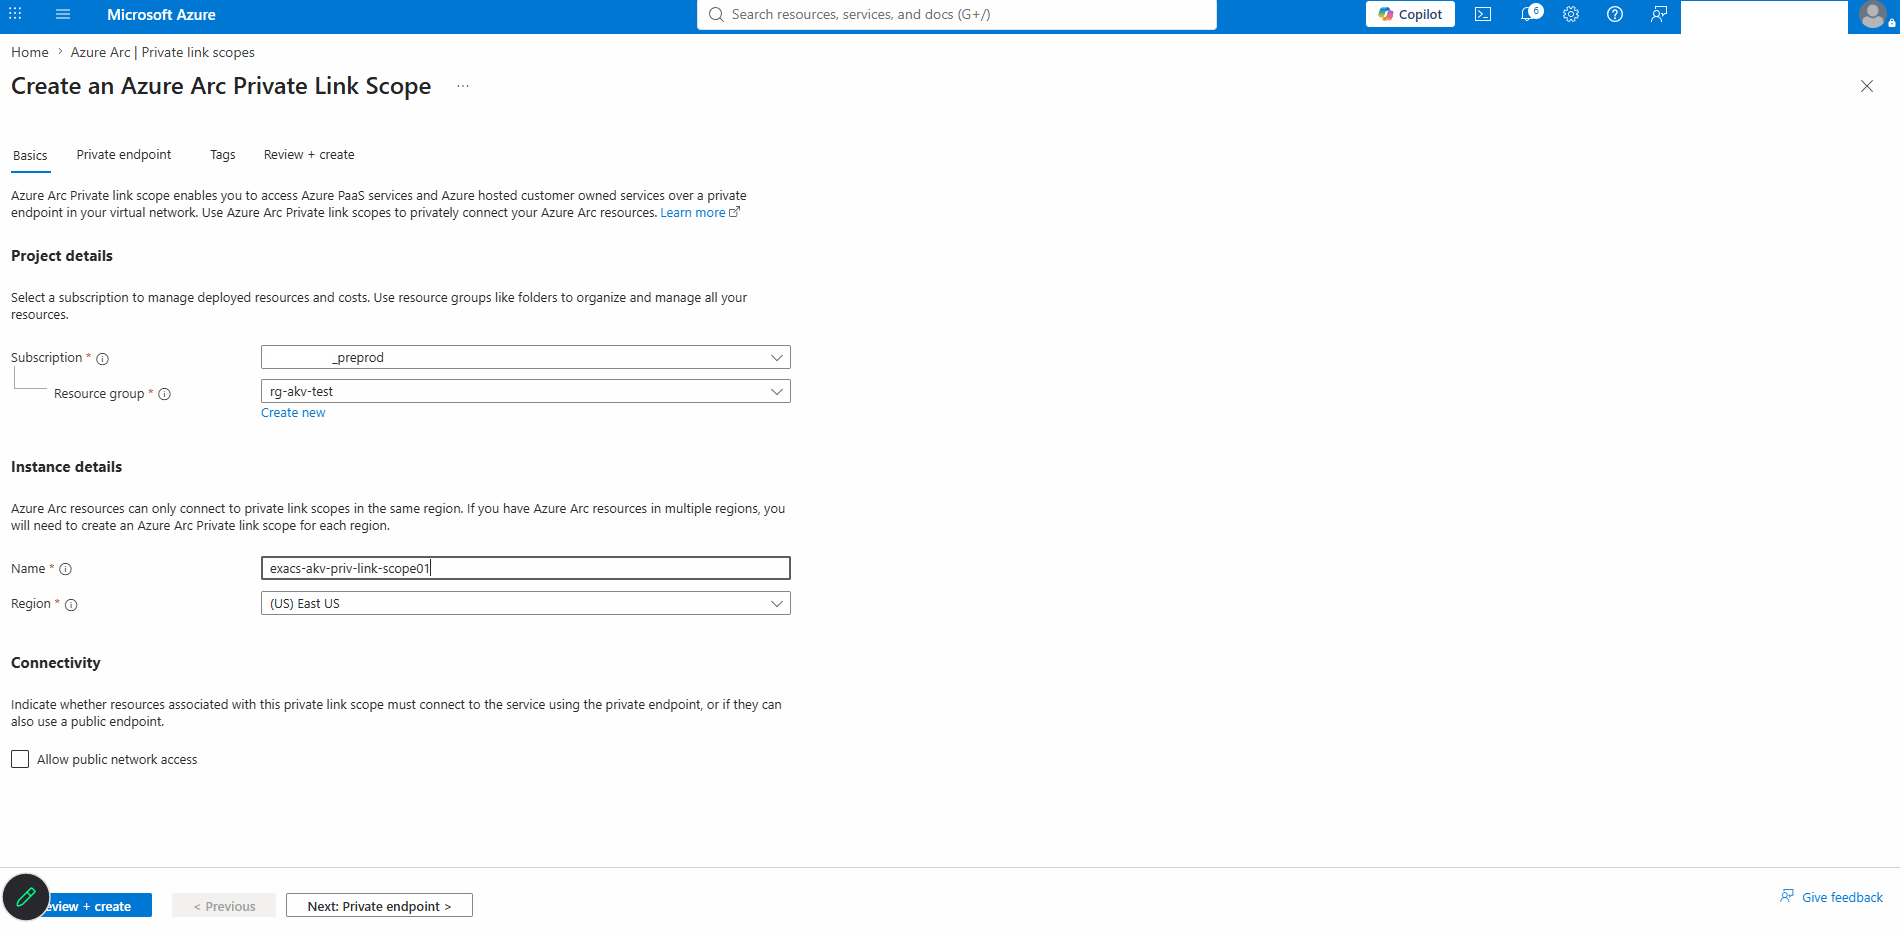
- From the Basics tab of the Create an Azure Arc Private Link Scope flow, enter the following information.
- Select the Subscription that you want to use, and then select the Resource group.
- Enter a descriptive Name for the private link scope. The private link scope name can contain only alphanumeric characters and the following symbols: hyphen (-), period (.) , and underscore (_). The name can not begin with underscore (_) or end with period (.) or hyphen (-).
- Select the Region.
- Select the Next: Private endpoint > button to proceed.
- From the Private endpoint tab of the Create an Azure Arc Private Link Scope flow, enter the following information.
- Select the + Create button to create a private endpoint.
- The Subscription field populates automatically.
- Select the Resource group.
- For the Location field, select the region corresponding to your Exascale VM Cluster deployment.
- Enter a descriptive Name for your private endpoint. The name must begin with a letter or number, end with a letter, number or underscore, and may contain only letters, numbers, underscores, periods, or hyphens.
- From the Networking section, select your Virtual network and Subnet.
- Choose the Yes option to integrate with private DNS zone. This automatically creates a new private DNS zone.
- Select the OK button.
- Select the Next: Tags > button to proceed.
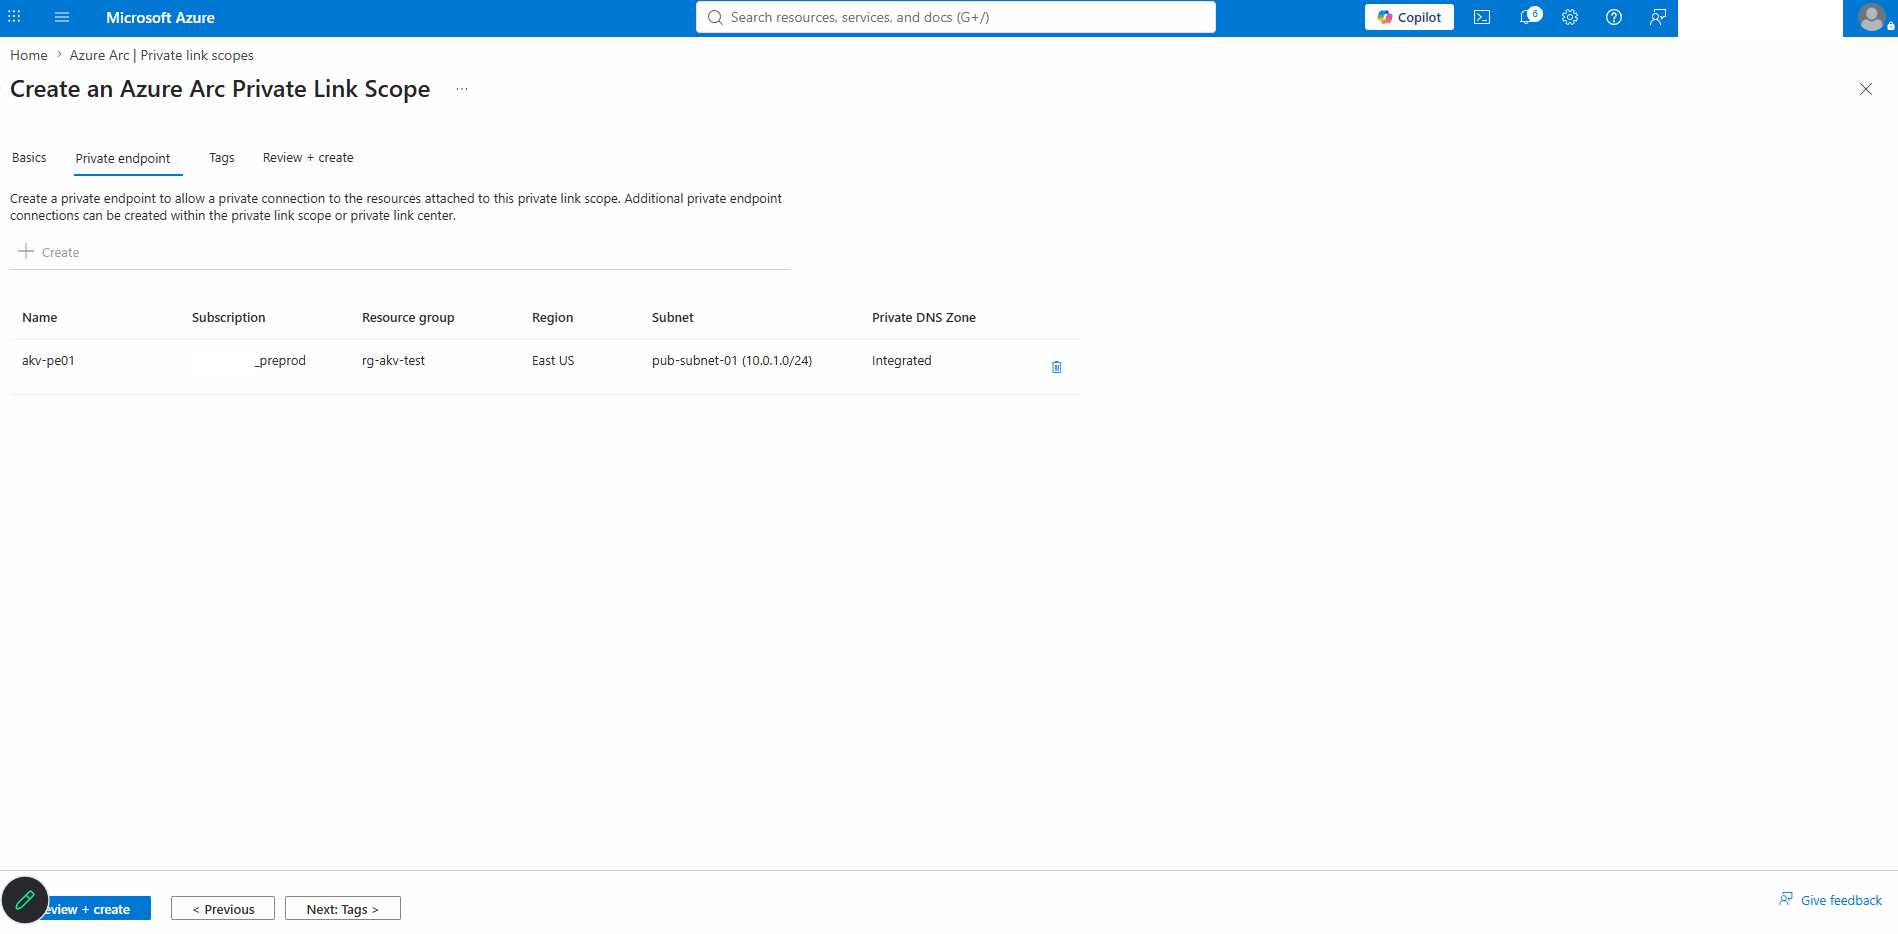
- The Tags section is optional. To manage and create custom views of your resources, assign tags. Select the Next: Review + create > button.
- Once you review your information, select the Create button.
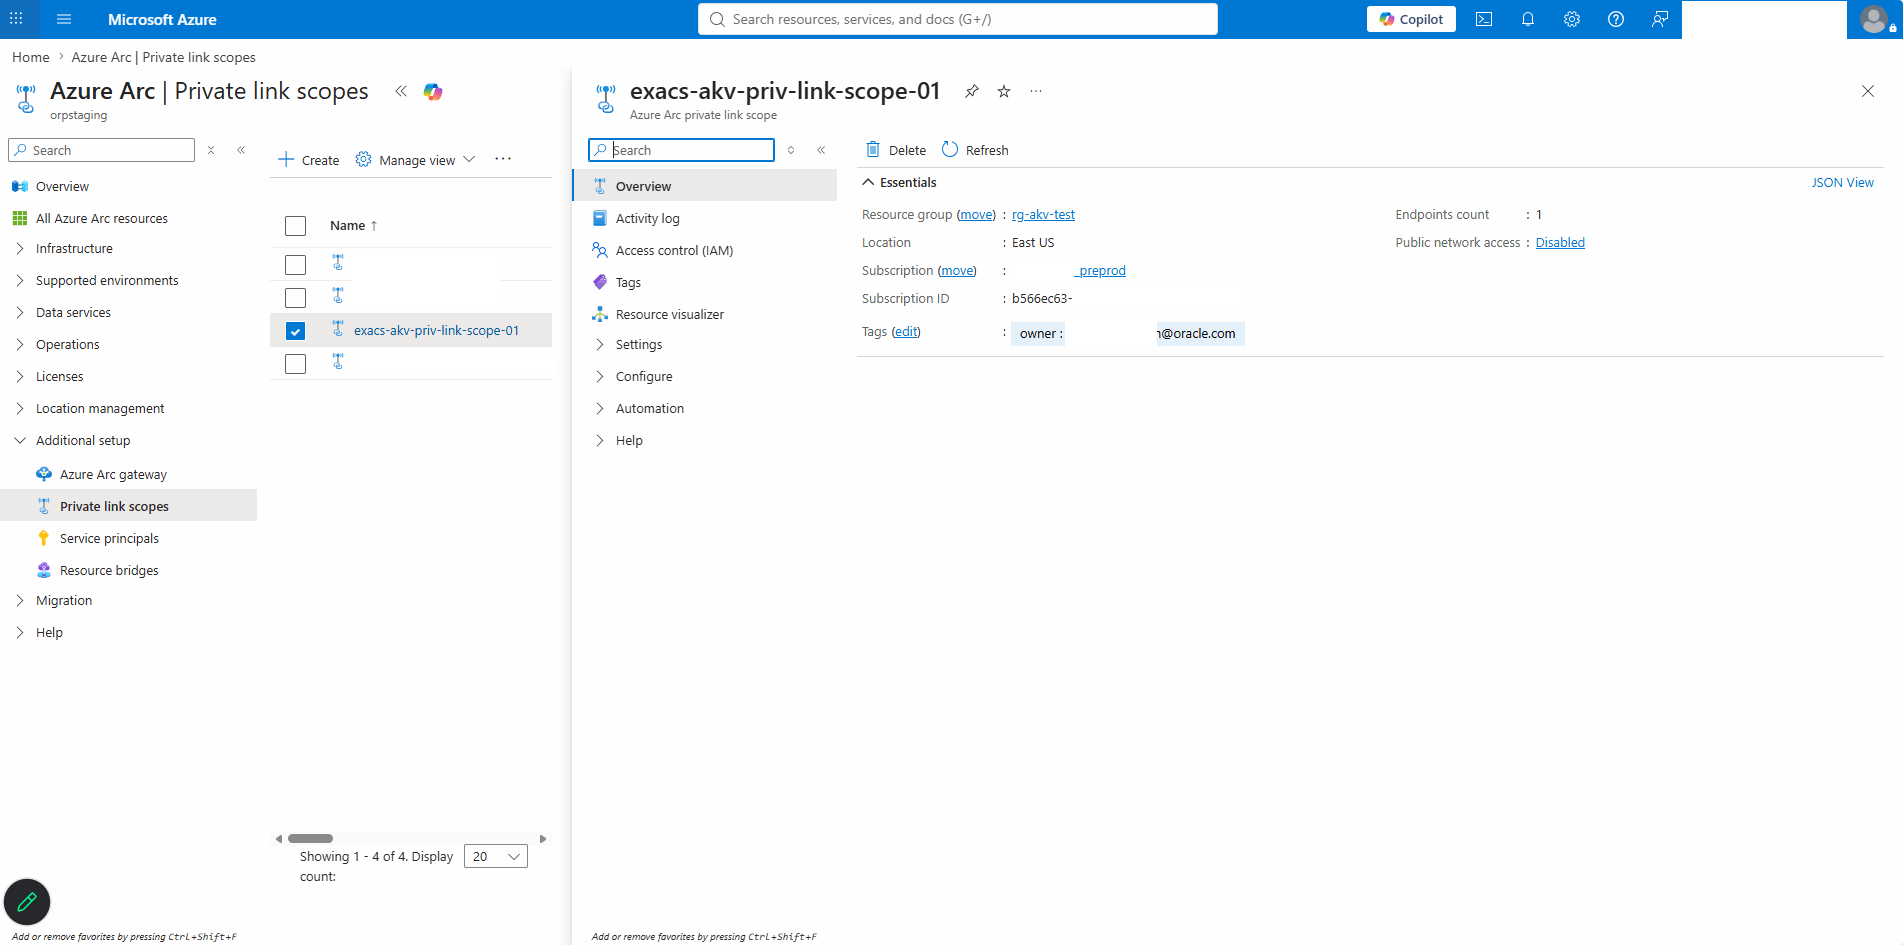
- Obtain Azure Arc Private Link DNS Zones Information
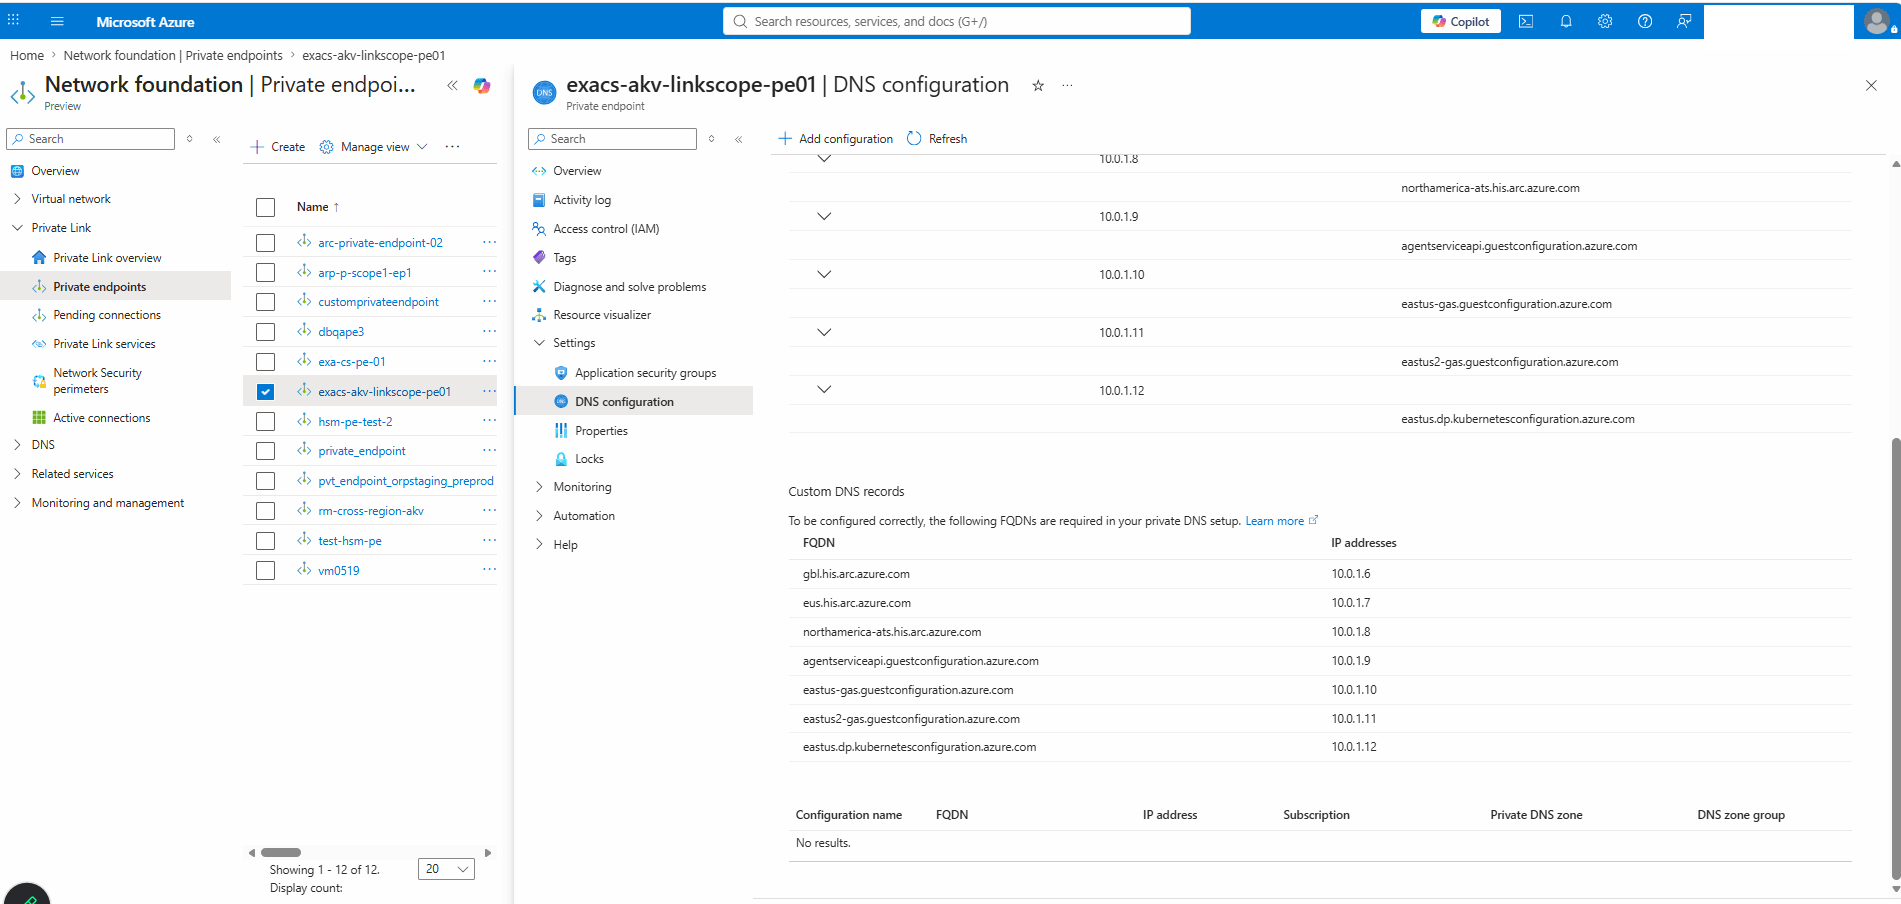
- From the Azure portal, navigate to Private endpoints.
- Expand the Private link section, and then select Private endpoints.
- Select your private endpoint from the list and then expand the Settings section.
- Select the DNS configuration.
- Take a note of the FQDN and IP addresses information.
Note
The DNS configuration for the Private Endpoint associated with the Private Link Scope must include the necessary private agent resource addresses. For more information, see URLs. - Create OCI Private Zone
Complete the step-by-step instructions from the OCI Console.
- Create a NAT Gateway
- From the Azure Portal, select NAT Gateways.
- Choose the Subscription that you want to use, then select the Resource group.
- Enter a name for your NAT gateway, select the Region corresponding to your VNET, then select the Next button.
- In the Outbound IP tab, select the Add Public IP addresses or prefixes button.
- You can select an existing public IP address or prefix or both to associate with the NAT gateway and enable outbound connectivity.
- To create a new public IP for the NAT gateway, select the Create a public IP address button. Enter a Name, and then select the OK button.
- To create a new public IP prefix for the NAT gateway, select the Create a new public IP prefix button. Enter a Name, select a Prefix size, then select the OK button.
- Once you enter your information, select the Next button.
- You can select an existing public IP address or prefix or both to associate with the NAT gateway and enable outbound connectivity.
- In Networking tab, select your Virtual Network, then select the subnet that you want to associate the NAT gateway.
- Select the Review + Create button, and then select the Createbutton.
- Create an Identity Connector for Exascale VM Cluster
Creating an Identity Connector installs the Azure Arc agent on the Exascale VM Cluster VMs, registering them as Azure Arc-enabled virtual machines.
This enables secure communication with the Azure Key Management Service (KMS) using the Azure identity generated by the Arc agent. The Azure Arc agent can communicate with Azure services over either a public network or a private connectivity setup. For more information, see Azure Arc.
Each Exascale VM Cluster must have an identity connector enabled to access Azure resources. The identity connector establishes either a public or private connection between the Exascale VM Cluster and Azure Key Management resources, depending on the roles assigned.
- Generate an Access Token for your Azure Account
- From the Azure Portal, select the Cloud shell button.
- In the Cloud Shell, run the following command. Replace
<Azure_subscription_ID>with your actual Azure Subscription ID.az account get-access-token --subscription <Azure_subscription_ID> - The command will return a JSON object similar to the example below. Take a note of the accessToken value as it is required for the next steps.
{
  "accessToken": "eyJ0eXAiOiJKV1QiLCJhbGciXXXXXXXXXXXXXXXXXXXXXXXXXXXXXXXXX",
  "expiresOn": "2026-03-25 14:35:43.000000",
  "expires_on": 1774449343,
  "subscription": "641531f9-2e12-430b-be35-XXXXXXXXXXXX",
  "tenant": "6798aca3-9d44-4ba7-8a36-XXXXXXXXXXXX",
  "tokenType": "Bearer"
}
- Create an Identity Connector
Complete the step-by-step instructions from the OCI Console.
- Validate the Identity Connector Status
Complete the step-by-step instructions from the OCI Console.
- Generate an Access Token for your Azure Account
- Create an IAM Policy for Accessing Azure AKV Key Resources
Complete the step-by-step instructions from the OCI Console.
- Enable the Azure Key Management
Complete the step-by-step instructions from the OCI Console.
- Configure Microsoft Entra ID Permissions for Key Vault Access
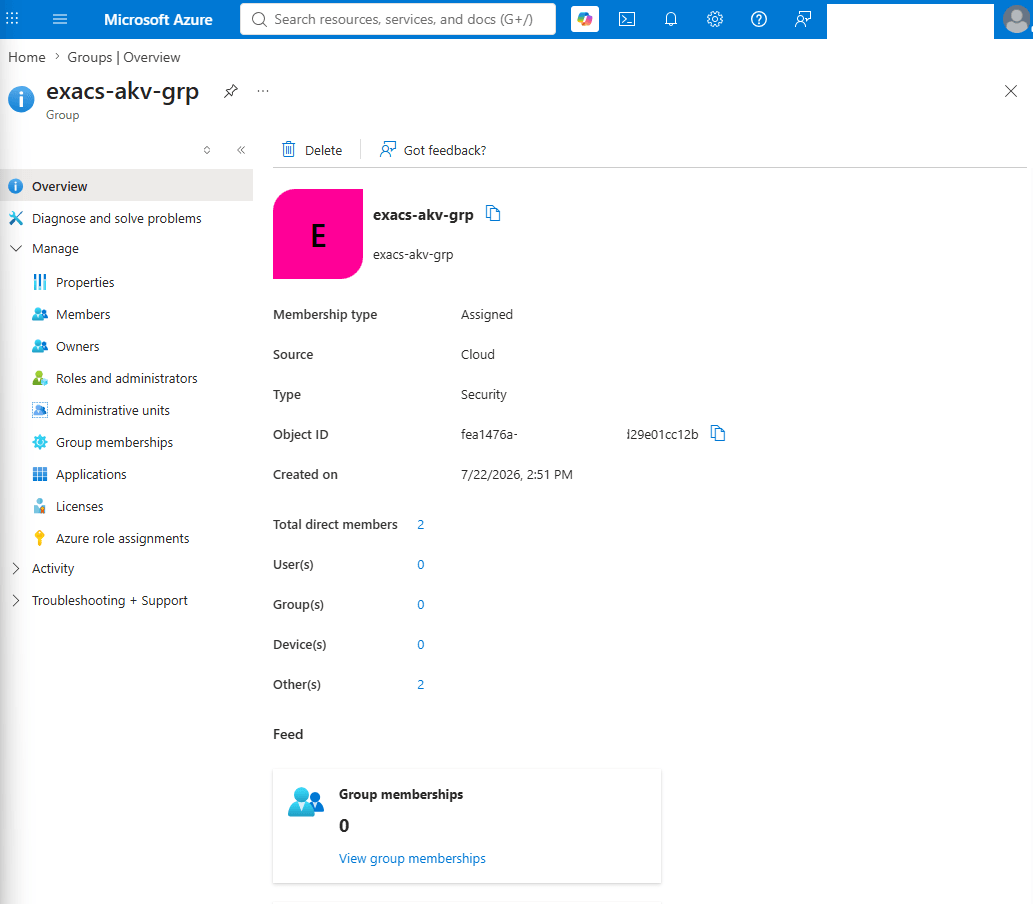
- Create a Azure Group in Microsoft Entra ID
- In the Azure portal, select Microsoft Entra ID.
- From the left menu, select Groups, and then select the New Group button.
- From the New Group page, enter the following information.
- Group type: Security
- Group name: Enter a descriptive name in the field.
- Group description: Enter a description in the field.
- Membership type: Assigned
- Review your information and then select the Create button.
- From the Azure portal, select Microsoft Entra ID and then select Groups.
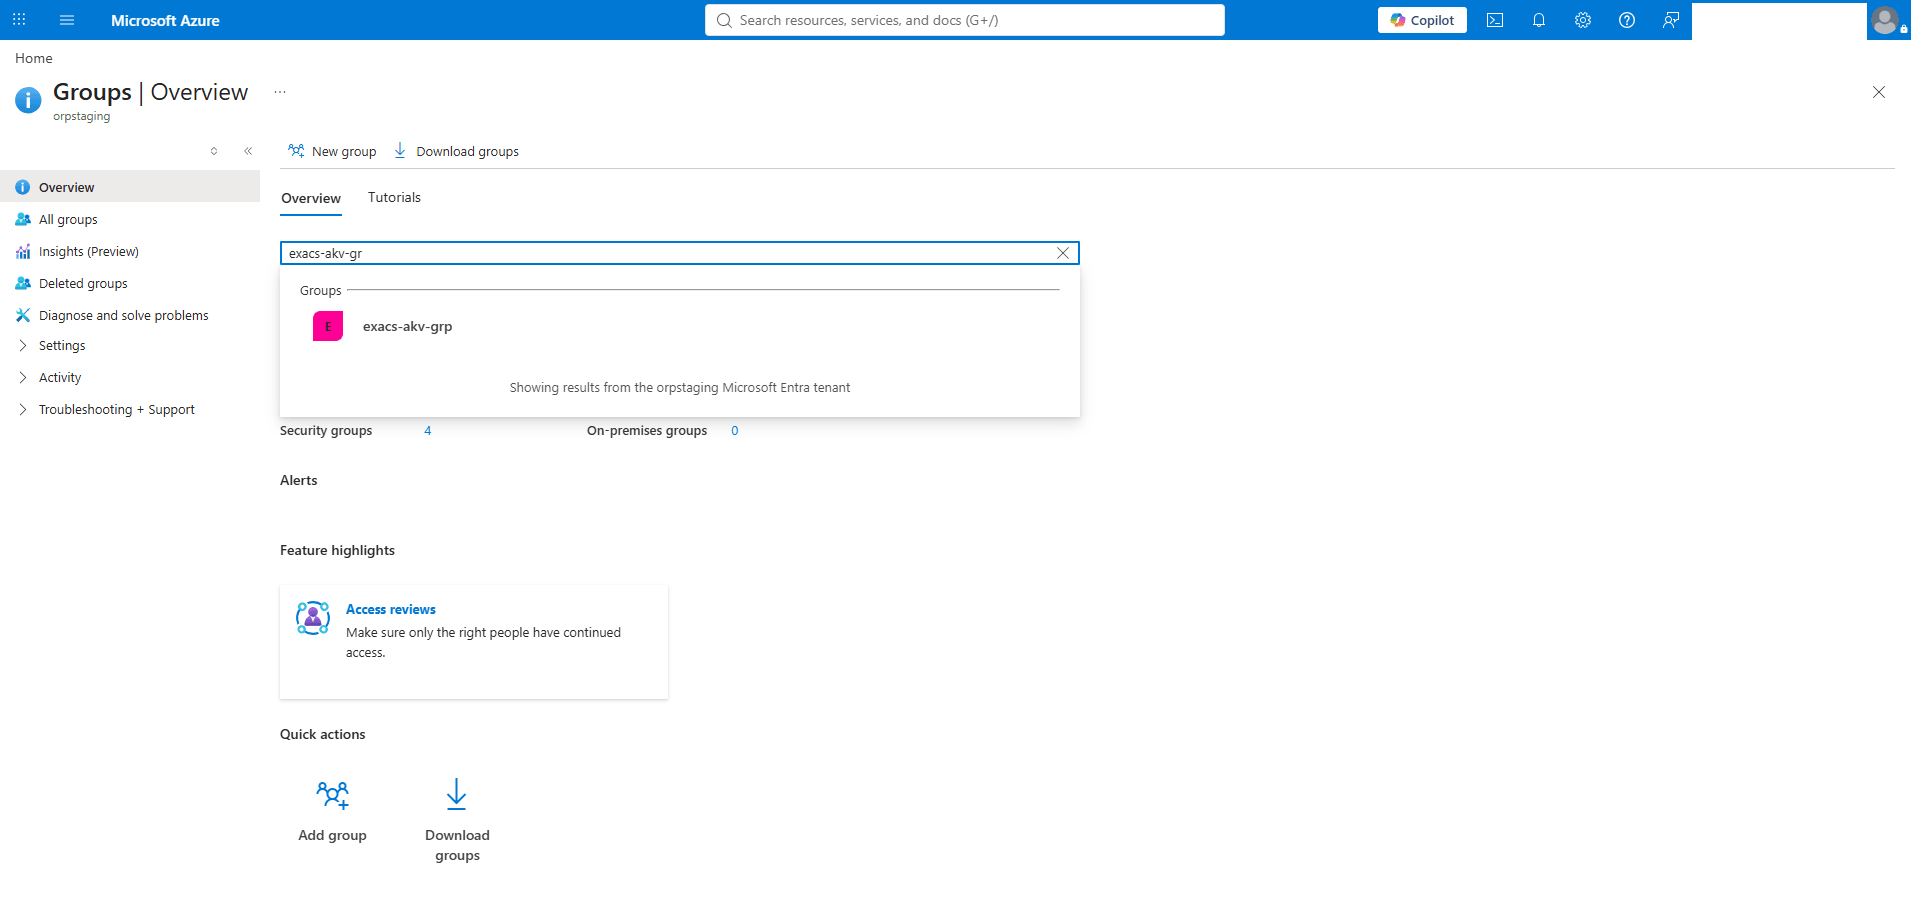
- Locate the group name that you previously created and then select it.
- In the Group Memberships section, select the View group members link.
- Select the + Add member button.
- Add the Azure Arc name of each node of your Exascale VM Cluster node, then choose the select button.
- Assign Permission to the Azure Key Vault
- From the Azure portal, select Key vaults and then select the Key vault that you want to use.
- From the left menu, select Access control (IAM).
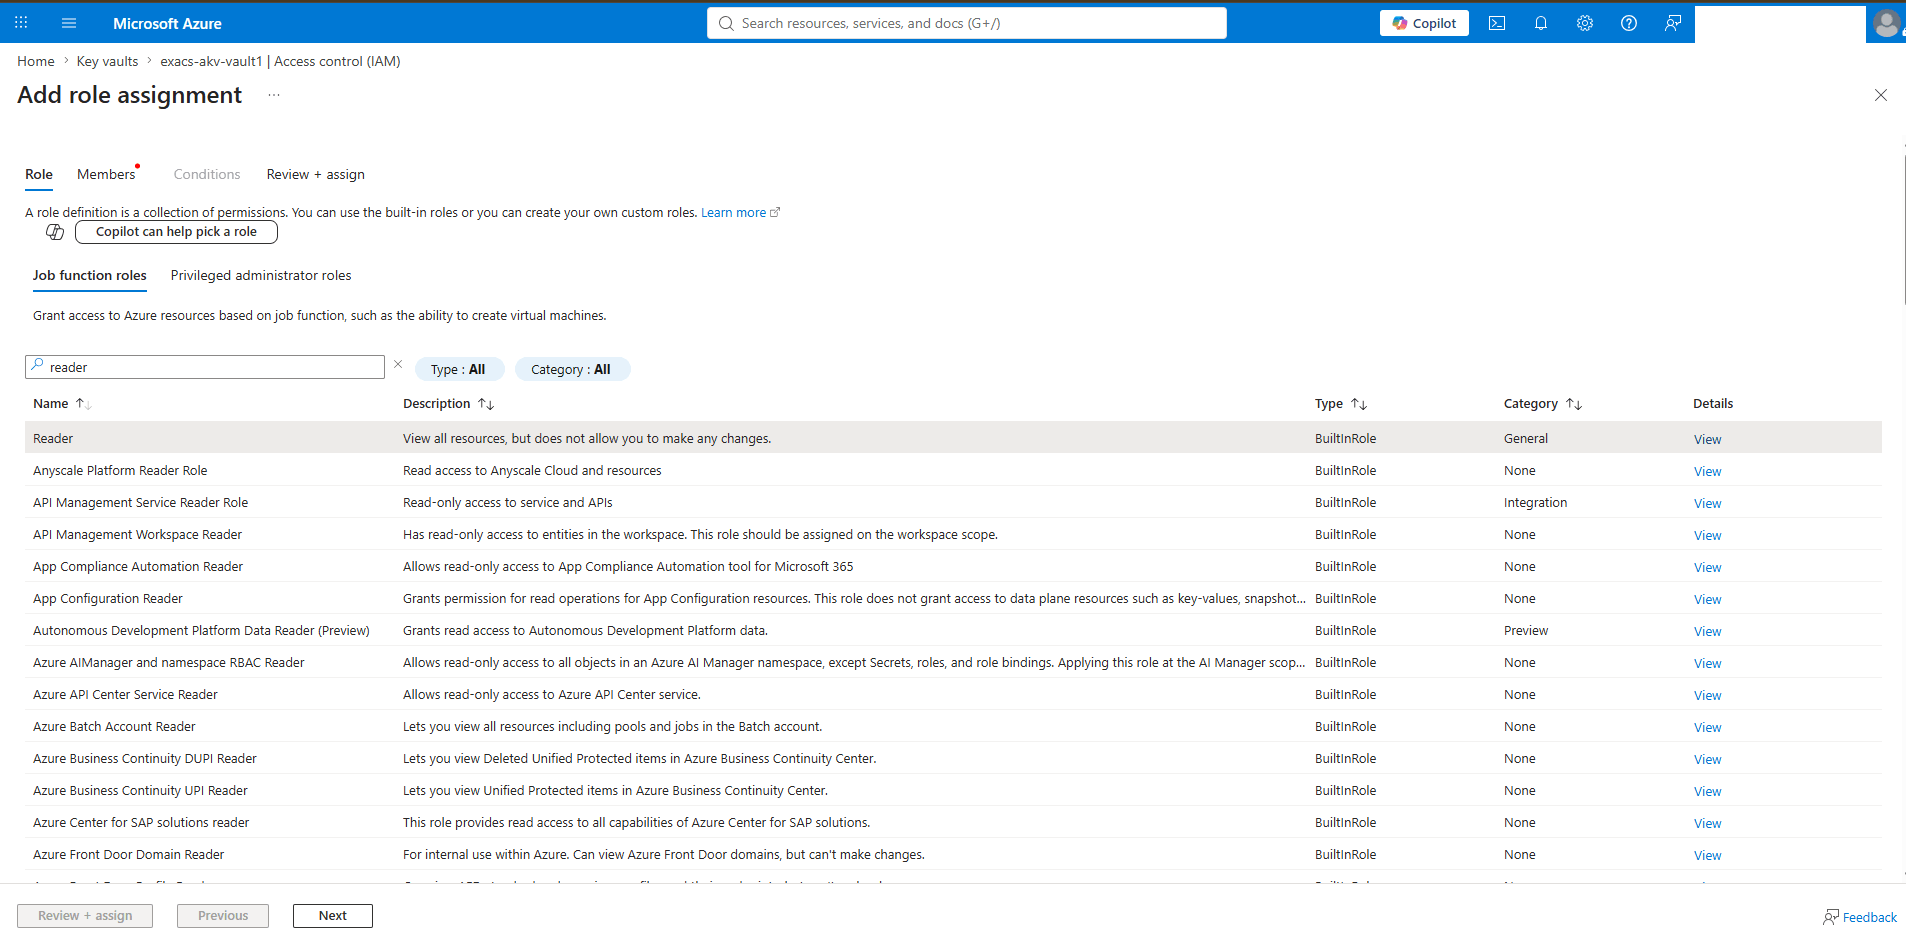
- Select the + Add button, then select the Add role assignment option.
- From the Role tab, search for the Reader role, then select the Next button.
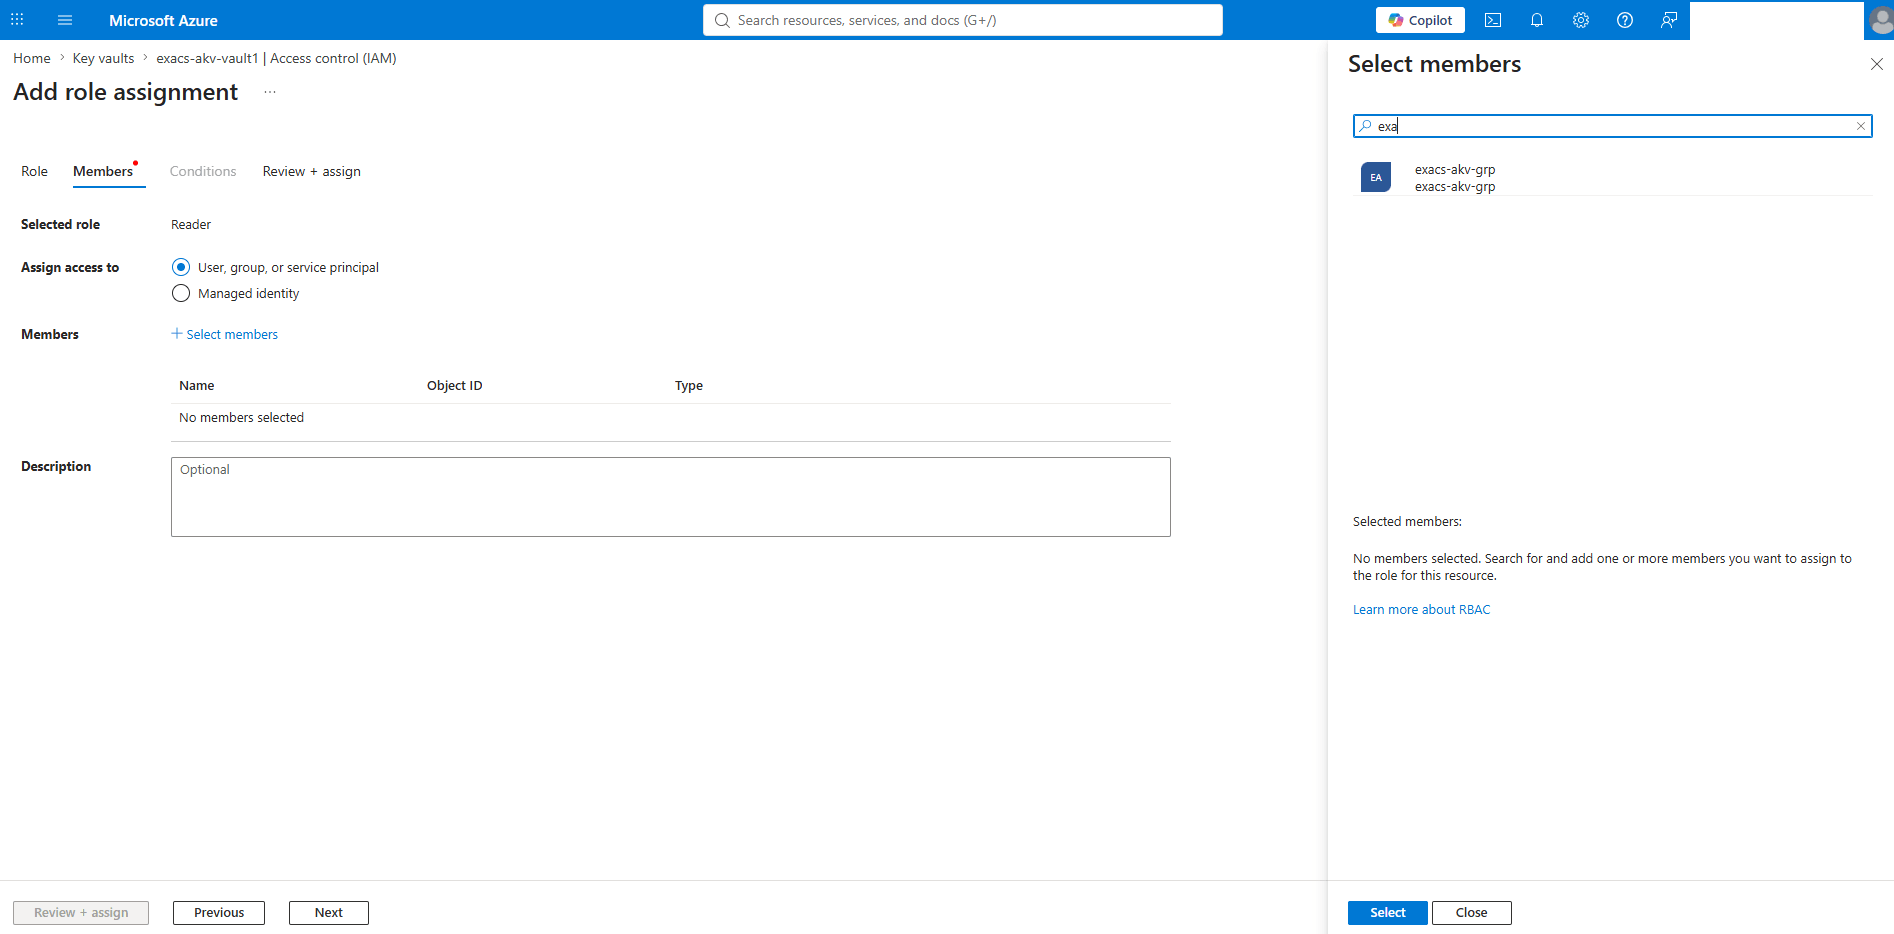
- In the Members tab, select the User, group, or service principal option, then choose the Select members link.
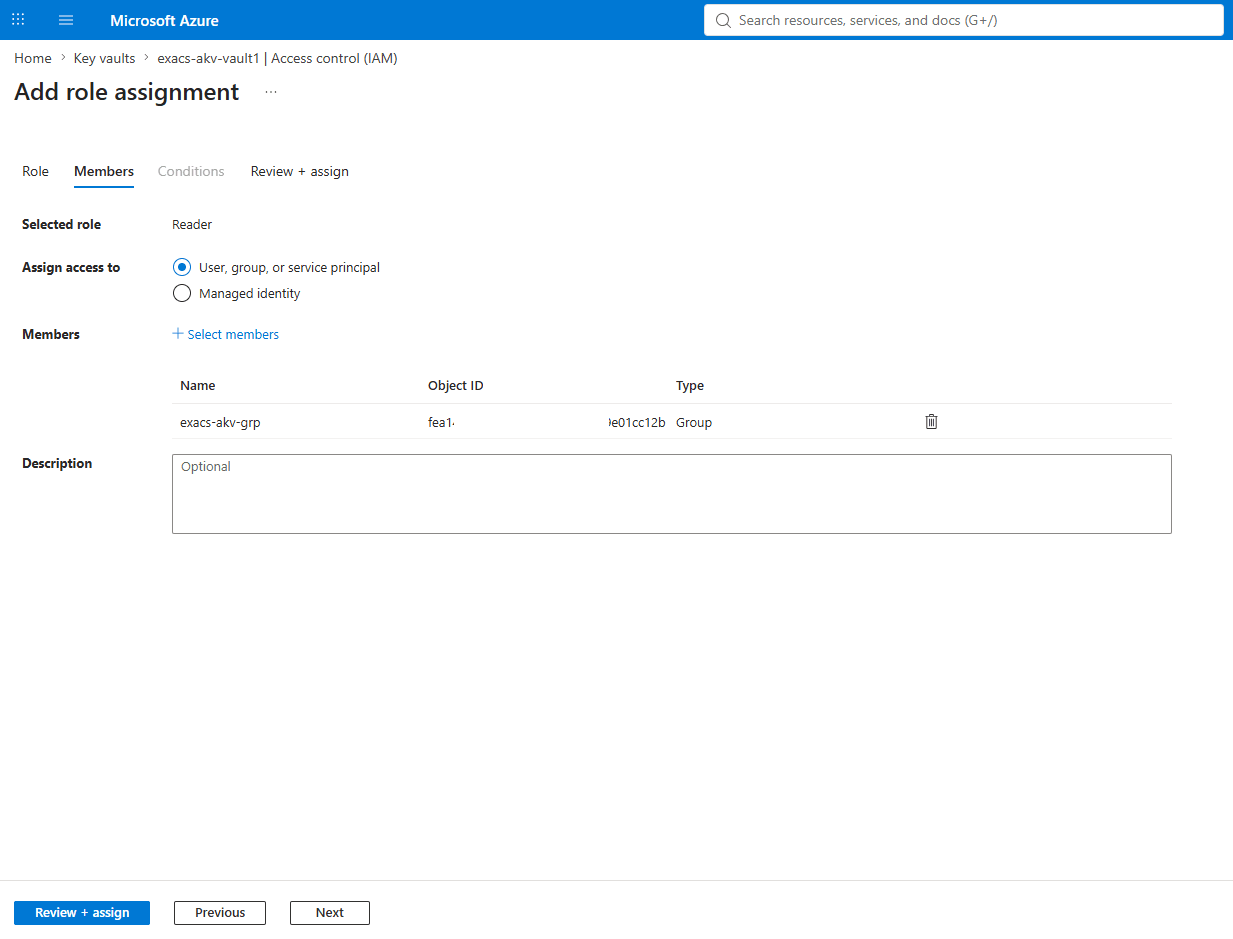
- Search for the Group Name that you previously created. It contains the Azure Arc Names of your Exascale VM Cluster nodes, then choose the Select button.
- Review your information and then select the Review + assign button.
- Repeat the step to assign the Key Vault Crypto Officer role.
Note
The Reader and Key Vault Crypto Officer roles must be assigned to the group to grant the necessary permissions to access and manage Azure Key Vault Premium and Azure Key Vault Standard resources.
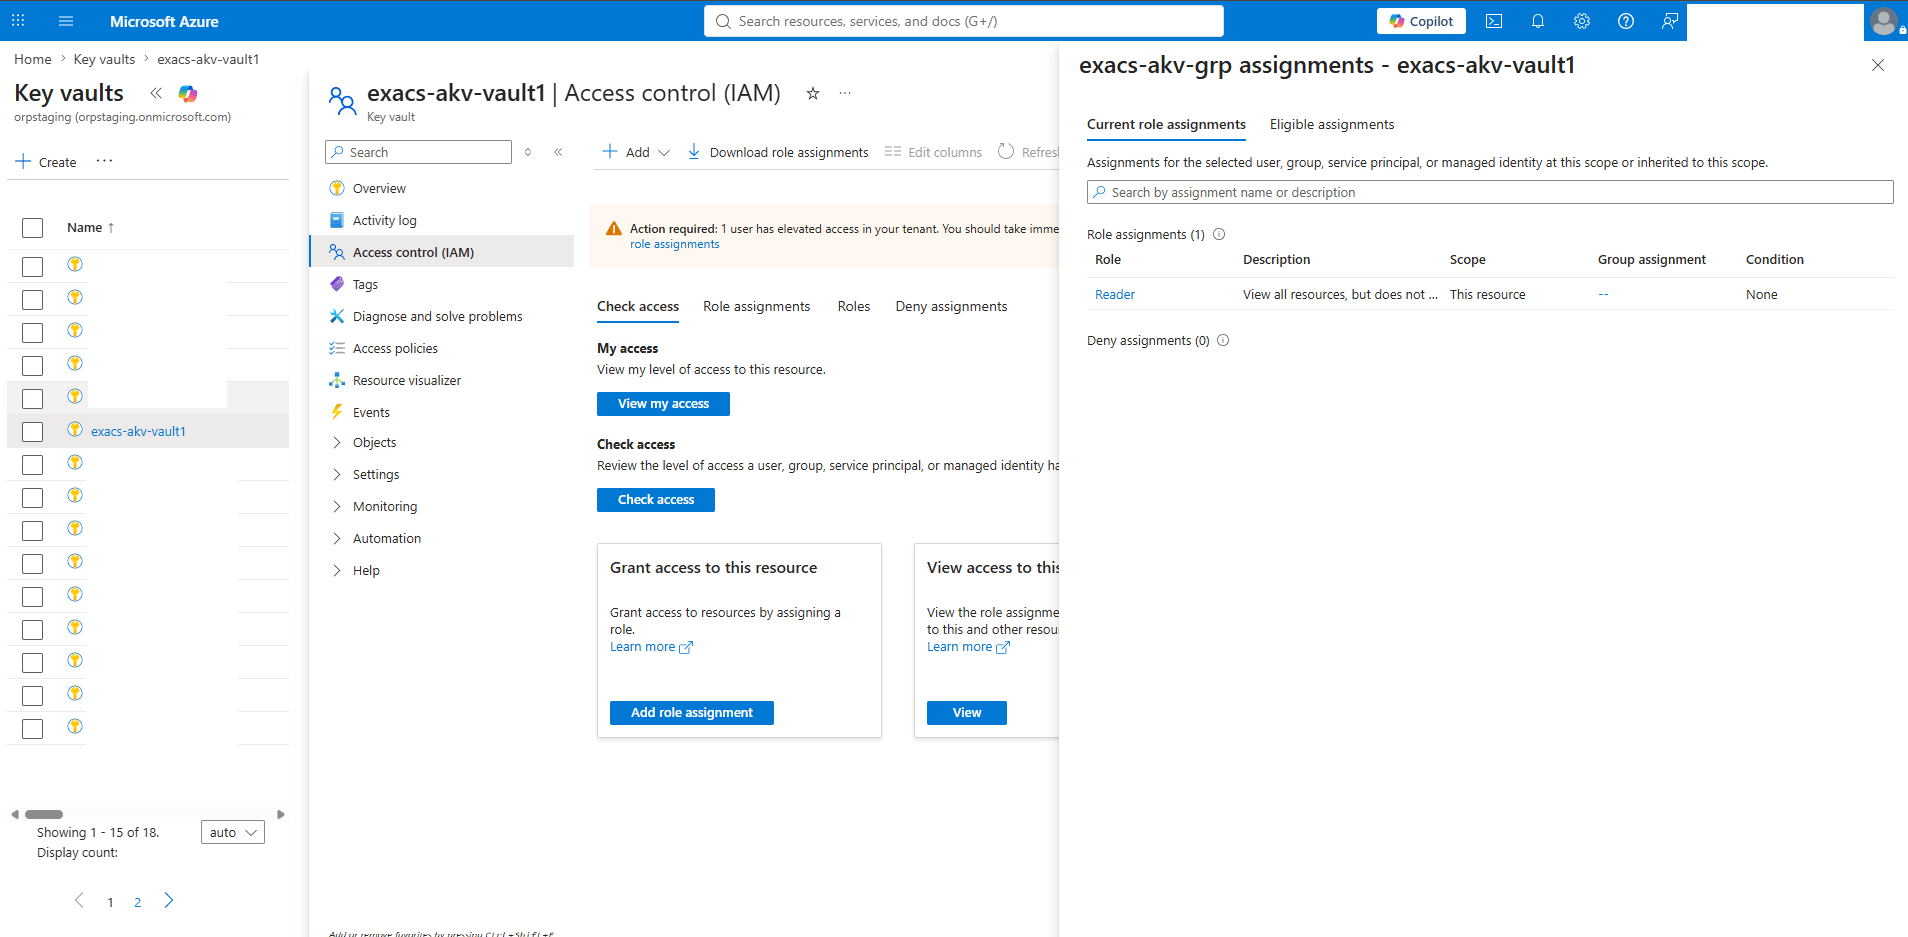
- Validate the Key Vault Permissions
- From the Azure portal, select Key vaults and then select the Key vault that you want to use.
- From the left menu, select Access control (IAM).
- From the Check access section, select the Check access button.
- Search for your Azure Arc Group name that you previously created, then select the Group Name.
- Create a Azure Group in Microsoft Entra ID
- Register Azure Key Vault
Complete the step-by-step instructions from the OCI Console.
- Create a Database and Use Azure Customer-Managed Key (CMK) as the Key Management Solution
Complete the step-by-step instructions from the OCI Console.
- Modify the Key Management from Oracle Wallet to Azure Customer-Managed Key (CMK)
Complete the step-by-step instructions from the OCI Console.
- Create an Azure Key Vault
- Add Private AKV DNS Zones
- From the OCI Console, select Oracle AI Database, then select Oracle Exadata Database Service on Exascale Infrastructure.
- From the left menu, select VM Clusters, and then select your Exascale VM Cluster.
- From the OCI Console, navigate to Networking section, and then select Virtual cloud networks.
- From the Details tab, select DNS Resolver link.
- From the Private resolvers page, select the Default private view link.
- In the Private view page, select the Private zones tab.
If the DNS Zone already exists in your environment, add the record to your existing Private Zone.
- In the Private Zones section, select the Create zone button to create the first private zone.
- The Zone type field is set to Primary by default.
- Enter a descriptive Zone name. Select the zone name that matches the domain FQDN copied in the previous step. For example,
vault.azure.net. - From the dropdown list, select the Compartment in which you want to create the private zone.
- The Tags section is optional.
- Select the Create button.
- Select the Zone name field of the zone that you previously created, and then select the Records tab.
- Select the Manage records button.
- From the Manage records page, select the Add record button.
- For the Name field, enter the FQDN name that you previously noted.
- Select the A- IPv4 address option as your Type.
- Adjust the TTL in seconds based on your requirements.
- Select your RDATA mode.
- In the Address field, enter the IP address that you previously noted , then select the Save changes button.
- Select the Review changes button, then select the Publish Changes button.
- To create a second zone, select the Create zone button.
- The Zone type field is set to Primary by default.
- In the Zone name field, enter a zone name based on your Private DNS Zone domain. For example,
privatelink.vaultcore.azure.net. - From the dropdown list, select the Compartment in which you want to create a private zone.
- The Tags section is optional.
- Select the Create button.
- Select the Zone name field of the zone that you previously created, and then select the Records tab.
- Select the Manage records button.
- From the Manage records page, select the Add record button.
- For the Name field, enter your Azure Private zone record set name.
- Select the A- IPv4 address option as your Type.
- Adjust the TTL in seconds based on your requirements.
- Select your RDATA mode.
- In the Address field, enter the IP address that you previously noted, then select the Save changes button.
- Select the Review changes button, then select the Publish Changes button.
- Create the Network Requirements for Creating an Identity Connector
- Create OCI Private Zone
- From the OCI console, select Oracle AI Database and then select Oracle Exadata Database Service on Exascale Infrastructure. Select the name of your Exascale VM Cluster.
- Scroll down to the Network section, then select the Virtual Cloud Network.
- In the VCN information section, under DNS Resolver, select DNS Resolver Name.
- From the Private Resolver section, select the Default Private view name.
- In the Private view page, select Private zones tab.
- From the Private zones page, select the Create zone button to create the first private zone.
- In the Zone name, select the name according with your domain FQDN which you copied in the previous step. For example,
arc.azure.com. - Select the Create button.
- Select the name field of the zone that you created in the previous step.
- Select the Records tab, and then select Manage records button.
- Select the Add record button.
- For the name field, paste your FQDN name. For example,
gbl. - Select A- IPv4 address as your type.
- In the Address field, enter the IP addresses that you copied in the previous step. Then, select the Save changes button.
- For the name field, paste your FQDN name. For example,
- Select the Review changes button, then select Publish Changes button.
- Repeat the previous step until you have added all records to the specified Private Zone.
- In the Zone name, select the name according with your domain FQDN which you copied in the previous step. For example,
- Create all the Private zones, and add the records obtained from the Obtain Azure Arc Private Link DNS Zones Information step.
Note
Even with Private Connectivity, the following endpoints must be routed through the Azure NAT gateway.Agent resources:guestconfiguration.azure.comhis.arc.azure.comlogin.microsoftonline.commanagement.azure.compas.windows.netguestconfiguration.azure.compackages.microsoft.comaka.ms
You must ensure the connectivity to these endpoints. Otherwise, the Identity Connector creation will fail.
- Create OCI Private Zone
- Create an Identity Connector
Creating an Identity Connector installs the Azure Arc agent on the Exascale VM Cluster VMs, registering them as Azure Arc-enabled virtual machines.
This enables secure communication with the Azure Key Management Service (KMS) using the Azure identity generated by the Arc agent. The Azure Arc agent can communicate with Azure services over either a public network or a private connectivity setup. For more information, see Azure Arc.
Each Exascale VM Cluster must have an identity connector enabled to access Azure resources. The identity connector establishes either a public or private connection between the Exascale VM Cluster and Azure Key Management resources, depending on the roles assigned.
- Create an Identity Connector
- From the OCI console, select Oracle AI Database, then select Oracle Exadata Database Service on Exascale Infrastructure.
- From the left menu, select VM Clusters, and then select your Exascale VM Cluster.
- From the VM Cluster information tab, scroll down to the Identity connector section, and then select the Create button.
- From the Create identity connector page, enter the following information.
- Enter the Azure Tenant id.
- Paste the Access token that you copied in the previous step.
- Expand the Advanced Options menu, then enter the name of your Azure Arc Private Link Scope that you previously created.
- The Tags section is optional.
- Review your information and then select the Create button.
- Validate the Identity Connector Status
- From the OCI console, select Oracle AI Database, then select Oracle Exadata Database Service on Exascale Infrastructure.
- From the left menu, select VM Clusters, and then select your Exascale VM Cluster.
- In the VM Cluster information tab, locate the Multicloud information section.
- Under Identity connector, select the Identity connector link. This will redirect you to the Identity Connector Information page, where you can verify the status. Ensure that the status is shown as Active.
- Create an Identity Connector
- Create an IAM Policy for Accessing Azure AKV Key Resources
The database uses the cluster resource principal to securely retrieve Azure Cloud key resources. To enable this functionality, you must define the appropriate IAM policies in your OCI tenancy.
To create the appropriate IAM policies, complete the following steps.
- From the OCI console, select Oracle AI Database, then select Oracle Exadata Database Service on Exascale Infrastructure.
- From the left menu, select VM Clusters, and then select your Exascale VM Cluster.
- In the VM Cluster information tab, scroll down to the General information section and take a note of the Compartment information.
- Navigate back to OCI Console, select Identity & Security and then select Compartments.
- Locate the Compartment that you previously recorded. From the Details tab, take a note of the compartment OCID information.
- Navigate back to OCI Console, select Identity & Security and then select Policies. Select the Create Policy button.
- Enter a policy Name.
- Select the root compartment.
- Select the show manual editor button, paste the following policy, and replace the
<your-compartment-OCID>with the compartment OCID that you previously copied.Allow any-user to read oracle-db-azure-vaults in compartment id <your-compartment-OCID> where all { request.principal.type = 'exadbvmcluster'}
- Select the Create button.
- Enable the Azure Key Management
- From the OCI console, select Oracle AI Database, then select Oracle Exadata Database Service on Exascale Infrastructure.
- From the left menu, select VM Clusters, and then select your Exascale VM Cluster.
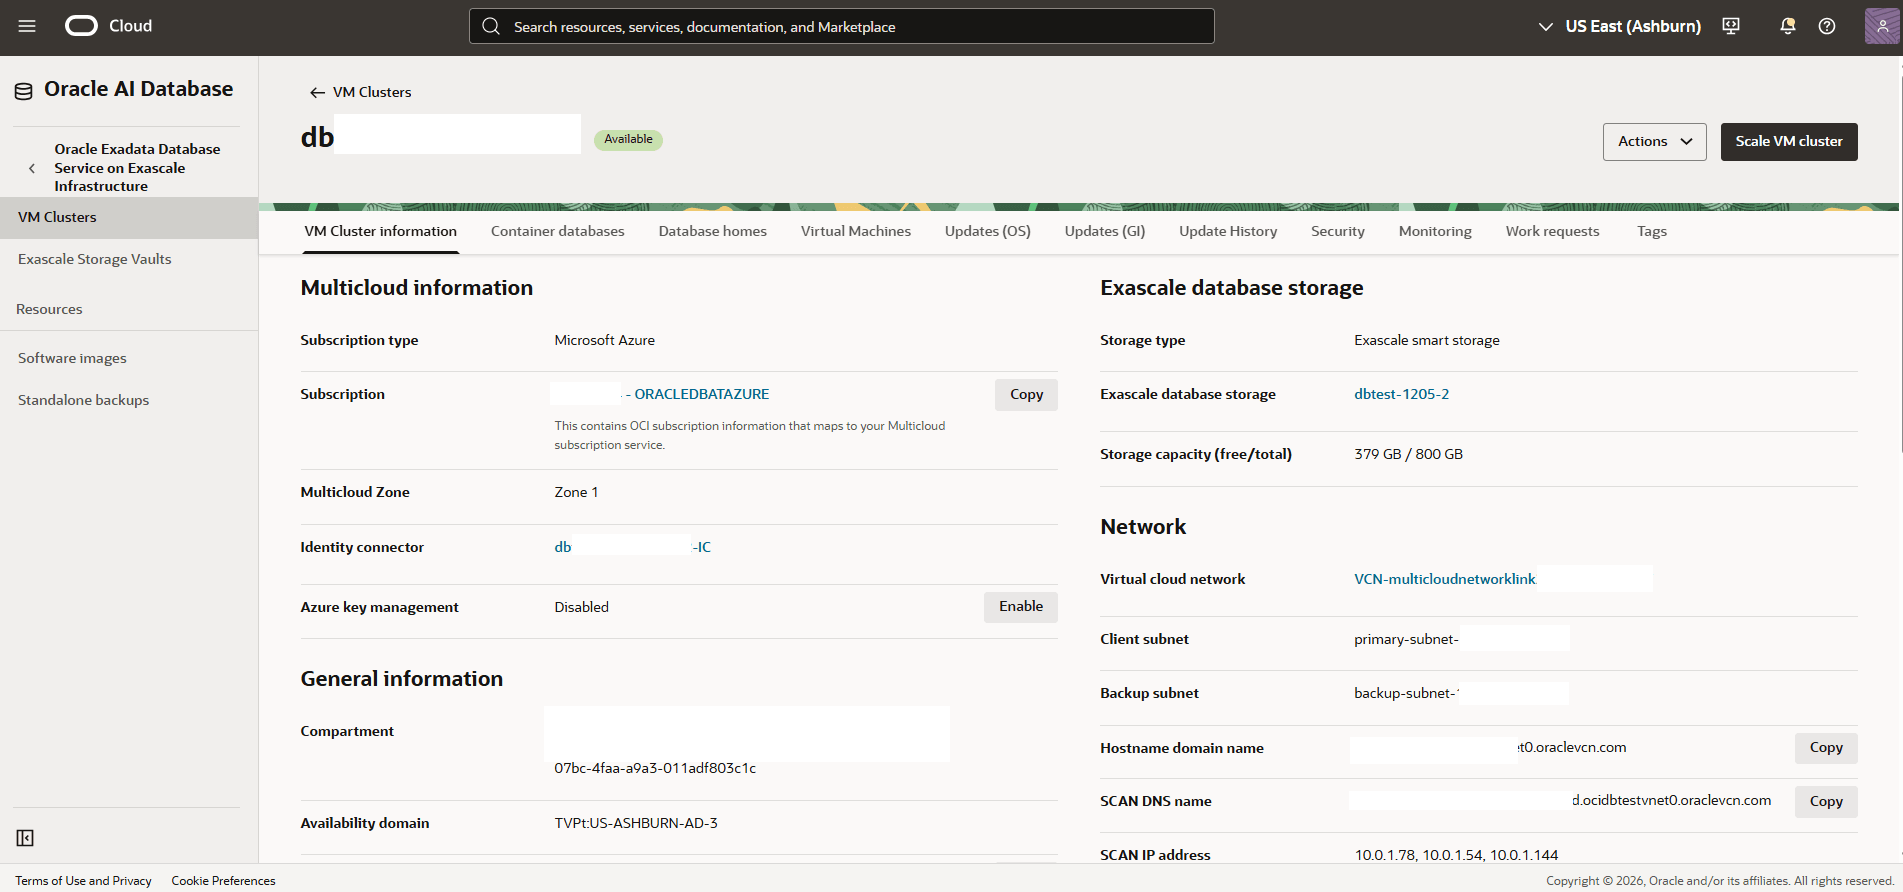
- In the VM Cluster information tab, scroll down to the Azure key management section, and select the Enable button. The confirmation message appears, select the Enable button to confirm it.
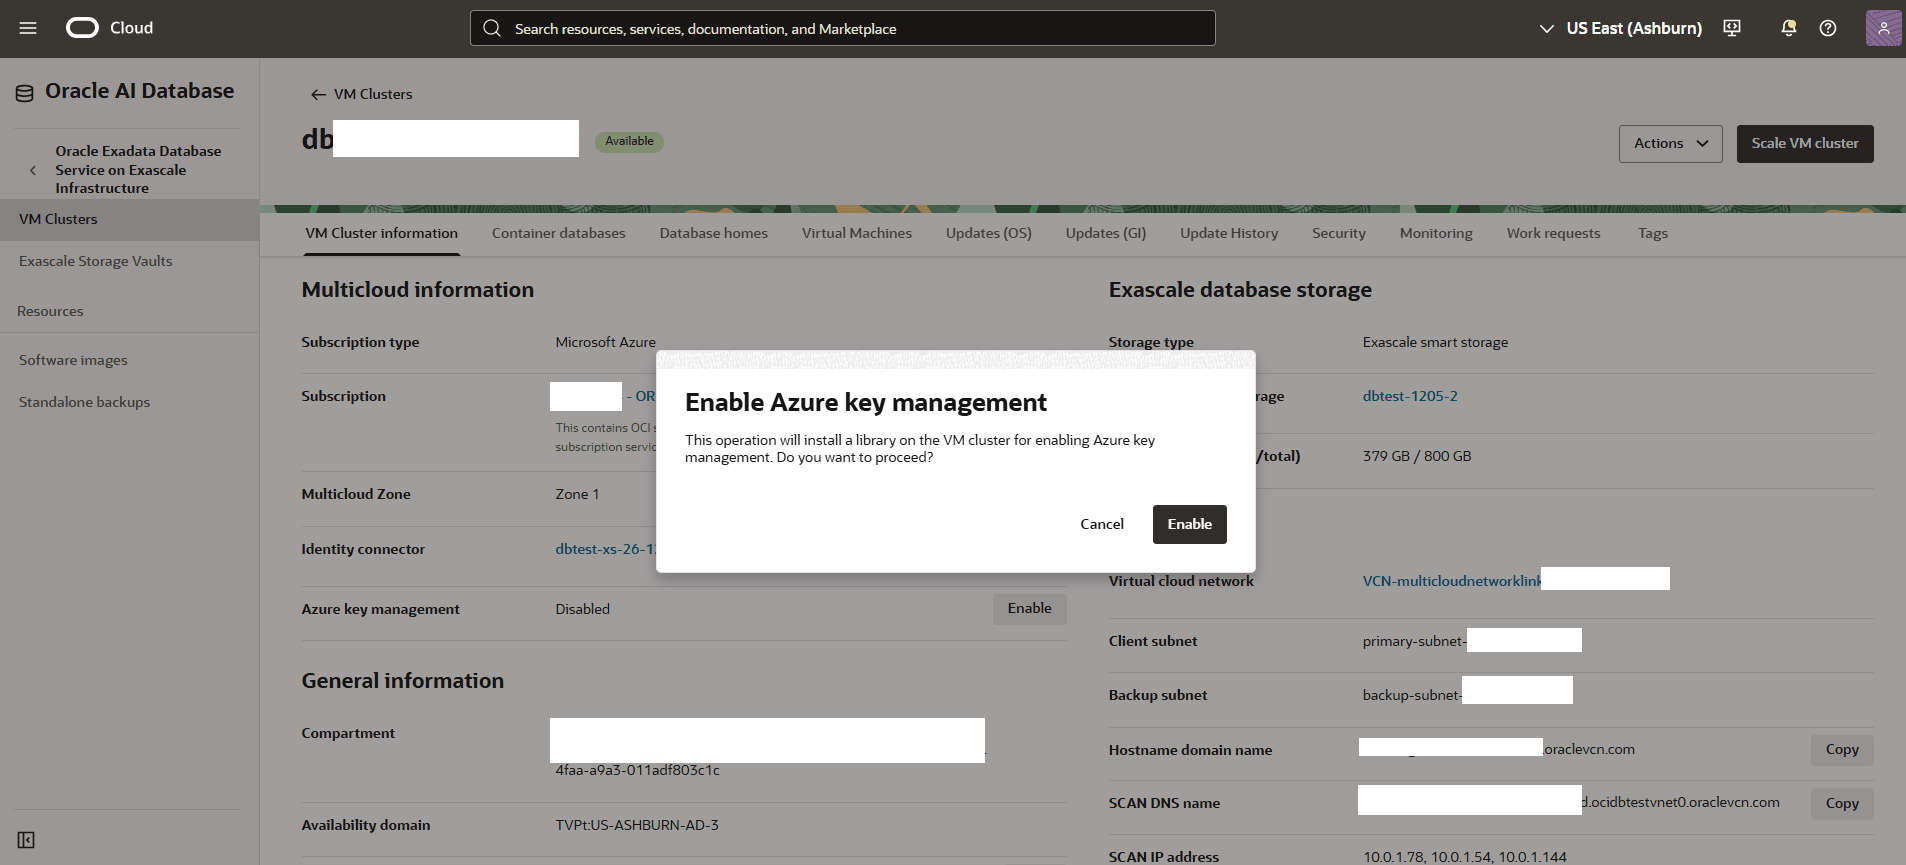
Note
- When you provision an Exascale VM Cluster, Azure key management is disabled by default.
- If you do not want to use Azure key management, you can disable it by selecting the Disable button. This action will disable Azure key management at the VM Cluster level. Disabling it will impact the availability of the databases using Azure key management. Ensure that no database is currently using Azure key management.
- Azure key management is configured at the VM cluster level, requiring all databases in the cluster to use the same key management solution. However, databases that use Oracle Wallet can coexist alongside those that use Azure Key Vault within the same VM cluster.
- Register Azure Key Vault
To enable Azure key management for your Exascale VM Cluster, you must first register your Azure Key Vault in the OCI Console.
- From the OCI Console, select Oracle AI Database, and then select Database Multicloud Integrations.
- From the left menu, select Microsoft Azure Integration, then select Azure Key Vaults.
- Select the Register Azure key vaults button, and then complete the following substeps.
- From the dropdown list, select the Compartment in which your Exascale VM Cluster resides.
- Select your identity connector from the dropdown list.
- The Key Vault Name field is optional.
- Select the Discover button.
- Once the key is discovered, select the Key vault checkbox, then select the Register button to register the key in OCI.
Note
Ensure the Azure Key Vault contains at least one valid key. Otherwise, the discovery process will not return any information.
- Create a Database and Use Azure Customer-Managed Key (CMK) as the Key Management Solution
- Complete the following steps described in the Create - Exascale Database documentation to create an Exascale Database.
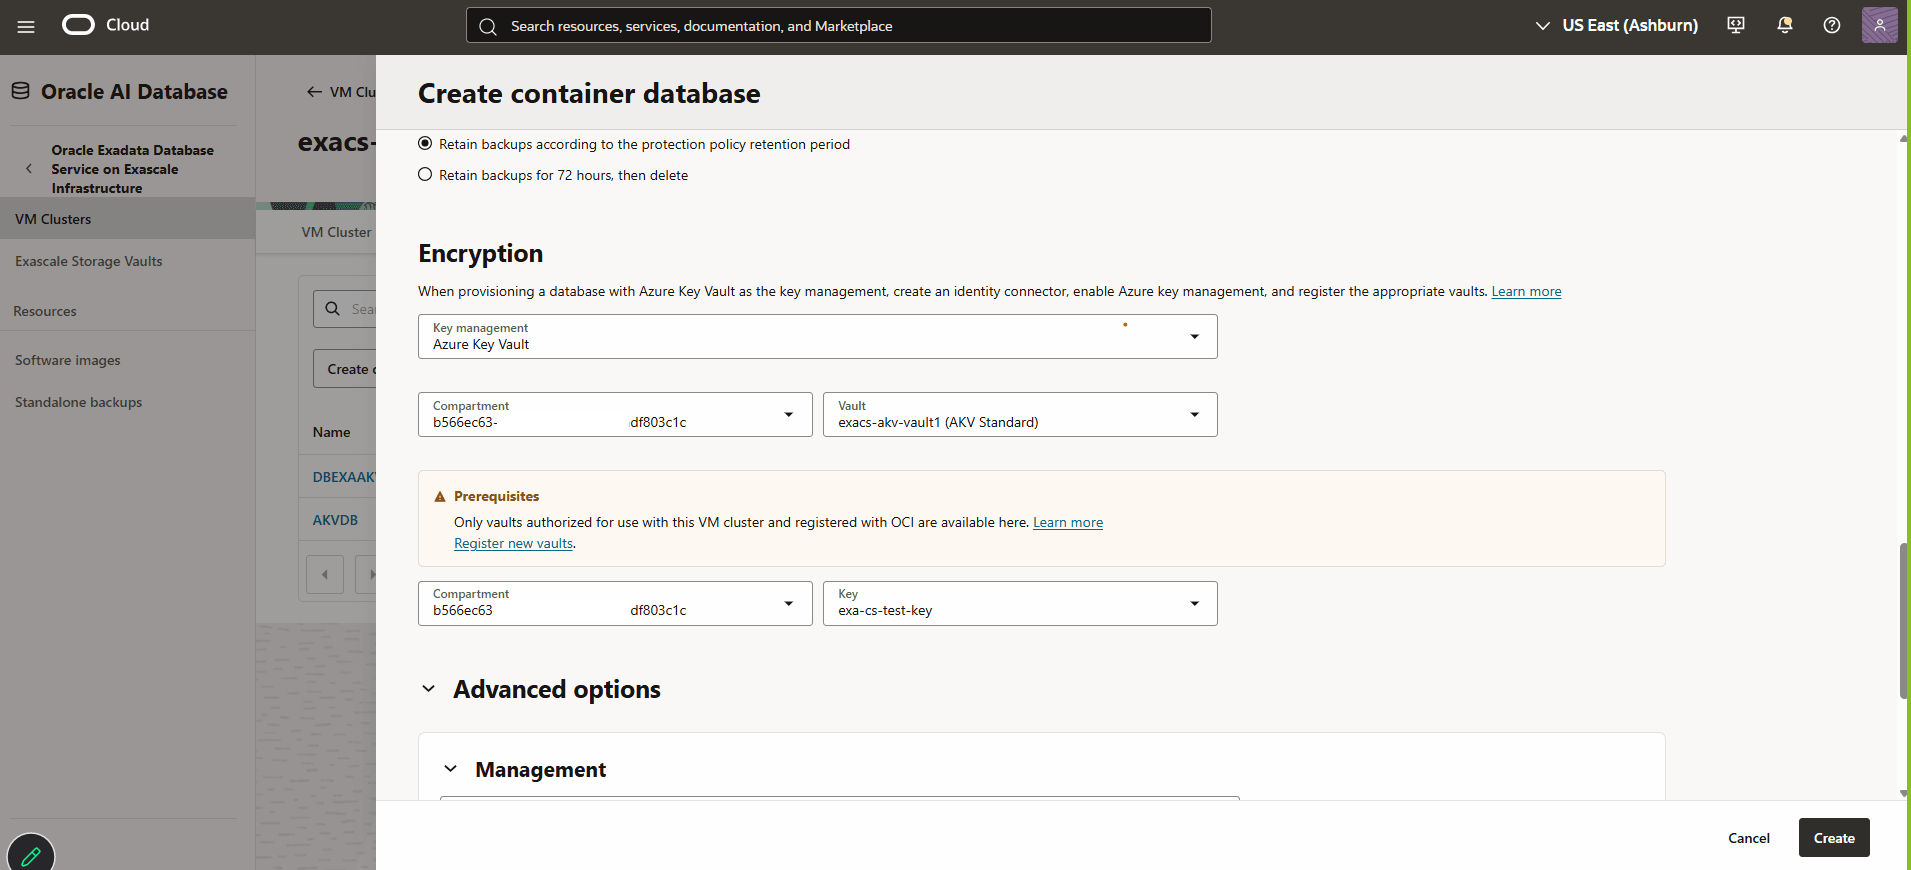
- Navigate to the Encryption section which provides two options. These options include Oracle Wallet and Azure Key Vault.
- Select the Azure Key Vault as the key management. Select the Compartment and the Azure Key Vault from the dropdown list, then select the Key from the dropdown list.
- Review your information, and then select the Create button.
- Modify the Key Management from Oracle Wallet to Azure Customer-Managed Key (CMK)
To update key management from Oracle Wallet to Azure Customer-Managed Key, complete the following steps:
- From the OCI console, select Oracle AI Database, then select Oracle Exadata Database Service on Exascale Infrastructure.
- From the left menu, select VM Clusters, and then select your Exascale VM Cluster.
- Select Container databases tab, and then select the database that you are using.
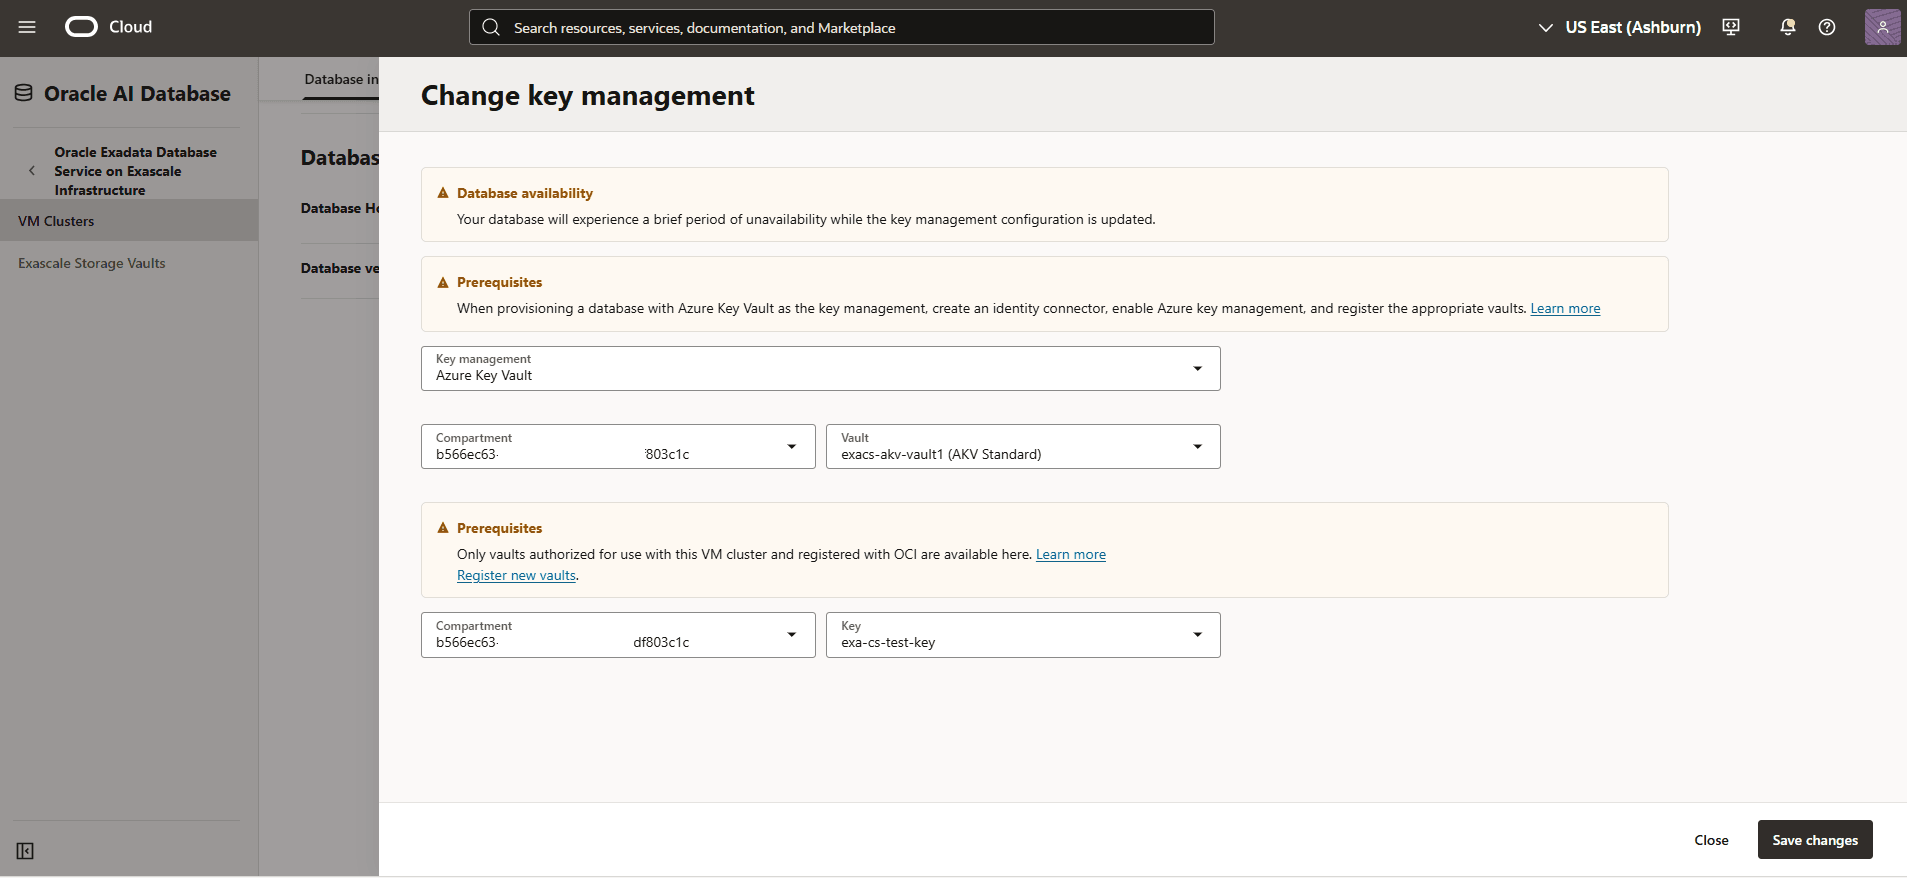
- From the Encryption section, confirm that Key management is set to Oracle Wallet, and then select the Change button.
- From the Change key management page, enter the following information.
- Select your Key management as Azure Key Vault from the dropdown list.
- Select the key compartment you are using, and select the desired Azure Key Vault from the dropdown list, then select the key from the dropdown list.
- Select the Save changes button.
Azure Customer-Managed Key allows you to rotate the key at both Container Database (CDB) and Pluggable Database (PDB) levels to meet your security compliance requirements. Complete the following steps to rotate the key:
Rotate the Azure Customer-Managed Key of a Container Database (CDB)- From the OCI console, select Oracle AI Database, then select Oracle Exadata Database Service on Exascale Infrastructure.
- From the left menu, select VM Clusters, and then select your Exascale VM Cluster that you want to rotate encryption keys.
- Select Container databases tab, and then select the database that that you want to rotate encryption keys.
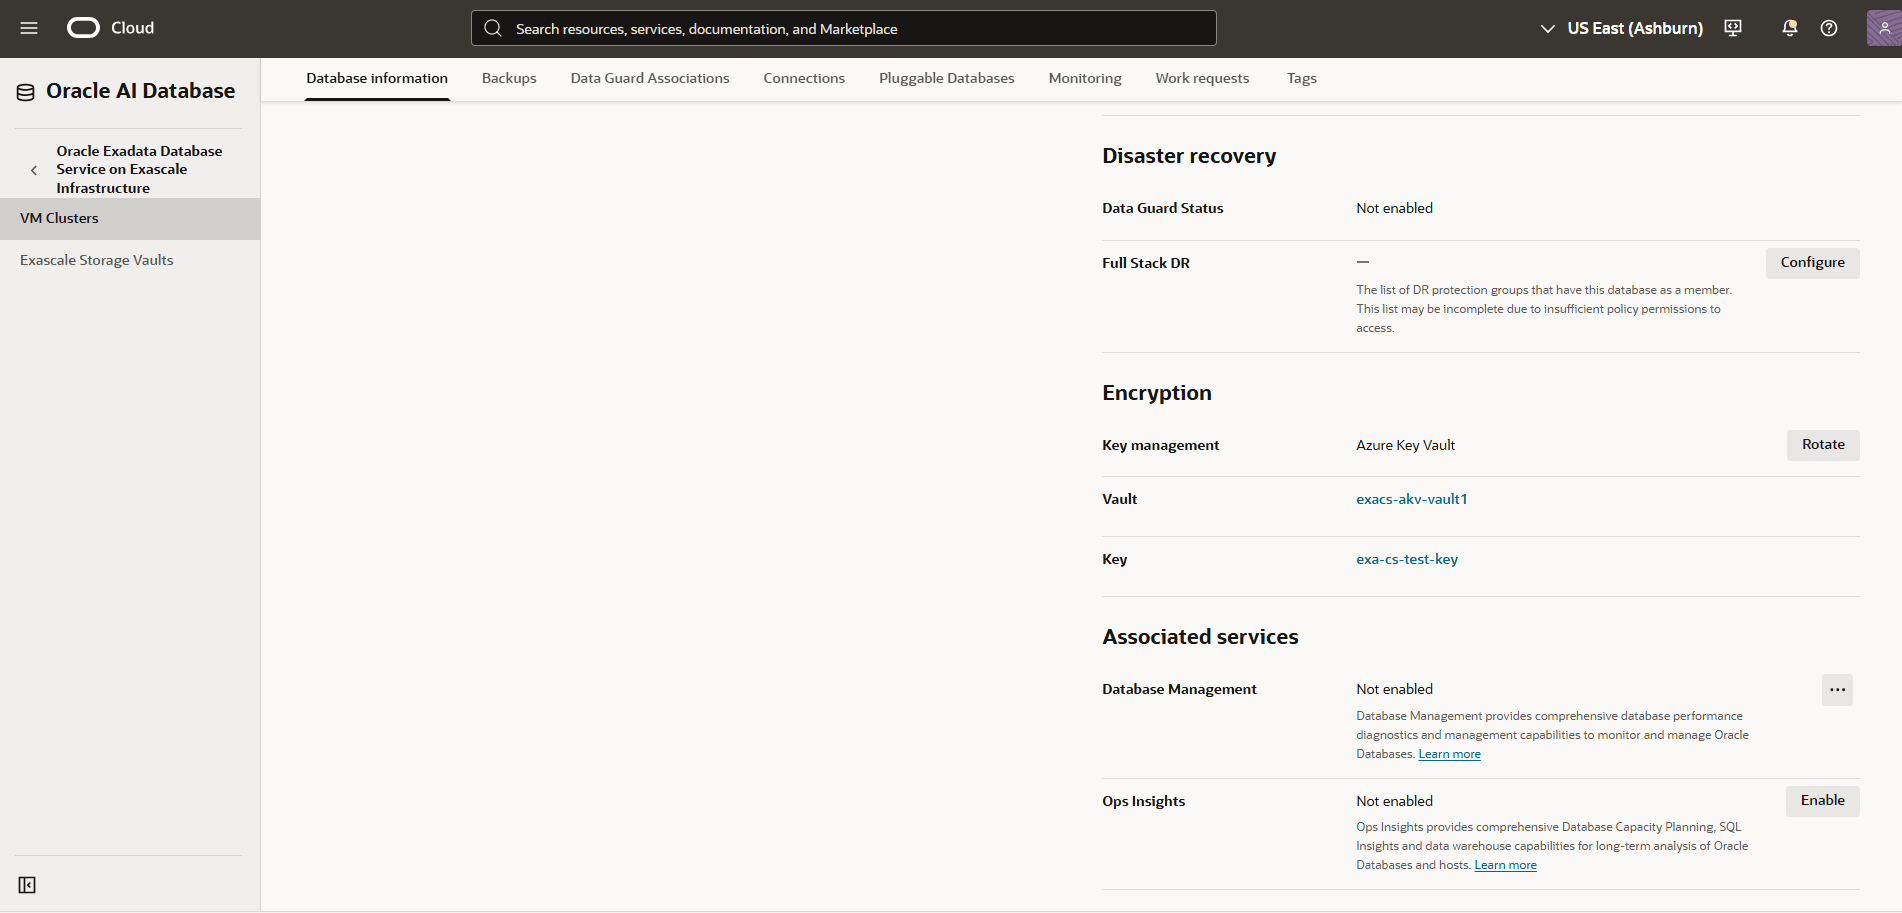
- From the Encryption section, verify that the Key Management is set to Azure Key Vault, and then select the Rotate button.
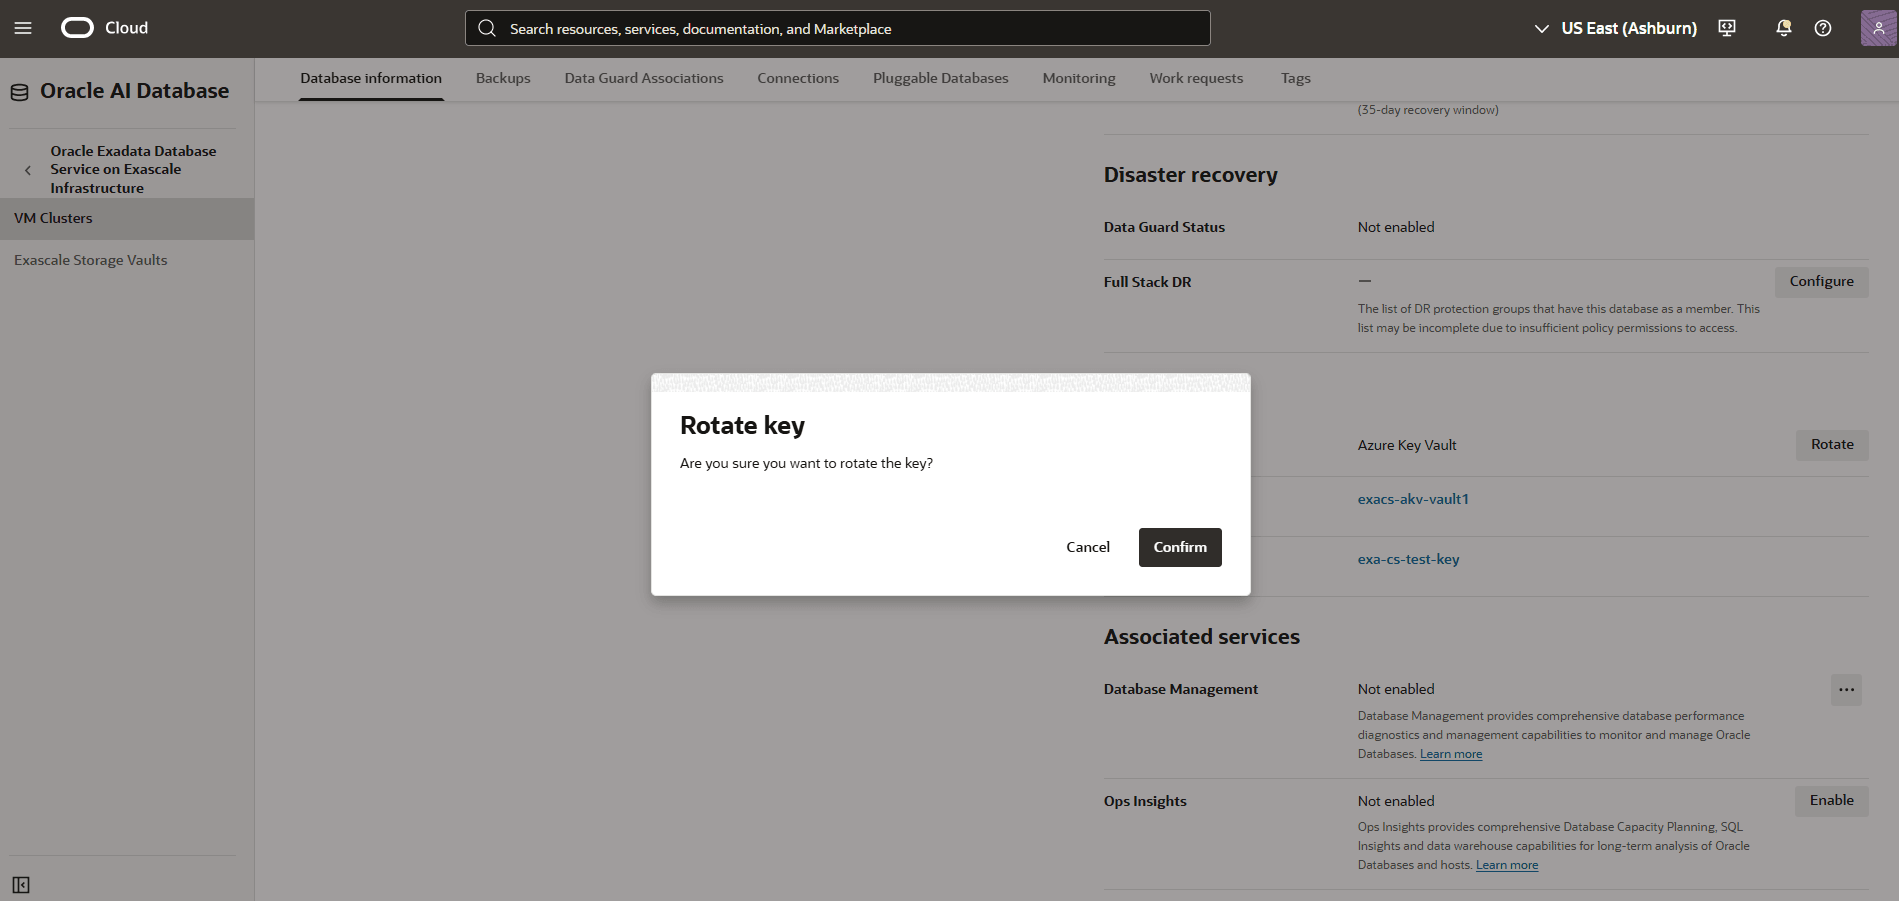
- Select the Confirm button to save the changes.
Rotate the Azure Customer-Managed Key of a Pluggable Database (PDB)- From the OCI console, select Oracle AI Database, and then select Oracle Exadata Database Service on Exascale Infrastructure.
- Select your Exascale VM Cluster, and then select Container databases tab.
- Select the Name field of your Container Database that you are using, and then select Pluggable Databases tab.
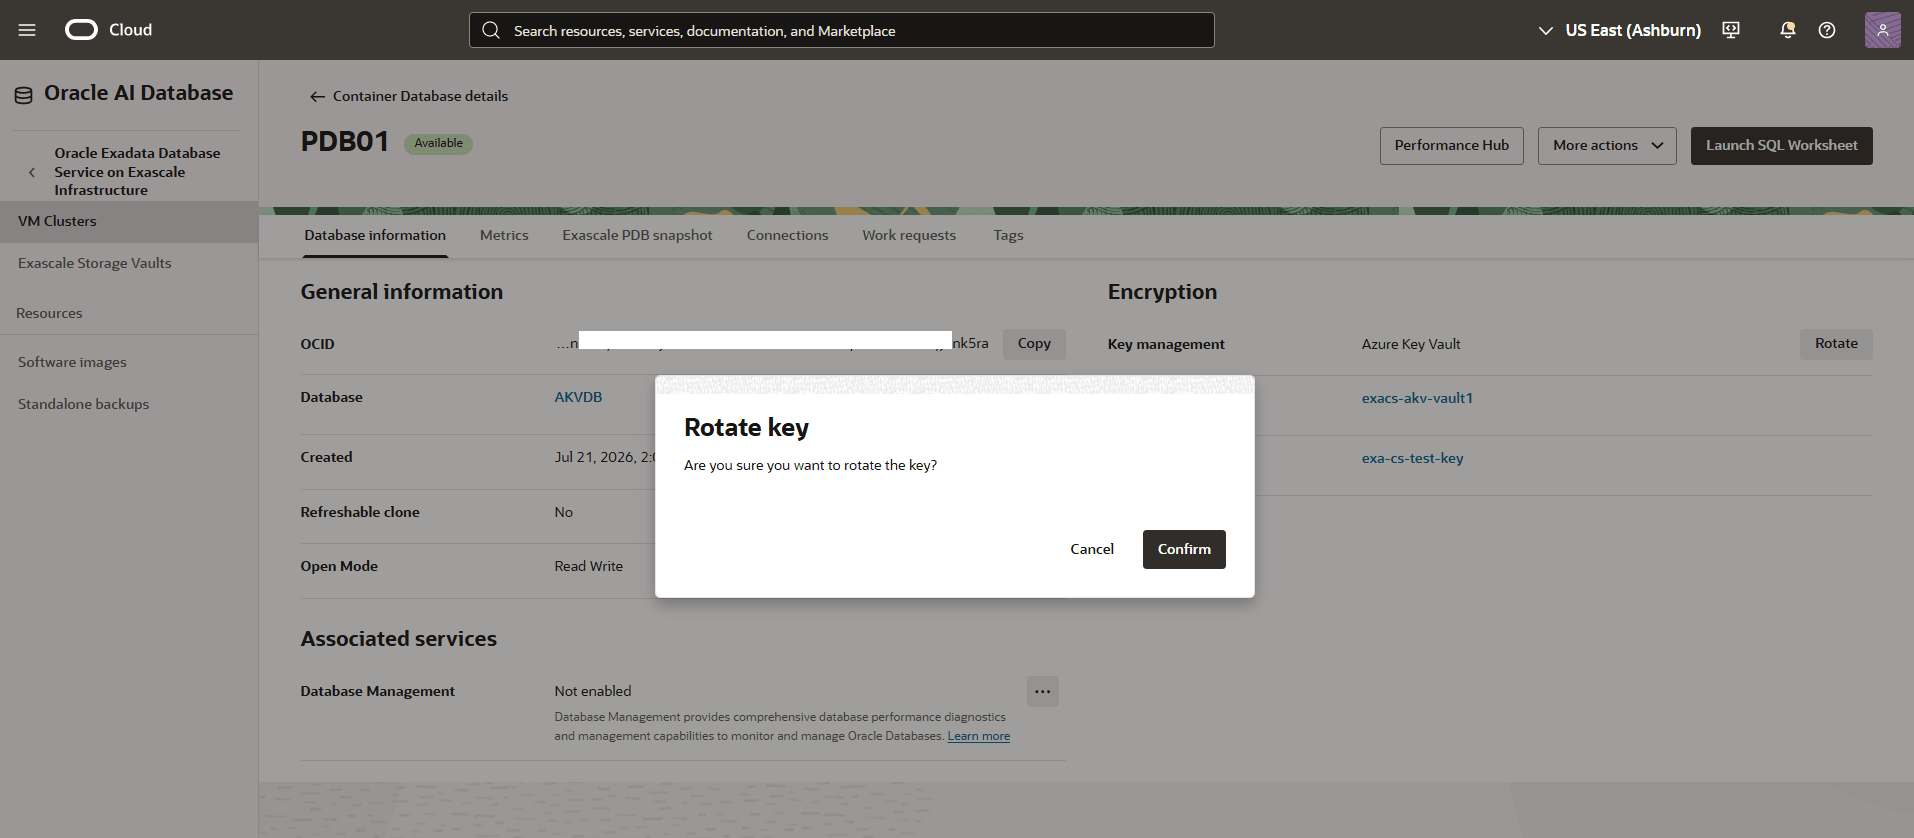
- Select the Name field of the Pluggable Database that you want to rotate encryption keys.
- The Encryption section displays that the Key Management is set as Azure Key Vault.
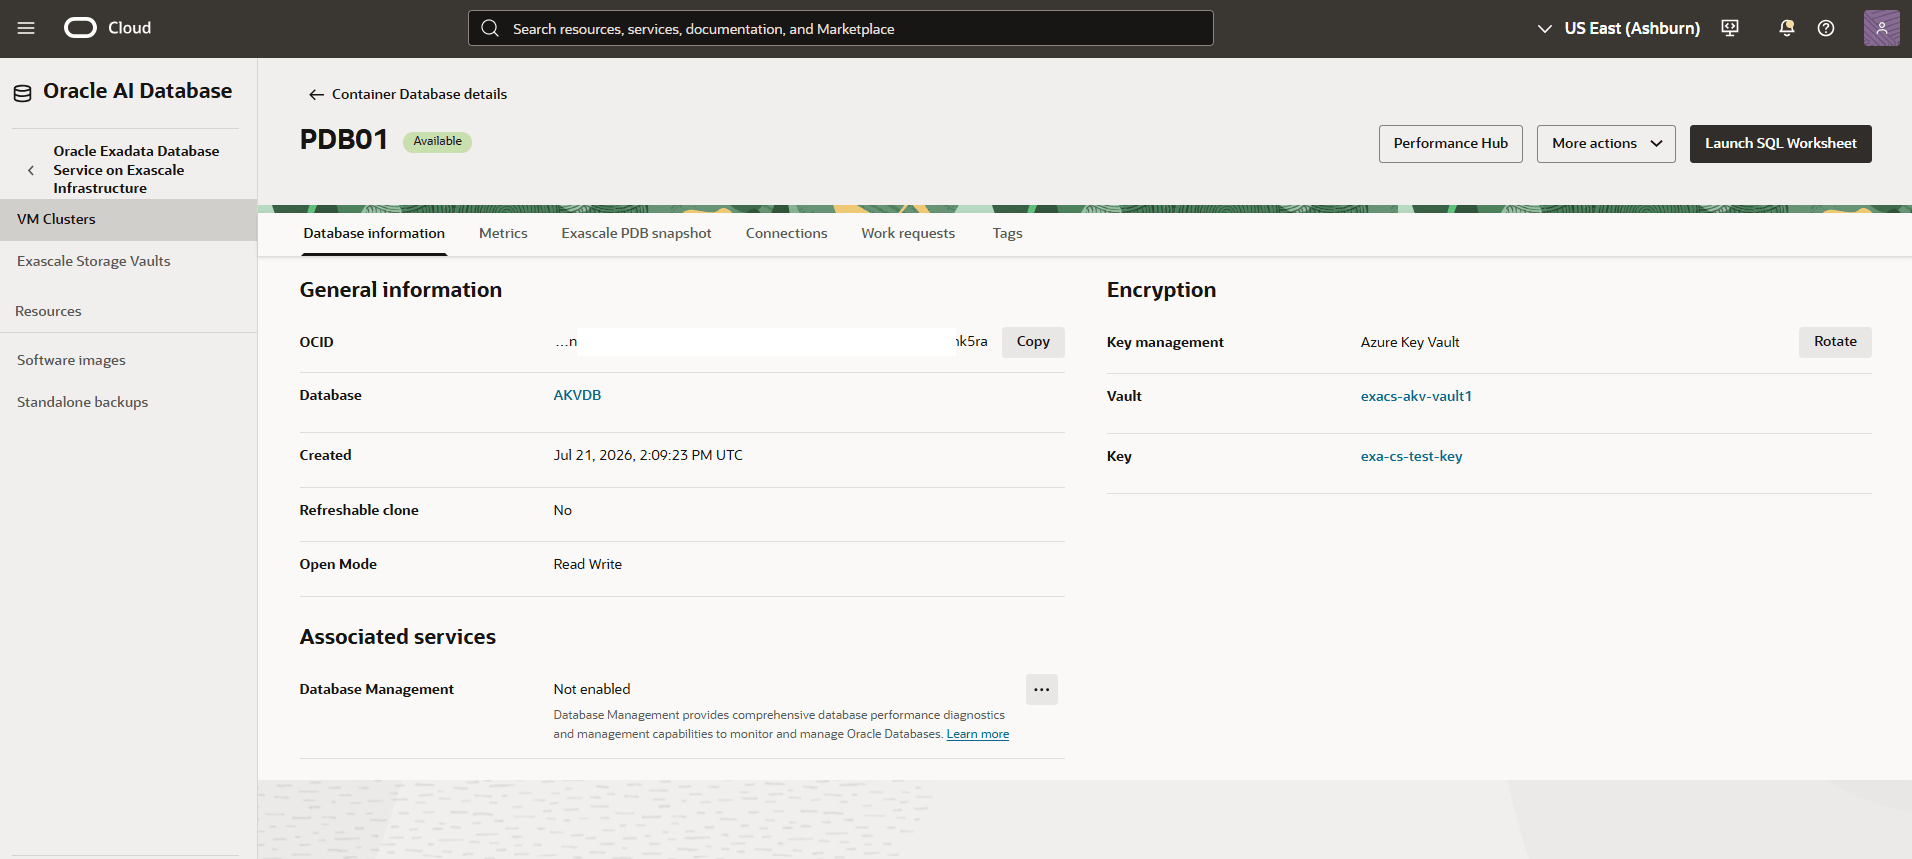
- Select the Rotate button, and then select the Confirm button to save the changes.
- Add Private AKV DNS Zones
There is currently no content for this page. Oracle AI Database@Azure team intends to add content here, and this placeholder text is provided until that text is added. The Oracle AI Database@Azure team is excited about future new features, enhancements, and fixes to this product and this accompanying documentation. We strongly recommend you watch this page for those updates.
There is currently no content for this page. Oracle AI Database@Azure team intends to add content here, and this placeholder text is provided until that text is added. The Oracle AI Database@Azure team is excited about future new features, enhancements, and fixes to this product and this accompanying documentation. We strongly recommend you watch this page for those updates.
There is currently no content for this page. Oracle AI Database@Azure team intends to add content here, and this placeholder text is provided until that text is added. The Oracle AI Database@Azure team is excited about future new features, enhancements, and fixes to this product and this accompanying documentation. We strongly recommend you watch this page for those updates.