Protect Autonomous AI Database (Serverless)
Learn about various data protection methods available for Autonomous AI Database on Oracle AI Database@Google Cloud.
Data in Transit Encryption
Autonomous AI Database is protected with encryption of data in transit by default. This ensures that data moving between application and the database is secured from unauthorized interception or tampering
Encryption in transit is implemented using Transport Layer Security (TLS) and mutual TLS (mTLS) for database connections. These protocols provide secure communication channels between database clients and servers, protecting authentication credentials and query data.
Connection Options
-
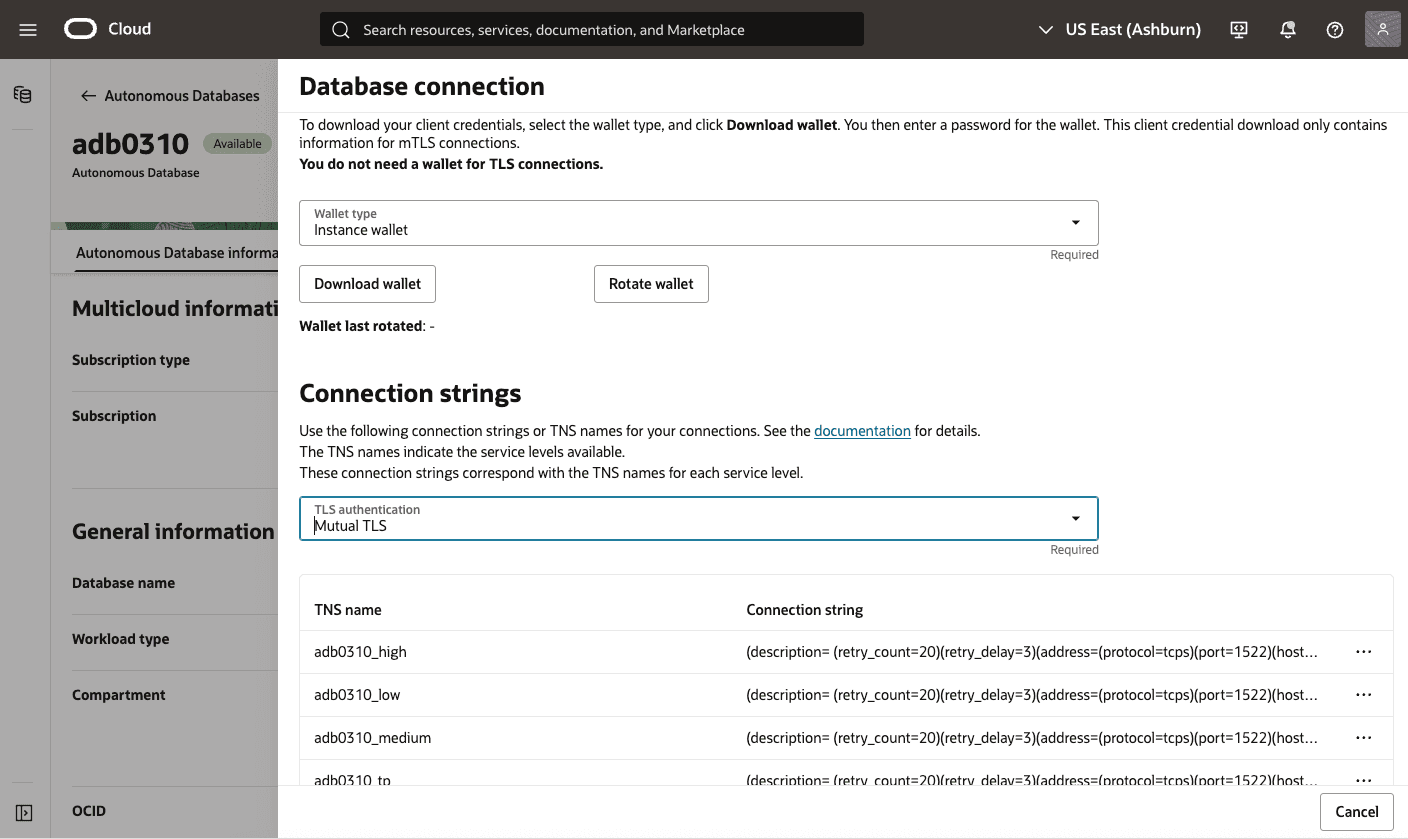
TLS: Encrypts traffic between the client and the database using standard X.509 certificates.
-
mTLS: Provides two-way authentication, where both the client and the database present valid certificates before a connection is established. This option offers stronger identity assurance for enterprise workloads.
Connections on Autonomous AI Database
Connections to your Autonomous AI Database are secured, and can be authorized using TLS or mTLS authentication options. TLS authentication is easier to use, provides better connection latency, and does not require you to download client credentials (wallet) if any of these is true for your connections:
-
You are using JDBC Thin Client (version 12.2.0.1 or higher) with JDK 8(u163+) or higher.
-
You are using the Python python-oracledb driver.
-
You are using ODP.NET version 19.14 (or higher), or 21.5 (or higher).
-
You are using an Oracle Call Interface based driver with Oracle Client libraries version 19.14 (or higher), or 21.5 (or higher).
Encryption at Rest for Oracle AI Database@Google Cloud
Oracle AI Database@Google Cloud supports encryption at rest to safeguard sensitive data residing in database files, backups, and configuration files. This protection is enabled by Transparent Data Encryption (TDE), which ensures that data is encrypted whenever it is written to persistent storage and transparently decrypted when accessed by authorized Oracle processes with no customer configuration is required. The master key encrypts tablespace keys, which in turn encrypt the data.
Transparent Data Encryption (TDE)
Encryption at rest is provided through TDE, a feature included in Oracle Advanced Security. TDE automatically encrypts tablespaces, redo logs, and undo logs, ensuring that all database data is written to disk in encrypted form and transparently decrypted for authorized users and applications. Database backups created using Oracle Recovery Manager (RMAN) or managed backup solutions adopt these encryption settings, protecting all database copies stored on persistent media.
Key Management
TDE uses a master encryption key to protect your tablespaces and columns. For Oracle AI Database@Google Cloud, there are two key management options:
-
Oracle-managed keys: The master encryption key is automatically generated and stored in an Oracle Wallet, which is secured within the database environment. Oracle handles all key lifecycle tasks, including backups and restores.
-
Customer-managed keys: You can integrate Autonomous AI Database Service with services like OCI Vault to generate and store the master encryption key outside the database, enabling centralized key control, lifecycle management, rotation, and auditing of key usage events. With customer-managed keys, you control the encryption keys used to protect your data. You can enable customer-managed keys when creating databases, switch from Oracle-managed to customer-managed keys, and rotate keys to meet security and compliance requirements.
Autonomous AI Database on Oracle AI Database@Google Cloud offers the following data at rest encryption methods:
-
Oracle-managed Key (OMK)
- Oracle Wallet
-
Customer-managed Key (CMK)
-
OCI Vault
-
Oracle Key Vault (OKV)
-
Google Cloud Key Management Service (Cloud KMS)
-
Oracle-managed Key (OMK) is the default method for securing data encryption in Oracle AI Database@Google Cloud. In Oracle AI Database, data encryption at rest is powered by TDE. When you choose OMK, the database system automatically handles all key management, including key generation, secure storage, and rotation required by TDE. There are no prerequisites or additional configuration steps required to use Oracle-managed Key on Oracle AI Database@Google Cloud.
View Encryption Details
-
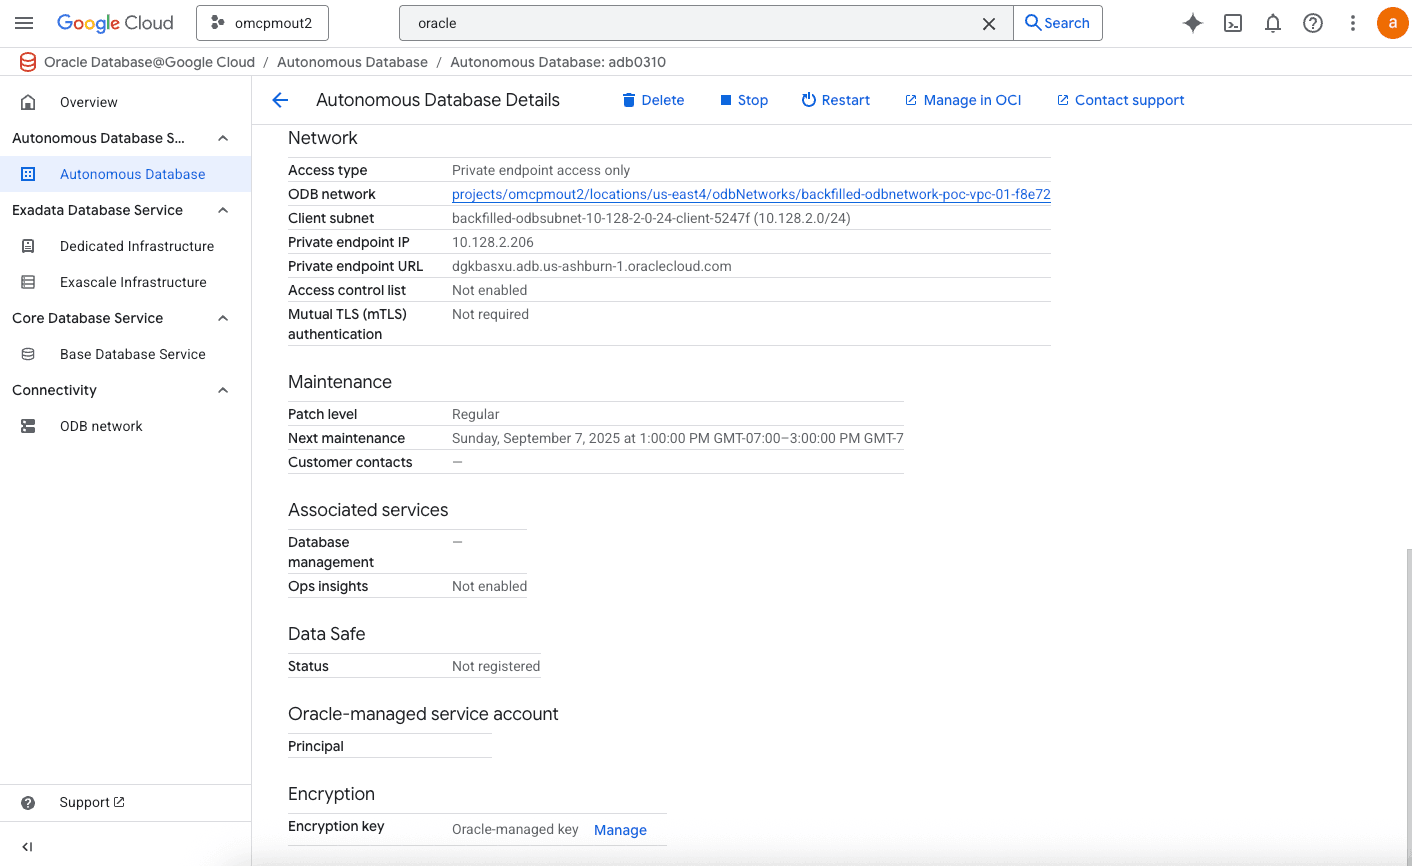
Navigate to the Oracle AI Database@Google Cloud console.
-
From the left menu, select Autonomous AI Database from Autonomous AI Database Service.
-
From the list, select the Display Name of your Autonomous AI Database to open its details page.
-
From the Details tab, navigate to the Encryption section to view the Encryption key details. By default, it is set to Oracle-managed key.
-
Autonomous AI Database integrates with OCI Vault to provide data encryption using a customer-managed key (CMK). This integration centralizes key storage and management, which simplifies the overall key lifecycle.
Note
To enable OCI Vault for Autonomous AI Database, complete the following steps. Note: The customer-managed encryption key option is not available during Autonomous AI Database instance creation. This option is available after the database instance is created.-
Create an Oracle Cloud Infrastructure Vault (OCI Vault)
For more information, see Create an Oracle Cloud Infrastructure Vault.
-
Create a Master Encryption Key in the Vault
For more information, see Create a Master Encryption Key in the Vault.
-
Create an OCI Dynamic Group
-
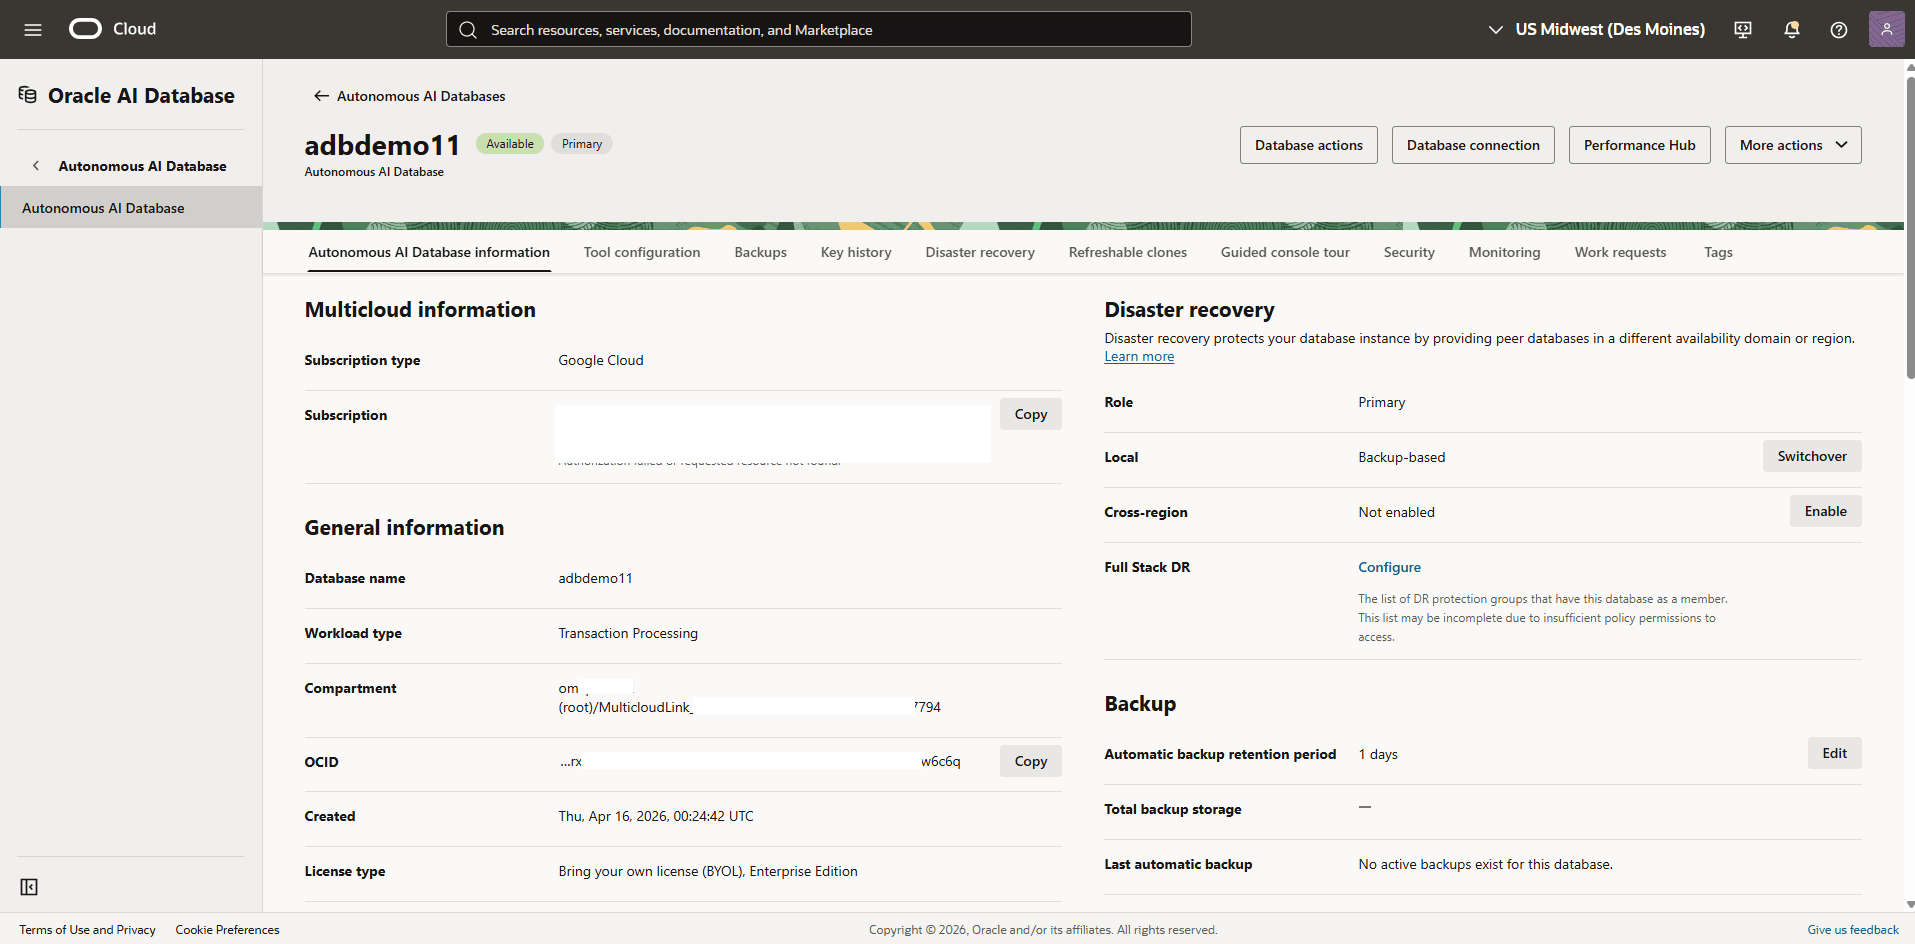
From the OCI console, select Oracle AI Database, and then select Autonomous AI Database.
-
Select the name of your Autonomous AI Database.
-
Scroll down to the General information section. Take note of your Autonomous AI Database Compartment information.
-
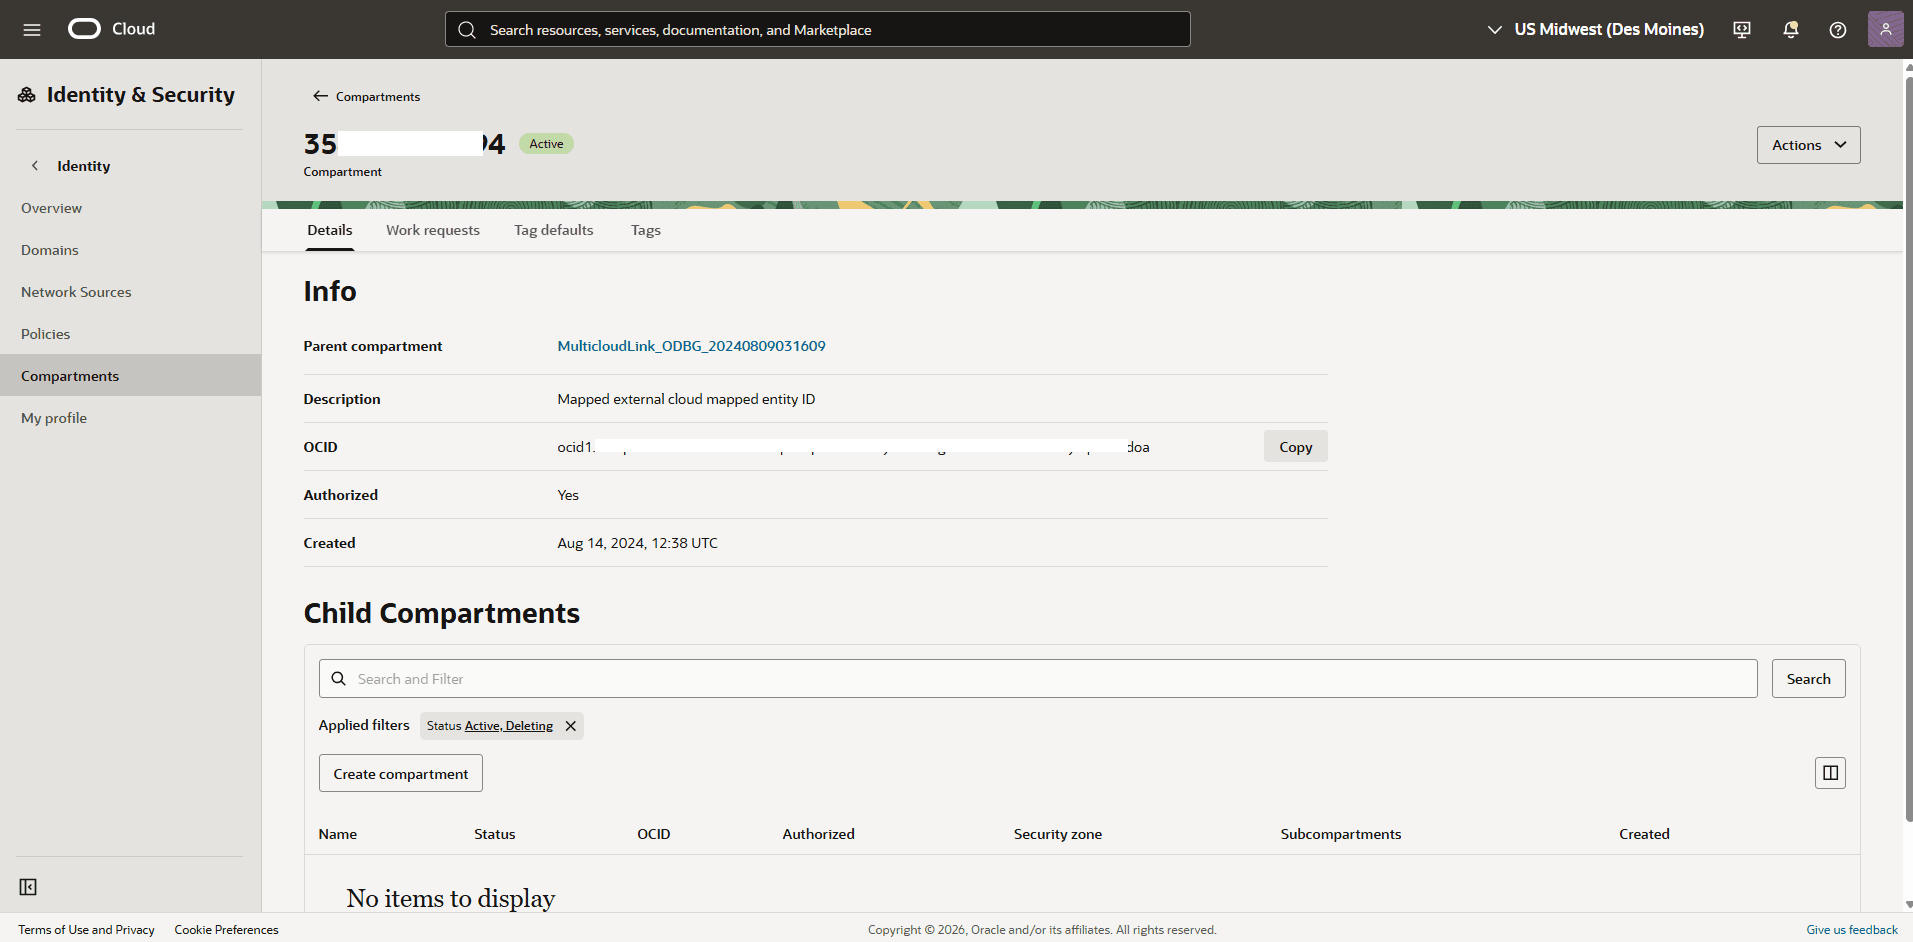
From the navigation menu, select Identity & Security, and then select Compartments.
-
From the Compartments list, navigate to your compartment which you previously created and copy the OCID information.
-
From the navigation menu, select Identity & Security, and then select Domains.
-
From the Applied filters section, select the Root Compartment and then choose the name of you domain.
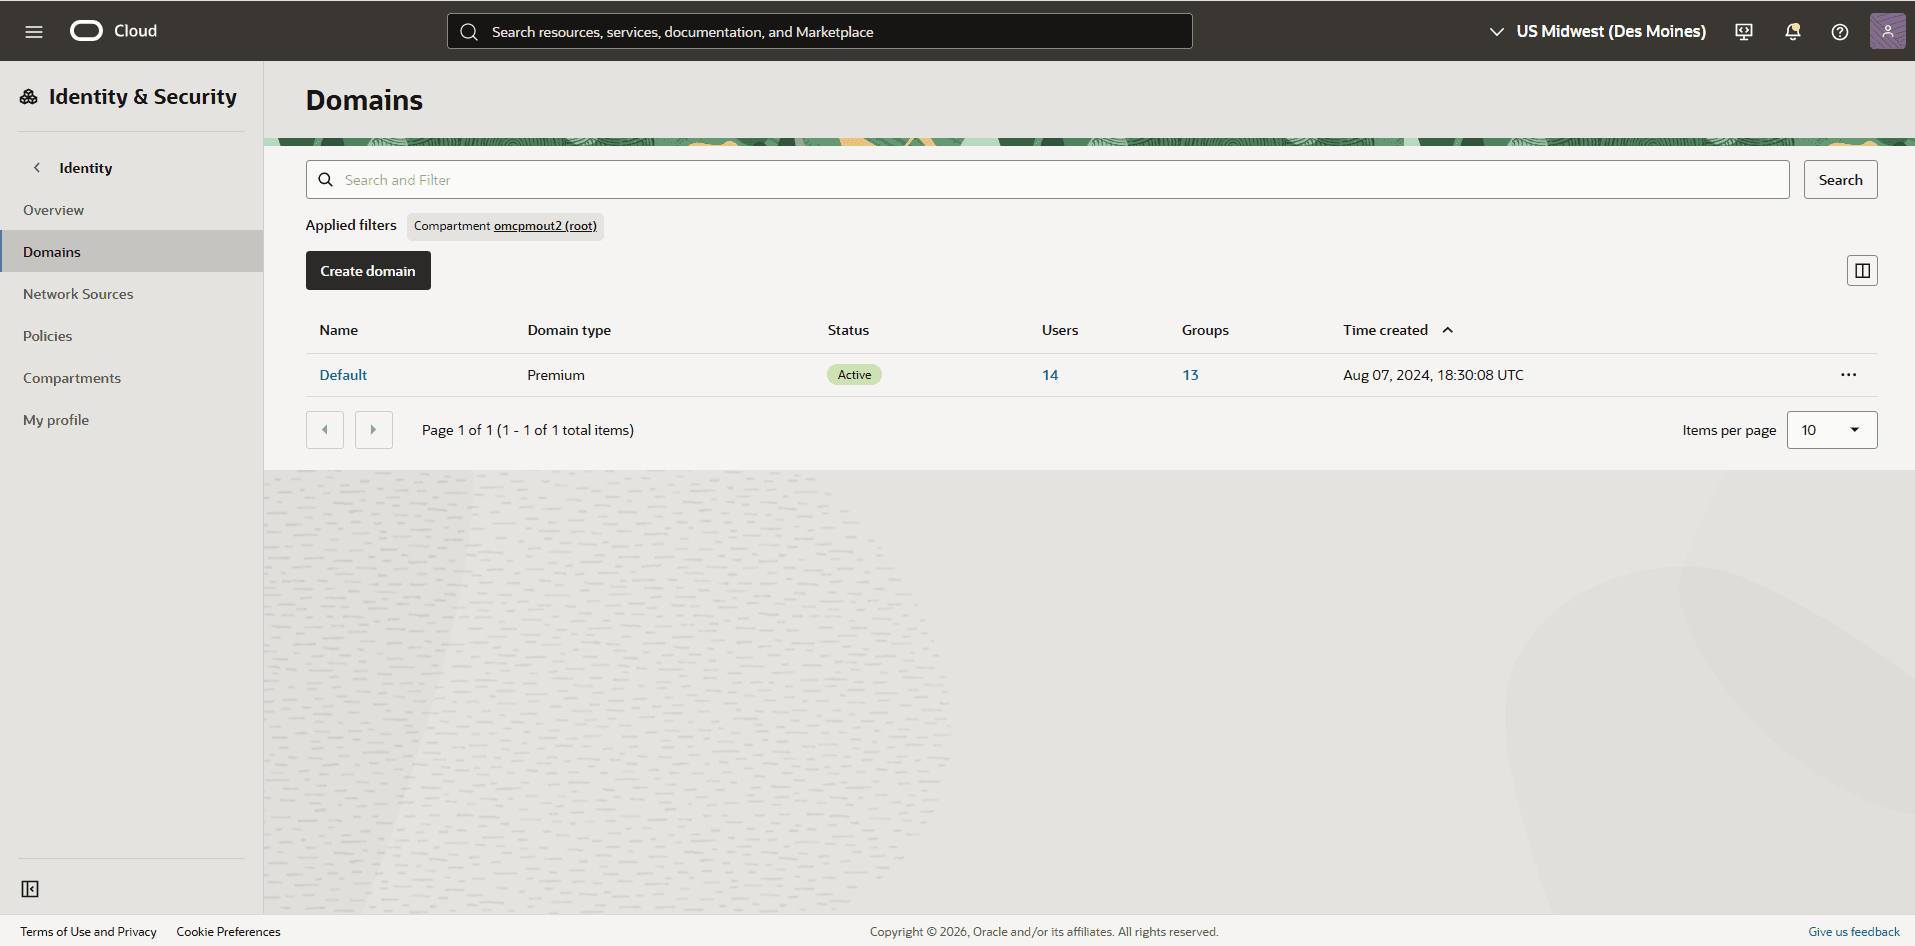
-
Select the Dynamic groups tab, and then select the Create dynamic group button.
-
Name: Enter a descriptive name for the group.
-
Description: Provide a brief description of the dynamic group’s purpose.
-
Matching Rules: Enter the following statement, replacing
<your_Compartment_OCID>with the compartment OCID you noted in the previous step:ALL {resource.compartment.id = '<your_Compartment_OCID>'} -
Review your information, and then select the Create button.
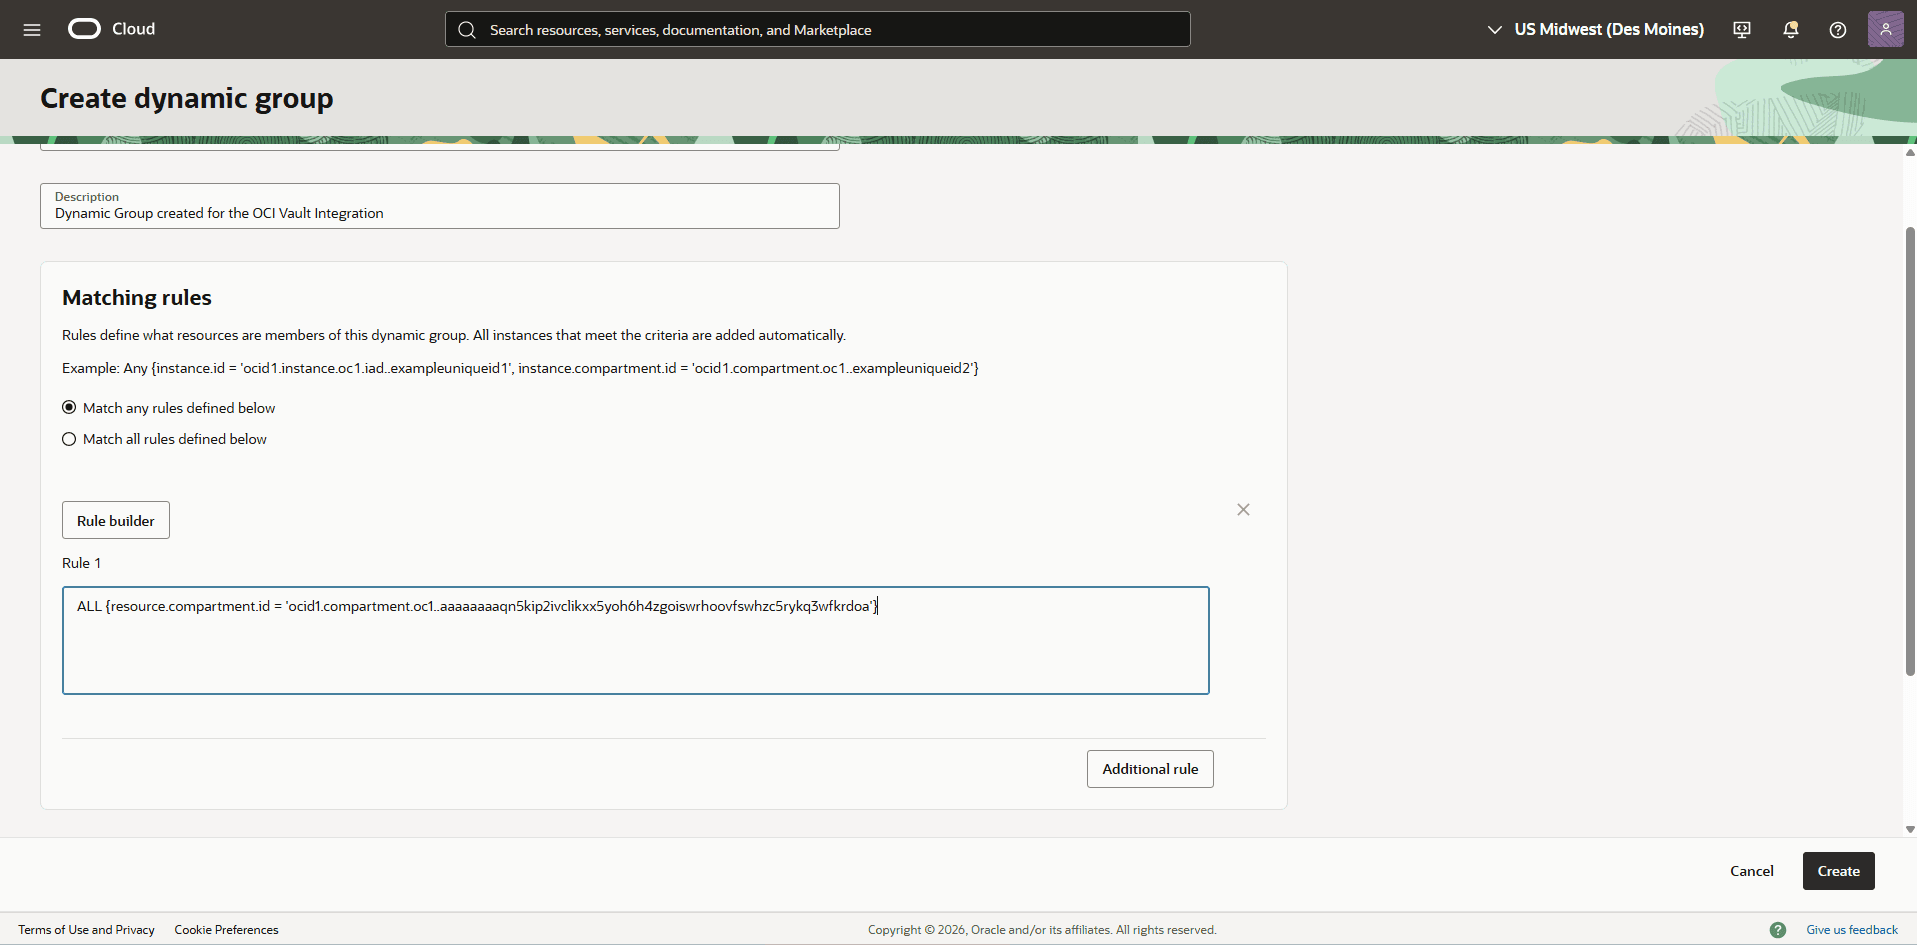
-
-
-
Create an OCI Policy
-
From the navigation menu, select Identity & Security, and then select Policies.
-
In the Applied Filter section, select the Root Compartment, and then select the Create Policy button.
-
Name: Enter a descriptive name for the group.
-
Description: Provide a brief description of the dynamic group’s purpose.
-
Enable the Show manual editor button, and then enter the following statements. Replace
<dynamic-group-name>with the name of the dynamic group created in the previous step, and<your_Compartment_OCID>with your specific compartment OCID:Allow dynamic-group <dynamic-group-name> to use vaults in compartment id <your_Compartment_OCID> Allow dynamic-group <dynamic-group-name> to use keys in compartment id <your_Compartment_OCID>Note
Note:
To use customer-managed keys with Autonomous Data Guard with a remote standby, the following policies are required:
-
Review your information and then select the Create button.
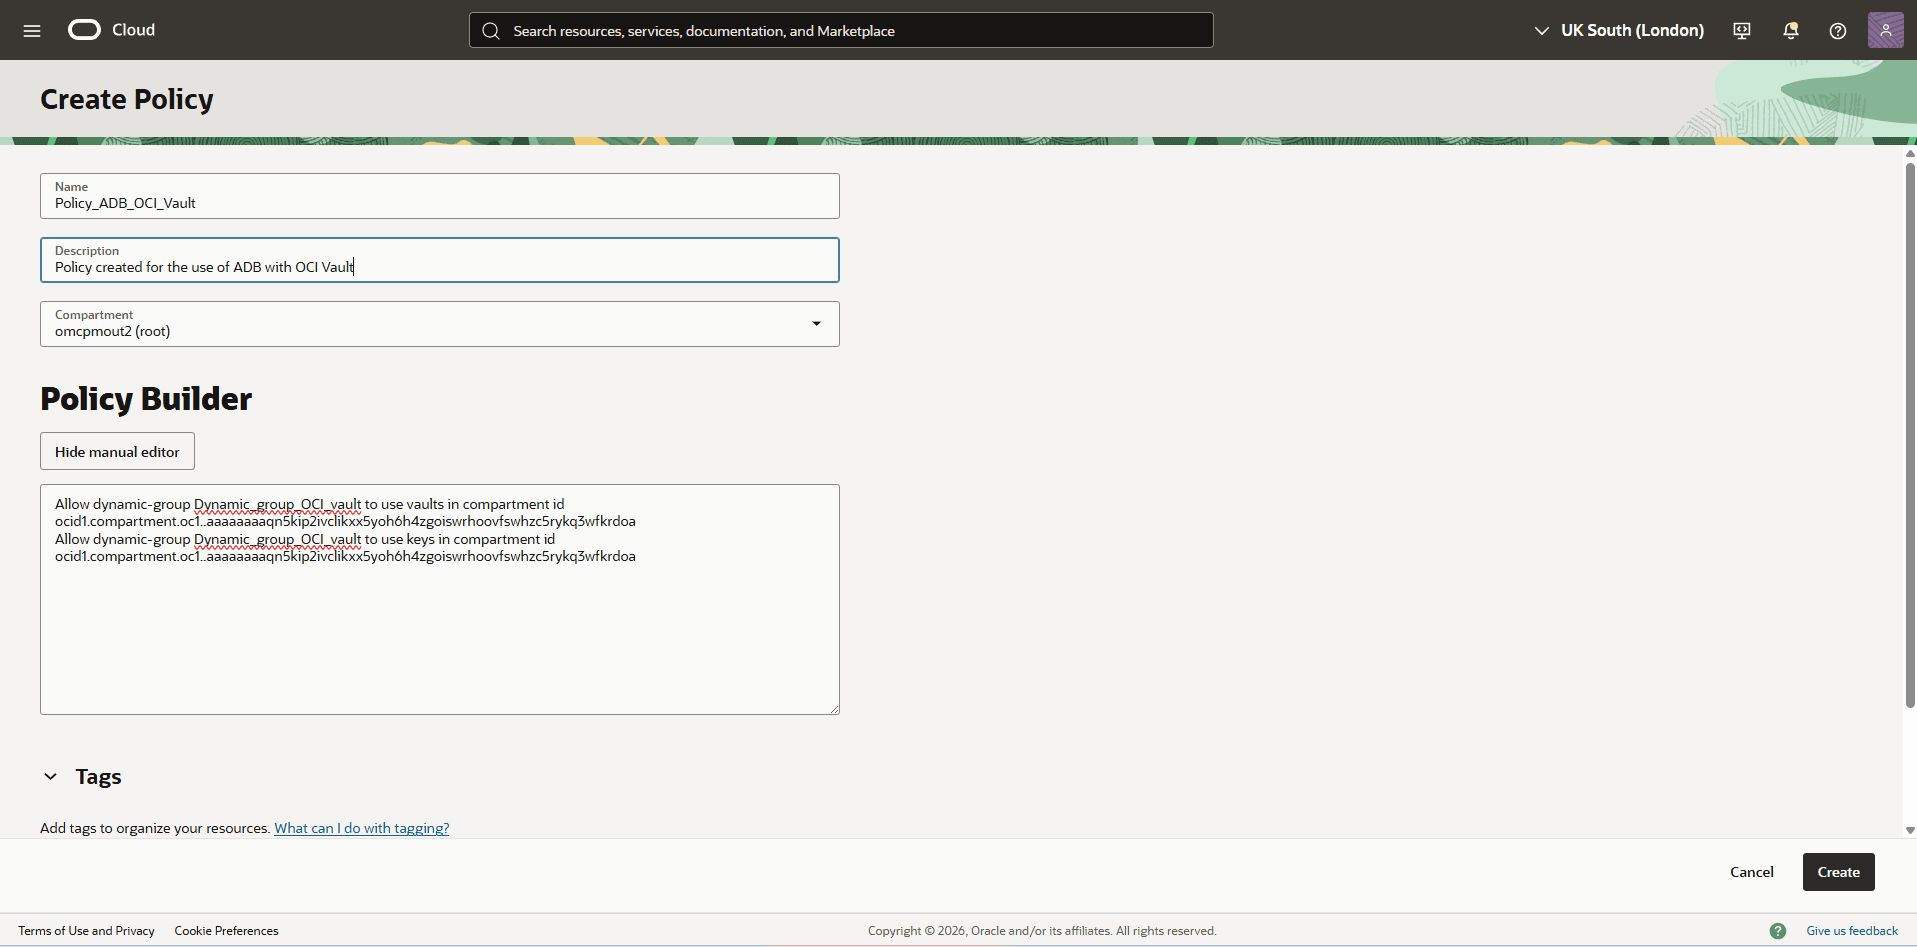
-
-
-
Modify the Customer Management Key to OCI Vault
-
From the OCI console, select Oracle AI Database, and then select Autonomous AI Database.
-
Select the name of your Autonomous AI Database.
-
Select the More action button, and then select Manage encryption key option.
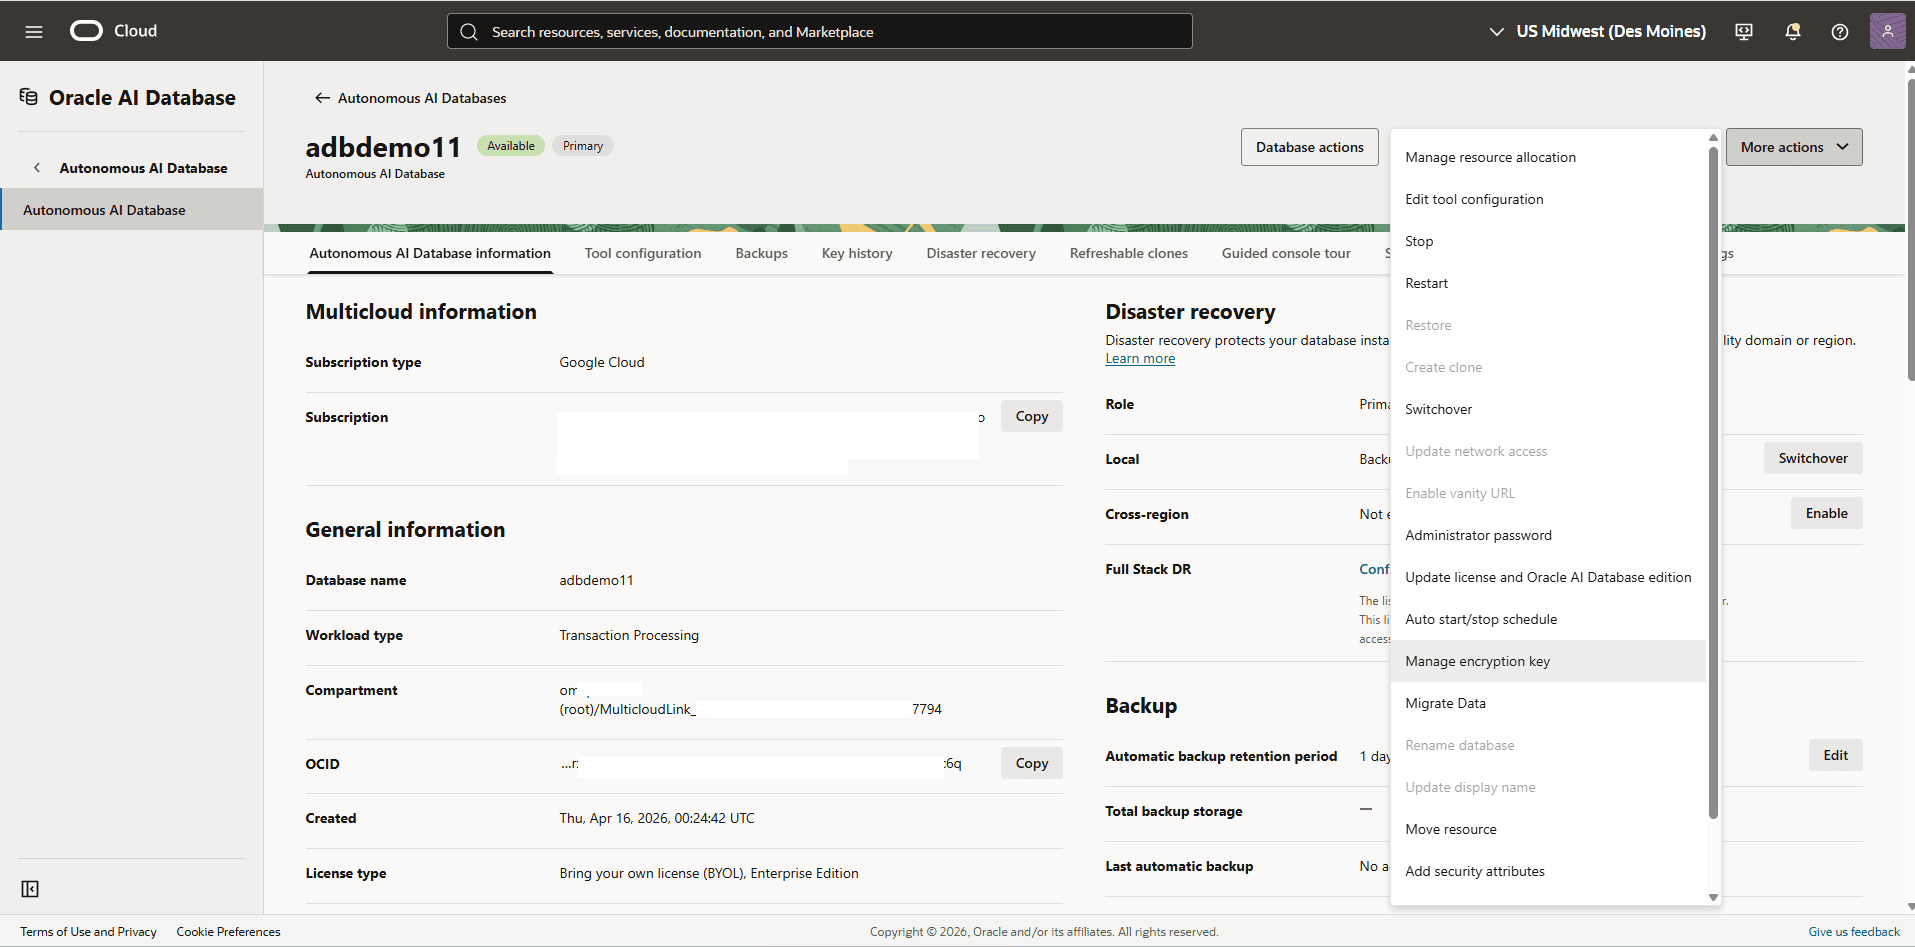
-
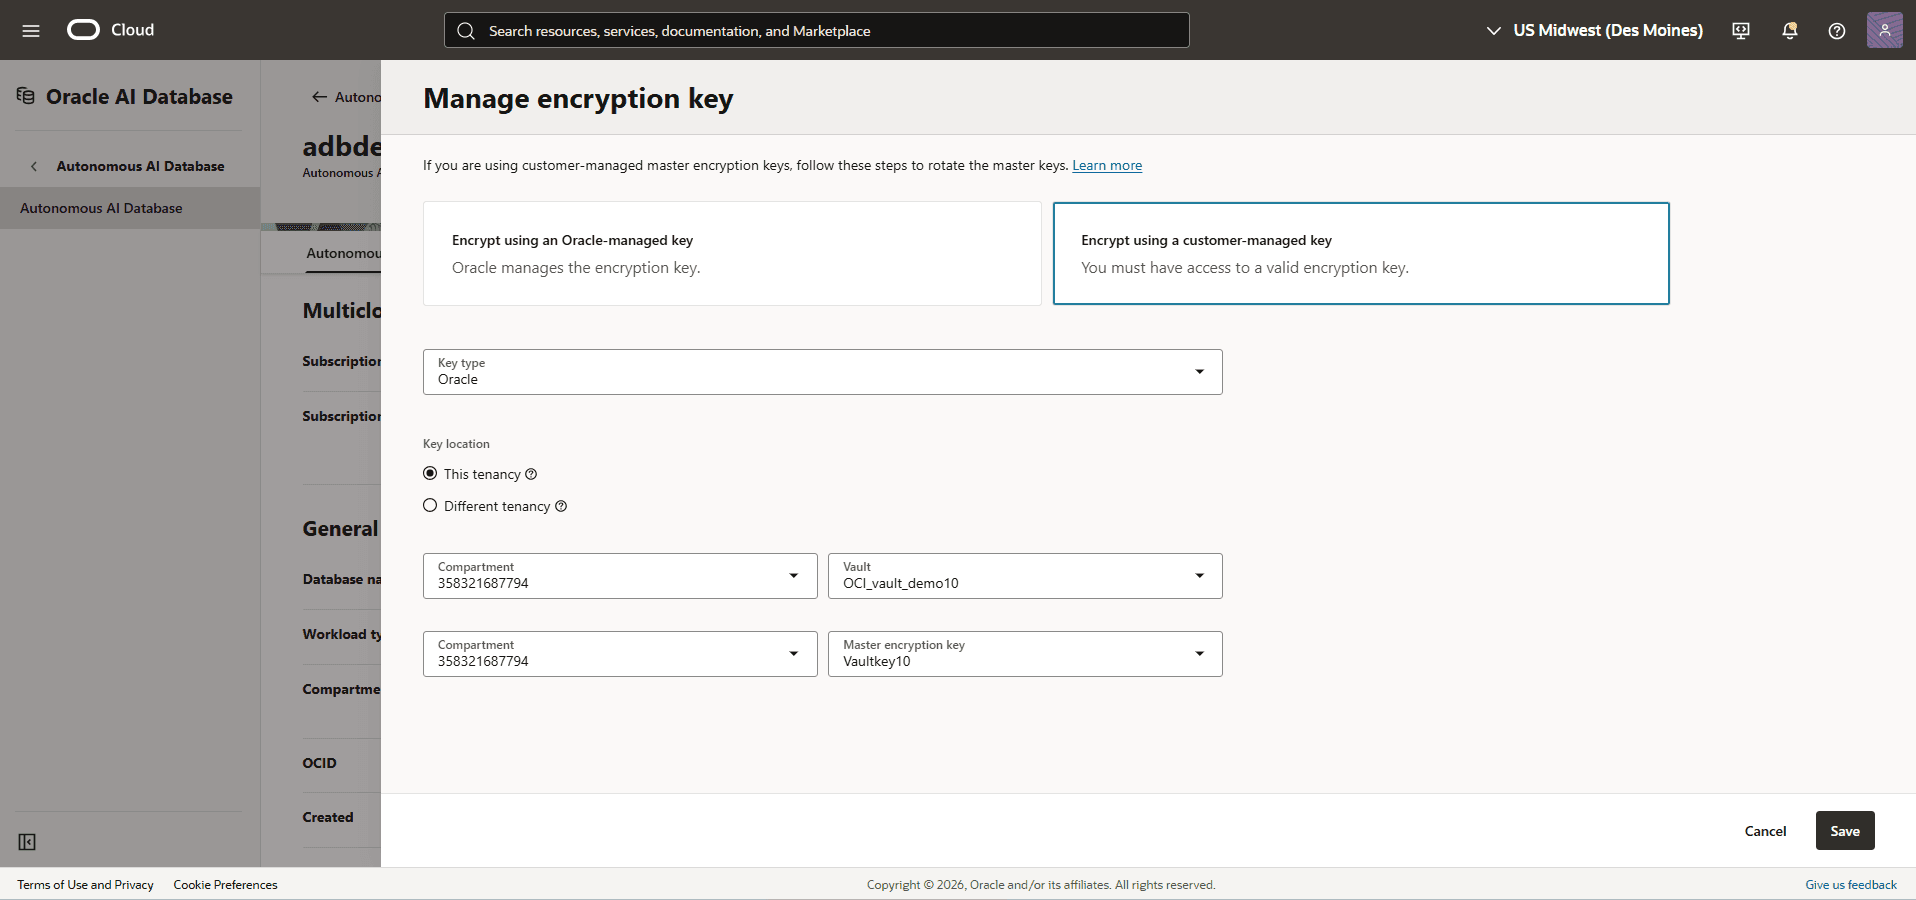
From the Manage encryption key page, enter the following information.
-
Choose the Encrypt using a customer-managed key option.
-
Select Oracle as the Key type.
-
Choose the This tenancy option.
-
Select the compartment where you created your OCI Vault, then select the Vault that you want to use.
-
Select the compartment where you created your Master encryption key, then select the key that you want to use.
-
Select the Save button.
-
-
-
Verify Autonomous AI Database Encryption Method
-
From the OCI console, select Oracle AI Database, and then select Autonomous AI Database.
-
Select the name of your Autonomous AI Database.
-
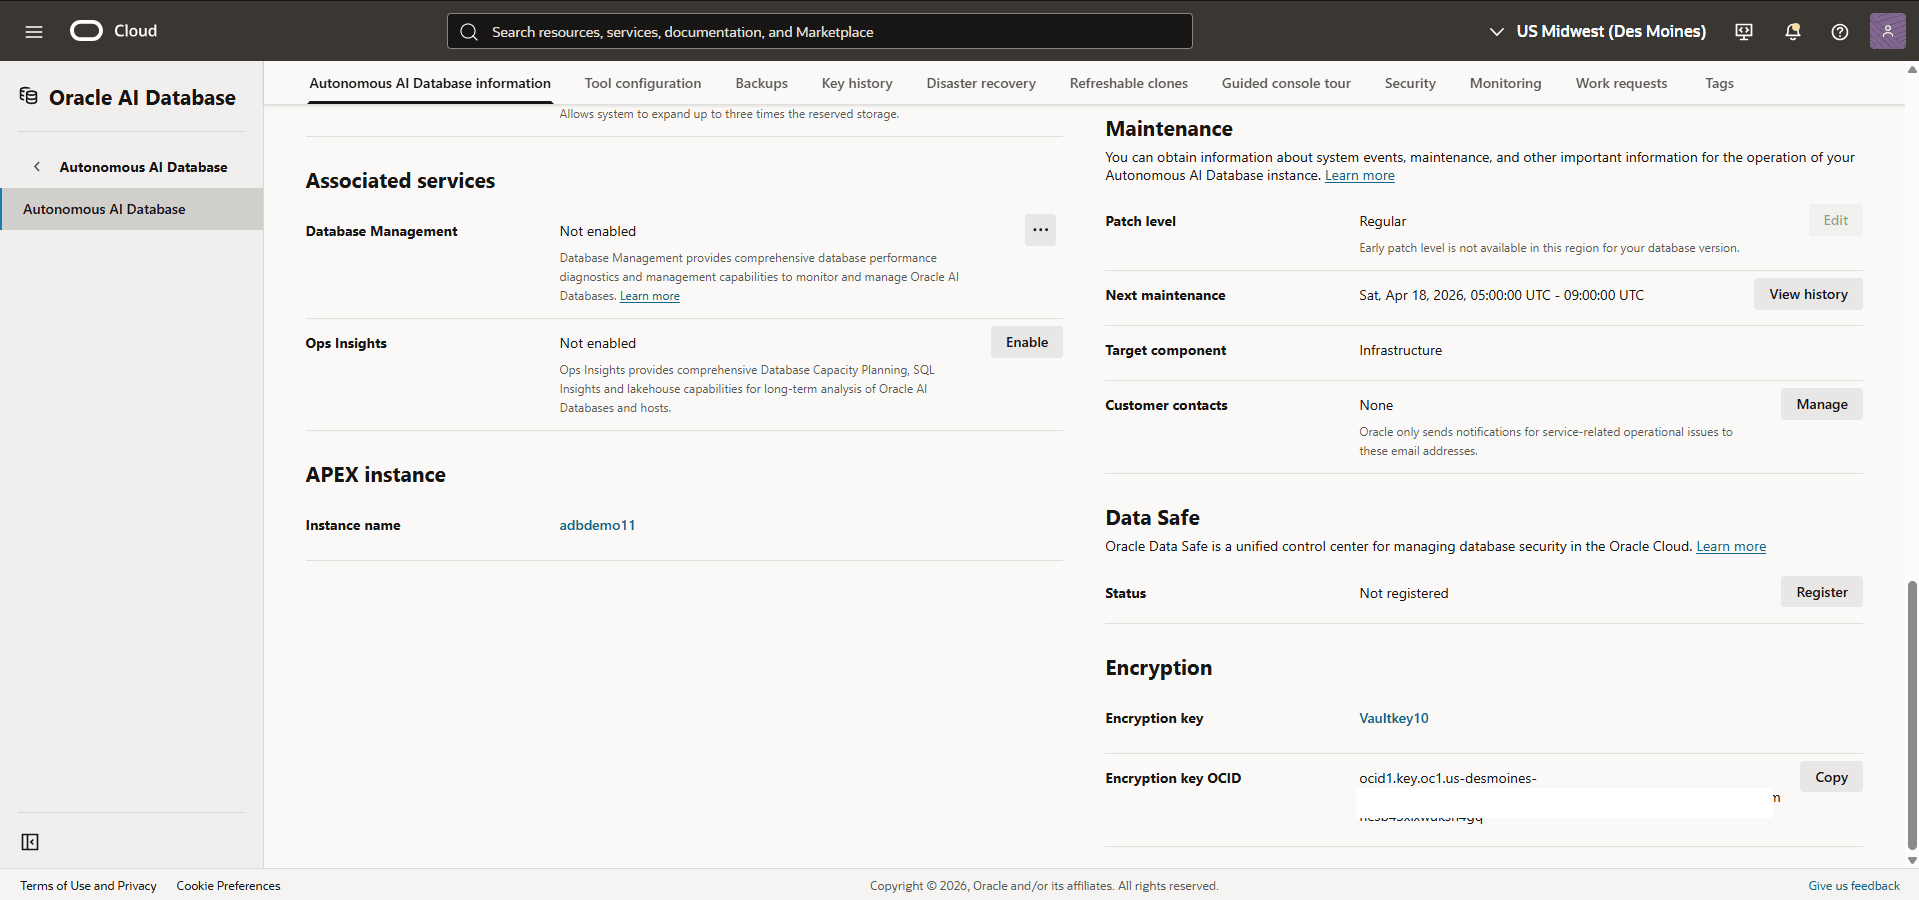
Select the Autonomous AI Database information tab, scroll down to the Encryption section to view the Encryption key details. You can verify the key used to encrypt your Encryption Key and view the Encryption key OCID of the key.
Note
Note: The customer-managed encryption key is stored in Oracle Cloud Infrastructure Vault, external to the database host. If the customer-managed encryption key is disabled or deleted, the database will be inaccessible.
-
Rotate Customer-Managed Encryption Key(s) on Autonomous AI Database with OCI Vault
To rotate your customer-managed encryption key(s), complete the following steps.
-
Create a new master encryption key within your OCI Vault. For more information, see Create a Master Encryption Key in the Vault.
-
From the OCI console, select Oracle AI Database, and then select Autonomous AI Database.
-
Select the name of your Autonomous AI Database.
-
Select the More action button, and then select Manage encryption key option.
-
Select the OCI Vault that contains the key you want to use.
-
Select a Master Encryption Key that is different from the one currently in use for your Autonomous AI Database instance.
-
Select the Save button.
Note
Note:
-
You cannot switch to a different customer-managed key more than two times in a 24-hour period.
-
If you plan to use OCI Vault in a different tenancy than your database, see the Create Dynamic Group and Policies for Customer Managed Keys with Vault in Different Tenancy than the Database documentation for step-by-step instructions.
-
-
There is currently no content for this page. The Oracle AI Database@Google Cloud team intends to add content here, and this placeholder text is provided until that text is added.
The Oracle AI Database@Google Cloud team is excited about future new features, enhancements, and fixes to this product and this accompanying documentation. We strongly recommend you watch this page for those updates.
Autonomous AI Database Service now supports integration with Google Cloud Key Management Service (KMS).
This capability allows you to manage Transparent Data Encryption (TDE) master encryption keys (MEKs) using Google Cloud Customer-Managed Keys (CMKs).
Previously, TDE master encryption keys can only be stored in a file-based Oracle Wallet, Oracle Cloud Infrastructure (OCI) Vault, or Oracle Key Vault (OKV).
With this update, users can now store and manage MEKs directly in Google Cloud KMS, providing key lifecycle control and alignment with organization-specific security policies.
To configure Cloud KMS and encrypt your database, complete the following steps:
Note
Note: Customer-managed encryption key option is not available during the Autonomous AI Database instance creation. This option is available after your Autonomous AI Database instance is created.
-
Obtain the Autonomous AI Database Account Identifier
-
From the Google Cloud Console, select Oracle AI Database@Google Cloud.
-
From the left menu, select Autonomous AI Database, and then select the Display Name link of your Autonomous AI Database to open the details tab.
-
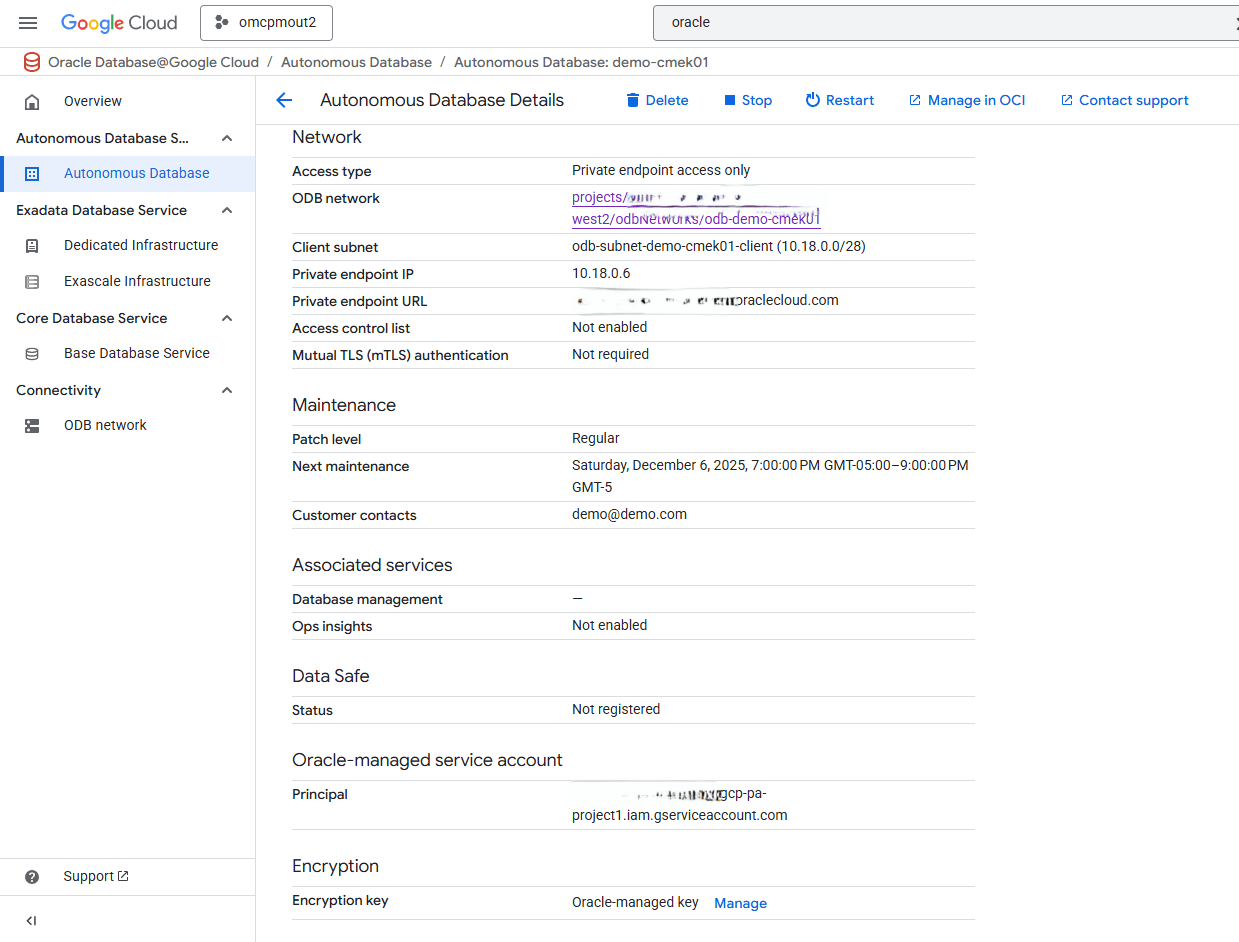
From the Details tab, scroll down to the Oracle-managed service account section, and note the Principal value.
-
-
Create a Key Ring in Google Cloud KMS
- To use Google Cloud KMS for data-at-rest encryption, you need to create a Key Ring to store your encryption keys. To learn more on how to create a key ring, see Prerequisites.
-
Create a Key in Google Cloud KMS
-
From the Google Cloud Console, select Key Management.
-
From the Key rings list, select the key ring name created in the previous step.
-
Select the + Create key button.
-
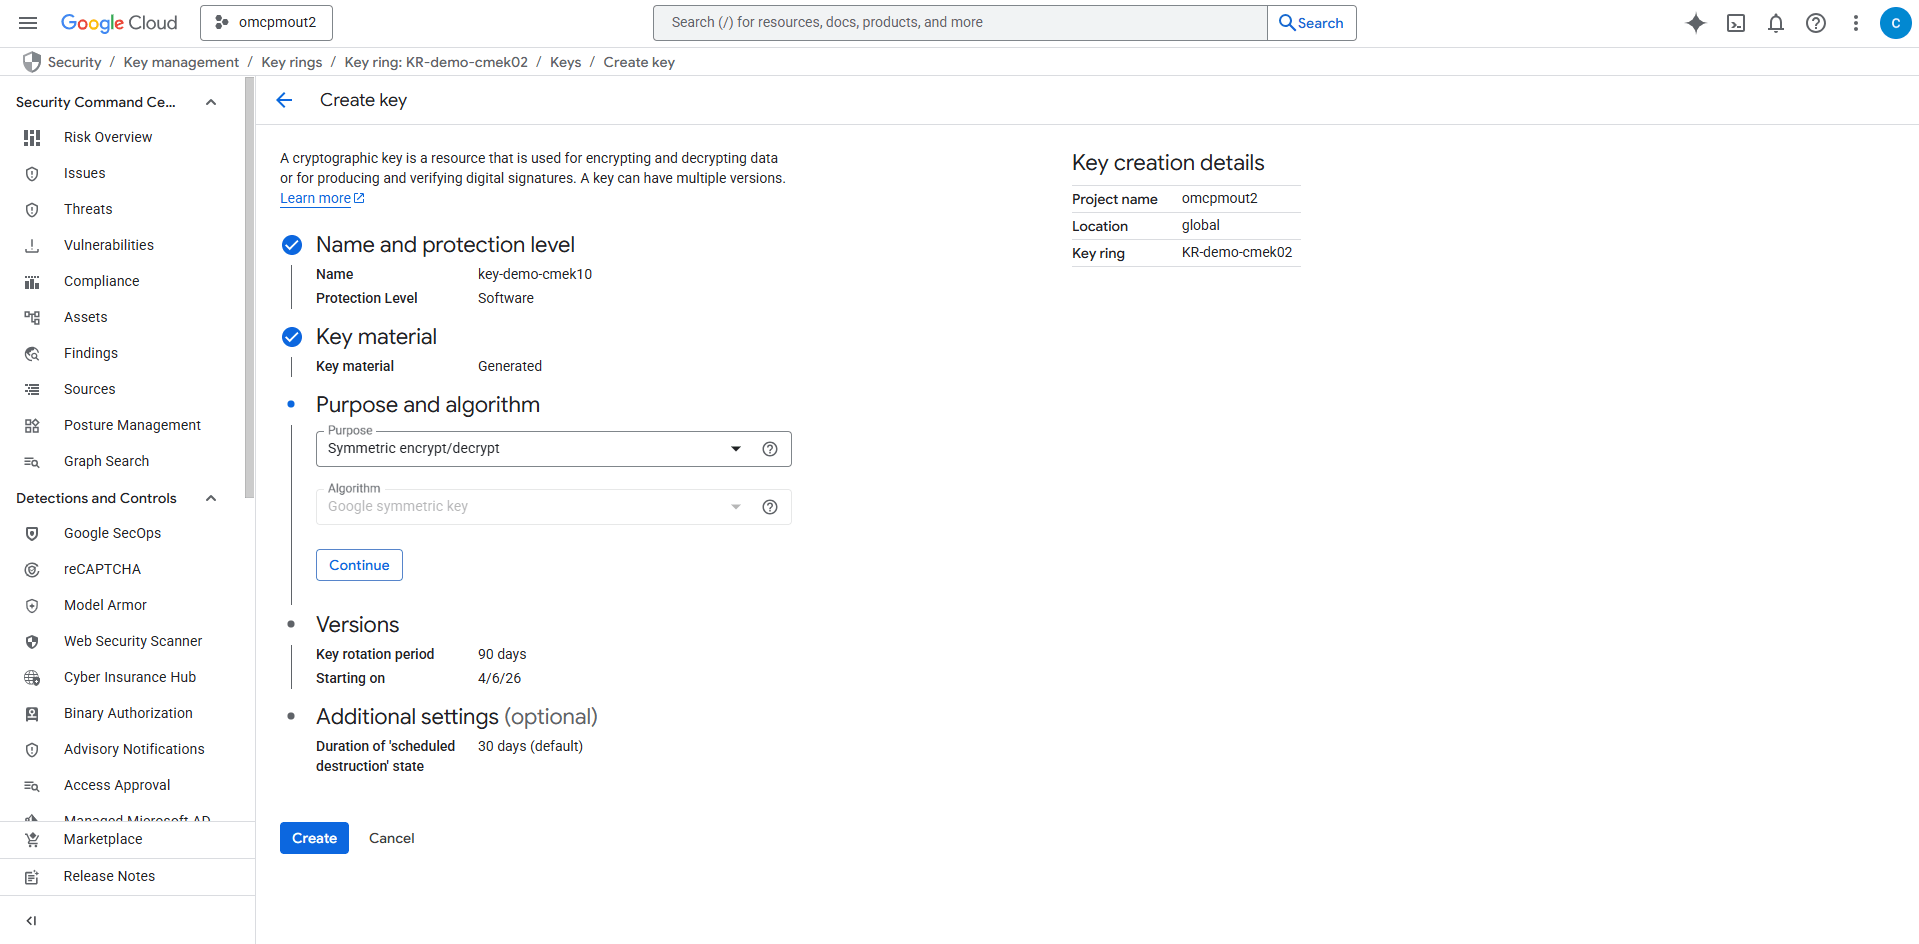
In the Create key page, enter the following information:
-
Key name: Enter a descriptive name for your key. Names can only contain letters, numbers, underscores (_), and hyphens (-)
-
Protection level: Choose either the Software or HSM (Hardware Security Module) option.
Note
Note: The protection level of a key can’t be changed after the key is created. For more information, see Protection levels. -
Select the Continue button.
-
Key material: Select Generated key or Imported key, and then select the Continue button.
-
Purpose and Algorithm: Select the Purpose as Symmetric encrypt/decrypt and then select the Continue button.
-
Versions: Based on your requirements, select your Key rotation period and Starting on. Select the Continue button.
-
Additional settings: This section is optional. By default, Duration of ‘scheduled destruction’ state is set to 30 days.
-
Select the Create button to create a key.
-
-
-
Grant Permissions to the Key
-
From the Google Cloud Console, select Key Management.
-
From the Keys list, select the key that you created at previous step.
-
Select the Permissions tab, and then select the Grant access button.
-
In the New principals field, enter the principal information you obtained in step 1c.
-
In the Assign Roles section, add the following two roles:
-
KMS CryptoKey Encrypter/Decrypter
-
KMS Viewer
-
-
Select the Save button.
 Note
Note
Note:
Google Cloud VPCs include default routes to the services listed below. Ensure that no firewall egress rules block access to these endpoints.
-
https://iamcredentials.googleapis.com/
-
https://sts.googleapis.com/
-
https://cloudkms.googleapis.com/
-
-
-
-
Update Autonomous AI Database
-
From the Google Cloud Console, select Oracle AI Database@Google Cloud, and then select your Autonomous AI Database.
-
From the list, select the Display Name link of your Autonomous AI Database that you want to change the encryption key.
-
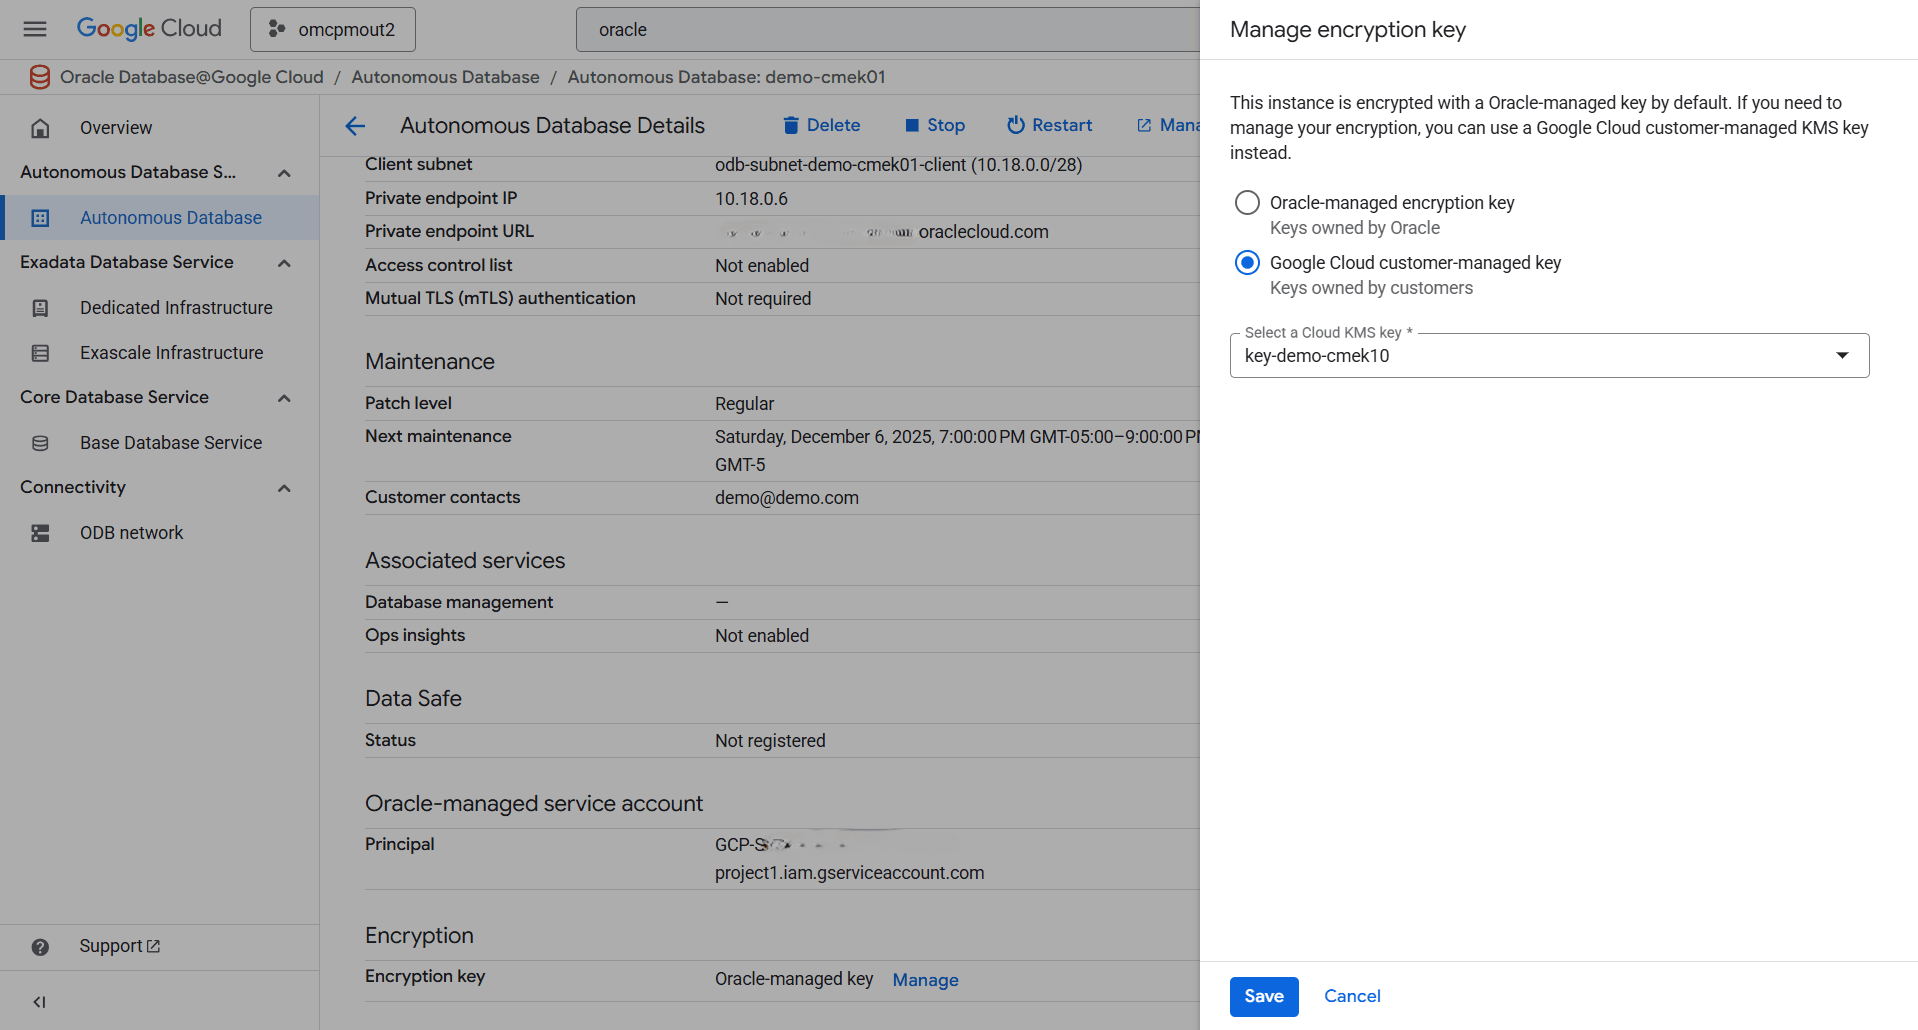
From the Details tab, navigate to the Encryption section, and then and select the Manage button.
-
Select the Google Cloud customer-managed key option.
-
From the dropdown list, select a Cloud KMS key to encrypt your Autonomous AI Database.
-
Select the Save button.
-
-
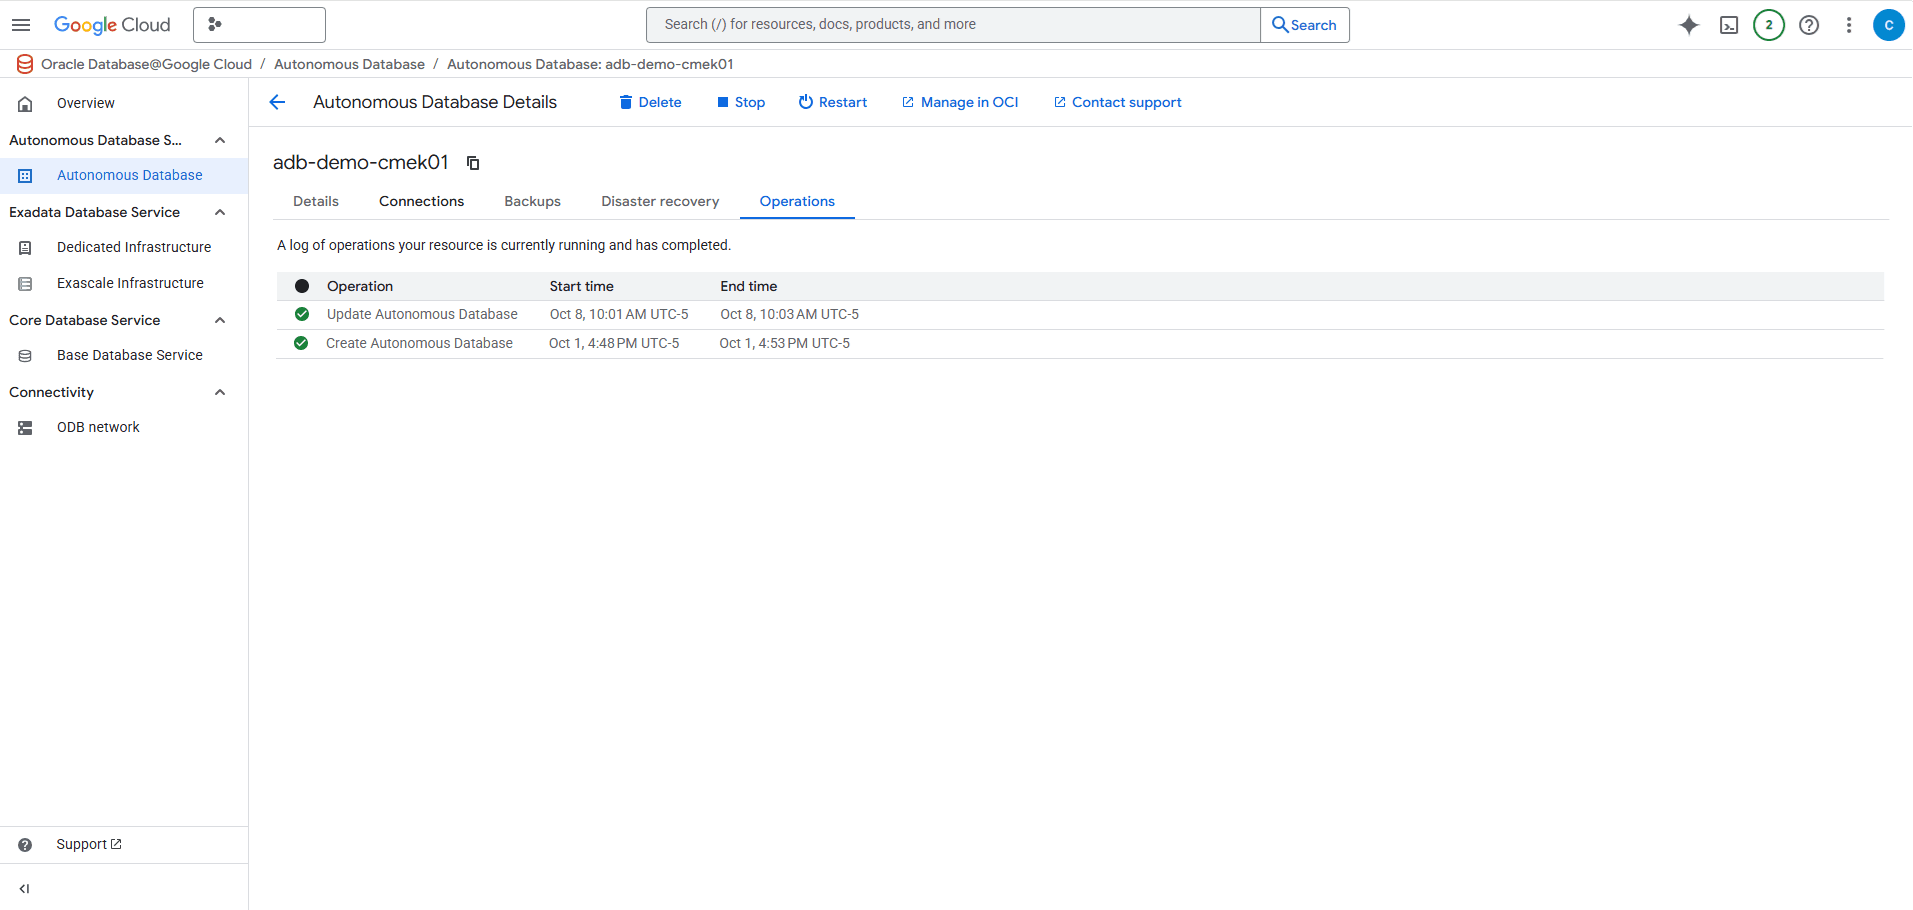
Select the Operations tab to view the operations details.
-
-
Verify the Encryption Changes
-
From the Google Cloud Console, select Oracle AI Database@Google Cloud, and then select your Autonomous AI Database.
-
From the list, select the Display Name link of your Autonomous AI Database that you want to verify the encryption method.
-
From the Details tab, navigate to the Encryption section to view the Encryption key details which was set to Google Cloud customer-managed in the previous step.
Note
Note: You can switch to a different customer-managed key a maximum of two times in a 24-hour period.
-
Change from Customer-managed Keys to Oracle-managed Encryption Keys
These are the steps to change from Customer-managed keys to Oracle-managed encryption keys:
-
From the Google Cloud Console, select Oracle AI Database@Google Cloud, and then select your Autonomous AI Database.
-
From the list, select the Display Name link of your Autonomous AI Database that you want to change the encryption method.
-
From the Details tab, navigate to the Encryption section, and then and select the Manage button.
-
Select the Oracle-managed encryption key option.
-
From the dropdown list, select a Cloud KMS key to encrypt your Autonomous AI Database.
-
Select the Save button.
-
-