Protect Exascale Database
Learn about various data protection methods available for Oracle Exadata Database Service on Exascale Infrastructure on Oracle AI Database@Google Cloud.
Data in Transit Encryption
Oracle Exadata Database Service on Exascale Infrastructure is protected with encryption of data in transit by default. This ensures that data moving between application and the database is secured from unauthorized interception or tampering. Oracle Net Services supports multiple industry-standard encryption algorithms including AES, DES, 3DES, and RC4 for securing data in transit. It also offers MD5, SHA-1, and SHA-2 hashing algorithms to verify data integrity.
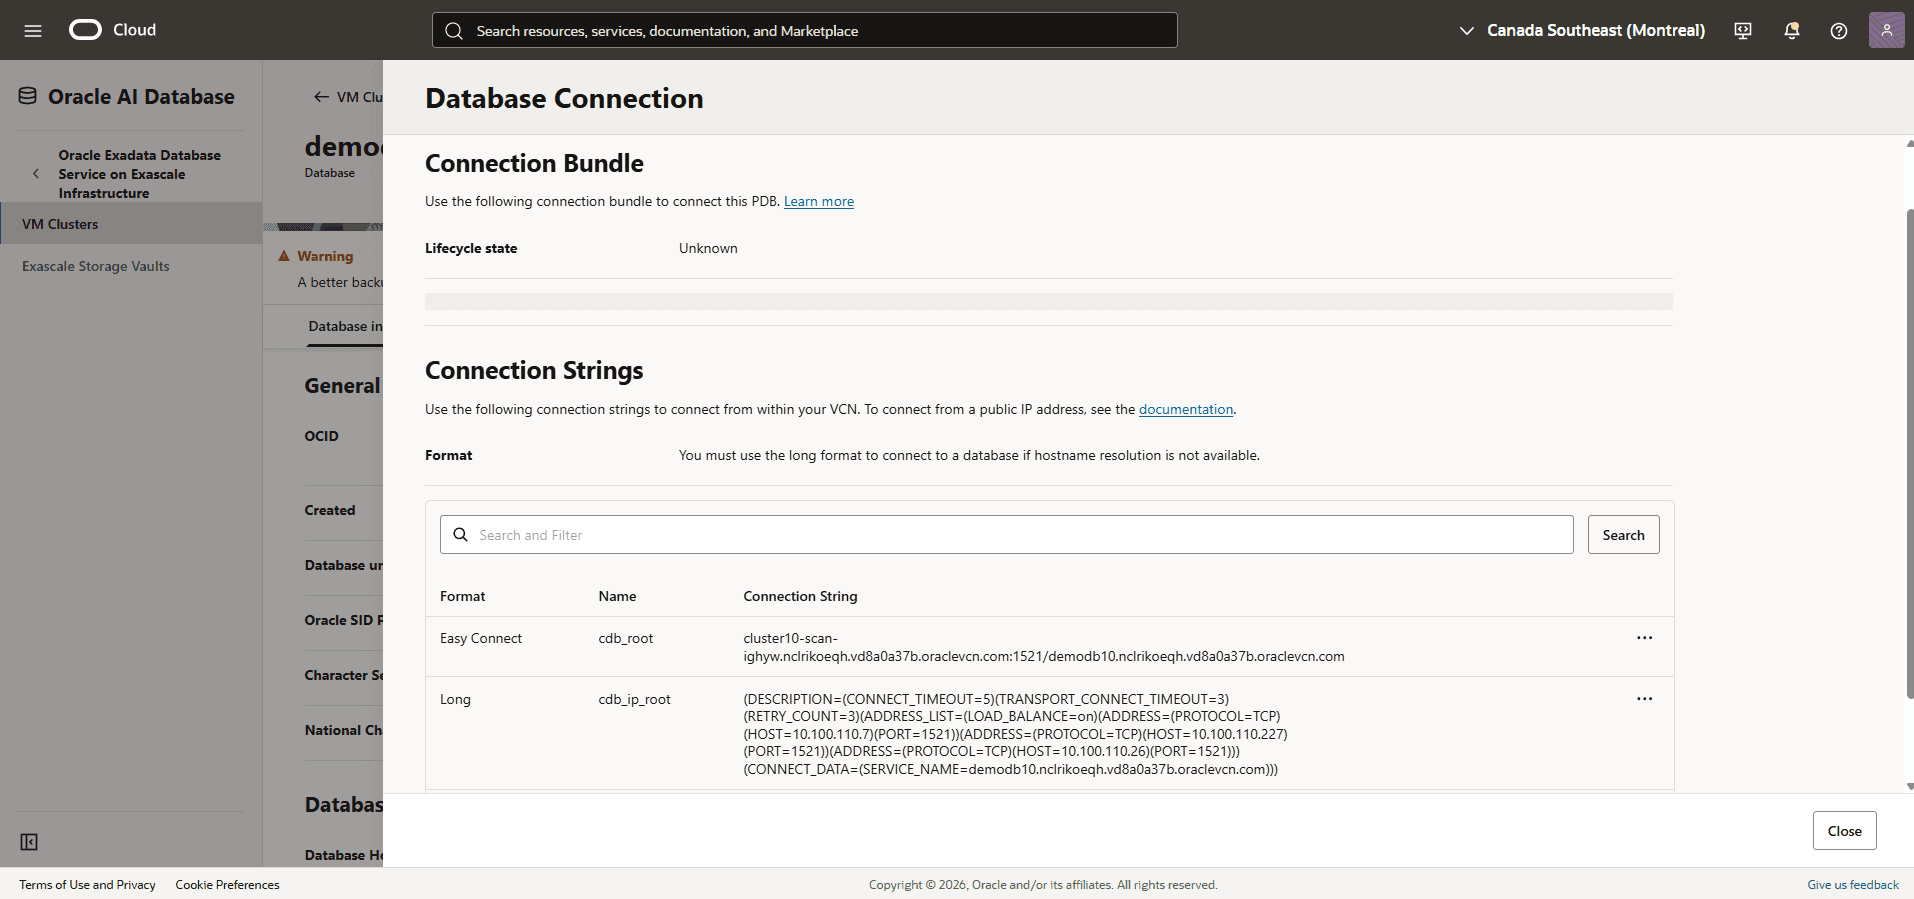
All communication between clients and the database is encrypted using Oracle Net Services (SQL*Net). Two types of connection services are supported:
-
TCPS (Secure TCP) Connections
-
Uses TLS 1.2 or TLS 1.3
-
Requires a downloadable connection wallet
-
Ensures symmetric encryption via secure handshake using the wallet
-
TLS 1.3 support is available starting with Oracle AI Database 26ai.
-
-
TCP Connections with Native Network Encryption
-
Uses Oracle’s built-in encryption protocol
-
Negotiates encryption during connection (AES-256, AES-192, AES-128)
-
No wallet needed, but connection details (e.g., tnsnames.ora) must be known
-
By default, Oracle Exadata Database Service on Exascale Infrastructure is configured to enable native Oracle Net Services encryption and integrity. Additionally, Oracle Net Services clients are configured to enable native encryption and integrity when connecting to an appropriately configured server. If your Oracle Net Services client is explicitly configured to reject the use of native encryption and integrity, connection attempts will fail. Native SQL*Net encryption is enabled for all network connections. The following sqlnet.ora parameters are set by default in Oracle Exadata Database Service on Exascale Infrastructure.
-
ENCRYPTION_TYPES_SERVER = (AES256, AES192, AES128)
-
ENCRYPTION_SERVER = requested
-
CRYPTO_CHECKSUM_SERVER = accepted
-
CRYPTO_CHECKSUM_TYPES_SERVER = (SHA256, SHA384, SHA512)
The TCPS protocol is offered for network connections to the database on port 2484 with the wallet configured at /var/opt/oracle/dbaas_acfs/grid/tcps_wallets. The following sqlnet.ora parameters are set by default in Oracle Exadata Database Service on Exascale Infrastructure.
-
SSL_CIPHER_SUITES = (SSL_ECDHE_ECDSA_WITH_AES_128_GCM_SHA256,
-
SSL_ECDHE_ECDSA_WITH_AES_256_GCM_SHA384,
-
SSL_ECDHE_RSA_WITH_AES_128_GCM_SHA256,
-
SSL_ECDHE_RSA_WITH_AES_256_GCM_SHA384)
Encryption at Rest for Oracle AI Database@Google Cloud
Oracle AI Database@Google Cloud supports encryption at rest to safeguard sensitive data residing in database files, backups, and configuration files. This protection is enabled by Transparent Data Encryption (TDE), which ensures that data is encrypted whenever it is written to persistent storage and transparently decrypted when accessed by authorized Oracle processes with no customer configuration is required. The master key encrypts tablespace keys, which in turn encrypt the data.
Transparent Data Encryption (TDE)
Encryption at rest is provided through TDE, a feature included in Oracle Advanced Security. TDE automatically encrypts tablespaces, redo logs, and undo logs, ensuring that all database data is written to disk in encrypted form and transparently decrypted for authorized users and applications. Database backups created using Oracle Recovery Manager (RMAN) or managed backup solutions adopt these encryption settings, protecting all database copies stored on persistent media.
Key Management
TDE uses a master encryption key to protect your tablespaces and columns. For Oracle AI Database@Google Cloud, there are two key management options:
-
Oracle-managed keys: The master encryption key is automatically generated and stored in an Oracle Wallet, which is secured within the database environment. Oracle handles all key lifecycle tasks, including backups and restores.
-
Customer-managed keys: You can integrate Oracle Exadata Database Service on Exascale Infrastructure with services like OCI Vault to generate and store the master encryption key outside the database, enabling centralized key control, lifecycle management, rotation, and auditing of key usage events. With customer-managed keys, you control the encryption keys used to protect your data. You can enable customer-managed keys when creating databases, switch from Oracle-managed to customer-managed keys, and rotate keys to meet security and compliance requirements.
Oracle Exadata Database Service on Exascale Infrastructure on Oracle AI Database@Google Cloud offers the following data at rest encryption methods:
-
Oracle-managed Key (OMK)
- Oracle Wallet
-
Customer-managed Key (CMK)
-
OCI Vault
-
Oracle Key Vault (OKV)
-
Google Cloud Key Management Service (Cloud KMS)
-
Oracle-managed Key (OMK) is the default method for securing data encryption in Oracle AI Database@Google Cloud. In Oracle AI Database, data encryption at rest is powered by TDE. When you choose OMK, the database system automatically handles all key management, including key generation, secure storage, and rotation required by TDE. There are no prerequisites or additional configuration steps required to use Oracle-managed Key on Oracle AI Database@Google Cloud.
View Encryption Details
-
From the Oracle AI Database@Google Cloud console, select Oracle Exadata Database Service on Exascale Infrastructure.
-
From the left menu, select VM Clusters, and then select the name of your Exascale VM Cluster.
-
Select the Manage in OCI button, which redirects you to the OCI console.
-
In the OCI console, select the Container databases tab, and then select the database that you want to check the key management.
-
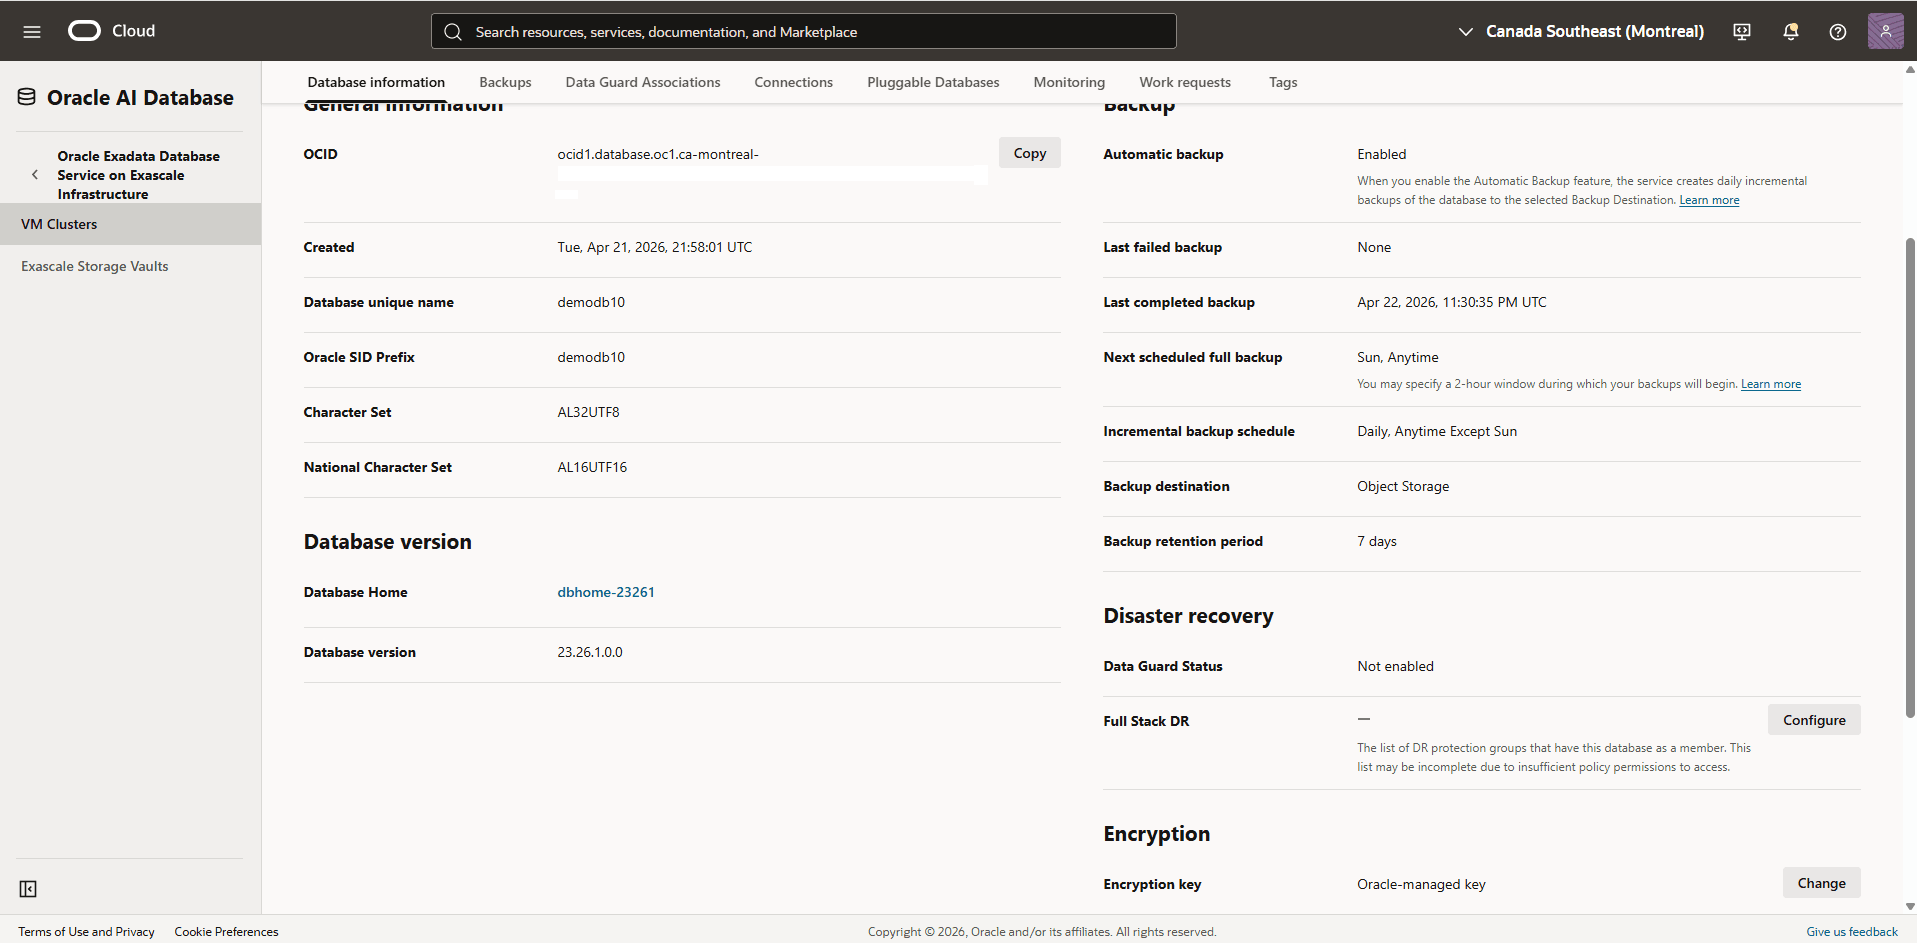
From the Database information tab, navigate to the Encryption section to view the Encryption key details. By default, the Encryption key is set to Oracle-managed key.
-
Oracle Exadata Database Service on Exascale Infrastructure in Oracle AI Database@Google Cloud integrates with OCI Vault to provide data encryption using a customer-managed key (CMK). This integration centralizes key storage and management, significantly simplifying your overall key lifecycle.
-
Create an Oracle Cloud Infrastructure Vault (OCI Vault)
For more information, see Create an Oracle Cloud Infrastructure Vault.
-
Create a Master Encryption Key in the Vault
For more information, see Create a Master Encryption Key in the Vault.
-
Create an OCI Dynamic Group
-
From the OCI console, select Oracle AI Database, and then select Oracle Exadata Database Service on Exascale Infrastructure.
-
From the left menu, select VM Clusters, and then select the name of the Exascale VM Cluster.
-
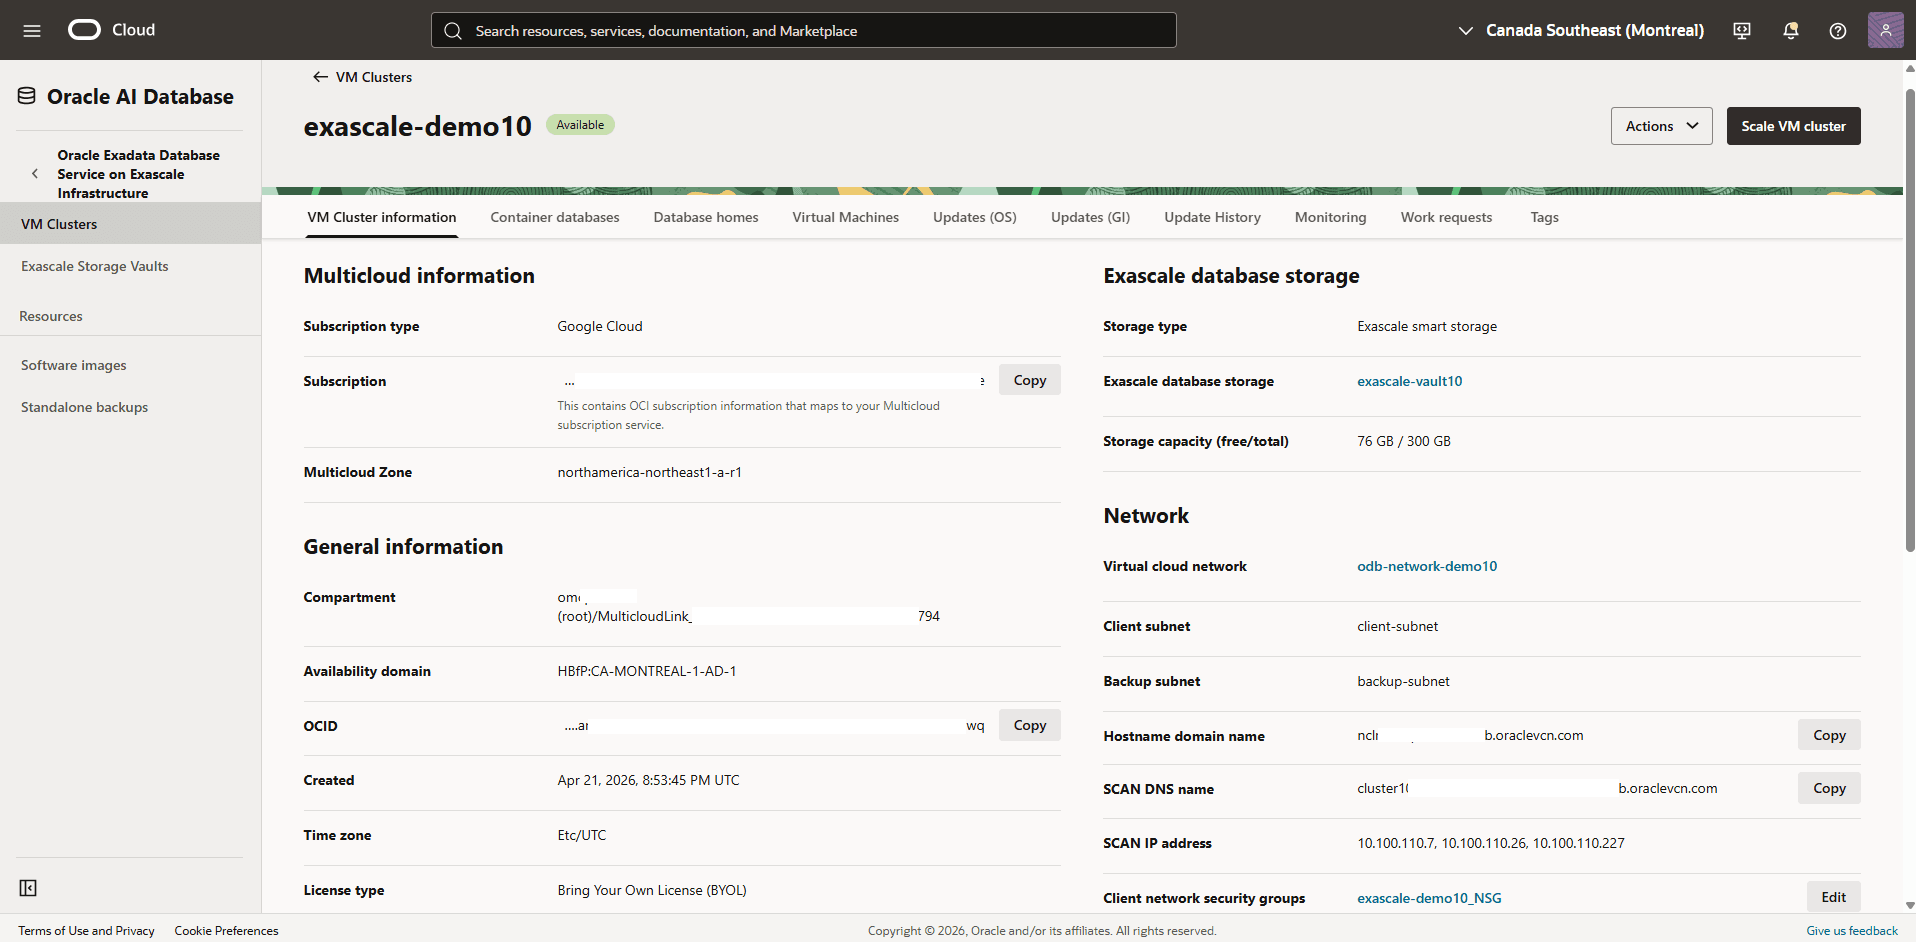
Select the VM Cluster information tab, scroll down to the General information section. Take note of your Exascale VM Cluster Compartment information.
-
From the navigation menu, select Identity & Security, and then select Compartments.
-
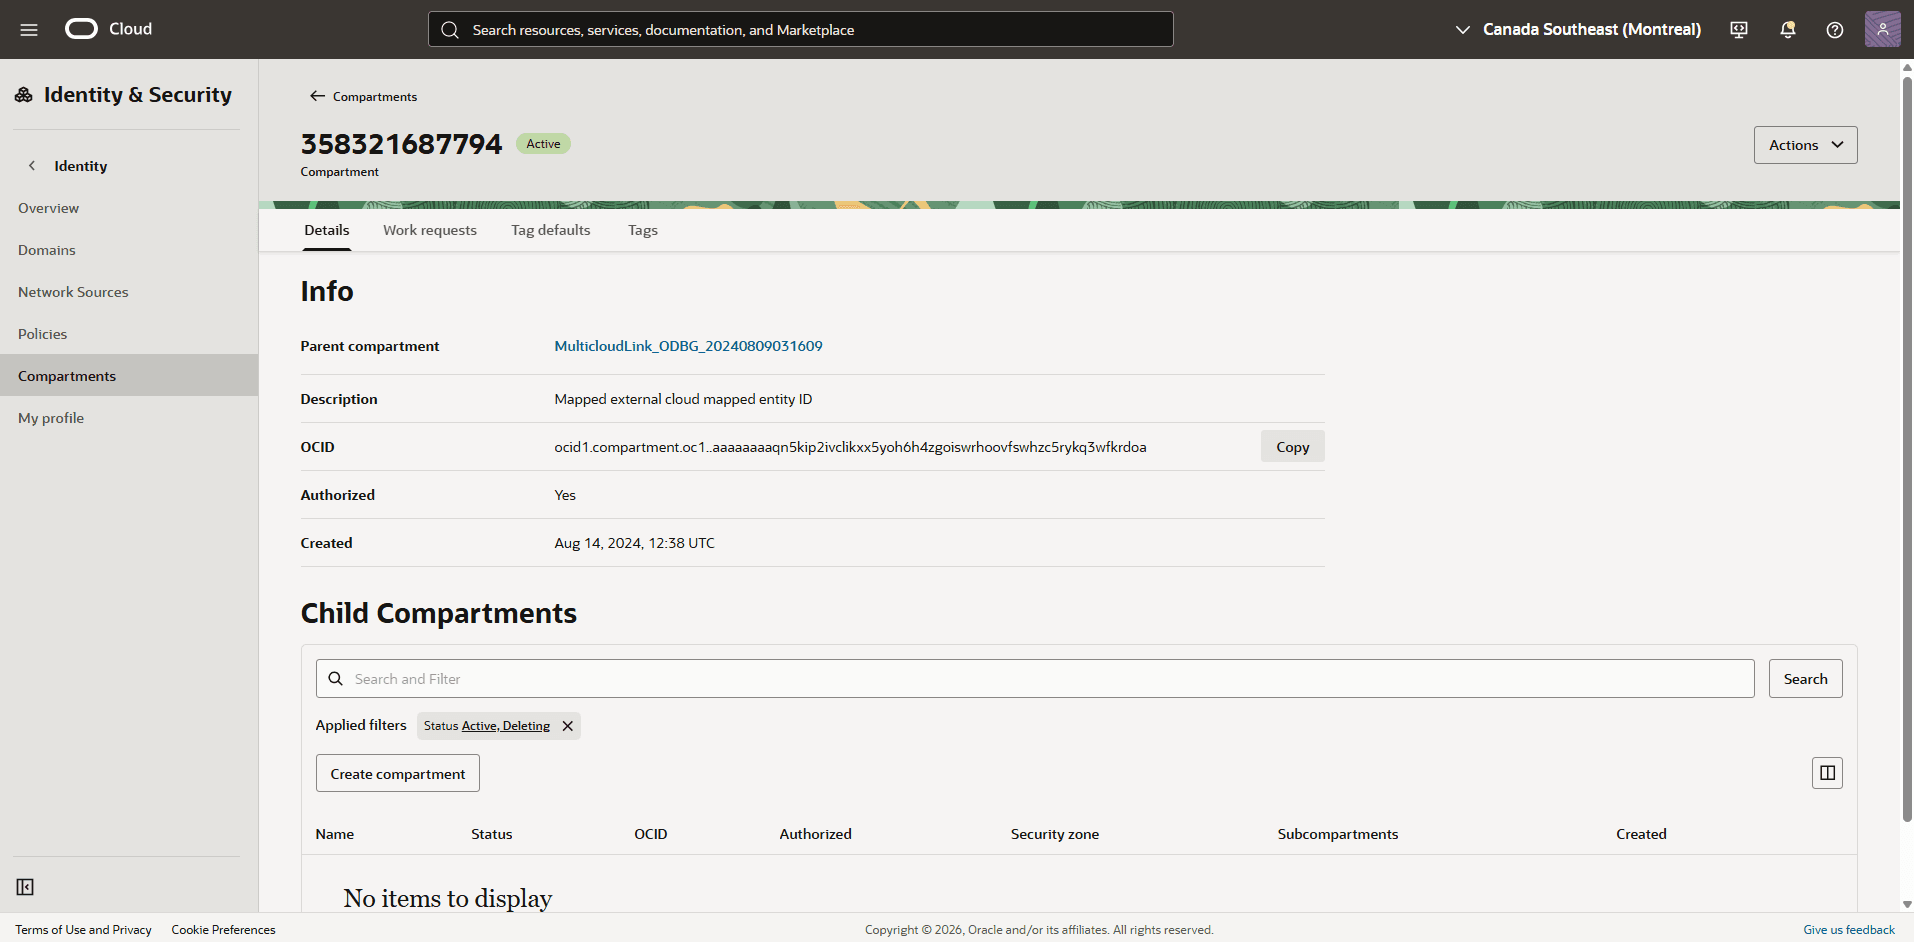
From the Compartments list, navigate to your compartment which you previously created and copy the OCID information.
-
From the navigation menu, select Identity & Security, and then select Domains.
-
From the Applied filters section, select the Root Compartment and then choose the name of you domain.
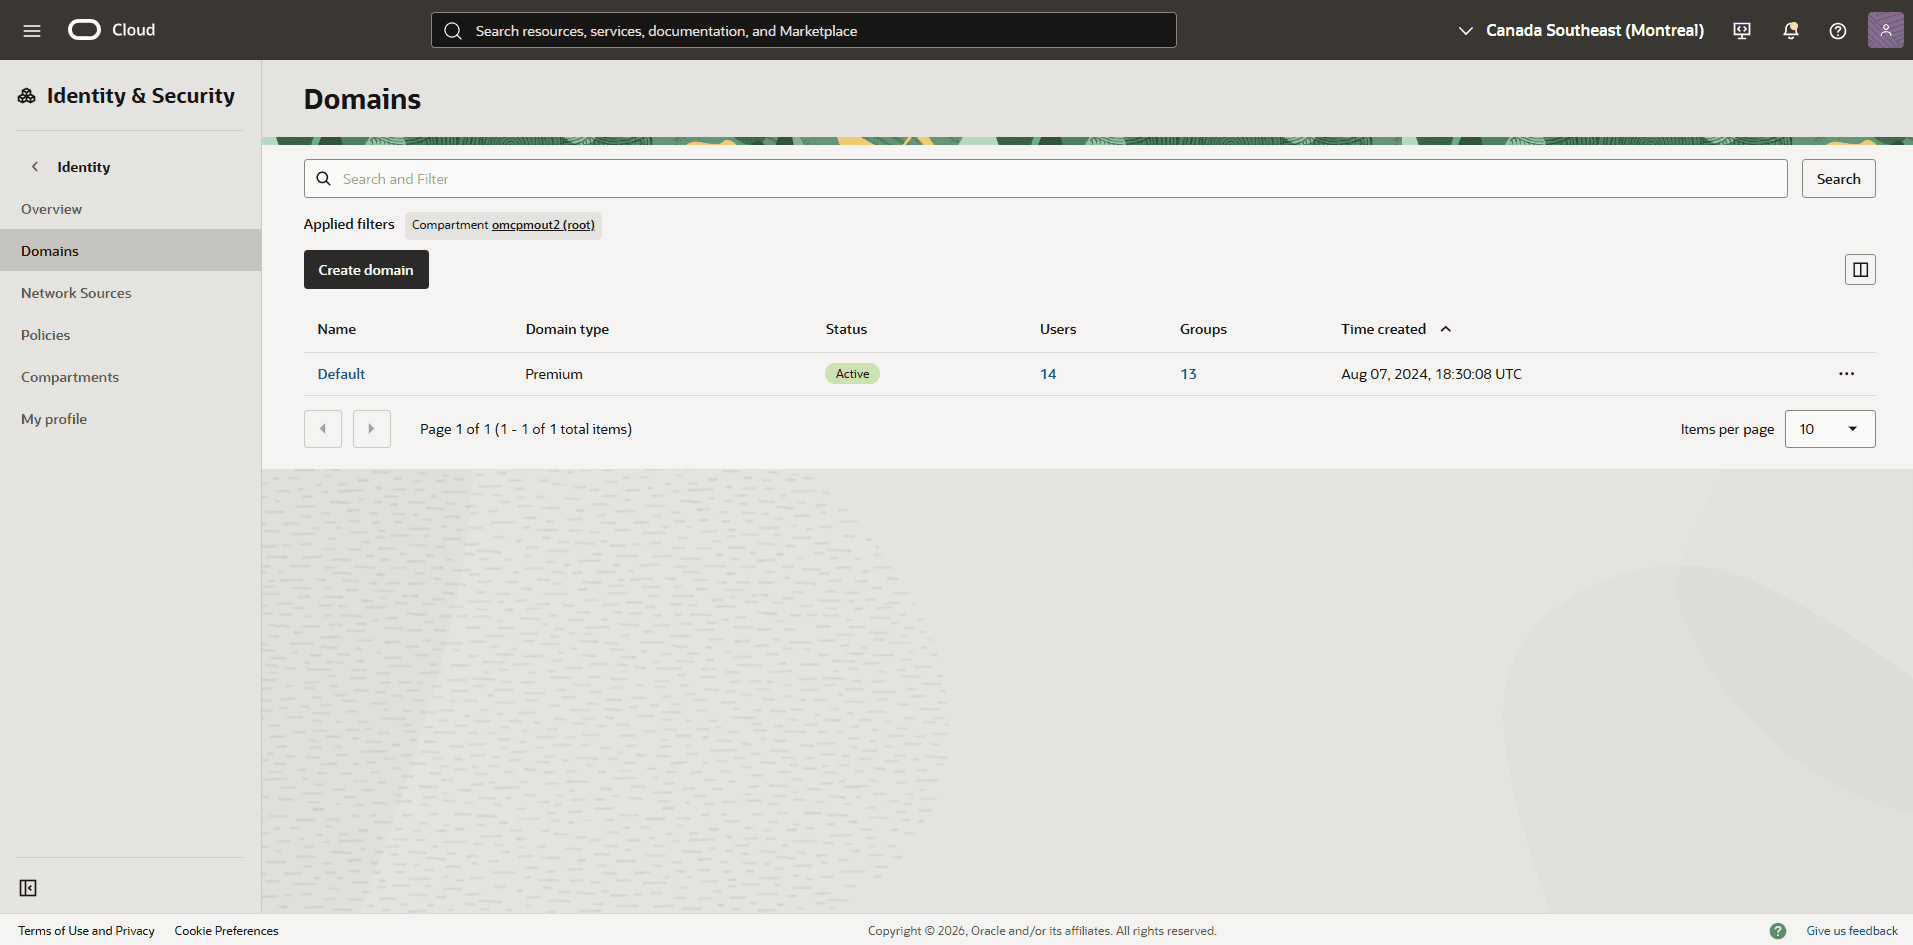
-
Select the Dynamic groups tab, and then select the Create dynamic group button.
-
Name: Enter a descriptive name for the group.
-
Description: Provide a brief description of the dynamic group’s purpose.
-
Matching Rules: Enter the following statement, replacing
<your_Compartment_OCID>with the compartment OCID you noted in the previous step:ALL {resource.compartment.id = '<your_Compartment_OCID>'} -
Review your information, and then select the Create button.
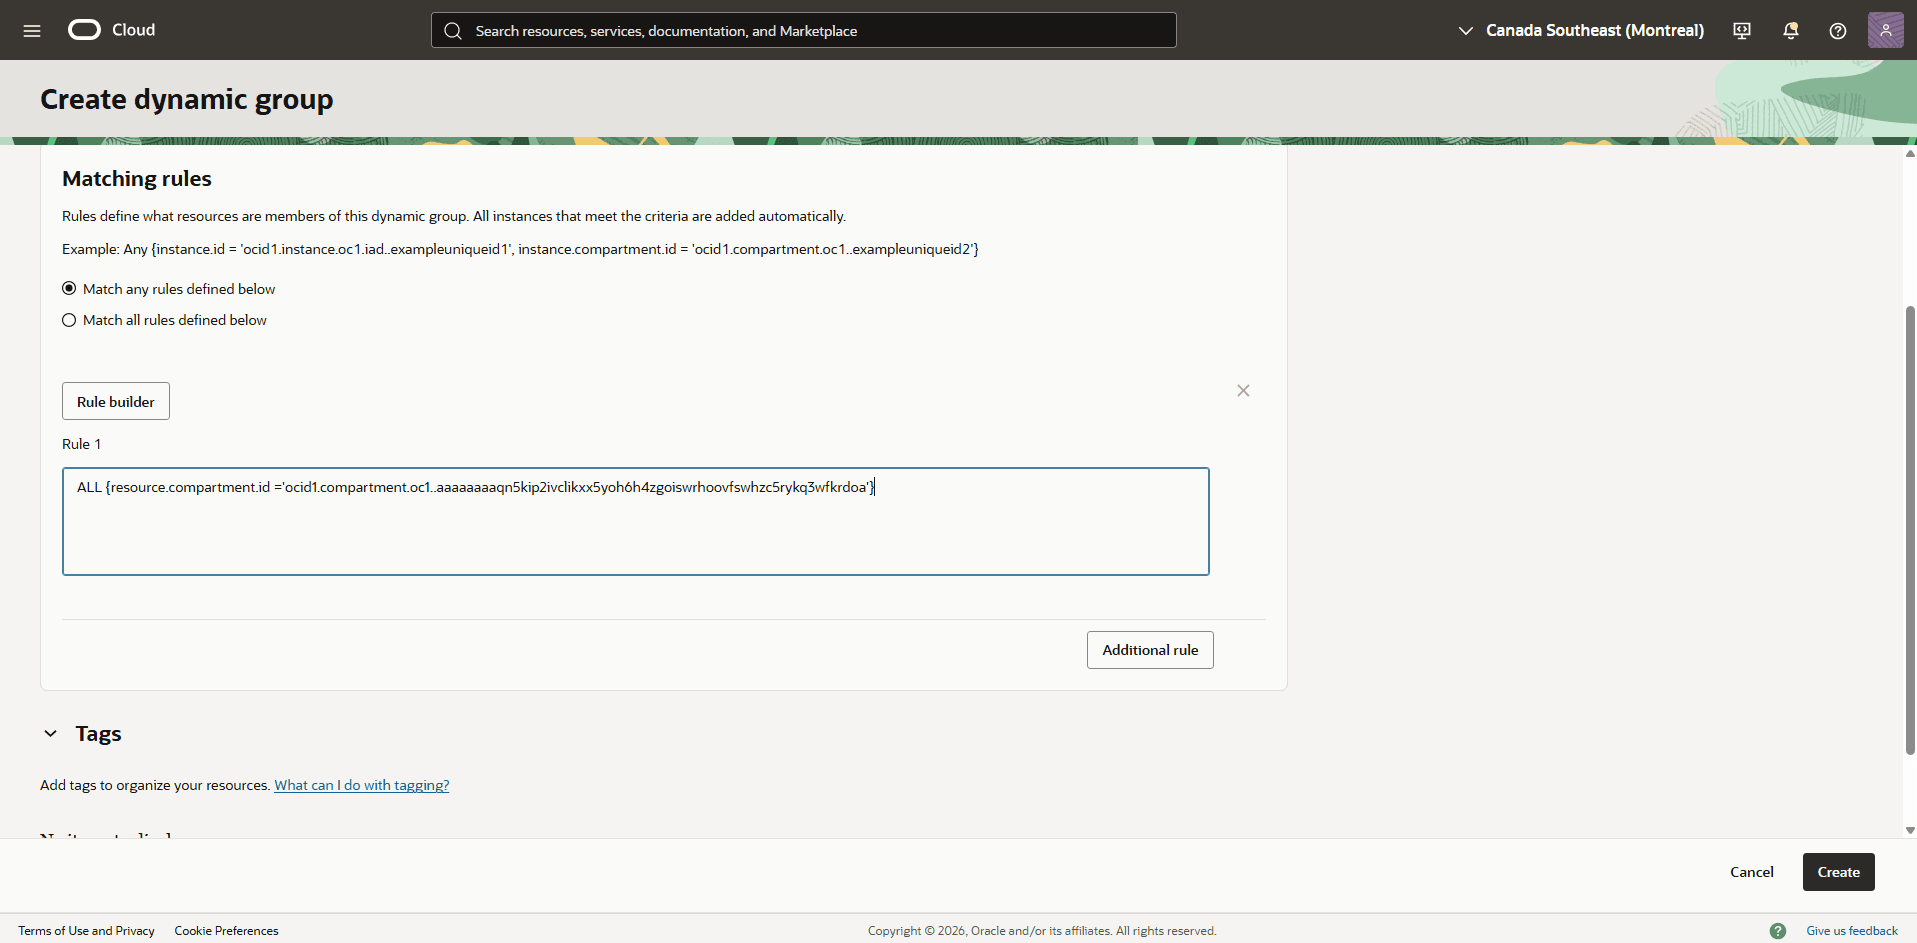
-
-
-
Create an OCI Policy
-
From the navigation menu, select Identity & Security, and then select Policies.
-
In the Applied Filter section, select the Root Compartment, and then select the Create Policy button.
-
Name: Enter a descriptive name for the group.
-
Description: Provide a brief description of the dynamic group’s purpose.
-
Enable the Show manual editor button, and then enter the following statements. Replace
<dynamic-group-name>with the name of the dynamic group created in the previous step, and<your_Compartment_OCID>with your specific compartment OCID:Allow dynamic-group <dynamic-group-name> to manage vaults in compartment id <your_Compartment_OCID> Allow dynamic-group <dynamic-group-name> to manage keys in compartment id <your_Compartment_OCID> -
Review your information and then select the Create button.
-
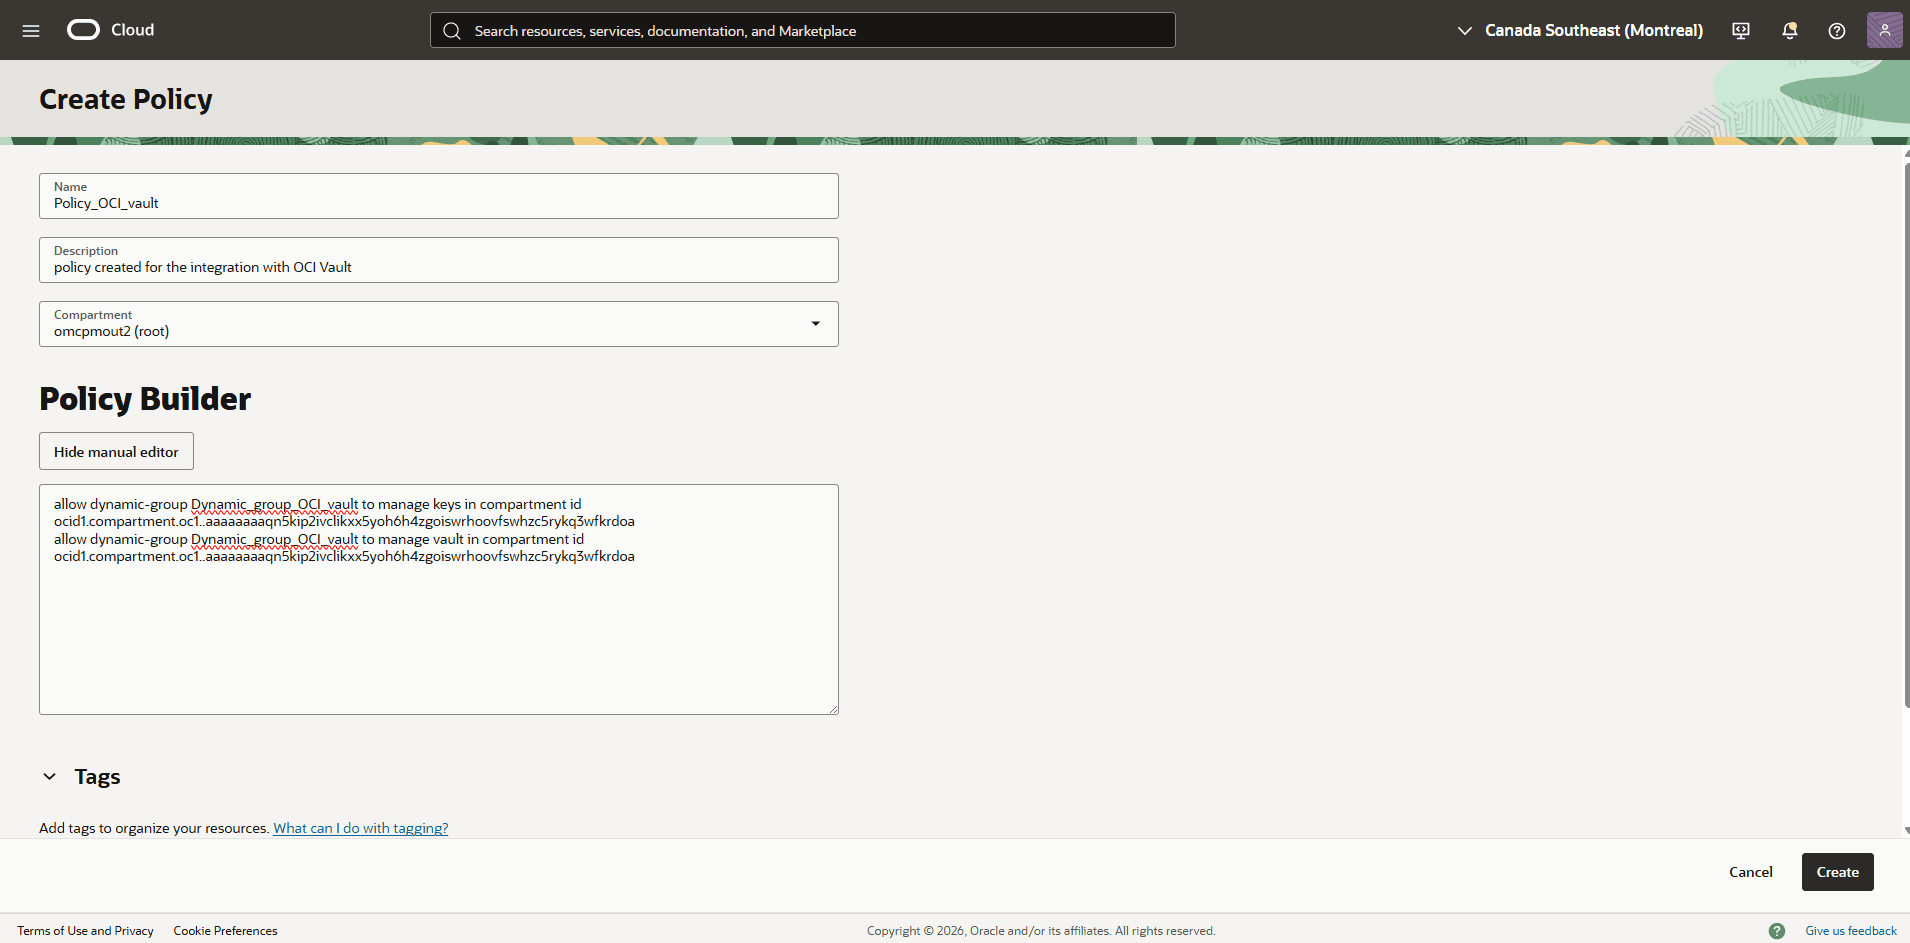
-
-
Create a Database and Use OCI Vault as the Key Management Solution
-
Create an Exascale VM Cluster and Exascale Database. See Exascale VM Cluster and Exascale Database for step-by-step instructions.
-
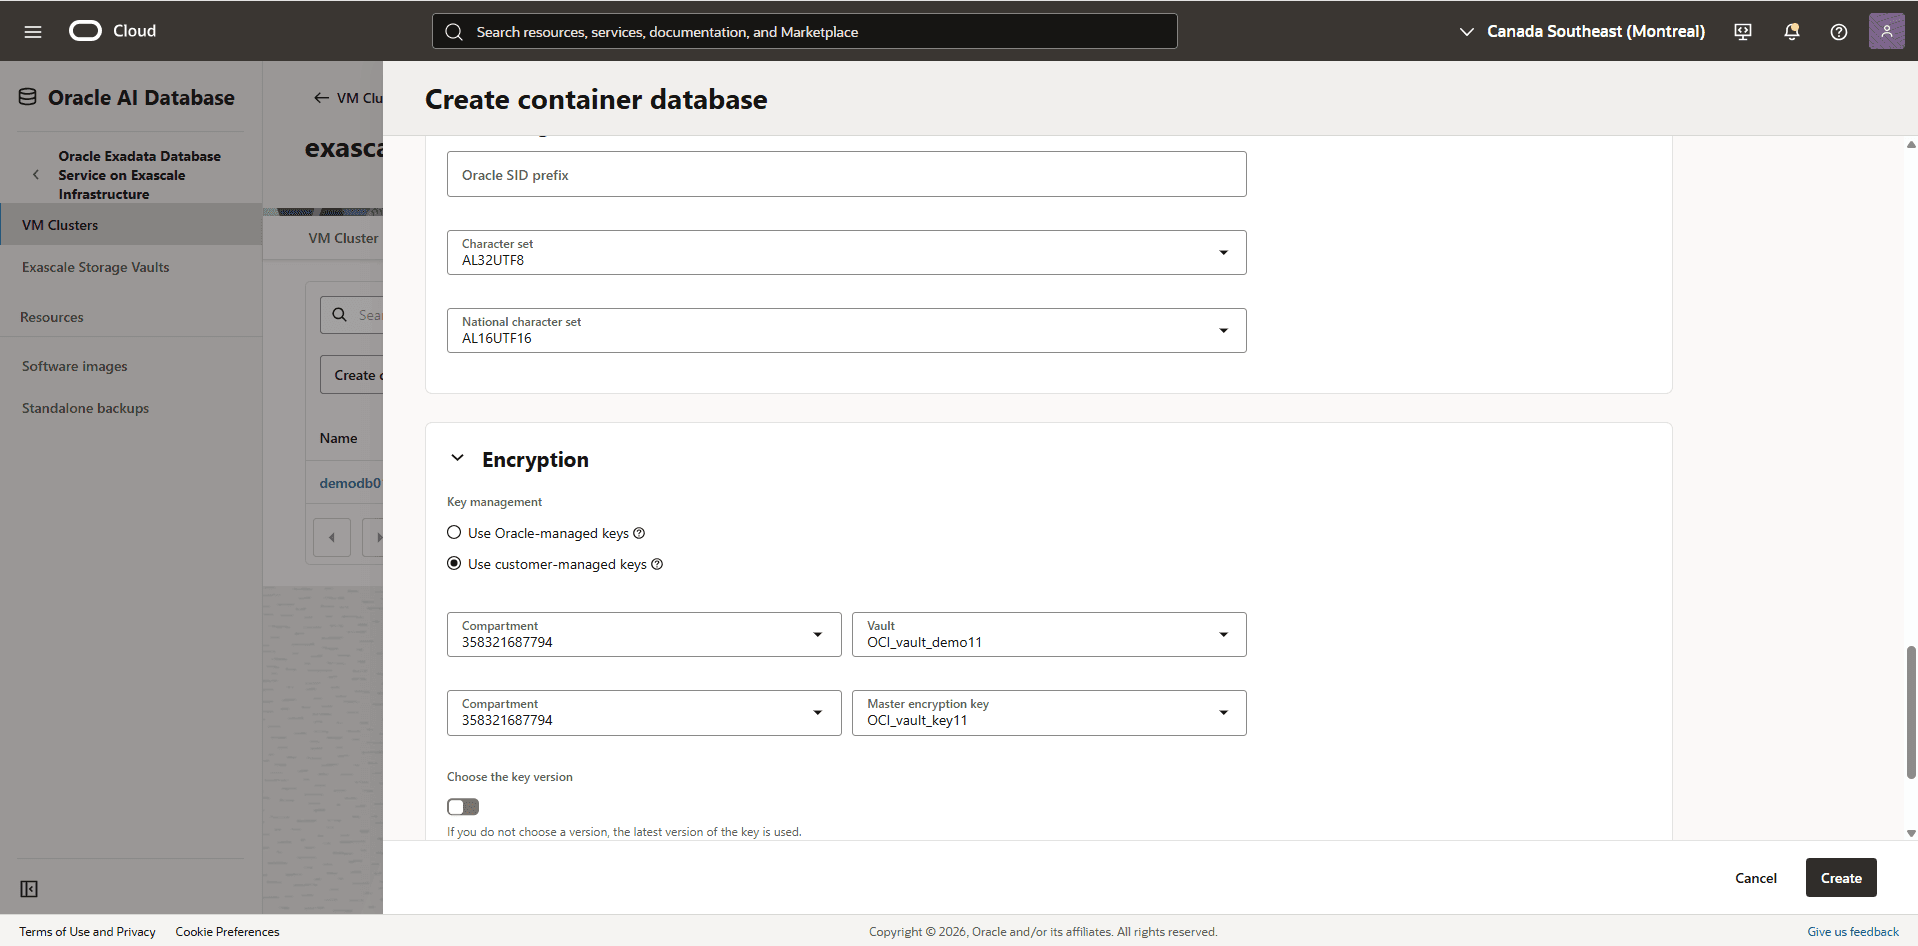
Expand the Advanced Options section. Within the Encryption section, select the Use customer-managed keys option. When the confirmation message appears, select the Yes, enable customer-managed keys button to proceed.
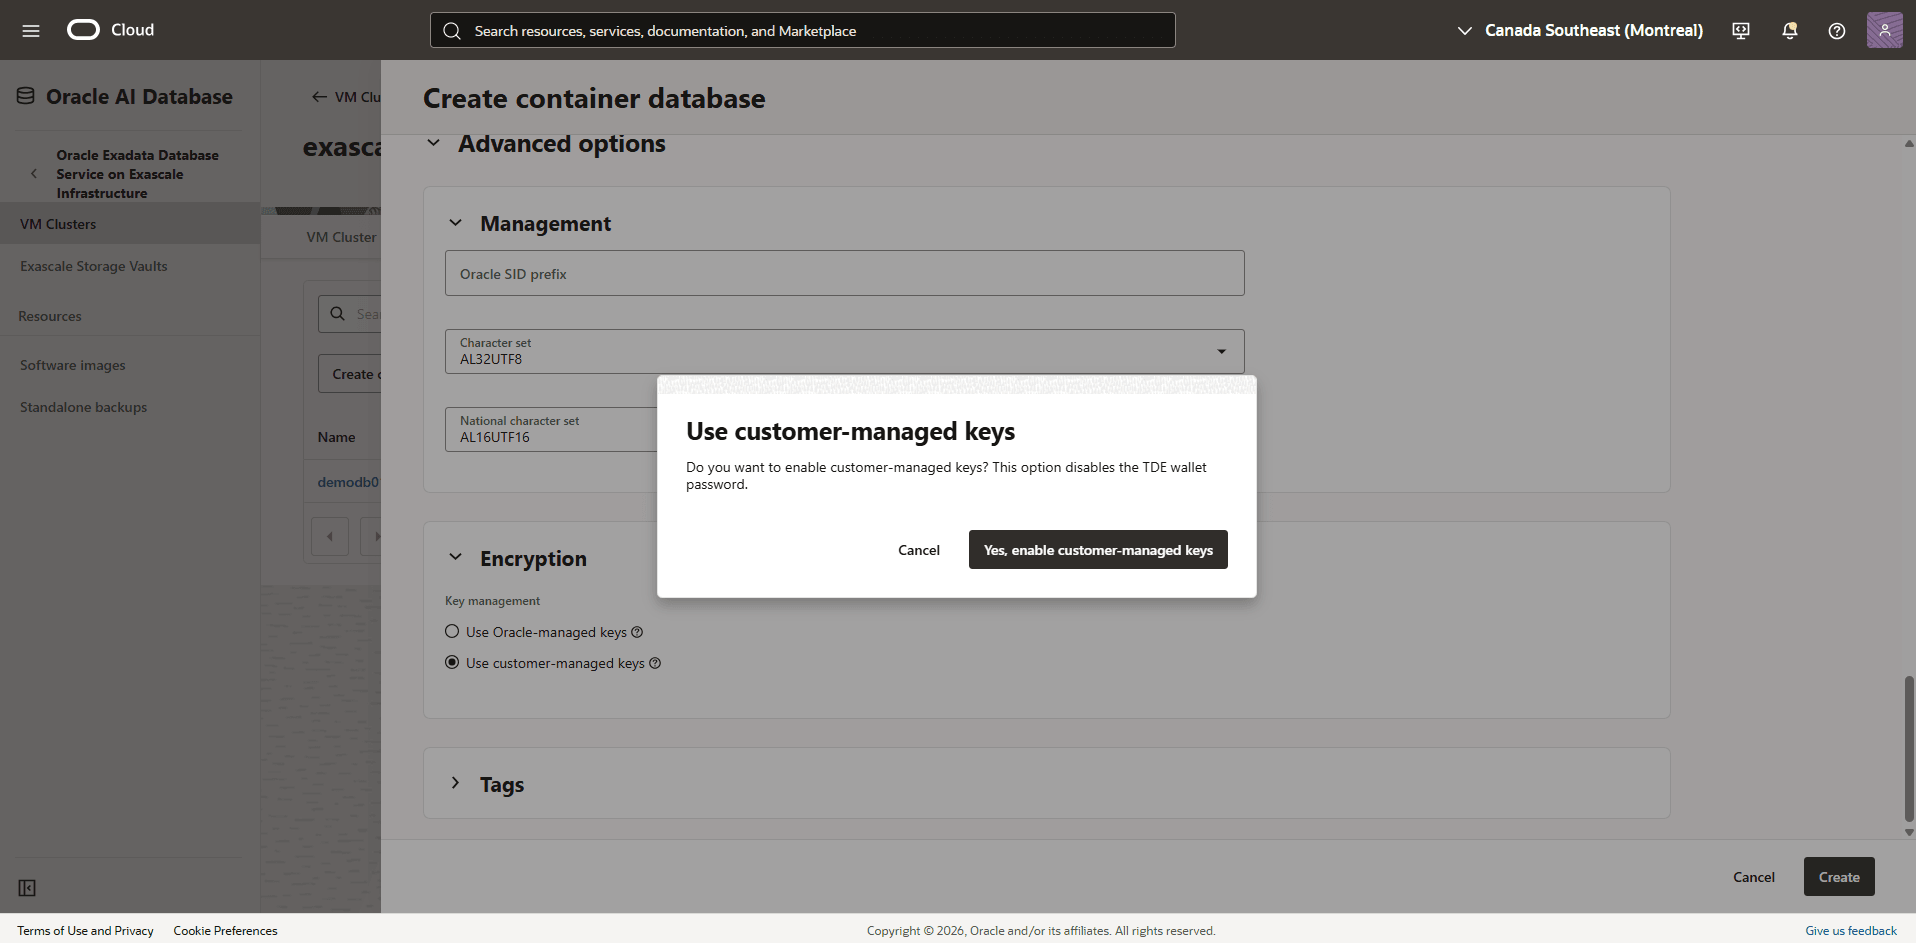
-
Select the Compartment where you created your OCI Vault, and then select OCI Vault from the dropdown list.
-
Select the Compartment where you created the OCI key, then select the Key from the dropdown list.
-
Review your information and then select the Create button.
-
-
Modify the Key Management from Oracle Wallet to OCI Vault
To update key management from Oracle Wallet to OCI Vault, complete the following steps:
-
From the OCI console, select Oracle AI Database, and then select Oracle Exadata Database Service on Exascale Infrastructure.
-
From the left menu, select VM Clusters, and then select your Exascale VM Cluster that you wish to modify.
-
From your VM cluster information, navigate to the Container databases tab, and then select the name field of the database you wish to modify.
-
From the Encryption section, confirm that Key management is set to Oracle-managed key, and then select the Change button.
-
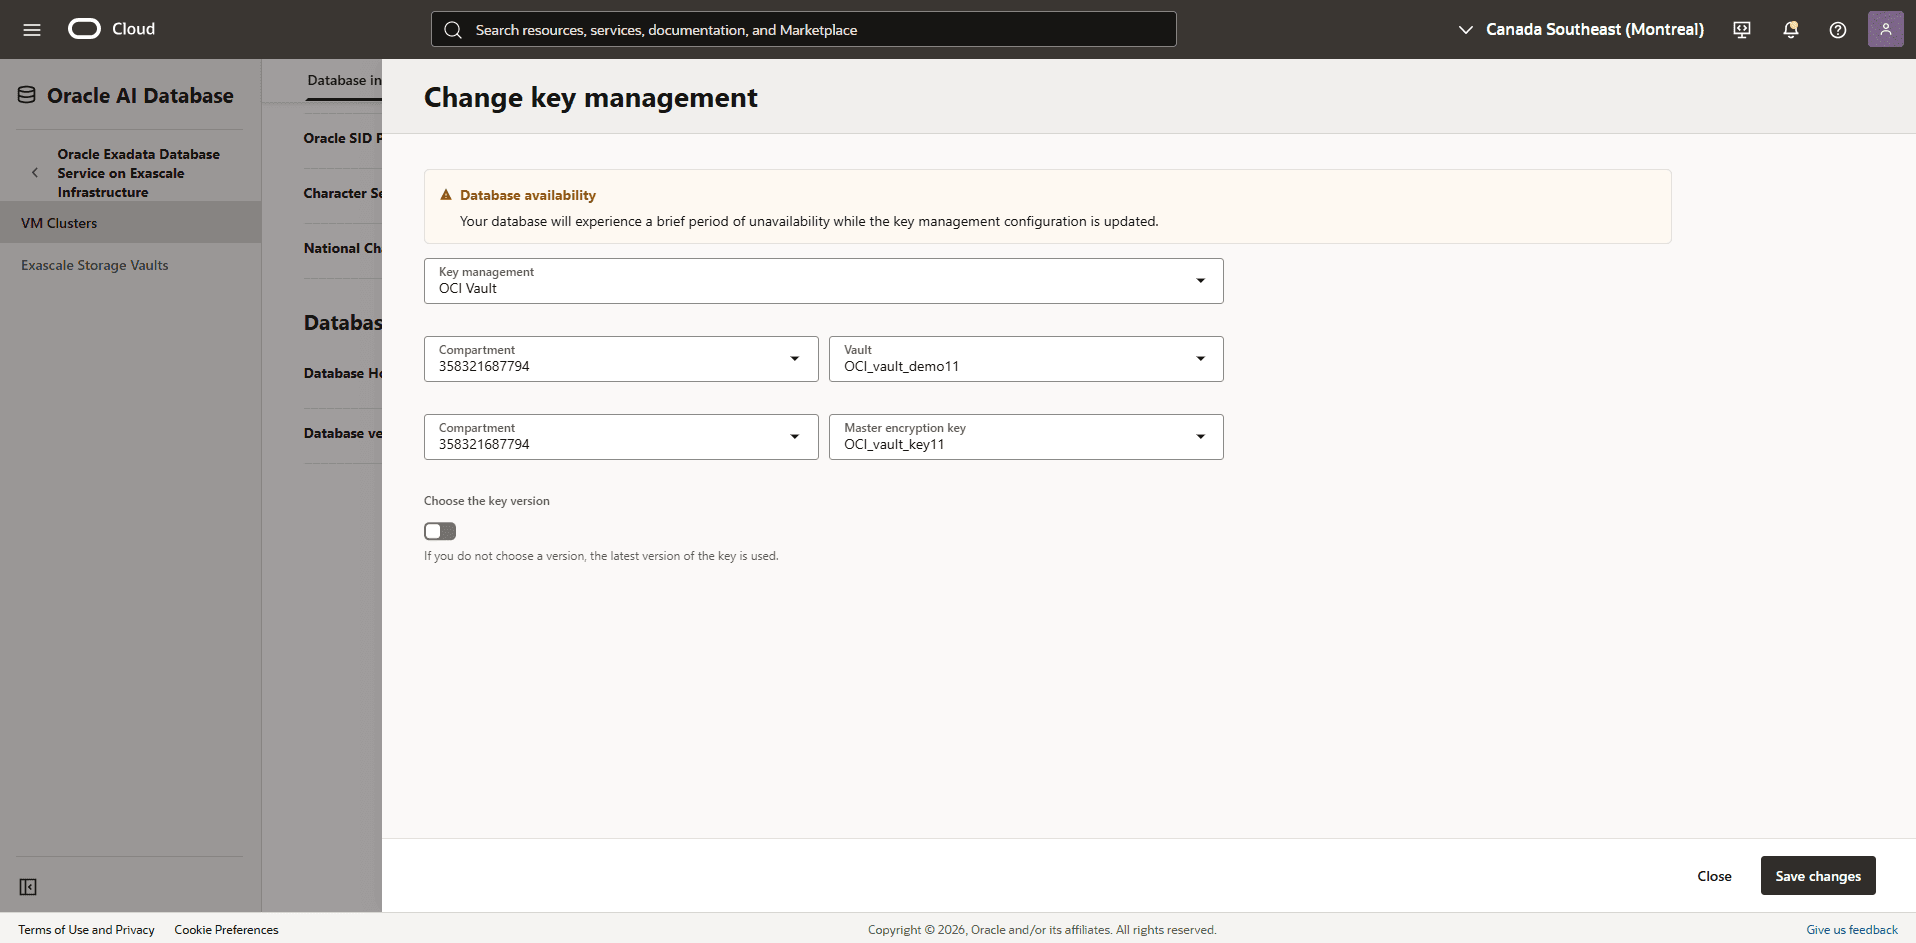
From the Change key management page, enter the following information:
-
Select your Key management as OCI Vault from the dropdown list.
-
Select the Compartment where you created your OCI Vault, and then select the OCI Vault from the Vault dropdown list.
-
Select the Compartment where you created your OCI key, and then select the OCI key from the Master encryption key dropdown list.
-
Select the Save changes button.
-
-
-
Verify the Database Encryption Method
-
From the OCI console, select Oracle AI Database, and then select Oracle Exadata Database Service on Exascale Infrastructure.
-
From the left menu, select VM Clusters, and then select your Exascale VM Cluster that you wish to modify.
-
Select the Container databases tab, and then select the name of the database that you wish to validate.
-
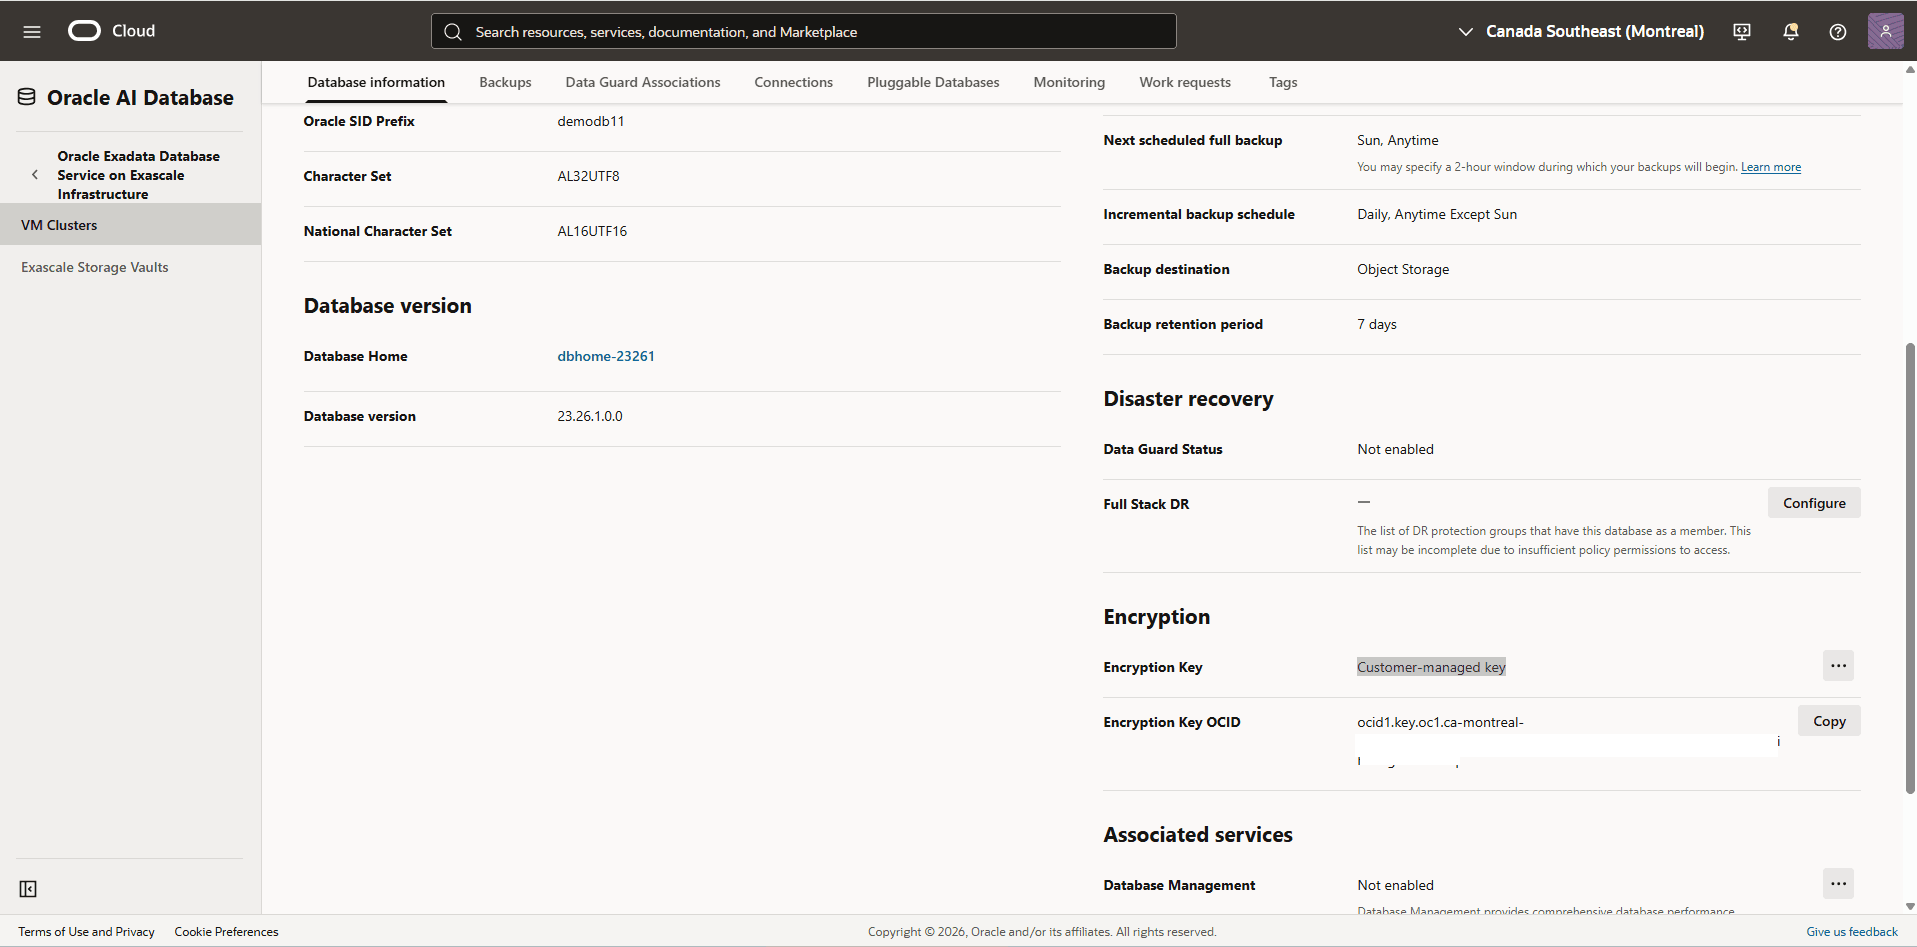
Scroll down to the Encryption section. In this section, you can confirm that Encryption Key is set to Customer-managed key and view the Encryption Key OCID of the OCI key in use.
-
Rotate the OCI Vault Key for a Container Database (CDB)
-
From the OCI console, select Oracle AI Database, and then select Oracle Exadata Database Service on Exascale Infrastructure.
-
From the left menu, select VM Clusters, and then select your Exascale VM Cluster that you want to rotate encryption keys.
-
Select the Container databases tab, and then select the name of the database that you want to rotate encryption keys.
-
From the Encryption section, verify that the Encryption Key is set to Customer-managed key.
-
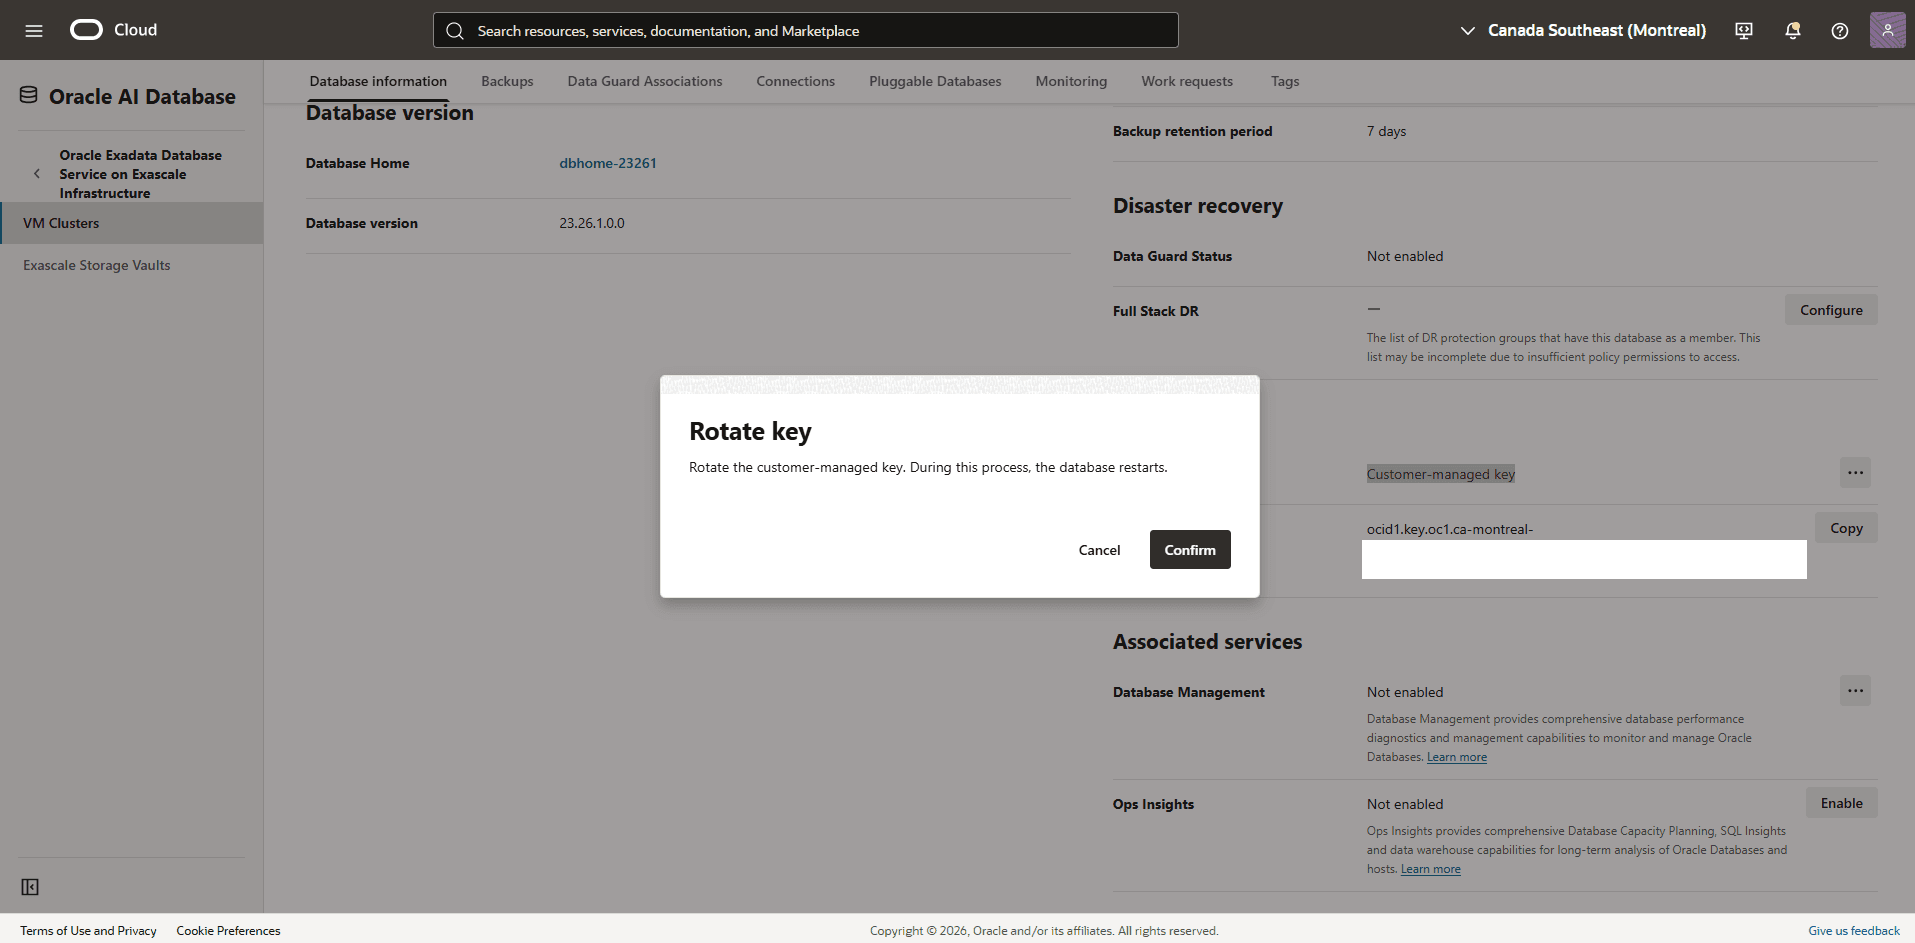
Select the Action menu ( three dots) and then select the Rotate option.
-
Select the Confirm button to save the changes.
-
There is currently no content for this page. The Oracle AI Database@Google Cloud team intends to add content here, and this placeholder text is provided until that text is added.
The Oracle AI Database@Google Cloud team is excited about future new features, enhancements, and fixes to this product and this accompanying documentation. We strongly recommend you watch this page for those updates.
Oracle Exadata Database Service on Exascale Infrastructure now supports integration with Google Cloud Key Management Service (KMS). This capability allows you to manage Transparent Data Encryption (TDE) master encryption keys (MEKs) using Google Cloud Customer-Managed Keys (CMKs). For Oracle Exadata Database Service on Exascale Infrastructure, TDE master encryption keys (MEKs) can be stored in a file-based Oracle Wallet, Oracle Cloud Infrastructure (OCI) Vault, Oracle Key Vault (OKV), or Cloud KMS, providing options to align with organization-specific security policies. Integration with Cloud KMS enables applications, Google services, and databases on Exascale VM Cluster(s) to leverage a single centralized key management solution.
To configure Cloud KMS to encrypt your database, complete the following steps:
- Note
-
Create an Exascale VM Cluster
See Exascale VM Cluster for step-by-step instructions.
-
Review the Identity Connector State
-
From the OCI Console, select Oracle AI Database, then select Oracle Exadata Database Service on Exascale Infrastructure.
-
From the left menu, select VM Clusters, and then select your Exascale VM Cluster.
-
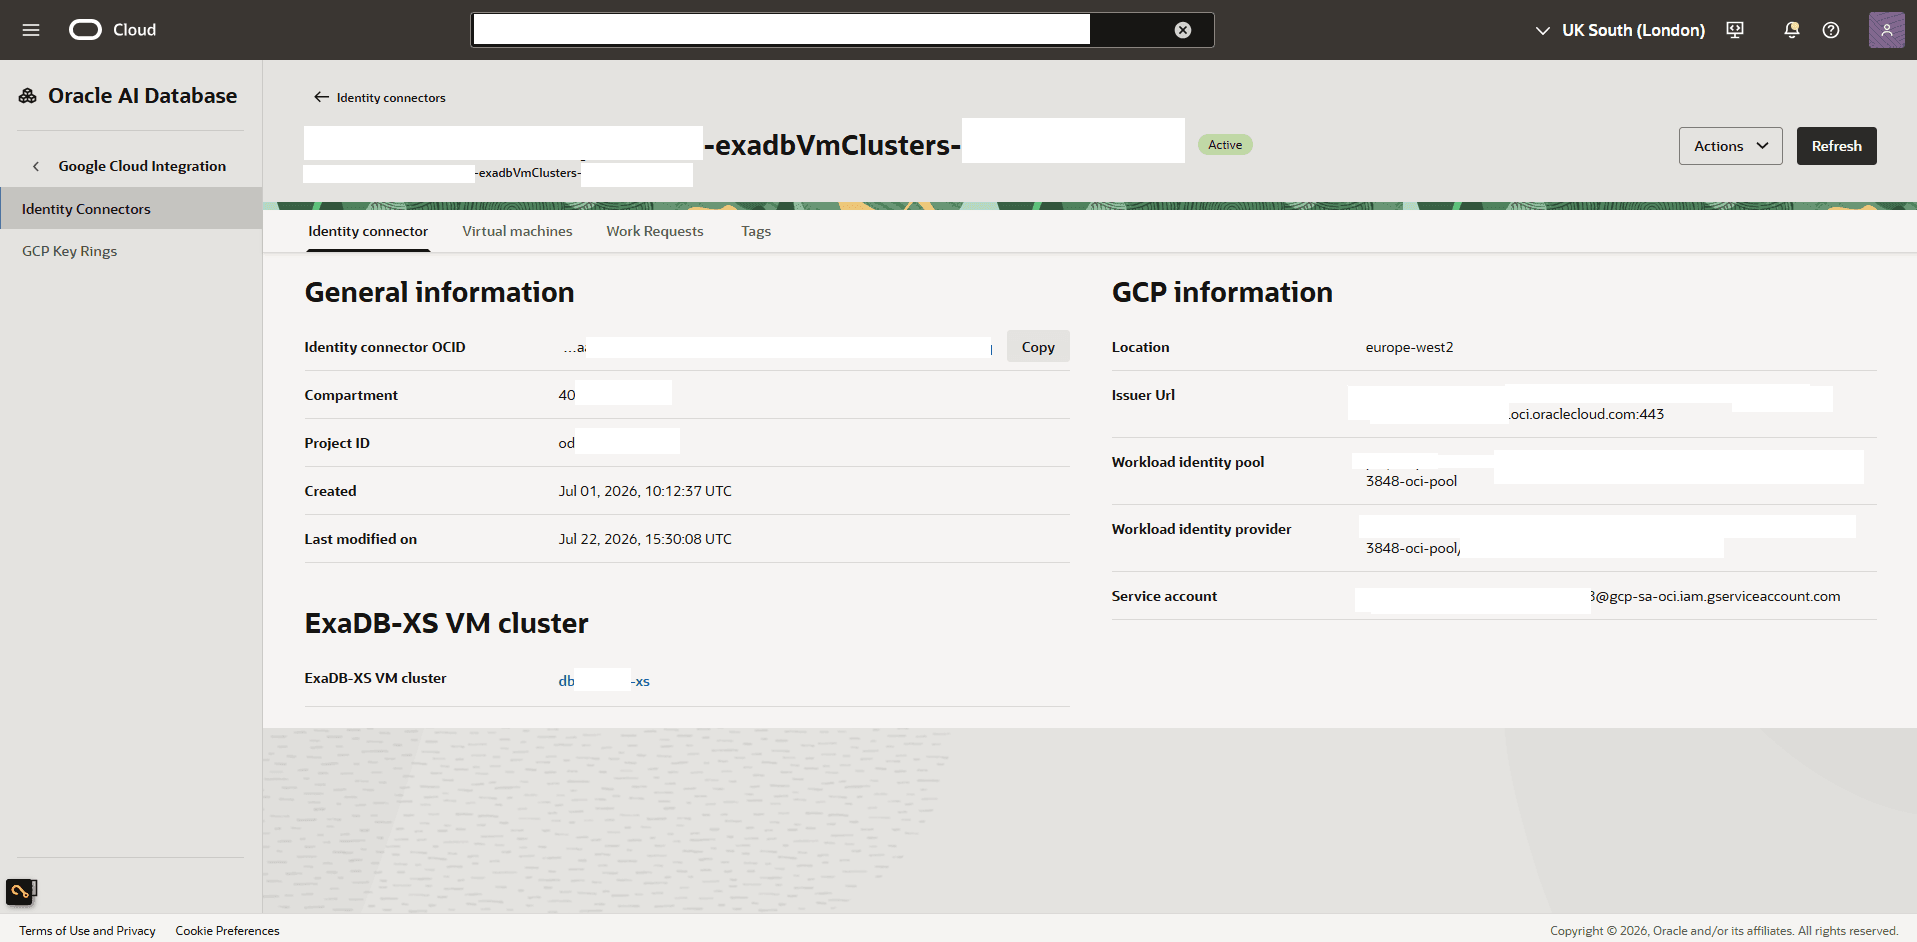
Select the VM Cluster information tab, scroll down to the Multicloud Information section. Confirm that the Identity connector field is populated.
-
Select the Identity connector name, confirm the status is Active.
-
-
Create an IAM Policy for Accessing GCP Key Resources
The database uses the cluster resource principal to securely retrieve GCP key resources. To enable this functionality, you must define the appropriate IAM policies in your OCI tenancy.
To create the IAM Policy follow the steps below:
-
From the OCI Console, select Oracle AI Database, then select Oracle Exadata Database Service on Exascale Infrastructure.
-
From the left menu, select VM Clusters, and then select your Exascale VM Cluster.
-
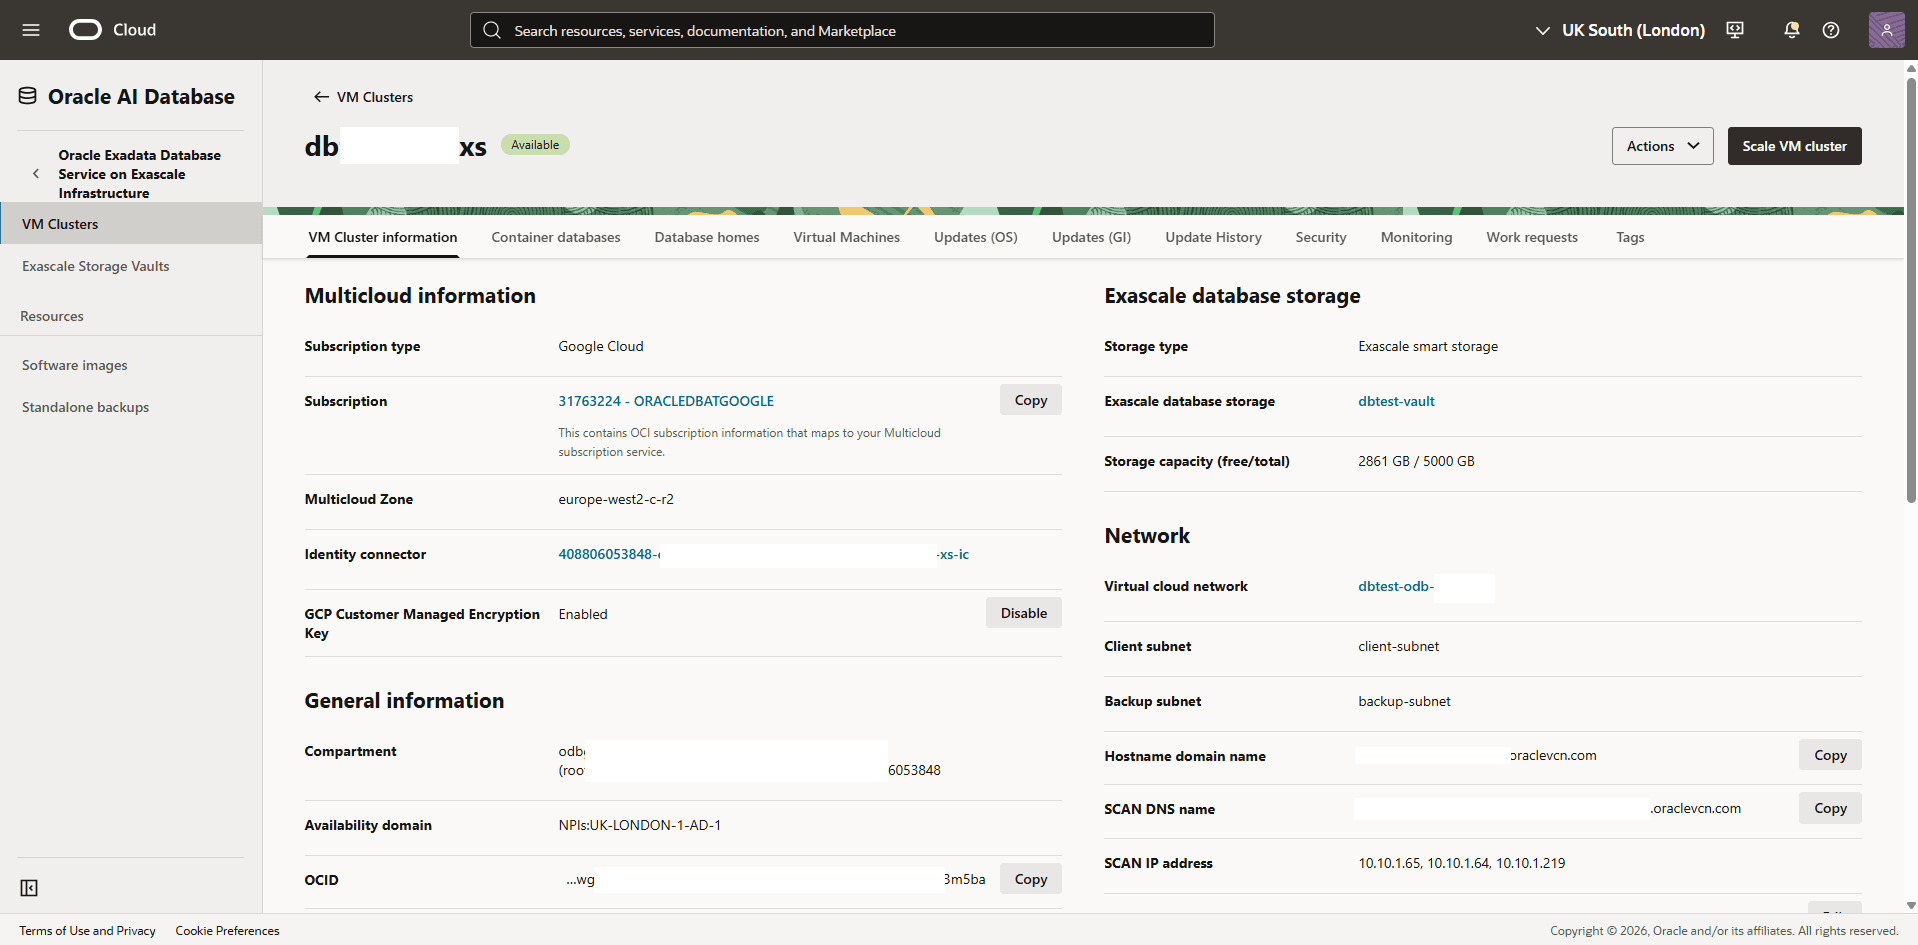
Select the VM Cluster information tab, scroll down to the General information section. Take note of the Compartment information of your Exascale VM Cluster.
-
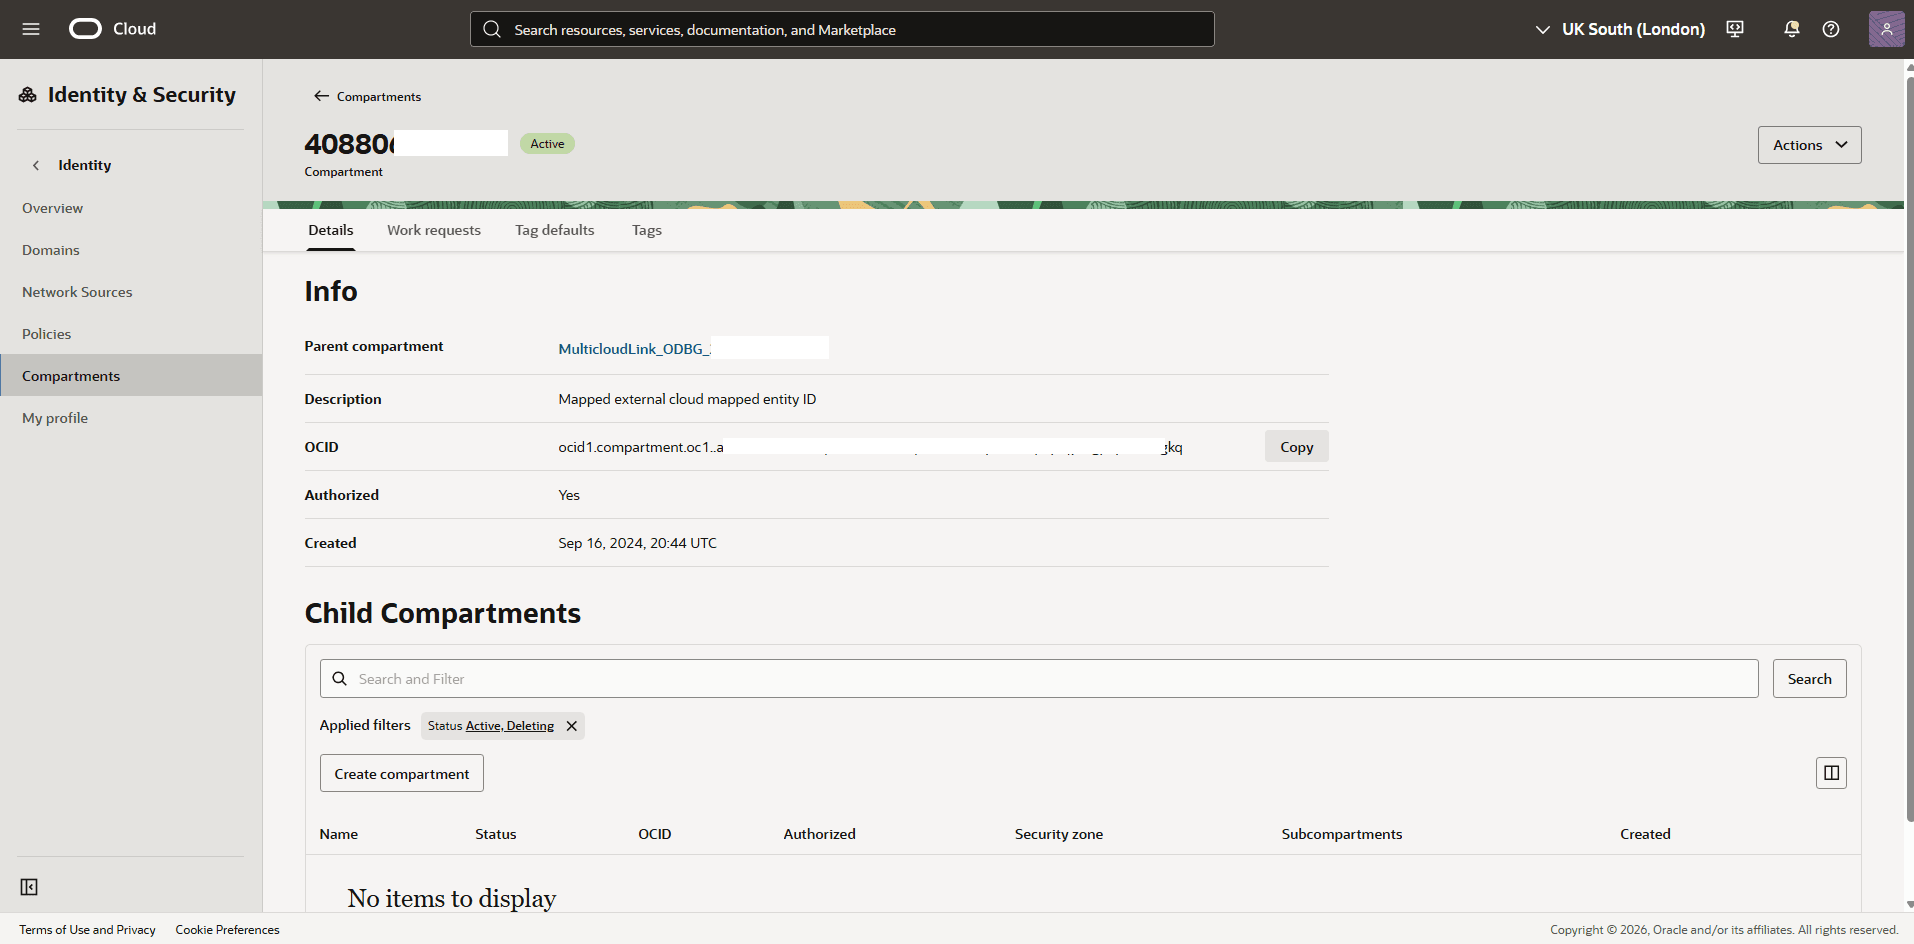
Navigate back to OCI Console, select Identity & Security and then select Compartments.
-
Locate the Compartment that you previously recorded. From the Details tab, take a note of the compartment OCID information.
-
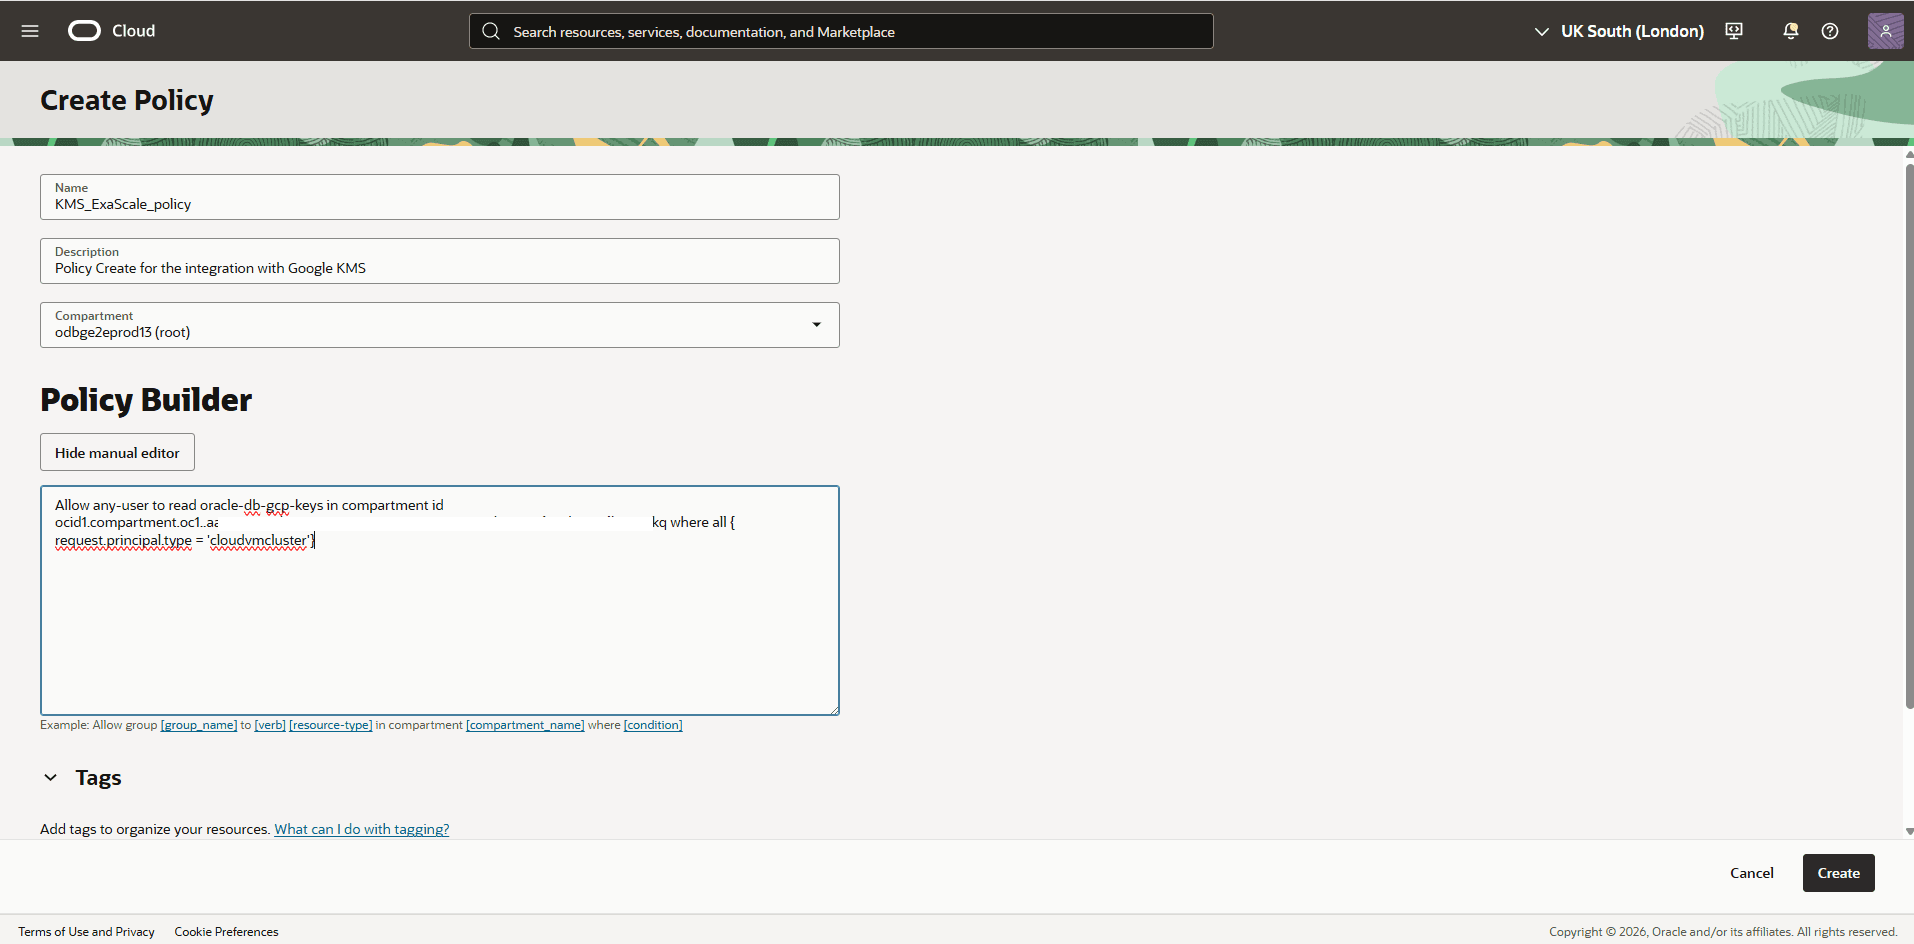
Navigate back to OCI Console, select Identity & Security, and then select Policies. Select the Create Policy button.
-
Enter a policy Name.
-
Select the root compartment.
-
Select the show manual editor button, and copy the following policy and replace the
<your-compartment-OCID>with the compartment OCID copied in the step 3e.Allow any-user to read oracle-db-gcp-keys in compartment id <your-compartment-OCID> where all { request.principal.type = 'cloudvmcluster'} -
Select the Create button. Note: This policy grants read-only access to Google Cloud key resources for the VM cluster resource principal.
-
-
<div class="infoboxnote" markdown="1"> **Note:** Google Cloud VPCs typically include default routes to the services listed below. Ensure that no firewall egress rules block access to these endpoints. - https://iamcredentials.googleapis.com/ - https://sts.googleapis.com/ - https://cloudkms.googleapis.com/ </div>-
Create a Key Ring in Google Cloud KMS
See Create Key Ring in Google Cloud KMS in the CMK - Cloud KMS tab for step-by-step instructions.
-
Create a Key in Google Cloud KMS
-
From the Google Cloud Console, select Key Management.
-
From the Key rings list, select the key ring name created in the previous step.
-
Select the + Create key button.
-
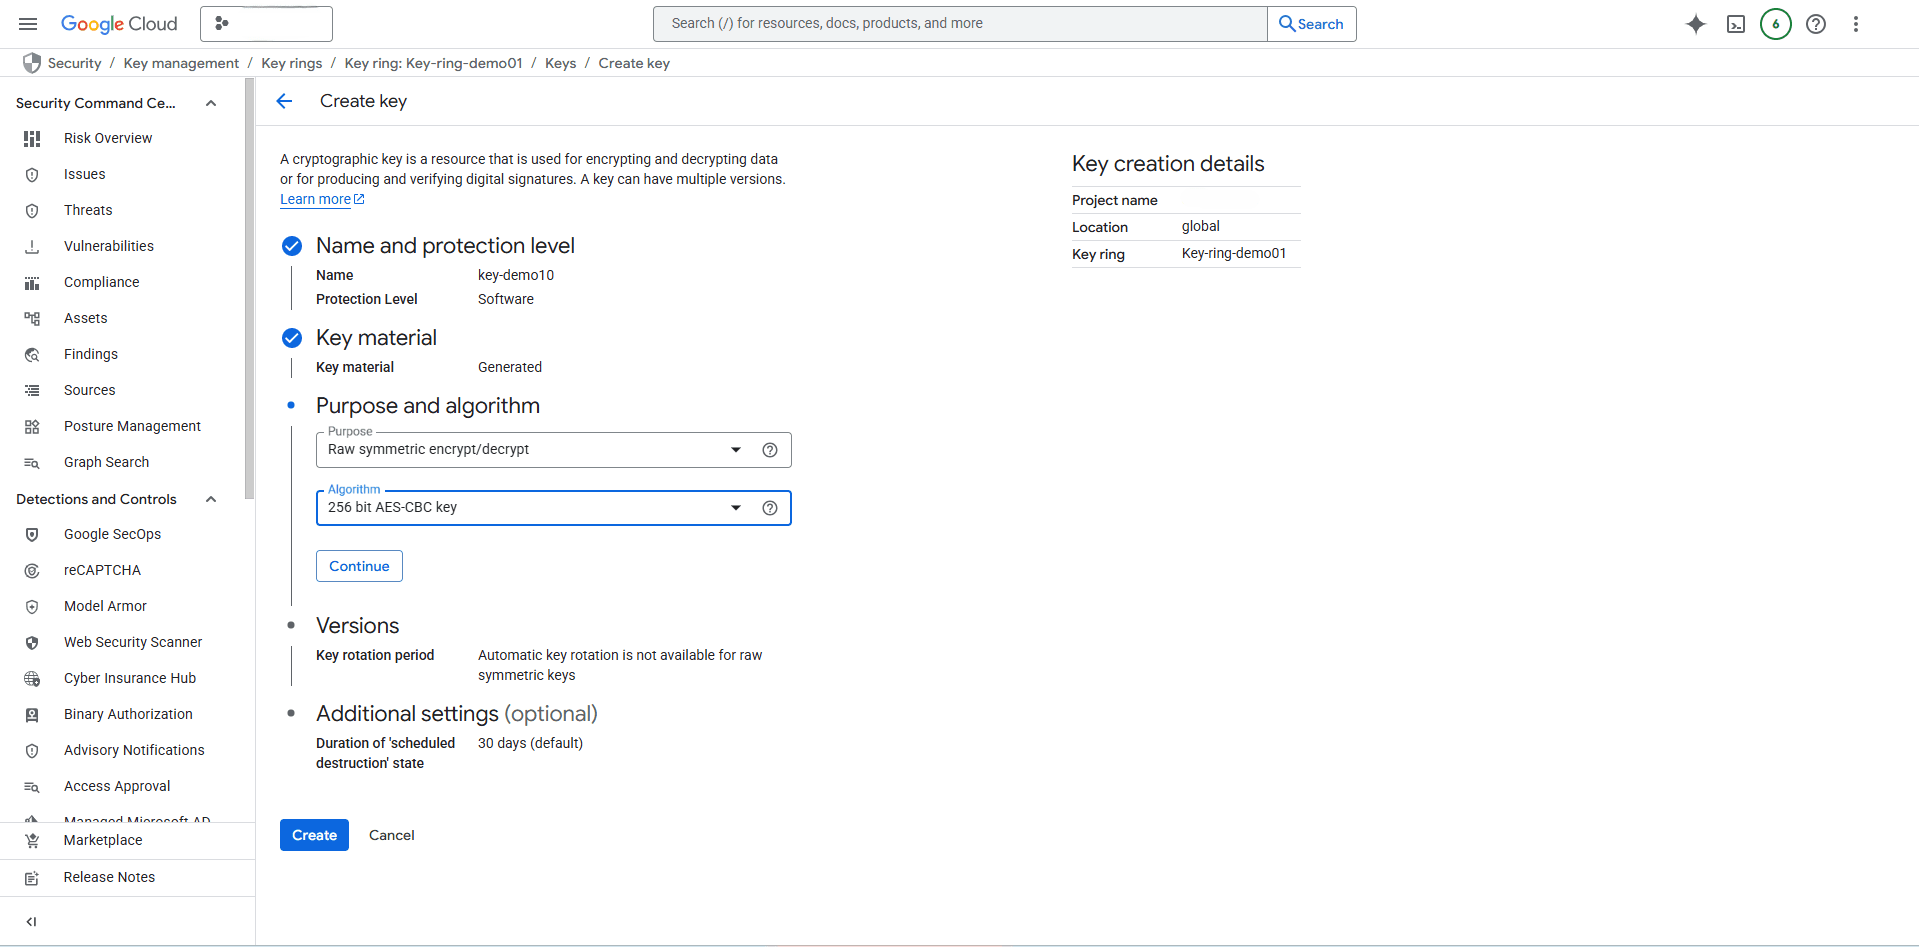
In the Create key page, enter the following information:
-
Key name: Enter a descriptive name for your key. Names can only contain letters, numbers, underscores (_), and hyphens (-)
-
Protection level: Choose either the Software or HSM (Hardware Security Module) option.
Note
Note: The protection level of a key can’t be changed after the key is created. For more information, see Protection levels. -
Select the Continue button.
-
Key material: Select Generated key or Imported key, and then select the Continue button.
Note
Note: Generate key material in Cloud KMS or import key material that is maintained outside of Google Cloud. For more information, see Customer-managed keys (CMK). -
Purpose and Algorithm: Select the Purpose as Raw encryption/decryption and For Algorithm, select 256 bit AES-256-CBC key.
Note
Note: You must select AES-256-CBC as the Algorithm Type. Otherwise, the key will not appear during the database creation or modification process. -
Versions: Based on your requirements, select your Key rotation period and Starting on. Select the Continue button.
-
Additional settings: This section is optional. By default, Duration of ‘scheduled destruction’ state is set to 30 days.
-
-
Select the Create button to create a key.
Note
Note: Restoring databases to a different region is currently not supported for databases that use Cloud KMS as customer-managed keys for the key management.
-
-
Create a Google Cloud Role with the Required Permissions
-
From the Google Cloud console, select Roles.
-
Select the Create Role button.
-
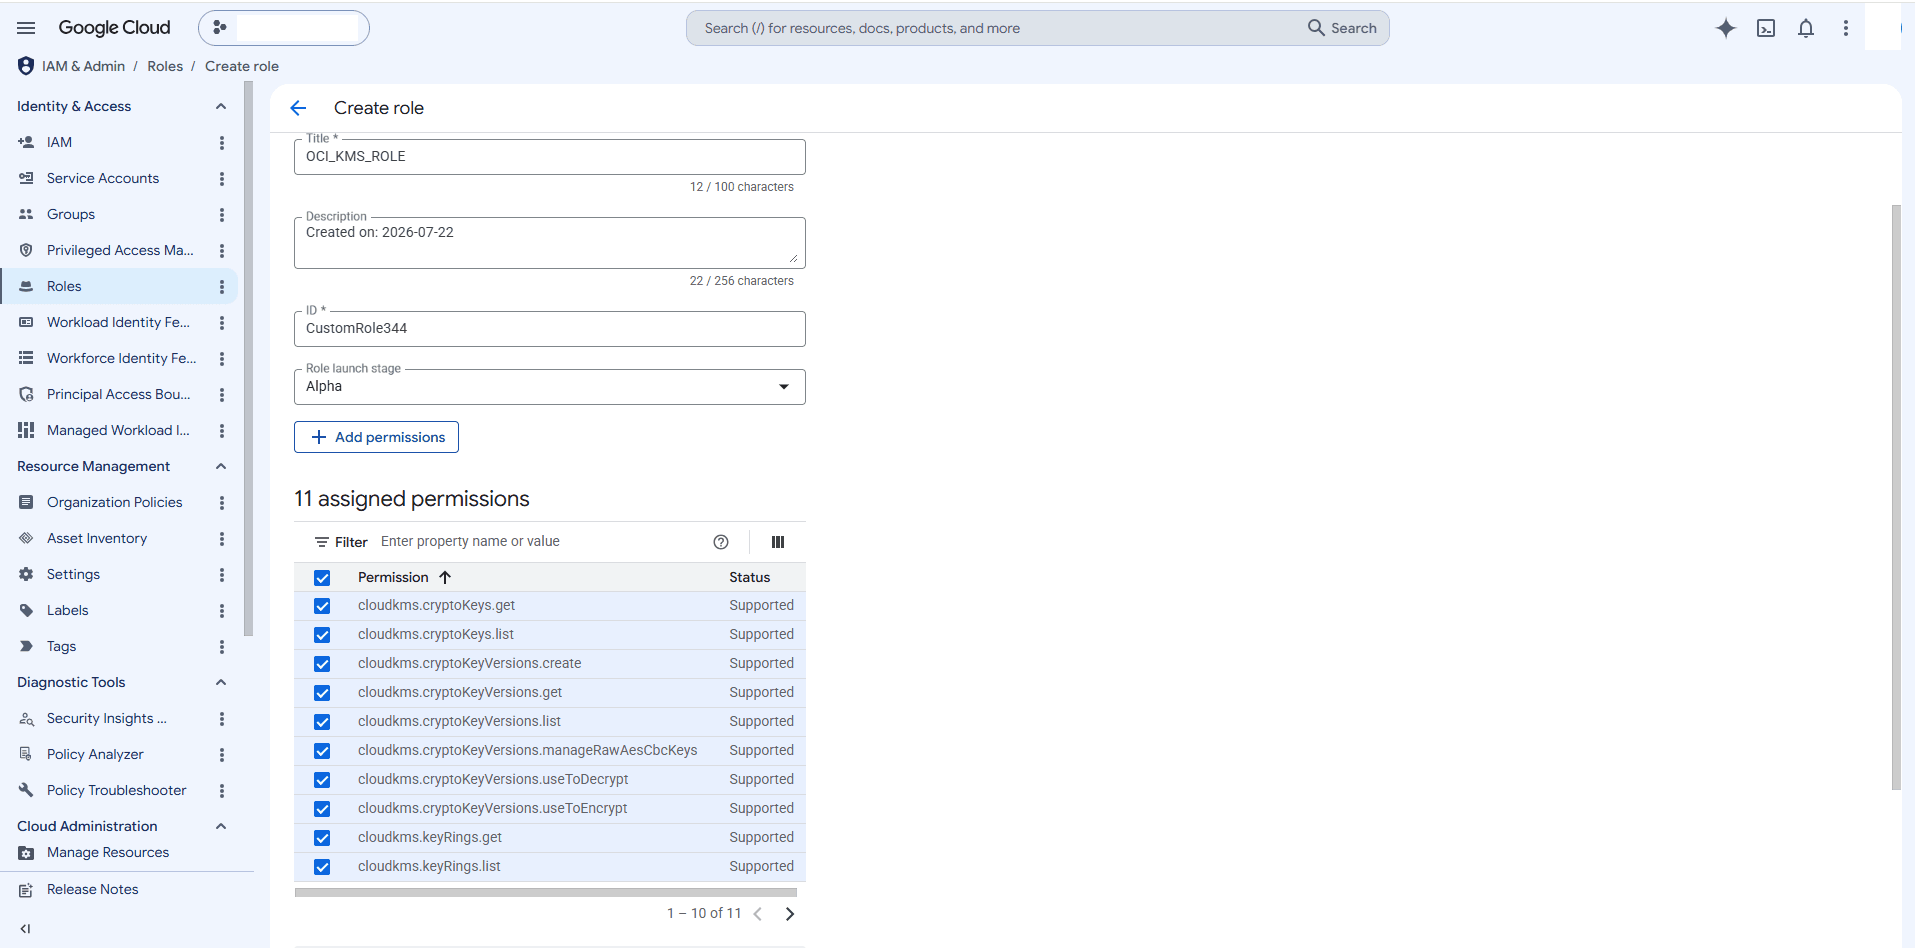
Provide a Title, Description, ID, and Role launch stage for the role, and then select the Add Permissions button.
-
Select the permissions you want to include in the role and select the Add Permissions button. Use the All Services and All Types dropdown lists to filter and select permissions by services and types.
-
Select the Create button.
Note
Note:
To allow a key to be discoverable in OCI, you must assign the necessary permission to the principal and use a custom role to achieve this.
Minimum Required Permissions:
cloudkms.cryptoKeyVersions.get
Allows retrieval of metadata for a specific key version.
cloudkms.cryptoKeyVersions.manageRawAesCbcKeys
Enables management of raw AES-CBC key material (import, rotation, etc.).
cloudkms.cryptoKeyVersions.create
Allows creation of new key versions within a key.
cloudkms.cryptoKeyVersions.list
Lists all versions of a given key.
cloudkms.cryptoKeyVersions.useToDecrypt
Grants permission to use a key version for decrypting data.
cloudkms.cryptoKeyVersions.useToEncrypt
Grants permission to use a key version for encrypting data.
cloudkms.cryptoKeys.get
Allows retrieval of metadata for a key.
cloudkms.cryptoKeys.list
Lists all keys within a key ring.
cloudkms.keyRings.get
Allows retrieval of metadata for a key ring.
cloudkms.locations.get
Retrieves information about supported key locations.
cloudkms.keyRings.list
Allows listing all key rings within a project.
These permissions enable OCI to: Discover KMS resources like key rings and keys. Access metadata about keys and their versions. Use the keys for cryptographic operations (encryption/decryption). Create key versions.
-
-
Identify the Principal Associated with VM Cluster Service Account
-
From the OCI Console, select Oracle AI Database, then select Oracle Exadata Database Service on Exascale Infrastructure.
-
From the left menu, select VM Clusters, and then select your Exascale VM Cluster.
-
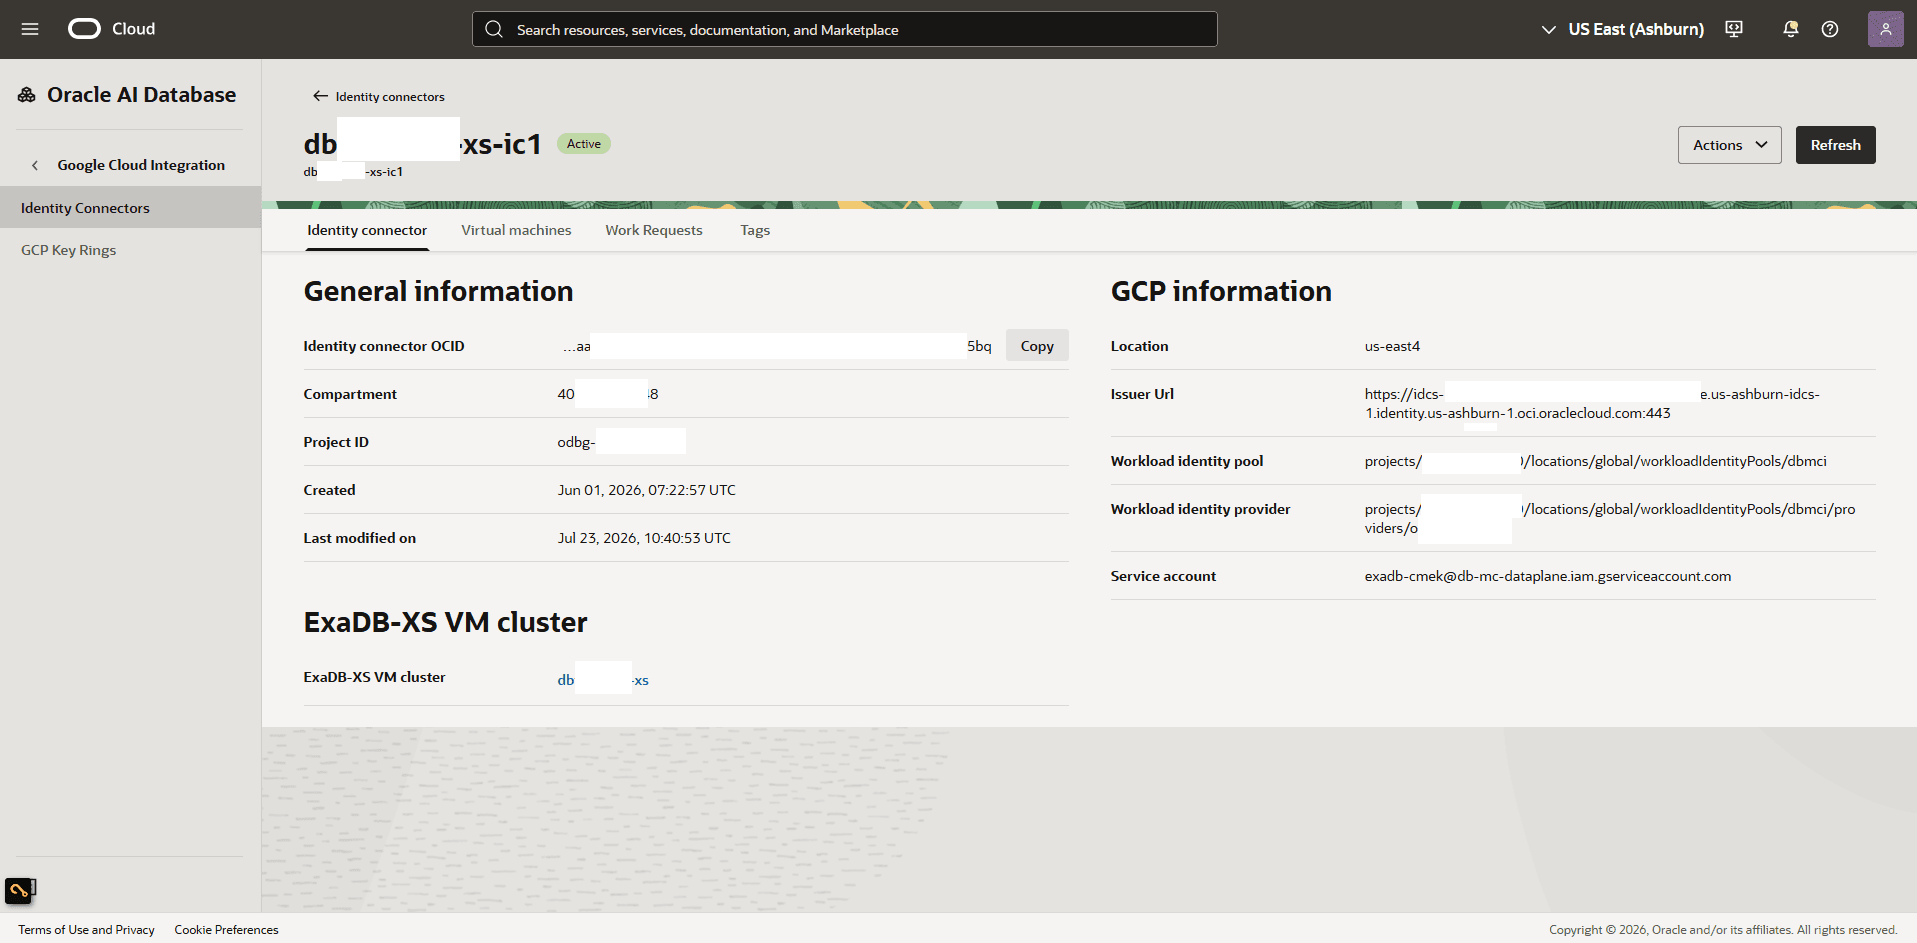
Select the VM Cluster information tab, scroll down to the Multicloud Information section, confirm that the Identity connector field displays the identity connector attached to this VM cluster.
-
Select the Identity connector name to review the Identity connector information.
-
Navigate to the GCP information section to view the Service account information. Take note of the Service account information
-
-
Grant Permissions in Google Cloud KMS for Key Discovery in OCI
-
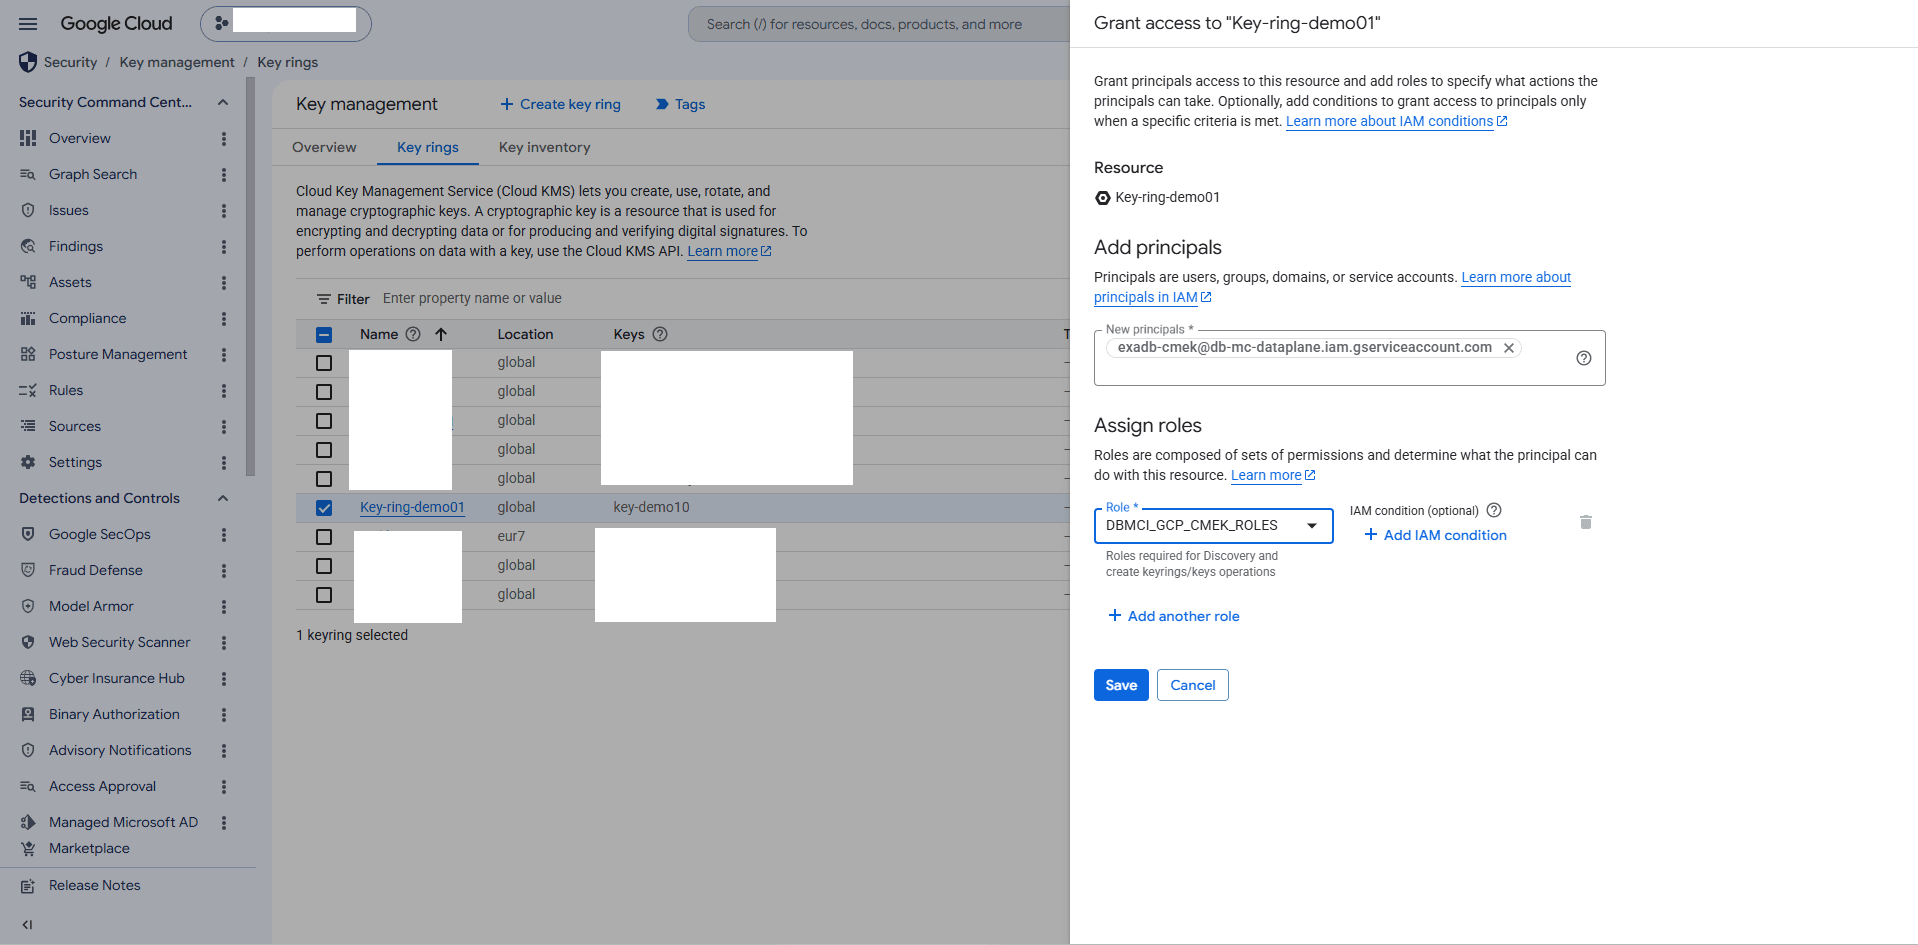
From the Google Cloud console, select Key management, then select the check box of Key Ring that contains the key you want to make discoverable.
-
Select the Add Principal button.
-
Paste the Service account information that you previously copied in the step 7e, and then assign the custom role that you created in the step 6.
-
Select the Save button.
-
From the Google Cloud console, select Key management, select the key you want to make discoverable
-
Select the Name field of the Key ring that contains the key that you want to use, then select the Name field of the Key that you want to use.
-
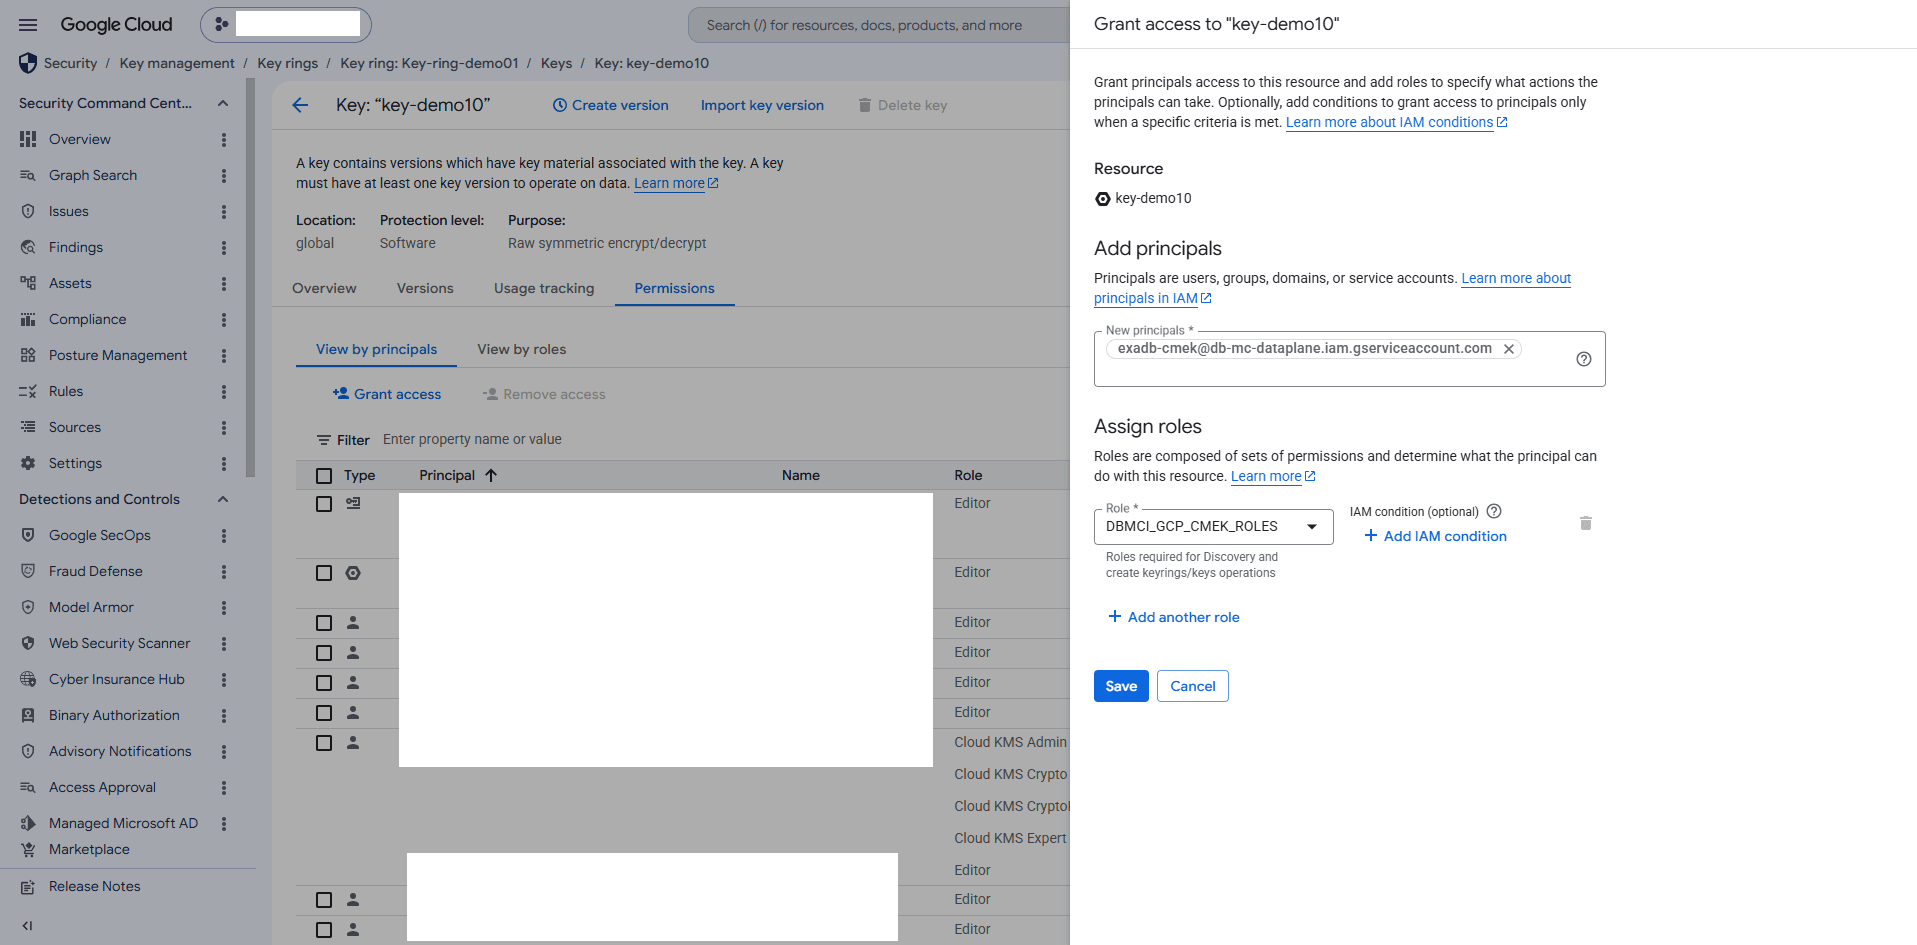
Navigate to the Permissions tab, then select the Grant access button.
-
In the Add principal field, enter the principal value found in previous steps.
-
In the Assign Roles section, assign the custom role created in the previous step.
-
-
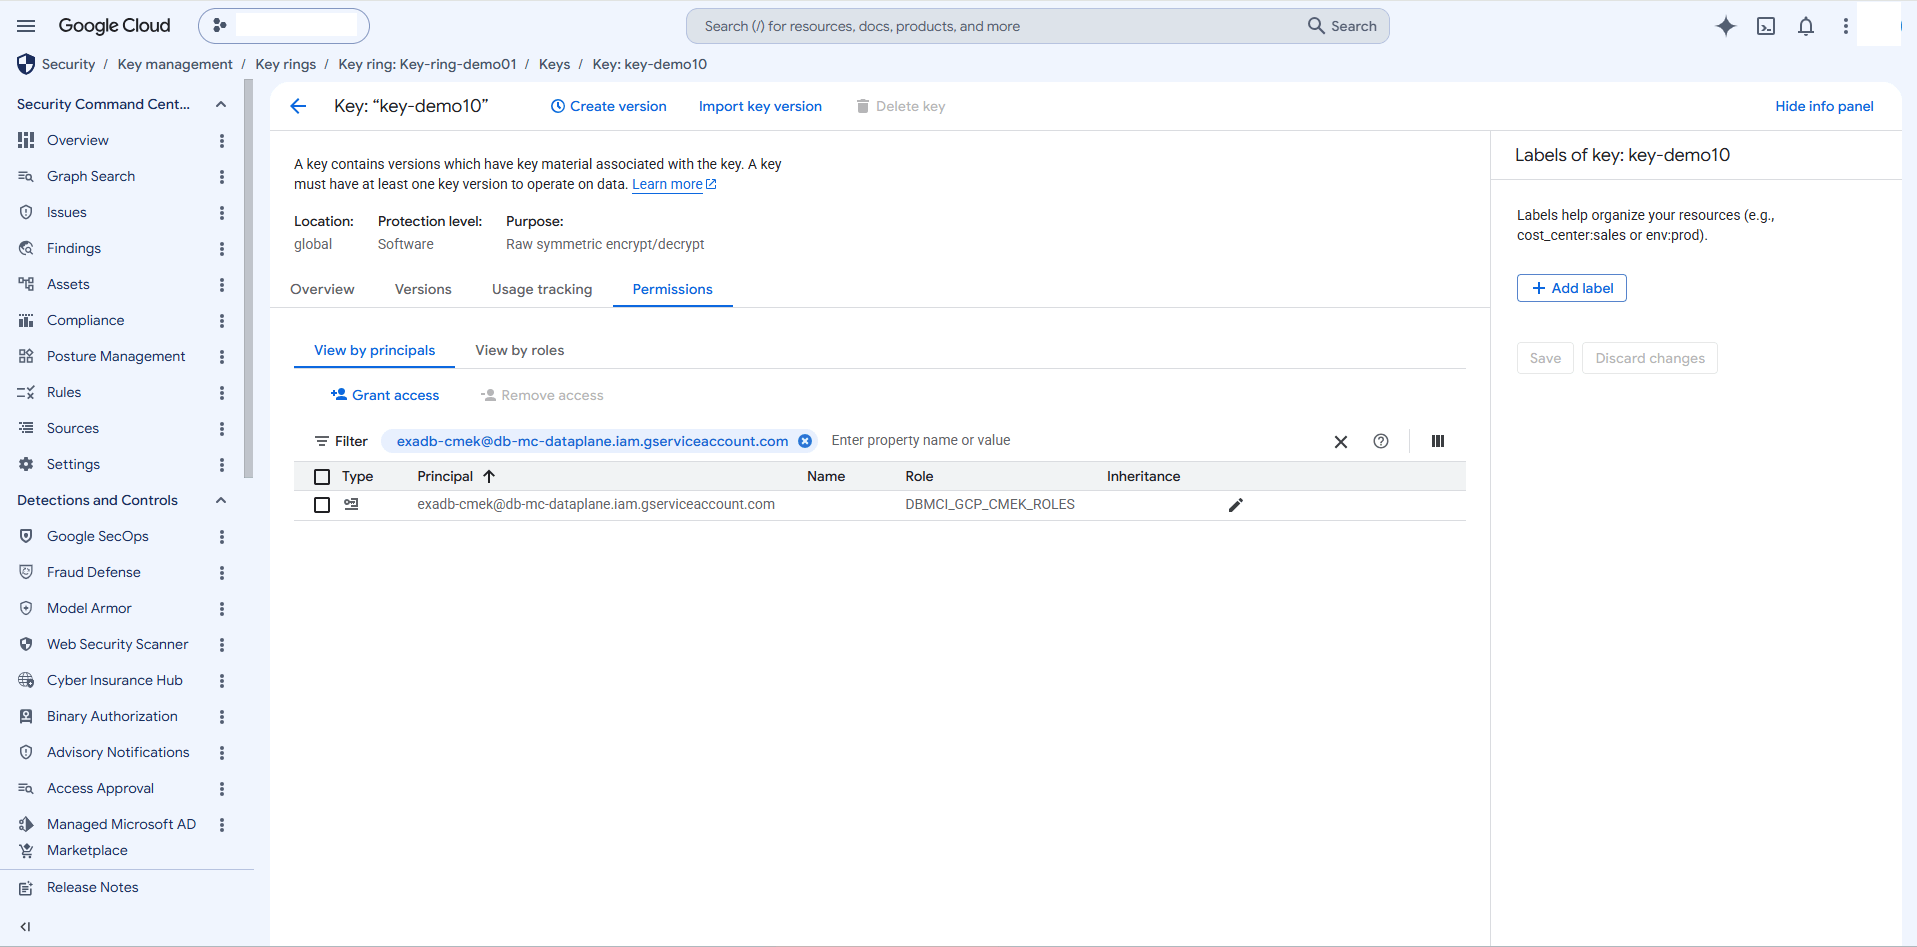
Select the Save button.
-
-
Register Google Cloud Key Ring in OCI
To enable Cloud KMS for your Exascale VM Cluster, you must first register the Google key Ring in the OCI console.
-
From the OCI console, select Oracle AI Database, and then select Database Multicloud Integrations.
-
After selecting Database Multicloud Integrations, the default page opens.
-
From the left menu, select the Previous button to navigate to Google Cloud Integration, and then select GCP Key Rings.
-
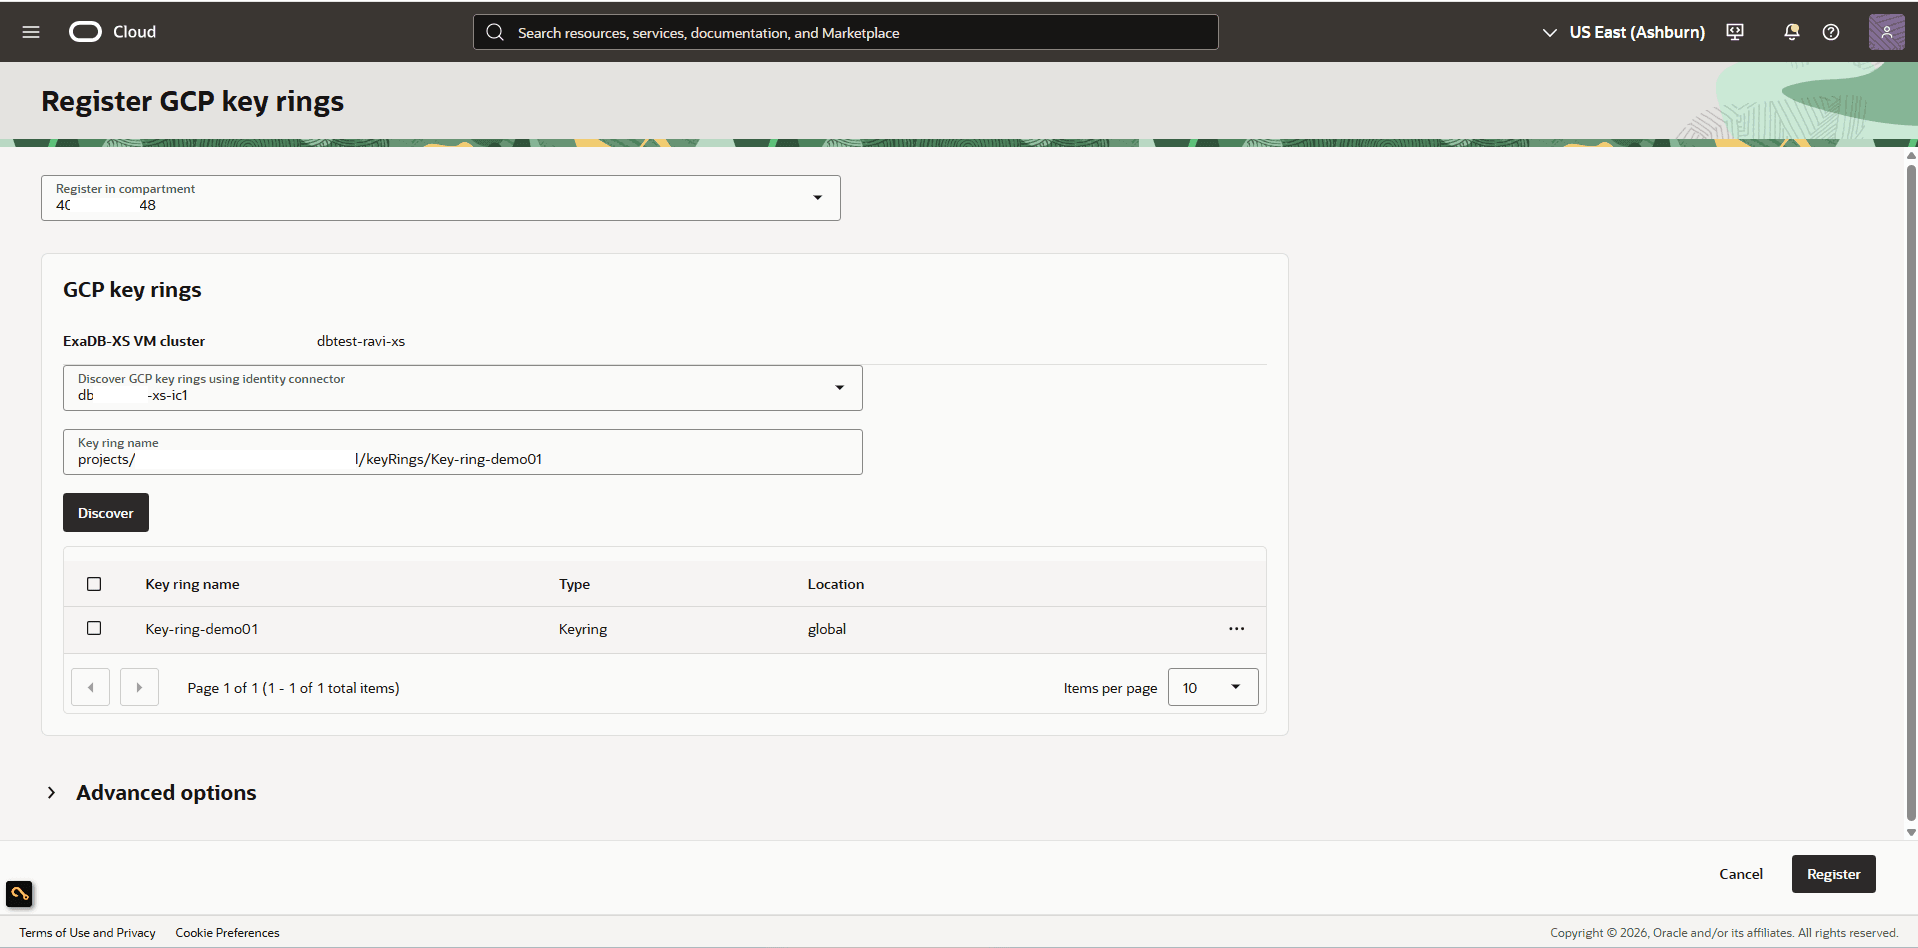
Select the Register GCP key rings button, and then complete the following substeps:
-
From the dropdown list, select the Compartment in which your Exascale VM Cluster resides.
-
Select your identity connector from the dropdown list.
-
The Key Ring Name field is optional.
-
Select the Discover button.
-
-
Once the key is discovered, select the Register button to register the key in OCI.
Note
Note: Only key rings can be registered, not individual keys. All supported keys associated with a registered key ring will be available, provided the required permissions are in place -
-
Enable Google Cloud Key Management
Note
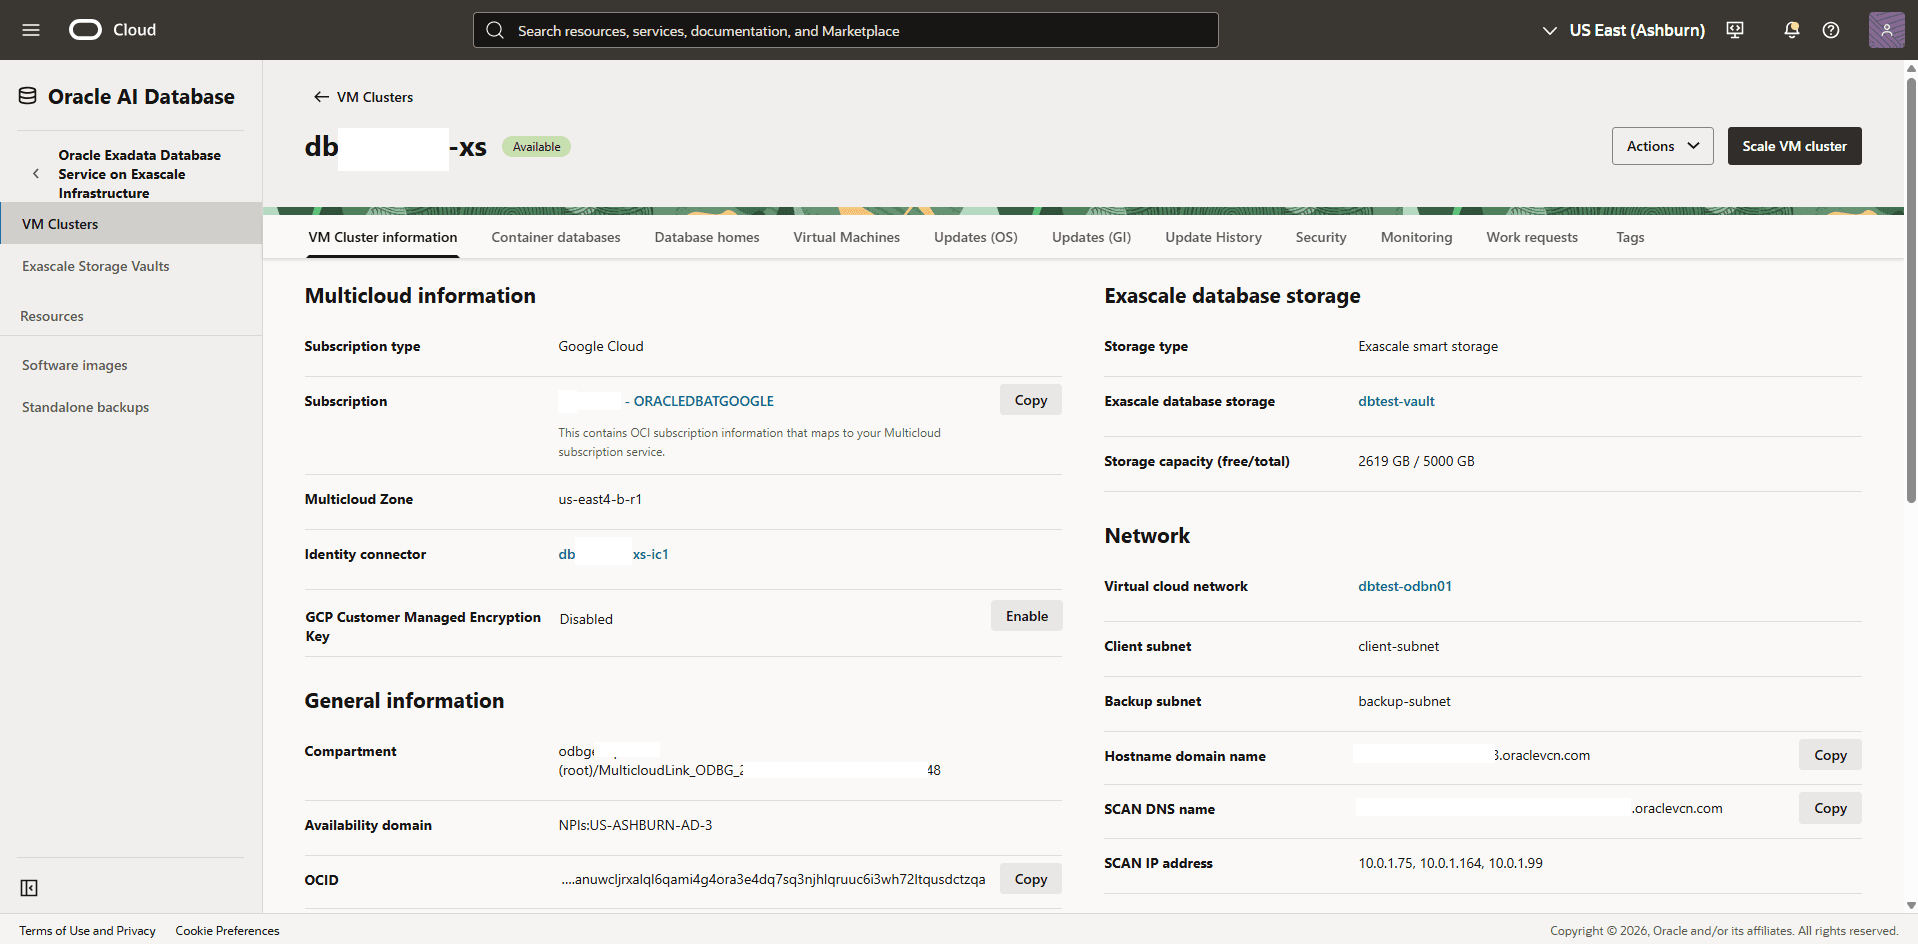
Note: When you provision an Exascale VM Cluster, GCP Customer Managed Key is disabled by default.Note
Note: If you do not want use GCP Customer Managed Key, you can disable it by selecting the Disable button. This action will disable GCP Customer Managed Key at the VM Cluster level. Disabling it will impact the availability of the databases using GCP Customer Managed Key. Ensure that no database is currently using GCP Customer Managed Key.-
From the OCI Console, select Oracle AI Database, then select Oracle Exadata Database Service on Exascale Infrastructure.
-
From the left menu, select VM Clusters, and then select your Exascale VM Cluster.
-
Select the VM Cluster information tab, scroll down to the Multicloud Information section. Select the Enable button next to GCP Customer Managed Key. A confirmation message will be displayed, and then select the Enable button to confirm.
-
-
Create a Database and Use Google Cloud Customer-Managed Key (CMK) as the Key Management Solution
-
Complete the following steps described in the Exascale Database documentation to create an Exascale Database.
-
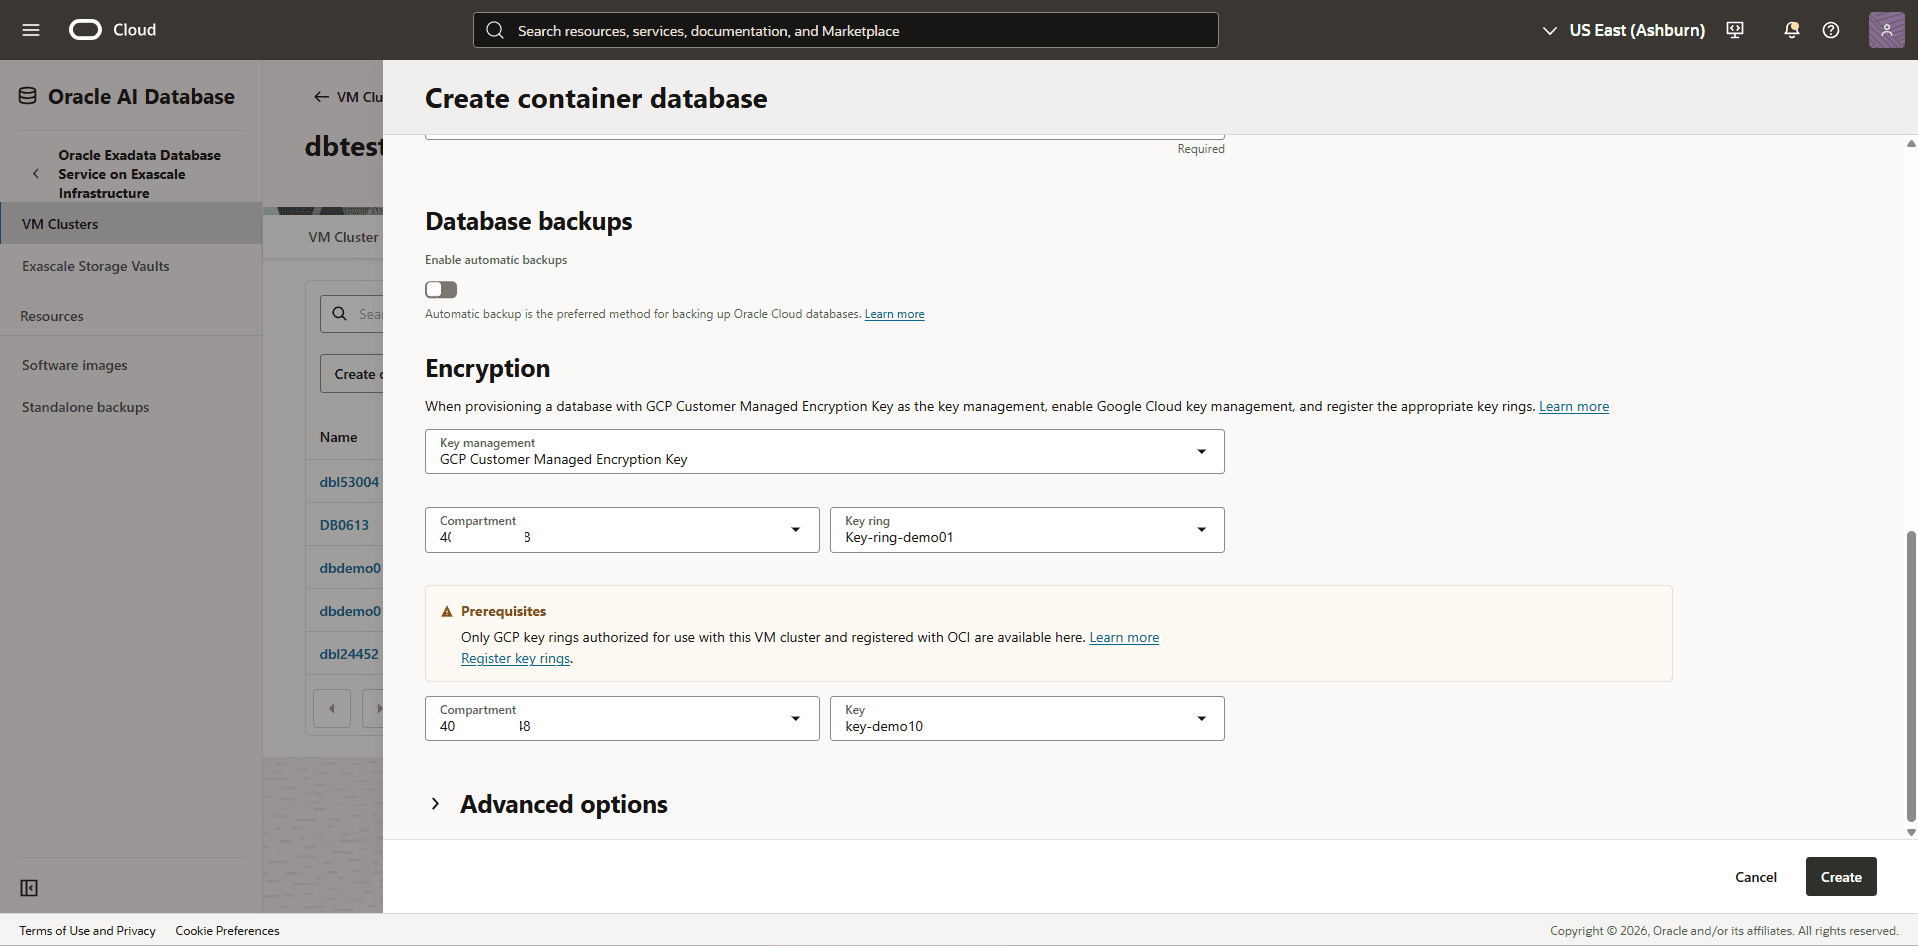
Navigate to the Encryption section which provides two options. These options include Oracle Wallet and GCP Customer Managed Encryption Key.
-
Select the GCP Customer Managed Encryption Key option as the key management. Select the Compartment and the Key Ring from the dropdown list, then select the Key from the dropdown list.
-
Review your information, and then select the Create button.
-
-
Modify the Key Management from Oracle Wallet to Google Cloud Customer Managed Key (CMK)
To update key management from Oracle Wallet to Google Cloud Customer Managed Key, complete the following steps:
-
From the OCI Console, select Oracle AI Database, then select Oracle Exadata Database Service on Exascale Infrastructure.
-
From the left menu, select VM Clusters, and then select your Exascale VM Cluster.
-
Select Container databases tab, select the database that you want to change the key management.
-
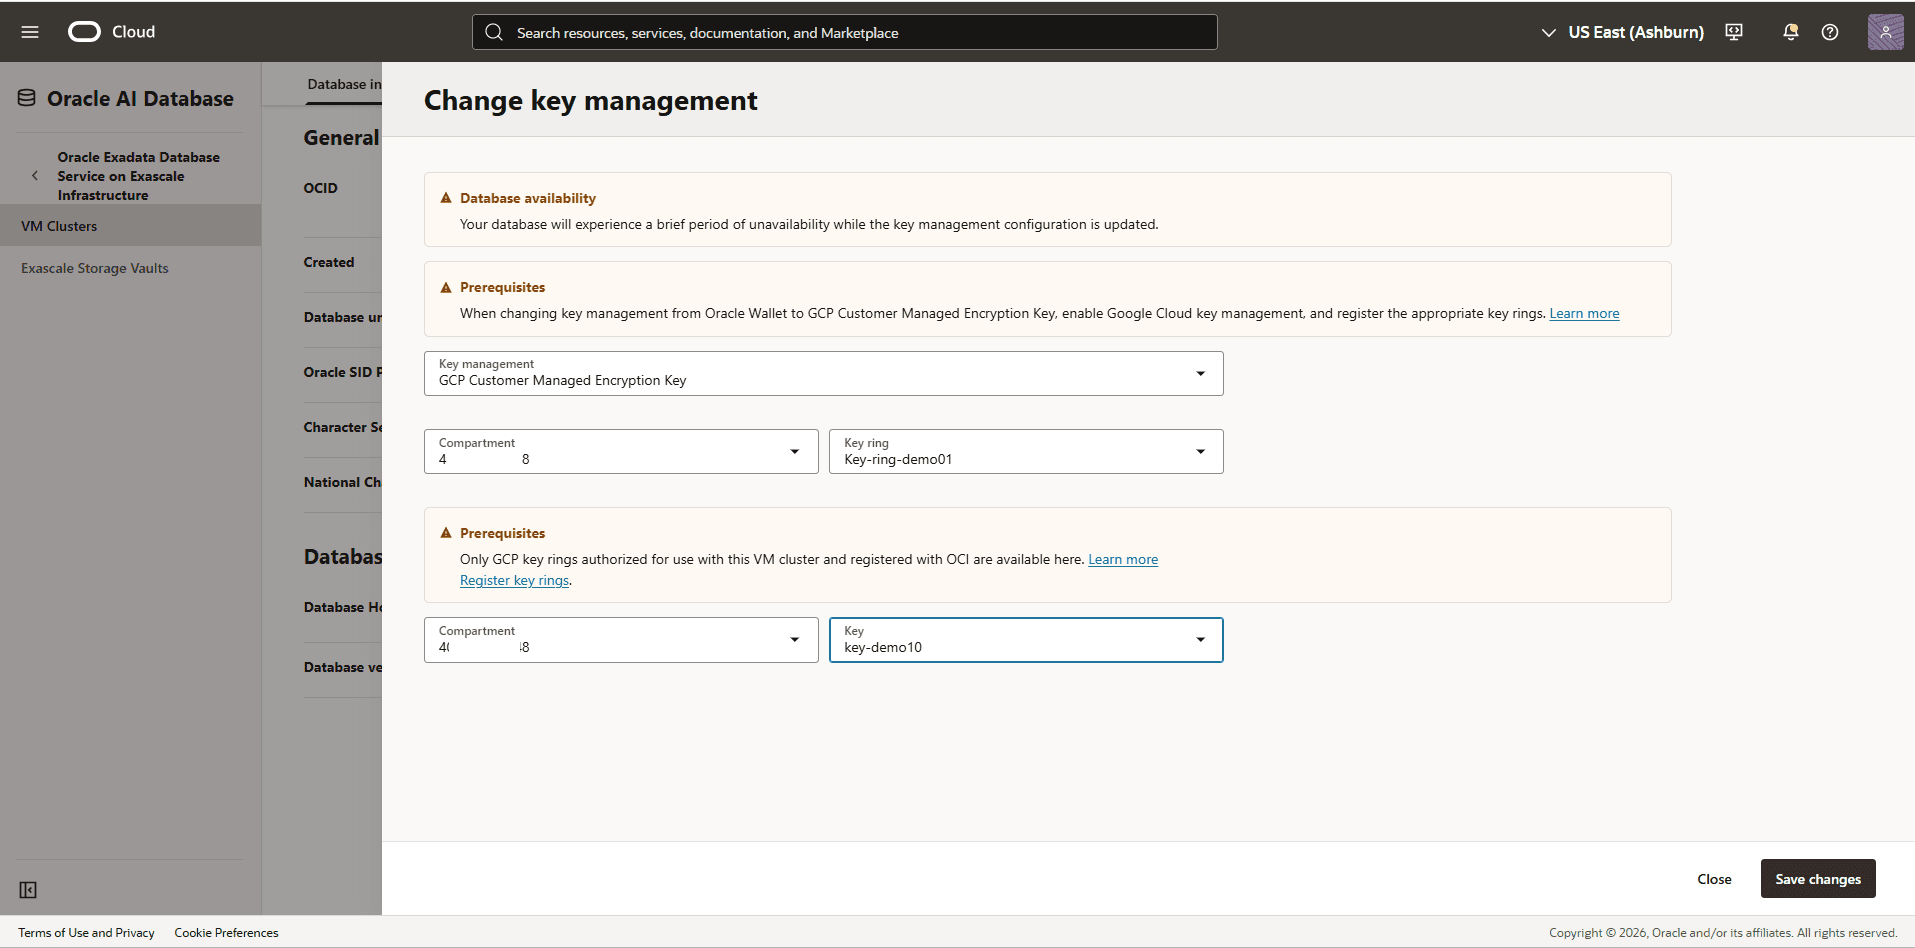
From the Encryption section, confirm that Key management is set to Oracle Wallet, and then select the Change button.
-
From the Change key management page, enter the following information.
-
Select your Key management as GCP Customer Managed Encryption Key from the dropdown list.
-
Select the key compartment you are using, and select your key ring from the dropdown list, then select the key from the dropdown list.
-
Select the Save changes button.
-
-
Google Cloud Customer Managed Key allows you to rotate the key at both Container Database (CDB) and Pluggable Database (PDB) levels to meet your security compliance requirements. Complete the following steps to rotate the key:
Rotate the Google Cloud Customer Managed Key of a Container Database (CDB)
-
From the OCI Console, select Oracle AI Database, then select Oracle Exadata Database Service on Exascale Infrastructure.
-
From the left menu, select VM Clusters, and then select your Exascale VM Cluster that you want to rotate encryption keys.
-
Select Container databases tab, select the database that you want to rotate encryption keys.
-
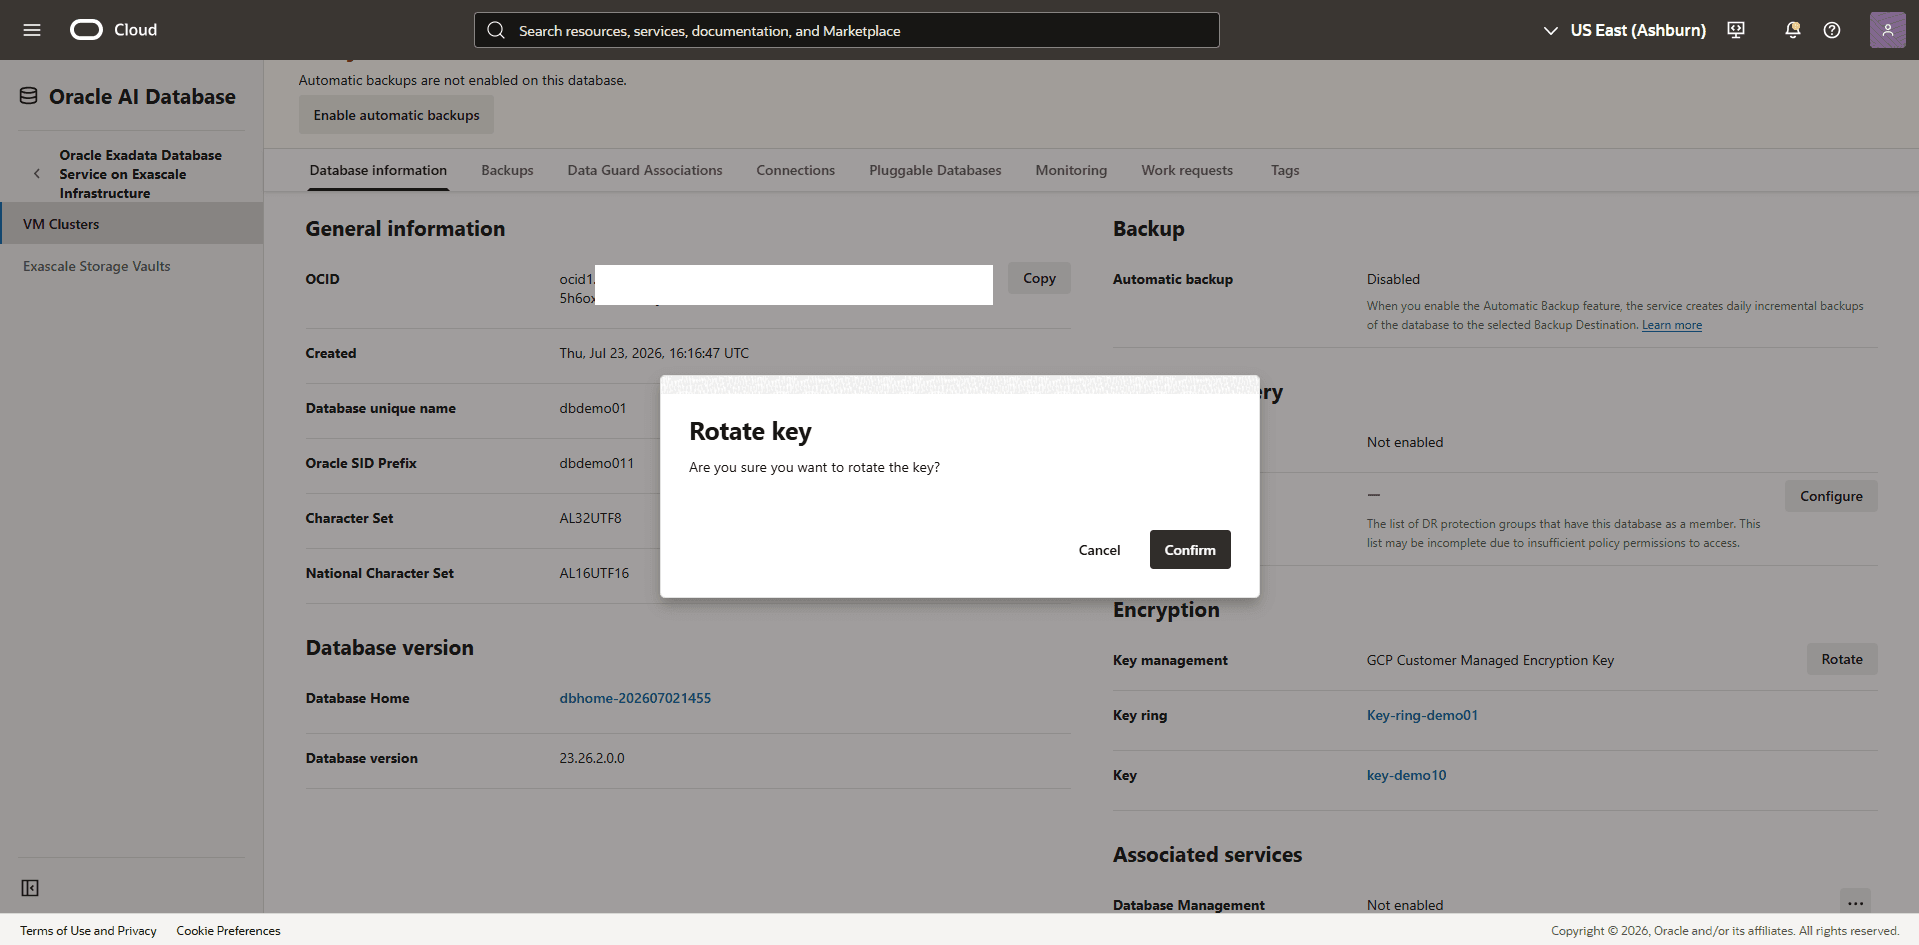
From the Encryption section, verify that the Key Management is set to GCP Customer Managed Encryption Key, and then select the Rotate button.
-
Select the Confirm button to save the changes.
Rotate the Google Cloud Customer Managed Key of a Pluggable Database (PDB)
-
From the OCI Console, select Oracle AI Database, then select Oracle Exadata Database Service on Exascale Infrastructure.
-
From the left menu, select VM Clusters, and then select your Exascale VM Cluster that you want to rotate encryption keys.
-
Select Container databases tab, select the Name field of your database you are using, then select the Pluggable Databases tab under the Resources section.
-
Select the Name field of the Pluggable Database you want to use.
-
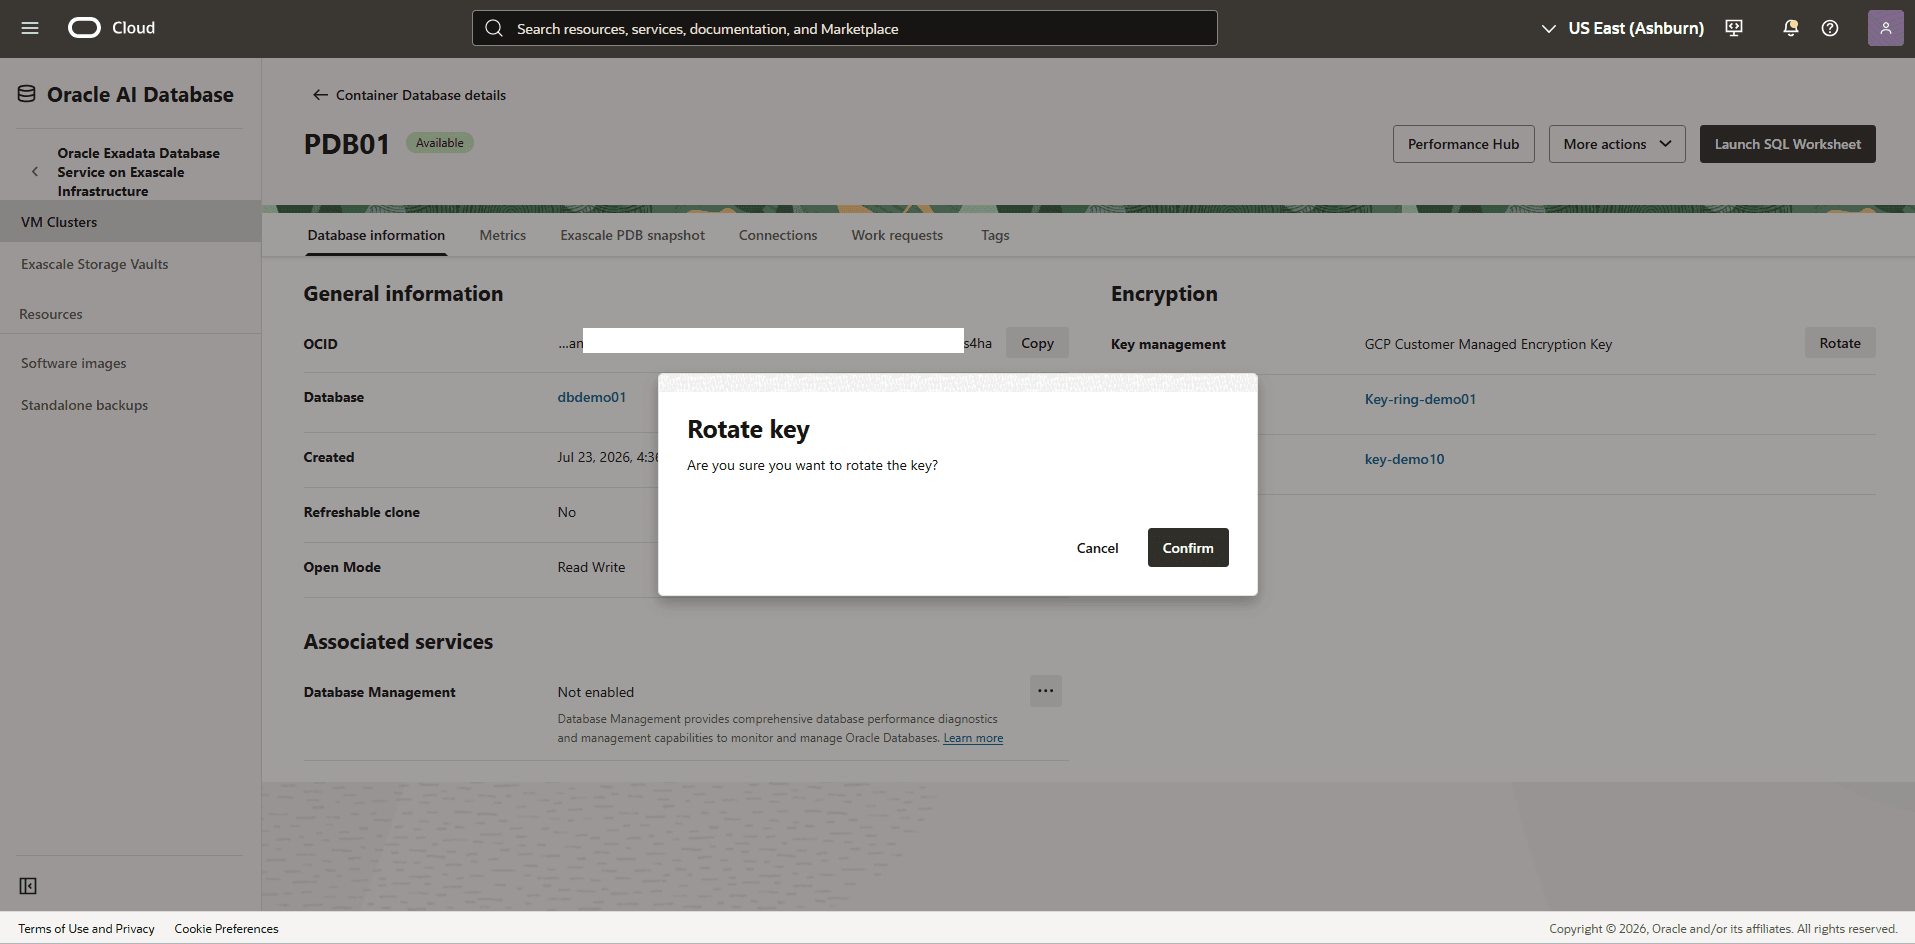
The Encryption section displays that the Key Management is set as GCP Customer Managed Encryption Key.
-
Select the Rotate button, and then select the Confirm button to save the changes.
-