ノート:
- このチュートリアルではOracle Cloudへのアクセスが必要です。無料アカウントにサインアップするには、Oracle Cloud Infrastructure Free Tierの開始を参照してください。
- Oracle Cloud Infrastructure資格証明、テナンシおよびコンパートメントの値の例を使用します。演習を完了する場合は、これらの値をクラウド環境に固有の値に置き換えてください。
Oracle Cloud API Gatewayを使用したファンクション認証によるセキュアなオブジェクト・ストレージ・ダウンロード・サービスの作成
イントロダクション
Oracle Cloud Object Storageは、大規模または小規模なファイルを格納するための非常に安価で効果的な方法です。Object Storageでは、イベント主導のアーキテクチャで作業できるため、プロセスの実行はほぼリアルタイムになります。オブジェクト・ストレージでイベントをトリガーするようにイベントを構成したり、RESTサービスを作成して、オブジェクト・ストレージに対するファイルの書込みまたは読取りを安全、迅速かつ低コストで実行することもできます。
イベント駆動型アーキテクチャの実装方法を確認する場合は、Oracle Cloud Infrastructure Data FlowでのAutonomous DatabaseおよびKafkaでの大規模ファイルの処理を参照してください。
アーキテクチャ
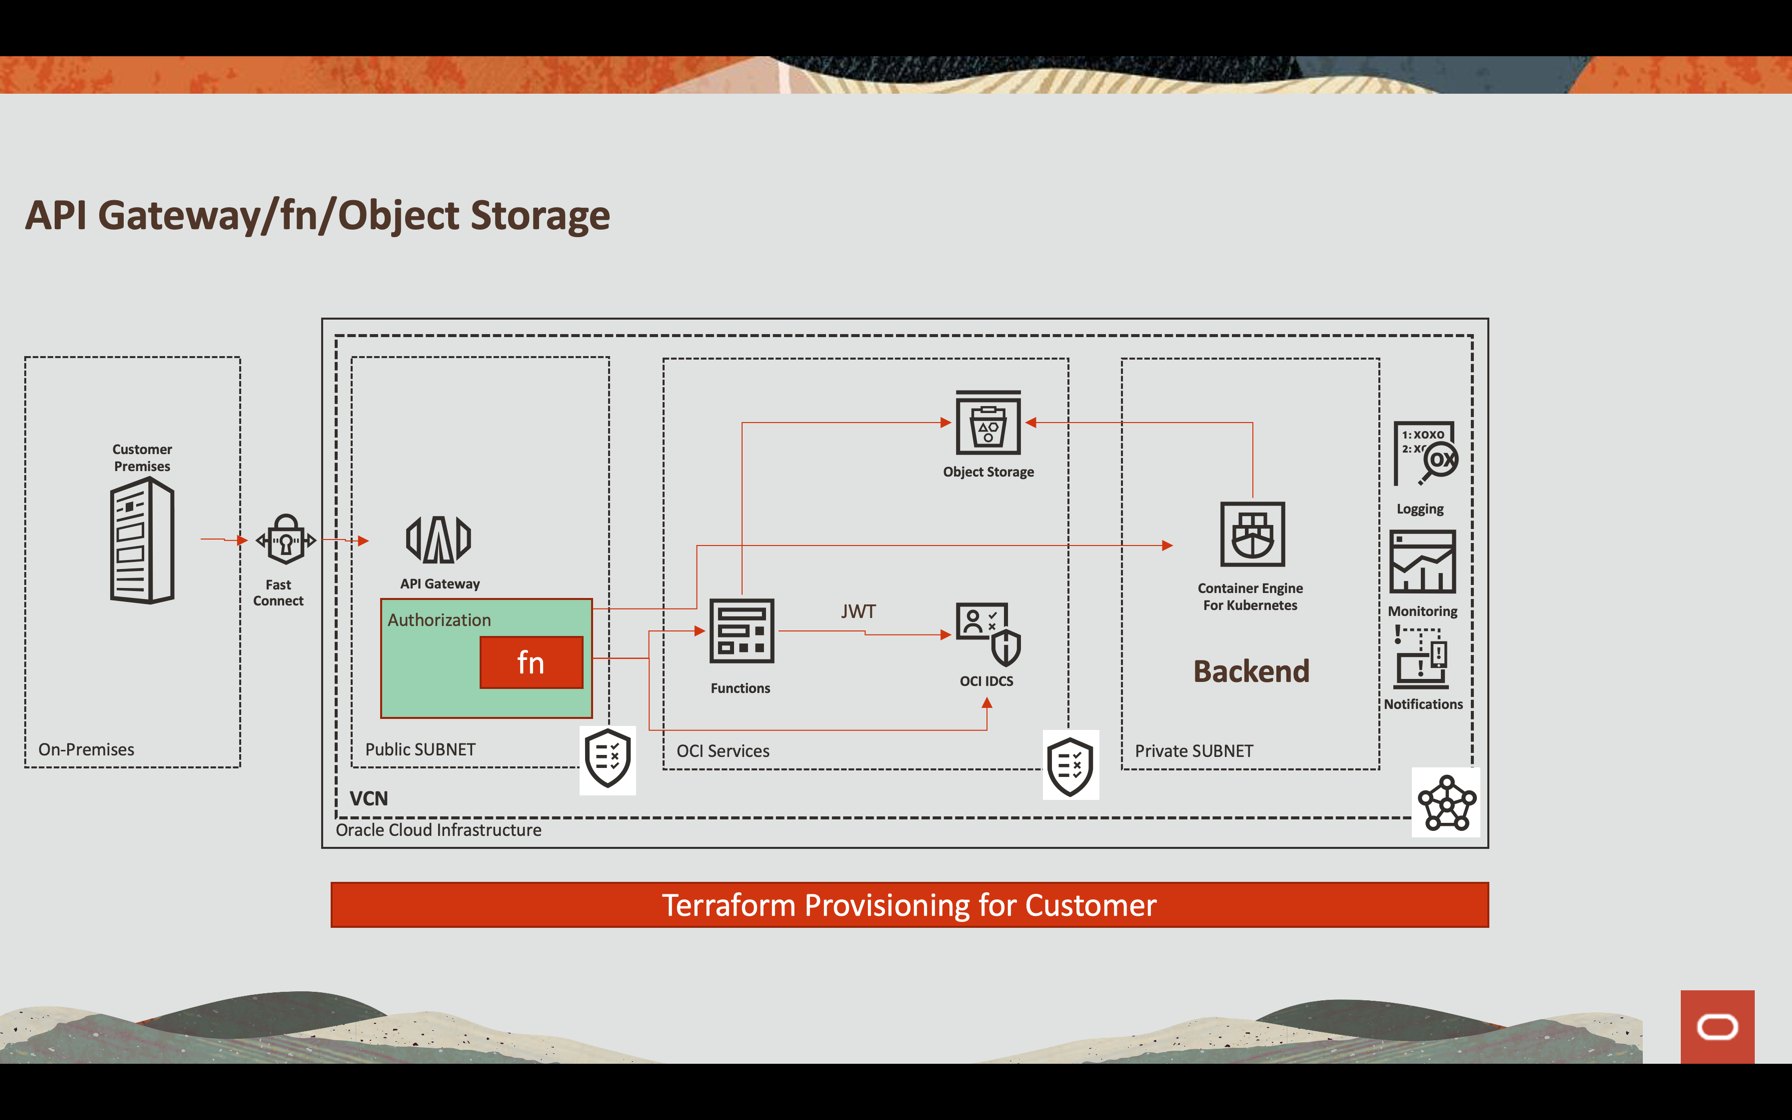
Oracle API Gateway統合
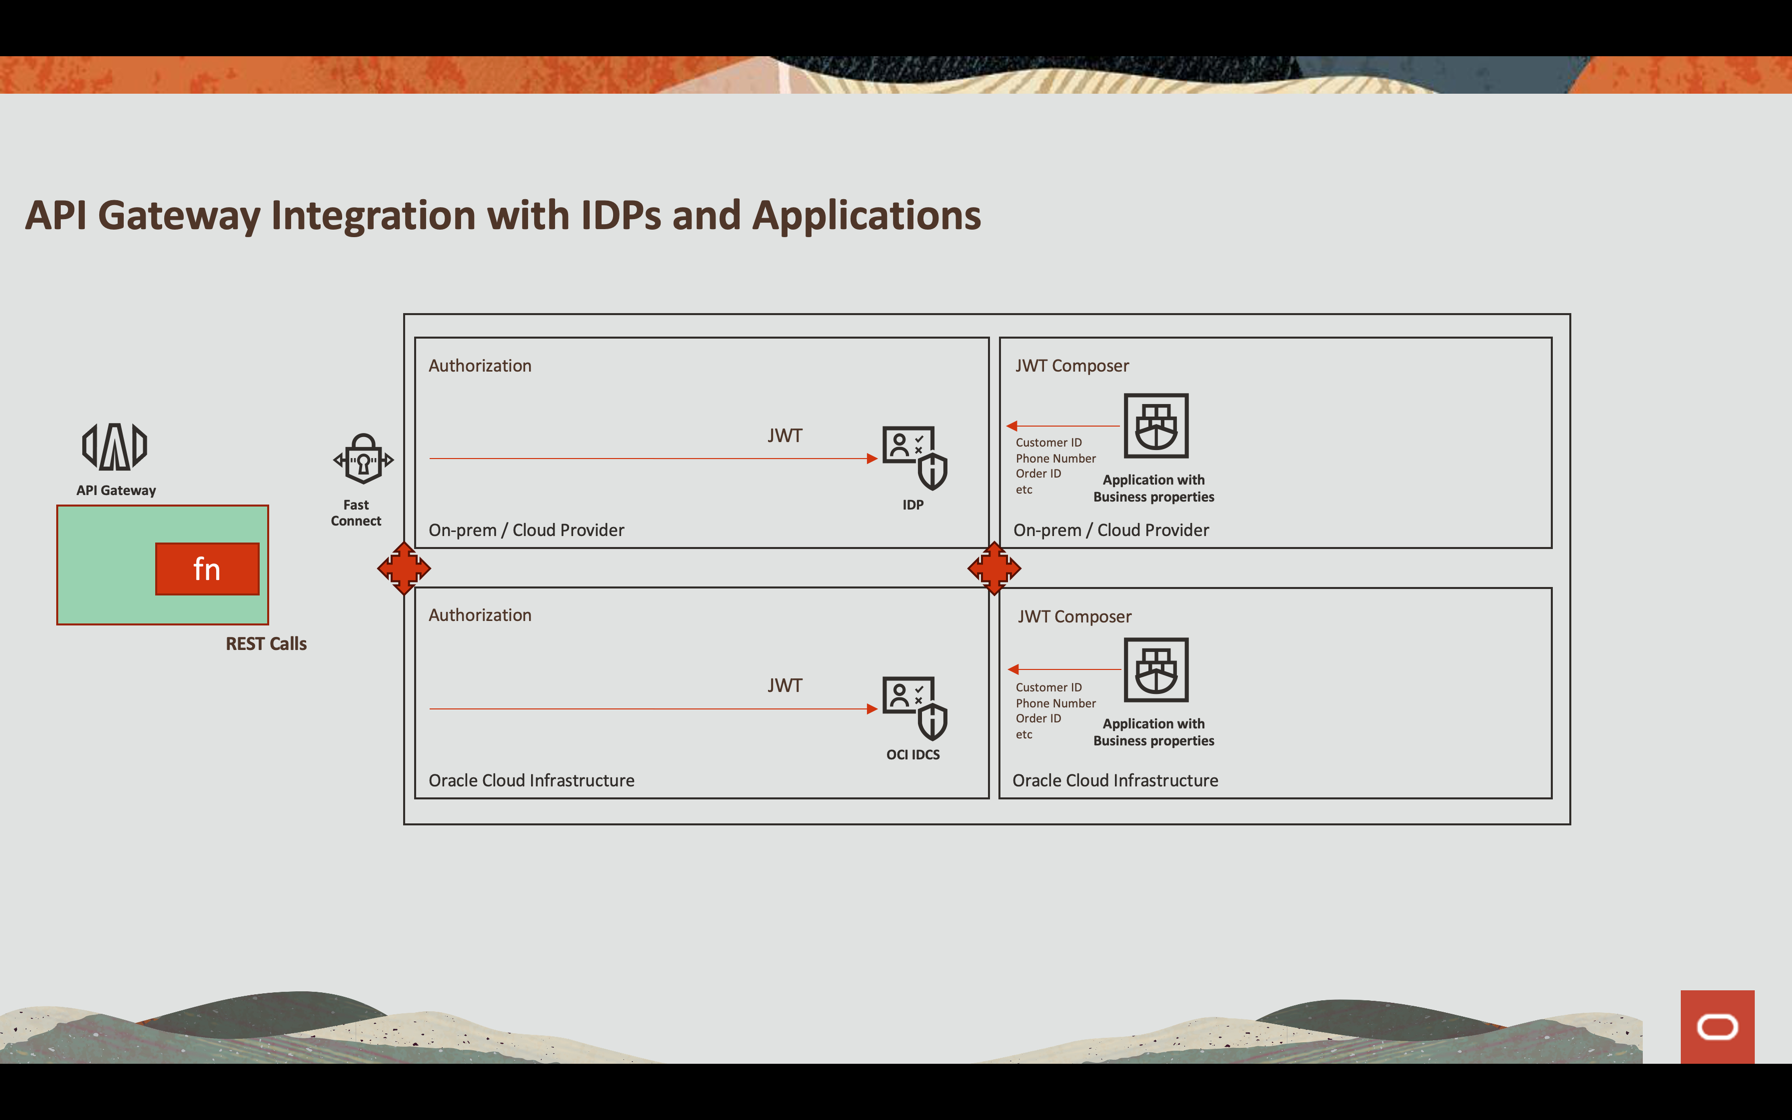
このチュートリアルでは、外部アイデンティティ・プロバイダまたはOracle Cloud Infrastructure (OCI)自体(Oracle Identity Cloud Service)を介してJWTトークンを柔軟に認証できるファンクションを介してRESTサービスを実装するようにOracle API Gatewayを構成する方法を示します。プロセスに関係なく、JWTトークンを検証し(属性はファイル名の一部にできるため)、SDKおよび他のカスタマイズ可能なプロセスを介してOCIサービスを使用できます。
目的
- API RESTサービスを公開して、Object Storageからファイルを安全な方法でダウンロードします
- OCIファンクションを使用したOCI APIゲートウェイ認証の使用
- ダウンロードの制限時間が60秒の事前認証済リンクを返します
- ファイルの書込みおよび読取りをモニターするための可観測性設定の構成
前提条件
-
ファイルの書込みおよび読取りに必要なポリシーを使用して作成および構成されたOCI Object Storageバケット。オブジェクト・ストレージ・セキュリティを参照してください。
-
運用中のOracle Cloudテナント: 1か月あたりUS$ 300.00の無料のOracle Cloudアカウントを作成して、このチュートリアルを試すことができます。無料Oracle Cloudアカウントを作成を参照してください。
-
ローカル・マシンにインストールされたOracle Cloudコマンドライン・インタフェース(OCI CLI): これは、OCI CLIをインストールするためのリンクです。
-
OCIファンクションおよび開発用に構成されたポリシー。この例は、Pythonで実装されています。詳細は、ファンクションQuickStartガイドを参照してください。
-
OCI APIゲートウェイ・インスタンスが作成され、インターネットに公開されました。Oracle Cloudでの最初のAPIゲートウェイの作成を参照してください。
-
Oracle Identity Cloud Serviceへのアクセス。
タスク1: Oracle Identity Cloud Serviceでのアプリケーションの構成
Auth0やOracle Identity Cloud ServiceなどのJWTと連携するようにREST API外部アイデンティティ・プロバイダを構成できます。
このチュートリアルでは、Oracle Identity Cloud Serviceを使用して、ファンクション内で認証をコールします。
-
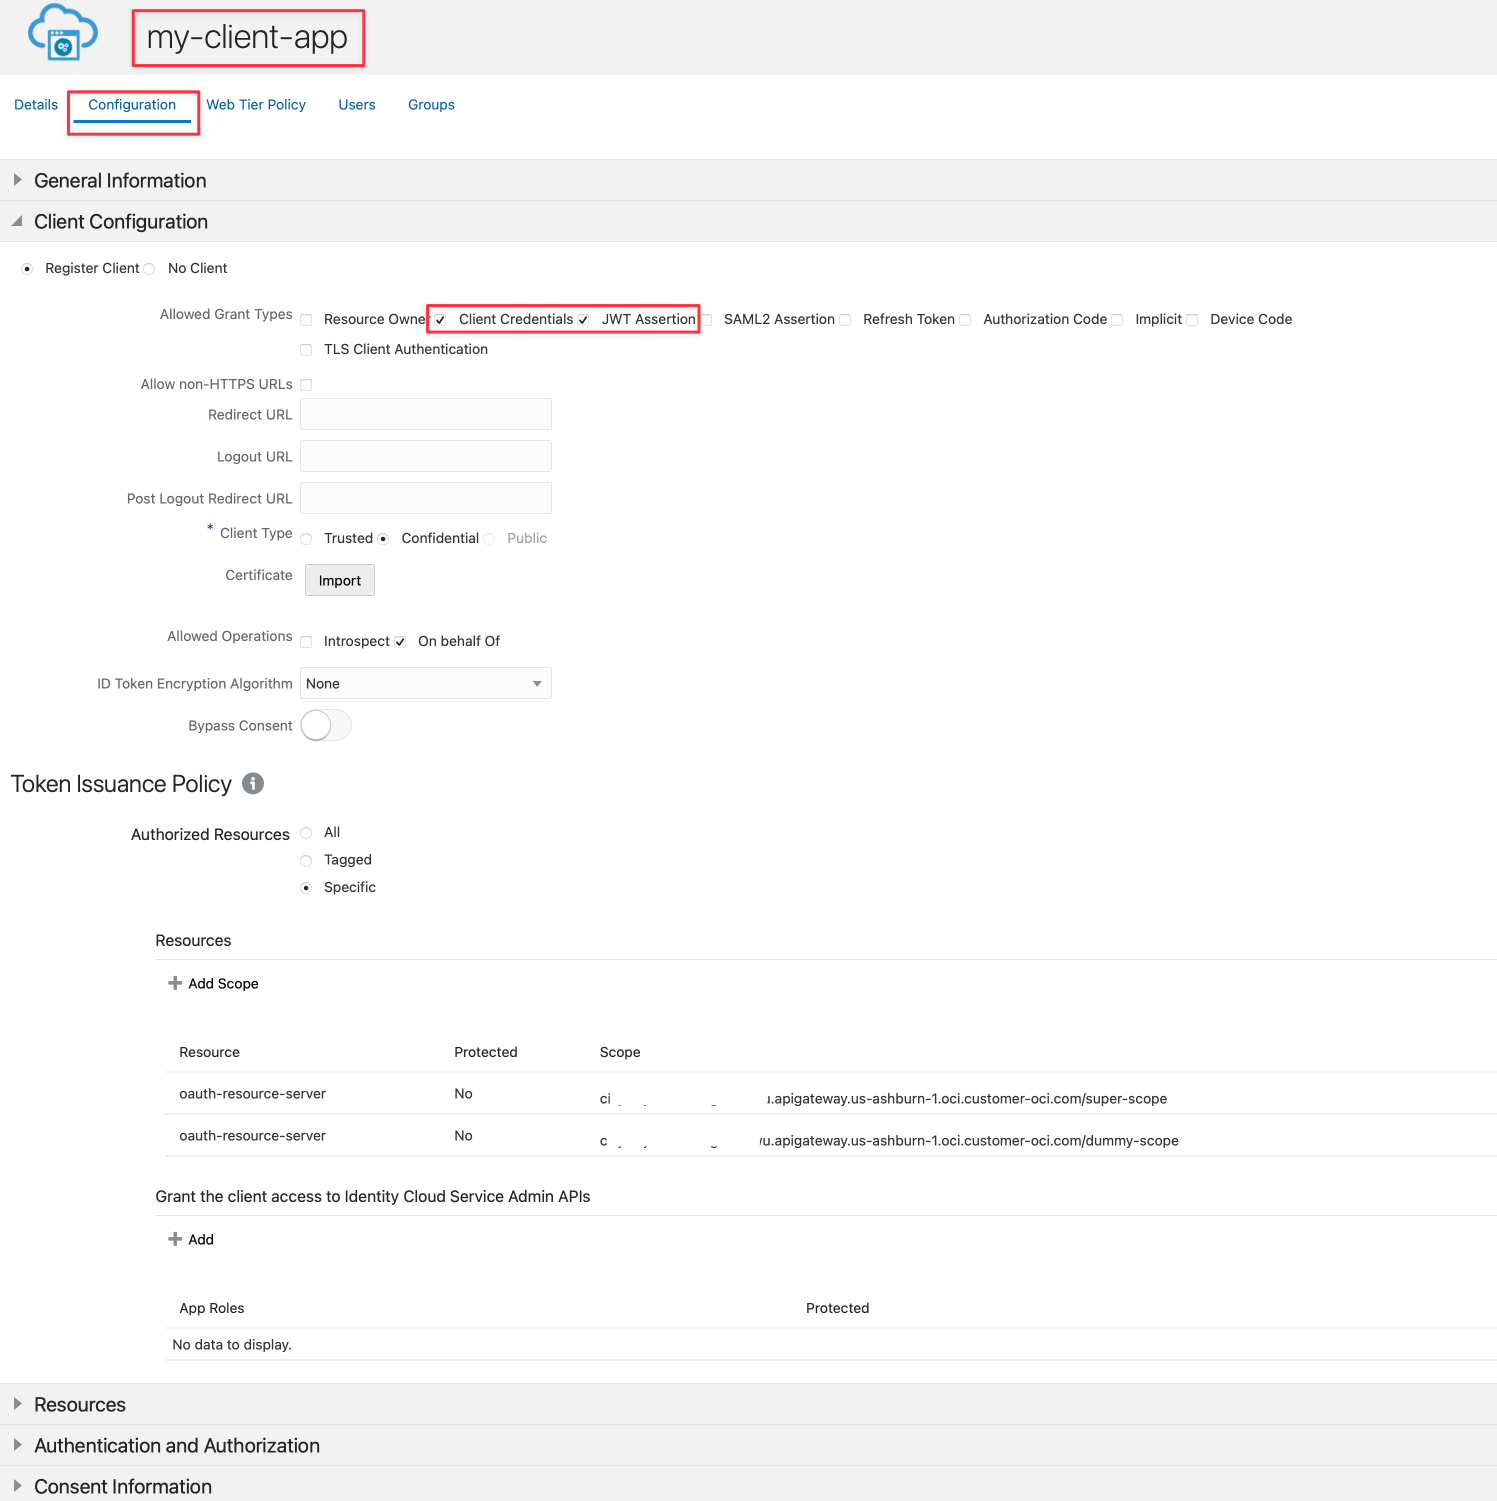
この例のmy-client-appというOracle Identity Cloud Serviceでアプリケーションを作成します。
-
「クライアント資格証明」および「JWTアサーション」オプションを選択します。
-
構成の詳細は、スコープおよびクレームのあるOracle Identity Cloud Service/IAM JWTを使用したAPIゲートウェイでのAPIの保護を参照してください。
ノート: この認証例は、ユーザーとバケットに関するその他の情報を識別するための仮想的な状況のみを反映しています。これは、アプリケーションを認証および認可するための最善の方法を反映していない可能性があり、会社の基準に照らして評価することをお薦めします。
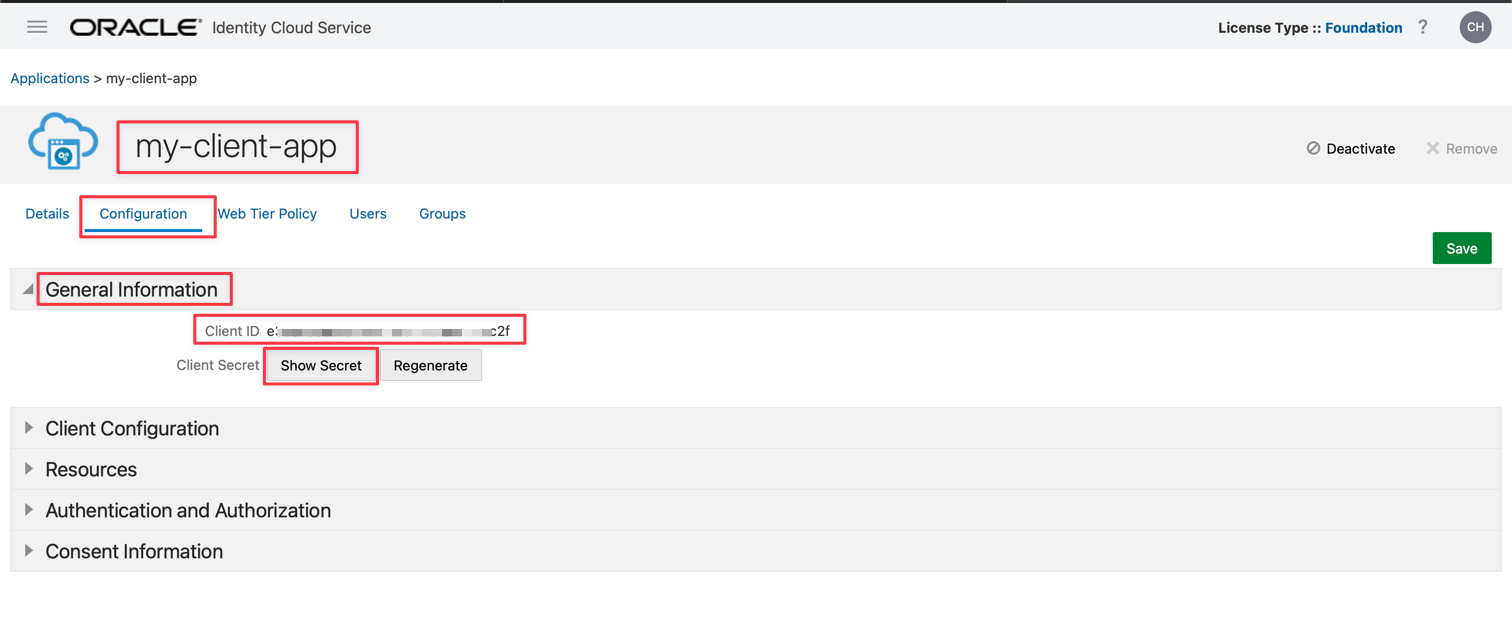
-
アプリケーションを保存してアクティブ化します。次のセクションで使用する clientIDおよび secretIDを取得できます。
タスク2: コードの確認
これは、オブジェクト・ストレージでファイルをダウンロードするための事前認証リンクを認可するためにAPIゲートウェイ・デプロイメントで使用されるPythonコードです。
Pythonコードは、Python fn Projectからダウンロードできます。
python
import io
import json
import logging
import datetime
import jwt
import requests
import base64
import oci

from datetime import timedelta
from fdk import response
from py_zipkin import Encoding #import Zipkin package
from py_zipkin.zipkin import zipkin_span #import Zipkin package
from transport import http_transport #import Zipkin transport

@zipkin_span(service_name='Status: Load File', span_name='statusGetFile')
def auth(ctx, data: io.BytesIO = None):
    auth_token = "invalid"
    token = "invalid"
    apiKey = "invalid"
    expiresAt = (datetime.datetime.utcnow() + timedelta(seconds=60)).replace(tzinfo=datetime.timezone.utc).astimezone().replace(microsecond=0).isoformat()

    config = oci.config.from_file("config")
    object_storage = oci.object_storage.ObjectStorageClient(config)
    namespace = object_storage.get_namespace().data

    try:
        auth_token = json.loads(data.getvalue())
        secretID = auth_token.get("secretID")
        clientID = auth_token.get("clientID")

        details = oci.object_storage.models.CreatePreauthenticatedRequestDetails(name="data", access_type="AnyObjectReadWrite", bucket_listing_action="ListObjects", time_expires=expiresAt)

        preauth = object_storage.create_preauthenticated_request(namespace_name=namespace, bucket_name="data", create_preauthenticated_request_details=details)
        preauthstr = str(preauth.data)

        auth = clientID + ":" + secretID
        auth_bytes = auth.encode("ascii")
        auth_base64_bytes = base64.b64encode(auth_bytes)
        auth_base64_message = auth_base64_bytes.decode("ascii")

        headers = {"Authorization": "Basic " + auth_base64_message, "Content-Type": "application/x-www-form-urlencoded"}

        scope = "cihxxxxxxxxxxxxxxxxxowu.apigateway.us-ashburn-1.oci.customer-oci.com/super-scope"
        grant_type = "client_credentials"

        body = {"scope": scope, "grant_type": grant_type}

        url_post = "https://Oracle Identity Cloud Service-4fxxxxxxxxxxxxxxxxxxxxxx9.identity.oraclecloud.com/oauth2/v1/token"
        post_response = requests.post(url_post, headers=headers, data=body)

        jwtTokenDecoded = jwt.decode(post_response.json()['access_token'], options={"verify_signature": False})

        return response.Response(
            ctx,
            status_code=200,
            response_data=json.dumps({"active": True, "principal": "foo", "scope": "bar", "clientId": "1234", "expiresAt": expiresAt, "context": {"username": "wally", "token":
post_response.json()['access_token'], "jwtTokenDecoded": jwtTokenDecoded, "objectID": preauthstr}})
        )

    except (Exception, ValueError) as ex:
        logging.getLogger().info('error parsing json payload: ' + str(ex))
        pass

    return response.Response(
        ctx,
        status_code=401,
        response_data=json.dumps({"active": False, "wwwAuthenticate": "API-key"})
    )

@zipkin_span(service_name='Status: Load File', span_name='statusGetFile')
def handler(ctx, data: io.BytesIO = None):
    with zipkin_span(
            service_name="Status: Load File", #You can change it as you need
            span_name="statusGetFile", #You can change it as you need
            transport_handler=http_transport, #zipkin transport, will use it to upload trace data to OCI APM
            encoding = Encoding.V2_JSON,
            binary_annotations = {"status":"Load File", "objectID":json.loads(data.getvalue()).get("objectID")}, #Custom tag
            sample_rate=100 # this is optional and can be used to set custom sample rates
    ):
        return auth(ctx, data)
次のことを理解するために、コードを部分的に分析します。
- OCI可観測性のプロセスに従う
- Object Storageのファイルをダウンロードするための事前認証リンクを構成します
- アイデンティティ・プロバイダで認証し、JWTトークンを取得します
- JWTトークンをデコードし、プロセス内の情報を使用します
- APIゲートウェイ・デプロイメントの成功または失敗のステータスを返します
コードのこの部分は、OCI可観測性のステータス位置を保存します。Zipkinフレームワークを使用してOCI APM可観測性に公開
python
@zipkin_span(service_name='Status: Load File', span_name='statusGetFile')
def handler(ctx, data: io.BytesIO = None):
    with zipkin_span(
            service_name="Status: Load File", #You can change it as you need
            span_name="statusGetFile", #You can change it as you need
            transport_handler=http_transport, #zipkin transport, will use it to upload trace data to OCI APM
            encoding = Encoding.V2_JSON,
            binary_annotations = {"status":"Load File", "objectID":json.loads(data.getvalue()).get("objectID")}, #Custom tag
            sample_rate=100 # this is optional and can be used to set custom sample rates
    ):
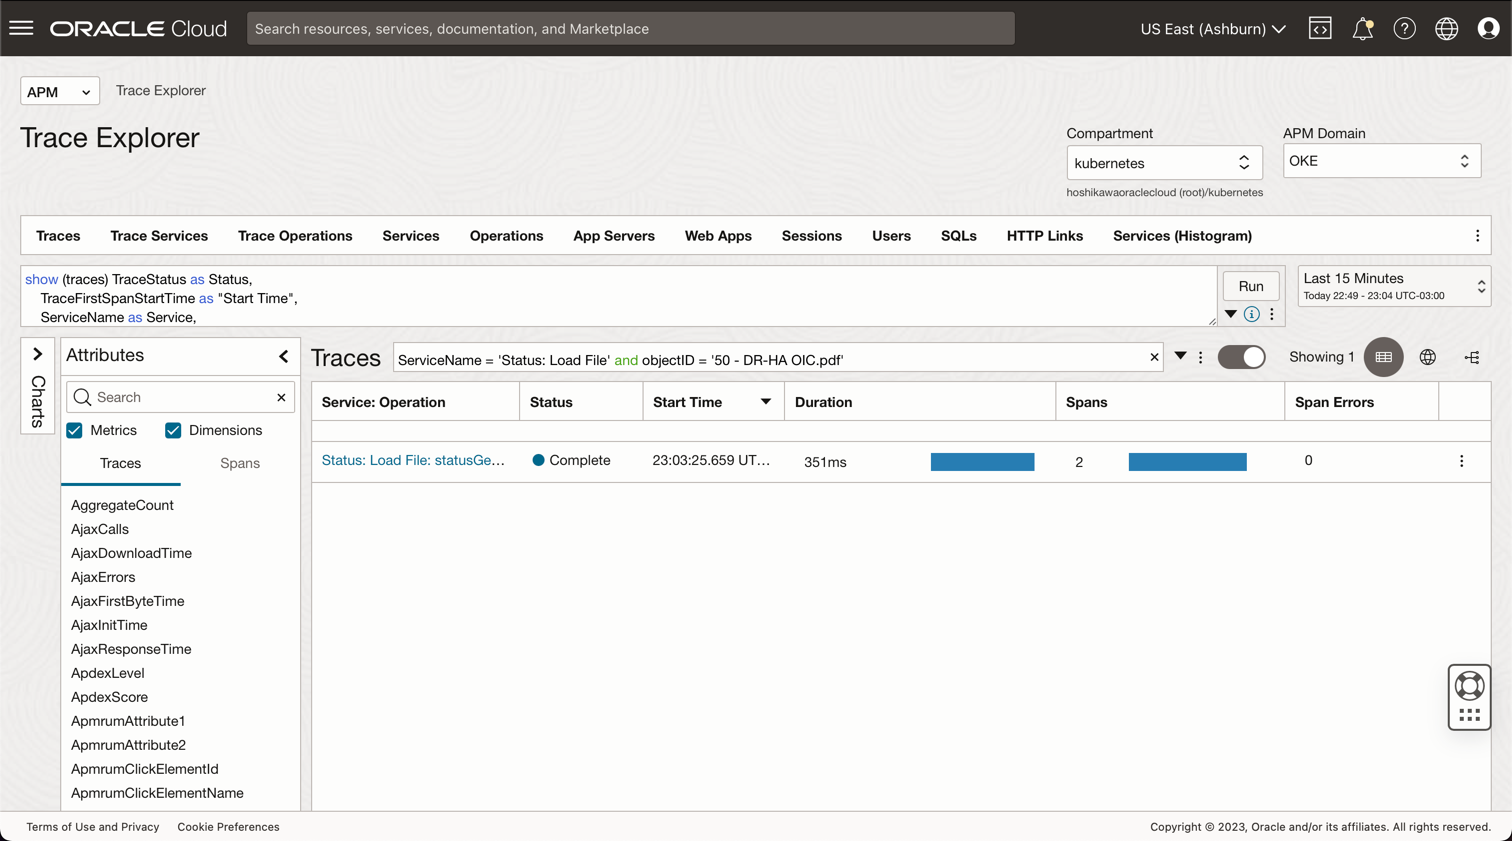
これはコードのOCI APMコンソール・ビューで、次のような問合せを含むファイルを見つけることができます:
**ServiceName** = 'Status: Load File' and **objectID** = '50 - DR-HA OIC.pdf'
次のコードは、オブジェクト・ストレージ・ファイルの有効期限日時をスタブ化します。事前認証が生成され、属性 expiresAtがこの目標に使用されます。timedeltaは、ファイルをダウンロードするための現在の時間から60秒を追加します。
python
expiresAt = (datetime.datetime.utcnow() + timedelta(seconds=60)).replace(tzinfo=datetime.timezone.utc).astimezone().replace(microsecond=0).isoformat()
ここで、OCI CLIインストールに保存されている資格証明に基づいてOCI Object Storageフレームワークを初期化する必要があります。OCI CLI構成では、~/.oci/configおよび証明書の.pemファイルを使用します。そのため、OCI CLIをローカルにインストールし、オブジェクト・ストレージにアクセスするようにユーザーを構成(OCIドキュメントを参照してOCI CLIおよびオブジェクト・ストレージ・ポリシーを「関連リンク」セクションにインストール)してから、これらの2つのファイルをこのfnプロジェクトにコピーできます。
python
config = oci.config.from_file("config")
object_storage = oci.object_storage.ObjectStorageClient(config)
namespace = object_storage.get_namespace().data
次の手順は、Bodyパラメータ値 secretID、clientID、および objectIDから取得します。
#secretID = the Oracle Identity Cloud Service secretID from the application created to validate the JWT Token
#clientID = the Oracle Identity Cloud Service clientID from the application created to validate the JWT Token
#objectID = the file name in the Object Storage
python
try:
    auth_token = json.loads(data.getvalue())
    secretID = auth_token.get("secretID")
    clientID = auth_token.get("clientID")
    objectID = auth_token.get("objectID")
OCI SDKは、ファイルの読取りや書込み、バケットのコンテンツのリストなど、多くのサービスでObject Storageをサポートできます。たとえば、コンシューマが事前認証済のURLを持つバケットのすべてのコンテンツをリストできるようにすると、コードのこの部分に生成されます。変数bucket_nameには、以前に作成したオブジェクト・ストレージ内のバケットの名前が含まれ、time_expiresはファイルをダウンロードするための日時失効を表します。
python
details = oci.object_storage.models.CreatePreauthenticatedRequestDetails(name="data", access_type="AnyObjectReadWrite", bucket_listing_action="ListObjects", time_expires=expiresAt)

preauth = object_storage.create_preauthenticated_request(namespace_name=namespace, bucket_name="data", create_preauthenticated_request_details=details)
preauthstr = str(preauth.data)
コードのこの部分は、Oracle Identity Cloud ServiceをコールしてclientIDとsecretIDを検証し、JWTトークンを取得します。JWTは、署名なしでJSON文字列にデコードできますが、署名は証明書を使用して簡単に検証できます。
python
auth = clientID + ":" + secretID
auth_bytes = auth.encode("ascii")
auth_base64_bytes = base64.b64encode(auth_bytes)
auth_base64_message = auth_base64_bytes.decode("ascii")

headers = {"Authorization": "Basic " + auth_base64_message, "Content-Type": "application/x-www-form-urlencoded"}

scope = "xxxxxxxxxxxxxxxxxxxx.apigateway.us-ashburn-1.oci.customer-oci.com/super-scope"
grant_type = "client_credentials"

body = {"scope": scope, "grant_type": grant_type}

url_post = "https://Oracle Identity Cloud Service-xxxxxxxxxxxxxxxxxxxxxxx.identity.oraclecloud.com/oauth2/v1/token"
post_response = requests.post(url_post, headers=headers, data=body)

jwtTokenDecoded = jwt.decode(post_response.json()['access_token'], options={"verify_signature": False})
これが最後の部分で、すべてのデータがコード200で返されます。アプリケーションに必要なすべての情報を返すことができ、コードのこの部分では認証が検証され、コード200 (承認/成功)または401 (未承認)になります。
python
    return response.Response(
        ctx,
        status_code=200,
        response_data=json.dumps({"active": True, "principal": "foo", "scope": "bar", "clientId": "1234", "expiresAt": expiresAt, "context": {"username": "wally", "token": post_response.json()['access_token'], "jwtTokenDecoded": jwtTokenDecoded, "objectID": preauthstr}})
    )

except (Exception, ValueError) as ex:
    logging.getLogger().info('error parsing json payload: ' + str(ex))
    pass

return response.Response(
    ctx,
    status_code=401,
    response_data=json.dumps({"active": False, "wwwAuthenticate": "API-key"})
)
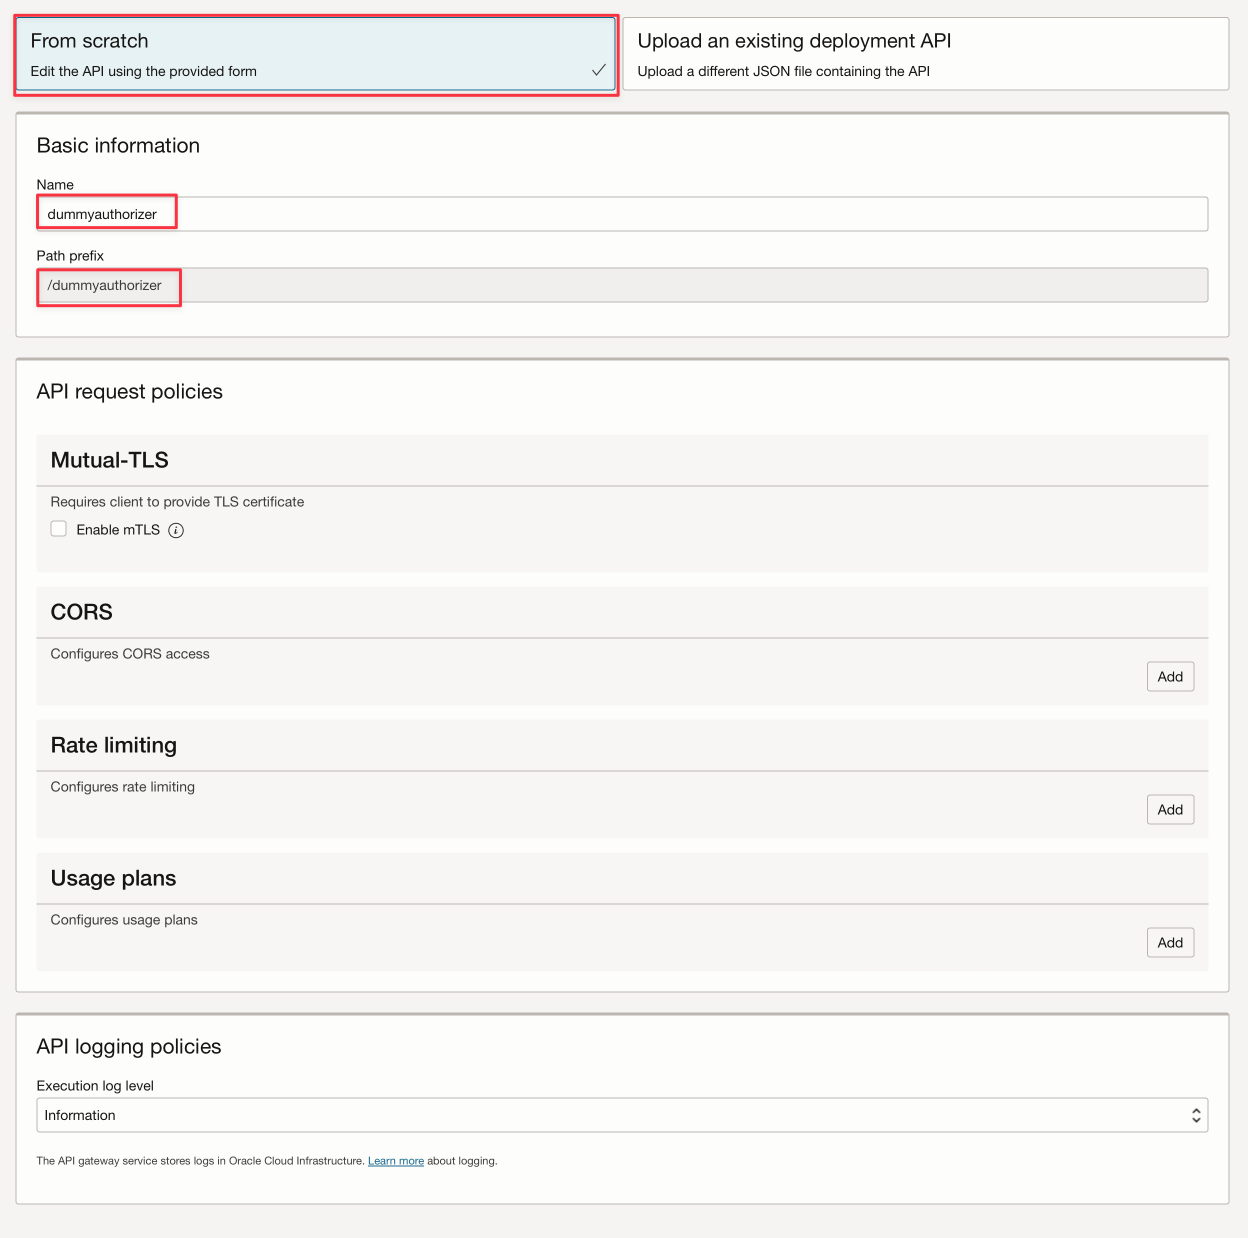
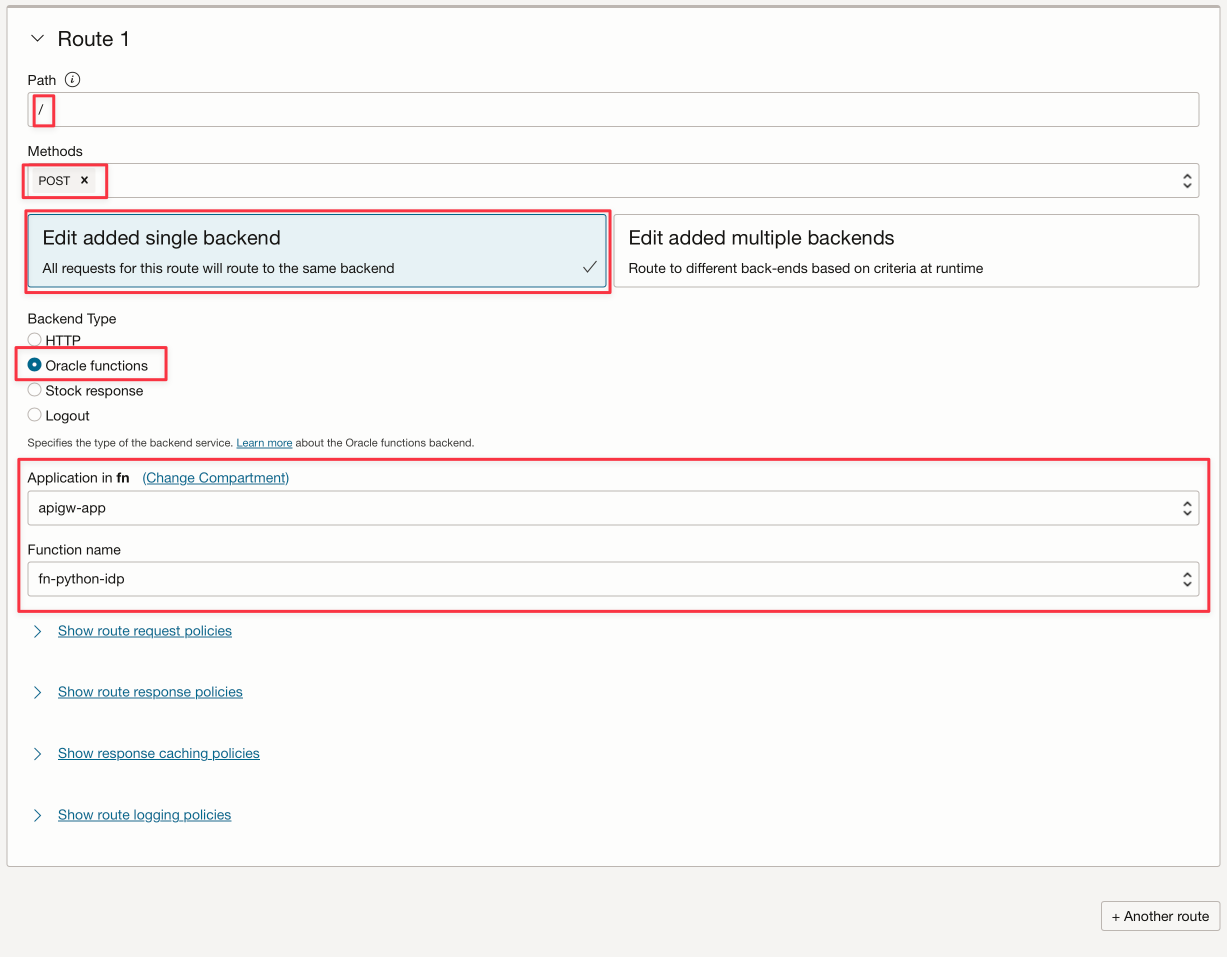
タスク3: fnで認証するためのOCI APIゲートウェイの構成
OCI APIゲートウェイは、APIをOCIファンクションとしてデプロイできます。前述のとおり、コードは、APIゲートウェイ構成によって渡されたclientID、secretIDおよびobjectID情報を含むbodyを使用します。デプロイメントを構成できます。

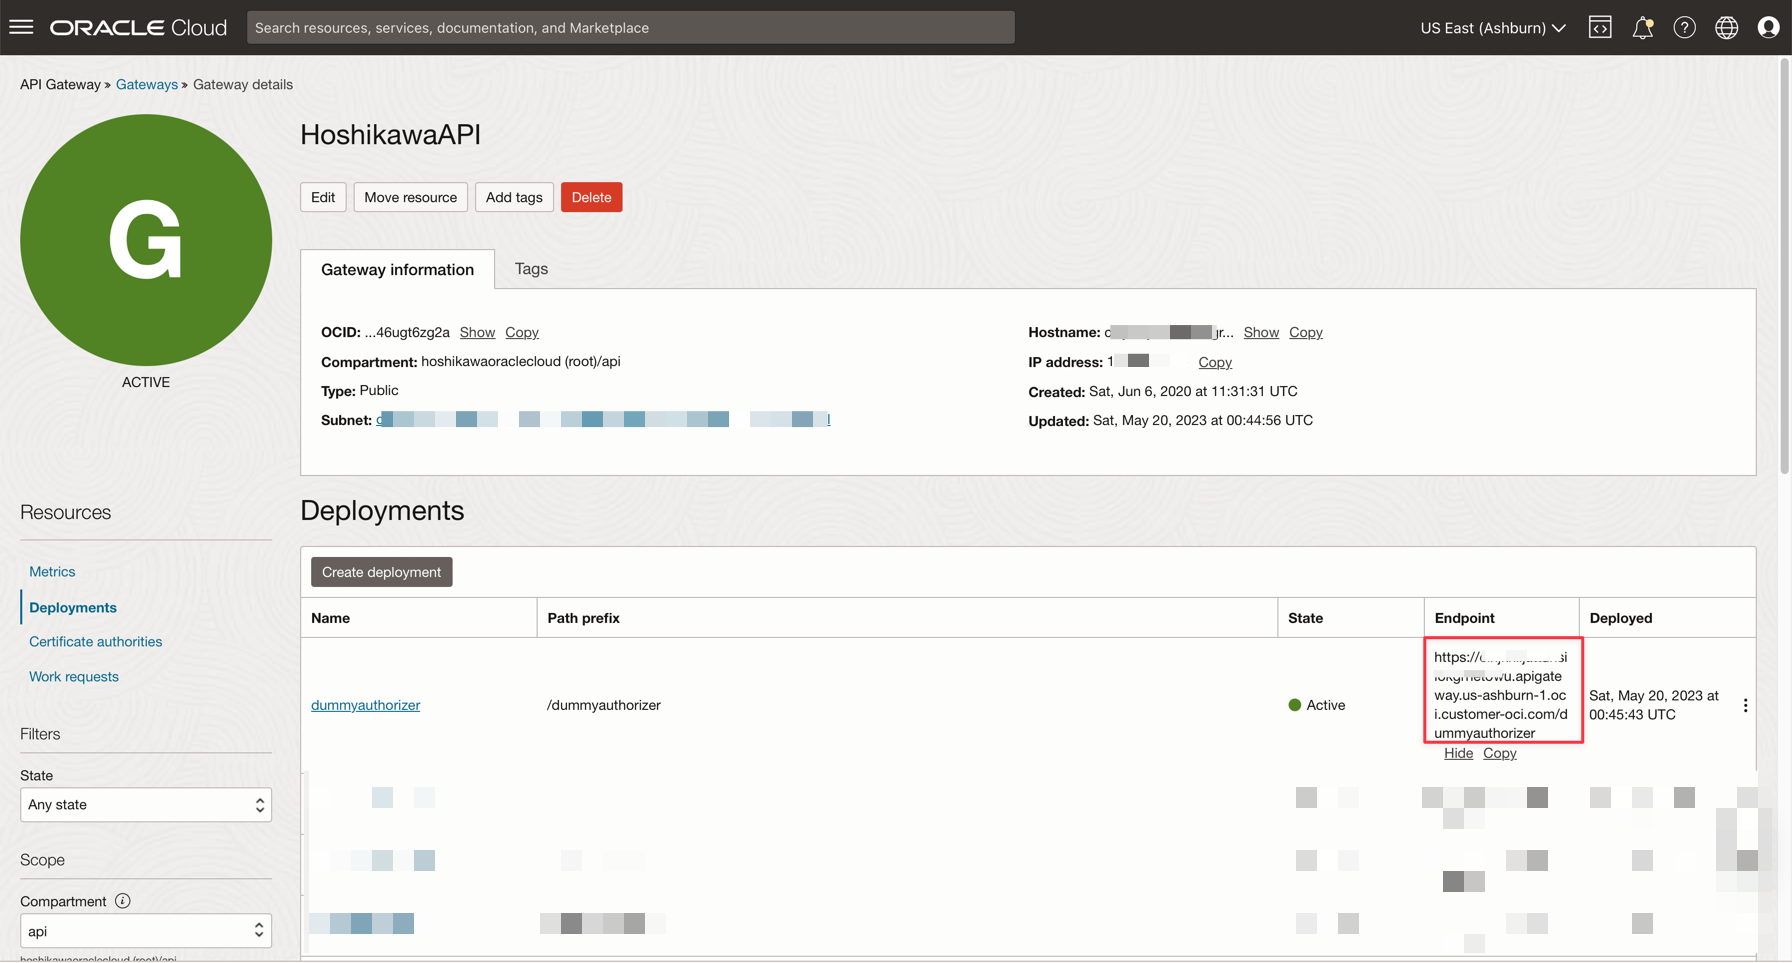
デプロイメントを保存した後、ここでRESTエンドポイントを取得できます。Object Storage REST APIサービスの完全なエンドポイントは、このエンドポイントに末尾に"/"を加えたものです(前述の/をパスとして宣言しました)。
タスク4: APIゲートウェイ・デプロイメントのテスト
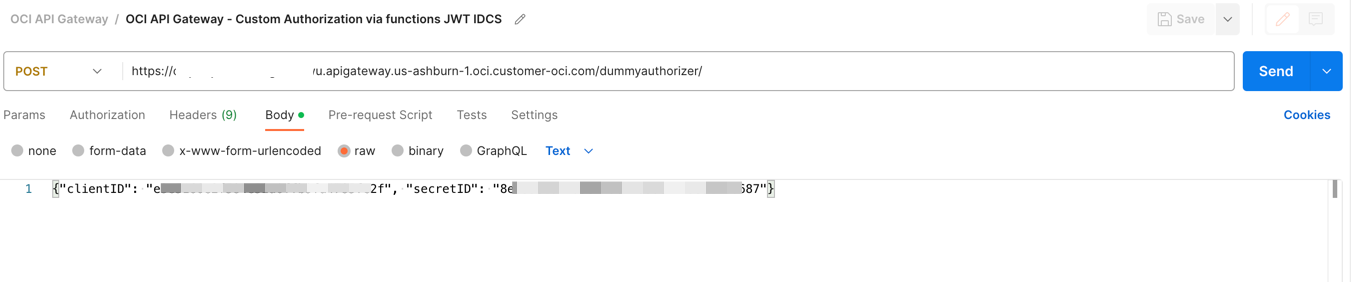
CURLまたはPostmanでアプリケーションをテストできます:
bash
curl --location 'https://xxxxxxxxxxxxxxxxxxx.apigateway.us-ashburn-1.oci.customer-oci.com/dummyauthorizer/' \
--header 'Content-Type: text/plain' \
--data '{"clientID": "e3exxxxxxxxxxxxxxxxxc2f", "secretID": "8exxxxxxx-fa5e-xxcf-8xxxc-xxxxxxxxxxx87", "objectID": "any-file.txt"}'
ノート: 属性
objectIDは、OCIコンソールのトレース・エクスプローラでの可観測性とそのステータスの表示方法を示すためにのみここで使用されます。
すべてが正常な場合は、成功コード200が表示されます。
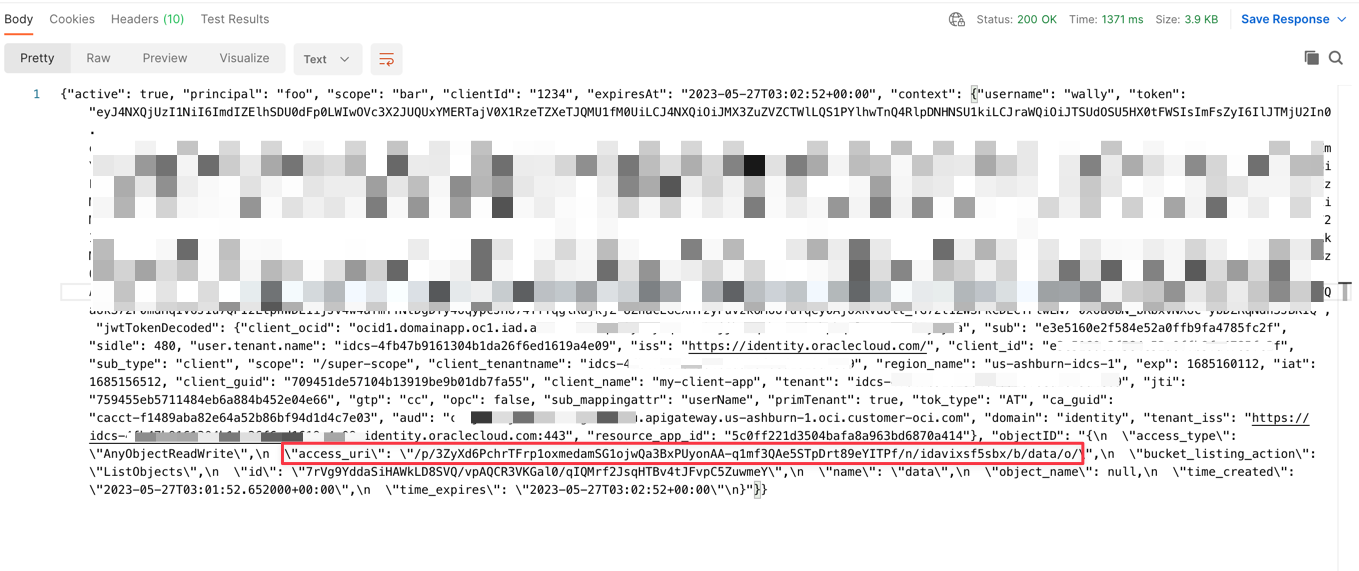
事前認証済オブジェクト・ストレージのURLが生成され、ファイルを60秒間ダウンロードできます。次の例に従ってファイルをダウンロードできます。
https://objectstorage.us-ashburn-1.oraclecloud.com + [access_uri]

or

https://objectstorage.us-ashburn-1.oraclecloud.com/p/eL5C0R0luN_cTNn-vUF7_Dx_z2N4w7IXemKr5y61cSRxZZPRXcR2Yj1dNCaJBDK8/n/idavixsf5sbx/b/data/o/calico.yaml
次のコマンドラインを使用して、バケット・ファイルをダウンロード、アップロードまたは表示できます。
- TO UPLOAD A FILE: `curl https://objectstorage.us-ashburn-1.oraclecloud.com/p/HoPudIF45Bj6J5-Qy3J1D9dOplLuKtECRFhvOTkKAtBjJXkOTDx0Pt8gXbOOEoRx/n/idavixsf5sbx/b/data/o/ --upload-file func.py`

- TO DOWNLOAD A FILE: `curl https://objectstorage.us-ashburn-1.oraclecloud.com/p/3ZyXd6PchrTFrp1oxmedamSG1ojwQa3BxPUyonAA-q1mf3QAe5STpDrt89eYITPf/n/idavixsf5sbx/b/data/o/func.py`

- TO LIST BUCKET: `curl https://objectstorage.us-ashburn-1.oraclecloud.com/p/ODVRMB71kD0SHWuoY4ojVd93nmIiy8u0zrxA56T7FBaohAgA7k8KOLAIlhxjcveE/n/idavixsf5sbx/b/data/o/``
タスク5: 可観測性ダッシュボードの構成
基本的に、すべてのOCIリソースがダッシュボードにメトリックを表示でき、これらのリソース上の多くのイベントがアクションをトリガーできます。このデモでは、オブジェクト・ストレージで書込みまたは読取りが行われたファイルの数を示すダッシュボードを構成できます。
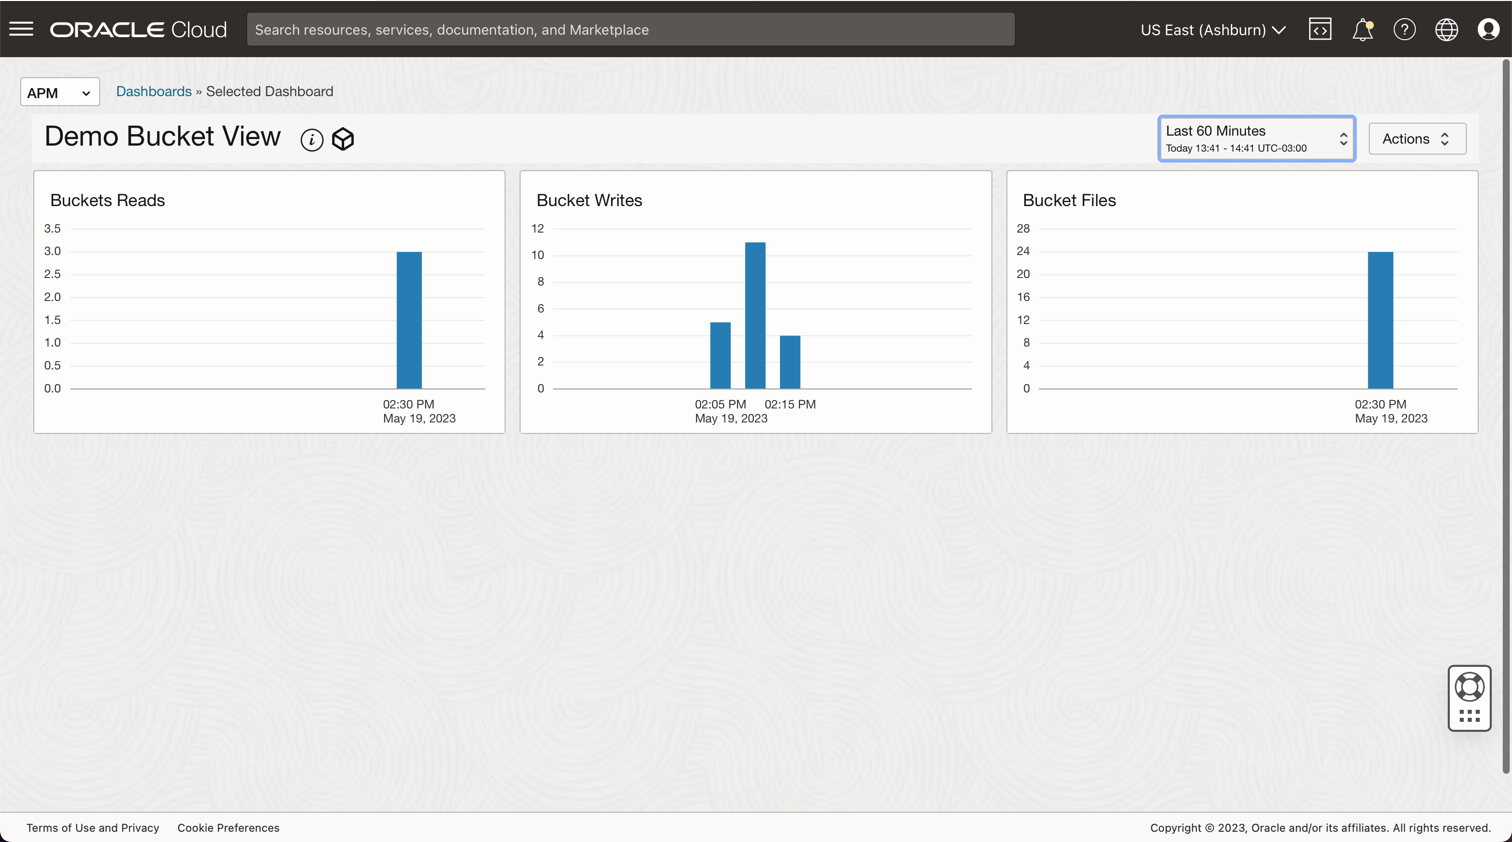
ダッシュボードクエリーは、次のように設定できます。
- バケット・ファイル= ObjectCount[1d].groupby(resourceID).count()
- バケット書込み= PutRequests[5m].grouping().count()
- バケット読取り= GetRequests[5m].grouping().count()
関連リンク
- OCI CLIのインストール
- オブジェクト・ストレージのセキュリティ
- Oracle Cloudでの最初のAPIゲートウェイの作成
- ファンクションQuickStartガイド
- Oracle Functionsのサンプル
- APIデプロイメントへの認証および認可を追加するためのトークンを認可プロバイダ・ファンクションに渡す
- Oracle Identity Cloud ServiceのJavaでのJWTトークンの作成
- オブジェクト・ストレージ・メトリック
- Monitoring Query Language (MQL)リファレンス
- スコープとクレーム付きのOracle Identity Cloud Service/IAM JWTを使用して、APIゲートウェイでAPIを保護
- Oracle Cloud Infrastructure Data FlowでAutonomous DatabaseおよびKafkaで大きなファイルを処理
- Object Storage - 制限とマルチパート・アップロードの使用
謝辞
- 著者 - Cristiano Hoshikawa (Oracle LAD Aチーム・ソリューション・エンジニア)
その他の学習リソース
docs.oracle.com/learnで他のラボをご覧いただくか、Oracle Learning YouTubeチャネルでより無料のラーニング・コンテンツにアクセスしてください。また、education.oracle.com/learning-explorerにアクセスして、Oracle Learning Explorerになります。
製品ドキュメントについては、Oracle Help Centerを参照してください。
Use Oracle Cloud API Gateway to create a secure Object Storage download service with function authentication
F84019-01
July 2023
Copyright © 2023, Oracle and/or its affiliates.